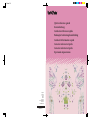
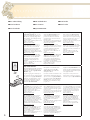
Brother Innov-is XE2 Guida di riferimento
- Tipo
- Guida di riferimento

English
German
French
Dutch
Italian
Spanish
Portuguese-BR
Russian
882-W83/W85
D02M4Z-001
Quick reference guide
Kurzanleitung
Guide de référence rapide
Beknopte bedieningshandleiding
Guida di riferimento rapido
Guía de referencia rápida
Guia de referência rápida
Краткий справочник
C M YK
Cover1-4


1
Refer to the Operation Manual for detailed instructions.
Also, there are differences in the keys and screens depending on the display language. In this guide, English screens are used for basic
explanations.
Ausführliche Hinweise finden Sie in der Bedienungsanleitung.
Je nachdem, welche Sprache für die Bildschirmanzeigen gewählt wurde, ergeben sich im Hinblick auf Bildschirmbilder eventuell
Unterschiede.
Die grundlegende Bedienung der Maschine ist in dieser Anleitung am Beispiel von Bildschirmbildern mit englischem Text erklärt.
Reportez-vous au manuel d’instructions pour des informations détaillées.
Par ailleurs, il y a des différences sur les touches et les écrans en fonction de la langue d’affichage.
Dans ce guide, les explications de base utilisent les écrans en Anglais.
In de Bedieningshandleiding vindt u uitvoerige aanwijzingen.
Er zijn verschillen in de toetsen en schermen afhankelijk van de ingestelde taal.
In de beschrijvingen in deze beknopte handleiding worden de Engelse schermen gebruikt.
Per le istruzioni dettagliate, consultare il manuale di istruzioni.
Inoltre, ci sono differenze nei tasti e nelle schermate a seconda della lingua visualizzata.
In questa guida, le schermate in inglese sono usate per le spiegazioni basilari.
Consulte las instrucciones detalladas en el manual de instrucciones.
Además, dependiendo del idioma visualizado algunos botones y pantallas podrán ser diferentes.
En esta guía, para las explicaciones básicas se emplean pantallas en inglés.
Consulte o manual de operações para obter instruções detalhadas.
Além disso, há diferenças nas teclas e telas dependendo do idioma de exibição.
Neste guia, as telas em inglês são usadas para as explicações básicas.
Подробные инструкции см. в “Руководстве пользователя”.
Кроме того, в зависимости от языка сообщений на ЖК-дисплее названия кнопок и другая информация на экранах могут иметь
некоторые различия. В настоящем справочнике основные пояснения даются на примере англоязычных экранов.
<English display>
<Englische Anzeige>
<Affichage en Anglais>
<Engels scherm>
<Schermata in inglese>
<Visualización en inglés>
<Display em inglês>
<Экран: английский язык>
<Example: German>
<Beispiel: Deutsch>
<Exemple : allemand>
<Voorbeeld: Duits>
<Esempio: Tedesco>
<Ejemplo: Alemán>
<Exemplo: alemão>
<Пример: немецкий язык>

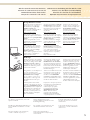
2
Contents
3 Wireless Network Connection Functions
6 Wireless Network Connection
8 Winding the Bobbin
11 Setting the Bobbin
12 Upper Threading
13 Preparing to Embroider
15 Selecting Embroidery Patterns
Inhalt
3 Funktionen zur Verbindung mit dem Wireless-
LAN
6 Verbindung per Wireless-LAN
8 Aufspulen des Unterfadens
11 Einsetzen der Spule
12 Einfädeln des Oberfadens
13 Vorbereitung zum Sticken
15 Auswählen von Stickmustern
Table des matières
3 Fonctions de connexion au réseau sans fil
6 Connexion au réseau sans fil
8 Bobinage de la canette
11 Mise en place de la canette
12 Enfilage supérieur
13 Préparation de la broderie
15 Sélection des motifs de broderie
Inhoudsopgave
3 Functies voor draadloze netwerkverbinding
6 Draadloze netwerkverbinding
8 Spoel opwinden
11 Aanbrengen van het spoeltje
12 Inrijgen van de bovendraad
13 Voorbereidingen voor borduren
15 Borduurpatronen selecteren
Sommario
3 Funzioni di connessione alla rete wireless
6 Connessione di rete wireless
8 Avvolgimento della spolina
11 Impostazione della spolina
12 Infilatura superiore
13 Preparativi per il ricamo
15 Selezione di ricami
Contenido
3 Funciones de conexión de red inalámbrica
6 Conexión de red inalámbrica
8 Devanado de la bobina
11 Colocación de la bobina
12 Hilo superior
13 Preparativos para bordar
15 Seleccionar patrones de bordado
Índice
3 Funções de conexão de rede sem fio
6 Conexão de rede sem fio
8 Enrolando a bobina
11 Regulando a bobina
12 Como passar a linha superior
13 Preparando para bordar
15 Seleção de padrões de bordado
Содержание
3 Функцииподключениякбеспроводнойсети
6 Подключениекбеспроводнойсети
8 Намоткашпульки
11 Установкашпульки
12 Заправкаверхнейнити
13 Подготовкаквышиванию
15 Выборрисунковдлявышивания

3
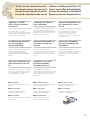
Wireless Network Connection Functions
Funktionen zur Verbindung mit dem Wireless-LAN
Fonctions de connexion au réseau sans fil
Functies voor draadloze netwerkverbinding
Funzioni di connessione alla rete wireless
Funciones de conexión de red inalámbrica
Funções de conexão de rede sem fio
Функции подключения к беспроводной сети
Operations Available
with a Wireless Network
Connection
This machine supports a wireless
network connection. The following useful
operations will be available if the machine
is connected to a wireless network.
■For updating
Directly download the update file to the
machine.
■Zur Aktualisierung
Laden Sie die Aktualisierungsdatei direkt
auf Ihre Maschine herunter.
■Pour mettre à jour
Téléchargez le fichier de mise à jour
directement vers la machine.
■Om te updaten
Download de update bestanden
rechtstreeks op de machine.
■Per aggiornare
Scaricare il file di aggiornamento
direttamente sulla macchina.
■Para actualizar
Descargue directamente el archivo de
actualización a la máquina.
■Для обновления
Загрузка файла обновления
непосредственно на машину.
Beschikbare functionaliteit
met een draadloze
netwerkverbinding
Deze machine ondersteunt een draadloze
netwerkverbinding. De volgende
toepassingen zijn beschikbaar als de
machine is verbonden met een draadloos
netwerk.
Opérations disponibles avec
une connexion au réseau
sans fil
Cette machine prend en charge une
connexion à un réseau sans fil. Les
opérations utiles suivantes seront
disponibles si la machine est connectée à
un réseau sans fil.
Funktionen der Wireless-
LAN-Verbindung
Diese Maschine kann per Wireless-LAN
mit dem Computer verbunden werden.
Die folgenden nützlichen Funktionen sind
verfügbar, wenn die Maschine mit einem
Wireless-LAN verbunden ist.
Operaciones disponibles
con una conexión de red
inalámbrica
Esta máquina es compatible con una
conexión de red inalámbrica. Las siguientes
operaciones útiles estarán disponibles
si la máquina está conectada a una red
inalámbrica.
Operazioni disponibili con
una connessione di rete
wireless
Questa macchina supporta una
connessione di rete wireless. Connettendo
la macchina a una rete wireless, saranno
disponibili le operazioni utili elencate di
seguito.
Operações disponíveis com
uma conexão de rede sem
fio
Esta máquina oferece suporte à conexão de
rede sem fio. As seguintes operações úteis
estarão disponíveis se a máquina estiver
conectada a uma rede sem fio.
Операции, доступные
при подключении к
беспроводной сети
Данная машина поддерживает
подключение к беспроводной сети. При
подключении машины к беспроводной
сети доступны следующие полезные
операции.
■Para atualizar
Baixe o arquivo de atualização diretamente
para a máquina.

4
■For embroidering
■Pour broder
■Für Stickarbeiten
■Voor borduren
■Per ricamare
■Para bordar
My Design Snap
With My Design Snap app, you can
position your embroidery designs on
the fabric by capturing image of the
hooped fabric and sending the image
to your machine.
Please visit the following URL for more
features and details.
https://s.brother/cneka/
Mit der App My Design Snap können
Sie Ihre Stickdesigns auf dem Stoff
positionieren, indem Sie ein Bild des
gespannten Stoffes erfassen und an die
Maschine senden.
Bitte besuchen Sie die folgende Webseite,
um detaillierte Informationen zu erhalten.
https://s.brother/cneka/
Grâce à l’application My Design Snap,
vous pouvez positionner vos motifs de
broderie sur le tissu en capturant l’image
du tissu se trouvant dans le cadre et en
envoyant l’image à votre machine.
Rendez-vous sur l’URL suivante pour plus
de fonctions et de details.
https://s.brother/cneka/
Met de app My Design Snap kunt u
een borduurpatroon exact op de stof
positioneren, door een foto van de
ingespannen stof in het borduurraam
naar de machine over te brengen.
Raadpleeg de volgende URL voor meer
gedetailleerde en aanvullende informatie.
https://s.brother/cneka/
L’app My Design Snap consente di
posizionare i ricami sul tessuto acquisendo
un’immagine del tessuto inserito nel telaio
e inviando l’immagine alla macchina.
Per le altre funzioni e maggiori
informazioni, visitare l’URL indicato di
seguito.
https://s.brother/cneka/
Con la aplicación My Design Snap,
podrá colocar sus diseños de bordado
sobre la tela capturando la imagen
de la tela colocada y enviándola a su
máquina.
Para más detalles acerca de las
funciones, visite la siguiente URL:
https://s.brother/cneka/
Com o aplicativo My Design Snap,
você pode posicionar seus desenhos
de bordado no tecido capturando
a imagem do tecido no bastidor
e enviando a imagem para a sua
máquina.
Acesse o seguinte URL para obter mais
recursos e detalhes.
https://s.brother/cneka/
С помощью приложения My Design
Snap можно размещать дизайны
вышивания на материале. Для
этого нужно сфотографировать
изображение материала в пяльцах
и отправить его на машину.
Подробное описание и инструкции
можно найти на сайте:
https://s.brother/cneka/
My Stitch Monitor
Conveniently check the operating
status of the machine from your
smart device by using My Stitch
Monitor app.
Überprüfen Sie den Betriebsstatus
der Maschine mit der App My
Stitch Monitor bequem über Ihr
Smartphone/Tablet.
L’application My Stitch Monitor vous
permet de vérifier facilement l’état de
fonctionnement de la machine depuis
votre appareil mobile.
Volg de voortgang van het borduurproces
van de machine vanaf uw smartphone/tablet
met gebruik van de app My Stitch Monitor.
Consente di controllare comodamente lo stato
di funzionamento della macchina dal proprio
dispositivo smart con l’app My Stitch Monitor.
Compruebe el estado operativo de la
máquina desde su dispositivo inteligente
utilizando la aplicación My Stitch Monitor.
Verifique convenientemente o status
operacional da máquina a partir do
seu dispositivo inteligente usando o
aplicativo My Stitch Monitor.
С помощью приложения My Stitch
Monitor можно удобно проверять
рабочий статус машины на смарт-
устройстве.
Artspira
With Artspira app, you can transfer content
published on the app to the embroidery
machine and enjoy creating original works
using the functions on the app.
Please visit the following URL for more
features and details.
https://s.brother/csyai/
Mit der Artspira-App können Sie Inhalte in
der App an die Stickmaschine übertragen
und mit den Funktionen der App originelle
Projekte erstellen.
Informationen zu weiteren Funktionen und
Details erhalten Sie über die folgende URL.
https://s.brother/csyai/
Avec l’application Artspira, vous pouvez transférer
le contenu publié sur l’application vers la machine
à broder et vous amuser à créer des projets
originaux grâce aux fonctions de l’application.
Consultez la page Web suivante pour plus de
fonctions et de détails.
https://s.brother/csyai/
Met de Artspira-app kunnen de in de
app aangeboden borduurpatronen
worden overgebracht naar de machine
en kan de functie worden gebruikt om
zelf borduurpatronen te tekenen en deze
over te brengen naar de machine.
Ga naar de volgende URL voor meer
gedetailleerde en aanvullende informatie.
https://s.brother/csyai/
L’app Artspira consente di trasferire
i contenuti pubblicato sull’app alla
macchina per ricamare e di creare
lavori originali con le funzioni
dell’app.
Per ulteriori funzioni e dettagli, visitare
l’URL indicato di seguito.
https://s.brother/csyai/
Con la aplicación Artspira, puede
transferir el contenido publicado
en la aplicación a la máquina de
bordar y disfrutar creando trabajos
originales utilizando las funciones de
la aplicación.
Para más detalles acerca de las
funciones, visite la siguiente URL.
https://s.brother/csyai/
Com o aplicativo Artspira, é possível
transferir o conteúdo publicado no
aplicativo para a máquina de bordar
e criar trabalhos originais usando as
funções do aplicativo.
Visite o URL a seguir para ter acesso a
mais recursos e informações.
https://s.brother/csyai/
С помощью приложения Artspira можно
переносить материалы, опубликованные
в приложении, на вышивальную машину
и создавать оригинальные проекты,
используя функции приложения.
Подробное описание и инструкции можно
прочитать по следующему URL-адресу.
https://s.brother/csyai/
■ Para bordados
■Для вышивания:

5
Wireless Network Connection Functions Funktionen zur Verbindung mit dem Wireless-LAN
Fonctions de connexion au réseau sans fil Functies voor draadloze netwerkverbinding
Funzioni di connessione di rete wireless Funciones de conexión de red inalámbrica
Funções de conexão de rede sem fio Функции подключения к беспроводной сети
Design Database Transfer
Wirelessly transfer an embroidery
pattern from your computer to
the machine by using Design
Database Transfer app.
Please visit the following URL for
more features and details.
https://s.brother/caeka/
Übertragen Sie mit Hilfe der App Design
Database Transfer Stickmuster drahtlos
von Ihrem Computer an die Maschine.
Informationen zu weiteren Funktionen
und Details erhalten Sie über die
folgende URL.
https://s.brother/caeka/
Transférez sans fil un motif de
broderie de votre ordinateur à la
machine à l’aide de l’application
Design Database Transfer.
Consultez la page Web suivante
pour plus de fonctions et de détails.
https://s.brother/caeka/
Breng draadloos een borduurpatroon
over van uw computer naar de machine
met gebruik van de app Design Database
Transfer.
Ga naar de volgende URL voor meer
gedetailleerde en aanvullende informatie.
https://s.brother/caeka/
Consente di trasferire un ricamo
in modalità wireless dal computer
alla macchina con l’app Design
Database Transfer.
Per ulteriori funzioni e dettagli,
visitare l’URL indicato di seguito.
https://s.brother/caeka/
Transfiera de forma inalámbrica
un patrón de bordado desde el
ordenador a la máquina utilizando la
aplicación Design Database Transfer.
Para más detalles acerca de las
funciones, visite la siguiente URL.
https://s.brother/caeka/
Transfira padrões de bordado do
seu computador para a máquina
por meio de uma conexão sem
fio usando o aplicativo Design
Database Transfer.
Visite o URL a seguir para ter acesso
a mais recursos e informações.
https://s.brother/caeka/
С помощью приложения Design
Database Transfer можно передавать
рисунок вышивания по беспроводной
сети с компьютера на машину.
Подробное описание и инструкции
можно прочитать по следующему
URL-адресу.
https://s.brother/caeka/
PE-Design
Wirelessly transfer to the machine
an embroidery pattern edited with
embroidery editing software (PE-
DESIGN version 11 or later) on
a computer. Also, transfer to PE-
DESIGN an embroidery pattern
edited on the machine.
Übertragen Sie drahtlos ein mit
einer Stickeditiersoftware (PE-
DESIGN Version 11 oder höher)
auf einem Computer bearbeitetes
Stickmuster an die Maschine. Sie
können auch ein auf der Maschine
bearbeitetes Stickmuster an PE-
DESIGN übertragen.
Transférez via le réseau sans fil vers
la machine un motif de broderie
modifié à l’aide d’un logiciel de
broderie (PE-DESIGN version 11
ou ultérieure) depuis un ordinateur.
Transférez également vers PE-
DESIGN un motif de broderie
modifié depuis la machine.
Breng draadloos een borduurpatroon
over naar de machine via het
borduurontwerpsoftwareprogramma
(PE-DESIGN versie 11 of hoger)
op een computer. U kunt ook een
borduurpatroon overbrengen naar
PE
-
DESIGN dat is bewerkt op de
machine.
Trasferire in modalità wireless alla
macchina un ricamo modificato
sul computer con il software di
modifica ricami (PE-DESIGN
versione 11 o successiva). Inoltre,
trasferire a PE-DESIGN un ricamo
modificato sulla macchina.
Transfiera de forma inalámbrica a
la máquina un patrón de bordado
editado con un programa de
edición de bordados (PE-DESIGN
versión 11 o posterior) en un
ordenador. Igualmente, transfiera
a PE-DESIGN un patrón de
bordado editado en la máquina.
Transfira padrões de bordado
editados com software de edição
de bordado (PE-DESIGN versão 11
ou posterior) em um computador
diretamente para a máquina por
meio de uma conexão sem fio.
Além disso, transfira padrões de
bordado editados na máquina
para o PE-DESIGN.
Передача по беспроводной сети
на машину рисунка вышивания,
отредактированного на
компьютере в программе
редактирования вышивок
(PE-DESIGN версии 11 или
выше). Также возможна
передача в программу PE-
DESIGN рисунка вышивания,
отредактированного на машине.
For details on each function, refer to the
Operation Manual.
Raadpleeg de Bedieningshandleiding voor
meer gedetailleerde informatie over elke
functie.
Pour plus d’informations sur chaque
fonction, reportez-vous au manuel
d’instructions.
Weitere Informationen zu den
einzelnen Funktionen finden Sie in der
Bedienungsanleitung.
Per i dettagli su ciascuna funzione, fare
riferimento al Manuale di istruzioni.
Si desea más información acerca de
cada función, consulte el Manual de
instrucciones.
Подробную информацию о
каждой функции см. в Руководстве
пользователя.
Para obter detalhes sobre cada função,
consulte o Manual de operações.

6
• When you first turn on the machine,
the following message about a wireless
LAN connection appears.
To set up a connection, touch ,
and then continue with step 5.
•
Beim ersten Einschalten der Maschine wird
die folgende Meldung bezüglich einer
Verbindung per Wireless-LAN angezeigt.
Berühren Sie , um eine Verbindung
einzurichten. Befolgen Sie dann Schritt
5
.
•
Quand vous mettez la machine sous tension pour la
première fois, le message suivant apparaît à propos
d’une connexion au réseau local LAN sans fil.
Pour configurer une connexion, touchez ,
puis passez à l’étape
5
.
•
Wanneer u de machine de eerste keer
inschakelt, wordt het volgende bericht over een
WLAN Draadloze verbinding weergegeven.
Druk op als u een verbinding wilt
instellen en ga vervolgens door met stap
5
.
•
Alla prima accensione della macchina,
viene visualizzato il seguente messaggio
relativo a una connessione LAN wireless.
Per configurare una connessione, toccare
e continuare con il passaggio
5
.
•
Cuando se activa la máquina por primera
vez, se muestra el siguiente mensaje acerca
de una conexión de LAN inalámbrica.
Para establecer una conexión, toque
y continúe con el paso
5
.
• Quando você liga a máquina pela
primeira vez, a seguinte mensagem
sobre uma conexão LAN sem fio é
exibida.
Para configurar uma conexão, toque
em e continue do passo 5.
• При первом включении машины
отображается следующее
сообщение о подключении к
беспроводной сети.
Чтобы настроить подключение,
нажмите и перейдите к
пункту 5.
Find your security information (SSID and
network key) and note it.
Suchen Sie ihre Sicherheitsinformationen
(SSID und Netzwerkschlüssel) heraus und
notieren Sie sie.
Recherchez vos informations de sécurité
(SSID et clé réseau) et notez-les.
Zoek uw beveiligingsgegevens (SSID en
netwerksleutel) op en noteer deze.
Cercare le informazioni di sicurezza (nome
SSID e chiave di rete) e annotarle.
Busque su información de seguridad (SSID y
clave de red) y anótela.
Encontre suas informações de segurança
(SSID e chave de rede) e anote-as.
Найдите данные безопасности своей
беспроводной сети (название SSID и
сетевой ключ) и запишите их.
Touch beside “Wireless LAN Setup
Wizard”.
Berühren Sie neben „Wireless LAN-
Setup-Assistent“.
Appuyez sur à côté de « Assistant de
configuration du réseau local LAN sans fil ».
Druk op naast “Installatiewizard voor
draadloos LAN”.
Toccare accanto a “Impostazione
guidata LAN wireless”.
Toque junto a “Asistente de
configuración de la LAN inalámbrica”.
Toque em ao lado de “Assistente de
configuração de LAN sem fio”.
Нажмите в пункте “Мастер установки
беспроводной сети”.
1 2
3 4
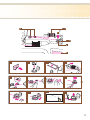
Wireless Network Connection
Verbindung per Wireless-LAN
Connexion au réseau sans fil
Draadloze netwerkverbinding
Connessione di rete wireless
Conexión de red inalámbrica
Conexão de rede sem fio
Подключение к беспроводной сети

7
Enter the network key (password) that was
noted in step 3, and then touch .
Geben Sie den im Schritt 3 notierten
Netzwerkschlüssel (Passwort) ein und
tippen Sie dann auf .
Saisissez la clé réseau (mot de passe) que
vous avez notée à l’étape 3, puis touchez
.
Voer de netwerksleutel (wachtwoord) in
die is genoteerd in stap 3 druk vervolgens
op .
Immettere la chiave di rete (password)
annotata al passaggio 3 e toccare
.
Introduzca la clave de red (contraseña) que
anotó en el paso 3 y luego toque .
Insira a chave de rede (senha) anotada no
passo 3 e toque em .
Введите сетевой ключ (пароль),
записанный в пункте 3, и нажмите
.
Select beside the SSID that was noted in
step 3.
Wählen Sie neben der SSID aus, die Sie
sich in Schritt
3
notiert haben.
Sélectionnez à côté du SSID que vous avez
noté à l’étape
3
.
Selecteer naast de SSID die u hebt
genoteerd in stap
3
.
Selezionare accanto al nome SSID
annotato al passaggio
3
.
Seleccione junto al SSID que se ha anotado
en el paso
3
.
Selecione ao lado do SSID anotado no
passo
3
.
Выберите рядом с именем беспроводной
сети, записанным в пункте
3
.
5
7 8 9
6

8
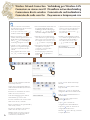
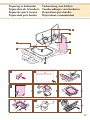
Winding the Bobbin Aufspulen des Unterfadens
Bobinage de la canette Spoel opwinden
Avvolgimento della spolina Devanado de la bobina
Enrolando a bobina Намотка шпульки
Follow the numbered steps below in order. Refer to the operation manual for detailed instruction.
Führen Sie die folgenden Schritte in der angegebenen Reihenfolge aus. Ausführliche Hinweise finden Sie in der Bedienungsanleitung.
Suivez les étapes numérotées ci-dessous dans l’ordre. Consultez le manuel d'instructions pour des procédures détaillées.
Voer de genummerde stappen uit in de juiste volgorde. Uitvoerige aanwijzingen vindt u in de bedieningshandleiding.
Seguire i passaggi numerati nell'ordine riportato di seguito. Fare riferimento al manuale d'istruzioni per le istruzioni dettagliate.
Realice los siguientes pasos numerados en el orden indicado. Para obtener instrucciones detalladas, consulte el manual de instrucciones.
Siga os passos numerados a seguir em ordem. Consulte o manual de operação para saber as instruções detalhadas.
Выполните приведенные ниже операции в порядке их нумерации. Более подробная информация представлена в “Руководстве
пользователя”.
Use the plastic bobbin that comes with this machine or bobbins of the same type.
Bobbin included with the machine is Class 15 type bobbin.
Verwenden Sie die Kunststoffspule, die mit dieser Maschine geliefert wird, oder
Spulen vom gleichen Typ. Die mit der Maschine gelieferte Spule ist eine Spule
Klasse 15.
Utilisez la canette en plastique fournie avec cette machine ou des canettes du
même type. La canette fournie avec la machine est de type Classe 15.
Gebruik de plastic spoel die is meegeleverd met deze machine of spoelen van
hetzelfde type. Het spoeltype dat met de machine wordt meegeleverd is klasse 15.
Utilizzare la spolina di plastica in dotazione con la macchina o spoline dello
stesso tipo. La spolina in dotazione con la macchina è del tipo Classe 15.
Utilice la bobina de plástico suministrada con esta máquina o bobinas del mismo
tipo. La bobina incluida con la máquina es de Clase 15.
Use a bobina de plástico que acompanha esta máquina ou bobinas do mesmo
tipo. A bobina incluída com a máquina é do tipo Classe 15.
Используйте прилагаемую к машине пластиковую шпульку или шпульки
такого же типа. К машине прилагается шпулька класса 15.
Using the Supplemental
Spool Pin
You can wind the bobbin during
embroidery.
Verwendung
des zusätzlichen
Garnrollenstifts
Sie können den Unterfaden während
des Stickens aufspulen.
Utilisation du porte-
bobine supplémentaire
Vous pouvez bobiner la canette
pendant la broderie.
Gebruik van de klospen
U kunt de spoel opwinden tijdens
het borduren.
Utilizzo del portarocchetto
supplementare
È possibile avvolgere la spolina
durante il ricamo.
Uso del portacarrete
suplementario
Puede devanar la bobina mientras
está bordando.
Usando o pino do carretel
complementar
Você pode enrolar a bobina durante
o bordado.
Использование
дополнительного стержня
для катушки
Можно наматывать нить на
шпульку во время вышивания.
11.5 mm (approx. 7/16 inch)
(ca. 7/16 Zoll)
(env. 7/16 po)
11,5 mm (ca. 7/16 inch)
(circa 7/16 in.)
(aprox. 7/16 pulg.)
(aprox. 7/16 pol.)
(прим. 7/16 дюйма)

9
1
5
2
7 98
3 4
6

10
3
2
4
568
7
Using the Spool Pin
You can use the main spool
pin to wind the bobbin before
embroidering.
Verwendung des Garnrollenstifts
Mit dem Hauptgarnrollenstift können
Sie vor dem Sticken den Unterfaden
aufspulen.
Utilisation du porte-bobine
Vous pouvez bobiner la canette
avant de broder à l’aide du porte-
bobine principal.
Gebruik van de klospen
Voordat u gaat borduren, kunt u met
de hoofdklospen de spoel opwinden.
Utilizzo del portarocchetto
È possibile utilizzare il portarocchetto
principale per avvolgere la spolina
prima di ricamare.
Uso del portacarrete
Se puede utilizar el portacarrete
principal para devanar la bobina
antes de bordar.
Usando o pino do carretel
Você pode usar o pino de carretel
principal para enrolar a bobina antes
de bordar.
Использование основного
стержня для катушки
Для намотки шпульки перед вышиванием
можно использовать главный стержень
для установки катушки.
1 2 3 4
5
67 8

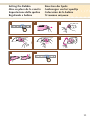
11
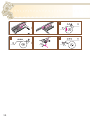
Setting the Bobbin Einsetzen der Spule
Mise en place de la canette Aanbrengen van het spoeltje
Impostazione della spolina Colocación de la bobina
Regulando a bobina Установка шпульки
1 2 3
4
6 7
5

12
1 2
6
3
10
4
5
8
12
11
FP
7
9
5
10
12
6
7 8
4
11
2
3
9 13
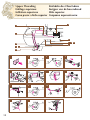
Upper Threading Einfädeln des Oberfadens
Enfilage supérieur Inrijgen van de bovendraad
Infilatura superiore Hilo superior
Como passar a linha superior
Заправка верхней нити
13

13
Preparing to Embroider Vorbereitung zum Sticken
Préparation de la broderie Voorbereidingen voor borduren
Preparativi per il ricamo Preparativos para bordar
Preparando para bordar Подготовка к вышиванию
1 2
3
4 5

14
8
6
7

15
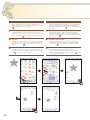
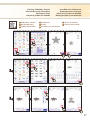
Selecting Embroidery Patterns
Auswählen von Stickmustern
Sélection des motifs de broderie
Borduurpatronen selecteren
Selezione di ricami
Seleccionar patrones de bordado
Seleção de padrões de bordado
Выбор рисунков для вышивания
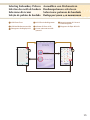
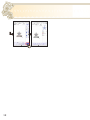
LCD Flow Chart LCD-Übersichtsdiagramm Organigramme de l’écran à
cristaux liquides
LCD Beeldscherm overzicht Schema di flusso LCD Diagrama de flujo del LCD
Fluxograma do display LCD Схема действий на LCD
дисплее

16
Embroidery Patterns
When the machine is turned on, the opening movie is
played. Touch the screen to display the home screen. Touch
to display the Embroidery Screen.
Stickmuster
Nach dem Einschalten der Maschine wird der Eingangsfilm
angezeigt. Berühren Sie den Bildschirm zur Anzeige des
Startbildschirms. Berühren Sie , um den Stickbildschirm
anzuzeigen.
Motifs de broderie
Quand la machine est mise sous tension, la vidéo de
démarrage commence. Touchez l’écran pour acher la page
d’accueil. Touchez pour acher l’écran de broderie.
Borduurpatronen
Wanneer u de machine aanzet, wordt de openingsfilm
afgespeeld. Raak het scherm aan om het beginscherm weer
te geven. Druk op om het scherm met borduurpatronen
weer te geven.
Ricami
All’accensione della macchina, viene riprodotto il filmato di
apertura. Toccare lo schermo per visualizzare la schermata
iniziale. Selezionare per visualizzare la schermata di
ricamo.
Patrones de bordado
Cuando se activa la máquina, se reproduce el vídeo de
presentación. Toque la pantalla para visualizar la pantalla
inicial. Toque para visualizar la pantalla de bordado.
Padrões de bordado
Quando a máquina estiver ligada, o vídeo de abertura será
reproduzido. Toque na tela para exibir a tela inicial. Toque
em para exibir a tela de bordado.
Рисунки для вышивания
После включения машины воспроизводится
вступительный видеоролик. Прикоснитесь к экрану,
чтобы отобразить начальный экран. Нажмите , чтобы
открыть экран вышивания.

17
Embroidery Patterns Stickmuster Motifs de broderie
Borduurpatronen Ricami Patrones de bordado
Padrões de bordado Дизайны для вышивания
Selecting Embroidery Patterns Auswählen von Stickmustern
Sélection des motifs de broderie Borduurpatronen selecteren
Selezione di ricami Seleccionar patrones de bordado
Seleção de padrões de bordado Выбор рисунков для вышивания

18
La pagina si sta caricando...
La pagina si sta caricando...
La pagina si sta caricando...
La pagina si sta caricando...
-
 1
1
-
 2
2
-
 3
3
-
 4
4
-
 5
5
-
 6
6
-
 7
7
-
 8
8
-
 9
9
-
 10
10
-
 11
11
-
 12
12
-
 13
13
-
 14
14
-
 15
15
-
 16
16
-
 17
17
-
 18
18
-
 19
19
-
 20
20
-
 21
21
-
 22
22
-
 23
23
-
 24
24


Brother Innov-is XE2 Guida di riferimento
- Tipo
- Guida di riferimento
in altre lingue
- français: Brother Innov-is XE2 Guide de référence
- español: Brother Innov-is XE2 Guia de referencia
- Deutsch: Brother Innov-is XE2 Referenzhandbuch
- Nederlands: Brother Innov-is XE2 Referentie gids
- português: Brother Innov-is XE2 Guia de referência
Documenti correlati
-
Brother NV2700 Embroidery Machine Guida utente
-
-
Brother Innov-is VM6200D Guida di riferimento
-
-
-
-
-
-
-