Orla CDP 1 Manuale del proprietario
- Categoria
- Strumenti musicali
- Tipo
- Manuale del proprietario

1
D i g i t a l P i a n o s
STAGE STARTER
Portable Piano
CDP 1
Digital Piano
O w n e r 's M a n u a l
M a n u a l e d’ u s o

2

3
D i g i t a l P i a n o s
STAGE STARTER
Portable Piano
CDP 1
Digital Piano
O w n e r 's M a n u a l

4
SAFETY PRECAUTIONS AND INSTRUCTIONS
WARNING
Make sure that the voltage set is suitable for the instrument (the voltage is indicated next to the AC
power inlet).
When using electric products, always follow basic precautions, including the following:
1 Read all of these instructions before using the product.
2 To reduce the risk of injury, close supervision is necessary when the product is used near
children.
3 Do not use this product near water - for example, near a bathtub, washbowl, kitchen sink, in
a wet basement, near a swimming pool, or the like.
4 This product, either alone or in combination with an amplifier and headphones, or speakers
may be capable of producing sound levels that could cause permanent hearing loss Do not
operate for a long period of time at a high volume level, or at a level that is uncomfortable.
If you experience any hearing loss, or ringing in your ears, you should consult an
audiologist.
5 The product should be located so that its location, or position, does not interfere with proper
ventilation.
6 This product should only be located away from heat sources such as radiators, heat registers,
and other products that cause heat.
7 The product should be connected only to the type of power supply described in the operating
instructions, or as marked on the product.
8 This product may be equipped with a polarised plug. This is a safety feature. If you are
unable to insert the plug into the outlet, contact an electrician to replace your obsolete outlet.
Do not defeat the safety purpose of the plug.
9 The power-supply/Adapter cord of the product should be unplugged from the outlet when
left unused for a long period of time. The battery may need to be replaced after two or three
years of use.
10 Care should be taken so that objects do not fall, and liquids are not spilled, into the cabinet
through openings
11 The product should be serviced by qualified personnel when:
a The power-supply/Adapter cord or the plug has been damaged; or
b Objects have fallen, or liquid has been spilled, into the product or
c The product has been exposed to rain or
d The product does not appear to operate normally, or exhibits a marked change in
performance, or
e The product has been dropped, or the cabinet damaged
12 Do not attempt to service the product beyond that described in the maintenance
instructions. All other servicing should be referred to qualified service personnel.

5
DANGER
Do not modify the plug provided with the product - if it will not fit - have a proper outlet installed
by a qualified electrician
DISCLAIMER
The information contained in this manual has been very carefully revised. Due to the constant effort
to improve the product, the product specifications might differ to those in the manual. The
specifications are subject to modification without prior notice.
TAKING CARE OF YOUR DIGITAL PIANO
Your Digital Piano is a fine instrument and deserves the most careful treatment.
Follow carefully the next few points, and it will operate at its best for many years.
- Never open the case and touch the internal circuits.
- Always switch the power Off after use.
- Use a cloth or a damp sponge. If the dirt is particularly persistent, use a neutral detergent to
remove it. Never use solvents or alcohol.
- Do not place your instrument near electric motors, neon or fluorescent lamps as these may
generate disturbances.
- In most cases you just need to change the position of the instrument to avoid interference.
- Keep your instrument away from dusty environments, high humidity, and high temperatures.
- Do not use on the same AC outlet with electrical appliances, neon lights or variable lighting
system.
- Before turning on the instrument, make sure that any external amplifier and speaker system
that you have connected to your piano are turned off.
- Computer controlled instruments can be interrupted by spikes, surges and dropouts on the
power line. If your instrument stops working because of a power line disturbance, switch it
off for a few seconds and then switch it on again.
- Never disconnect the power/Adapter cable without turning the power switch off.

6
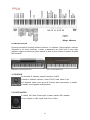
INTRODUCTION
Welcome to the high tech world of electronic instruments. Your piano has been designed and made
using the latest technology and computerized systems, to offer you years of trouble free pleasure.
Read this manual carefully in order to fully exploit the potential of your instrument.
Stage Starter Portable Digital Piano CDP 1 Console Digital Piano
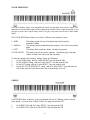
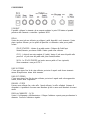
POWER ON
To turn on the instrument simply push the On/Off switch. On the Stage Starter it is
located on the Left side of the instrument and on the CDP1 it is located on the Right
side of the instrument.
The default setting will automatically select the PIANO 1 sound.
If the instrument is left switched on for more than 30 minutes without being played,
the Standby control will automatically switch it off.
MASTER VOLUME
The Master Volume control adjusts the overall volume of the instrument.
On the Stage Starter it is located in the Left side of the instrument and on the CDP1
it is located in the Right side of the instrument.
If headphones are connected it will also adjust the headphone volume.

7
SUSTAIN PEDAL
STAGE STARTER – it is supplied with a Sustain Pedal.
An optional 3 pedal unit is also available.
CDP 1 – It is supplied with the 3 pedal unit.
STAGE STARTER Digital Piano is supplied with a Sustain Pedal.
Connect the Sustain Pedal to the Pedal Input Sustain/Sostenuto to obtain the Sustain effect when
used. It has the same function as the ''sustain'' pedal on the acoustic piano.
It provides sustain and lets the sound slowly decay after the keys have been released.
SOFT/SOSTENUTO/SUSTAIN PEDAL (optional for Stage Starter)
Insert the mono jack to the Pedal Input Soft and the stereo jack in the Pedal Input
Sustain/Sostenuto.
The instrument works now with a set of three pedals giving the following functions:
SOFT: gives the piano voices a ''softer'' sound.
SOSTENUTO: this allows only the notes pressed on the keyboard before the Sostenuto pedal
is activated to sustain and no subsequent notes played afterwards.
SUSTAIN: has the same function as the ''sustain'' pedal on the acoustic piano. It
provides sustain and lets the sound slowly decay after the keys have been
released.

8
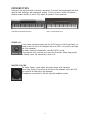
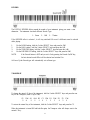
SELECT KEYS
There are two groups of 3 WHITE KEYS, the 3 Lowest to the Left and the 3 Highest to the Right,
that are used as SELECT KEYS if pressed at the same time. These will allow all the changes in the
instrument. You can use either the Left group or the Right group whichever is most convenient.
DEMO SONGS
It is possible to select 6 DEMO songs on the instrument keyboard by pressing and holding the 3
white SELECT keys and the keys related to the DEMO SONGS. To stop the Demo Song press
and hold the 3 white SELECT keys and the key related to the selected DEMO SONG a second
time. To change from one demo to another Demo, press and hold the 3 white SELECT keys and
the key related to the new selected DEMO SONG. The previous Demo Song stops and the new
selected Demo Song starts.
It is possible to play all the Demo Songs in a loop sequence, just start one of the Demos and the
instrument will play all of them no stop.
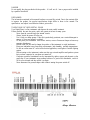
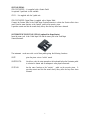
SOUND SELECT
The Stage Starter is designed to be simple to use and provide a great sound. Even though there are
no switches visible in the instrument, there are 16 sounds available in the internal memory and they
can be easily selected whit a combination of keys.

9
Here find the sound list:
Nr
Key
Sound
Name
Nr
Key
Sound
Name
1
E
0
-
Mi
0
Grand
Piano
9
F
1
-
Fa
1
Nylon
Guitar
2
F
0
-
Fa
0
Upright
Piano
10
G
1
-
Sol
1
Church
Organ
3
G
0
-
Sol
0
Electric
Piano
11
A
1
-
La
1
Chapel
Organ
4
A
0
-
La
0
Harpsi
12
B
1
-
Si
1
Jazz
Organ
5
B
0
-
Si
0
Slow
Strings
13
C
2
-
Do
2
Grand
Piano
&
Strings
–
Layer
6 C 1 - Do 1
Fast Strings
14
D 2 - Re 2
Grand Piano & Strings – Split
7 D 1 - Re 1
Vocals
15 E 2 - Mi 2
Electric Piano & Strings – Layer
8 E 1 - Mi 1
Brass
16 F 2 - Fa 2
Nylon Guitar & Strings – Layer
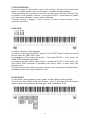
These sounds can be easily accessed using the following procedure.
1. Hold down the 3 lowest (or highest) white keys of the keyboard (A-1, B-1,C0 or A6, B6,
C7).
2. While holding down the 3 white SELECT keys, you may now select any of the 16 sounds
by pushing one of the 16 white keys dedicated to Sound Select. Once you have pushed one
of these keys, you may release the 3 white SELECT keys. The entire keyboard will now
play the new selected sound.
To change to any other sound, just repeat the above process. When the instrument is turned off and
back on again, the Grand Piano sound will be selected.
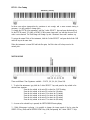
TONE CONTROL
It is possible to adjust the sound (TONE) according to personal taste and change the sound to a
more mellow or brighter tone.
To change the TONE of the instrument, hold the 3 white SELECT keys and press the key for the
TONE control DOWN (Mellow) (F#4) or TONE control UP (Bright) (G#4).There are max 4 steps
down and 4 steps up.
To restore the natural TONE of the instrument, hold the 3 white SELECT and press the both the
F#4 and G#4 keys at the same time.
When the instrument is turned Off and back On again, the TONE value will always reset to the
natural setting.

10
TOUCH SENSITIVITY
Just like an acoustic piano, your instrument has an 88 note keyboard with velocity control. This
means the level of the audio signal will be in proportion with the velocity of the key pressed. If you
play soft you will have a quiet sound, while if you play very hard you will have a much louder
sound .
The TOUCH SENSE button allows you to select 3 different touch sensitivity curves:
1 - HARD This setting requires the keys to be played quite hard to produce
maximum loudness.
2 - NORMAL This setting produces standard keyboard response. This is the factory default
mode.
3 - SOFT This setting allows maximum volume with light key pressure.
TOUCH ON/OFF. This setting turns off the velocity sensitivity, and all notes play at the same
volume no matter how hard or soft they are played.
To select the desired touch sensitivity settings, follow the instructions:
1. For the HARD setting, hold the 3 white SELECT keys and press the F#6.
2. For the NORMAL setting, hold the 3 white SELECT keys and press the G#6.
3. For the SOFT setting, hold the 3 white SELECT keys and press the A#6.
4. For the NO TOUCH SENSITIVITY setting, hold the 3 white SELECT keys and press the
D#6. In this mode the Touch Sense Value will be automatically set at 100.
CHORUS
This gives all the sounds of these sections a fuller, rounder and warmer sound.
If the CHORUS effect is selected , it will stay switched ON even if a different sound is selected
while playing. At Power Up the CHORUS effect will always be switched OFF.
1. For CHORUS ON, hold the 3 white SELECT keys and press the C#5.
2. For CHORUS OFF, hold the 3 white SELECT keys and press the C#5.

11
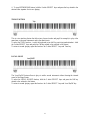
REVERB
The DIGITAL REVERB effects expand the sounds of your instrument giving your music a new
dimension. The instrument has three different Reverb Type:
1 – Room 2 – Hall 3 – Theatre.
If the REVERB effect is selected , it will stay switched ON even if a different sound is selected
while playing.
1. For the ROOM setting, hold the 3 white SELECT keys and press the F#5.
2. For the HALL setting, hold the 3 white SELECT keys and press the G#5.
3. For the THEATRE setting, hold the 3 white SELECT keys and press the A#5.
4. For the REVERB OFF setting, hold the 3 white SELECT keys and press the D#5.
NOTE: if the Reverb feature is OFF and you set it On by pressing the Reverb On/Off key,
the last selected reverb Effect will be selected and switched On.
At Power Up the Reverb type will automatically set as Room type.
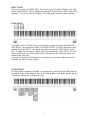
TRANSPOSE
To change the natural (C) key of the instrument, hold the 3 white SELECT keys and press the new
key for the Transpose (from G2 up to F#3).
G2 G2# A2 A2# B2 C3 C3# D3 D3# E3 F3 F3#
-5 -4 -3 -2 -1 0 1 2 3 4 5 6
To restore the natural key of the instrument, hold the 3 white SELECT keys and press the C3.
When the instrument is turned Off and back On again, the Transpose value will always reset to the
natural C Key .

12
PITCH – Fine Tuning
In those cases where transposition by semitones is not enough, and a more accurate tuning is
necessary, it is still possible to change pitch.
To change the PITCH of the instrument, hold the 3 white SELECT keys and press the desired key
for the PITCH control UP (A#3) or DOWN (G#3) as many times until you hear that the new Pitch
value is set as desired. The Pitch Range will change by max 1 Semitone down and 1 semitone up.
To restore the natural Pitch of the instrument, hold the 3 white SELECT and press the both the G#3
and A#3 keys at the same time.
When the instrument is turned Off and back On again, the Pitch value will always reset to the
natural pitch .
METRONOME
There are different Time Signatures available : CLICK, 2/4, 3/4, 4/4, 5/4 and 6/8.
1 - To select the metronome type, hold the 3 white SELECT keys and press the key related to the
selected time signature:
Press the key related to the note E4 to select the CLICK setting.
Press the key related to the note F4 to select the 2/4 setting.
Press the key related to the note G4 to select the 3/4 setting.
Press the key related to the note A4 to select the 4/4 setting.
Press the key related to the note B4 to select the 5/4 setting.
Press the key related to the note C5 to select the 6/8 setting.
2 - As soon as the selected key is pressed, the METRONOME starts playing.
3 - While Metronome is playing, it is possible to change the tempo speed of the by using the
SPEED UP key (D#4) and the SPEED DOWN key (C#4) and pressing the 3 white SELECT keys.

13
4 - To stop METRONOME feature, hold the 3 white SELECT keys and press the key related to the
selected time signature that is now playing.
TWIN FUNCTION
This is a nice teaching feature that allows two players (teacher and pupil for example) to play at the
same time on the same instrument and in the same octave.
To select the TWIN function – to split the keyboard in two half for practicing teacher/student - hold
the 3 white SELECT keys and press the C#2 key related to the selected to the feature.
To return to normal playing repeat the function: the 3 white SELECT keys and Twin key.
LOCAL ON/OF
The Local On/Off feature allows to play via midi a second instrument without hearing the internal
sound of the Stage Starter.
To select the LOCAL ON/OFF function, hold the 3 white SELECT keys and press the G#1 key
related to the selected to the feature.
To return to normal playing repeat the function: the 3 white SELECT keys and Local On/Off key.

14
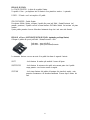
CONNECTIONS
USB TO HOST
It is possible to connect the instrument to a computer using the USB port located in the back panel
of the instrument and control the Midi parameters.
PEDALS Soft – Sostenuto/Sustain
These two jack plugs are used to connect the pedals available with the instrument.
STAGE STARTER – it is supplied with a Sustain Pedal. Connect it to the Pedal Input Sustain/Sostenuto to
obtain the Sustain effect when used.
CDP 1 – It is supplied with a complete set of 3 pedals. Insert the mono jack to the Pedal Input Soft and the
stereo jack in the Pedal Input Sustain/Sostenuto.
NOTE – The STAGE STARTER can also use a set of 3 pedals (optional). Same connection as in CDP 1.
STEREO LINE IN
There is a Stereo In socket that is used to send the Left and Right audio signal of an external
instrument via the internal amplifier of the Piano (an Mp3 player for example).
STEREO LINE OUT
There is a Stereo Line Out socket that is used to send the audio signal out an external amplifier,
mixer console or recording equipment.
PHONES 1/2
Two headphone set can be plugged in for private practice. They disconnect the speaker system and
allow you to play without disturbing the others being disturbed by outside noise.
DC IN
Connect the power adapter (12V) in the DC IN socket.

15
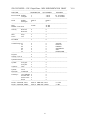
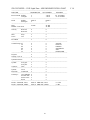
STAGE STARTER – CDP 1 Digital Piano - MIDI IMPLEMENTATION CHART V 1.0
--------------------------------------------------------------------------------------------------------------------------
FUNCTION TRANSMITTED RECOGNIZED REMARKS
--------------------------------------------------------------------------------------------------------------------------
Basic Channel Default 1 1 to 16 Ch. 10 omitted
Changed 1 1 to 16 Ch. 10 omitted
--------------------------------------------------------------------------------------------------------------------------
Mode Default Mode 3 Mode 3
Messages x x
--------------------------------------------------------------------------------------------------------------------------
Note 21-108 21-108
Number: True voices 21-108
--------------------------------------------------------------------------------------------------------------------------
Velocity Note ON 0 0
Note OFF x x
--------------------------------------------------------------------------------------------------------------------------
After Key's x x
Touch Ch's x x
--------------------------------------------------------------------------------------------------------------------------
Pitch Bend x 0
--------------------------------------------------------------------------------------------------------------------------
ControlChange 07 0 0 VOLUME
10 x 0 PAN POT
64 0 0 DAMPER
66 0 0 SOSTENUTO
67 0 0 SOFT
11 x 0 EXPRESSION
--------------------------------------------------------------------------------------------------------------------------
Program 0 0
Change : True # 0 0
--------------------------------------------------------------------------------------------------------------------------
System Exclusive x x
--------------------------------------------------------------------------------------------------------------------------
System: Song pos. x x
Song Sel. x x
Common: Tune x x
--------------------------------------------------------------------------------------------------------------------------
System : Clock x x
Real time : Commands x x
--------------------------------------------------------------------------------------------------------------------------
Aux Msgs : Local ON/OFF 0 0
All notes OFF 0 0
Active sense x x
Reset x x
--------------------------------------------------------------------------------------------------------------------------
Mode 1: OMNI ON, POLY Mode 3: OMNI OFF, POLY 0 = YES
Mode 2: OMNI ON, MONO Mode 4: OMNI OFF, MONO x = NO
--------------------------------------------------------------------------------------------------------------------------

16

17
D i g i t a l P i a n o s
STAGE STARTER
Portable Piano
CDP 1
Digital Piano
M a n u a l e d’ u s o

18
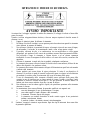
ISTRUZIONI E MISURE DI SICUREZZA
AVVISO IMPORTANTE
Accertarsi che il voltaggio impostato sia adatto allo strumento (il voltaggio è indicato a fianco della
presa di corrente).
Quando si utilizza un'apparecchiatura elettrica, si devono sempre rispettare le basilari norme di
sicurezza, tra cui:
1 Leggere le istruzioni prima di utilizzare lo strumento.
2 Per ridurre il rischio di incidenti, occorre prestare particolare attenzione quando lo strumento
viene utilizzato in presenza di bambini.
3 Non utilizzare il prodotto in prossimità di acqua, ad esempio vicino ad una vasca da bagno,
ad un lavandino o un lavabo, in un seminterrato umido, vicino ad una piscina o simili.
4 Il prodotto, utilizzato da solo o in combinazione con un amplificatore e cuffie oppure
altoparlanti, può produrre livelli sonori che potrebbero arrecare danni permanenti all'udito.
Non utilizzare a lungo lo strumento a volume elevato o ad un volume comunque
intollerabile. In caso di insorgenza di deficit uditivo o di ronzio alle orecchie, consultare uno
specialista.
5 Collocare lo strumento in modo tale che sia possibile un'adeguata ventilazione.
6 Lo strumento deve essere collocato lontano da fonti di calore come radiatori, diffusori di aria
calda e altri dispositivi che producono calore.
7 Lo strumento deve essere esclusivamente collegato all'alimentazione specificata nel manuale
o indicata sullo strumento.
8 Questo prodotto può essere dotato di spina polarizzata. Si tratta di un dispositivo di
sicurezza. Se non siete in grado di inserire la spina nella presa, rivolgetevi ad un elettricista
per sostituire la vecchia presa. Non rinunciate agli scopi di sicurezza della spina.
9 Il cavo di alimentazione dello strumento dovrebbe essere scollegato dalla presa della
corrente in caso di inutilizzo per un lungo periodo di tempo. Quando si ricollega l'unità,
accendere la tastiera e lasciarla accesa per 3-5 ore per ricaricare la batteria interna. La
batteria può dover essere sostituita dopo due o tre anni di utilizzo.
10 Fare attenzione a non far cadere oggetti o liquidi, che potrebbero penetrare nello strumento
attraverso le fessure.
11 La manutenzione deve essere effettuata da personale qualificato nei seguenti casi:
a sono stati danneggiati il cavo di alimentazione e la spina;
b sono caduti oggetti o liquidi all'interno dello strumento;
c lo strumento è rimasto esposto alla pioggia;
d lo strumento non sembra funzionare in modo corretto oppure le sue prestazioni
risultano notevolmente alterate;
e il prodotto è caduto o la struttura esterna è stata danneggiata.
12 Limitatevi a seguire le istruzioni sopra elencate. Ogni altro tipo di intervento deve essere fatto
da personale qualificato.

19
ISTRUZIONI PER LA MESSA A TERRA
Lo strumento deve essere collegato con messa a terra. In caso di mal funzionamento o guasto, la
messa a terra fornisce una via di resistenza minima per la corrente elettrica e riduce il rischio di
scossa elettrica. Lo strumento è dotato di cavo con conduttore e spina per la messa a terra. La spina
deve essere inserita nell'apposita presa della corrente che deve essere installata e messa a terra in
conformità ai regolamenti e alle normative locali.
ATTENZIONE
Non modificare la spina fornita con lo strumento. Qualora non fosse adatta, far installare
un'adeguata presa della corrente da un elettricista qualificato.
DISPLAY MULTI-INFORMAZIONI
I messaggi visualizzati sul Display multi-informazioni possono non corrispondere sempre alle
pagine relative al display. Si tratta solamente di esempi delle numerose funzioni dello strumento.
CLAUSOLA ESONERATIVA
Le informazioni contenute in questo manuale sono state revisionate molto attentamente. A causa del
continuo impegno volto a migliorare lo strumento, le specifiche dello strumento potrebbero essere
diverse da quelle indicate nel manuale. Tali specifiche sono soggette a variazioni senza preavviso.
CURA E MANUTENZIONE DELLO STRUMENTO
La tastiera da Voi acquistata è uno strumento di qualità e merita di essere trattata con cura. Vi
preghiamo di seguire attentamente le poche avvertenze sotto elencate per conservarla al meglio per
molti anni.
- Non aprire mai lo strumento e non toccare mai i circuiti interni.
- Spegnere sempre lo strumento dopo l'uso tramite l'apposito interruttore.
- Pulire lo strumento con un panno o una spugna umida. In caso di sporco particolarmente
ostinato, usare un detergente neutro. Non usare mai solventi o alcool.
- Non collocare lo strumento vicino a motori elettrici, lampade al neon o a fluorescenza in
quanto potrebbero creare disturbi. Nella maggior parte dei casi, per evitare interferenze, è
sufficiente cambiare posizione allo strumento.
- Tenere lo strumento al riparo da polvere, umidità e temperature elevate.
- Accertarsi che il voltaggio della rete locale corrisponda a quello indicato sulla targa posta
nella parte posteriore dello strumento. Collegare il cavo di alimentazione alla presa di
corrente.
- Non collegare elettrodomestici, luci al neon o sistemi di lampade alogene alla stessa presa di
corrente.
- Nel caso di strumenti computerizzati, picchi, sovratensioni transitorie e cadute di tensione
possono provocare interruzioni. Se lo strumento smette di funzionare a causa di un disturbo
della linea elettrica, spegnerlo per alcuni secondi e poi riaccenderlo.
- Non scollegare mai il cavo di alimentazione senza aver prima spento lo strumento mediante
l'apposito interruttore.

20
INTRODUZIONE
Benvenuti nel mondo hi-tech degli strumenti elettronici. Lo strumento è stato progettato e realizzato
utilizzando le più recenti tecnologie e sistemi computerizzati per offrire anni di svago senza
problemi. Leggere con attenzione questo manuale in modo da poter sfruttare al massimo le qualità
dello strumento.
Stage Starter Portable Digital Piano CDP 1 Console Digital Piano
ACCENSIONE
Per accendere lo strumento premere l'interruttore On/Off.
Di default lo strumento seleziona il suono PIANO 1 nella sezione Voice.
Se lo strumento rimane acceso per più di 30 minuti senza essere suonato, il controllo
di standby lo farà spegnere automaticamente.
VOLUME MASTER
Il controllo del Volume Master regola il volume generale dello strumento.
Se sono collegate le cuffie regola anche il loro volume.
La pagina si sta caricando...
La pagina si sta caricando...
La pagina si sta caricando...
La pagina si sta caricando...
La pagina si sta caricando...
La pagina si sta caricando...
La pagina si sta caricando...
La pagina si sta caricando...
La pagina si sta caricando...
La pagina si sta caricando...
La pagina si sta caricando...
La pagina si sta caricando...
-
 1
1
-
 2
2
-
 3
3
-
 4
4
-
 5
5
-
 6
6
-
 7
7
-
 8
8
-
 9
9
-
 10
10
-
 11
11
-
 12
12
-
 13
13
-
 14
14
-
 15
15
-
 16
16
-
 17
17
-
 18
18
-
 19
19
-
 20
20
-
 21
21
-
 22
22
-
 23
23
-
 24
24
-
 25
25
-
 26
26
-
 27
27
-
 28
28
-
 29
29
-
 30
30
-
 31
31
-
 32
32


Orla CDP 1 Manuale del proprietario
- Categoria
- Strumenti musicali
- Tipo
- Manuale del proprietario
in altre lingue
- English: Orla CDP 1 Owner's manual
Altri documenti
-
Viscount SMART 30 Manuale utente
-
-
Yamaha CLP-F01 Manuale utente
-
-
-
-
-
-
-