Muse MT-501 ATB Manuale utente
- Categoria
- Giradischi audio
- Tipo
- Manuale utente
Questo manuale è adatto anche per

CONSIGNES DE SÉCURITÉ
INSTRUÇÕES DE SEGURANÇA
MORE INFORMATION
ATTENTION: Pour réduire le risque de choc électrique, ne
démontez pas l’appareil. L’appareil ne contient aucune pièce
réparable par l’utilisateur. Conez tout entretien à un technicien
qualié.
ATENÇÃO: Para reduzir o risco de choque eléctrico, não
desmonte o aparelho. O aparelho não contém qualquer peça
passível de ser reparada pelo utilizador. Cone todas as
operações de manutenção a um técnico qualicado.
CAUTION: To reduce the risk of electric shock, do not remove
the cover (or back). There are no user serviceable parts inside
the unit. Refer all servicing to qualify personnel.
AVERTISSEMENT:
- Utilisez cet appareil sous un climat tempéré.
- La plaque signalétique se trouve à l’arrière de l’appareil.
- Veiller à avoir une distance minimale de 5 cm autour de l'appareil pour une aération
susante.
- Veillez à ce que la ventilation ne soit pas gênée en recouvrant les orices d'aération de
l'appareil avec des objets tels que journaux, nappes, rideaux.
- Ne placez pas de sources de ammes nues, telles que des bougies allumées sur
l'appareil.
- Ne pas exposer l'appareil à des gouttes d'eau ou éclaboussures.
- Ne placez pas d'objets remplis de liquides, tels que verre, vase ou objets similaires
sur l'appareil.
- La che du cordon d'alimentation est utilisée comme dispositif de débranchement et
doit rester facilement accessible. Pour être totalement déconnecté, cette che doit être
débranchée du réseau complètement. La prise de courant ne doit pas être obstruée et
doit être facilement accessible lors de son utilisation.
- Sous l'inuence du phénomène transitoire rapide et / ou phénomène électrostatique
électrique, le produit pourrait présenter des dysfonctionnements et l'utilisateur devra
faire une réinitialisation de l'appareil.
- Le fonctionnement normal du produit peut être perturbé par de fortes interférences
électromagnétiques. Si tel est le cas, il sut de réinitialiser le produit pour qu'il reprenne
son fonctionnement normal en suivant le manuel d'instructions. Si le fonctionnement ne
revient toujours pas à la normale, veuillez déplacer et utiliser le produit dans un endroit
orant une meilleure réception.
AVISO:
- Utilize este aparelho num clima temperado.
- A placa sinalética encontra-se na parte de trás do aparelho.
- Certique-se de que respeita uma distância mínima de 5 cm à volta do aparelho de
modo a permitir uma ventilação suciente.
- Certique-se de que garante uma ventilação correcta do aparelho e que não tapa os
orifícios de ventilação com objectos como jornais, toalhas, cortinas, etc.
- Não coloque qualquer fonte de calor, como uma vela acesa, sobre ou na proximidade
do aparelho.
- Não exponha o aparelho a salpicos ou a humidade.
- Não coloque objectos que contenham líquido, como uma jarra, sobre ou na proximidade
do aparelho.
- A cha de alimentação de rede permite desligar o aparelho e deve car facilmente
acessível. Para cortar a alimentação do aparelho, desligue de vez a cha de
alimentação de rede da tomada de rede. A cha de alimentação de rede não pode
estar tapada e deve ser facilmente acessível durante a utilização.
- Sob o efeito de fenómenos electrostáticos e / ou eléctricos transitórios, o produto
pode apresentar anomalias e pode acabar por ser necessário proceder-se a uma
reinicialização.
- A função normal do produto pode ser interrompida por fortes interferências
eletromagnéticas. Nesse caso, basta reiniciar o produto para retomar a operação
normal seguindo o manual de instruções. Caso a função não possa ser retomada,
utilize o produto noutro local.
WARNING!
- The use of apparatus in moderate climates.
- The Marking plate is located on the back of the device.
- Make sure to have a minimum distance of 5 cm around the unit for sucient ventilation.
- Ensure that the ventilation openings is not covered with items such as newspapers,
tablecloths, curtains, etc.
- Do not place naked ame sources, such as lighted candles on the apparatus.
- Do not expose this appliance to dripping or splashing water.
- Do not place objects lled with liquids, such as glass, vase on the device.
- The power plug is used as a disconnect device and must be easily accessible. To
be completely disconnected from the power, the plug of the appliance should be
disconnected completely. The socket must not be obstructed and should be easily
accessible during intended use.
- Under the inuence of fast transient and / or electrostatic electric phenomenon, the
product may malfunction and the user must perform a power reset of the device.
- The normal function of the product may be disturbed by strong Electro-Magnetic
Interference. If so, simply reset the product to resume normal operation by following
the instruction manual. In case the function could not resume, please use the product
in other location.
Le symbole de l'éclair terminé par une èche à l'intérieur d'un triangle avertit
l'utilisateur de la présence d’une « tension dangereuse » dans l'appareil.
O símbolo do relâmpago com uma seta e situado no interior de um triângulo destina-
se a alertar o utilizador para a presença de uma “tensão perigosa” no aparelho.
The lightening ash with arrowhead symbol within the triangle is a warning sign
alerting the user of “dangerous voltage” inside the unit.
Le point d’exclamation à l’intérieur d’un triangle avertit l’utilisateur de la présence
d’importantes instructions dans le manuel accompagnant l’appareil.
O ponto de exclamação no interior de um triângulo destina-se a alertar o utilizador
para a presença de instruções importantes no manual que acompanha o aparelho.
The exclamation point within the triangle is a warning sign alerting the user of
important instructions accompanying the product.
Si vous souhaitez vous débarrasser de cet appareil, pensez à le recycler dans
une décharge pour appareils ménagers électriques. Renseignez-vous pour
connaître votre centre de recyclage le plus proche. Informez-vous auprès des
autorités locales ou de votre revendeur pour de plus amples détails. (Directive
sur les Déchets des équipements électriques et électroniques)
Caso pretenda descartar-se deste aparelho, proceda à sua reciclagem num
centro de recolha para electrodomésticos. Procure obter informações sobre o
centro de reciclagem mais próximo. Informe-se junto das autoridades locais ou
do seu revendedor local para a obtenção de pormenores adicionais (Directiva
sobre os Resíduos dos Equipamentos Eléctricos e Electrónicos).
If at any time in the future you should need to dispose of this product please note
that Waste electrical products should not be disposed of with household waste.
Please recycle where facilities exist. Check with your Local Authority or retailer
for recycling advice. (Waste Electrical and Electronic Equipment Directive)
Nos emballages peuvent faire l’objet d’une consigne de tri, pour en savoir
plus: www.quefairedemesdechets.fr
NEW ONE S.A.S
10, Rue de la Mission, 25480 Ecole Valentin, France
NEW ONE S.A.S
10, Rue de la Mission, 25480 Ecole Valentin, France
NEW ONE S.A.S
10, Rue de la Mission, 25480 Ecole Valentin, France
EMPLACEMENT ET DESCRIPTION DES COMMANDES
DESCRIÇÃO DO APARELHO
BESCHREIBUNG DES GERÄTES
LOCATION AND DESCRIPTION CONTROLS
ALIMENTATION
FONCTION DE SÉPARATION
ALIMENTAÇÃO
FUNÇÃO DE DIVISÃO
STROMVERSORGUNG
POWER SUPPLY
SYSTÈME STÉRÉO TOURNE-DISQUE
SISTEMA DE SOM DE TOCA-DISCOS
STEREO-PLATTENSPIELERSYSTEM
TURNTABLE STEREO SYSTEM
FR
PT
DE
GB
Lire attentivement les instructions avant de faire
fonctionner l’appareil.
Read the instructions carefully before operating the
unit.
Leia este manual com atenção antes de qualquer
utilização.
Bitte lesen sie dieses handbuch vor dem gebrauch des
gerätes sorgfältig durch.
Antes de utilizar este aparato, lea atentamente las
siguientes instrucciones.
Leggere attentamente questo manuale prima di
utilizzare l’apparecchio.
Lees deze handleiding aandachtig voor u het toestel
gebruikt.
FR
GB
PT
DE
ES
IT
NL
FR Manuel de l’utilisateur
GB User Manual
PT Manual do Utilizador
Benutzerhandbuch
DE
ES Manual de instrucciones
Manuale di istruzioni
IT
NL Handleiding
MT-501 ATB / MT-501 ATC
1. Plateau
2. Axe
3. Adaptateur 45 tours
4. Bras de lecture
5. Bouton PITCH (An d’ajuster la
vitesse du plateau)
6. AUTO STOP ON/OFF
(INTERRUPTEUR M/A, ARRÊT
AUTOMATIQUE)
7. MODE (Permet de choisir les modes
BLUETOOTH, disque, AUX IN, USB)
8. SÉLECTEUR DE VITESSE
(33/45/78)
9. Mode indicator
10. ALIMENTATION M/A et contrôle du
volume (MIN/MAX)
1. Prato
2. Carretel
3. Adaptador de 45 RPM
4. Braço
5. Botão PITCH (para ajustar a velocidade
do prato)
6. AUTO STOP ON/OFF (Interruptor para
PARADA AUTOMÁTICA, LIGADO/
DESLIGADO)
7. MODE (Para selecionar o modo
BLUETOOTH, TOCA-DISCOS,
ENTRADA AUXILIAR, USB)
8. SELETOR DE VELOCIDADE (33/45/78)
9. Indicator (indicador de modo)
10. LIGAR/DESLIGAR e ajustador de
volume (MIN/MAX)
1. Plattenteller
2. Spindel
3. 45 RPM-Adapter
4. Tonarm
5. PITCH-Regler (um die Geschwindigkeit
des Plattentellers einzustellen)
6. AUTO STOP ON/OFF (AUTO-STOPP-
Schalter, EIN/AUS)
7. MODE (BLUETOOTH, PHONO, AUX IN
oder USB auswählen)
8. GESCHWINDIGKEITSAUSWAHL
(33/45/78)
9. indicator (Modusanzeige)
10. EIN/AUS und Lautstärkeregelung (MIN/
MAX)
11. Kopf- / Ohrhörerbuchse
1. Platter
2. Spindle
3. 45 RPM adaptor
4. Tone arm
5. PITCH knob (to adjust the speed of
platter)
6. Auto stop (ON/OFF) switch
7. MODE button (to select BLUETOOTH,
PHONO, AUX IN, USB mode)
8. Speed selector (33/45/78)
9. Mode indicator
10. POWER ON/OFF and volume control
(MIN/MAX)
11. Phones jack
11. Prise casque
12. Cartouche avec stylet
13. Support de bras de lecture
14. Loquet
15. Poignée
16. Haut-parleurs
17. Couvercle
18. Prise de sortie pour appareil externe
(AUX)
19. Entrée auxiliaire
20. Prise CC / Alimentation
21. Port USB
22. RECHERCHE ARRIÈRE
23. REC / : Enregistrement/ Lecture/
Pause
24. SPLIT/ : Enregistrement segmenté/
RECHERCHE AVANT
11. Tomada para auriculares
12. Cápsula com agulha
13. Descanso do braço
14. Fecho
15. Alça de transporte
16. Alto Falantes
17. Tampa do Toca-Disco
18. Conector de saída para dispositivos
externos
19. Tomada de entrada Aux
20. Conector de energia
21. Porta USB
22. BUSCAR ANTERIOR
23. REC / : gravação/ Play/ Pausa
24. SPLIT/ : Registo segmentado/
BUSCAR SEGUINTE
12. Kassette mit Nadel
13. Tonarmablage
14. Verschluss
15. Tragegri
16. Lautsprecher
17. Deckel
18. Externer Geräteanschluss
19. AUX IN (AUX-Eingang)
20. DC-Buchse
21. USB-Port
22. SUCHLAUF RÜCKWÄRTS
23. REC / : Aufnahme/ Wiedergabe/
Pause
24. SPLIT/ : Segmentierte
Aufnahme/SUCHLAUF VORWÄRTS
12. Cartridge with stylus
13. Tone arm rest
14. Latch
15. Carrying Handle
16. Speakers
17. Phonograph lid
18. External device output jack
19. AUX IN jack
20. DC JACK
21. USB port
22. back button
23. REC / : RECORD/ PLAY/PAUSE
button
24. SPLIT/ : Segmented record/next
button
Utiliser l'adaptateur CA
Adaptateur secteur:
Entrée 100-240V 50/60Hz 0.4A
sortie 5V 2000mA
Pressez le bouton SPLIT pendant l’enregistrement, l’enregistrement en cours va être
découpé et automatiquement stocké dans un chier. Pressez SPLIT une seconde fois
pour générer un autre chier.
REMARQUE: Appuyez sur le bouton pour arrêter l’enregistrement.
Utilização do adaptador de corrente
Adaptador de corrente:
Entrada 100-240V 50/60Hz 0.4A
Saída 5V 2000mA
Pressione o botão SPLIT ao gravar, o registo atual será cortado e armazenado
automaticamente num arquivo. Pressione novamente o botão SPLIT para criar outro
arquivo.
NOTA: Pressione o botão para parar a gravação.
Verwendung des Netzstromadapter
Netzstromadapter:
Eingang 100-240V 50/60Hz 0.4A
Ausgang 5V 2000mA
Using the AC adaptor
AC adaptor:
Input 100-240V 50/60Hz 0.4A
Output 5V 2000mA
Les adaptateurs secteurs fournis peuvent uniquement être utilisés sur une alimentation
secteur de 100-240V. L’adaptateur secteur fourni ne peut en aucun cas être utilisé sur
un autre type d’alimentation.
Attention:
* L’adaptateur secteur fourni est exclusivement destiné à être utilisé avec cet appareil.
* Éteignez l’appareil avant de débrancher l’adaptateur secteur an d’éviter d’abîmer
l’appareil.
* En cas de non-utilisation prolongée, débranchez l’adaptateur secteur de la prise.
* Placez l’appareil à proximité de la prise murale et veillez à ce que cette dernière soit
facilement accessible. En cas de dysfonctionnement, débranchez immédiatement
l’appareil de la prise murale.
* L’adaptateur secteur permet de débrancher l’appareil.Il doit rester facilement accessible
durant l’utilisation.
* Pour couper complètement l’alimentation de l’appareil, débranchez l’adaptateur de la
prise secteur.
* N’utilisez jamais un adaptateur secteur abîmé. Placez le câble d’alimentation de
manière sûre et de façon à ne pas le coincer ou l’écraser. Si le câble est endommagé,
contactez un service de réparation.
O adaptador de corrente funciona com uma alimentação AC que varia entre 100V
e 240V . O adaptador de corrente fornecido não pode ser, em caso algum, utilizado
num outro tipo de alimentação.
Atenção:
* O adaptador de corrente fornecido destina-se apenas a ser utilizado com este aparelho.
Não o utilize, pois, com outros aparelhos.
* Desligue o aparelho antes de desligar o adaptador de corrente para evitar danicar
o leitor.
* No caso de não utilização prolongada, desligue o adaptador de corrente da tomada.
* Coloque o aparelho na proximidade da tomada de parede e certique-se de que
esta se mantém facilmente acessível. Em caso de avaria, desligue imediatamente o
aparelho da tomada de parede.
* O adaptador de corrente permite desligar o aparelho. Deve ser mantido facilmente
acessível durante a utilização. Para cortar completamente a alimentação do aparelho,
desligue efectivamente o adaptador da tomada de corrente.
* Nunca utilize um adaptador de corrente danicado. Coloque o cabo de alimentação
de forma segura e de modo a não car preso nem esmagado. Se o cabo estiver
danicado, contacte um serviço de reparação agent.
Der Netzstromadapter funktioniert mit Wechselstrom zwischen 100 und 240V
Wechselstrom.Der mitgelieferte Netzstromadapter darf auf keinen Fall mit einer
Stromquelle mit anderen Kenndaten als den genannten verwendet werden.
Achtung:
* Der mitgelieferte Netzstromadapter darf nur mit diesem Gerät verwendet werden.
Verwenden Sie ihn nicht mit anderen Geräten.
* Schalten Sie das Gerät aus, bevor Sie den Netzstromadapter abstecken, um ein
Beschädigen des DVD-Players zu vermeiden.
* Wird das Gerät während längerer Zeit nicht verwendet, sollte der Netzstromadapter von
der Stromsteckdose abgesteckt werden.
* Stellen Sie das Gerät in der Nähe der Stromsteckdose auf und sorgen Sie dafür, dass die
Stromsteckdose leicht zugänglich ist. Sollte die Stromsteckdose eine Störung aufweisen,
müssen Sie das Gerät sofort abstecken.
* Der Netzstromadapter erlaubt das Abstecken des Geräts. Er muss während des
Gebrauchs leicht zugänglich sein. Um die Stromversorgung des Geräts komplett zu
unterbrechen, muss der Netzstromadapter von der Stromsteckdose abgesteckt werden.
* Verwenden Sie auf keinen Fall einen beschädigten Netzstromadapter. Verlegen Sie
das Netzkabel so, dass es weder eingeklemmt noch gequetscht wird. Ein beschädigtes
Netzkabel muss bei einer Reparaturstelle repariert werden.
The supplied AC adaptor is suitable for use on AC main supplies of 100-240V AC and
should only be connected to a mains supply within these parameters.
Caution:
* The included AC adapter is exclusively intended to be used with this device.
* Turn o the power before unplugging the AC adapter to avoid damaging the device.
* In case of unused for long periods, unplug the AC adapter from the outlet.
* Place the unit near the outlet and make sure it is easily accessible. If a malfunction
occurs, immediately disconnect the unit from the wall outlet.
* The adapter enables you to unplug the unit. It must be easily accessible during use.
* To completely turn o power, unplug the adapter from the wall outlet.
* Never use a damaged power adapter. Place the power cord safely and so that you do
not pinch or crush it. If the cable is damaged, contact a repair service.
ÉCOUTER UN DISQUE
ESCUTANDO O TOCA-DISCOS
LISTEN TO THE PHONO
ALLUMER / ÉTEINDRE L’UNITÉ
LIGANDO/DESLIGANDO O APARELHO
TURN ON/ OFF THE UNIT
ENCODAGE DEPUIS DISQUE, ENTRÉE AUX VERS USB.
GRAVANDO UM TOCA-DISCO OU ENTRADA AUXILIAR PARA O USB
RECORDING FROM PHONO, AUX IN TO USB.
SPLIT FUNCTION
UTILISER LE MODE D’ENTRÉE AUXILIAIRE
UTILIZANDO O MODO DE ENTRADA AUXILIAR
USING THE AUX IN MODE
FONCTION BLUETOOTH
FUNÇÃO BLUETOOTH
BLUETOOTH FUNCTION
ÉCOUTE D’UN PERIPHERIQUE USB
OPERAÇÃO USB
LISTEN TO THE DEVICE USB
1. Lorsque l'unité est allumée, tournez le commutateur MODE pour choisir le mode
PHONO jusqu'à ce que l'indicateur lumineux de fonction passe au rouge.
2. Enlevez la protection du stylet et détachez le support du bras de lecture.
3. Placez un disque sur le plateau du tourne-disque et choisissez la vitesse nécessaire
(33/45/78) en fonction du disque.
REMARQUE: Si vous jouez des disques 45 tours, placez l'adaptateur 45 tours sur l’axe
central.
4. Soulevez le levier de bras pour lever le bras de lecture et déplacez doucement le bras
de lecture sur la position désirée sur le disque, abaissez le levier de bras et le bras de
lecture doucement sur le disque pour commencer à lire le disque.
5. Tournez le bouton PITCH pour régler la vitesse du plateau.
6. Réglez le volume (MIN/MAX) sur le niveau désiré.
7. Si AUTO STOP ON/OFF (l'interrupteur M/A, ARRÊT AUTOMATIQUE) est sur la
position ON, le disque s'arrêtera automatiquement une fois terminé (pour certains
enregistrements vinyle, ils ne s'arrêteront pas tant qu'ils n'arriveront pas à la n.). Si
l'interrupteur d'arrêt automatique est désactivé (OFF), l'enregistrement ne s'arrêtera
PAS automatiquement une fois terminé.
IMPORTANT: N'éteignez pas ou n'arrêtez pas le tourne disque manuellement sans avoir
levé le bras. Déplacer ou secouer le plateau du tourne-disque sans xer le crochet du
bras de lecture pourrait aboutir à des dégâts sur le bras de lecture ou sur la pointe.
1. Com o aparelho ligado, gire o botão MODE (MODO) para selecionar o modo de
TOCA-DISCOS, indicador luminoso se torne vermelho.
2. Remova a capa da agulha e libere o braço do seu descanso.
3. Coloque um disco no prato e selecione a velocidade desejada (33/45/78) de acordo
com o disco.
OBSERVAÇÃO: Caso você esteja reproduzindo um compacto simples de 45rpm,
coloque o adaptador de 45 RPM no centro do carretel.
4. Levante a agulha através do alavanca de levantamento e coloque o braço na posição
do disco desejada. Abaixe a agulha e o braço com cuidado no disco para iniciar sua
reprodução.
5. Gire o botão PITCH para ajustar a velocidade do prato.
6. Coloque o ajustador do volume (MIN/MAX) no nível desejado.
7. Caso o botão de AUTO STOP ON/OFF (PARADA AUTOMÁTICA LIGADA/
DESLIGADA) esteja na posição ON (LIGADO), o disco irá parar automaticamente
quando terminado (para alguns discos de vinil, ele não irá parar enquanto não chegar
no m). Caso botão da Parada Automática esteja na posição OFF (DESLIGADO), o
disco NÃO irá parar automaticamente quando chegar ao m.
IMPORTANTE: Não gire ou pare o prato do Toca-Discos com as mãos. Girar de forma
rápida ou devagar o prato do Toca-Discos com as mãos sem que a Agulha esteja
guardada, poderá resultar em defeitos no braço ou na agulha.
1. When the unit is on, rotate the MODE button to select the phono mode, function
indicator light becomes red.
2. Remove the stylus cover from the stylus and have released the Tone arm rest.
3. Place a record on the turntable platter and select the desired speed (33/45/78)
according to the record.
NOTE: If you are playing 45 RPM singles, place the 45 RPM adapter on the center
spindle.
4. Push up the lift lever to raise the tone arm and gently move the tone arm to the desired
position onto the record, Push down the lift lever, the tone arm slowly onto the record
to start playing the record.
5. Rotate the PITCH knob to adjust the speed of platter.
6. Adjust the volume control (MIN/MAX) to your desired level.
7. If the AUTO STOP ON/OFF Switch turned ON, the record will stop automatically when
nished (For some few vinyl records, it will not stop when it does not come to the end.).
If Auto Stop switch turned OFF, record will NOT stop automatically when nished.
IMPORTANT: Do not turn or stop the Turntable platter manually. Moving or jarring the
Turntable platter without securing the Tone Arm Clamp could result in damage to the
Tone Arm or Stylus.
1. Pour allumer l'unité, tournez l'interrupteur d'alimentation ON/OFF dans le sens des
aiguilles d'une montre jusqu'à entendre un « clic » et réglez le volume (MIN/MAX) sur
un niveau assez bas.
2. Lorsque vous avez terminé l'unité, tournez l'interrupteur d'alimentation ON/OFF dans
le sens des aiguilles d'une montre jusqu'à entendre un « Clic » pour éteindre l'unité.
1. Para ligar o aparelho, gire o interruptor ON/OFF no sentido horário até que um barulho
“clique” seja escutado e coloque o volume (MIN/MAX) em um nível baixo.
2. Quando você terminar de utilizar o aparelho, gire o interruptor ON/OFF no sentido
anti-horário, até que um barulho “clique” seja escutado, para desligar o aparelho.
1. To turn the unit on, rotate the POWER ON/OFF switch clockwise until a “click” is heard
and set the volume (MIN/MAX) to a lower level.
2. When you have nished the unit, rotate the POWER ON/OFF switch counter-clockwise
until a “click” is heard to turn o the unit.
1. Connectez l'appareil USB sur le port USB (assurez-vous que l'appareil USB a
susamment d'espace pour sauvegarder l'encodage).
2. Choisissez l'un de vos modes favoris (PHONO ou AUX IN) et commencez la lecture
sous ce mode.
3. Appuyez sur la touche REC, l'indicateur devient au bleu et rouge clignotant en
alternance pour démarrer l'enregistrement.
4. Appuyez sur la touche REC, l'indicateur devient au bleu et rouge sans clignoter pour
arrêter l'enregistrement.
5. Pour écouter l'enregistrement, tournez le commutateur MODE pour sélectionner le
mode USB, l'indicateur devient clignotant rouge, appuyez sur / pour écouter
votre enregistrement.
1. Conecte o dispositivo USB na porta USB (Certique-se de que o dispositivo USB
tenha espaço o suciente para guardar a gravação).
2. Selecione o seu modo desejado (TOCA-DISCOS ou ENTRADA AUXILIAR) e inicie
a sua reprodução.
3. Pressione o botão REC até o indicador se torna azul e vermelho piscando
alternadamente para iniciar a gravação.
4. Pressione o botão REC até que o indicador se tornar azul e vermelha sem piscar para
parar a gravação.
5. Quando o aparelho estiver ligado, gire o botão MODE (MODO), para selecionar o
modo USB, indicador luminoso se torna vermelho intermitente, pressione /
para encontrar a sua faixa e ouvir sua gravação.
1. Connect the USB device to the USB port (Make sure the USB device have enough
space to save the encoding).
2. Select one of your favorite mode (PHONO or AUX IN) and start your mode playback.
3. Press REC button till the indicator becomes blue and red ashing alternately to start
the recording.
4. Press the REC button until the indicator becomes blue and red without ashing to
stop the recording.
5. To listen the recording, rotate the MODE button to select the USB mode, indicator
becomes red ashing, press / to nd your track and listen your recording.
Press SPLIT button when recording, the current record will be cut o and automatically
stored in a le. Press SPLIT button again will generate another le.
NOTE: Press the button to stop the recording.
1. Branchez votre source auxiliaire (par ex. Lecteur MP3) à la prise AUX IN (3.5mm) à
l'arrière de l'appareil. (Câble non inclus).
2. Lorsque l'unité est allumée, tournez le commutateur MODE pour choisir le mode AUX
IN, l'indicateur lumineux de fonction passe au bleu et rouge. Utilisez normalement
votre appareil externe, le son passe automatiquement par les haut-parleurs de votre
appareil.
3. Réglez la commande VOLUME (MIN/MAX) sur le niveau de votre choix.
4. Pour arrêter la lecture, déconnectez votre appareil audio externe de l’entrée auxiliaire.
1. Ligue o cabo auxiliar (por exemplo, leitor de mp3) à entrada AUX IN (3.5mm) na parte
de trás da unidade. (Cabo não incluído).
2. Quando o aparelho estiver ligado, gire o botão MODE (MODO), para selecionar
o modo ENTRADA AUXLIAR, indicador se torna azul e vermelho. Utilize o seu
dispositivo de áudio externo. O som sairá automaticamente na caixa de som do seu
dispositivo.
3. Ajuste o controle de VOLUME (MIN/MAX) para o nível desejado.
4. Desligar o dispositivo externo da entrada auxiliar para parar a leitura.
1. Connect your auxiliary source (e. g. mp3 player) to the AUX IN jack (3.5mm) on back
of unit. (cable not included).
2. When the unit is on, rotate the MODE button to select AUX IN mode, indicator becomes
blue and red. Normally use your external audio appliance, the sound automatically
goes through the speakers of your device.
3. Adjust the volume (MIN/MAX) to the desired level.
4. Disconnect the external appliance from the auxiliary input to stop playback.
Le mot Bluetooth® ainsi que les marques et logo sont des marques commerciales
déposées détenues par Bluetooth SIG, Inc. et l'utilisation de ces marques par New One
S.A.S se fait dans le cadre d'une autorisation. Les autres marques et noms commerciaux
sont les propriétés de leurs titulaires respectifs.
Coupler un appareil Bluetooth
1. Lorsque l’unité est allumée, tournez le commutateur MODE sur l'unité pour choisir le
mode Bluetooth. L'indicateur Bluetooth commencera à clignoter bleu.
2. Sur l'appareil Bluetooth, activez le Bluetooth et sélectionnez «MUSE MT-501» dans
la liste des appareils. (consultez le manuel d'instruction de l'appareil pour les détails
de connexion). Si l'appareil Bluetooth vous demande un mot de passe, utilisez '0000'.
Certains appareils Bluetooth vous demanderont d'accepter la connexion. Si les
appareils sont couplés correctement, vous entendrez une notication sonore.
Astuce: Si vous souhaitez connecter votre enceinte Bluetooth à un autre appareil
Bluetooth, appuyez sur le bouton et maintenez-le enfoncé pour déconnecter le
périphérique, puis suivez les étapes ci-dessus pour établir une nouvelle connexion.
• Sur certains appareils, comme les ordinateurs, une fois couplé, vous devrez sélectionner
l'unité dans le menu Bluetooth et choisir «utiliser comme un dispositif audio (Stéréo)»
ou une phrase similaire.
• Le couplage reste intact lorsque l’unité et/ou l’appareil Bluetooth sont amenées hors de
la portée de liaison. Une connexion active sera rétablie lorsque votre appareil Bluetooth
reviendra dans la portée.
• Lorsque vous rallumez l'unité, elle essayera automatiquement de se reconnecter avec
le dernier appareil Bluetooth connecté.
Utiliser un appareil Bluetooth
1. Avec une unité couplée, (voir la section précédente), faites fonctionner votre appareil
Bluetooth et il diusera du son par le biais de l'enceinte MUSE MT-501.
2. Appuyez sur la touche pour mettre la lecture en pause. Touchez à nouveau pour
reprendre la lecture.
3. Sélectionnez la piste de votre choix avec / .
4. Réglez la commande VOLUME (MIN/MAX) sur le niveau de votre choix. Vous pouvez
également régler le volume sur l'appareil avec lequel vous êtes couplé.
A marca e logotipos Bluetooth® são marcas registradas da Bluetooth SIG, Inc. e qualquer
uso dessas marcas pela New One S.A.S está sob licença. Outras marcas comerciais e
nomes comerciais são de seus respectivos proprietários.
Emparelhamento de um dispositivo Bluetooth
1. Quando o aparelho estiver ligado, gire o botão MODE (MODO), para selecionar o
modo bluetooth, indicador luminoso se torna azul intermitente
2. No dispositivo com Bluetooth, ative o Bluetooth e selecione "MUSE MT-501" na
Lista de Dispositivos. (Consulte o manual de instruções do dispositivo que estiver
sendo conectado para mais detalhes). Caso o dispositivo com bluetooth solicite uma
senha, utilize "0000". Alguns dispositivos com Bluetooth solicitarão que você aceite
a conexão. Se as unidades estiverem emparelhadas corretamente, você ouvirá um
sinal de indicação.
Dica: Caso você queira conectar a sua caixa de som Bluetooth a outro dispositivo com
Bluetooth, pressione e segure o botão para desconectar o dispositivo e siga os
passos seguintes para fazer uma nova conexão.
• Em alguns dispositivos, como computadores, uma vez pareado, você precisará
selecionar o aparelho em um Menu Bluetooth e escolher "Utilizar como Dispositivo de
Áudio (estéreo)" ou semelhante.
• O pareamento permanecerá intacto quando o aparelho ou o seu dispositivo com
Bluetooth for retirado da área de comunicação. Uma conexão ativa será restabelecida
quando o dispositivo com Bluetooth voltar à área de alcance.
• Quando o aparelho for ligado novamente, ele tentará automaticamente se reconectar
ao dispositivo de Bluetooth com o qual ele tenha sido mais recentemente pareado.
Utilizando um dispositivo com Bluetooth
1. Com o aparelho pareado (veja seção anterior), utilize o seu dispositivo com Bluetooth
e o seu som poderá ser escutado através das caixas de som do MUSE MT-501.
2. Pressione o botão para pausar uma reprodução. Pressione novamente para
continuar uma reprodução.
3. Selecione a faixa desejada com / .
4. Ajuste o controle de VOLUME (MIN/MAX) para o nível desejado. Você também
poderá ajustar o volume através do dispositivo com o qual você estiver pareado.
The Bluetooth® word mark and logos are registered trademarks owned by Bluetooth SIG,
Inc. and any use of such marks by New One S.A.S is under license. Other trademarks
and trade names are those of their respective owners.
Pairing a Bluetooth Device
1. When the unit is ON, rotate the MODE button to select Bluetooth mode. Indicator
becomes blue ashing.
2. On the Bluetooth device, enable Bluetooth and select “MUSE MT-501” from the Device
List. (Refer to the user manual of the device to be connected for detailed operations.)
If the Bluetooth device prompts for a passcode, use “0000”. Some Bluetooth devices
will ask you to accept the connection. If the units are paired properly, you will hear an
indication sound.
Tip: If you want to connect your Bluetooth speaker to another Bluetooth audio device,
press and hold the button to disconnect the device, and then follow the steps above
to make a new connection.
• On some devices such as computers, once paired you must select the unit from the
Bluetooth menu and choose “Use as Audio Device (stereo)” or similar.
• Pairing remains intact when the unit and/or your Bluetooth device is taken out of
communication range. An active connection will be re-established when your Bluetooth
device returns within range.
• When the unit is turned on again, it will automatically try to reconnect with the most
recently paired Bluetooth device.
Using a Bluetooth Device
1. With a unit paired (see previous section), operate your Bluetooth device and its sound
will be heard through the MUSE MT-501’s speakers.
2. Press the button to pause playback. Press again to resume playback.
3. Select desired track with / .
4. Adjust the volume (MIN/MAX) to the desired level. You can also adjust the volume on
the device to which you are paired.
1. Connectez une clé USB contenant des chiers MP3 ou un lecteur MP3 au port USB.
2. Lorsque l'unité est allumée, tournez le commutateur MODE pour sélectionner le
mode USB, l'indicateur devient rouge. La lecture USB commence automatiquement.
Appuyez sur pour faire une pause, l'indicateur rester rouge sans clignoter.
3. Réglez la commande VOLUME (MIN/MAX) sur le niveau de votre choix.
4. Appuyez une fois sur la touche pour passer à la plage suivante ou appuyez
plusieurs fois pour sauter plusieurs plages. Appuyez une fois sur la touche
pour revenir au début de la plage en cours ou appuyez plusieurs fois pour revenir
aux plages précédentes. Tenez la touche ou appuyée pour rechercher
rapidement dans une piste.
5. Appuyez sur pour arrêter la lecture USB.
Enlever l'appareil USB
Assurez-vous d'arrêter la lecture et d'éteindre l'unité avant d'enlever l'appareil USB pour
éviter d'endommager l'appareil USB et le système.
Remarque:
* Il existe de nombreux modèles de périphériques USB. Nous ne pouvons garantir que
l’appareil soit compatible avec tous ces diérents modèles. Si votre périphérique USB
n’est pas compatible, veuillez en essayer un autre.
* Il se peut que certains chiers enregistrés sur le périphérique USB ne puissent être lus.
En eet, certains formats spéciaux ne sont pas compatibles avec cet appareil.
1. Conecte um pendrive USB com arquivos MP3 ou um aparelho de MP3 na porta USB.
2. Quando o aparelho estiver ligado, gire o botão MODE (MODO), para selecionar o
modo USB, indicador luminoso se torna vermelho. O início USB para reproduzir
automaticamente. Prima para fazer uma pausa, o indicador manter vermelho sem
piscar.
3. Ajuste o controle de VOLUME (MIN/MAX) para o nível desejado.
4. Pressione uma vez a tecla para passar à faixa seguinte ou pressione diversas
vezes para saltar várias faixas. Pressione uma vez a tecla para voltar ao início da
faixa em curso e pressione diversas vezes para voltar às faixas anteriores. Prima e
segure ou para procurar rapidamente dentro de uma faixa.
5. Pressione para pausar a reprodução USB.
Removendo o dispositivo USB
Cerique-se de que o Toca-Discos esteja parado e desligue o aparelho, para evitar
danos no dispositivo de USB e no sistema de som.
Nota:
* Existem muitos dispositivos USB no mercado. Nós não podemos garantir que suporta
todos os diferentes modelos. Experimente outro dispositivo USB se o seu não for
suportado.
* A unidade pode não suportar todos os arquivos multimédia armazenados em USB, pois
inclui algums procedimentos de reprodução especial que pode não ser compatível com
o procedimento desta unidade.
1. Connect a USB device containing MP3 les or MP3 player to the USB port.
2. When the unit is on, rotate the MODE button to select the USB mode, indicator
becomes red. The USB start to playback automatically. Press to pause, the
indicator keep remain red without ashing.
3. Adjust the volume (MIN/MAX) to the desired level.
4. Press to skip forward to the next track or repeatedly to several tracks. Press
return to the beginning of the track, or press repeatedly to skip backwards several
tracks. Press and hold or to search quickly within a track.
5. Press to pause the USB playback.
Removing the USB device
Please be sure to stop playback and turn the unit OFF before removing the USB device
to avoid damage the USB and system.
Note:
* There are many USB devices in the market. We cannot guarantee to support all
dierent models. Please try another USB device if yours is not supported.
* The unit might not support all the multimedia les stored in USB because it includes
some special playback procedure which might not be compatible with the procedure
of this unit.
UTILISATION D’UN CASQUE / D’ÉCOUTEURS
UTILIZAÇÃO DE AURICULARES/AUSCULTADORES
USING HEADPHONES / EARPHONES
UTILISER LA PRISE DE SORTIE RCA
UTILIZANDO O CONECTOR DE SAÍDA DO FIO RCA
USING THE RCA LINE OUT JACK
CONSEILS POUR UNE MEILLEURE UTILISATION DU TOURNEDISQUE
DICAS PARA MELHOR UTILIZAÇÃO DO TOCA-DISCOS
TIPS FOR BETTER TURNTABLE PERFORMANCE
SPÉCIFICATIONS
ESPECIFICAÇÕES
SPECIFICATIONS
Tension de sortie maximale ≤ 150 mV
MISE EN GARDE SUR LE NIVEAU DE VOLUME DU CASQUE
Diminuez le volume avant de connecter un casque et augmentez-le ensuite si nécessaire.
L’utilisation prolongée d’un casque à un volume élevé peut endommager votre système
auditif. Lorsqu’un casque ou des écouteurs sont connectés, les haut-parleurs du lecteur
sont désactivés.
Attention: évitez les niveaux sonores élevés pouvant nuire à votre système auditif.
Tensão de saída máxima ≤ 150 mV
PRECAUÇÕES RELATIVAS AO NÍVEL DO VOLUME DOS AURICULARES
Diminua o volume antes de ligar os auriculares e aumente-o de seguida, se necessário.
A utilização prolongada de auriculares com um volume alto pode causar lesões no
sistema auditivo. Quando se ligam auriculares ou auscultadores, os altifalantes do leitor
são desactivados.
Atenção: Evite os níveis sonoros altos que podem danicar o sistema auditivo.
Maximum output voltage ≤ 150Mv
HEADPHONE VOLUME WARNING
Connect earphones with the volume set low and increase it if required. Prolonged
listening through some earphones at high volume settings can result in hearing damage.
When headphones/earphones are connected, no sound will be emitted from the unit’s
speaker.
Caution: Avoid listening to sound at levels which may be harmful to your ears.
Connectez une extrémité du câble audio (câble non fourni) sur la prise LINE OUT de
l'unité et l'autre extrémité du câble sur la prise RCA IN ou la prise AUX IN de votre autre
équipement audio.
1. Allumez votre équipement audio.
2. Choisissez l'un de vos modes favoris (BLUETOOTH, PHONO, AUX IN ou USB) et
commencez la lecture sous ce mode.
Conecte uma das pontas do cabo de áudio (cabo não incluso) no conector de FIO DE
SAÍDA, localizado na aparelho, e conecte a outra ponta no conector de ENTRADA RCA
ou ENTRADA AUXILIAR do seu outro dispositivo ou equipamento de áudio.
1. Ligue o seu dispositivo ou equipamento de áudio.
2. Selecione o seu modo desejado (BLUETOOTH, TOCA-DISCOS, ENTRADA
AUXILIAR ou USB) e inicie a sua reprodução.
Connect one end of audio cable (cable not included) to the LINE OUT jack on the unit
and other end of cable connect to the RCA IN jack or AUX IN jack of your other audio
drive equipment.
1. Turn on your audio drive equipment.
2. Select one of your favorite mode (BLUETOOTH,PHONO, AUX IN, USB) and start
your mode playback.
1. Lorsque vous ouvrez ou fermez le couvercle du tourne-disque, manipulez-le
soigneusement, en le prenant soit au centre, soit de chaque côté.
2. Ne touchez pas l'embout de l'aiguille avec les doigts, évitez de cogner l'aiguille contre
le plateau du tourne-disque ou le rebord du disque.
3. Nettoyez fréquemment l'embout de l'aiguille - utilisez une brosse douce avec un
mouvement 'avant-arrière' uniquement.
4. Si vous devez utiliser un liquide de nettoyage d'aiguille, utilisez-le en faible quantité.
5. Essuyez doucement la protection de poussière et le boitier du tourne-disque avec un
tissu doux. N'utilisez qu'une petite quantité de détergent léger pour nettoyer le tourne
disque et le couvercle de la poussière.
6. N'appliquez jamais de produits chimiques ou de solvants abrasifs sur aucune partie
du système de tourne-disque.
Par la présente, NEW ONE S.A.S déclare que l'appareil "MUSE MT-501 ATB/
MT-501 ATC" est conforme aux exigences essentielles et autres dispositions pertinentes
de la directive 2014/53/EU. La déclaration de conformité peut être consultée sur le site
www.muse-europe.com.
1. Quando for abrir ou fechar a tampa do toca-discos, manuseie com cuidado, utilizando
o centro ou cada um dos lados.
2. Não toque na ponta da agulha com os seus dedos; evite esbarrar a agulha contra o
prato do toca-discos ou a quina de um disco.
3. Limpe a agulha com frequência. Dica – utilize um pincel macio, movimentando-o
apenas de “trás para frente”.
4. Caso você precise utilizar um líquido de limpeza de agulhas, utilize-o em pequenas
quantidades.
5. Passe um pano macio com muito cuidado para retirar a poeira da tampa e da caixa
do toca-discos. Utilize apenas uma pequena quantidade de detergente fraco para
realizar essa limpeza.
6. Nunca utilize produtos químicos fortes ou solventes em quaisquer partes do sistema
de toca-discos.
A NEW ONE S.A.S aqui declara que este produto « MUSE MT-501 ATB/ MT-501 ATC »
cumpre os requisitos essenciais e outras disposições relevantes da Norma 2014/53/EU.
A declaração de conformidade pode ser consultada em www.muse-europe.com.
1. When opening or closing the turntable cover, handle it gently, gripping it either at the
centre or at each side.
2. Do not touch the needle tip with your ngers; avoid bumping the needle against the
turntable platter or record edge.
3. Frequently clean the needle tip-use a soft brush in a “back-to-front’ motion only.
4. If you must use a needle cleaning uid, use very sparingly.
5. Gently wipe the dust cover and turntable housing with a soft cloth. Use only a small
amount of mild detergent to clean the turntable and dust cover.
6. Never apply harsh chemicals or solvents to any part of the turntable system.
Hereby, NEW ONE S.A.S, declares that this MUSE MT-501 ATB/ MT-501 ATC is in
compliance with the essential requirements and other relevant provisions of Directive
2014/53/ EU. The declaration of conformity may be consulted at www.muse-europe.com
GÉNÉRALITÉS
Puissance: 100-240V CA 50/60Hz
Puissance de sortie: DC 5V 2000mA
Puissance de sortie max: 2 x 2W RMS
BLUETOOTH
Version Bluetooth: 4.0
Bluetooth: 2.402-2.48GHz
Puissance de sortie des RF (fréquences radios): 4 dBm
Distance de fonctionnement:
Jusqu'à 10 mètres mesurés en espace ouvert (les murs et les structures peuvent aecter
la portée de l'appareil)
Le modèle et les spécications techniques sont susceptibles d’être modiés sans
notication préalable.
GERAL
Alimentação: 100-240V AC, 50/60Hz
Potência de Saída: DC 5V 2000mA
Potência Máxima: 2 x 2W RMS
BLUETOOTH
Versão do Bluetooth: 4.0
Bluetooth: 2.402-2.48GHz
Potência de saíde de RF (Rádio Frequência): 4 dBm
Distância de Funcionamento: Até 10 metros, medido em espaço aberto (paredes e
estruturas poderão afetar a distância de funcionamento do dispositivo).
O modelo e as especicações técnicas são passíveis de serem alterados sem aviso prévio.
GENERAL
Power:
AC ADAPTOR: AC IN 100-240V AC, 50/60Hz
Output: DC 5V 2000mA
Output Power: 2 x 2W RMS
BLUETOOTH
Bluetooth Version: 4.0
Bluetooth: 2.402-2.48GHz
RF Output Power: 4 dBm
Working Distance:
Up to 10 meters measured in open space (wall and structures may aect range of device).
Specications and appearance are subject to change without notice.
An de réduire les risques de lésions auditives, n’écoutez pas de la musique
à un volume élevé pendant longtemps.
Para prevenir possíveis danos auditivos, não escute em volumes muito altos
por longos períodos de tempo.
To prevent possible hearing damage, do not listen at high volume levels for
long periods.
GERÄT EIN-/AUSSCHALTEN
1. Um das Gerät einzuschalten, drehen Sie den POWER ON/OFF-Schalter im
Uhrzeigersinn, Sie ein Klicken hören und stellen Sie die Lautstärke (MIN/MAX) auf
ein niedriges Niveau.
2. Wenn Sie das Gerät nicht benutzen, drehen Sie den POWER ON/OFF-Schalter
entgegen dem Uhrzeigersinn, Sie ein Klicken hören. Das Gerät ist damit ausgeschaltet.
PHONO-BETRIEB
1. Wenn das Gerät eingeschaltet ist, drehen Sie die MODE-Taste zur Auswahl des
Phono-Modus, die Funktionsanzeige ROT aueuchtet.
2. Entfernen Sie die Nadelabdeckung und nehmen Sie den Tonarm von seiner Ablage
herunter.
3. Legen Sie eine Platte auf den Plattenteller und wählen Sie die gewünschte
Geschwindigkeit (33/45/78).
HINWEIS: Wenn Sie 45RPM-Singles abspielen, legen Sie zunächst den 45RPM-Adapter
auf den Plattenteller.
4. Drücken Sie den Hebel nach oben, um den Tonarm zu behen und bewegen Sie den
Tonarm in die gewünschte Position auf die Platte. Drücken Sie den Tonarmhebel nach
unten und die Platte wird abgespielt.
5. Drehen Sie den Pitch-Regler, um die Geschwindigkeit des Plattentellers einzustellen.
6. Stellen Sie die Lautstärke (MIN/MAX) auf ein angenehmes Maß.
7. Wenn der AUTO STOP ON/OFF-Schalter auf ON steht, stoppt die Wiedergabe
automatisch bei Erreichen des Plattenendes (bei bestimmten Vinylplatten ist dies
nicht möglich). Wenn die Auto-Stopp ausgeschaltet ist, wird die Wiedergabe NICHT
automatisch gestoppt.
WICHTIG: Drehen oder stoppen Sie den Plattenteller niemals per Hand. Wenn Sie den
Plattenteller bewegen oder verklemmen, wenn der Tonarm nicht gesichert ist, kann es
zu Schäden am Tonarm oder der Nadel kommen.

MT-501ATB/IB/V0
Um mögliche Gehörschäden zu vermeiden, sollten Sie nicht über längere
Zeit bei hohen Lautstärken Musik hören.
Para evitar posibles daños en el oído, no escuche a un volumen elevado
durante largos periodos.
Per prevenire possibili danni all’apparato uditivo, non ascoltare la radio con
il volume alto per un lungo periodo.
Luister niet voor lange perioden op hoog volume om mogelijke gehoorschade
te voorkomen.
SICHERHEITSANWEISUNGEN
INSTRUCCIONES DE SEGURIDAD
AVVERTENZE DI SICUREZZA
VEILIGHEIDSWAARSCHUWINGEN
ACHTUNG: Um Elektroschockgefahr zu vermeiden, dürfen Sie
dieses Gerät nicht demontieren. Das Gerät enthält keine Teile,
die der Benutzer selbst reparieren kann. Vertrauen Sie die
Instandhaltung des Geräts einem Fachmann an.
ATENCIÓN: Para reducir el riesgo de descarga eléctrica, no
desmonte el aparato. En el interior de este aparato no existe
ninguna pieza que pueda ser reparada por el usuario. Para
cualquier operación de mantenimiento y reparación, póngase en
contacto con personal técnico cualicado.
ATTENZIONE: Per ridurre il rischio di scossa elettrica, non
smontate l’apparecchio. Questo apparecchio non contiene
pezzi riparabili dall’utente. Per ogni riparazione rivolgetevi
esclusivamente a tecnici qualicati.
OPGEPAST: Om het risico op elektrische schokken te vermijden,
mag u het toestel niet demonteren. Het toestel bevat geen enkel
onderdeel dat door de gebruiker zelf kan gerepareerd worden.
Contacteer altijd een gekwaliceerde technieker indien een
reparatie nodig is.
WARNHINWEIS:
- Verwenden Sie dieses Gerät in klimatisch gemäßigter Umgebung.
- Das Typenschild bendet sich auf der Rückseite des Gerätes.
- Achten Sie auf einen Mindestabstand von 5 cm zu Ihrem Gerät, um eine ausreichende
Belüftung zu gewährleisten.
- Stellen Sie eine ausreichende Belüftung des Geräts sicher und behindern Sie die
Belüftungsönungen nicht mit Gegenständen wie z. B. Zeitungen, Tischdecken,
Vorhängen, usw.
- Stellen Sie keine Wärmequelle wie eine angezündete Kerze auf oder in der Nähe des
Geräts ab.
- Setzen Sie das Gerät niemals Wasserspritzern oder Feuchtigkeit aus.
- Stellen Sie kein mit Wasser gefülltes Gefäß, wie z. B. Vasen, in der Nähe des Geräts ab.
- Mit dem Netzstecker kann das Gerät vom Netz getrennt werden, er muss daher leicht
zugänglich sein. Um das Gerät vollständig vom Netz zu trennen, trennen Sie den
Netzstecker komplett von der Netzsteckdose. Der Netzstecker darf nicht behindert
werden und muss während der Verwendung leicht zugänglich sein.
- Unter der Einwirkung von elektrostatischen und/oder elektrischen Phänomen kann das
Produkt Fehlfunktionen aufweisen. Ein Zurücksetzen auf die Werkseinstellungen kann
sich als notwendig erweisen.
- Der ordnungsgemäße Betrieb des Geräts kann durch starke elektromagnetische
Störungen beeinträchtigt werden. Setzen Sie das Gerät in solch einem Fall gemäß
den Angaben in der Bedienungsanleitung zurück, um den normalen Betrieb wieder
herzustellen. Falls der ordnungsgemäße Betrieb nicht fortgesetzt werden kann,
versuchen Sie das Gerät an einem anderen Ort zu verwenden.
ADVERTENCIAS:
- Utilice este aparato en lugares con climas templados.
- La placa de identicación se encuentra en la parte posterior del aparato.
- Deje libre alrededor del aparato una distancia mínima de 5 cm para garantizar una
correcta ventilación del mismo.
- Para asegurar una ventilación correcta del aparato, no cubra los oricios de ventilación
con objetos tales como periódicos, manteles, cortinas, etc.
- No coloque ninguna fuente de calor, como por ejemplo una vela encendida, sobre el
aparato o cerca de él.
- No exponga el aparato a salpicaduras o a la humedad.
- No coloque objetos que contengan líquido, como un jarrón, encima del aparato.
- El acceso al enchufe ha de permanecer despejado. Para cortar por completo la
alimentación del aparato, desenchúfelo de la toma de corriente. Se ha de poder
acceder fácilmente al enchufe durante el uso del aparato; procure que el acceso al
mismo esté despejado.
- Como resultado de fenómenos electroestáticos y/o eléctricos transitorios, pueden
producirse fallos en el funcionamiento del producto. En estos casos, el usuario deberá
reiniciar el aparato desenchufándolo y volviéndolo a enchufar.
- El funcionamiento normal del producto podría verse alterado por fuertes interferencias
electromagnéticas. En caso de ocurrir, simplemente reinicie el producto y continúe
utilizándolo con normalidad siguiendo las indicaciones del manual de instrucciones. En
el caso de que no volviera a funcionar, utilícelo en una ubicación diferente.
AVVERTENZA:
- Utilizzare l’apparecchio in ambienti temperati.
- La targhetta informativa si trova sul retro dell’apparecchio
- Lasciare uno spazio minimo di 5 cm intorno all’apparecchio per permettere una
ventilazione suciente.
- Garantire sempre una ventilazione corretta dell’apparecchio e non ostruire i fori di
ventilazione con oggetti come giornali, tovaglie, tende, ecc.
- Non collocare nessuna fonte di calore, come una candela accesa, sopra o nei pressi
dell’apparecchio.
- Non esporre l’apparecchio all'acqua o all’umidità.
- Non collocare nessun recipiente contenente liquidi, come ad esempio un vaso, nelle
vicinanze dell’apparecchio.
- La presa di alimentazione permette di scollegare l’apparecchio dalla corrente elettrica
e deve quindi restare facilmente accessibile. Per interrompere completamente
l’alimentazione dell’apparecchio, scollegare la spina di alimentazione dalla presa di
corrente. La presa di alimentazione deve restare facilmente accessibile durante l’uso,
accertarsi che l’accesso alla presa sia libero.
- Per eetto di fenomeni transitori elettrostatici e/o elettrici, è possibile che il prodotto non
funzioni correttamente. In tal caso è opportuno reinizializzare l’apparecchio.
- Il normale funzionamento del prodotto può essere compromesso da forti interferenze
elettromagnetiche. In tal caso, segui le istruzioni nel manuale per reimpostare il
prodotto per riprendere il normale funzionamento. Nel caso in cui il funzionamento non
venga ripristinato, utilizzare il prodotto in altro luogo.
WAARSCHUWING:
- Gebruik dit toestel bij een gematigd klimaat.
- Het kenmerkenplaatje bevindt zich aan de achterkant van het toestel.
- Zorg voor een afstand van minimum 5 cm rondom uw toestel voor voldoende ventilatie.
- Zorg voor een juiste ventilatie van het toestel en bedek de ventilatieopeningen niet met
voorwerpen zoals dagbladen, tafellakens, gordijnen, enz.
- Plaats geen warmtebron, zoals een brandende kaars, op of in de buurt van het toestel.
- Stel het toestel niet bloot aan waterspatten of vochtigheid.
- Plaats geen voorwerpen met vloeistof, zoals een vaas, op of in de buurt van het toestel.
- Met de netspanningsstekker kan het toestel uitgetrokken worden, deze moet
dus gemakkelijk toegankelijk blijven. Om de voeding van het toestel volledig te
onderbreken dient u de voedingsstekker helemaal uit het stopcontact te trekken. De
netspanningsstekker mag niet verhinderd worden en moet gemakkelijk toegankelijk zijn
tijdens gebruik.
- Onder invloed van tijdelijke elektrostatische en/of elektrische verschijnselen kan het
product storingen ondervinden en kan een heropstart nodig blijken.
- De normale functie van het product kan worden verstoord door sterke elektromagnetische
storing. Als dit het geval is, reset het product dan gewoon door de handleiding te volgen.
Als het normale gebruik daarna niet kan worden hervat, probeer het product dan op een
andere locatie te gebruiken.
Das in einem Pfeil endende Blitzsymbol innerhalb eines Dreiecks weist den
Benutzer auf die Gegenwart einer „gefährlichen Spannung“ im Gerät hin.
El símbolo del rayo con una echa dentro de un triángulo equilátero advierte al
usuario de la presencia de voltaje peligroso en el interior del aparato.
Il simbolo del fulmine con una freccia all’estremità all’interno di un triangolo
equilatero avverte l’utente della presenza di una “tensione pericolosa”
nell’apparecchio.
Het symbool van een zwarte driehoek met daarin een witte bliksemschicht
eindigend in een driehoek, waarschuwt de gebruiker dat er een gevaarlijke
spanning aanwezig is in het toestel.
Das Ausrufezeichen im Inneren eines Dreiecks weist den Benutzer auf wichtige
Anweisungen hin, die sich in dem das Gerät begleitenden Handbuch benden.
El signo de exclamación dentro de un triángulo equilátero advierte al usuario de
la presencia de importantes instrucciones de funcionamiento y mantenimiento en
el manual que acompaña al producto.
Il punto esclamativo inscritto nel triangolo equilatero indica all'utente che nel
manuale di istruzioni si trovano importanti avvertenze per l'uso e la manutenzione
dell'apparecchio.
Het bovenstaande symbool (zwarte driehoek met daarin een wit uitroepingsteken)
waarschuwt de gebruiker dat er belangrijke gebruiksaanwijzingen in verband met
het gebruik en het onderhoud ter beschikking zijn in de bijgeleverde handleiding.
Wenn Sie dieses Gerät entsorgen möchten, denken Sie daran, es bei einer
Sammelstelle für elektrische Haushaltsgeräte zu entsorgen. Erkundigen
Sie sich nach Ihrer nächstgelegenen Wertstosammelstelle. Für detaillierte
Informationen wenden Sie sich an die örtlichen Behörden oder an Ihren
Händler. (Richtlinie über elektrische und elektronische Abfallgeräte).
Si desea deshacerse de este aparato, recuerde que ha de depositarlo en un
lugar destinado al reciclado de electrodomésticos. Infórmese acerca del centro
de reciclaje más cercano. Consulte a las autoridades locales o a su proveedor
para obtener más información al respecto. (Directiva de Residuos de Aparatos
Eléctricos y Electrónicos)
Se in futuro volete sbarazzarvi di questo apparecchio, ricordate che le
apparecchiature elettroniche non devono essere gettate insieme ai riuti
domestici. Informatevi per sapere dove si trova il centro di riciclaggio più
vicino. Per ulteriori dettagli, rivolgetevi alle autorità locali o al vostro rivenditore.
(Direttiva sui riuti delle apparecchiature elettriche ed elettroniche).
Indien u dit toestel in de toekomst wilt weggooien, denk er dan aan om het te
recycleren via een inzamelpunt voor elektrische huishoudapparaten. Informeer
naar het dichtstbijzijnde recyclagecentrum. Voor meer informatie wendt u
zich tot de lokale overheden of uw verdeler (richtlijn met betrekking tot Afval
afkomstig van elektrische en elektronische apparaten).
NEW ONE S.A.S
10, Rue de la Mission, 25480 Ecole Valentin, France
NEW ONE S.A.S
10, Rue de la Mission, 25480 Ecole Valentin, France
NEW ONE S.A.S
10, Rue de la Mission, 25480 Ecole Valentin, France
NEW ONE S.A.S
10, Rue de la Mission, 25480 Ecole Valentin, France
VERWENDUNG DES CINCH-AUSGANGS
USO DE LA TOMA DE SALIDA RCA
UTILIZZO DELL’USCITA RCA
DE RCA-UITGANG GEBRUIKEN
TIPPS ZUM OPTIMIEREN DER LEISTUNG
CONSEJOS PARA UN MEJOR USO DEL TOCADISCOS
CONSIGLI PER UN MIGLIORE FUNZIONAMENTO DEL GIRADISCHI
TIPS VOOR BETERE DRAAITAFELPRESTATIES
TECHNISCHE DATEN
ESPECIFICACIONES
SPECIFICHE
SPECIFICATIES
Schließen Sie das eine Ende des Audiokabels (Kabel nicht im Lieferumfang) am LINE
OUT-Buchse am Gerät und das andere Ende des Kabels am Cinch- oder AUX-Eingang
Ihres Audiogeräts.
1. Schalten Sie Ihre Audiogerät ein.
2. Wählen Sie den gewünschten Modus (BLUETOOTH,PHONO, AUX IN oder USB) und
starten Sie die Wiedergabe.
Conecte un extremo del cable de audio (cable no incluido) a la toma LINE OUT de la
unidad, y el otro extremo del cable a la toma RCA IN o AUX IN de su otro equipo de audio.
1. Encienda su otro equipo de audio.
2. Seleccione el modo que preera (BLUETOOTH, PHONO, AUX IN o USB) y comience
la reproducción.
Collega un capo del cavo audio (non incluso) all'uscita LINE OUT nel retro dell'apparecchio
e l'altro capo all'uscita RCA IN o AUX IN del dispositivo audio esterno.
1. Accendere il disposito audio esterno.
2. Selezionare la modalità deisderata (BLUETOOTH, PHONO, AUX IN, USB) e avviare
la riproduzione.
Sluit het ene uiteinde van de audiokabel (kabel niet meegeleverd) aan op de LINE OUT
aansluiting op het toestel en de andere uiteinde van de kabel aan te sluiten op de RCA-
INGANG of de AUX-INGANG van uw audioapparatuur.
1. Schakel uw audioapparatuur in.
2. Selecteer de gewenste modus (BLUETOOTH, PHONO, AUX IN of USB) en start het
afspelen.
1. Wenn Sie den Deckel des Plattenspielers önen oder schließen, gehen Sie vorsichtig vor.
Greifen Sie entweder an der Mitte oder an den Seiten.
2. Berühren Sie die Nadelspitze nicht mit Ihren Fingern. Vermeiden Sie jegliche Berührung
mit dem Plattenteller oder dem Plattenrand.
3. Reinigen Sie die Nadelspitze nur mit einem weichen Pinsel in einer von hinten nach vorne
gerichteten Bewegung.
4. Wenn Sie zur Reinigung der Nadel Reinigungsüssigkeit benötigen, gehen Sie nur sehr
sparsam vor.
5. Wischen Sie den Staubschutz und den Plattenteller mit einem weichen Tuch ab. Benutzen
Sie nur kleine Mengen Reinigungsmittel zur Reinigung des Staubschutzes und des
Plattentellers.
6. Verwenden Sie niemals aggressive Chemikalien oder Lösungsmittel zur Reinigung
jeglicher Teile des Plattenspielers.
NEW ONE S.A.S erklärt hiermit, dass dieser „MUSE MT-501 ATB/ MT-501 ATC“ den
wesentlichen Anforderungen und anderen geltenden Vorgaben der Richtlinie 2014/53/EU
entspricht. Die Konformitätserklärung lässt sich unter www.muse-europe.com herunterladen.
1. Cuando abara o cierre la tapa del tocadiscos, hágalo con cuidado, agarrándola o por
el centro o por los lados.
2. No toque la punta de la aguja con sus dedos; evite que la aguja salte sobre el plato del
tocadiscos o el borde del disco.
3. Limpie con frecuencia la punta de la aguja con un cepillo suave, siguiendo un
movimiento desde atrás hacia delante.
4. Si tuviera que usar un líquido limpiador de la aguja del tocadiscos, hágalo en pequeñas
cantidades.
5. Limpie la tapa guardapolvos y el exterior del tocadiscos con un trapo suave. Use solo
una pequeña cantidad de detergente no agresivo para limpiarlos.
6. No aplique productos químicos abrasivos ni disolventes sobre ninguna de las partes
del tocadiscos.
Por la presente, NEW ONE S.A.S declara que el « MUSE MT-501 ATB / MT-501 ATC »
cumple con los requerimientos esenciales y otras provisiones aplicables de la Directiva
2014/53/EU. La declaración de conformidad podrá consultarse en www.muse-europe.com
1. Aprire il coperchio del giradischi con cautela aerrandolo al centro o da entrambi i lati.
2. Non toccare la punta della puntina di lettura con le mani; evitare di far urtare la puntina
sul piatto o su qualsiasi altra supercie dura dell'apparecchio.
3. Pulire spesso la puntina con un pennellino morbido con un movimento dall'interno
verso l'esterno.
4. Utilizzare le soluzioni per la pulizia della puntina con moderazione.
5. Pulire con cautela il coperchio ed il piatto utilizzando un panno morbido. Utilizzare
detergenti non aggressivi e non sgrassanti.
6. Non utilizzare solventi o detergenti aggressivi per pulire il giradischi.
Con la presente, NEW ONE S.A.S dichiara che «MUSE MT-501 ATB / MT-501 ATC»
è conforme ai requisiti essenziali e alle altre disposizioni fondamentali della direttiva
2014/53/EU. La dichiarazione di conformità è consultabile alla pagina www.muse-europe.com
1. Als u de stofkap van de draaitafel opent of sluit, doe dit dan voorzichtig en pak de kap
vast in het midden of aan beide zijkanten.
2. Raak de punt van de naald niet aan met uw vingers en stoot de naald niet tegen het
draaiplateau of de rand van de plaat.
3. Reinig de punt van de naald regelmatig met een zachte borstel in een beweging van
“achter-naar-voren”.
4. Als u gebruik moet maken van een naaldreinigingsvloeistof, gebruik deze dan
spaarzaam.
5. Veeg de stofkap en de behuizing van de draaitafel voorzichtig af met een zachte
doek. Gebruik slechts een kleine hoeveelheid mild reinigingsmiddel om de draaitafel
en stofkap te reinigen.
6. Gebruik nooit agressieve chemicaliën of oplosmiddel op de verschillende delen van
het draaitafelsysteem.
Hierbij verklaart NEW ONE S.A.S dat deze “MUSE MT-501 ATB/ MT-501 ATC” voldoet
aan de essentiële eisen en andere relevante bepalingen uit richtlijn 2014/53/EU. De
verklaring van conformiteit kan worden geraadpleegd op www.muse-europe.com
ALLGEMEIN
Leistung: 100 - 240V AC, 50/60Hz
Ausgangsleistung: DC 5V 2000mA
Max. Ausgangsleistung: 2 x 2W RMS
BLUETOOTH
Bluetooth-Version: 4.0
Bluetooth: 2.402-2.48GHz
RF-Ausgangsleistung (Radiofrequenz-Augangsleistung): 4 dBm
Betriebsreichweite: bis zu 10 Meter in oenen Räumen (Wände und Hindernisse können
die Reichweite des Geräts beeinträchtigen)
Das Modell und die technischen Spezikationen können jederzeit unangekündigt
geändert werden.
GENERAL
Energía: 100-240V CA, 50/60Hz
Potencia de salida: DC 5V 2000mA
Máxima potencia de salida: 2 x 2W RMS
BLUETOOTH
Versión Bluetooth: 4.0
Bluetooth: 2.402-2.48GHz
Salida de corriente RF (radiofrecuencia): 4 dBm
Distancia de rendimiento: Hasta 10 m medidos en espacio abierto (la pared y las
estructuras pueden afectar el rango del dispositivo)
El diseño y las especicaciones técnicas pueden modicarse sin noticación previa.
GENERALI
Alimentazione: 100-240V CA, 50/60Hz
Uscita: DC 5V 2000mA
Potenza massima in uscita: 2 x 2W RMS
BLUETOOTH
Versione del Bluetooth: 4.0
Bluetooth: 2.402-2.48GHz
Potenza RF (radiofrequenza) irradiata: 4 dBm
Raggio d’azione: no a 10 metri in spazi aperti (pareti e altre strutture possono inuire sul
raggio d’azione del dispositivo).
Ci riserviamo il diritto di modicare il modello e le speciche tecniche senza obbligo di
preavviso.
ALGEMEEN
Stroom: 100-240V AC, 50/60Hz
Vermogen: DC 5V 2000mA
Max. vermogen: 2 x 2W RMS
BLUETOOTH
Bluetooth-versie: 4.0
Bluetooth: 2.402-2.48GHz
RF-vermogen (radiofrequentievermogen): 4 dBm
Werkafstand: Tot 10 meter gemeten in een open ruimte (muren en bouwwerken kunnen
invloed hebben op het bereik van de luidspreker)
Het model en de technische specicaties kunnen gewijzigd worden zonder voorafgaande
kennisgeving.
DESCRIPCIÓN DEL APARATO
POSIZIONE DEI COMANDI
BESCHRIJVING VAN HET TOESTEL
ALIMENTACIÓN
ALIMENTAZIONE
VOEDING
SISTEMA DE TOCADISCOS ESTÉREO
STEREO GIRADISCHI
STEREO DRAAITAFELSYSTEEM
ES
IT
NL
1. Plato
2. Eje
3. Adaptador de 45 RPM
4. Brazo fonocaptor
5. Control de PITCH (para ajustar la
velocidad del disco)
6. AUTO STOP ON/OFF (Interruptor de
DETENCIÓN AUTOMÁTICA, Encendido/
Apagado)
7. MODE: Para seleccionar el modo
BLUETOOTH, disco, AUX IN, USB
8. SELECTOR DE VELOCIDAD (33/45/78)
9. Indicador de Modo
10. Encendido / Apagado y control de
volumen(MIN/MAX)
11. Toma para auriculares
1. Piatto
2. Perno centrale
3. Adattatore per 45 giri
4. Braccio
5. Manopola PITCH (per regolare la
velocità del piatto)
6. AUTO STOP ON/OFF (Interruttore di
autospegnimento AUTO STOP, ON/
OFF)
7. MODE button (per selezionare
BLUETOOTH, phono, Aux IN, USB)
8. SELETTORE DI VELOCITA' DEL
PIATTO (33/45/78)
9. Indicatore
10. Interruttore di accensione ON/ OFF e
regolatore del volume (MIN/MAX)
1. Draaiplateau
2. Spindel
3. 45 TPM -adapter
4. Toonarm
5. PITCH-knop (om de snelheid van
het draaiplateau aan te passen)
6. AUTO STOP ON/OFF (AUTO
STOP-schakelaar, aan/uit)
7. MODE (Voor het selecteren van de
BLUETOOTH, PHONO, AUX IN,
USB modus)
8. Snelheidsschakelaar (33/45/78)
9. indicator
10. AAN/UIT-knop en volumeregeling
11. Aansluiting hoofdtelefoon
12. Cartucho con aguja
13. Descanso del brazo fonocaptor
14. Cierre
15. Manija para transportar
16. Altavoces
17. Tapa del fonógrafo
18. Toma de salida de dispositivo
externo
19. Entrada auxiliar
20. Toma DC
21. Puerto USB
22. BÚSQUEDA ANTERIOR
23. REC / : Grabación/ Reproducción/
pausa
24. SPLIT/ : Grabación segmentada/
BÚSQUEDA SIGUIENTE
11. Presa cue
12. Cartuccia completa con
puntina
13. Ferma braccio
14. Chiavistello
15. Manico
16. Casse stereo
17. Coperchio del giradischi
18. Uscita per dispositivi esterni
19. Uscita AUX IN
20. Connettore CC
21. Porta USB
22. precedente
23. REC / Tasto
24. SPLIT/ : Registrazione
segmentata / successivo
12. Cartridge met naald
13. Toonarmsteun
14. Vergrendeling
15. Draagbeugel
16. Luidsprekers
17. Stofkap
18. Uitgang voor extern apparaat
19. AUX IN-aansluiting
20. Stroomingang
21. USB-poort
22. VORIGE & TERUGSPOELEN
23. REC / : opnemen / spelen / pauze
24. SPLIT/ : Gesegmenteerde
opname /VOLGENDE &
VOORUITSPOELEN)
Utilización del adaptador de red
Adaptador de corriente:
Entrada 100-240V 50/60Hz , 0.4A
Salida 5V 2000mA
Utilizzo dell'adattatore AC
Adattatore AC:
Uscita 100-240V 50/60Hz 0.4A
Ingresso 5V 2000mA
Gebruik van de netstroomadapter
Netstroomadapter:
Invoer 100-240V 0.4A
Uitgang: 5V 2000mA
Este adaptador funciona con una alimentación CA de entre 100V y 240V . El
adaptador de red que se suministra con el aparato no se puede utilizar en ningún caso
con otro tipo de alimentación.
Atención:
* El adaptador de red que se suministra ha sido diseñado exclusivame-nte para utilizarse
con este aparato. No lo utilice con ningún otro aparato.
* Apague el aparato antes de desenchufarlo al adaptador de red para evitar que se
produzcan daños.
* Cuando no vaya a utilizar el aparato durante un período de tiempo prolongado,
desenchufe el adaptador de red de la toma de corriente.
* Coloque el aparato cerca de la toma de pared y compruebe que puede accederse
a esta última fácilmente. Si se produce un fallo en el funcionamiento del aparato,
desconéctelo inmediatamente de la toma de pared.
* El adaptador de red se utiliza para conectar y desconectar el aparato. El acceso al
mismo debe permanecer despejado en todo momento. Para cortar por completo la
alimentación del aparato, ha de desenchufar el adaptador de red de la toma de pared.
* No utilice nunca el adaptador si está dañado. Coloque el cable de alimentación de
forma segura de manera que no pueda ser aplastado o dañado de otro modo. Si el
cable está dañado, contacte con un servicio de reparación.
L'adattatore AC incluso può essere utilizzato con prese di alimentazione di tensione
100-240V Collegare l'adattatore solo a prese di corrente con queste caratteristiche.
Attenzione:
* L’adattatore di rete fornito in dotazione è destinato esclusivamente all’uso con il
presente apparecchio. Non utilizzatelo con altri apparecchi.
* Per non danneggiare il lettore, spegnete l’apparecchio prima di scollegare l’adattatore
di rete.
* In caso di un prolungato periodo di non utilizzo, scollegate il cavo di alimentazione
dalla presa.
* Posizionate l’apparecchio nei pressi della presa a muro e fate in modo che questa
resti facilmente accessibile. In caso di malfunzionamento scollegate immediatamente
l’apparecchio dalla presa a muro.
* L’adattatore di rete permette di scollegare l’apparecchio. Deve essere facilmente
accessibile durante l’uso. Per mettere del tutto l’apparecchio fuori tensione, scollegatelo
dall’alimentazione di rete.
* Non utilizzate mai un adattatore di rete danneggiato. Posizionate il cavo di
alimentazione in modo sicuro e in modo che non venga calpestato o schiacciato. Se il
cavo è danneggiato, rivolgetevi ad un servizio di assistenza.
De netstroomadapter gebruikt een netstroom van AC 100V 240V. De meegeleverde
netstroomadapter mag nooit gebruikt worden op een ander type voeding.
OPGEPAST:
* De meegeleverde netstroomadapter mag uitsluitend met dit toestel gebruikt worden.
Gebruik hem niet met een ander toestel.
* Deactiveer het toestel vooraleer u de stekker uit het stopcontact trekt, om beschadiging
van het toestel te vermijden.
* Als het toestel lange tijd niet gebruikt wordt, trek de stekker van de netstroomadapter
dan uit het stopcontact.
* Plaats uw toestel dicht bij een stopcontact en zorg ervoor dat het stopcontact makkelijk
bereikbaar blijft. Van zodra u een functiestoornis vaststelt, dient u de stekker van het
toestel uit het stopcontact te trekken.
* De netstroomadapter maakt het mogelijk om de stroomvoorziening naar het toestel te
onderbeken. Zorg ervoor dat deze altijd makkelijk bereikbaar blijft tijdens het gebruik.
Om de voeding van het toestel volledig te onderbreken, dient u de stekker van de
netstroomadapter uit het stopcontact te trekken.
* Gebruik nooit een beschadigde netstroomadapter. Zorg ervoor dat de voedingskabel
niet vertrappeld of verpletterd wordt. Indien de voedingskabel beschadigd is, neem dan
contact op een gekwaliceerde technieker.
PARA ESCUCHAR UN DISCO
ASCOLTA IN MODALITÀ PHONO
EEN PLAAT BELUISTEREN
ENCENDER/APAGAR EL APARATO
ACCENSIONE / SPEGNIMENTO DELL’UNITÀ
HET APPARAAT AAN-/UITZETTEN
CODIFICACIÓN DE UN DISCO, AUX IN A USB.
CODIFICA DALLE MODALITÀ PHONO, AUX IN A USB. PHONO OF AUX IN OPNEMEN OP USB
FUNCIÓN DIVIDIR
FUNZIONE SPLIT
SPLIT-FUNCTIE
USO DEL MODO AUX IN
RIPRODUZIONE IN MODALITÀ AUX IN
DE AUX IN-MODUS GEBRUIKEN
FUNCIÓN BLUETOOTH
FUNZIONALITÀ BLUETOOTH
BLUETOOTH-FUNCTIE
OÍR UN DISPOSITIVO USB
RIPRODUZIONE DI UN DISPOSITIVO USB
LUISTEREN NAAR USB-APPARAAT
1. Cuando la unidad esté encendida, gire el botón MODE para seleccionar el modo de
reproducción de discos (phono), que la luz indicadora de función se ilumine en rojo.
2. Retire el capuchón de la aguja y suelte el brazo fonocaptor de su descanso.
3. Coloque un disco en el plato del tocadiscos y seleccione la velocidad (33/45/78) que
corresponda al tipo de disco.
NOTA: Si está reproduciendo sencillos a 45RPM, coloque el adaptador de 45 RPM en
el eje central.
4. Levante la palanca de alzamiento para que el brazo fonocaptor suba y desplace este
despacio hasta la posición deseada del disco, después baje la palanca de alzamiento
y el brazo fonocaptor descenderá lentamente hasta posarse sobre el disco para
comenzar su reproducción.
5. Gire la perilla de pitch para ajustar la velocidad del disco.
6. Ajuste el volumen (MIN/MAX) a su gusto.
7. Si el AUTO STOP ON/OFF (interruptor de DETENCIÓN AUTOMÁTICA, Encendido/
Apagado) se encuentra en la posición ON, el disco se detendrá automáticamente
cuado termine su reproducción (algunos discos de vinilo no se detendrán cuando
alcancen el nal). Si el interruptor de detención automática se encontrará en la
posición OFF, el disco NO se detendrá automáticamente cuando termine.
IMPORTANTE: No gire ni detenga el plato del tocadiscos manualmente. El movimiento
o sacudida del plato del tocadiscos sin haber asegurado el brazo fonocaptor podría
dañar la aguja del brazo.
1. Quando l'unità è accesa, per selezionare la modalità Phono premere il tasto MODE,
l'indicatore di funzione diventa rosso.
2. Rimuovere la protezione dello stilo e rilasciare il braccio.
3. Posizionare un disco sul piatto girevole e selezionare la velocità desiderata (33/45/78)
come mostrato sul disco.
NOTA: Per riprodurre singoli a 45 giri, posizionare l'adattatore 45 giri sul perno centrale.
4. Sollevare la leva di sollevamento per alzare il braccio e spostare delicatamente il braccio
nella posizione desiderata sul disco, spingere verso il basso la leva di sollevamento,
per avvicinare il braccio lentamente alla supercie del disco ed avviare la riproduzione.
5. Ruotare la manopola Pitch per regolare la velocità del piatto.
6. Regolare il volume al livello desiderato.
7. Se AUTO STOP ON/OFF (Interruttore di autospegnimento AUTO STOP, ON/
OFF) è attivato, la riproduzione si arresta automaticamente al termine del disco (per
alcuni dischi in vinile, l'autospegnimento potrebbe non funzionare). Se l'interruttore
di autospegnimento è disattivato, la riproduzione non si fermerà automaticamente al
termine del disco.
IMPORTANTE: Non ruotare o bloccare la roatazione del piatto del giradischi manualmente.
Ruotare o scorrere il piatto del giradischi, senza ssare il braccio della puntina potrebbe
danneggiare il braccio e la puntina.
1. Druk als het apparaat is ingeschakeld op MODE om de phono-modus te selecteren,
de functie-indicator wordt rood.
2. Haal de naaldbeschermer van de naald en ontgrendel de toonarmsteun.
3. Plaats een plaat op het draaiplateau en selecteer de gewenste snelheid (33/45/78)
op basis van de plaat.
OPMERKING: Als u 45TMP singles afspeelt, plaats de 45 TPM-adapter dan op de
spindel in het midden.
4. Druk de lifthendel omhoog om de toonarm op te tillen en verplaats de toonarm
voorzichtig naar de gewenste positie op de plaat, Druk de lifthendel omlaag om de
toonarm langzaam te laten zakken op de plaat en het afspelen te starten.
5. Draai de Pitch knop om de snelheid van het draaiplateau aan te passen.
6. Stel het volume (MIN/MAX) naar wens in.
7. Als de AUTO STOP ON/OFF (AUTO STOP-schakelaar, aan/uit) is ingeschakeld,
dan zal de plaat automatisch stoppen als het afspelen is voltooid (voor sommige
grammofoonplaten zal het afspelen niet stoppen als het einde niet wordt bereikt.).
Als de AUTO STOP-schakelaar is uitgeschakeld, dan zal de plaat NIET automatisch
stoppen als het afspelen is voltooid.
BELANGRIJK: Draai of stop het draaiplateau van de draaitafel niet handmatig. Het
bewegen of stoppen van het draaiplateau zonder de toonarmklem vast te zetten kan
leiden tot schade aan de toonarm of de naald.
1. Para encender la unidad, gire el interruptor de encendido ON/OFF hacia la derecha
hasta oír un “clic” y seleccione un nivel bajo de volumen (MIN/MAX).
2. Cuando haya terminado de usar la unidad, gire el interruptor de encendido ON/OFF
hacia la izquierda hasta que oiga un “clic” para apagar la unidad.
1. Per accendere l'apparecchio, ruotare l'interruttore ON / OFF in senso orario no a
sentire un "clic" e regolare il volume (MIN/MAX) come si desidera..
2. Quando si desidera spegnere l'unità, ruotare l'interruttore ON / OFF in senso antiorario
no a sentire il "clic".
1. Draai de aan/uit-knop met de klok mee tot u een “klik” hoort om het apparaat in te
schakelen en stel het volume (MIN/MAX) laag in.
2. Als u klaar bent met het gebruik van de draaitafel, schakel het apparaat dan uit door
de aan/uit-knop tegen de klok in te draaien tot u een “klik” hoort.
1. Conecte el dispositivo USB al puerto USB (asegúrese de que el dispositivo USB
cuenta con el sufciente espacio para guardar la codicación).
2. Seleccione el modo que preera (PHONO o AUX IN) y comience la reproducción.
3. Pulse el botón REC hasta que el indicador se azul y roja intermitente alterna para
iniciar la grabación.
4. Pulse el botón REC hasta que el indicador de ponerse azul y roja sin parpadear para
detener la grabación..
5. Para escuchar la grabación, gire el botón MODE para seleccionar el modo USB,
que la luz indicadora de función se vuelve intermitente de color roja parpadear, pulse
/ para encontrar su pista y escuchar su grabación.
1. Collegare il dispositivo USB alla porta USB (assicurarsi che il dispositivo USB abbia
suciente spazio per eseguire la codica).
2. Selezionare la modalità desiderata (PHONO o AUX IN) e procedere con la riproduzione.
3. Premere il tasto REC indicatore no diventa blu e rosso lampeggiante alternativamente
per avviare la registrazione.
4. Premere il tasto REC nché l'indicatore diventare blu e rosso senza lampeggiare per
interrompere la registrazione.
5. Per ascoltare la registrazione, ruotare il tasto MODE per selezionare la modalità USB.
l'indicatore diventa lampeggiante rosso. premere / per trovare la traccia e
ascoltare la registrazione.
1. Sluit het USB-apparaat aan op de USB-poort (zorg ervoor dat u voldoende vrije ruimte
beschikbaar heeft om de opname op te slaan).
2. Selecteer de gewenste modus (PHONO of AUX IN) en start het afspelen.
3. Druk op de REC-knop totdat de indicator wordt blauw en rood knipperen afwisselend
om de opname te starten.
4. Druk op de knop REC tot de indicator blauw en rood worden zonder te knipperen om
de opname te stoppen.
5. Om de opname te beluisteren, op MODE om de USB-modus te selecteren totdat
indicator wordt rood knipperen, drukt u op / om je baan te vinden en te
luisteren uw opname.
Durante la grabación, presione el botón SPLIT y la grabación actual se cortará y
guardará automáticamente en un archivo. Presionar de nuevo el botón SPLIT generará
otro archivo.
NOTA: Presione el botón para detener la grabación.
Premere il tasto SPLIT durante la registrazione, la registrazione corrente sarà interrotta
e salvata automaticamente in un le. Premere di nuovo il tasto SPLIT per creare un
altro le.
NOTA: Premere il tasto per interrompere la registrazione.
Druk op SPLIT tijdens het maken van een opname, de huidige opname wordt beëindigd
en automatisch opgeslagen in een bestand. Druk nogmaals op SPLIT om een nieuw
bestand aan te maken.
OPMERKING: Druk op om de opname te stoppen.
1. Conecte su fuente auxiliar (por ejemplo, un reproductor mp3) al jack de ENTRADA
AUXILIAR (3.5mm) en la parte trasera de la unidad (cable no incluido).
2. Cuando la unidad esté encendida, gire el botón MODE para seleccionar el modo AUX
IN, que la luz indicadora de función se ilumine en azul y roja. Normalmente, al usar
su dispositivo externo de audio, el audio se oirá automáticamente por los altavoces
de su dispositivo.
3. Ajuste el control VOLUME (MIN/MAX) a su gusto.
4. Desconecte el dispositivo externo de la entrada auxiliar para detener la reproducción.
1. Collegare il proprio dispositivo esterno, ad esempio un lettore MP3, all'ingresso
ausiliario AUX IN (3.5mm) sul retro dell'unità (cavo non incluso).
2. Quando l'unità è accesa ruotare il tasto MODE per selezionare la modalità AUX IN,
l'indicatore diventa blu e rosso. Utilizzando dispositivi audio esterni, il suono verrà
riprodotto automaticamente sul dispositivo.
3. Regolare il volume (MIN/MAX) al livello desiderato.
4. Scollegare il dispositivo esterno dall'ingresso AUX IN per interrompere la riproduzione.
1. Sluit uw hulpbron (bijv. mp3-speler) aan op de AUX INGANG (3.5mm) op de achterkant
van het apparaat. (kabel niet meegeleverd).
2. Druk, als het apparaat is ingeschakeld, op MODE om de AUX IN-modus te selecteren,
indicator wordt blauw en rood. Gebruik uw extern audioapparaat zoals u dat normaal
ook zou doen; het geluid wordt automatisch afgespeeld door de luidsprekers van de
apparaat.
3. Stel het volume (MIN/MAX) naar wens in.
4. Koppel de externe apparatuur los van de hulpingang om het afspelen te beëindigen.
Los logos y nombres Bluetooth® son marcas registradas que pertenecen a Bluetooth
SIG, Inc. y cualquier uso de dichas marcas por parte de New One S.A.S tiene sus
respectivas licencias. Otras marcas comerciales y registradas son propiedad de sus
respectivos propietarios.
Emparejar un dispositivo Bluetooth
1. Cuando la unidad esté encendida, gire el botón MODE de la unidad para seleccionar
el modo Bluetooth, indicadora de función se intermitente de color azul parpadear.
2. En el dispositivo Bluetooth, habilite Bluetooth y seleccione “MUSE MT-501” de la
lista de dispositivos. (Para obtener el detalle de operaciones para conectarse,
consulte el manual de usuario del dispositivo). Si el dispositivo Bluetoothle solicita
una contraseña de acceso, utilice “0000”. Algunos dispositivos Bluetooth le indicarán
que acepte la conexión. Si las unidades están vinculadas correctamente, escuchará
una indicación sonora.
Sugerencia: si desea conectar su altavoz Bluetooth a otro dispositivo de audio Bluetooth,
mantenga pulsado el botón para desconectar el dispositivo, y a continuación, siga los
pasos de más abajo para establecer una nueva conexión.
• En algunos dispositivos como computadoras, una vez realizado el emparejamiento,
debe seleccionar la unidad del menú Bluetooth y elegir " Use as Audio Device (stereo)
or similar " (utilizar como dispositivo de audio (estéreo) osimilar).
• El emparejamiento permanece intacto cuando launidad y/o su dispositivo Bluetooth
sale del rango de comunicación. Se restablecerá una conexiónactiva cuando su
dispositivo Bluetooth vuelva dentro del rango.
• Cuando vuelva a encender la unidad, se intentará la reconexión automática con el
dispositivo Bluetooth al que se haya emparejado más recientemente.
Utilizar un dispositivo Bluetooth
1. Con alguna unidad emparejada (ver la sección anterior),haga funcionar su dispositivo
Bluetooth. El sonido se escuchará a través de los altavoces MUSE MT-501.
2. Oprima el botón para pausar la reproducción. Presione nuevamente para retomar
la reproducción.
3. Seleccione la pista que desee con / .
4. Ajuste el control VOLUME (MIN/MAX) a su gusto.También puede ajustar el volumen
en el dispositivo con el cual está emparejado.
Il marchio denominativo Bluetooth® e i relativi loghi sono marchi registrati di Bluetooth
SIG, Inc., utilizzati da New One S.A.S su licenza. Altri marchi e nomi commerciali sono
di proprietà dei rispettivi titolari.
Associazione di un dispositivo Bluetooth
1. Quando l'unità è accesa, ruotare il tasto MODE per selezionare la modalità Bluetooth.
l'indicatore diventa lampeggiante blu.
2. Attivare la funzione Bluetooth sul proprio dispositivo Bluetooth e selezionare
“MUSE MT-501”.dall’elenco dei dispositivi rilevati (consultare il manuale di istruzioni
del dispositivo per informazioni dettagliate su come connettere il dispositivo). Se il
dispositivo Bluetooth richiede la digitazione di una password, inserire “0000”. Alcuni
dispositivi Bluetooth richiedono di accettare la connessione. Al completamento
dell'associazione l'unità emette un segnale acustico.
Nota: se si desidera connettere l’altoparlante Bluetooth a un altro dispositivo Bluetooth,
tenere premuto il tasto per scollegare il dispositivo, quindi seguire la procedura per
stabilire una nuova connessione
• Su alcuni dispositivi, come ad esempio computer, una volta associato il dispositivo
è necessario selezionare l’unità dal menu Bluetooth, quindi selezionare l’opzione
“Utilizza come dispositivo audio (stereo)” o similare.
• L’associazione rimane attiva quando l’unità e/o il dispositivo Bluetooth escono dal
raggio d’azione del Bluetooth. Una connessione attiva viene ristabilita quando il
dispositivo rientra nel raggio d’azione del Bluetooth.
• Una volta riaccesa, l’unità tenta in automatico di riconnettersi all’ultimo dispositivo
Bluetooth associato.
Utilizzo di un dispositivo Bluetooth
1. Una volta associata l’unità a un dispositivo (vedi sezione precedente) l’audio del
dispositivo Bluetooth viene riprodotto mediante l’altoparlante.
2. Premere il tasto per sospendere la riproduzione. Premerlo di nuovo per riprendere
la riproduzione.
3. Utilizzare i tasti / per selezionare la traccia desiderata.
4. Regolare il volume (MIN/MAX) al livello desiderato. È possibile regolare il volume
anche dal dispositivo a cui l’unità è associata.
De Bluetooth® markering en de logo’s zijn geregistreerde handelsmerken die eigendom
zijn van Bluetooth SIG, Inc. en het gebruik van deze markeringen door New One S.A.S
is onder licentie. Andere handelsmerken en handelsnemen zijn van hun respectieve
eigenaars.
Een Bluetooth-apparaat koppelen
1. Druk, als het apparaat is ingeschakeld, op MODE om de USB-modus te selecteren, de
functie-indicator wordt blauw knipperen.
2. Schakel Bluetooth in op het Bluetooth-apparaat en selecteer “MUSE MT-501” uit de
lijst met apparaten. (Kijk in de handleiding van het apparaat waarmee u verbinding
wilt maken voor gedetailleerde instructies.) Als het Bluetooth-apparaat vraagt om
een wachtwoord, voer dan “0000” in. Sommige Bluetooth-apparaten zullen u vragen
de verbinding te accepteren. Als de apparaten goed zijn gekoppeld, klinkt er een
indicatiegeluid.
Tip: Als u uw Bluetooth-luidspreker wilt verbinden met een andere Bluetoothaudioapparaat,
houd ingedrukt om de verbinding met het apparaat te verbreken, en volg daarna de
bovenstaande stappen om een nieuwe verbinding tot stand te brengen.
• Op bepaalde apparaten, zoals computers, moet u, zodra er is gekoppeld, het apparaat
selecteren in het Bluetooth-menu en de optie “Gebruik als audioapparaat (stereo)” (of
een soortgelijke optie) gebruiken.
• De verbinding blijft intact wanneer de luidspreker en/of uw Bluetooth-apparaat buiten
het communicatiebereik wordt verplaatst. Er wordt opnieuw een actieve verbinding
gemaakt wanneer uw Bluetooth-apparaat terugkeert binnen het bereik.
• Als het apparaat weer wordt ingeschakeld, dan zal het automatisch proberen opnieuw
verbinding te maken met het Bluetooth-apparaat waarmee het laatst werd gekoppeld.
Een Bluetooth-apparaat gebruiken
1. Als u verbinding heeft gemaakt met een apparaat (zie voorgaande paragraaf), gebruik
dan de bediening op uw Bluetooth-apparaat en wanneer het afspelen wordt gestart,
dan zal het geluid uit de luidsprekers van de MUSE MT-501 klinken.
2. Druk op om het afspelen te pauzeren. Druk nogmaals om het afspelen te hervatten.
3. Selecteer de gewenste track met / .
4. Stel het volume (MIN/MAX) naar wens in. U kunt het volume ook instellen op het
apparaat dat is verbonden met de luidspreker.
1. Conecte un lápiz USB con contenido MP3 o un reproductor MP3 al puerto USB.
2. Cuando la unidad esté encendida, gire el botón MODE para seleccionar el modo
USB, que la luz indicadora de función se intermitente de color roja. El inicio USB para
reproducir automáticamente. Pulse para hacer una pausa, el indicador es mantener
permanecen roja y sin parpadear.
3. Ajuste el control VOLUME (MIN/MAX) a su gusto.
4. Pulse una vez el botón para pasar a lapista siguiente o pulse varias veces para
saltar varias pistas. Pulse una vez el botón para retroceder al comienzo de la pista
que se esté reproduciendo o pulse varias veces para retroceder a las pistas anteriores.
Mantenga presionado o para avanzar o retroceder dentro de una pista.
5. Presione para pausar la reproducción USB.
Desconexión del dispositivo USB
Por favor, asegúrese de detener la reproducción y apagar la unidad antes de desconectar
el dispositivo USB, para evitar daños en el USB y en el propio sistema.
Nota:
* Existen diferentes modelos de dispositivos USB. Nosotros no podemos garantizar
que este aparato sea compatible con todos los modelos. Si su dispositivo USB no es
compatible, pruebe con otro.
* Es posible que algunos archivos grabados en una tarjeta USB no sean compatibles.
En efecto, algunos formatos de reproducción especiales no son compatibles con este
aparato.
1. Collegare un dispositivo USB contenente le MP3 o un lettore MP3 alla porta USB.
2. Quando l'unità è accesa, ruotare il tasto MODE per selezionare la modalità USB.
l'indicatore diventa rosso. L'avvio USB per la riproduzione automaticamente. Premere
per mettere in pausa, l'indicatore di mantenere rimanere rosso senza lampeggiare.
3. Regolare il volume (MIN/MAX) al livello desiderato.
4. Premere per riprodurre lil brano successivo o premere ripetutamente per scorrere
ai brani successivi. Premere per riprendere la riproduzione dall'inizio, o premere
ripetutamente per riprodurre un brano precedente. Tenere premuto il tasto o il
tasto per riavvolgere o avanzare rapidamente una traccia.
5. Premere per interrompere la riproduzione del dispositivo USB.
Rimuovere il dispositivo USB
Per evitare di danneggiare il dispositivo USB ed il sistema, assicurarsi di interrompere la
riproduzione e spegnere l'unità prima di rimuovere il dispositivo.
Nota:
* Esistono in commercio molti modelli di periferiche USB. Non possiamo garantire che
il presente apparecchio supporti tutti i modelli. Qualora una periferica USB non sia
supportata, provate con un’altra.
* L’apparecchio potrebbe non essere compatibile con alcuni le multimediali memorizzati
sulla periferica USB, poiché tali dipositivi richiedono particolari procedure di riproduzione
non sempre compatibili con quelle dell’apparecchio.
1. Sluit een USB-stick met MP3’s of een MP3-speler aan op de USB-poort.
2. Druk, als het apparaat is ingeschakeld, op MODE om de USB-modus te selecteren,
de functie-indicator wordt rood. De USB start automatisch afspelen. Druk op om te
pauzeren, de indicator houden rood blijven zonder te knipperen.
3. Stel het volume (MIN/MAX) naar wens in.
4. Druk eenmaal op de toets om naarde volgende track te gaan of druk meermaals
om verschillende tracks verder te gaan; Drukeenmaal op de toets om terug te
keren naar het begin van de huidige track of drukmeermaals om terug te keren naar
de vorige tracks. Houd de toets of ingedrukt om snel een bepaald fragment
in een track te zoeken.
5. Druk op knop om de USB afspelen te onderbreken.
Het USB-apparaat verwijderen
Zorg ervoor dat u het afspelen stopt en het apparaat uitschakelt voordat u het USB-
apparaat verwijdert om te vorkomen dat u de USB-poort of het systeem beschadigd.
Opmerking:
* Er bestaan tal van modellen van USB-sleutels. We kunnen niet garanderen dat het
toestel alle modellen ondersteunt. Als uw USB-sleutel niet ondersteund wordt, probeer
dan een ander model.
* Het is mogelijk dat bepaalde bestanden die opgeslagen zijn op de het USB-apparaat
niet kunnen gelezen worden omdat deze speciale afspeelprocedures vereisen die niet
compatibel zijn met dit toestel.
USO DE CASCOS O AURICULARES
COLLEGAMENTO DI CUFFIE O AURICOLARI
GEBRUIK VAN EEN HOOFDTELEFOON
Tensión de salida máxima ≤ 150 mV
ADVERTENCIA SOBRE EL NIVEL DE VOLUMEN DE LOS CASCOS O DE LOS
AURICULARES
Disminuya el volumen antes de conectar los cascos o auriculares y auméntelo a
continuación en caso de que sea necesario. El uso prolongado de los auriculares (o de los
cascos) a un volumen elevado puede dañar el sistema auditivo. Cuando se utilicen cascos
o auriculares, la salida de audio de los altavoces queda automáticamente desactivada.
Atención: No utilice los cascos o auriculares a un volumen demasiado alto. Podría dañar
su sistema auditivo.
Tensione massima di uscita ≤ 150 mV
AVVERTENZA SUL VOLUME DELLE CUFFIE
Diminuite il volume prima di collegare le cue e aumentatelo successivamente se
necessario. L’uso prolungato delle cue ad alto volume può danneggiare l’udito. Se le
cue / auricolari sono collegati all’apparecchio, gli altoparlanti del lettore si disattivano
automaticamente.
Attenzione: evitate di utilizzare l’apparecchio ad un volume troppo elevato per non
danneggiare il vostro udito.
Maximaal vermogen ≤ 150 mV
WAARSCHUWING MET BETREKKING TOT HET VOLUME VAN DE
HOOFDTELEFOON
Verminder het geluidsvolume vooraleer u een hoofdtelefoon aansluit. Vervolgens kan
u het geluid naar wens luider zetten. Langdurig luisteren naar het toestel op hoog
volume kan het oor van de gebruiker beschadigen. Het geluid wordt niet langer door de
luidsprekers gestuurd, van zodra u een hoofdtelefoon aansluit.
OPGEPAST: vermijd het luisteren naar het toestel op hoge volumes die het oor van de
gebruiker kunnen beschadigen.
CODIERUNG VON PHONO, AUX IN AUF USB
SPLIT-FUNKTION
1. Schließen Sie das USB-Gerät an den USB-Anschluss an (vergewissern Sie sich, dass
genügend Speicherplatz zum Codieren auf dem USB-Medium vorhanden ist).
2. Wählen Sie den gewünschten Modus (PHONO oder AUX IN) und starten Sie die
Wiedergabe.
3. Drücken Sie die REC -Taste, bis die Anzeige leuchtet blau und rot blinkend um die
Aufnahme zu starten.
4. Drücken Sie die REC-Taste, bis die Anzeige blau und rot werden, ohne zu blinken um
die Aufnahme zu stoppen.
5. Um die Aufnahme zu hören, drehen Sie die MODE-Taste zur Auswahl des um den
USB-Modus zu wählen, die Anzeige rot Blinken wird, drücken Sie / Ihre Spur
zu nden und Ihre Aufnahme anzuhören.
Drücken Sie während der Aufnahme die Taste SPLIT, der aktuelle Datensatz wird
abgeschnitten und automatisch in einer Datei gespeichert. Drücken Sie die SPLIT-Taste
erneut, um eine weitere Datei zu erzeugen.
HINWEIS: Drücken Sie die -Taste, um die Aufnahme zu stoppen.
GEBRAUCH EINES KOPFHÖRERS / OHRHÖRERS
Maximale Ausgangsspannung ≤ 150 mV
WARNUNG IN ZUSAMMENHANG MIT DER LAUTSTÄRKE BEIM GEBRAUCH DES
KOPFHÖRERS
Vor dem Anstecken eines Kopfhörers zuerst die Lautstärke verringern; sie kann danach
bei Bedarf wieder erhöht werden. Das längere Hören mit einem Kopfhörer bei großer
Lautstärke kann Ihr Gehör unwiderruich schädigen. Wenn ein Kopf- oder Ohrhörer an
das Gerät angeschlossen wird, deaktiviert das die Lautsprecher des Players.
Achtung: Vermeiden Sie große Lautstärken, sie schädigen Ihr Gehör.
VERWENDUNG DES AUX-MODUS
BLUETOOTH-FUNKTION
WIEDERGABE EINER USB
1. Schließen Sie Ihr externes Gerät (z.B. MP3-Player) an die AUX IN (3.5mm) Buchse an
der Rückseite des Geräts an (Kabel nicht enthalten).
2. Wenn das Gerät eingeschaltet ist, drehen Sie die MODE-Taste zur Auswahl des AUX-
Modus, die Anzeige zu abwechselnd blau und rot wird. Normalerweise wird der Ton
bei der Verwendung eines externen Audiogeräts automatisch über die Lautsprecher
des Geräts wiedergegeben.
3. Stellen Sie die Lautstärke (MIN/MAX) auf ein angenehmes Maß.
4. Wenn Sie die Wiedergabe beenden möchten, trennen Sie die Verbindung des
externen Gerätes mit dem Aux-Eingang des Players.
Der Bluetooth®-Markenname und damit verbundene Logos sind Eigentum der Firma
Bluetooth SIG, Inc. Jegliche Benutzung dieser Marken durch die Firma New One S.A.S
stehen unter Lizenz. Alle anderen Produkt- und Markennamen sind Eigentum ihrer der
jeweiligen Besitzer.
Verbindungsaufbau mit einem Bluetooth-Gerät
1. Wenn das Gerät EINGESCHALTET ist, drehen Sie die MODE-Taste zur Auswahl des
um den Bluetooth-Modus auszuwählen. Die Bluetooth-Anzeige beginnt blinken blau.
2. Aktivieren Sie die Bluetooth-Funktion auf Ihrem Bluetooth-Gerät, und wählen Sie
"MUSE MT-501" in der Geräteliste. (Lesen Sie bitte die Bedienungsanleitung des
jeweiligen Geräts für detaillierte Bedienungsschritte zum Verbindungsaufbau.)
Wenn das Bluetooth-Gerät Sie zur Eingabe eines Schlüssels auordert, geben Sie
bitte "0000" ein. Manche Bluetooth-Geräte erfordern es zudem, dass die Verbindung
bestätigt wird. Nach der erfolgreichen Kopplung der Geräte ertönt ein Signalton.
Tipp: Wenn Sie Ihren Bluetooth-Lautsprecher mit einem anderen Bluetooth-AudioGerät
verbinden möchten, halten Sie die Taste gedrückt, um das Gerät zu trennen.
Folgen Sie dann der oben erläuterten Vorgehensweise, um eine neue Verbindung
herzustellen.
• Auf einigen Geräten wie z. B. Computern müssen Sie bei bestehender Verbindung das
Gerät aus dem Bluetooth-Menü wählen und als Audiogerät aktivieren.
• Die Verbindung bleibt bestehen, wenn das Bluetooth-Gerät außer Reichweite bzw.
ausgeschaltet ist. Eine aktive Verbindung wird dann wieder hergestellt, wenn das
BluetoothGerät sich wieder in Reichweite bendet.
• Wird das Gerät erneut eingeschaltet, versucht es automatisch, sich mit dem zuletzt
gekoppelten Bluetooth-Gerät zu verbinden.
Verwenden eines Bluetooth-Geräts
1. Bei bestehender Verbindung (siehe voriger Abschnitt), können Sie das Bluetooth-
Gerät bedienen und den Ton über das MUSE MT-501 wiedergeben.
2. Betätigen Sie die Taste , um die Wiedergabe vorübergehend anzuhalten. Betätigen
Sie die Taste ein weiteres Mal, um mit der Wiedergabe fortzufahren.
3. Wählen Sie mit den Tasten / einen Titel aus.
4. Stellen Sie die Lautstärke (MIN/MAX) auf ein angenehmes Maß. Sie können die
Lautstärke auch direkt auf dem Gerät, mit dem die Verbindung hergestellt wurde,
einstellen.
1. Schließen Sie einen USB-Datenträger mit MP3-Inhalten oder einen MP3-Player am
USB-Anschluss.
2. Wenn das Gerät eingeschaltet ist, drehen Sie die MODE-Taste zur Auswahl des USB-
Modus, die Anzeige rot wird. Der USB-Start automatisch abzuspielen. Drücken Sie
REC / pausieren, die Anzeige halten bleiben rot ohne zu blinken.
3. Stellen Sie die Lautstärke (MIN/MAX) auf ein angenehmes Maß.
4. Drücken Sie einmal die Taste , um zum nächsten Titel zu gehen oder drücken Sie
mehrere Male, um mehrere Titel zu überspringen. Drücken Sie einmal auf die Taste
, um zum Beginn des aktuellen Titels zurückzukehrenoder drücken Sie mehrere
Male, um zu den vorherigen Titeln zurückzukehren. Halten Sie die Taste oder
für den schnellen Suchlauf innerhalb eines Titels gedrückt.
5. Drücken Sie , das USB-Wiedergabe zu stoppen.
Abtrennen des USB-Geräts
Vergewissern Sie sich bitte, dass die Wiedergabe gestoppt ist und das Gerät
ausgeschaltet wird, bevor Sie das USB-Gerät abtrennen, um zu vermeiden, dass
Schäden am USB-Gerät und dem System entstehen.
Anmerkungen:
* Auf dem Markt gibt es viele verschiedene externe USB-Geräte. Wir können deshalb die
Kompatibilität dieses Gerätes mit allen externen USB-Geräten nicht garantieren. Falls
Ihr externes USB-Gerät nicht unterstützt wird, probieren Sie ein anderes aus.
* Möglicherweise werden einige Dateien, die auf der USB-Gerät gespeichert sind, nicht
vom Gerät unterstützt. Denn bestimmte spezielle Wiedergabe- Prozeduren sind mit
diesem Gerät nicht kompatibel.
-
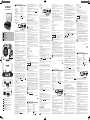 1
1
-
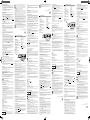 2
2


Muse MT-501 ATB Manuale utente
- Categoria
- Giradischi audio
- Tipo
- Manuale utente
- Questo manuale è adatto anche per
in altre lingue
- English: Muse MT-501 ATB User manual
- français: Muse MT-501 ATB Manuel utilisateur
- español: Muse MT-501 ATB Manual de usuario
- Deutsch: Muse MT-501 ATB Benutzerhandbuch
- Nederlands: Muse MT-501 ATB Handleiding
- português: Muse MT-501 ATB Manual do usuário
Documenti correlati
-
Muse MT-201 WG Manuale utente
-
-
-
Muse MT-106 BT Manuale utente
-
-
Muse MT-201 BTR Manuale utente
-
-
-
-