Hitachi RP 150YB Handling Instructions Manual
- Categoria
- Aspirapolvere
- Tipo
- Handling Instructions Manual

Handling instructions
Bedienungsanleitung
Mode d’emploi
Istruzioni per l’uso
Gebruiksaanwijzing
Instrucciones de manejo
Instruções de uso
Bruksanvisning
Brugsanvisning
Bruksanvisning
Käyttöohjeet
Οδηγίες χειρισμού
Instrukcja obsługi
Kezelési utasítás
Návod k obsluze
Kullanım talimatları
Instrucţiuni de utilizare
Navodila za rokovanje
Pokyny na manipuláciu
Инструкция за експлоатация
Uputstvo za rukovanje
Upute za rukovanje
Iнструкції щодо поводження з
пристроєм
Инструкция по эксплуатации
RP 150YB RP 250YE RP 350YE
en
de
fr
it
nl
es
pt
sv
da
no
fi
el
pl
hu
cs
tr
ro
sl
sk
bg
sr
hr
uk
ru
RP150YB
en
de
fr
it
nl
es
pt
sv
da
no
fi
el
pl
hu
cs
tr
ro
sl
sk
bg
sr
hr
uk
ru
RP350YE

2
12
34
5
1
2
3
4
5
9
@
#
6
8
$
%
1
2
3
7
7
45
9
@
#
6
8
$
^
1
$
*
&
(
)
w
q
e
r

3
6
78
910
q
t
y
u
p
i
o
s
a
2
2
4
5
g
h
f
d
j
@
6
#
&
$
$

4
11 12
13 14
15 16
17
%
$
@
0
6
$
k
l
;
z
e
!
x
c
v
n
b
m
,
90°
.
c
v
b

17
English Deutsch Français Italiano
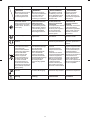
Symbols
WARNING
The following show symbols
used for the machine. Be
sure that you understand
their meaning before use.
Symbole
WARNUNG
Die folgenden Symbole
werden für diese Maschine
verwendet. Achten Sie
darauf, diese vor der
Verwendung zu verstehen.
Symboles
AVERTISSEMENT
Les symboles suivants
sont utilisés pour l’outil.
Bien se familiariser avec
leur signifi cation avant
d’utiliser l’outil.
Simboli
AVVERTENZA
Di seguito mostriamo
i simboli usati per la
macchina. Assicurarsi di
comprenderne il signifi cato
prima dell’uso.
Read all safety warnings
and all instructions.
Failure to follow the warnings
and instructions may result
in electric shock, fi re and/or
serious injury.
Lesen Sie sämtliche
Sicherheitshinweise und
Anweisungen durch.
Wenn die Warnungen
und Anweisungen nicht
befolgt werden, kann es
zu Stromschlag, Brand
und/oder ernsthaften
Verletzungen kommen.
Lire tous les
avertissements de
sécurité et toutes les
instructions.
Tout manquement à observer
ces avertissements et
instructions peut engendrer
des chocs électriques,
des incendies et/ou des
blessures graves.
Leggere tutti gli
avvertimenti di
sicurezza e tutte le
istruzioni.
La mancata osservanza
degli avvertimenti e
delle istruzioni potrebbe
essere causa di scosse
elettriche, incendi e/o
gravi lesioni.
Always wear eye protection.
Tragen Sie immer einen
Augenschutz.
Toujours porter des verres
de protection.
Indossate sempre le
protezioni oculari.
Always wear hearing
protection.
Stets Gehörschutz tragen. Porter des protections
anti-bruit en permanence.
Indossare sempre I
dispositivi di protezione
acustica.
Only for EU countries
Do not dispose of electric
tools together with
household waste material!
In observance of European
Directive 2002/96/EC
on waste electrical and
electronic equipment
and its implementation in
accordance with national
law, electric tools that
have reached the end of
their life must be collected
separately and returned to an
environmentally compatible
recycling facility.
Nur für EU-Länder
Werfen Sie Elektrowerkzeuge
nicht in den Hausmüll!
Gemäss Europäischer
Richtlinie 2002/96/EG über
Elektro- und Elektronik-
Altgeräte und Umsetzung
in nationales Recht müssen
verbrauchte Elektrowerkzeuge
getrennt gesammelt und
einer umweltgerechten
Wiederververtung zugeführt
werden.
Pour les pays européens
uniquement
Ne pas jeter les appareils
électriques dans les ordures
ménagères!
Conformément à la directive
européenne 2002/96/EG relative
aux déchets d’équipements
électriques ou électroniques
(DEEE), et à sa transposition
dans la législation nationale,
les appareils électriques
doivent être collectés à part
et être soumis à un recyclage
respectueux de l’environnement.
Solo per Paesi UE
Non gettare le apparecchiature
elettriche tra i rifi uti domestici.
Secondo la Direttiva Europea
2002/96/CE sui rifi uti di
apparecchiature elettriche ed
elettroniche e la sua attuazione
in conformità alle norme
nazionali, le apparecchiature
elettriche esauste devono
essere raccolte separatamente,
al fi ne di essere reimpiegate in
modo eco-compatibile.
Never stand on the dust
extractor.
Stehen Sie niemals auf
der Staub-Absaugung.
Ne jamais se tenir sur
l’extracteur de poussière.
Non sostare mai
sull’estrattore di polvere.
Warning Warnung Avertissement Avvertenza

23
English
(Original instructions)
SAFETY PRECAUTIONS FOR THE
DUST EXTRACTOR
○ In order to prevent accidents, such as fi res, electric
shock, and injuries, be sure to follow the “Safety
Precautions” stated below.
○ Before use, read all of the “Safety Precautions” and use
the appliance correctly according to the instructions.
○ Be sure to keep this instructions manual in the place
where it can be consulted by the user at any time.
WARNING
1. Keep the workplace clean. Littered place or workbench
may cause accidents.
2. Pay attention to the situation around the workplace as
well. Make the workplace bright enough. Do not use the
appliance in places with infl ammable liquid or gas.
3. Use the power supply with the voltage and frequency
displayed on the nameplate. Use of the power supply
with other voltage or frequency will cause fi res, electric
shock, or failures.
4. Keep children away. Do not let other persons than
the operator touch the dust extractor or the cord.
Keep persons other than the operator away from the
workplace.
5. Use the dust extractor suitable for the work. Use the
appliance only for the specifi ed applications.
6. Do not handle the cord roughly. Do not carry the dust
extractor holding the cord by hand or do not extract
the cord from the power receptacle by pulling it.
Keep the cord away from heat, oil, or angular places.
Moreover, do not put a heavy thing on it or do not get it
sandwiched.
7. The dust extractor should be maintained carefully.
Replacement of accessories should follow the
instructions manual. Check the cord periodically.
When it is damaged, please request repair from your
local retailer or the authorized servicing agent. If an
extension cord is used, check it periodically, and when
damaged, replace it.
8. In the following cases, switch off the dust extractor and
turn OFF the main power supply:
The dust extractor is not used or it is sent for repair.
Accessories, such as a hose and a fi lter, are replaced.
Danger is expected.
9. Avoid sudden starting. Do not carry the appliance
which is connected to the power supply with your fi nger
placed on the switch. Confi rm that the switch is off
before putting the plug in the power receptacle.
10. Do the work with enough care. When you use the dust
extractor, pay attention to the handling method, how
to do the work, the surrounding situation, etc. and
perform the operation in a cautious manner. When
you do the work at a distance from the dust extractor,
pay attention to the operation condition of the dust
extractor. (abnormal sound, dust blow off , emitting
smoke, etc.) Exercise common sense. Do not use the
appliance when you are tired.
11. Check for any damaged part.
○ Before use, check for any damages in the protective
cover or other parts and confi rm whether the appliance
operates normally and performs specifi ed functions.
○ Check for any abnormalities in all places that may
aff ect the operation, the position adjustment and
clamping state of movable portions, damaged parts or
attachment state.
○ Replacement and repair of damaged protective cover
and other parts should follow the provisions of the
handling instructions. If there are no such provisions
in the manual, please request repair from your local
retailer or authorized servicing agent.
○ If the switch fails, please request repair from your local
retailer or authorized servicing agent. Avoid using the
dust extractor which cannot be started or stopped by
the switch.
12. Contact the specialty store for repair of the dust
extractor.
○ Since this dust extractor conforms to the corresponding
safety standard, do not modify it.
○ Be sure to request repair from your local retailer or
authorized servicing agent. Self-repair may cause
accidents or injuries.
13. This appliance can be used by children aged from 8
years and above and persons with reduced physical,
sensory or mental capabilities or lack of experience
and knowledge if they have been given supervision or
instruction concerning use of the appliance in a safe
way and understand the hazards involved. Children
shall not play with the appliance. Cleaning and user
maintenance shall not be made by children without
supervision.
PRECAUTIONS FOR USE OF THE
DUST EXTRACTOR FOR ELECTRIC
TOOLS
The precautions common to the dust extractors have been
described. For the dust extractors for electric tools, follow
further precautions described below:
WARNING
1. The power consumption of an electric tool that can
be connected to the interlocking outlet is 2400 W
during operation, respectively. If an electric tool with
power consumption exceeding the above is used in
connection with the interlocking outlet, overcurrent will
cause failures of the interlocking circuit or the plug or
injuries.
2. Use the power receptacle with its rating 16 A or
more and in isolation. If it is used together with other
instruments, fi res may be caused by abnormal heat
generation.
3. Prevent the appliance from sucking in the following:
○ Generated spark during metal grinding or cutting.
○ High temperature things, such as lighted cigarette.
○ Infl ammable substances (gasoline, thinner, benzine,
kerosene, paint, etc.), explosive substances
(nitroglycerine, etc.), combustible substances
(aluminum, zinc, magnesium, titanium, red
phosphorus, yellow phosphorus, celluloid, etc.)
○ Sharp things, such as nail and razor.
○ Wood chip, metal, stone, string, etc.
○ Solidifi cation materials, such as cement powder and
toner, and conductive fi ne dusts, such as metal powder
and carbon powder.
○ Foaming liquids, such as oil, boiling water, chemical
fl uid, and detergent. Liquids, such as water and oil.
May cause fi res or injuries.
4. Set the fi lter correctly before use. Do not use the
appliance without the fi lter or with it set in a wrong
position, or do not use a torn fi lter. May cause failures,
such as motor burnout.
5. Do not put water or oil on the appliance or plug
or interlocking outlet. Since this appliance is not
waterproof, electric shock or failures may be caused.
6. Do not use the appliance with its suction opening, air
inlet or exhaust opening obstructed. The temperature
of the motor may rise abnormally, causing troubles
such as deformation of parts or motor burnout.

24
English
7. Do not operate the appliance when its fl oat is operating
or when its hose or suction mouth, etc. is clogged with
foreign matter. The temperature of the motor may rise
abnormally, causing troubles such as deformation of
parts or motor burnout.
8. Do not topple the appliance or do not use it on its side.
May cause electric shock or failures.
9. To prevent deformation or breakage of the appliance
due to toppling etc., the appliance should be moved
calmly. Breakage, crack, or deformation may cause
injuries.
SPECIFICATIONS
Model
Item
RP150YB RP250YE RP350YE
Power supply used Single phase AC 50/60 Hz common use, Voltage 230 V / 240 V
Motor Single phase series commutator motor
Application Wet and Dry type
Power input 1140 W
Interlocking electric outlet
*1
2400 W / 1700 W / 1200 W
Max. Airfl ow 3.5 m
3
/min
Max. Vacuum 22 kPa
Details-Dry 15 L 25 L 35 L
Details-Wet 12 L 22 L 30 L
Dimensions (W × D × H)
334 mm × 366 mm × 400 mm 390 mm × 469 mm × 550 mm 390 mm × 469 mm × 665 mm
Weight
*2
7.8 kg 9.4 kg 9.7 kg
Cord 8 m
*1 Be sure to check the nameplate and mode selection switch on product as it is subject to change by areas.
*2 Excluding cord and accessories.
10. When you drop or bump the appliance accidentally,
check for breakage, crack, or deformation in the
appliance. Breakage, crack or deformation may cause
injuries.
11. When the appliance is out of condition or emits
abnormal sound during use, immediately turn off the
switch and request repair from your local retailer or
authorized servicing agent. If you continue to use the
appliance as it is, it may lead to injuries.
12. When you use an extension cord, use a triplex cabtyre
cable equipped with an earth wire. Duplex cable
without earth wire may cause electric shock.
13. This appliance is only used indoors. Never use it
outdoors. Insulation deterioration may cause electric
shock or electrical fi re.
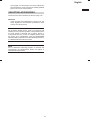
STANDARD ACCESSORIES
(1) Hose (id 38 mm × 3 m long) .........................................1
(2) Pipe ..............................................................................2
(3) Joint handle .................................................................1
(4) Master nozzle...............................................................1
(5) Crevice nozzle .............................................................1
(6) Wet nozzle ...................................................................1
(7) Round Brush nozzle .....................................................1
(8) Joint (D) .......................................................................1
(9) Adapter ........................................................................1
Standard accessories are subject to change without notice.
OPTIONAL ACCESSORIES (sold
separately)
○ Paper fi lter
○ Cartridge fi lter
Optional accessories are subject to change without notice.
APPLICATIONS
○ General cleaning in workplaces and others.
○ Collection of fi ne dusts generated during grinding,
cutting or drilling of concrete or wood using power tools.
○ Suction of liquid such as water spilt on the fl oor.
UNPACKING
○ Carefully unpack the power tool.
○ Take out the accessories in the tank before work.
PRIOR TO OPERATION
WARNING
Before use, check the following. 1 to 3 should be
checked before putting the plug in the power receptacle.
1. Confi rm the power supply used.
Be sure to use the appliance with the voltage indicated
on the nameplate. If it is used with the voltage exceeding
the indication, the rotation of the motor may be
abnormally fast, damaging the appliance. Moreover, do
not use the appliance with transformers, such as a DC
power supply, an engine generator, and a booster, or not
only the appliance will be damaged, but accidents may
be caused.
2. Confi rm that the vacuum switch is OFF.
If, without knowing that the vacuum switch is ON, the
plug is put in the power receptacle, the appliance will
start suddenly, causing unexpected accidents. The
vacuum switch will be turned on by pushing “ON” and
it will be turned off by returning it to “OFF”. Be sure to
check that the vacuum switch is OFF. (Fig. 8)
3. Check the fi lter
Referring to “2. Attaching the Filter” the fi lter should be
correctly attached.

25
English
4. Inspection of the power receptacle
If, when the plug is inserted, the power receptacle is
shaky or the plug readily comes off , repair is required.
Consult the electrical work shop nearest you. If such a
power receptacle is used as it is, it will be overheated,
and causing accidents.
5. Extension cord
WARNING
Use undamaged extension cord. If the power supply is
distant, use an extension cord which is thick enough to
pass an electric current and is as short as possible.
HOW TO USE
CAUTION
Do not use the head top as a footstool or do not sit on
it. Otherwise the appliance begins to move suddenly,
causing an injury.
NOTE
Handle the hose with care. Do not bend the hose by
force, or do not trample it, or do not pull it to move the
dust extractor. Moreover, do not put away the hose as
it is bent. Otherwise troubles such as its deformation
may be caused.
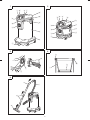
1. Connecting the hose
Press the attached hose into the suction opening of the
tank until it clicks and connect it. When removing the
hose, pull out the hose while pushing the button of the
suction opening. (Fig. 3)
2. Attaching the fi lter (Fig. 4)
WARNING
○ Be sure to attach the fi lter. (cloth fi lter or fi lter for dusts)
Otherwise the motor will be damaged.
○ When you collect fi ne dusts, such as siding powder and
stone powder, use the optional paper fi lter.
○ Since it is a fi lter for dry and wet suction, do not remove
it when you suck up liquids, such as water.
NOTE
If the fi lter is wet, leave it to dry out of direct sunlight.
Using the fi lter when wet will conspicuously reduce the
suction power.
(1) Check that the fi lter packing is put on the mouth of the
tank.
(2) Check that the fi lter cage is on the bottom of the fi lter.
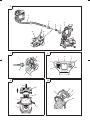
3. Attach the master nozzles, pipes, etc.
When it is used as a cleaner (Fig. 5)
Connect in order of Hose (id 38 mm × 3 m long), Joint
handle, Pipes, and Master nozzle. Connection is done
by pressing in the direction of the arrow. The suction
mouth for crevices can also be attached depending on
the application.
4. Connect power tools (Fig. 6)
Connect in order of Hose (id 38 mm × 3 m long) and
Adapter or Joint (D) (Standard Accessory). Connection
is done by pressing in the direction of the arrow.
5. How to use the interlocking electric outlet
WARNING
○ Voltage is applied to the interlocking electric outlet
irrespective of the position of the vacuum switch or
mode selection switch in this appliance. When you put
the plug of a power tool in the interlocking electric outlet,
check that the switch of the power tool is OFF. If, without
knowing that the vacuum switch is ON, the plug is put in
the power receptacle, the appliance will start suddenly,
causing unexpected accidents.
○ Do not connect the power tool exceeding the following
power consumption to the interlocking electric outlet.
Otherwise an overcurrent will cause failures of the
interlocking circuit or plug or an injury. Connect the
power tool exceeding the following power consumption
to an outlet other than the power receptacle to which the
plug of this appliance is connected. 2400 W of the power
consumption for the power tool.
NOTE
If a product containing a winding transformer is
connected to the interlocking electric outlet, the
appliance will be interlocked for about 5 seconds, which
does not mean any failure.
(1) Check the power consumption of the power tool to
be connected
This appliance can be connected to a power tool whose
power consumption is 2400 W. Check the power
consumption of the power tool to be connected. For a
power tool exceeding the above, connect it to an outlet
other than the power receptacle to which the plug of
the appliance is connected. In this case, the appliance
cannot be operated or stopped by the operation of the
switch of the power tool.
(2) Connect the plug of a power tool (Fig. 7)
Raising the cover, put the plug of the power tool in the
interlocking electric outlet.
6. Operation of mode selection switch, vacuum switch
(Fig. 8)
(1) Mode selection switch
By pushing “A”(Auto) this appliance can be operated and
stopped by the operation of the switch of the power tool
connected. By pushing “M” (Manual) this appliance can
be operated and stopped by the operation of its switch.
(2) Vacuum switch
By pushing “ON” the appliance will be operated. By
returning the switch to “OFF” the appliance will stop.
When the mode selection switch is in “M” (Manual) the
appliance will operate and stop by the operation of the
vacuum switch.
(3) Procedure of operation of each switch
(a) When using the appliance with a power tool interlocked
1 Push “ON“ of the vacuum switch.
2 Push “A”(Auto) of the mode selection switch.
3 By operation of the switch of the connected power tool,
this appliance also operates and stops interlockedly.
In addition, in order to suck up the dusts remaining in
the hose, the appliance runs for several seconds even
after turning off the switch of the power tool, and then the
appliance stops.
(b) When using the appliance as a cleaner
1 Push “M” (Manual) of the mode selection switch.
2 If “ON” of the vacuum switch is pushed, the appliance will
operate. To stop it, return the switch to “OFF”.
7. Filter cleaning
WARNING
Be sure to turn off the vacuum switch and disconnect the
plug from the power receptacle.
CAUTION
If the tank is fi lled with dusts, the suction power declines.
Dump dusts as early as possible when they reach the
half of the tank height.
When the suction power declines during use, remove
dusts in the following procedure:
(1) Remove the clamp and detach the head. For the
procedure, refer to “8. Dump dusts”.
(2) Remove attached dusts by striking the inner side of the
fi
lter several times with the fi lter mounted in the tank. The
suction power will be recovered.
(3) Attach the head and the clamp in the original
position. For the method of attachment, refer to
“8. Dump dusts”.
NOTE
Since the fi lter cleaning device operates when the
suction power declines to some extent, it also operates
in the following cases:
○ When the suction mouth at the tip of the hose is closed.
○ When the hose is clogged with foreign matter.
(1) When the suction power of the appliance declines to
some extent during use, its fi lter cleaning device will
operate automatically and its suction power will be
recovered as follows:

26
English
(a) When using the appliance as a cleaner
After the motor is stopped by putting the mode selection
switch in “A” (Auto) the fi lter cleaning device operates for
several seconds.
(b) When using the appliance with a power tool connected
Put the switch of the power tool in “OFF” and run the
appliance in full operation for several seconds. Then,
after the motor is stopped, the fi lter cleaning device
operates for several seconds. Depending on the power
tool connected and the thickness of the attachment
adapter at the tip of the hose, the fi lter cleaning device
may operate whenever the switch of the power tool is put
in “OFF”. This is not a failure, however.
(2) If the fi lter cleaning device is repeatedly operated and
the suction power is not recovered, the tank is almost
fi lled with dusts. Dump dusts in the tank.
8. Dump dusts
WARNING
Be sure to turn off the vacuum switch and disconnect the
plug from the power receptacle.
CAUTION
○ Do not impact the tank, the fi lter, or the head. Otherwise
they will be deformed or damaged.
○ Although it is based on the amount of suction of dusts
and liquids, dump dusts and liquids in the tank at least
once a day and keep the appliance, the fi lter, etc. clean.
Otherwise suction power fall, motor failure, bad smell or
rusting may be caused.
○ Do not hold the clamps when you dump dusts in the tank.
Otherwise the clamps may be damaged.
NOTE
Do not tilt the tank with accessories (Pipe, Master nozzle,
etc.) inserted in the base or in the tank. Otherwise any
part may be damaged.
WARNING
If the appliance is pushed on its side while the tank
contains liquid, the liquid will get inside the motor or
switch region, causing an electric shock or motor failure.
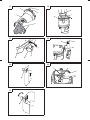
(1) Remove the clamps (2 pieces) and raise the handle of
the head. (Fig. 9)
(2) Lightly striking the inner side of the fi lter several times,
remove dusts attached to the fi lter.
(3) Tilt the tank and dump dusts. (Fig. 10, 11)
(4) Attach the fi lter, the fi lter cage, the head, and the clamp
in the initial positions.
9. Transportation and storage
(1) How to use the handle
When carrying or moving the appliance, hold the handle
of the head part as shown in the Fig. 12. When you do
not use the handle, put it in the head part.
(2) Fixation and release of the caster
By lowering the lever of the caster with the brake, the
rotation of the wheel is fi xed. When releasing the fi xed
wheel, raise the lever. (Fig. 13) When moving with
the appliance on a vehicle, fi x the caster to retain the
appliance. However, when you move the appliance,
check that the caster is released, or the caster will be
damaged.
(3) When the appliance is stored
When you want to interrupt cleaning for a moment, you
can hook the pipe holder of the pipe. The appliance
can be then stored. The cord can also be bundled and
hooked. (Fig. 14)
10. How to attach the paper fi lter (Optional)
WARNING
○ Be sure to turn off the appliance and remove the plug
from the electric outlet.
○ When using a paper fi lter, use it in combination with the
standard cloth fi lter.
If the paper fi lter gets torn, dust may get inside the motor,
causing abnormal noise or fi re due to overheating.
CAUTION
When using a paper fi lter, avoid sucking in liquids such
as water or wet dust, as this may lead to tearing of the
fi lter.
(1) Open the paper fi lter horizontally so that the suction hole
in the paper fi lter is over the top of the tank. (Fig. 15)
(2) Before attaching the fi lter to the appliance, bend the two
folds in the cardboard approx. 90° in the direction of the
arrow. (Fig. 16)
(3) Match the suction hole in the paper fi lter with the suction
opening of the appliance. Insert the fi lter in the direction
of the arrow as shown in the illustration, so that the
cardboard of the paper fi lter goes past the stopper on
the suction opening. (Fig. 17)
FLOAT MECHANISM
This appliance is equipped with a fl oat mechanism to prevent
water from entering in the motor when it sucks in more than
a specifi c quantity of water. When the fl oat operates not to
suck in water, turn off the switch promptly and throw away
water in the tank.
WARNING
○ With the fl oat working, do not continue operation.
Otherwise the temperature of the motor may rise
abnormally causing troubles such as deformation of
parts or motor burnout.
○ Avoid sucking in foaming liquid such as detergent or
foams. Before the fl oat works, foams may spurt from the
air outlet. If you continue to use the appliance as it is, it
will lead to electric shock or failure.
MAINTENANCE AND INSPECTION
WARNING
○ For inspection and maintenance, be sure to turn off the
vacuum switch and disconnect the plug from the power
receptacle.
○ Do not work with wet hands. May cause electric shock
or injuries.
1. Maintenance of fi lter
NOTE
○ Since a fi lter is a consumable, we recommend you to
prepare spares.
○ The cloth fi lter should simply be tapped even if it is
considerably clogged. Strong brushing will shorten its
life.
○ Do not hurl a fi lter. May break its resin part.
A clogged fi lter will decrease the suction power
remarkably. Tap the inner side of the fi lter to drop off
dusts regularly.
2. Inspecting the mounting screws
Regularly inspect all mounting screws and ensure that
they are properly tightened. Should any of the screws
be loose, retighten them immediately. Failure to do so
could result in serious hazard.
3. Maintenance of the motor
The motor unit winding is the very “heart” of the power
tool.
Exercise due care to ensure the winding does not
become damaged and/or wet with oil or water.
4. Check for Dust
Dust may be removed with a soft cloth or a cloth
dampened with soapy water. Do not use bleach,
chlorine, gasoline or thinner, for they may damage the
plastics.
5. Service and repairs
All quality power tools will eventually require servicing
or replacement of parts because of wear from normal
use. To assure that only authorized replacement parts
will be used, all service and repairs must be performed
by a HITACHI AUTHORIZED SERVICE CENTER,
ONLY.

27
English
If the supply cord is damaged, it must be replaced by
the manufacturer, its service agent of similarly qualifi ed
persons in order to avoid a hazard.
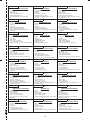
SELECTING ACCESSORIES
The accessories of this machine are listed on page 146.
CAUTION
In the operation and maintenance of power tools, the
safety regulations and standards prescribed in each
country must be observed.
GUARANTEE
We guarantee Hitachi Power Tools in accordance with
statutory/country specifi c regulation. This guarantee does
not cover defects or damage due to misuse, abuse, or
normal wear and tear. In case of complaint, please send
the Power Tool, undismantled, with the GUARANTEE
CERTIFICATE found at the end of this Handling instruction,
to a Hitachi Authorized Service Center.
NOTE
Due to HITACHI’s continuing program of research and
development, the specifi cations herein are subject to
change without prior notice.

146
337519 337520
337523
337521
320994 337518 337527
337522 326127 321984
337513

147
English Dansk Română
GUARANTEE CERTIFICATE
1 Model No.
2 Serial No.
3 Date of Purchase
4 Customer Name and Address
5 Dealer Name and Address
(Please stamp dealer name and address)
GARANTIBEVIS
1 Modelnummer
2 Serienummer
3 Købsdato
4 Kundes navn og adresse
5 Forhandlers navn og adresse
(Indsæt stempel med forhandlers navn og
adresse)
CERTIFICAT DE GARANŢIE
1 Model nr.
2 Nr. de serie
3 Data cumpărării
4 Numele și adresa clientului
5 Numele și adresa distribuitorului
(Vă rugăm aplicaţi ștampila cu numele și adresa
distribuitorului)
Deutsch Norsk Slovenščina
GARANTIESCHEIN
1 Modell-Nr.
2 Serien-Nr.
3 Kaufdaturn
4 Name und Anschrift des Kunden
5 Name und Anschrift des Händlers
(Bitte mit Namen und Anschrift des Handlers
abstempeln)
GARANTISERTIFIKAT
1 Modellnr.
2 Serienr.
3 Kjøpsdato
4 Kundens navn og adresse
5 Forhandlerens navn og adresse
(Vennligst stemple forhandlerens navn og adresse)
GARANCIJSKO POTRDILO
1 Št. modela
2 Serijska št.
3 Datum nakupa
4 Ime in naslov kupca
5 Ime in naslov prodajalca
(Prosimo vtisnite žig z imenom in naslovom
prodajalca)
Français Suomi Slovenčina
CERTIFICAT DE GARANTIE
1 No. de modèle
2 No de série
3 Date dʼachat
4 Nom et adresse du client
5 Nom et adresse du revendeur
(Cachet portant le nom et lʼadresse du revendeur)
TAKUUTODISTUS
1 Malli nro
2 Sarja nro
3 Ostopäivämäärä
4 Asiakkaan nimi ja osoite
5 Myyjän nimi ja osoite
(Leimaa myyjän nimi ja osoite)
ZÁRUČNÝ LISTA
1 Č. modelu
2 Sériové č.
3 Dátum zakúpenia
4 Meno a adresa zákazníka
5 Názov a adresa predajcu
(Pečiatka s názvom a adresou predajcu)
Italiano Ελληνικά Български
CERTIFICATO DI GARANZIA
1 Modello
2 N° di serie
3 Data di acquisto
4 Nome e indirizzo dellʼacquirente
5 Nome e indirizzo del rivenditore
(Si prega di apporre il timbro con questi dati)
ΠΙΣΤΟΠΟΙΗΤΙΚΟ ΕΓΓΥΗΣΗΣ
1 Αρ. Μοντέλου
2 Αύξων Αρ.
3 Ημερομηνία αγοράς
4 Όνομα και διεύθυνση πελάτη
5 Όνομα και διεύθυνση μεταπωλητή
(Παρακαλούμε να χρησιμοποιηθεί σφραγίδα)
ГАРАНЦИОНЕН СЕРТИФИКАТ
1 Модел №
2 Сериен №
3 Дата за закупуване
4 Име и адрес на клиента
5 Име и адрес на търговеца
(Моля, отпечатайте името и адрес на дилъра)
Nederlands Polski Srpski
GARANTIEBEWIJS
1 Modelnummer
2 Serienummer
3 Datum van aankoop
4 Naam en adres van de gebruiker
5 Naam en adres van de handelaar
(Stempel a.u.b. naam en adres vande de
handelaar)
GWARANCJA
1 Model
2 Numer seryjny
3 Data zakupu
4 Nazwa klienta i adres
5 Nazwa dealera i adres
(Pieczęć punktu sprzedaży)
GARANTNI SERTIFIKAT
1 Br. modela.
2 Serijski br.
3 Datum kupovine
4 Ime i adresa kupca
5 Ime i adresa prodavca
(Molimo da stavite pečat na ime i adresu trgovca)
Español Magyar Hrvatski
CERTIFICADO DE GARANTÍA
1 Número de modelo
2 Número de serie
3 Fecha de adquisición
4 Nombre y dirección del cliente
5 Nombre y dirección del distribudor
(Se ruega poner el sello del distribudor con su
nombre y dirección)
GARANCIA BIZONYLAT
1 Típusszám
2 Sorozatszám
3 A vásárlás dátuma
4 A Vásárló neve és címe
5 A Kereskedő neve és címe
(Kérjük ide elhelyezni a Kereskedő nevének és
címének pecsétjét)
JAMSTVENI CERTIFIKAT
1 Br modela.
2 Serijski br.
3 Datum kupnje
4 Ime i adresa kupca
5 Ime i adresa trgovca
(Molimo stavite pečat na ime i adresu trgovca)
Português Čeština Український
CERTIFICADO DE GARANTIA
1 Número do modelo
2 Número do série
3 Data de compra
4 Nome e morada do cliente
5 Nome e morada do distribuidor
(Por favor, carímbe o nome e morada do
distribuidor)
ZÁRUČNÍ LIST
1 Model č.
2 Série č.
3 Datum nákupu
4 Jméno a adresa zákazníka
5 Jméno a adresa prodejce
(Prosíme o razítko se jménem a adresou prodejce)
ГАРАНТІЙНИЙ СЕРТИФІКАТ
1 № моделі
2 № серії
3 Дата придбання
4 Імʼя і адреса клієнта
5 Імʼя і адреса дилера
(Будь ласка, поставте печатку з іменем і
адресою дилера)
Svenska Türkçe Русский
GARANTICERTIFIKAT
1 Modellnr
2 Serienr
3 Inköpsdatum
4 Kundens namn och adress
5 Försäljarens namn och adress
(Stämpla försäljarens namn och adress)
GARANTİ SERTİFİKASI
1 Model No.
2 Seri No.
3 Satın Alma Tarihi
4 Müşteri Adı ve Adresi
5 Bayi Adı ve Adresi
(Lütfen bayi adını ve adresini kaşe olarak basın)
ГАРАНТИЙНЫЙ СЕРТИФИКАТ
1 Модель №
2 Серийный №
3 Дата покупки
4 Название и адрес заказчика
5 Название и адрес дилера
(Пожалуйста, внесите название и адрес дилера)

148
1
2
3
4
5

149
Hitachi Power Tools Europe GmbH
Siemensring 34, 47877 willich, Germany
Tel: +49 2154 49930
Fax: +49 2154 499350
URL: http://www.hitachi-powertools.de
Hitachi Power Tools Netherlands B. V.
Brabanthaven 11, 3433 PJ Nieuwegein, The Netherlands
Tel: +31 30 6084040
Fax: +31 30 6067266
URL: http://www.hitachi-powertools.nl
Hitachi Power Tools (U. K.) Ltd.
Precedent Drive, Rooksley, Milton Keynes, MK 13, 8PJ,
United Kingdom
Tel: +44 1908 660663
Fax: +44 1908 606642
URL: http://www.hitachi-powertools.co.uk
Hitachi Power Tools France S. A. S.
Parc de l’Eglantier 22, rue des Cerisiers, Lisses-C.E. 1541,
91015 EVRY CEDEX, France
Tel: +33 1 69474949
Fax: +33 1 60861416
URL: http://www.hitachi-powertools.fr
Hitachi Power Tools Belgium N.V. / S.A.
Koningin Astridlaan 51, B-1780 Wemmel, Belgium
Tel: +32 2 460 1720
Fax: +32 2 460 2542
URL http://www.hitachi-powertools.be
Hitachi Fercad Power Tools Italia S.p.A
Via Retrone 49, 36077, Altavilla Vicentina (VI), Italy
Tel: +39 0444 548111
Fax: +39 0444 548110
URL: http://www.hitachi-powertools.it
Hitachi Power Tools lberica, S.A.
Puigbarral, 26-28 Pol. Ind. Can Petit 08227
TERRSSA(Barcelona) Spain
Tel: +34 93 735 6722
Fax: +34 93 735 7442
URL: http://www.hitachi-powertools.es
Hitachi Power Tools Österreich GmbH
Str. 7, Objekt 58/A6, Industriezentrum NÖ –Süd 2355
Wiener Neudorf, Austria
Tel: +43 2236 64673/5
Fax: +43 2236 63373
URL: http://www.hitachi-powertools.at/
Hitachi Power Tools Norway AS
Kjeller Vest 7, N-2007 Kjeller, Norway
Tel: (+47) 6692 6600
Fax: (+47) 6692 6650
URL: http://www.hitachi-powertools.no
Hitachi Power Tools Sweden AB
Rotebergsvagen 2B SE-192 78 Sollentuna, Sweden
Tel: (+46) 8 598 999 00
Fax: (+46) 8 598 999 40
URL: http://www.hitachi-powertools.se
Hitachi Power Tools Denmark A/S
Lillebaeltsvej 90, 6715 Esbjerg N, Denmark
Tel: (+45) 75 14 32 00
Fax: (+45) 75 14 36 66
URL: http://www.hitachi-powertools.dk
Hitachi Power Tools Finland Oy
Tupalankatu 9, 15680 Lahti, Finland
Tel: (+358) 20 7431 530
Fax: (+358) 20 7431 531
URL: http://www.hitachi-powertools.fi
Hitachi Power Tools Hungary Kft.
1106 Bogancsvirag U.5-7, Budapest, Hungary
Tel: +36 1 2643433
Fax: +36 1 2643429
URL: http://www.hitachi-powertools.hu
Hitachi Power Tools Polska Sp.z o.o.
ul. Gierdziejewskiego 1
02-495 Warszawa, Poland
Tel: +48 22 863 33 78
Fax: +48 22 863 33 82
URL: http://www.hitachi-narzedzia.pl/
Hitachi Power Tools Czech s.r.o.
Modricka 205, 664, 48, Moravany, Czech, Republic
Tel: +420 547 422 660
Fax: +420 547 213 588
URL: http://www.hitachi-powertools.cz
Hitachi Power Tools Netherlands B.V.
Moscow Branch
Kashirskoye Shosse Dom 65, 4F
115583 Moscow, Russia
Tel: +7 495 727 4460
Fax: +7 495 727 4461
URL: http://www.hitachi-pt.ru
Hitachi Power Tools Romania S. R. L.
Bld. Biruintei, Nr. 101, Oras Pentelimon, 077145, Judetul
Ilfov, ROMANIA
Tel: +031 805 27 19
Fax: +031 805 25 77

150
English Nederlands
Object of declaration: Hitachi Dust Extractor RP150YB, RP250YE, RP350YE
EC DECLARATION OF CONFORMITY
We declare under our sole responsibility that this product is in
conformity with standards or standardization documents EN60335-
1, EN60335-2-2, EN55014-1, EN55014-2, EN61000-3-2 and
EN61000-3-3 in accordance with Directives 2004/108/EC and
2006/95/EC. This product also conforms to RoHS Directive 2011/65/
EU.
The European Standards Manager at Hitachi Koki Europe Ltd. is
authorized to compile the technical fi le.
This declaration is applicable to the product affi xed CE marking.
Onderwerp van verklaring: Hitachi Nat-droog stofzuiger RP150YB, RP250YE,
RP350YE
EC VERKLARING VAN CONFORMITEIT
Wij verklaren onder eigen verantwoordelijkheid dat dit product
conform de richtlijnen of gestandardiseerde documenten
EN60335-1, EN60335-2-2, EN55014-1, EN55014-2, EN61000-3-2 en
EN61000-3-3 voldoet aan de eisen van bepalingen 2004/108/EC en
2006/95/EC. Dit product voldoet ook aan de RoHS-richtlijn 2011/65/
EU.
De manager voor Europese normen van Hitachi Koki Europe Ltd.
heeft de bevoegdheid tot het samenstellen van het technische
bestand.
Deze verklaring is van toepassing op produkten voorzien van de CE-
markeringen.
Deutsch
Español
Gegenstand der Erklärung: Hitachi Nass-, Trockensauger RP150YB,
RP250YE, RP350YE
EG-KONFORMITÄTSERKLÄRUNG
Wir erklären mit alleiniger Verantwortung, dass dieses Produkt
den Standards oder Standardisierungsdokumenten EN60335-
1, EN60335-2-2, EN55014-1, EN55014-2, EN61000-3-2 und
EN61000-3-3 in Übereinstimmung mit den Direktiven 2004/108/
EG und 2006/95/EG entspricht. Dieses Produkt stimmt auch mit der
RoHS-Richtlinie 2011/65/EU überein.
Der Manager für europäische Standards bei der Hitachi Koki Europe
Ltd. ist zum Verfassen der technischen Datei befugt.
Diese Erklärung gilt für Produkte, die die CE-Markierung tragen.
Objeto de declaración: Hitachi Aspirador RP150YB, RP250YE, RP350YE
DECLARACIÓN DE CONFORMIDAD DE LA CE
Declaramos bajo nuestra única responsabilidad que este producto
está de acuerdo con las normas o con los documentos de
normalización EN60335-1, EN60335-2-2, EN55014-1, EN55014-
2, EN61000-3-2 y EN61000-3-3, según indican las Directrices
2004/108/CE y 2006/95/CE. Este producto satisface también los
requisitos establecidos por la Directiva 2011/65/EU (RoHS).
El Jefe de Normas Europeas de Hitachi Koki Europe Ltd. está
autorizado para recopilar archivos técnicos.
Esta declaración se aplica a los productos con marcas de la CE.
Français Português
Objet de la déclaration: Hitachi Aspirateur eau & poussières RP150YB,
RP250YE, RP350YE
DECLARATION DE CONFORMITE CE
Nous déclarons sous notre seule et entière responsabilité que ce
produit est conforme aux normes ou documents de normalisation
EN60335-1, EN60335-2-2, EN55014-1, EN55014-2, EN61000-3-
2 et EN61000-3-3 en accord avec les Directives 2004/108/CE et
2006/95/CE. Ce produit est aussi conforme à la
Directive RoHS 2011/65/EU.
Le responsable des normes européennes d’Hitachi Koki Europe
Ltd.
est autorisé à compiler les données techniques.
Cette déclaration s’applique aux produits désignés CE.
Objeto de declaração: Hitachi Aspirador RP150YB, RP250YE, RP350YE
DECLARAÇÃO DE CONFORMIDADE CE
Declaramos, sob nossa única e inteira responsabilidade, que este
produto está de acordo com as normas ou documentos normativos
EN60335-1, EN60335-2-2, EN55014-1, EN55014-2, EN61000-3-2 e
EN61000-3-3, em conformidade com as Directrizes 2004/ 108/CE
e 2006/95/CE. Este produto está também em conformidade com a
Directiva RoHS 2011/65/EU.
O Gestor de Normas Europeias da Hitachi Koki Europe Ltd. está
autorizado a compilar o fi cheiro técnico.
Esta declaração se aplica aos produtos designados CE.
Italiano Svenska
Oggetto della dichiarazione: Hitachi Aspiratore RP150YB, RP250YE,
RP350YE
DICHIARAZIONE DI CONFORMITÀ CE
Dichiariamo sotto nostra responsabilità che questo prodotto è
conforme agli standard o ai documenti sulla standardizzazione
EN60335-1, EN60335-2-2, EN55014-1, EN55014-2, EN61000-3-2
e EN61000-3-3 in conformità alle Direttive 2004/108/CE e 2006/95/
CE. Il prodotto è inoltre conforme alla direttiva RoHS 2011/65/EU.
Il Responsabile delle Norme Europee di Hitachi Koki Ltd. è
autorizzato a compilare la scheda tecnica.
Questa dichiarazione è applicabile ai prodotti cui sono applicati i
marchi CE.
Objekt för deklaration: Hitachi Industri dammsugare RP150YB, RP250YE,
RP350YE
EF-DEKLARATION BETRÄFFANDE LIKFORMIGHET
Vi tillkännagiver med eget ansvar att denna produkt överensstämmer
med standard eller standardiserings dokument EN60335-1,
EN60335-2-2, EN55014-1, EN55014-2, EN61000-3-2 och EN61000-
3-3 i enlighet med direktiven 2004/108/EF och 2006/95/EF. Denna
produkt efterlever även RoHS-direktiv 2011/65/EU.
Den europeiska standardansvarige på Hitachi Koki Europe Ltd. är
auktoriserad att utarbeta den tekniska fi len.
Denna deklaration gäller för CE-märkningen pà produkten.
Hitachi Koki Europe Ltd.
Clonshaugh Business & Technology Park, Dublin 17, lreland
Representative offi ce in Europe
Hitachi Power Tools Europe GmbH
Siemensring 34, 47877 Willich 1, F. R. Germany
Head offi ce in Japan
Hitachi Koki Co., Ltd.
Shinagawa Intercity Tower A, 15-1, Konan 2-chome,
Minato-ku, Tokyo, Japan
29. 5. 2015
Mr. John de Loughry
European Standard Manager
29. 5. 2015
A. Yoshida
Vice-President & Director
-
 1
1
-
 2
2
-
 3
3
-
 4
4
-
 5
5
-
 6
6
-
 7
7
-
 8
8
-
 9
9
-
 10
10
-
 11
11
-
 12
12
-
 13
13
-
 14
14
-
 15
15


Hitachi RP 150YB Handling Instructions Manual
- Categoria
- Aspirapolvere
- Tipo
- Handling Instructions Manual
in altre lingue
- English: Hitachi RP 150YB
- română: Hitachi RP 150YB