
HOBS
USER INSTRUCTIONS
GB
TABLES DE CUISSON
NOTICE D’EMPLOI
FR
ANKASTRE OCAK
KULLANIM KLAVUZU
TR
PIANI COTTURA
ISTRUZIONI PER L’USO
IT
• ZPL46
CANDY HOOVER GROUP S.R.L. • Via Comolli 16 • 20861 Brugherio (MB) - Italy

Gas Type Tables ...........................................................................22
CONTENT
Safety Instuructions
1. Instructions For The Installer
1.1. Bulding In
1.2. Suitable Location
2. Electrical Connection (For U.K. Only)
2.1. Electrical Connection
2.2. Gas Connection (For U.K. Only)
2.3. Adapting The Hob To Different Types Of Gas
2.4. Regulating The Minimum Flame
3. Use Of Hob - User Instructions
3.1. Using The Gas Burner
3.2. Use Of Cooktop Electrical Plates
4. Maintenance and Cleaning
5. Aftercare
6. Protection Of The Environment
GB
....................................................................14
..................................................15
................................................................................15
....................................................................15
....................................15
..............................................................15
..............................................15
.........................16
..............................................16
...............................................16
.............................................................16
............................................16
......................................................17
...................................................................................17
..............................................17
CONTENU
Conseils De Sécurité
1. Installation
1.1 Encastrement
1.2. Caracteristiques Requises
2.1. Raccordement Electrique
2.2. Raccordement Gaz
2.3. Adapter La Table A Differents Types De Gaz
2.4. Reguler La Flamme Au Minimum
3. Utilisation De La Table
3.1. Using The Gas Burner
3.2. Manuel D'utilisation Des Pl Au Es Chauffantes Electriques
Sur Comptoirs
4. Maintenance Et Entretien
5. Assistance Technique
6. Protection De L'environnement
FR
...................................................................18
................................................................................19
..........................................................................19
......................................................19
........................................................19
.................................................................19
..........................20
...........................................20
.............................................................20
.............................................................20
................................................................................20
........................................................21
..............................................................21
.............................................21
İÇİNDEKİLER
Güvenlik Uyarıları
1. Kurulum Talimatları
1.1. Ankastre Montaj
1.2. Uygun Yer Tespiti
2.1. Elektrik Bağlantısı
2.2. Gaz Bağlantısı
2.3. Ocağın Farklı Gaz Türlerine Uyarlanması
2.4. Minimum Alevin Ayarlanması
3. Ocak Kullanımı Kullanım Talimatları
3.1. Gazlı Ocak Gözlerinin Kullanımı
3.2. Elektrikli Isıtıcının Kullanımı
4. Bakim Ve Temizlik
5. Satış Sonrası Servis
6. Çevrenin Korunması
Garanti Belgesi
TR
.....................................................................09
................................................................10
......................................................................10
....................................................................10
...................................................................10
.........................................................................10
..............................10
.................................................11
.....................................11
............................................11
.....................................................11
.................................................................12
...............................................................12
..............................................................12
............................................................................13
INDICE
Indicazioni Di Sicurezza
1. Istruzioni Per L'installatore
1.1. Installazione
1.2. Locazioni Consigliate
2.1. Connessione Elettrica
2.2. Connessione Gas
2.3. Adattare Il Piano Cottura Con Diversi Tipi Di Gas
2.4. Regolare Il Minimo Della Fiamma
3. Uso Del Piano - Istruzioni Utente
3.1. Uso Del Bruciatore Gas
3.2. Uso Dí Fornelli Con Le Piastre Elettriche
4. Manutenzione E Pulizia
5. Ripristino
6. Rispetto Dell'ambiente
7. Garanzie
IT
............................................................04
....................................................05
............................................................................05
..............................................................05
..............................................................05
...................................................................05
..................06
...........................................06
............................................06
..........................................................06
...................................06
...........................................................07
..................................................................................07
............................................................07
....................................................................................08

03
accessible space
Figure 3
Min 10 mm
Sp.da 25 a 45 mm
Figure 2Figure 1
2
60 cm
2
240 cm
2
120 cm
2
180 cm
Figure 5Figure 4
1/2 GAS
CONICAL
C
A B
CYLINDRICAL
CONICAL
INJECTOR
Figure 6
Figure 7
Figure 8
Seal
Bracket
Figure 10 Figure 11
YES

04 IT
ATTENZIONE: l'apparecchio e le parti accessibili diventano calde durante l'uso. Prestare attenzione a
non toccare le parti calde.
• I bambini al di sotto di 8 anni dovrebbero essere tenuti a distanza se non continuamente supervisionati.
• L'apparecchio può essere usato da bambini dagli 8 anni in su e persone con ridotte capacità fisiche,
sensoriali o mentali o senza esperienza e conoscenza del prodotto se supervisionate o dando loro
istruzioni riguardo al funzionamento dell'apparecchio in maniera sicura e coscente del rischio possibile.
• I bambini non dovrebbero giocare con l'apparecchio.
• La pulizia e la manutenzione non dovrebbero essere fatte da bambini senza supervisione.
ATTENZIONE: cucinare senza supervisione grasso o olio sul piano cottura può essere pericoloso e può
provocare incendi.
• MAI provare a spegnere il fuoco con acqua. Prima spegnere l'apparecchio e poi coprire le fiamme, ad
esempio con un coperchio o un telo non infiammabile.
ATTENZIONE: pericolo di incendo: non lasciare oggetti sul piano cottura.
ATTENZIONE: Se la superficie è incrinata, spegnere l’apparecchio per evitare la possibilità di scosse
elettriche.
• Non utilizzare un pulitore a vapore.
• Rimuovere gli eventuali liquidi tracimati dal coperchio prima di aprirlo.
• Far raffreddare la superficie del piano di cottura prima di chiudere il coperchio.
• L'apparecchio non è progettato per funzionare con un timer esterno o con un sistema di comando
separato.
• Il mezzo di disconnessione deve essere incorporato nel cablaggio fisso in accordo con le leggi di
cablaggio.
• Le istruzioni devono indicare quale tipo di cavo debba essere utilizzato, tenendo presente la
temperatura della superficie posteriore dell’apparecchio.
• Se il cavo di alimentazione è danneggiato, esso deve essere sostituito da un cavo o un assieme speciali
disponibili presso il costruttore o il suo servizio assistenza tecnica.
ATTENZIONE: Al fine di evitare ogni pericolo dovuto al riarmo accidentale del dispositivo termico di
interruzione, il presente apparecchio non deve essere alimentato con un dispositivo di manovra esterno,
quale un temporizzatore oppure essere connesso a un circuito che viene regolarmente alimentato o
disalimentato dal servizio.
• Questo apparecchio può essere installato in accordo con il regolamento vigente e solo in un ambiente
ben ventilato. Leggere le istruzzioni prima dell'installazione o l'uso dell'apparecchio.
• Queste istruzioni sono valide solamente se appare il simbolo del paese sull'apparecchio. Se non
appare il simbolo sull'apparecchio, è necessario consultare le istruzioni tecniche che vi daranno le
istruzioni necessarie riguardo alle modifiche delle condizioni d'uso dell'apparecchio nel paese di
riferimento.
• Prima dell'installazione, assicurarsi che le condizioni di distribuzione del locale (natura del gas e
pressione del gas) e l'aggiustamento dell'apparecchio siano compatibili;
• le condizione di aggiustamento dell'apparecchio sono indicate nell'etichetta (o nella targa);
• l'apparecchio non è connesso a un sistema di avacuazione dei prodotti di combustione. Dovrebbe
essere installato e connesso in accordo con le correnti norme di installazione. Particolare attenzione
deve essere posta sui rilevanti requisiti riguardo alla ventilazione.
• L'utilizzo di un apparecchio a gas causa calore e umidità nella stanza in cui è installato. Assicurarsi che
la cucina sia ben ventilata: lasciare aperti i fori di ventilazione naturale o installare un dispositivi di
ventilazione meccanica (cappa meccanica aspirante). L'uso intensivo prolungato dell'apparecchio
potrebbe richiedere un sistema di ventilazione addizionale, per esempio aumentando il livello di
ventilazione meccanica dove presente.
INDICAZIONI DI SICUREZZA

1. ISTRUZIONI PER L'INSTALLATORE
Il plano cottura può essere Installato In qualsiasi top che sia resistente
ad una temperatura di 100°C e abbia uno spessore di 25-45 mm. La
dimensione del vano di Inserimento del plano cottura è mostrata In
Figura 2.
Qualora II plano venga Incassato In modo che sul suo lato sinistro o
destro ci sia una parete, la distanza non dev'essere Inferiore a 15 cm
(vedere Figura 4); mentre la distanza tra la parete posteriore e II plano
deve essere di almeno 5,5 cm.
La distanza tra II plano cottura e qualsiasi altro apparecchio sopra di
esso (es. una cappa) non deve essere Inferiore a 70 cm (Figura 4).
Qualora sotto II plano cottura vi sia un vano accessibile bisogna
predisporre un parete di divisione In materiale Isolante (legno o slmili)
(Figura 3).
Importante - Il diagramma In figura 1 mostra come deve essere
applicato il sigillante.
Il piano cottura è fissato grazie a morsetti di supporto agganciati alla
base.
Se un piano cottura da 60 cm è posizionato sopra un forno non
equipaggiato con un sistema di raffreddamento a ventola si
raccomanda di predisporre delle aperture che assicurino una corretta
circolazione d'aria.
La dimensione di queste aperture deve essere di almeno 300 cm² e
posizionate come in Figura 5.
Quando un piano cottura da 75 cm viene posizionato sopra un forno,
la parte posteriore deve essere raffreddata ad aria.
05 IT
INSTALLARE UN ELETTRODOMESTICO PUÒ ESSERE UN'OPERAZIONE COMPLICATA CHE, SE NON ESEGUITA CORRETTAMENTE, PUÒ
COMPROMETTERE SERIAMENTE LA SICUREZZA DELL'UTENTE. È PER QUESTA RAGIONE CHE L'OPERAZIONE DEV'ESSERE CONDOTTA
DA PERSONALE PROFESSIONALMENTE QUALIFICATO CHE TENGA PRESENTE LE NORME VIGENTI. NEL CASO IN CUI QUESTO AVVISO
VENGA IGNORATO E L'INSTALLAZIONE VENGA ESEGUITA DA PERSONALE NON QUALIFICATO, IL PRODUTTORE DECLINA OGNI
RESPONSABILITÀ PER OGNI PROBLEMA TECNICO DEL PRODOTTO SIA IN CASO DI DANNI A COSE O PERSONE SIA IN ASSENZA DI ESSI.
1.1. INSTALLAZIONE
1.2. LOCAZIONI CONSIGLIATE
Questo apparecchio può essere installato in accordo con il
regolamento vigente e solo in un ambiente ben ventilato. Leggere le
istruzzioni prima dell'installazione o l'uso dell'apparecchio.
Un piano gas produce umidità e calore nell'area in cui è installato. Per
questa ragione bisogna garantire una buona ventilazione sia tramite
passaggio di aria naturale sia grazie all'installazione di una cappa
d'aspirazione. Un uso intensivo e prolungato dell'apparecchio
richiede una ventilazione maggiore, come l'apertura di una finestra o
aumentando la velocità di ventole di raffreddamento, se possibile. Se
non vi è la possibilità di installare una cappa, un aspiratore può essere
installato su una parete esterna o su una finestra affinché ci siano
delle correnti d'aria nell'area.
Una ventola elettrica è in grado di assicurare un cambio d'aria
completo nella cucina 3-5 volte ogni ora. L'installatore dovrà seguire
gli standard nazionali pertinenti.
2.2. CONNESSIONE GAS
Queste istruzioni sono per personale qualificato, l'installazione
dell'apparecchio deve seguire le direttive standard nazionali. (Solo
per U.K.: per legge l'installazione deve essere commissionata ad
un operatore "Corgi")
Qualsiasi operazione deve essere svolta staccando la corrente
elettrica.
La placca segnaletica sotto il piano cottura mostra il tipo di gas con cui
bisogna allacciare l'apparecchio. La connessione all'alimentazione
gas principale deve essere apportata dopo aver controllato che sia
regolata in base al tipo di gas previsto dall'apparecchio. Se non è
regolata correttamente guardare le istruzioni nei paragrafi seguenti
per cambiare le impostazioni gas.
Per il gas liquido GPL usare dei regolatori di pressione che siano
conformi con gli standard nazionali.
Usare solo tubazioni, guarnizioni e sigillanti che siano conformi con gli
standard nazionali.
2.1. CONNESSIONE ELETTRICA
Controllare i dati sulla placca segnaletica, situata sotto l'unità, per
assicurarsi che il collegamento elettrico sia corretto. Prima della
connessione, controllare l'impianto di messa a terra. Per legge,
quest'apparecchio deve avere la messa a terra. Se questa
operazione non viene eseguita, il produttore non sarà responsabile di
eventuali danni occorsi a persone o proprietà. Se non è già applicata
una spina, applicarne una appropriata come indicato sulla placca
segnaletica. Il cavo di messa a terra è di color verde/giallo. La spina
deve essere posizionata in modo tale che sia sempre accessibile.
Qualora il piano cottura sia connesso direttamente all'alimentazione
principale, bisognerà predisporre anche un salvavita. Se il cavo di
alimentazione è danneggiato dovrà essere sostituito da personale
qualificato in modo da prevenire qualsiasi potenziale rischio.
Il cavo di messa a terra (di color verde/giallo) deve essere più lungo di
almeno 10 mm rispetto ai cavi neutro e fase. La sezione del cavo
usato deve essere delle giuste dimensioni in base all'assorbimento
dell'apparecchio.
FASE
TERRA
NEUTRA
F
N
Cavo di
alimentazione
Cavo Marrone
Cavo Verde/Giallo
Cavo Blu
Alimentazione
principale
Per il collegamento diretto alla rete, è necessario prevedere un
dispositivo che assicuri la disconnessione dalla rete, con una distanza
di apertura dei contatti che consenta la disconnessione completa
nelle condizioni della categoria di sovratensione III, conformemente
alle regole di installazione.
Si prega di controllare la placca segnaletica per i dettagli riguardanti la
potenza dell'aparecchio e assicurare che il cavo di connessione sia
dei tipi 3x0.75 mm² H05RR-F.
Per alcuni modelli viene fornito in dotazione una raccordo conico,
come attrezzatura per l'installazione, nei paesi dove è obbligatorio per
legge; in Figura 8 viene mostrato come riconoscere i diversi tipi di
raccordi (CY=cilindrico, CO=conico). In qualsiasi caso la parte
cilindrica del raccordo sarà connessa al piano cottura.
Quando la connessione del piano all'alimentazione gas verrà
effettuata utilizzando manicotti flessibili assicurarsi che la distanza
massima coperta dal tubo non superi i 2 metri.
Il tubo flessibile deve essere sistemato in modo tale che non possa
entrare in contatto con parti mobile dell'unità abitativa (ad esempio un
cassetto) e non passi attraverso alcuno spazio che sia suscettibile a
congestionamento.
Per prevenire qualsiasi danno al piano seguire l'installazione
seguendo questa sequenza (Figura 6):
1) Come illustrato, assemblare le parti in sequenza:
A: 1/2 Adattatore cilindrico maschio
B: ½ Sigillante
C: 1/2 Adattatore gas femmina conico-cilindrico o cilindrico-cilindrico
2) Stringere le giunture con la chiave inglese, ricordando di
mettere le tubature in posizione.
3) Attaccare l'elemento C all'alimentazione gas usando tubi di
rame o manicotti flessibili in acciaio.

2.3. ADATTARE IL PIANO COTTURA CON
DIVERSI TIPI DI GAS
Per adattare il piano cottura all'uso di diversi tipi di gas, seguire le
seguenti istruzioni:
• rimuovere le griglie e i bruciatori
• inserire una chiave esagonale a tubo (7 mm) dentro il supporto
bruciatore (Figura 7)
• svitare l'iniettore e sostituirlo con uno compatibile con il tipo di gas
che verrà utilizzato (vedere la tabella tipi di gas).
2.4. REGOLARE IL MINIMO DELLA FIAMMA
Dopo aver acceso i bruciatori, girare la manopola del gas sul minimo
quindi rimuovere la manopola (può esere rimossa con una leggera
pressione).
L'apparecchio può essere usato da bambini dagli 8 anni in su e
persone con ridotte capacità fisiche, sensoriali o mentali o senza
esperienza e conoscenza del prodotto se supervisionate o dando loro
istruzioni riguardo al funzionamento dell'apparecchio in maniera
sicura e coscente del rischio possibile.
Usare una piccola estermità come un cacciavite per regolare la vite
come mostrato in Figura 9. Girando la vite in senso orario si riduce il
flusso di gas, viceversa in senso antiorario si aumenta il flusso - Usate
questi aggiustamenti per ottenere una fiamma approssimativamente
di 3/4 mm di lunghezza dopodiché riposizionare la manopola. Nel
caso in cui l'alimentazione sia di tipo GPL - la vite per regolare la
fiamma ideale deve essere ruotata (in senso orario) verso fine corsa.
Una volta che si è impostata la nuova regolazione, sostituire la
vecchia placca segnaletica sull'apparecchio con una adatta al tipo di
alimentazione gas che è stata installata.
3.1. USO DEL BRUCIATORE GAS
Per l'accensione basta premere e girare la manopola sul simbolo di
accensione.
Il sistema di accensione partirà generando scintille. Quando la
fiamma si è accesa, tenere premuta la manopola per 5/6 secondi
dopodiché regolare la potenza.
Se non c'è corrente elettrica, accendere la fiamma con un fiammifero.
Se il bruciatore non si accende entro 3 secondi girare la manopola
sulla posizione 0, attendere un minuto e ripetere l'operazione.
ATTENZIONE:
Prima di accendere il gas assicurarsi che i bruciatori e i rispettivi
coperchi siano al loro posto.
AVVISI GENERICI:
Per risultati migliori, la dimensione delle pentole deve seguire la
dimensione del bruciatore come mostrato qui a seguito. Tabella A.
Per contenitori più piccoli il bruciatore gas può essere regolato in
modo che la fiamma non superi la pase della pentola. Recipienti con
una base concava o convessa non possono essere usati.
ATTENZIONE: se un bruciatore si spegne accidentalemente,
riportare la monopola sulla posizione spenta e non tentare di
riaccenderlo prima che sia passato 1 minuto.
Se col passare del tempo il rubinetto del gas si indurisce è necessario
lubrificarlo.
Questo tipo di operazione deve essere eseguita da personale
qualificato.
06 IT
3. USO DEL PIANO - ISTRUZIONI UTENTE
Quest'apparecchio deve essere utilizzato solo per gli scopi con cui è
stato pensato, qualsiasi altro utilizzo può essere considerato
improprio e quindi pericoloso. Il produttore non è responsabile per
qualsiasi danno o perdita dovuti ad un uso inappropriato.
IMPORTANTE: eseguire un ultimo controllo con una soluzione a
base di sapone per controllare che le tubature non perdano. Non
usare mai una fiamma. Inoltre assicurarsi che il manicotto
flessibile non venga a contatto con una parte mobile della cucina
(es. cassetto) e che non sia situato dove possa essere
danneggiato.
Attenzione: se si avverte odore di gas in vicinanza dell'apparecchio
spegnere l'alimentazione e chiamare il tecnico. Non cercare
un'eventuale perdita con una fiamma.
Tipo di bruciatore
Ausiliario
Semi rapido
Rapido
Tabella A
A
SR
R
12 - 18
18 - 24
24 - 26
Potenza
(kW)
G20/20 mbar
(metano)
G30/28-30 mbar
(LPG)
1
1,7
2,7
95 I/h
162 I/h
257 I/h
73 g/h
124 g/h
196 g/h
Ø /
(cm)
Idoneità delle pentole di cucina (Figura 11)
Tieni presente che le pentole più grandi sono più grandi superfici di
riscaldamento. Questo li aiuterà a cuocere il cibo più veloce di
vaschette con piccole superfici di riscaldamento. Utilizzare sempre il
tegame quale dimensione è proporzionata alla quantità di cibo da
cucinare. Al fine di evitare spruzzi, non usare molto piccole padelle, in
particolare peri prodotti alimentari con eccesso di liquido. Se si usa le
padelle troppo grandi per cibi cotti rapidamente, salsicce e liquidi
bastone e rimangono residui allegata al tegame dopo essere stati
svuotati. Chiuso padelle e vassoi di cottura o stampi sono suggeriti
per cucinare i dolci. Spruzzata di zucchero e succhi di frutta da una
pentola aperta può attaccare alla superficie del fornello e sarà difficile
da rimuovere.
Questo è particolarmente importante per le padelle di arrostimento o
utilizzati per la cottura a pressione ad alta temperatura. Non lasciare
incustoditi bruciatori senza una padella o tegame o senza coperchio.
Controlla l'idoneità di pentole da cucina con il rispetto dei seguenti
criteri, Devono essere pesanti.
Essi dovrebbero coprire completamente la superficie del bruciatore;
ma può essere un po"più grande, ma non minore.
Le superfici della base devono essere completamente pianeggianti e
adatta bene alla cottura.
•X Per la migliore utilizzazione delle piastre calde a elettrico e per
ridurre al minimo il consumo di energia, solo le padelle con le basi
buoni piatti dovrebbero essere usato. La dimensione della pentola
dovrebbe essere al più vicino possibile al diametro della piastra, e mai
più piccoli. La base della vasca deve essere asciutta e la fuoriuscita
deve essere evitato. Tegami vuoti non devono essere lasciati sui
piatti, e le lastre non devono essere lasciato acceso senza una
padella.
Girare la manopola alla posizione per la temperatura richiesta della
piastra. L'indicatore luminoso della piastra calda sarà acceso e la
piastra si avvia al calore.
Quando la cottura è completata, girare la manopola per la posizione
"O". (Figura 10). Non lasciare la piastra accesa senza una padella su
di esso. Il diametro e la base di pentola da usare sono critica. Il
diametro massimo della base di pentola deve essere 14 centimetri e
la base piatta. Per la prima volta che si utilizza, lasciare la piastra a
riscaldarsi per 5 minuti prima di mettere un tegame su di esso. Questo
consentirà il rivestimento resistente al calore della piastra per indurire
a causa di combustione. Utilizzare un panno umido e detersivo per la
pulizia delle piastre. Non rimuovere residui di cibo dalle piastre con un
coltello o di qualsiasi altro disco, oggetto appuntito. Accendere il piatto
caldo per qualche minuto ad asciugare dopo la pulizia. Tuttavia, essa
non deve mai essere lasciata per più di qualche minuto senza un
tegame in cima.
Posizione
Potenza (Watt)
Potenza (Watt)
Descrizione
0
1
2
3
4
5
6
0
100 W
180 W
250 W
500 W
750 W
1000 W
0
135 W
220 W
300 W
850 W
1150 W
1500 W
Spento
Riscalda
Cottura alla bassa temperatura
Cottura alla bassa temperatura
Cottura, Arrostimento, bollitura
Cottura, Arrostimento, bollitura
Cottura, Arrostimento, bollitura
3.2. USO DÍ FORNELLI CON LE PIASTRE
ELETTRICHE

Questo apparecchio è contrassegnato in conformità
alla Direttiva europea 2012/19/EU sulle
apparecchiature elettriche ed elettroniche (WEEE). I
WEEE contengono sia le sostanze inquinanti (che
possono provocare conseguenze negative
sull'ambiente) che componenti di base (che possono
essere riutilizzati). È importante che i WEEE siano
soggetti a rattamenti specifici, per rimuovere e
smaltire correttamente tutti gli inquinanti e recuperare e riciclare tutti i
materiali.
I singoli possono giocare un ruolo importante nell'assicurare che i
WEEE non diventino un problema ambientale; è essenziale seguire
alcune regole di base:
• I WEEE non devono essere trattati come rifiuti domestici.
• I WEEE devono essere portati ai punti di raccolta appositi gestiti dal
comune o da società registrate. In molti Paesi, per i WEEE grandi,
potrebbe essere presente la raccolta domestica.
• Quando si acquista un nuovo apparecchio, quello vecchio potrebbe
essere restituito al rivenditore che deve acquisirlo gratuitamente su
base singola, sempre che l'apparecchio sia del tipo equivalente e
abbia le stesse funzioni di quello acquistato.
6. RISPETTO DELL'AMBIENTE
07 IT
Dichiarazione di conformità: questo apparacchio, nelle parti
progettate per venire a contatto con cibi, è conforme con le
regolamentazioni espresse nelle direttive EEC 89/109.
L'elettrodomestico è conforme alla Direttiva Europea 2009/142/CE
(GAD) e a partire dal 21/04/2018 con il regolamento GAR (Gas
Appliances Regulation) 2016/426.
Apponendo la marcatura su questo prodotto, dichiariamo,
sotto la nostra responsabilità, di ottemperare a tutti i requisiti relativi
alla tutela di sicurezza, salute e ambiente previsti dalla legislazione
europea in essere per questo prodotto.
// produttore non si rende responsabile per alcuna imprecisione
dovuta a errori di stampa o trascrizione contenuti nel libretto. Ci
riserviamo il diritto di apportare modifiche al prodotto qualora sia
necessario, inclusi i consumi, senza compromettere le caratteristiche
inerenti la sicurezza del funzionamento.
4. MANUTENZIONE E PULIZIA
Prima di pulire il piano cottura, assicurarsi che l'apparecchio si sia
raffreddato.
La pulizia e la manutenzione non dovrebbero essere fatte da bambini
senza supervisione.
Rimuovere la spina dalla presa corrente o (se connessa direttamente
all'alimentazione generale) togliere la corrente dall'impianto
generale.
Non usare sostanze abrasive, detergenti corrosivi, agenti sbiancanti o
acidi. Evitare ogni tipo di acido o sostanza alcalina (limone, aceto,
etc.) per pulire le parti smaltate, laccate o in acciao inox.
Quando bisogna pulire le parti smaltate, laccate o cromate, usare
acqua calda con sapone o un detergente non corrosivo. Per l'acciaio
antimacchia usare una soluzione appropriata.
I bruciatori possono essere puliti con acqua e sapone. Per ripristinare
la loro brillantezza originale, usare un comune prodotto di pulizia per
superfici in acciaio. Dopo averli puliti, asciugarli e ricollocarli al loro
posto.
È importante che i bruciatori vengano riposizionati
correttamente.
Griglie cromate e bruciatori
Le griglie cromate e i bruciatori tendono a diventare scuri con l'uso.
Questo è un fenomeno normale ed inevitabile, che tuttavia non
compromette assolutamente il buon funzionamento del piano cottura.
In ogni caso sono disponibili, presso i centri servizio post vendita, i
pezzi di ricambio.
5. RIPRISTINO
Prima di contattare un tecnico del Centro Assistenza si prega di
controllare:
• che la spina sia ben inserita e collegata;
• che l'alimetazione gas non sia difettosa.
Se il malfunzionamento non è identificabile:
spegnere l'apparecchio - non manometterlo - e chiamare il Centro
Assistenza.
PIANI COTTURA DA INCASSO
Tabella 1
4 gas
R /2SR / AUX
S60 / HBGS
1
Sİ
1
-
2
1
7.1 kW
516 g/h
3
220-240 V / 50-60 Hz
15 W
Sİ
585 x 510
676 l/h
Bruciatore
Nome prodotto
Dispositivo sicurezza fiamma
Ausiliario (A Ø 50 mm)
Piastra elettrica
Semirapido (SR Ø 75 mm)
Rapido (R Ø 100 mm)
Tipologia di gas e potenza installata
Potenza
G 20/20 mbar (metano)
G 30/28-30 mbar (LPG)
Classe di installazione
Voltaggio / Frequenza (V / Hz)
Potenza elettrica in ingresso
Iniezione elettrica
Dimensione prodotto (mm)
Questo apparecchio è stato progettato per uso domestico e non professionale.

7. GARANZIE
08 IT
Il prodotto è garantito, oltre che ai sensi di legge, alle condizioni e nei
termini riportati sul certificato di garanzia convenzionale inserito nel
prodotto. Il certificato dovrà essere conservato e mostrato al nostro
Centro di Assistenza Tecnica Autorizzato, in caso di necessità,
insieme allo scontrino comprovante l'acquisto dell'elettrodomestico.
Puoi consultare le condizioni di garanzia anche sul nostro sito
internet. Per ottenere assistenza compila l'apposito form on-line
oppure contattaci al numero che trovi indicato nella pagina di
assistenza del nostro sito internet.

09 TR
UYARI: Cihaz ve aparatları kullanım sırasında ısınır. Isınmış parçalara dokunmaktan kaçınınız.
• 8 yaşın altındaki çocukları cihazdan uzakta tutmalı ve sürekli denetlemelisiniz.
• Bu cihaz, 8 yaş ve üzeri çocuklar ve fiziksel, duyusal veya zihinsel yetenekleri veya bilgi ve tecrübe
açısından yetersiz kişiler tarafından ancak yetişkin bir bireyin denetiminde ve cihazın nasıl
kullanılacağına dair verilen talimatların uygulanması durumunda ve oluşabilecek tehlikleri kavradıkları
takdirde güvenle kullanılabilir.
• Çocuklar cihazla oynamamalıdırlar.
• Cihazın temizlik ve bakımı gözetmen olmaksızın çocuklar tarafından yapılmamalıdır.
UYARI: Sadece yağın ocak üzerinde bırakılması tehlikeli olabilir ve yangına neden olabilir.
• Yangını HİÇBİR ZAMAN su ile söndürmeyin, cihazı kapatınız ve kapak gibi bir aparatla yada yangın
battaniyesi ile alevi örterek kontrol altına alınız.
UYARI: Yangın tehlikesi: Ocak yüzeyini bir takım malzemelerinizi depolamak için kullanmayınız, yüzeyi
boş bırakınız.
UYARI: Yüzey kırık ise elektrik çarpması olasılığını önlemek için, cihazı kapatınız.
• Fırını temizlemerken buharlı temizleyiciler kullanmayınız.
• Kapağa dökülen artıklar temizliğe başlamadan önce çıkarılmalıdır.
• Ocak yüzey kapağını kapatmadan önce soğumasına izin verilmelidir.
• Cihaz, harici bir zamanlayıcı veya ayrı uzaktan kumanda sistemi ile kontrol edilmeye uygun değildir.
• Bağlantının sağlanamaması kablolama kurallarına göre kabloların bağlanmamasından
kaynaklanmıştır.
• Talimatlarda kullanılacak prizin tipi cihazın arka kısmındaki sıcaklık düşünülerek belirtilmelidir.
•Elektrik kablosu hasarlı ise, özel bir kablo ya da üretici veya yetkili servisin uygun gördüğü kablo ile
değiştirilmelidir.
Uyarı: Termal ısı kesici dikkatsizce yerleşiminden doğacak zararları engellemek için, bu cihaz kaynağı
zamanlayıcı veya sürekli açık ya da kapalı olacak devre gibi dış devre cihazlarına bağlanmamalıdır.
• Bu cihaz, yürürlükteki mevzuata uygun olarak kurulmalıdır ve sadece iyi havalandırılan bir alanda
kullanılmalıdır.
• Cihazı kurarken veya kullanmadan önce talimatları okuyun."
• Bu talimatlar sadece ülke sembolleri cihaz üzerinde olduğu zaman geçerlidir. Eğer cihaz üzerinde
sembol yoksa, ürün üzerinde kullanılacak ülkenin koşullarına uygun modifikasyonların nasıl
yapılacağını tarif eden teknik talimatları incelemek gerekmektedir.
• "Kurulum işleminden önce, yerel dağıtım koşulları (gaz ve gaz basıncı niteliği) ve cihazın ayarlara
uyumlu olması garanti altına alınmalıdır."
• "Bu cihaz için gerekli tüm koşullar tip etiket üzerinde belirtilmiştir."
• Bu cihaz yanmalı ürünlerin tahliye aparatlarına bağlanmamalıdır.Cihaz mevcut montaj yönetmeliğine
göre kurulup bağlanmalıdır. Havalandırma ile ilgili gerekli şartların sağlaması için özel önem
gösterilmelidir.
• Gazlı pişirme cihazlarının kullanımı montajlandığı yere göre oda içinde ısı ve nem yaratmaktadır.
Mutfağın iyi havalandırılmış olduğundan emin olun: Doğal havalandırma delikleri açın veya mekanik bir
havalandırma cihazı(mekanik aspiratör) takın.Cihazın uzun süre yoğun kullanımı durumunda ilave bir
havalandırma yapın; örneğin bir pencere açın veya mekanik ventilasyon düzeyini artırarak daha etkili bir
havalandırma yapın.
GÜVENLİK UYARILARI

10 TR
1. KURULUM TALİMATLARI
Ocak 100 °C sıcaklığa dayanıklı ve 25-45 mm kalınlıkta bir tezgah
içine yerleştirilebilir. Tezgah içinde oluşturulacak bölmenin boyutları
Şekil 2'de verilmiştir.
Ocak bir kabinin yanına yerleştirilecekse, Ocak ile kabin arasındaki
mesafe en az 15 cm olmalıdır (Şekil 4'e bakın); ocak ile arkasındaki
duvar arasındaki mesafe de en az 5,5 cm olmalıdır.
Ocak ile diğer herhangi bir ünite veya cihaz (örn, hava tahliye
aspiratörü) arasındaki mesafe 70 cm'den az olmamalıdır (Şekil 4).
Ankastre ocak ile aşağıdaki boşluk arasındaki erişilebilir bir mesafe
olduğunda, izole bir malzemeden yapılmış bir bölme duvarı
yerleştirilmelidir (ahşap malzeme veya benzeri bir başka malzeme)
(Şekil 3).
Önemli Şekil 1'deki diyagram dolgu malzemesinin nasıl
uygulanacağını göstermektedir.
Ocak ünitesi, ünite kaidesindeki delikler kullanılarak Sabitleme
Kelepçeleriyle yerleştirilir.
60 cm'lik ocak, soğutucu sistemi olmayan bir fırın üzerine
yerleştirilecekse, doğru hava sirkülasyonunun sağlanması için
ankastre mobilyada hava çıkışlarının oluşturulması tavsiye edilir. Bu
hava delikleri en az 300cm olmalıdır ve Şekilde gösterildiği gibi
yerleştirilmelidir.
Ankastre fırın üzerinde 75 cm'lik bir ocak yerleştirilecekse, fırının fan
soğutucusu olmalıdır.
EVDE KULLANIMA YÖNELİK BİR CİHAZIN KURULUMU, DOĞRU ŞEKİLDE YAPILMAZSA MÜŞTERİNİN GÜVENLİĞİNİ CİDDİ BİÇİMDE
ETKİLEYEBİLECEK KARMAŞIK BİR İŞLEM OLABİLİR. BU NEDENLE, BU İŞLEM MESLEKİ YETERLİLİĞE SAHİP BİR KİŞİ TARAFINDAN,
YÜRÜRLÜKTEKİ TEKNİK MEVZUATA UYGUN OLARAK GERÇEKLEŞTİRİLMELİDİR. BU ÖNERİNİN GÖZ ARDI EDİLMESİ VE KURULUMUN
YETKİSİZ BİR KİŞİ TARAFINDAN YAPILMASI DURUMUNDA ÜRETİCİ, İSTER ÜRÜNLERİN, İSTER KİŞİLERİN ZARAR GÖRMESİYLE
SONUÇLANSIN, ÜRÜNÜN HİÇBİR TEKNİK ARIZASINDA SORUMLULUK KABUL ETMEZ.
1.1. ANKASTRE MONTAJ
1.2. UYGUN YER TESPİTİ
Bu cihaz, yürürlükteki mevzuata uygun olarak kurulmalıdır ve sadece
iyi havalandırılan bir alanda kullanılmalıdır. Cihazı kurarken veya
kullanmadan önce talimatları okuyun.
Cihazın yoğun ve uzun süreli kullanımı pencereyi açmak gibi ilave
havalandırmayı veya varsa elektrikli soğutucunun hızını artırmayı
gerektirebilir.
Aspiratör kurulamıyorsa, mekanda hava çıkışı olduğu sürece, duvarın
veya pencerenin dışına bir elektrikli soğutucu yerleştirilmelidir.
Elektrikli soğutucu saatte 3-5 kez havayı tamamen sirküle edebilecek
kapasitede olmalıdır. Montaj uzmanı ilgili ulusal standartları
izlemelidir.
2.1. ELEKTRİK BAĞLANTISI
Ünitenin dışına yerleştirilmiş olan değer plakasındaki verilerin, güç
kaynağı ve giriş voltajı değerlerine uygun olduğunu kontrol edin.
Bağlantı öncesinde, topraklama sistemini kontrol edin. Kanun
gereğince, bu cihaz topraklanmalıdır. Bu düzenlemeye uyulmadığı
taktirde, Üretici kişilere veya mülkiyete verilecek zararlardan sorumlu
olmayacaktır. Fiş henüz takılmadıysa, değer plakasında gösterilen
yüke uygun bir fiş takınız. Topraklama teli sarı/yeşil renklidir. Fiş her
zaman erişilebilir durumda olmalıdır.
Ocağın doğrudan bir elektrik kaynağına bağlandığı yerde, bir devre
kesicisi (şalter) tesis edilmelidir.
Güç kaynağı kablosu zarar görürse, potansiyel bir riski önlemek için
ehliyetli bir mühendis tarafından değiştirilmelidir. Topraklama kablosu
(yeşil veya sarı renkli) aktif ve nötr kablolardan en az 10 mm daha
uzun olmalıdır.
Kullanılan kablo bölümü, ocağın çektiği elektriğe göre uygun
ölçülerde olmalıdır.
Lütfen güç bilgileri için değer plakasını kontrol edin ve güç kaynağı
kablosunun 3x0.75 mm² H05RR-F tipinde olmasını sağlayın.
AKTİF
TOPRAK
NOTR
L
N
Güç
Kablosu
Kahverengi Kablo
Yeşil/Sarı Kablo
Mavi Kablo
Ana Güç
Kaynağı
2.2. GAZ BAĞLANTISI
Bu talimatlar sadece ehliyet sahibi uzman personel için hazırlanmıştır,
ekipmanın kurulumu geçerli ulusal standartlara uygun olmalıdır.
Tüm işler elektrik bağlantısı kesilmiş durumda yapılmalıdır.
Ocak üzerindeki değer plakası, ocakla birlikte kullanılması
tasarlanmış olan gaz türünü göstermektedir. Ana gaz kaynağına veya
gaz tüpüne yapılan bağlantı, cihazın verilecek gaz türüne göre
ayarlandığı kontrol edildikten sonra, gerçekleştirilmelidir. Doğru
şekilde ayarlanmamışsa, gaz ayarını değiştirmek için aşağıdaki
paragraflardaki talimatlara bakın.Likit gaz için (tüp gaz), geçerli ulusal
standartlara uyumlu olan basınçlı regülatörleri kullanın.
Sadece ulusal standartlara uyumlu olan boru, pul veya conta pulu
kullanın.
Bazı modeller için, konik bağlantı tipinin zorunlu olduğu ülkelerde,
montaj için konik bir bağlantı verilmektedir; Resim 8'de farklı bağlantı
türlerinin nasıl tanınacağı anlatılmaktadır (CY= silindirik, CO = konik).
Her tür durumda, bağlantının konik parçası ocağa bağlanmalıdır.
Ocağı gaz kaynağına esnek hortumlarla bağlayacaksanız, lütfen
hortumun kaplayacağı maksimum mesafenin 2 metreyi geçmemesini
temin edin.
Esnek hortum, ocağın yerleştirildiği mobilyanın çekmece gibi
hareketli parçalarına temas etmeyecek şekilde montajlanmalı ve
tıkanıklık yaratabilecek hassas bölümlerden geçmemelidir.
Ocağın herhangi bir şekilde zarar görmesinin önüne geçmek için,
lütfen aşağıdaki adımları sırayla takip ederek montaj işlemini
gerçekleştirin (Resim 6)
Eğer ocak, kablo veya fiş bağlantısına sahip değilse veya diğer bir
deyişle aşırı voltaj kategorisi şartları altında bütün kutuplar ana
şebeke bağlantısından ayrılma durumu varsa yönergelerce
belirlenen kablolama kurallarına uygun bağlantı sağlanmalıdır.
1) Gösterildiği şekilde, parçaları sırayla birleştirin:
A: 1/2 Erkek Adaptör Silindirik,
B: 1/2Conta,
C: 1/2 Dişi Gaz Adaptörü Konik-Silindirik veya Silindirik-Silindirik
2) Boruları pozisyona sokmak için, anahtarlarla bağlantı yerlerini
sıkın.
3) Sert bakır boru veya esnek çelik boru kullanarak ana gaz
kaynağına C rakoru takın.
ÖNEMLİ: Sabunlu bir çözelti yardımıyla son kez borularda sızıntı
olup olmadığını kontrol edin. Asla ateş kullanmayın. Ayrıca
esnek boruyu, kabinin hareket eden bir parçasıyla (örn çekmece)
ile temas etmeyecek şekilde ayarlayın veya borunun zarar
görebilecek bir konumda olmamasını temin edin.
Uyarı: Bu cihazın yanında herhangi bir gaz kokusu aldığınız zaman,
cihaza giden gaz kaynağını kapatın ve doğrudan mühendisi arayın.
Sızıntıyı tespit etmek için çıplak ateş kullanmayın.
2.3. OCAĞIN FARKLI GAZ TÜRLERİNE
UYARLANMASI
Ocağı farklı gaz türleriyle birlikte kullanmak için, aşağıdaki talimatları
gerçekleştirin.
• Izgaraları ve ocak gözlerini çıkarın
• Ocak gözü desteği için altıgen bir anahtar (7mm), (Şekil 7) kullanın
• Enjektörü çıkarın ve kullanılacak olan gaz türü için uygun olan yen
enjektörü takın (gaz türleri tablosuna bakın)

11 TR
2.4. MİNİMUM ALEVİN AYARLANMASI
Ocak gözlerini yaktıktan sonra, kontrol düğmesini kısık ayara getirin
ve sonra da düğmeyi yerinden çıkarın (hafifçe bastırmak suretiyle
kolayca çıkarılabilir).
Küçük bir «Terminal» tipi tornavida kullanarak, ayar vidası Şekil 9'da
gösterildiği gibi ayarlanabilir. Vidayı saat yönüne çevirirseniz, gaz
akışını azaltırsınız, saat yönünün tersine çevirirseniz, akışı artırırsınız
- yaklaşık 3-4 mm uzunlukta bir alev seviyesi ayarlayın ve daha sonra
kontrol düğmesini tekrar yerine takın.
Gaz kaynağı LPG ise (tüp gaz) - boş alevi ayarlama vidası, uçtaki stop
noktasına kadar (saat yönünde) döndürülmelidir.
Yeni gaz ayarlamasını yaptığınızda, cihazınızın üzerindeki eski gaz
değer plakasını, yeni ayarladığınız gaz türüne uygun olan değer
plakasıyla (ocakla birlikte teslim edilmiştir) değiştirin.
3. OCAK KULLANIMI KULLANIM TALİMATLARI
Bu cihaz sadece evde yemek pişirmek için tasarlanmıştır ve bu
amaçla kullanılmalıdır. Diğer kullanım türleri sakıncalı olup tehlikeli
durumlara neden olabilir. Üretici uygunsuz ve sakıncalı
kullanımlardan kaynaklanan zarar ve ziyandan sorumlu
olmayacaktır.UYARI: Yangın tehlikesi: Ocak yüzeyini bir takım
malzemelerinizi depolamak için kullanmayınız, yüzeyi boş bırakınız.
3.1. GAZLI OCAK GÖZLERİNİN KULLANIMI
Ocağın gözlerini yakmak için, ateş kaynağını gözün yakınında tutun,
kontrol düğmesine bastırın ve saat yönüne çevirin.
Ocak birkaç günlüğüne kullanılmadıysa, yakmadan önce birkaç
saniye bekleyin, böylece borularda mevcut olan havanın tahliye
olması sağlanmış olacaktır.
Elektronik tutuşturma sistemi olan cihazlar için, aşağıdaki işlemleri
gerçekleştirin.
• Düğmeye bastırın ve tutuşturma sembolüne kadar saat yönünün
tersine çevirin.
• Ateşleme butonuna basarak ocak gözünü yakın.
Otomatik çakmağı olan ocaklar için, sadece düğmeye bastırın ve
tutuşturma sembolüne kadar çevirin.
Ateşleme sistemi gaz vanasına basıldığı sürece kıvılcım çıkarmaya
devam edecektir.
Ocak gözü 5 saniye içerisinde yanmazsa, düğmeyi 0 konumuna
getirin ve işlemi tekrarlayın.
Güvenlik vanasına sahip modellerde (ateş kazayla söndüğünde
gaz akışını kesen modeller), ocak gözü yukarıda anlatılan şekilde
yakılır; fakat yakma sonrasında düğme 5 veya 6 saniye boyunca
basılı tutulmalıdır.
DİKKAT:
Gaz ocağını açmadan önce, ocak gözlerinin ve ocak gözü
kapaklarının yerlerine yerleştirildiğinden emin olun.
GENEL TAVSİYELER
En iyi sonuçları almak için, düz tabanlı tencerelerin ölçüleri aşağıdaki
şekilde gaz ocağı gözü ölçülerine uygun olmalıdır: Tablo A.
Daha küçük kaplar için, gaz ocağı gözlerinin, alevin tavanın tabanını
aşmayacak şekilde ayarlanması gerekir. Konkav veya konveks
tabanlı kaplar kullanılmamalıdır.
UYARI: Ocak yanlışlıkla söndürülürse, düğmeyi kapalı (off)
konuma getirin ve tekrar yakmadan önce en az 1 dakika bekleyin.
Tablo A
A
SR
R
12 - 18
18 - 24
24 - 26
Güç
(kW)
G20/20 mbar
(metano)
G30/28-30 mbar
(LPG)
1
1,7
2,7
95 I/h
162 I/h
257 I/h
73 g/h
124 g/h
196 g/h
Ø Tav /Tencere
(cm)
Yardımcı Ocak Gözü
Yarı Hızlı Ocak Gözleri
Hızlı Ocak Gözü
Ocak Gözü Türü
Zaman içerisinde, gaz vanaları açılıp kapatılırken sertleşirse,
yağlanmaları gerekir.
Bu işlem sadece ehliyetli Bakım Mühendisleri tarafından
yapılmalıdır.
Pişirme kabının uygunluğu (Şekil 11)
Büyük pişirme kaplarının büyük pişirme yüzeylerine sahip olduğunu
unutmayınız.
Büyük pişirme yüzeyli kaplar, küçük pişirme yüzeyli kaplardan daha
hızlı pişirmeyi sağlayacaktır. Her zaman pişirilecek yiyecek miktarına
göre pişirme kabı seçiniz. Özellikle çok fazla sıvı içeren yiyeceklerin
pişirme esnasında sıçramasını önlemek için çok küçük pişirme kapları
seçmeyiniz. Aşırı büyük pişirme kapları seçilirse, kabın
boşaltılmasından sonra sos ve sıvılar pişirme kabına yapışarak
kalacaktır. Tatlıların pişirilmesinde pişirme kabının kapatılması
tavsiye edilir. Açık kalan kapaktan sıçrayan şeker ve meyve suları
pişirme yüzeyine yapışabilir. Bu atıkların yüzeyden temizlenmesi
güçtür.
Bu özellikle yüksek sıcaklıkta basınçla pişen yemekler ve kızartmalar
için önemlidir. Isıtıcıları, üzerinde boş pişirme kabı veya pişirme
kabsız olarak çalıştırmayınız.
Aşağıdaki kriterlere göre pişirme kabının uygunluğunu kontrol ediniz;
Pişirme kapları ağır olmalı.
Pişirme kapları ısıtıcının tüm yüzeyini kaplamalı veya bu yüzeyden
biraz büyük olmalı, ancak küçük olmamalı.
Pişirme kabı tabanı düz olmalı ve pişirme yüzeyine uygun olmalı.
Elektrikli ısıtıcının en iyi şekilde kullanımı ve en az enerji tüketimi için,
sadece düz tabana sahip pişirme kapları kullanılmalıdır. Pişirme
kabının çapı, ısıtıcı ölçüsüne yakın olmalı ancak hiç bir zaman küçük
olmamalıdır. Pişirme kabının tabanı kuru olmalı ve kabın dökülmesi
önlenmelidir. Boş pişirme kapları ısıtıcı üzerinde bırakılmamalı ve
pişirme kabı konulmadan ısıtıcı çalıştırılmamalıdır.
İstenilen sıcaklığa göre elektrikli ısıtıcının düğmesini çevirin.
Elektrikli ıstıcı çalışmaya başladığında uyarı lambası yanacaktır.
Pişirme tamamlandığında düğmeyi “O” kapalı pozisyona getirin.
(Şekil 10 ). Pişirme kabı üzerinde olmadan elektrikli ısıtıcıyı çalışır
durumda bırakmayın. Kullanılaacak pişirme kabı çapları
önemlidir. Pişirme kabı tabanı düz olmalı ve çapı 14 cm yi
geçmemelidir. İlk kullanımda, pişirme kabı koymadan önce 5
dakika elektrikli ısıtıcıyı çalıştırın. Bu ısınma sonucunda
rezistansın kaplamasının sertleşmesi sağlanacaktır.
Elektrikli ısıtıcıyı temizlemek için ıslak bez ve deterjan kullanınız.
Elektrikli ısıtıcı üzerinde kalmış yemek parçalarını bıçak ve
benzeri sert ve keskin malzemelerle temizlemeyiniz.
Temizlemeden sonra elektrikli ısıtıcıyı kurutmak için bir kaç dakika
çalıştırın. Bununla beraber, elektrikli ısıtıcıyı üzerinde pişirme kabı
olmadan bir kaç dakikadan fazla çalıştırmayın.
Pozisyon
Güç (Watt)
Güç (Watt)
Açıklama
0
1
2
3
4
5
6
0
100 W
180 W
250 W
500 W
750 W
1000 W
0
135 W
220 W
300 W
850 W
1150 W
1500 W
Kapalı
Isıtma
Düşük sıcaklıkta pişirme
Düşük sıcaklıkta pişirme
Pişirme, kızartma, kaynatma
Pişirme, kızartma, kaynatma
Pişirme, kızartma, kaynatma
3.2. ELEKTRİKLİ ISITICININ KULLANIMI

12 TR
Bu cihaz, Atık Elektrikli ve Elektronik Cihazlar (AEEE)
hakkındaki 2012/19/EU Avrupa Birliği Yönergesine
uygun biçimde işaretlenmiştir.
AEEE, hem kirletici maddeleri (bunlar çevre üzerinde
olumsuz etkilere neden olabilir) hem de temel
bileşenleri (bunlar yeniden kullanılabilir) içerir. Tüm
kirleticilerin düzgün bir şekilde bertaraf edilmesi ve
atılması ve tüm malzemelerin geri kazanılıp ve
dönüştürülmesi için AEEE'nin özel işlemlere tabi tutulması önemlidir.
Kişiler, AEEE'nin bir çevre sorununa dönüşmemesini sağlamakta
önemli bir rol üstlenir; bazı basit kuralların izlenmesi gerekir:
• AEEE'lere ev atıkları olarak davranılmamalıdır.
• AEEE'ler, belediye veya kayıtlı şirketler tarafından yönetilen ilgili
toplama noktalarına teslim edilmelidir. Pek çok ülkede, büyük
AEEE'ler için evden toplama hizmeti verilir.
• Yeni bir cihaz satın aldığınızda, eskisi satıcıya verilebilir ve satıcı
yeni teslim ettiği cihaz başına bir adet olmak üzere ücretsiz olarak bu
cihazı teslim alabilir, bunun için alınacak ekipmanın teslim edilen
ekipman ile aynı türden ve aynı fonksiyonlara sahip olması gerekir.
6. ÇEVRENİN KORUNMASI
Üretici bu broşürde bulunan basım veya kopyalama hatalarından
kaynaklanan herhangi bir eksiklikten sorumlu olmayacaktır. Güvenlik
veya işlevle ilgili özelliklere zarar vermeden tüketim istekleri dahil olmak
üzere ürünlerde gerektiğinde değişiklik yapma hakkımız mahfuzdur.
Uygunluk Beyanı: Bu ekipman, gıdalarla temas ettiği parçalarda,
89/109 sayılı EEC Direktifinde öngörülen düzenlemelere uygundur.
Cihaz, 2009/142/EC (GAD) Avrupa Yönergesi ve 21/04/2018 itibariyle
2016/426 (GAR) Gaz Yakan Cİhazlar Yönetmeliği ile uyumludur.
işareti ile bu cihazın, Avrupa direktiflerine uygunluğunun ve
yasa tarafından belirlenmiş güvenlik, sağlık ve çevresel gerekliliklerin
yerine getirilmesinin bize ait olduğunu kabul ediyoruz.
4. BAKIM VE TEMİZLİK
Ocağı temizlemeden önce, cihazın soğutulmasını sağlayın. Fişini
prizden çekin veya (direkt bağlıysa) güç kaynağını kapatın.
Cihazın temizlik ve bakımı gözetmen olmaksızın çocuklar tarafından
yapılmamalıdır.
Asla, zımpara, yıpratıcı deterjan, ağartıcı veya asit ürünü
kullanmayın. Emaye kaplı, vernikli veya paslanmaz çelik bölümlerin
üzerine asit veya alkalin madde (limon suyu, sirke, vb.) dökmeyin.
Emaye kaplı, vernikli veya krom yüzeyleri temizlerken, sıcak sabunlu
su veya aşındırıcı olmayan deterjanlar kullanın. Paslanmaz çelik için,
uygun bir temizleme solüsyonu kullanın.
Ocak gözleri sabunlu suyla temizlenebilir. Orijinal parlaklıklarını
muhafaza etmek için, evsel bir paslanmaz çelik temizleyici kullanın.
Temizleme işlemi sonunda, ocak gözlerini kurutun ve yerine takın.
Ocak gözlerinin doğru yerleştirilmesi önemlidir.
Krom ızgara ve ocak gözleri
Krom ızgaralar ve ocak gözleri kullanıldıkça kararma eğilimi
gösterirler. Bu durum normaldir ve kaçınılmazdır ama ocağın
işlevselliğini tamamen tehlikeye atmaz.
Herhangi bir durumda, satış sonrası servis merkezimizden, yedek
parçaları alabilirsiniz.
5. SATIŞ SONRASI SERVİS
Bir Servis Teknisyeni çağırmadan önce, lütfen aşağıdaki kontrolleri yapın:
• fiş doğru şekilde takılmış ve yerine oturmuş;
• gaz kaynağı hatalı değil.
Arıza belirlenemiyorsa:
cihazı kapatın -kurcalamayın- ve Satış Sonrası Servis Merkezini arayın.
ANKASTRE OCAKLAR
Tablo 1
4 gaz
R /2SR / AUX
S60 / HBGS
1
EVET
1
-
2
1
7.1 kW
516 g/h
3
220-240 V / 50-60 Hz
15 W
EVET
585 x 510
676 l/h
Gazlı Ocak Gözü
Tür / referans
Gaz Emniyeti
Yardımcı Ocak Gözü (A Ø 50 mm)
Elektrikli Isıtıcı
Yarı Hızlı Ocak Gözü (SR Ø 75 mm)
Hızlı Ocak Gözü (R Ø 100 mm)
Kurulumu Yapılan Gaz Türü/Elektrik :
Güç
G 20/20 mbar
G 30/28-30 mbar (LPG)
Montaj Sınıfı
Voltaj / Frekans V/Hz
Elektrik Giriş Gücü
Elektrikli Ateşleme
Ürün Boyutları
Bu cihaz, profesyonel kullanım için değil yalnızca evde kullanılmak üzere tasarlanmıştır.

ÜRETİCİ FİRMA:
CANDY HOOVER GROUP
Via Privata E. Fumagalli 20861 Brugherio (MB) - ITALY
Tel: 039.2086.1 • Fax: 039.2086.403
www.candy-group.com
İTHALATCI FİRMA:
CANDY HOOVER EUROASIA EV GEREÇLERİ SAN. VE TİC. A.Ş.
İçerenköy Mh. Hal Yolu Cd. Çayır Yolu Sk. No: 11
Sayar İş Merkezi Kat: 7 34752 Ataşehir / İSTANBUL/ TÜRKİYE
Tel: 0216 466 42 42 • Fax: 0216 466 15 45
www.hoover.com.tr • servis@hoover.com.tr
ANKASTRE OCAK
Ankastre ocak kullanma kılavuzunda gösterildiği şekilde kullanılması ve yetkili kıldığımız servis elemanları dışındaki şahıslar tarafından bakımı, onarımı
veya başka bir nedenle müdahale edilmemiş olması şartıyla bütün parçaları dahil olmak üzere tamamı malzeme, işçilik ve üretim hatalarına karşı
ürünün teslim tarihinden itibaren 3 ( ÜÇ ) YIL SÜRE İLE CANDY HOOVER EUROASIA A.Ş. TARAFINDAN GARANTİ EDİLMİŞTİR.
Malın bütün parçaları dahil olmak üzere tamamı garanti kapsamındadır.
Malın ayıplı olduğunun anlaşılması durumunda tüketici, 6502 sayılı Tüketicinin Korunması Hakkında Kanunun 11 inci maddesinde yer alan;
a) Satılanı geri vermeye hazır olduğunu bildirerek sözleşmeden dönme,
b) Satılanı alıkoyup ayıp oranında satış bedelinde indirim isteme,
c) Aşırı bir masraf gerektirmediği takdirde, bütün masrafları satıcıya ait olmak üzere satılanın ücretsiz onarılmasını istem,
ç) İmkan varsa, satılanın ayıpsız bir misli ile değiştirilmesini isteme, seçimlik haklarından birini kullanabilir.
Tüketicinin, Kanunun 11. maddesinde yer alan seçimlik haklarından ücretsiz onarım hakkını seçmesi durumunda satıcı; işçilik masrafı, değiştirilen
parça bedeli ya da başka herhangi bir ad altında hiçbir ücret talep etmeksizin malın onırımını yapmak veya yaptırmakla yükümlüdür. Tüketici ücretsiz
onarım hakkını üretici veya ithalatçıya karşı da kullanılabilir. Satıcı, üretici ve ithalatçı tüketicinin bu hakkını kullanmasından müteselsilen sorumludur.
Tüketicinin, ücretsiz onarım hakkını kullanması halinde malın;
• Garanti süresi içinde tekrar arızalanması,
• Tamiri için gereken azami sürenin aşılması,
• Tamirinin mümkün olmadığının, yetkili servis istasyonu, satıcı, üretici veya ithalatçı tarafından bir raporla belirlenmesi durumlarında;
tüketici malın bedel iadesini alıp, ayıp oranında beden indirimini veya imkan varsa malın ayıpsız misli ile değiştirilmesini satıcıdan talep edebilir. Satıcı,
tüketicinin talebini reddetmez. Bu talebin yerine getirilmemesi durumunda satıcı, üretici ve ithalatçı müteselsilen sorumludur.
Garanti uygulaması sırasında değiştirilen malın garanti süresi, satın alınan malın kalan garanti süresi ile sınırlıdır.
Malın tamir süresi 20 iş gününü geçemez. Bu süre, garanti süresi içerisinde mala ilişkin arızanın yetkili servis istasyonuna veya satıcıya bildirimi
tarihinde, garanti süresi dışında ise malın yetkili servis istasyonuna teslim tarihinden itibaren başlar. Malın arızasının 10 iş günü içerisinde
giderilememesi halinde, üretici veya ithalatçı; malın tüketicinin kullanımına tahsis etmek zorundadır. Malın garanti süresi içerisinde arızalanması
durumunda, tamirde geçen süre garanti süresine eklenir.
Malın kullanma kılavuzunda yer alan hususlara uykırı kullanılmasından kaynaklanın arızalar garanti kapsamı dışındadır.
Tüketici, garantiden doğan haklarının kullanılması ile ilgili olarak çıkabilecek uyuşmazlıklarda yerleşim yerinin bulunduğu veya tüketici işleminin
yapıldığı yerdeki Tüketici Hakem Heyetine veya Tüketici Mahkemesine başvurabilir.
Garanti belgesinin tekemmül ettirilerek tüketiciye verilmesi ve bu yükümlülüğün yerine getirildiğinin ispatı satıcıya aittir.
Satılan mala ilişkin olarak düzenlenen faturalar garanti belgesi yerine geçmez.
Satıcı tarafından bu Garanti Belgesinin verilmemesi durumunda, tüketici Gümrük ve Ticaret Bakanlığı Tüketicinin Korunması ve Piyasa Gözetimi Genel
Müdürlüğüne başvurabilir.
Bu bölümü, ürünü aldığınız Yetkili Satıcı imzalayacak ve kaşeleyecektir.
Bu garanti belgesi ile kesilen fatura garanti süresi boyunca garanti belgesi ile muhafaza edilmesi önerilir.
CANDY-HOOVER-EUROASIA EV GEREÇLERİ SAN VE TİC. A.Ş.
Yetkili servislerimizden hizmet talebiniz olduğunda veya ürünlerimizle ilgili genel öneri ve talepleriniz için aşağıdaki numaradan ulaşabilirsiniz.
Sabit telefonlardan veya cep telefonlarından alan kodu çevirmeden arayınız.
Ürününüzü kullanmadan önce montaj ve kullanma kılavuzunu mutlaka okuyunuz. Ürünün montaj ve kullanım kılavuzunda yer alan hususlara aykırı
kullanılması, kullanım hataları ve cihazın standart kullanım şartları / amaçları haricinde kullanılması halinde ürün garanti kapsamı dışında kalacaktır.
Ürünün standart ve sorunsuz çalışma koşullarının sağlanması için gerekli / zorunlu olan montaj ve kullanım kılavuzunda belirtilen teknik özelliklerinin (su
basıncı, voltaj değeri, gaz besleme basıncı, sigorta değeri, topraklama, yakıt cinsi, yakıt kalitesi vb.) uygun olmaması, sabit olmaması ve/veya değişken
olması halinde, cihazda meydana gelebilecek arızalar ve sorunlar garanti kapsamı dışında kalacaktır.
Candy Hoover Euroasia tarafından sağlanan garanti şartları aşağıdaki koşullarda geçersiz olacaktır.
• Ürüne, yetkili servis dışındaki kişiler tarafından müdahale edilmesi, elektrik-su kesintisi ve üründen kaynaklanmayan kaçaklar garanti kapsamı dışındadır.
• Kullanım hatalarından dolayı oluşan arıza ve hasarlar, elektrik-gaz -su tesisatı ve / veya tesisat ekipmanları nedeniyle meydana gelebilecek arızalar garanti
kapsamı dışındadır.
•Ürünün, müşteriye ulaştırılması sonrası yapılan taşıma işlemine bağlı arıza ve hasarlar, tüketici tarafından yapılan yanlış depolama ve ortam koşulları
nedeniyle cihazda meydana gelen hasarlar ve arızalar garanti kapsamı dışındadır.
• Hatalı elektrik tesisatı, ürünün üzerinde belirtilen voltajdan farklı voltajda kullanılması veya şebeke voltajındaki dalgalanmalar sonucu oluşan arıza ve
hasarlar, doğal afetler, üründen kaynaklanmayan harici/fiziki dış etkenler, mevsimsel hava şartları ve çevresel etkenler (deprem, yangın, sel, su basması,
şiddetli rüzgar, yıldırım düşmesi, kireç, nem, rutubet, toz, nakliye, taşıma, ürünün dona maruz kalması, susuz çalışma vb.) nedeniyle oluşan arızalar garanti
kapması dışında kalacaktır.
• Kullanım kılavuzunda belirtilen hususlara aykırı kullanılmasından kaynaklanan arızalar ve hasarlar.
Yukarıda belirtilen arızaların giderilmesi ücret karşılığı yapılır.
Ürünün kullanım ömrü 10 (on) yıldır. Bu ürünün tanımlandığı şekilde çalışabilmesi için gerekli yedek parçaları bulundurma süresidir.
Üretim yeri Türkiye 'dir.
TÜKETİCİ HİZMETLERİ
TÜKETİCİ HATTI: 444 03 98
GARANTİ BELGESİ
Model:...............................................
Bandrol ve Seri No:............................
Teslim Tarihi Yeri: ...............................
Fatura Tarihi No: ..............................................
Satıcı Firma Ünvanı: ........................................
Adres: .........................................................
...................................................................
Tel - Fax: .....................................................
Satıcı Firma (Kaşe ve İmza):........................
Genel Müdür:
13 TR

14 GB
WARNING: The appliance and its accessible parts become hot during use. Care should be taken to avoid
touching heating elements.
• Children under 8 Year of age must be kept away from the appliance unless they are continuously
supervised.
• This appliance can be used by children aged from 8 years and above and persons with reduced
physical, sensory or mental capabilities or lack of experience and knowledge if they have been given
supervision or instruction concerning use of the appliance in a safe way and understand the hazards
involved.
• Children must not play with the appliance.
• Cleaning and user maintenance shall not be made by children without supervision
WARNING: Unattended cooking on a hob with fat or oil can be dangerous and may result in fire.
• NEVER try to extinguish a fire with water, but switch off the appliance and then cover flame e.g. with a lid
or a fire blanket.
WARNING: Danger of fire: do not store items on the cooking surfaces.
WARNING: If the surface is cracked, switch off the appliance to avoid the possibility of electric shock.
• Do not use a steam cleaner for cleaning operations.
• Any spillage should be removed from the lid before opening.
• The hob surface must be allowed to cool down before closing the lid.
• This appliance is not intended to be operated by means of an external timer or separate remote-control
system.
• The means for disconnection must be incorporated in the fixed wiring in accordance with the wiring
rules.
• The instructions state the type of cord to be used, taking into account the temperature of the rear surface
of the appliance.
• If the supply cord is damaged, it must be replaced by a special cord or assembly available from the
manufacturer or its service agent.
CAUTION: In order to avoid a hazard due to inadvertent resetting of the thermal cutout, this appliance
must not be supplied through an external switching device, such as a timer, or connected to a circuit that
is regularly switched on and off by the utility.
• This appliance must be installed in accordance with the regulations in force and only used in a well
ventilated space. Read the instructions before installing or using this appliance.
• "These instructions are only valid if the country symbol appears on the appliance. If the symbol does not
appear on the appliance, it is necessary to refer to the technical instructions which will provide the
necessary instructions concerning modification of the appliance to the conditions of use of the country".
• "Prior to installation, ensure that the local distribution conditions (nature of the gas and gas pressure)
and the adjustment of the appliance are compatible";
• "The adjustment conditions for this appliance are stated on the label (or data plate)";
• "This appliance is not connected to a combustion products evacuation device. It shall be installed and
connected in accordance with current installation regulations. Particular attention shall be given to the
relevant requirements regarding ventilation".
• The use of a gas cooking appliance results in the production of heat and moisture in the room in which it
is installed. Ensure that the kitchen is well ventilated: keep natural ventilation holes open or install a
mechanical ventilation device (mechanical extractor hood). Prolonged intensive use of the appliance
may call for additional ventilation, for example opening of a window, or more effective ventilation, for
example increasing the level of mechanical ventilation where present.
SAFETY INSTURUCTIONS

If an appliance is not fitted with a supply cord and a plug, or with other
means for disconnection from the supply mains having a contact
separation in all poles that provide full disconnection under
overvoltage category III conditions, the instructions shall state that
means for disconnection must be incorporated in the fixed wiring in
accordance with the wiring rules.
15 GB
1. INSTRUCTIONS FOR THE INSTALLER
The hob may be installed in any worktop which is heat resistant to a
temperature of 100°C, and has a thickness of 25-45 mm. The
dimensions of the insert to be cut out of the worktop are in shown in
Figure 2.
If the Hob is fitted next to a cabinet on either side, the distance
between the Hob and the cabinet must be at least 15 cm (see Figure
4); while the distance between the hob and the rear wall must be at
least 5,5 cm.
The distance between the hob and any other unit or appliance above it
(e.g. An extractor hood) must be no less than 70 cm (Figure 4).
When there is an accessible space between the built-in hob and the
cavity below, a dividing wall made of insulating material should be
inserted (wood or a similar material) (Figure 3).
Important - The diagram in figure 1 shows how the sealant should
be applied.
The Hob unit is fitted by attaching the Fixing Clamps supplied, using
the holes at the base of the unit.
If a hob of 60 cm is fitted above an oven which is not equipped with fan
cooling system it is recommended that openings are created within
the built in furniture to ensure correct air circulation.
The size of these openings must be at least 300 cm2 and placed as
shown in Figure 5.
When a 75 cm hob is fitted over a built in oven, the latter must be fan
cooled.
This appliance is not intended to be operated by means of an external
timer or separate remote-control system.
2. ELECTRICAL CONNECTION (FOR U.K. ONLY)
Warning - this appliance must be earthed
This appliance is designed for domestic use only. Connection to the
main supply must be made by a competant electrician, ensuring that
all current regulations concerning such installations are observed.
The appliance must only be connected to a suitably rated spur point, a
3 pin 13 amp plug/socket is not suitable. A double pole switch must be
provided and the circuit must have appropriate fuse protection.
Further details of the power requirement of the individual product will
be found in the users’ instruction and on the appliance rating plate. In
the case of built-in product you are advised, should you wish to use a
longer cable than the one supplied, that a suitably rated heat resistant
type must be used.
The wiring must be connected to the mains supply as follows:
CONNECT TO SPUR TERMINAL
Green & Yellow Wire Earth Connection
Blue Wire Neutral Connection
INSTALLING A DOMESTIC APPLIANCE CAN BE A COMPLICATED OPERATION WHICH IF NOT CARRIED OUT CORRECTLY, CAN SERIOUSLY
AFFECT CONSUMER SAFETY. IT IS FOR THIS REASON THAT THE TASK SHOULD BE UNDERTAKEN BY A PROFESSIONALLY QUALIFIED
PERSON WHO WILL CARRY IT OUT IN ACCORDANCE WITH THE TECHNICAL REGULATIONS IN FORCE. IN THE EVENT THAT THIS ADVICE IS
IGNORED AND THE INSTALLATION IS CARRIED OUT BY AN UNQUALIFIED PERSON, THE MANUFACTURER DECLINES ALL RESPONSIBILITY
FOR ANY TECHNICAL FAILURE OF THE PRODUCT WHETHER OR NOT IT RESULTS IN DAMAGE TO GOODS OR INJURY TO INDIVIDUALS.
1.1 BUILDING IN
1.2. SUITABLE LOCATION
Check the data on the rating plate, located on the outside of the unit, to
ensure that the supply and input voltage are suitable.
Before connection, check the earthing system.
By Law, this appliance must be earthed. If this regulation is not
complied with, the Manufacturer will not be responsible for any
damage caused to persons or property. If a plug is not already
attached, fit a plug appropriate to the load indicated on the rating plate.
The earth wire is coloured yellow/green. The plug should always be
accessible.
Where the Hob is connected direct to the electricity supply, a circuit
breaker must be fitted.
If the power supply cord is damaged this is to be replaced by a
qualified engineer so as to prevent any potential risk.
The earth wire ( green and yellow coloured ) must be at least 10 mm
longer than the live and neutral wires.
The section of the cable used must be of the correct size in relation to
the absorbed power of the hob.
Please check rating plate for the power details and ensure that the
power supply cord is of the type 3x0.75 mm² H05RR-F.
LIVE
EARTH
NEUTRAL
L
N
Power Cable
Brown Wire
Green/Yellow Wire
Blue Wire
Mains Supply
2.2. GAS CONNECTION
These instructions are for qualified personnel, installation of
equipment must be in line with the relevant national standard. (For
U.K. only: by law the gas installation\commissioning must be
carried out by a "Gas Safe" installer)
All work must be carried out with the electricity supply disconnected.
The rating plate on the hob shows the type of gas with which it is
designed to be used. Connection to the mains gas supply or gas
cylinder should be carried out after having checked that it is regulated
for the type of gas with which it will be supplied. If it is not correctly
regulated see the instructions in the following paragraphs to change
gas setting.
For liquid gas (cylinder gas) use pressure regulators which comply
with the relevant national standards.
Use only pipes,washers and sealing washers which comply with the
relevant national standards.
For some models a conic link is furnished to outfit for the installation in
the countries where this type of link is obligatory; in picture 8 it is
pointed out how to recognize the different types of links (CY =
cylindrical, CO = conic). In every case the cylindrical part of the link
has to be connected to the hob.
When connecting the hob to the gas supply via use offlexible hoses
please ensure that the maximum distance covered by the hose does
not exceed 2 metres.
This appliance must be installed in accordance with the regulations in
force and only used in a well ventilated space. Read the instructions
before installing or using this appliance.
A gas-powered cooking appliance produces heat and humidity in the
area in which it is installed. For this reason you should ensure good
ventilation either by keeping all natural air passages open or by
installing an extractor hood with an exhaust flue. Intensive and
prolonged use of the appliance may require extra ventilation, such as
the opening of a window or an increase in speed of the electric fan, if
you have one.
If a hood can not be installed, an electric fan should be fitted to an
outside wall or window to ensure that there is adequate ventilation.
The electric fan should be able to carry out a complete change of air in
the kitchen 3-5 times every hour. The installer should follow the
relevant national standards.
Brown Wire Live Connection
Note: We do not advocate the use of earth leakage devices with
electric cooking appliances installed to spur points because of the
«nuisance tripping» which may occur. You are again reminded that
the appliance must be correctly earthed, the manufacturer declines
any responsibility for any event occurring as a result of incorrect
electrical installation.
2.1. ELECTRICAL CONNECTION

16 GB
2.3. ADAPTING THE HOB TO DIFFERENT
TYPES OF GAS
To adapt the Hob for use with different types of gas, carry out the
following instructions:
•remove the grids and burners
•insert on hexagonal spanner (7 mm) into the burner support (Figure
7)
•Unscrew the injector and replace it with one suitable for the gas to be
used (see gas type table)
1)As illustrated, assemble parts in sequence:
A: 1/2 Male Adaptor Cylindirical
B: 1/2 Seal
C: 1/2 Female Gas Adaptor Conical-Cylindirical or
Cylindirical-Cylindirical
2)Tighten the joints with the spanner, remembering to twist the
pipes into position.
3)Attach fitting C to mains gas supply using rigid copper pipe or
flexible steel pipe.
IMPORTANT: carry out a final check for leaks on the pipe
connections using a soapy solution. NEVER USE A FLAME. Also,
make sure that the flexible pipe cannot come into contact with a
moving part of the cabinet (eg.adrawer) and that it is not situated
where it could be damaged.
Warning: If gas can be smelt in the vicinity of this appliance turn off the
gas supply to the appliance and call the engineer directly. Do not
search for a leak with a naked flame.
2.4. REGULATING THE MINIMUM FLAME
After lighting the burners, turn the control knob to the minimum setting
and then remove the knob (this can easily be removed by applying
gentle pressure).
Using a small «Terminal» type screwdriver the regulating screw can
be adjusted as in Figure 9. Turning the screw clockwise reduces the
gas flow, whilst turning it anticlockwise increases the flow – Use this
adjustment to obtain a flame of approximately 3 to 4 mm in length and
then replace the control knob.
When the gas supply available is LPG - the screw to set the idle flame
must be turned (clockwise) to the end stop.
When you have carried out the new gas regulation, replace the old gas
rating plate on your appliance with one (supplied with hob) suitable for
the type of gas for which it has been regulated.
3. USE OF HOB - USER INSTRUCTIONS
This appliance must only be used for the purpose for which it is
intended, domestic cooking, and any other use will be considered
improper and could therefore be dangerous. The Manufacturer will
not be responsible for any damage or loss resulting from improper
use.
3.1. USING THE GAS BURNER
To ignite the burners, place a lighted taper close to the burner, press in
and turn the control knob anti-clockwise.
If the burners have not been used for a couple of days, wait for a few
seconds before lighting the burner, this will allow any air present in the
pipes to escape.
For appliances fitted with electronic ignition carry out the following:
• push in and turn the knob anticlockwise to the ignition symbol.
• ignite the burner by pressing the sparker button.
For hobs fitted with automatic ignition simply push in and turn the knob
to the ignition symbol.
The ignition system will continue to generate sparks as long as the
control knob is being pressed.
If the burner has not ignited within 5 seconds, turn the knob to the 0
position and repeat the operation.
For smaller containers the gas burner should be regulated so that the
flame does not overlap the base of the pan. Vessels with a concave or
convex base should not be used.
WARNING: If a flame is accidentally extinguished, turn the knob
to the off position and do not attempt to re-ignite if for at least 1
minute.
If over the years the gas taps become stiff to turn it is necessary to
lubricate them.
Such operation must be carried out only by qualified Service
Engineers.
The flexible tube shall be fitted in such a way that it cannot come into
contact with a moveable part of the housing unit (e.g. a drawer) and
does not pass through any space where it may become crushed/
kinked or damaged in any way.
To prevent any potential damage to the hob please carry out the
installation following this sequence (picture 6):
Auxiliary Burner
Semi Rapid Burner
Rapid Burner
Burner Type
Ø pan / pot
(cm)
AUX
SR
R
12 - 18
18 - 24
24 - 26
Table A
Power
(kW)
G20/20 mbar
(Methane)
G30/28-30 mbar
(LPG)
1
1,7
2,7
95 I/h
162 I/h
257 I/h
73 g/h
124 g/h
196 g/h
For models fitted with a safety tap (which cuts-off the flow of gas if the
flame is accidentally extinguished) the burners are ignited and
described above, but care must be taken.
Prior to switching on the gas hob ensure that the burners and burner
caps are correctly placed within their position.
GENERAL ADVISE
For best results, use cooking vessels with a flat surface. The size of
the surface should match the gas burner side as follows. Table A.
Suitability of Cooking Pans (Figure 11)
Keep in mind that larger pans have larger heating surfaces.
This will help them to cook the food faster than pans with smaller heating
surfaces.
Always use pan sizes proportionate to the amount of the food to be
cooked. In order to prevent splashing, do not use very small pans,
especially for foods with excess liquid. If you use excessively large pans
for quick cooked foods, sausages and liquids will stick and residues will
remain attached to the pan after being emptied.
Closed pans and baking trays or moulds are suggested for cooking
sweets. Splashed sugar and juices from an open pan may stick to the
cooker surface and will be difficult to remove.
This is especially important for pans used for roasting or pressurized
cooking at high temperature.
Do not leave burners unattended without a pan or with an empty pan on
top.
Check the suitability of cooking pans with respect to the following criteria;
They should be heavy.
They should completely cover the burner surface; they may be a little
bigger but no smaller.
Base surfaces should be completely flat and fit well on the cooking
surface.
•For the best use of the electric hotplates and to minimize energy
consumption, only pans with smooth flat bases should be used. The size of
the pan should be as close as possible to the diameter of the hotplate, and
never smaller. The base of the pan should be dry and spillage should be
avoided. Empty pans must not be left on the plates, and the plates should
not be left switched on without a pan.
Turn the knob to the position for the required temperature of the hot plate.
The indicator light of the hot plate will come on and the hot plate will start to
heat.
When cooking is completed, turn the knob to the “ O” position. (Figure 10).
Do not leave the hot plate turned on without a pan on it. The diameter and
the base of the pan you use is critical. The maximum diameter of the pan
base is 14 cm and the base should be flat.
Leave the hot plate to heat up for 5 minutes before placing a pan on it the
first time you use it. This will allow the heat resistant coating of the plate to
harden due to burning.
Use a wet cloth and detergent for cleaning the hot plates. Do not remove
food residues from the hot plates with a knife or any other hard, sharp
object.
Turn on the hot plate for a few moments to dry it after cleaning. However, it
must never be left on for more than a few moments without a pan on top.
Position
Power (Watt)
Power (Watt)
Explanation
0
1
2
3
4
5
6
0
100 W
180 W
250 W
500 W
750 W
1000 W
0
135 W
220 W
300 W
850 W
1150 W
1500 W
Off
Heating
Cooking at low temperature
Cooking at low temperature
Cooking, Roasting, Boiling
Cooking, Roasting, Boiling
Cooking, Roasting, Boiling
3.2. USE OF COOKTOP ELECTRICAL PLATES

17 GB
4. MAINTENANCE AND CLEANING
Before cleaning the hob, ensure the appliance has cooled down.
Remove the plug from the socket or (if connected directly) switch off
the electricity supply.
Cleaning and user maintenance shall not be made by children without
supervision.
Never use abrasives, corrosive detergents, bleaching agents or
acids. Avoid any acid or alkaline substances (lemon, juice, vinegar
etc.) on the enamelled, varnished or stainless steel sections.
When cleaning the enamelled, varnished or chrome sections, use
warm soapy water or a non caustic detergent. For stainless steel use
an appropriate cleaning solution.
The burners can be cleaned with soapy water. To restore their original
shine, use a household stainless steel cleaner. After cleaning, dry the
burners and replace.
It is important the Burners are replaced correctly.
Chromed grids and burners
Chromed grids and burners have a tendency to discolour with use.
This does not jeopardize the functionality of the hob.
Our After Sales Service Centre can provide spare parts if required.
5. AFTERCARE
Before calling out a Service Engineer please check the following:
• that the plug is correctly inserted and fused;
• that the gas supply is not faulty.
If the fault cannot be detected:
Switch off the appliance and call the After Service Centre. DO NOT
TAMPER WITH THE APPLIANCE.
This appliance is marked according to the European
directive 2012/19/EU on Waste Electrical and
Electronic Equipment (WEEE). WEEE contains both
polluting substances (which can cause negative
consequences for the environment) and basic
components (which can be re-used). It is important to
have WEEE subjected to specific treatments, in order
to remove and dispose properly all pollutants, and
recover and recycle all materials.
Individuals can play an important role in ensuring that WEEE does not
become an environmental issue; it is essential to follow some basic
rules:
• WEEE shall not be treated as household waste.
• WEEE shall be handed over to the relevant collection points
managed by the municipality or by registered companies. In many
countries, for large WEEE, home collection could be present.
• When you buy a new appliance, the old one may be returned to the
retailer who has to collect it free of charge on a one-to-one basis, as
long as the equipment is of equivalent type and has the same
functions as the supplied equipment.
6. PROTECTION OF THE ENVIRONMENT
The Manufacturer will not be responsible for any inaccuracy resulting from
printing or transcript errors contained in this brochure. We reserve the right
to carry out modifications to products as required, including the interests of
consumption, without prejiudice to the characteristics relating to safety or
function.
Declaration of compliance: This equipment, in the parts intended to
come into contact with food, complies with the regulations laid down in
EEC directives 89/109.
The appliance complies with European Directive 2009/142/EC (GAD)
and starting from 21/04/2018 with Gas Appliances Regulation
2016/426 (GAR).
By placing the mark on this product, we are confirming
compliance to all relevant European safety, health and environmental
requirements which are applicable in legislation for this product.
This appliance has been designed for non-professional, i.e. domestic, use.
Burner
BUILT IN HOBS
Type / reference
Flame failure device
Auxiliary burner ( AUX Ø 50 mm)
Electric Plate
Semirapid burner ( SR Ø 75 mm)
Rapid burner ( R Ø 100 mm)
Installed Gas Type / Power:
G 20/20 mbar (methane)
G 30/28-30 mbar (LPG)
Installation Class
Voltage / Frequency V / Hz
Electrical input power
Electric ignition
Product dimension
Table 1
Gas Power
4 gas
R /2SR / AUX
S60 / HBGS
1
YES
1
-
2
1
7.1 kW
516 g/h
3
220-240 V / 50-60 Hz
15 W
YES
585 x 510
676 l/h

AVERTISSEMENT: L'appareil et les parties accessibles deviennent chauds pendant l'utilisation. Des
précautions doivent être prises pour éviter de toucher les éléments chauffants.
• Les enfants de moins de 8 ans doivent être tenus à l'écart à moins d'être surveillés continuellement.
• Cet appareil n'est pas destiné à être utilisé par des personnes (y compris les enfants) dont les capacités
physiques, sensorielles ou mentales sont réduites, ou ayant un manque d'expérience et de
connaissances, à moins qu'elles n'aient été formées à l'utilisation de l'appareil, par une personne
responsable de leur sécurité.
• Les enfants ne doivent jouer avec l'appareil.
• Le nettoyage et l'entretien par l'utilisateur ne doit pas être fait par des enfants sans surveillance.
ATTENTION: La cuisson sans surveillance sur une plaque de cuisson avec de la graisse ou d'huile peut
être dangereuse et peut entraîner un incendie.
• Ne jamais tenter d'éteindre un incendie avec de l'eau, mais éteindre l'appareil, puis couvrir la flamme
par exemple avec un couvercle ou une couverture anti-feu.
AVERTISSEMENT: Danger d'incendie: ne pas stocker des éléments sur les surfaces de cuisson.
ATTENTION: Si la surface est fêlée, éteindre l'appareil pour éviter les risques de choc électrique.
• Ne pas utiliser de nettoyants vapeur pour le nettoyage.
• Tout liquide doivent être enlevé du couvercle avant ouverture.
• Il est recommandé de laisser refroidir la table de cuisson avant de refermer le couvercle.
• l'appareil n'est pas destiné à être utiliser avec une minuterie externe ou un système de contrôle à
distance.
• Un système de déconnexion doit être incorporé dans le compteur conformément aux règles de
câblage.
• Les instructions ndiquent le type de cordon à utiliser, en tenant compte de la température de la surface
arrière de l'appareil.
• Si le cordon d'alimentation est endommagé, il doit être remplacé par un cordon spécial disponible
auprès du fabricant ou de stations de dépannage agrées.
ATTENTION: Pour éviter tout danger dû à une réinitialisation accidentelle, cet appareil ne doit pas être
alimenté par un dispositif de commutation externe, comme une minuterie, ou connecté à un circuit qui est
régulièrement allumé et éteint par l'utilitaire.
• Cet appareil doit être installé en conformité avec la réglementation en vigueur et utilisé uniquement
dans un espace ventilé. Lisez les instructions avant d'installer ou utiliser cet appareil.
• Ces instructions ne sont valables que si le symbole du pays apparaît sur l'appareil. Si le symbole
n'apparaît pas sur l'appareil, il est nécessaire de se référer à la notice technique qui fournira les
instructions nécessaires concernant la modification de l'appareil selon les conditions d'utilisation du
pays.
• Avant l'installation, s'assurer que les conditions de distribution locale (la nature du gaz et la pression) et
le réglage de l'appareil sont compatibles"
• Les conditions de réglage de cet appareil sont indiqués sur l'étiquette (ou données de la plaque) ;
• "Cet appareil n'est pas relié à un dispositif d'évacuation des produits de combustion. Il doit être installé
et raccordé conformément aux règles d'installation en cours. Une attention particulière doit être
accordée aux exigences concernant la ventilation ".
• "Les résultats de la table gaz dans la production de chaleur depend de l'humidité dans la pièce dans
laquelle elle est installé Veiller à ce que la cuisine soit bien ventilée. Laissez les ouvertures de ventilation
naturelle ouvertes ou installez un dispositif de ventilation mécanique (hotte aspirante mécanique). Une
utilisation intensive prolongée de l'appareil peut faire appel à l'utilsation d'une ventilation
supplémentaire, par exemple d'ouverture d'une fenêtre, ou plus efficace de ventilation mécanique, par
exemple en augmentant le niveau de la ventilation mécanique présent.
18 FR
CONSEILS DE SÉCURITÉ

1. INSTALLATION
Le meuble ou le support dans lequel doit être encastrée la table, ainsi
que les parois du meuble qui pourraient juxtaposer celui-ci, doivent être
d'une matière résistant à une température élevée (jusqu'à 100°C) et
d'une épaisseur comprise entre 25 et 45 cm.
Les dimensions d'encastrement sont indiquées sur le schéma 2.
Si la table est installée entre deux meubles de cuisine, la distance entre
la table et les meubles doit être au moins de 15 cm (voir schéma 4);
tandis que la distance entre la table et le mur du fond doit être au moins
de 5,5 cm. La distance entre la table et tout autre appareil ou meuble
situé au dessus (par exemple une hotte) doit être au moins de 70 cm
(voir schéma 4).
Si, en fonction de l'installation de la table, la partie inférieure de son
caisson se trouve à proximité d'une zone normalement accessible lors
de manipulations et/ou de rangements, placer une cloison (bois ou
similaire) pour éviter tous risques de brûlure ou de détérioration (schéma
3).
Attention : Lors de la mise en place, un soin particulier doit être
porté au joint entourant le bord de la table afin d'éviter toute
infiltration dans le meuble support (schéma 1).
Lors de la mise en place du joint sur la partie arrière, veiller à ne pas
obstruer les passages d'air nécessaires à la combustion.
Le caisson de la table est équipé en dessous de 4 emplacements prévus
pour recevoir les brides de fixation destinées à l'immobilisation de la table
sur le meuble. Placer les 4 brides de fixation de manière à ce que la table
de travail soit parfaitement plaquée au meuble.
Si une table de 60 cm de large est installée au-dessus d'un four qui n'est
pas équipé de ventilation tangentielle, il est recommandé de créer des
ouvertures dans le caisson de cuisine pour faire ainsi circuler l'air.
La taille de ces ouvertures doit être au moins de et placées 300 cm²
comme indiqué sur le schéma 5.
Si c'est une table de 75cm de large qui est installée au-dessus du four, ce
dernier doit être équipé d'une ventilation tangentielle.
l'appareil n'est pas destiné à être utiliser avec une minuterie externe ou
un système de contrôle à distance.
19 FR
La mise en place fonctionnelle des appareils ménagers dans leur environnement est une opération délicate qui, si elle n'est pas correctement
effectuée, peut avoir de graves conséquences sur la sécurité des consommateurs. Dans ces conditions, il est impératif de confier cette tâche à
un professionnel qui la réalisera conformément aux normes techniques en vigueur. Si malgré cette recommandation, le consommateur
réalisait lui-même l'installation, le constructeur déclinerait toute responsabilité en cas de défaillance technique du produit entraînant ou non
des dommages aux biens et/ou aux personnes.
1.1. ENCASTREMENT
1.2. CARACTERISTIQUES REQUISES
Cet appareil doit être installé en conformité avec la réglementation en
vigueur et utilisé uniquement dans un espace ventilé. Lisez les
instructions avant d'installer ou utiliser cet appareil.
Un appareil de cuisson alimenté par le gaz produit de la chaleur et de
l'humidité à l'endroit où il est installé. Pour cette raison, veuillez
assurer la bonne ventilation de la pièce en gardant des courants d'air
ou en installant une hotte.
Une utilisation intensive et prolongée de l'appareil peut requérir une
ventilation plus importante, telle que l'ouverture d'une fenêtre ou une
puissance d'aspiration plus intense de la VMC si vous en êtes
équipés.
S'il n'est pas possible d'installer une hotte, une VMC devrait être
installée sur un mur donnant sur l'extérieur ou sur une fenêtre.
La VMC devrait être en mesure d'apporter un changement complet de
l'air de la cuisine 3 à 5 fois par heure. L'installateur doit installer la VMC
conformément aux règles en vigueur dans le pays d'installation
PHASE
TERRE
NEUTRE
L
N
Câble
lectriqueé
d’alim
Fil Marron
Fil Vert/jaune
Fil Bleu
Alimentation
2.2. RACCORDEMENT GAZ
L'appareil doit être installé et raccordé conformément aux règles
En vigueur dans le pays d'installa-tion. Une attention
particulière sera accordée aux dispositions applicables en matière
De ventilation.
Tous les travaux d'installation doivent être effectués avec l'électricité
déconnectée.
La plaque signalétique sur la plaque indique le type de gaz qui doit
être utilisé. Le raccordement au réseau d'approvisionnement en gaz
cylindre doit être effectuée qu'après avoir vérifié qu'il est réglementé
pour le type de gaz avec lequel il sera distribué. S'il n'est pas
correctement réglementé, voir les instructions dans les paragraphes
suivants pour modifier les paramètres du gaz.
Pour le gaz liquide (bouteille de gaz), utiliser des régulateurs de
pression conformes aux normes en vigueur.
Utilisez uniquement des tuyaux, des rondelles et des rondelles
d'étanchéité conformes aux normes en vigueur.
Pour certains modèles un lien conique est fourni pour installation
l'appareil, dans les pays où ce type de lien est obligatoire ; sur le
schéma 8, il est indiqué comment reconnaître les différents types de
liens (CY = cylindrique, CO = conique). Dans tous les cas, la partie
cylindre du lien doit être connecté à la table.
Lorsque vous connectez la table de cuisson à l'alimentation du gaz via
l'utilisation de tuyaux flexibles, veuillez faire en sorte que la distance
maximum couverte par le tuyau ne dépasse pas 2 mètres.
Le tube flexible doit être installé de manière à ne pas entrer en contact
avec un élément mobile de la cuisine (par exemple un tiroir) et à ne
pas passer dans un espace pouvant être encombré.
Pour éviter tout dommage potentiel à la table de cuisson, veuillez
effectuer l'installation suivant les indications du schéma 6.
1) Comme illustré dans le schéma, assembler les pièces en
séquence :
2.1. RACCORDEMENT ELECTRIQUE
"L'installation recevant l'appareil cité en référence doit être
conforme à la norme en vigueur dans le pays
d'installation". Le constructeur décline toute responsabilité
en cas de non respect de cette disposition.
Vérifier les données sur la plaque signalétique, située à l'extérieur
de l'unité, pour assurer que l'alimentation et le voltage
conviennent.
Avant le branchement, vérifier le système de mise à la terre.
Attention : vérifier la continuité de la terre de l'installation
avant de procéder au raccordement. Notre responsabilité ne
saurait être engagée pour tout incident ou ses
conséquences éventuelles qui pourraient survenir à l'usage
d'un appareil non relié à la terre, ou relié à une terre dont la
continuité serait défectueuse.
Si une prise n'est pas déjà fournie, installer une prise appropriée
pour la charge indiquée sur la plaque signalétique.
La prise devrait toujours être accessible.
Le fil de terre est de couleur jaune / vert.
Lorsque la table de cuisson est reliée directement à
l'approvisionnement en électricité, un disjoncteur doit être
installé.
Si le cordon d'alimentation est endommagé, il doit être remplacé
par un technicien qualifié afin d'éviter tout risque potentiel.
Le fil de terre (couleur vert et jaune) doit être au moins 10mm plus
long que les fils de phase et neutre.
La section du câble utilisé doit être de la bonne taille par rapport à
la puissance absorbée de la table de cuisson.
Veuillez vérifier la plaque signalétique pour les détails de
puissance et veiller à ce que le cordon d'alimentation électrique
soit de type 3x0.75 mm² l'H05RR F.
Si l’appareil n'est pas muni d'un cordon d'alimentation et d'une prise,
ou d’un autre moyen assurant que l’appareil puisse être déconnecté
du réseau d'alimentation dans le cas d’un surtension répondant aux
conditions de catégorie III, il est nécessaire d’intégrer un système de
disjoncteur dans le câblage, conformément aux règles établies en la
matière.

2.3. ADAPTER LA TABLE A DIFFERENTS
TYPES DE GAZ
Pour adapter la table de cuisson à différents types de gaz, veuillez
exécuter les instructions suivantes:
• Enlever les grilles, chapeaux et corps de brûleurs
• Insérez une clé à pipe (7 mm) dans le support du brûleur (schéma 7)
• Dévisser le/les injecteurs et le/les remplacer par un/des injecteurs
adaptés au gaz à utiliser (voir le type de gaz préconisé sur la table)
• Visser le/les injecteurs à fond
• Régler la bague d'air
• Replacer les corps de brûleurs, le chapeau de brûleur et les grilles
2.4. REGULER LA FLAMME AU MINIMUM
Après l'allumage du brûleur, tourner le bouton de commande au
réglage minimum, puis enlever la manette de commande (ce qui
peut facilement être enlevé par appliquer une légère pression).
En utilisant un petit «Terminal » type tournevis, la vis de réglage peut
être ajustée (cf Schéma 9). En tournant la vis dans le sens des
aiguilles d'une montre, cela réduit le débit de la flamme, alors qu'en
tournant dans le sens inverse, cela l'augmente. Utilisez ce réglage
pour obtenir une flamme d'environ 3 à 4 mm de longueur, puis
replacer la manette de commande.
Lorsque l'approvisionnement en gaz disponible est du
butane/propane (gaz de bouteilles), la vis pour régler la flamme au
ralenti doit être tournée dans le sens des aiguilles d'une montre,
jusqu'à la butée.
Lorsque vous avez effectué la régulation du gaz, remplacer
l'ancienne plaque signalétique de votre appareil avec celle adaptée
au type de gaz installé (fournie avec plaque de cuisson).
3.1. USING THE GAS BURNER
Pour allumer les brûleurs, placez une flamme (allume-feu, allumette,
briquet etc…) près du brûleur, appuyez et tournez la manette de
commande.
Si les brûleurs n'ont pas été utilisés depuis quelques jours, attendre
quelques secondes avant d'allumer le brûleur, ce qui permettra l'air
éventuellement présent dans les tuyaux de s'échapper.
Pour les appareils équipés d'allumage électronique, effectuer les
opérations suivantes:
• Pousser et tourner la manette de commande sur le symbole
d'allumage.
• Allumer le brûleur en appuyant sur le bouton d'allumage
Pour les tables de cuisson équipées d'allumage électronique intégré,
il suffit de pousser et tourner le bouton sur le symbole d'allumage.
Le système d'allumage continuera à produire des étincelles aussi
longtemps que le robinet de gaz est actionné.
Si le brûleur ne s'enflamme pas dans les 5 secondes, tournez le
bouton vers la position 0 et répéter l'opération.
Pour les petites casseroles/poêles, le brûleur à gaz doit être réglé de
telle manière que la flamme ne chevauche pas le fond de la casserole.
Les récipients à fond concave ou convexe ne doivent pas être utilisés.
ATTENTION: Si un brûleur est accidentellement éteint, tournez le
bouton vers la position fermée et ne pas tenter de relancer
pendant au moins 1 minute.
Si au fil des années les robinets de gaz deviennent raides, il est
nécessaire de les lubrifier.
Cette opération doit être effectuée que par un technicien agréé.
20 FR
3. UTILISATION DE LA TABLE
Cet appareil ne doit être utilisé que pour des fins pour lesquelles il est
destiné : la cuisson domestique. Toute autre utilisation sera
considérée comme abusive et peut donc être dangereuse. Le
fabricant ne sera pas responsable pour tout dommage ou perte
découlant d'une utilisation abusive.
A: ½ Adaptateur Cylindrique mâle
B: ½ Obturation
C: ½ Adaptateur gaz Femelle conique-cylindrique ou cylindrique-
cylindrique.
2) Serrer les joints avec des clés à molette, pensez à placer les
tuyaux en position.
3) Fixer le raccord C au réseau d'approvisionne-ment en gaz à
l'aide tuyau rigide ou en acier flexi-ble.
IMPORTANT: effectuer une dernière vérification pour détecter
les fuites sur les raccords de tuyauterie en utilisant une solution
savonneuse. Ne jamais utiliser une flamme. Aussi, assurez vous
que le tuyau flexible ne peut pas entrer en contact avec une partie
mobile du meuble de cuisine (par exemple un tiroir) et qu'il ne se
trouve pas à un endroit où il pourrait être endommagé.
Attention: Si vous sentez des émanations de gaz en provenance de
l'appareil, coupez immédiatement l'alimentation en gaz et appelez
directement une personne qualifiée. Ne cherchez pas une fuite à
l'aide d'une flamme.
Ø casserole
(cm)
A
SR
R
12 - 18
18 - 24
24 - 26
GazPower
(kW)
G20/20 mbar
(Gaz de naturel:
Méthane)
G30/28-30 mbar
(Butane/Propane)
1
1,7
2,7
95 I/h
162 I/h
257 I/h
73 g/h
124 g/h
196 g/h
Table A
Type de brûleurs
Brûleur auxiliaire
Brûleur semi-rapide
Brûleur rapide
Pour les modèles équipés d'un robinet de sécurité par thermocouple
(qui coupe l'écoulement du gaz si la flamme est accidentellement
éteint), les brûleurs sont allumés et décrit ci-dessus, mais il faut
prendre soin de garder la manette de commandes enfoncée pendant
5 ou 6 secondes après que la flamme est allumée.
ATTENTION : Avant d'allumer la table gaz, veillez à ce que les
brûleurs et les chapeaux de brûleur soient correctement placés dans
leur position.
CONSEIL
Pour de meilleurs résultats, la taille de casseroles à fond plat doit
correspondre à la taille des brûleurs comme suit :
Placer le bouton sur la température voulue pour régler la température
de la plaque chauffante électrique. Le voyant lumineux s'allume et la
plaque chauffante électrique commence à se réchauffer.
Après la cuisson placer le bouton à la position "0" pour éteindre la
plaque chauffante électrique (Schéma 10). Ne laisser jamais allumer
la plaque chauffante électrique lorsqu'il y a un récipient dessus. Le
diamètre et la forme du fond du récipient utilisé a une très grande
importance. Le fond du récipient doit être plat et son diamètre ne doit
être supérieur à 14 cm. Avant de la première utilisation, avant d'y
placer un récipient, réchauffer la plaque chauffante électrique durant
5 minutes. Cette opération permettra l'endurcissement da la
couverture de la plaque chauffante électrique qui est résistante à la
haute température. Pour nettoyer les plaques chauffantes électriques
utiliser du chiffon mouillé et du détergent à vaisselle. N'essayer jamais
à enlever en grattant les restes des produits cuits sur les plaques
chauffantes à l'aide d'un couteau ou autres instruments aigus et durs.
Après le nettoyage des plaques chauffantes électriques laisser les
allumées pendant quelques minutes pour les faire sécher. Ne les
laisser jamais allumer plus de quelques minutes quand les surfaces
des plaques chauffantes électriques sont vides.
3.2. MANUEL D'UTILISATION DES PL AU ES
CHAUFFANTES ELECTRIQUES SUR COMPTOIRS
Position
Puissance (Watt)
Puissance (Watt)
Remarques
0
1
2
3
4
5
6
0
100 W
180 W
250 W
500 W
750 W
1000 W
0
135 W
220 W
300 W
850 W
1150 W
1500 W
Fermée
Réchauffage
Cuisson à basse température
Cuisson à basse température
Cuisson, Torréfaction, Ebullition
Cuisson, Torréfaction, Ebullition
Cuisson, Torréfaction, Ebullition
La conformité des récipients de cuisson (Schéma 11)
N'oubliez pas que des récipients plus grands ont des surfaces de
réchauffement plus larges.
Des grands récipients permettent une cuisson plus rapide par rapport
aux récipients ayant des petites surfaces de réchauffement.
Utiliser toujours des récipients qui sont conformes aux quantités des
plats à cuir. Pour que les plats ne se débordent pas, surtout pour la
cuisson des plats relativement liquides, n'utilisez pas des petits
récipients. En cas d'utilisation des grands récipients pour les plats
dont leurs cuissons sont rapides, la sauce du plat restera collée au
récipient et quand vous le transférez dans une assiette de service, les
restes du plat resteront aussi collés au fond du récipient.
La pagina si sta caricando...
La pagina si sta caricando...
La pagina si sta caricando...
-
 1
1
-
 2
2
-
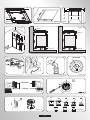 3
3
-
 4
4
-
 5
5
-
 6
6
-
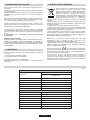 7
7
-
 8
8
-
 9
9
-
 10
10
-
 11
11
-
 12
12
-
 13
13
-
 14
14
-
 15
15
-
 16
16
-
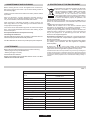 17
17
-
 18
18
-
 19
19
-
 20
20
-
 21
21
-
 22
22
-
 23
23


Documenti correlati
Altri documenti
-
ROSIERES RGV 64 STFPN Manuale utente
-
Candy CVG64SPN Manuale utente
-
Candy CVG63SPN Manuale utente
-
ROSIERES RGV74SQFPN Manuale utente
-
Candy CVG 64 STGN HOB Manuale utente
-
Hoover HGV7550B Manuale utente
-
-
Hoover HGV93SXV B Manuale utente
-
-