
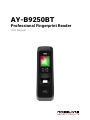
AY-B9250BT
Professional Fingerprint Reader
User Manual

Copyright © 2019 by Rosslare. All rights reserved.
This manual and the information contained herein are proprietary to ROSSLARE
ENTERPRISES LIMITED and/or its related companies and/or subsidiaries’ (hereafter:
"ROSSLARE"). Only ROSSLARE and its customers have the right to use the information.
No part of this manual may be re-produced or transmitted in any form or by any means,
electronic or mechanical, for any purpose, without the express written permission of
ROSSLARE.
ROSSLARE owns patents and patent applications, trademarks, copyrights, or other
intellectual property rights covering the subject matter in this manual.
TEXTS, IMAGES, AND ILLUSTRATIONS INCLUDING THEIR ARRANGEMENT IN THIS
DOCUMENT ARE SUBJECT TO THE PROTECTION OF COPYRIGHT LAWS AND OTHER
LEGAL RIGHTS WORLDWIDE. THEIR USE, REPRODUCTION, AND TRANSMITTAL TO THIRD
PARTIES WITHOUT EXPRESS WRITTEN PERMISSION MAY RESULT IN LEGAL
PROCEEDINGS.
The furnishing of this manual to any party does not give that party or any third party any
license to these patents, trademarks, copyrights or other intellectual property rights,
except as expressly provided in any written agreement of ROSSLARE.
ROSSLARE reserves the right to revise and change this document at any time, without
being obliged to announce such revisions or changes beforehand or after the fact.

AY-B9250BT User Guide 3
Table of Contents
Table of Contents ..................................................................................................... 3
1. Before Getting Started .................................................................................. 5
1.1. Safety Notes ......................................................................................................... 5
1.2. Product Details ..................................................................................................... 6
1.2.1. FRONT ........................................................................................................ 6
1.2.2. REAR .......................................................................................................... 7
1.2.3. Input / Output ............................................................................................... 8
1.3. Screen information during operation ................................................................. 9
1.3.1. Initial Screen ................................................................................................ 9
1.3.2. Icons ............................................................................................................ 9
1.3.3. Function KEY ............................................................................................ 10
1.3.4. Main Screen .............................................................................................. 10
1.4. LED information during operation .................................................................... 12
1.5. Voice information during operation ................................................................. 12
1.6. Buzzer guide announced during operation ..................................................... 12
1.7. How to register and enter the correct fingerprint ........................................... 13
2. Product Description .................................................................................... 14
2.1. Product Features ................................................................................................ 14
2.2. Diagram ............................................................................................................... 15
2.2.1. Single Type (Door Lock) ............................................................................ 15
2.2.2. Single Type (Lock Controller) .................................................................... 15
2.2.3. Dummy Type ............................................................................................. 15
2.2.4. Network Type (Door Lock) ......................................................................... 16
2.2.5. Network Type (Lock Controller) ................................................................. 16
2.3. Product Specification ........................................................................................ 17
3. Environment Setting ................................................................................... 18
3.1. Checkpoints before Environment Setting ....................................................... 18
3.1.1. Menu ......................................................................................................... 18
3.1.2. Administration authentication .................................................................... 18
3.1.3. How to access the menu without administrator authentication ................. 19
3.1.4. Save Settings ............................................................................................ 19
3.1.5. Default Setting ........................................................................................... 20
3.1.6. Setting guide for Network Configuration ................................................... 21
3.2. Access and Registration between Rosslare Bio9000 and terminal .............. 22
3.2.1. Install Rosslare Bio9000 ............................................................................ 22
3.2.2. Execute Rosslare Bio9000 .......................................................................... 22
3.2.3. Set in terminal ........................................................................................... 23
3.2.4. LAN connection in terminal ........................................................................ 23
3.2.5. Register the terminal in Rosslare Bio9000 ................................................. 24
3.3. Menu Configuration ........................................................................................... 25
3.4. USER Menu ......................................................................................................... 30
3.4.1. ADD ........................................................................................................... 30
3.4.2. AUTO ADD ................................................................................................. 32
3.4.3. MODIFY ..................................................................................................... 33
3.4.4. DELETE ...................................................................................................... 34
3.4.5. DELETE ALL ............................................................................................... 34
3.5. NETWORK Menu ................................................................................................ 34
3.5.1. AUTH Mode ................................................................................................ 35
3.5.2. Terminal ID ................................................................................................ 36
3.5.3. Terminal ..................................................................................................... 36
3.5.4. Server ........................................................................................................ 37
3.6. OPTION Menu ..................................................................................................... 37

AY-B9250BT User Guide 4
3.6.1. ATTEND ..................................................................................................... 38
3.6.2. Screen ........................................................................................................ 39
3.6.3. SAVE .......................................................................................................... 42
3.6.4. TIMEOUT ................................................................................................... 43
3.6.5. LOCKING .................................................................................................... 44
3.7. INT DEVICE Menu ............................................................................................... 45
3.7.1. FP SENSOR ................................................................................................ 45
3.7.2. BEEP .......................................................................................................... 47
3.7.3. VOICE ........................................................................................................ 47
3.7.4. BLE ............................................................................................................ 47
3.7.5. TAMPER ..................................................................................................... 47
3.8. EXT DEVICE Menu ............................................................................................. 48
3.8.1. DOORLOCK ................................................................................................ 48
3.8.2. RS485 ........................................................................................................ 51
3.8.3. WIEGAND .................................................................................................. 51
3.9. STATUS Menu ..................................................................................................... 53
3.9.1. DB INFO .................................................................................................... 54
3.9.2. NETWORK .................................................................................................. 54
3.9.3. OPTION ..................................................................................................... 54
3.9.4. INT DEVICE ............................................................................................... 54
3.9.5. EXT DEVICE ............................................................................................... 55
3.9.6. I/O PORT ................................................................................................... 55
3.9.7. VERSION .................................................................................................... 55
3.10. RECOVERY Menu ............................................................................................... 55
3.10.1. INITIALIZE .......................................................................................... 56
3.10.2. SELF TEST .......................................................................................... 57
3.10.3. BACKUP .............................................................................................. 60
3.10.4. REBOOT .............................................................................................. 61
Appendix 1. Glossary .............................................................................................. 62
Appendix 2. Declaration of Conformity ................................................................. 63
Appendix 3. Radio Equipment Directive (RED) .................................................... 64
Appendix 4. RoHS Directive ................................................................................... 65

AY-B9250BT User Guide 5
1. Before Getting Started
1.1. Safety Notes
l Warning
Do not operate the terminal
with wet hands, and pay
attention not to let any
liquid such as water enter
inside the terminal.
- > Otherwise, malfunction
or electric shock may be
caused.
Keep the terminal away
from inflammables.
- > Otherwise, it may
cause a fire.
Do not disassemble, repair
or remodel the terminal at
your disposal.
- > Otherwise, it may cause
malfunction, electric shock,
or a fire.
Do not allow children to
touch the terminal
carelessly.
- > Otherwise, it may
cause safety accidents of
children or malfunction.
- Non-compliance of safety notes may cause death or serious injury for users.
l Cautions
Do not install the terminal
in a place exposed to direct
sunlight.
→ Otherwise, it may cause
malfunction, deformation
and discoloration.
Do not install the terminal
in humid or dusty places.
→ Otherwise, it may
cause malfunction.
Do not clean this terminal
by sprinkling water, nor
wipe it with benzene,
thinner, and alcohol.
→ Otherwise, it may cause
electric shock or a fire.
Keep the terminal away
from magnets.
→ Otherwise, it may
cause failure and
malfunction.
Keep the fingerprint input
section clean.
→ Otherwise, the
fingerprint cannot be
recognized correctly.
Do not spray insecticides
or inflammables on the
terminal.
→ Otherwise, it may
cause deformation and
discoloration.
Keep the terminal away
from shock or sharp
objects.
→ Otherwise, it may
damage the terminal and
result in malfunction.
Do not install the terminal
in a place where there is
a severe change in
temperature.
→ Otherwise, it may
cause malfunction.
- Non-compliance of safety notes may cause personal injury or property damage for
users.
* We are not responsible for any accidents and damage that may arise from non-
compliance of the information in this manual.

AY-B9250BT User Guide 6
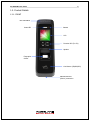
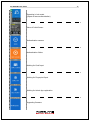
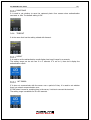
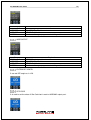
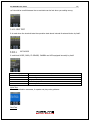
1.2. Product Details
1.2.1. FRONT
Camera
LCD
Function KEY (F1~F4)
Speaker
Card Sensor (EM/SC/HID)
Fingerprint
Sensor
State LED
BLE embedded
USB assist device
(UDL10) connection

AY-B9250BT User Guide 7
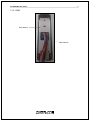
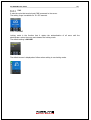
1.2.2. REAR
Fixed bracket
Cable harness

AY-B9250BT User Guide 8
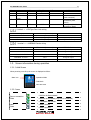
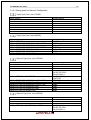
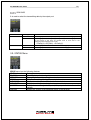
1.2.3. Input / Output
Cable & Connector
Pin Details
Pin
number
Line color
Label
(Line name)
Explanation
IN/OUT
Note
1
ORANGE
EXT
Inside open
IN
Connect to Exit button
2
YELLOW
DM0
DoorMonitor0
IN
Sense door state(DM0)
3
GREEN
DM1
DoorMonitor1
IN
Sense door state(DM1)
4
BLUE
DM2
DoorMonitor2
IN
Sense door state(DM2)
5
BLACK
GND
GND
-
Ground connection(for
door monitor)
6
RED
5V
DC5V
OUT
DC 5V output
7
BLACK
PGND
Power GND
-
Power supply ground
connection
8
GREEN
R4A
RS485A
BI
RS-485 interface
9
BLUE
R4B
RS485B
BI
RS-485 interface
10
ORANGE
WO0
WIE_OUT0
OUT
Output WIGAND (WO0)
11
YELLOW
WO1
WIE_OUT1
OUT
Output WIGAND (WO1)
12
BROWN
WI0
WIE_IN0
IN
Input WIGAND (WI0)
13
PURPLE
WI1
WIE_IN1
IN
Input WIGAND (WI1)
14
BLACK
GND
GND
-
Ground connection
(WIGAND signal)
15
RED
-
N_TXN
OUT
LAN I/F (LAN cable)
16
BLACK
-
N_TXP
OUT
LAN I/F (LAN cable)
17
GREEN
-
N_RXN
IN
LAN I/F (LAN cable)
18
WHITE
-
N_RXP
IN
LAN I/F (LAN cable)
19
RED
12V
DC12V
IN
DC 12V power supply
input
20
BLACK
GND
Power GND
-
Power supply ground
connection (Adapter)
21
RED
12V
DC12V
OUT
DC 12V put out power
22
GRAY
L1C
LOCK1_COM
OUT
Lock1 COM terminal

AY-B9250BT User Guide 9
23
BROWN
L1NC
LOCK1_NC
OUT
Lock1 NC terminal
24
WHITE
L1NO
LOCK1_NO
OUT
Lock1 NO terminal
25
PURPLE
L2
LOCK2
OUT
Lock2 terminal
26
BLACK
GND
GND
-
Ground connection
(Lock connecter)
27
BLACK
PGND
Power GND
-
Power supply ground
connection (Lock
power)
28
BLACK
PGND
Panel GND
-
Panel ground
connection (Earth)
Terminal <- > EM Type Door Lock wiring
Category
T2 terminal (Line name)
EM Door Lock
Lock
L1NC (Green)
+
GND
GND (Black)
-
Door Monitor
DM0 (Black)
NC(Normal Close)
Terminal <- > WIEGAND Device wiring
Category
T2 terminal (Line name)
WIEGAND Device
WIEGAND INPUT0
WI0
Wiegand output0
WIEGAND INPUT1
WI1
Wiegand output1
WIEGAND OUTPUT0
WO0
Wiegand input0
WIEGAND OUTPUT1
WO1
Wiegand input1
GND
GND
GND
1.3. Screen information during operation
1.3.1. Initial Screen
When powering on at first, the screen is displayed as follow.
1.3.2. Icons
Server connection
State
NONE
: No use network
: LAN line is disconnected.
: LAN line is connected (only link is connected)
: Connected with server
Gate
State
: Gate is closed.
: Gate is opened
State icon
Operation Mode
TNA Mode
Date and Time

AY-B9250BT User Guide 10
: Gate is opened forcedly (unusual door open state)
: Gate communication problem
Warning signal
State
NONE
: Normal
: Terminal Disassembly State
Fire detection
State
NONE
: Normal
: Sensed by fire detector (valid on DM2 fire set)
BLE connection
State
NONE
: Disconnected with Admin App
: Connected with Admin App
UDL connection
State
NONE
: UDL is not used (Normal state)
: UDL is connected
1.3.3. Function KEY
Icon
Meaning
Function Key
Explanation
UP
F1
Move cursor up
DOWN
F3
Move cursor down
LEFT
F2
Move cursor to left
ESC
F2 long
Move to upper menu
RIGHT
F4
Move cursor to right
ENTER
F4 long or
F4
Move to submenu
ENABLE
DISABLE
F2
Category choice (ENABLE or DISABLE)
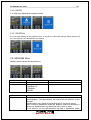
1.3.4. Main Screen
Operating in Exclusive mode
Initial Screen
Operating in Network mode
Initial Screen
Operating in Dummy mode
Initial Screen

AY-B9250BT User Guide 11
Operating in lock mode
(Reject all users authentication)
Menu of Initial Screen
Authentication success
Authentication failure
Waiting for Card Input
Waiting for Fingerprint Input
Waiting for Admin App registration
Upgrading firmware

AY-B9250BT User Guide 12
1.4. LED information during operation
LED
Operating state
Remark
RED
Normal
OFF
Alarm
ON or Flash
Authentication Failure
ON (Maintain during authentication time)
à OFF
GREEN
Normal
OFF
LOCK OPEN
ON
Authentication Success
ON (Maintain during authentication time)
à OFF
BLUE
Terminal Normal(alive)
Flash at intervals of 5 seconds
Function Key
LED
Enter menu
Always ON
Touch in initial screen.
ON(Maintain for 10 seconds) à OFF
1.5. Voice information during operation
Category
Voice information
Fingerprint Input
Please enter your fingerprint.
Authentication
success
You are authorized.
Authentication
failure
Please try again.
1.6. Buzzer guide announced during operation
Buzzer Sound
State
Explanation
Beep
Key touch
Card tag
Fingerprint touch
-Pressing key or reading card
-When inputting fingerprint, input has
been completed and hands can take off.
2 Beeps
Failure
If authentication fails or the user's input is
wrong
Long Beep
Waiting for input
It shows the state for waiting user’s input
such as fingerprint or password.
Short Beeps
Success
Authentication success or setting
completion

AY-B9250BT User Guide 13
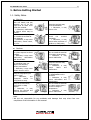
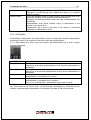
1.7. How to register and enter the correct fingerprint
l Correct fingerprint input method
Enter your fingerprint as if you take a thumbprint by using your forefinger if possible.
The fingerprint cannot be correctly registered and entered only by your fingertips.
The center of the fingerprint should be touched with the fingerprint input section.
l Enter the fingerprint of your forefinger if possible.
When using your forefinger, you can enter your fingerprint correctly and safely.
l Make sure that the fingerprint is unclear or wounded.
Too d r y, wet, blurry or wound e d fingerprints are difficult t o recognize . In this case,
the fingerprint of another finger should be registered.
l Precautions subject to your fingerprint state.
The availability of the fingerprint may vary subject to your fingerprint state.
Ø This product consists of a fingerprint recognition system and cannot recognize the
damaged or unclear fingerprints. The fingerprint should be registered using the
RF card.
Ø If your hands are dry, you can blow your breath on the system to operate
it more smoothly.
Ø For children, too small or unclear fingerprints may be difficult or impossible to use.
They need to register a new fingerprint every six months.
Ø For seniors, the fingerprint with too many lines may not be registered.
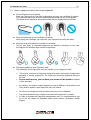
Ø It is recommended that you register more than two fingerprints if possible.
Ø In order to increase the fingerprint authentication rate, it is recommended to use
six of the ten fingers as illustrated below (both thumbs, forefingers, middle
fingers).

AY-B9250BT User Guide 14
2. Product Description
2.1. Product Features
l BLE is equipped. Door Control with smartphone is possible at close range.
l It is equipped with Color Camera, and it saves the visitor’s video when authentication
succeeds or fails.
l Optional, Available to use as RF(125kHz), Smart Card(13.56MHz), HID Reader
l Easy to verify your ID via fingerprint
- The use of the fingerprint recognition technology (Biometrics) can prevent
forgetting your password, losing your card or key, or avoid the risk of their theft.
The use of personal fingerprints enhances the security of authentication.
l Access control system using the local area network (LAN)
- The fingerprint reader communicates with the authentication server using a TCP/IP
protocol. Therefore, this terminal can be applied to the existing LAN and has easy
expandability. It ensures a fast speed by 10/100 Mbps Auto Detect and
facilitates management and monitoring via the network.
l Provide various registration and authentication method
Fingerprint
Fingerprint registration
Fingerprint authentication
Card
Card registration
Card authentication
Card
or Fingerprint
Card, Fingerprint registration
Card or Fingerprint authentication
Card
and Fingerprint
Card, Fingerprint registration
Fingerprint authentication after Card authentication
Mobile card
Mobile Card registration (registration only via server and admin
App)
Mobile Card authentication

AY-B9250BT User Guide 15
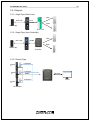
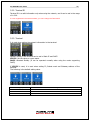
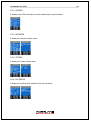
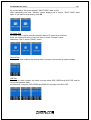
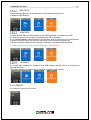
2.2. Diagram
2.2.1. Single Type (Door Lock)
2.2.2. Single Type (Lock Controller)
2.2.3. Dummy Type
Door Lock
Lock
control
BLE 2.4G
Mobile App
T2
Close
Open
Lock
Controller
Mobile App
RS485
BLE 2.4G
T2
Close
Open
RS485
Ethernet
Server
AY-B9250BT
Lock/Open
Lock/Open
Lock/Open
RS485ID
#2
RS485ID
#1
RS485ID
#3

AY-B9250BT User Guide 16
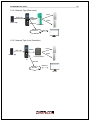
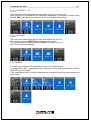
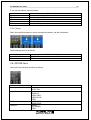
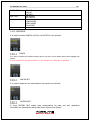
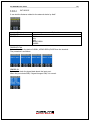
2.2.4. Network Type (Door Lock)
2.2.5. Network Type (Lock Controller)
Lock
Control
BLE 2.4G
Mobile App
Close
Ethernet
Open
T2
Door Lock
Ethernet
Internet
Server
Internet
RS485
Lock Controller
BLE 2.4G
Mobile App
Ethernet
Ethernet
T2
Close
Open
Server

AY-B9250BT User Guide 17
2.3. Product Specification
Category
Spec
CPU
32Bit RISC CPU(400MHz)
MEMORY
64M DDR RAM, 32M NOR,128M NAND
Camera
VGA, F2.8, View angle 61 degree
LCD
1.77’’ Color LCD
Fingerprint Sensor
Optical / 500 DPI
Authentication Method
Fingerprint, RF Card, Mobile Card
Authentication Speed
1:N < within 1 sec. (based on 1,000 fingerprints)
Fingerprint capacity
20,000 Fingerprints, 10,000 users (Two identical fingerprints
registration per user)
Note) Similar fingerprint inspection is possible when the number of
fingerprints is less than 200.
Log capacity
100,000 logs
Communication interface
TCP/IP, Wiegand In/Out (26/34bit),RS485
Lock
Deadbolt, EM Lock, Door Strike, Automatic Door
Temperature /
Humidity
-20~60 ℃ / < RH 90%
Certification
KC, CE, FCC
Size
58mm(W) * 191mm(H) * 62mm(D)

AY-B9250BT User Guide 18
3. Environment Setting
3.1. Checkpoints before Environment Setting
3.1.1. Menu
Press F4 long until the menu screen is displayed.
It is available to enter the menu without authentication because the manager doesn’t register
when shipping the product.
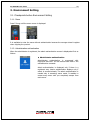
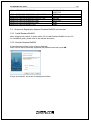
3.1.2. Administration authentication
When the administrator is registered, the admin authentication screen is displayed at first as
follows.
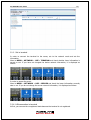
▶ Administrator authentication
Administrator authentication is progressed with
fingerprint and card. You can access each menu if the
authentication succeeds.
Admin authentication is displayed only if there is a
registered user. Admin authentication displays only if
admin is enrolled already. The admin authentication is
needed only in accessing menu mode. It enables to
access every menu until you completely escape from
main menu.

AY-B9250BT User Guide 19
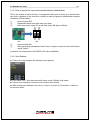
3.1.3. How to access the menu without administrator authentication
This is the method to enter the Menu in exceptional cases such as losing your administrator
card that is registered in the terminal or inability to make a fingerprint authentication because
of absence of administrator.
① Power terminal OFF.
② Disassemble device and make case open state.
③ While case opens, make DIP of rear side switch ON state as follows.
④ Power terminal ON.
⑤ After the terminal completely booted, Press F1 longer to enter the menu with buzzer
sound “Ppiririk”.
★ Caution: You should return DIP SWITCH OFF after modification.
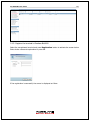
3.1.4. Save Settings
▶ If there are some changes, the following screen appears.
▶ If you select “YES”, then save them with buzzer sound “Ppibibig” and reboot.
▶ If there are no changes, it returns to the previous menu screen.
▶ While changing the settings in the menu, if there is no input for 30 seconds, it returns to
the previous menu.
OFF
ON
ON
1
2

AY-B9250BT User Guide 20
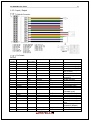
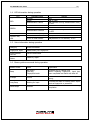
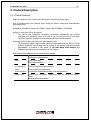
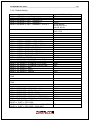
3.1.5. Default Setting
Category
Default setting
MENU > NETWORK
USE
MENU > NETWORK > USE > AUTH MODE
TN
MENU > NETWORK > USE > TERMINAL ID
1
MENU > NETWORK > USE > TERMINAL >
STATIC
MENU > NETWORK > USE > TERMINAL > STATIC >
IP:192.168.0.3
SN:255.255.255.0
GW:192.168.0.1
MENU > NETWORK > USE > SERVER
IP:192.168.0.2
PORT: 7332
MENU > OPTION > ATTEND > TYPE
F1~F4
MENU > OPTION > ATTEND > AUTO TNA
NO
MENU > OPTION > SCREEN > LANGUAGE
English
MENU > OPTION > SCREEN > SHOW ID
YES
MENU > OPTION > SCREEN > USER LOGO
NO
MENU > OPTION > SCREEN > USER ID LEN
4
MENU > OPTION > SCREEN > DATE > FORMAT
YYMMDD
MENU > OPTION > SAVE > LOG SAVE
Yes
MENU > OPTION > SAVE > IMAGE SAVE
No
MENU > OPTION > TIME OUT > RESULT
1sec
MENU > OPTION > TIME OUT > NET ERROR
30sec
MENU > OPTION > TIME OUT > PING
60sec
MENU > OPTION > LOCKING
NO USE
MENU > INT DEVICE > FP SENSOR > 1:1 LEVEL
5
MENU > INT DEVICE > FP SENSOR > 1:N LEVEL
8
MENU > INT DEVICE > FP SENSOR > LFD LEVEL
NONE
MENU > INT DEVICE > FP SENSOR > AUTH TIME
5sec
MENU > INT DEVICE > BEEP
3
MENU > INT DEVICE > VOICE
3
MENU > INT DEVICE > TAMPER
Alarm
MENU > EXT DEVICE > DOORLOCK > LOCK1 > TYPE
STRIKE/OK
MENU > EXT DEVICE > DOORLOCK > LOCK1 > OPEN
TIME
3sec
MENU > EXT DEVICE > DOORLOCK > LOCK2 > TYPE
None
MENU > EXT DEVICE > DOORLOCK > LOCK2 > OPEN
TIME
3sec
MENU > EXT DEVICE > DOORLOCK > OPEN ALARM
5sec
MENU > EXT DEVICE > DOORLOCK > DM0
NONE
MENU > EXT DEVICE > DOORLOCK > DM1
NONE
MENU > EXT DEVICE > DOORLOCK > DM2
NONE
MENU > EXT DEVICE > RS485 > TYPE
NONE
MENU > EXT DEVICE > RS485 > DEV ID
0
MENU > EXT DEVICE > WIEGAND > WIRE-INPUT
NONE
MENU > EXT DEVICE > WIEGAND > WIRE-OUTPUT
NONE
MENU > EXT DEVICE > WIEGAND > WIRE-OUTPUT>
26 BIT or 34 BIT > SITE CODE
0
MENU > EXT DEVICE > WIEGAND > WIRE-OUTPUT>
26 BIT or 34 BIT > SITE CODE > SEND INFO
UID
La pagina si sta caricando...
La pagina si sta caricando...
La pagina si sta caricando...
La pagina si sta caricando...
La pagina si sta caricando...
La pagina si sta caricando...
La pagina si sta caricando...
La pagina si sta caricando...
La pagina si sta caricando...
La pagina si sta caricando...
La pagina si sta caricando...
La pagina si sta caricando...
La pagina si sta caricando...
La pagina si sta caricando...
La pagina si sta caricando...
La pagina si sta caricando...
La pagina si sta caricando...
La pagina si sta caricando...
La pagina si sta caricando...
La pagina si sta caricando...
La pagina si sta caricando...
La pagina si sta caricando...
La pagina si sta caricando...
La pagina si sta caricando...
La pagina si sta caricando...
La pagina si sta caricando...
La pagina si sta caricando...
La pagina si sta caricando...
La pagina si sta caricando...
La pagina si sta caricando...
La pagina si sta caricando...
La pagina si sta caricando...
La pagina si sta caricando...
La pagina si sta caricando...
La pagina si sta caricando...
La pagina si sta caricando...
La pagina si sta caricando...
La pagina si sta caricando...
La pagina si sta caricando...
La pagina si sta caricando...
La pagina si sta caricando...
La pagina si sta caricando...
La pagina si sta caricando...
La pagina si sta caricando...
La pagina si sta caricando...
La pagina si sta caricando...
-
 1
1
-
 2
2
-
 3
3
-
 4
4
-
 5
5
-
 6
6
-
 7
7
-
 8
8
-
 9
9
-
 10
10
-
 11
11
-
 12
12
-
 13
13
-
 14
14
-
 15
15
-
 16
16
-
 17
17
-
 18
18
-
 19
19
-
 20
20
-
 21
21
-
 22
22
-
 23
23
-
 24
24
-
 25
25
-
 26
26
-
 27
27
-
 28
28
-
 29
29
-
 30
30
-
 31
31
-
 32
32
-
 33
33
-
 34
34
-
 35
35
-
 36
36
-
 37
37
-
 38
38
-
 39
39
-
 40
40
-
 41
41
-
 42
42
-
 43
43
-
 44
44
-
 45
45
-
 46
46
-
 47
47
-
 48
48
-
 49
49
-
 50
50
-
 51
51
-
 52
52
-
 53
53
-
 54
54
-
 55
55
-
 56
56
-
 57
57
-
 58
58
-
 59
59
-
 60
60
-
 61
61
-
 62
62
-
 63
63
-
 64
64
-
 65
65
-
 66
66


in altre lingue
- English: Rosslare AY-B9250BT User manual
Altri documenti
-
Elvox 46910.H22.01 Istruzioni per l'uso
-
 Retekess T-AC04 Metal Standalone Keypad Access Control Manuale utente
-
Retekess T-AC04 Manuale utente
-
PRASTEL Fingerkey Manuale del proprietario
-
 Doalltech Gateware FVS Manuale utente
-
Videx MTPX-MF Manuale utente
-
-
Crow RUNNER 8/64 Guida d'installazione
-
-
QSC Synapse DM1 Manuale utente

