Clarion SRV250 Manuale utente
- Categoria
- Accessori per schermi piatti
- Tipo
- Manuale utente

Printed in China / Imprimé en Chine / Gedruckt in China / Stampato in Cina / Impreso en China / Напечатано в Китае 2012/12 SE-308A
SRV250
6-3/4”(16.5cm) Powered Sub-Woofer Instruction Manual
Mode d’emploi du subwoofer amplifi é 16,5 cm
16,5 cm Aktiv-Subwoofer Benutzerhandbuch
Manuale di istruzioni del subwoofer con amplifi catore da 16,5 cm
Manual del usuario del subwoofer alimentado de 16,5 cm
Руководство пользователя усиленного сабвуфера 16,5 см
English Deutsch
Español
Français
Italiano
Русский
■
Thank you for purchasing this Clarion
product.
• Please read through this instruction manual
before operating the equipment.
• Check the contents of the enclosed warranty
card and store it in a safe place with this
manual.
■
Nous vous remercions d'avoir acheté ce
produit Clarion.
• Veuillez lire l'ensemble de ce mode d'emploi
avant de mettre l'appareil en service.
• Lisez le contenu de la carte de garantie
jointe et conservez-la précieusement avec ce
manuel.
■
Vielen Dank, dass Sie sich für dieses
Clarion-Gerät entschieden haben.
• Lesen Sie dieses Benutzerhandbuch
vollständig durch, bevor Sie das Gerät
betreiben.
• Machen Sie sich mit dem Inhalt der
beiliegenden Garantiekarte vertraut und
bewahren Sie die Garantiekarte zusammen
mit diesem Handbuch an einem sicheren Ort
auf.
■
Grazie per aver acquistato questo prodotto
Clarion.
• Prima di utilizzare l'apparecchio, leggere
attentamente il presente manuale di
istruzioni.
• Controllare il contenuto della scheda di
garanzia allegata e conservarla in un luogo
sicuro insieme al manuale.
■
Gracias por adquirir este producto Clarion.
• Lea atentamente este manual del usuario
antes de manipular el equipo.
• Lea la tarjeta de garantía adjunta y guárdela
en un lugar seguro, junto con este manual.
■
Благодарим за приобретение данного
изделия Clarion.
• Прочтите данное руководство
пользователя перед эксплуатацией
оборудования.
• Проверьте содержание прилагаемого
гарантийного талона и храните его в
надежном месте с данным руководством.
WARNING
● This unit is for use in DC12V negative
earth cars.
● Before making connections, disconnect
the negative battery terminal. Failure
to do so may cause a short circuit,
resulting in electric shock or fire.
● When mounting or making connections,
avoid places that would obstruct
operation of the air bags. Inability of the
air bag system to operate normally may
result in injury.
● When mounting and connecting ground
wires, do not use bolts or nuts from the
steering system, brake system, tanks or
any other of the vehicle's safety-related
parts. Doing so may result in loss of
control, fire or traffic accident.
● After mounting and making connections,
check that the brake lights, horn, hazard
lamps, blinkers and other electrical
equipment in the vehicle operate
normally. Malfunctioning equipment
may lead to fire, electric shock or traffic
accident.
● Do not attempt to disassemble or modify
the unit. Doing so may lead to accident,
fire or electric shock.
● When changing a fuse, be sure to use
a fuse with the specified capacity. Use
of any other fuse may lead to fire or
malfunction.
● Discontinue use in the event of
malfunction* or abnormality*.
* If no sound is output or there is crackling
or distortion.
* If a foreign object gets inside the unit,
the unit gets splashed with water, smoke
appears or there is an abnormal sound or
smell.
CAUTION
● Avoid mounting the unit where it will
be exposed to rain, humidity or dust.
If water, humidity or dust gets inside
the unit, it may cause smoke, fire or
breakdown.
● Be sure to use the accessories and
specified parts. Failure to do so may
lead to accident or breakdown.
● Follow the instruction manual when
mounting and making connections.
Incorrect wiring may result in fire.
● When making holes in the vehicle
chassis to mount the unit, avoid
interference or contact with the pipes,
tanks or electrical wiring. Damaged
pipes or other parts may lead to fire or
accident.
● To clean the unit, wipe with a soft dry
cloth. If the unit is very dirty, wipe with
a soft cloth containing mild detergent
diluted with water and finish with a dry
cloth. Do not use benzine, thinner, car
cleaner or other organic solvents as this
may lead to deterioration or peeling of
the paint.
ATTENTION DANGER
● Cet appareil est destiné à être utilisé
dans des véhicules avec mise à la terre
négative 12 VCC.
● Avant de procéder aux raccordements,
débranchez la prise négative de la
batterie, sous peine de provoquer un
court-circuit, ce qui présente un risque
d'électrocution ou d'incendie.
● Lors de l'installation ou du
raccordement, évitez les endroits
susceptibles de bloquer le
fonctionnement des airbags. Si le
système d'airbag ne fonctionne pas
normalement, cela peut provoquer des
blessures.
● Lors de l'installation et du raccordement
des fils de mise à la terre, n'utilisez pas
les boulons ou écrous de la direction,
du système de frein, des réservoirs ou
d'autres pièces liées à la sécurité du
véhicule, sous peine de provoquer une
perte du contrôle, un incendie ou un
accident de la route.
● Après l'installation et le raccordement,
vérifiez que les feux de stop, le klaxon,
les feux de détresse, les clignotants et
d'autres appareils électriques dans le
véhicule fonctionnent normalement.
Un dysfonctionnement de l'équipement
peut être à l'origine d'un incendie, d'une
électrocution ou d'un accident de la
route.
● N'essayez pas de démonter ou de
modifier l'appareil, sous peine de
provoquer un accident, un incendie ou
une électrocution.
● Lors du remplacement d'un fusible,
veillez à utiliser un fusible ayant la
capacité spécifiée. L'utilisation de tout
autre fusible peut provoquer un incendie
ou un dysfonctionnement.
● Cessez l'utilisation en cas de
dysfonctionnement* ou anomalie*.
* Si aucun son n'est émis ou en présence
de craquement ou de distorsion.
* Si un corps étranger pénètre à l'intérieur
de l'appareil, si l'appareil est mouillé, si de
la fumée apparaît ou en présence de sons
ou odeurs inhabituels.
ATTENTION
● Évitez d'installer l'appareil dans un
endroit où il sera exposé à la pluie,
l'humidité ou la poussière. Si de l'eau,
de l'humidité ou de la poussière pénètre
à l'intérieur de l'appareil, cela présente
un risque de fumée, d'incendie ou de
panne.
● Veillez à utiliser les accessoires et
les pièces spécifiées, sous peine de
provoquer un accident ou une panne.
● Suivez le mode d'emploi lors de
l'installation et du raccordement. Un
câblage incorrect peut entraîner un
incendie.
● Si vous percez des trous dans le châssis
du véhicule pour installer l'appareil,
évitez de gêner ou de toucher les
tuyaux, les réservoirs ou le câblage
électrique. Des tuyaux ou d'autres
pièces endommagés peuvent provoquer
un incendie ou un accident.
● Pour nettoyer l'appareil, essuyez-le avec
un chiffon doux et sec. Si l'appareil est
très sale, essuyez-le avec un chiffon
doux imbibé de détergent neutre dilué
dans l'eau, puis frottez avec un chiffon
sec. N'utilisez pas de benzène, diluant,
nettoyant pour voiture ou d'autres
solvants organiques sous peine
d'abîmer ou de décoller la peinture.
WARNUNG
● Dieses Gerät ist für Pkw mit
12-V-Bordnetz und Minus an Masse
vorgesehen.
● Klemmen Sie vor dem Herstellen von
Verbindungen das Kabel vom Minuspol
der Batterie ab. Nichtbeachtung kann
einen Kurzschluss verursachen, der
wiederum einen elektrischen Schlag
oder Brand zur Folge haben kann.
● Vermeiden Sie den Einbau bzw. die
Kabelverlegung an Orten, wo die
Funktion der Airbags beeinträchtigt
sein könnte. Eine Behinderung des
Airbagsystems kann eine Verletzung zur
Folge haben.
● Verwenden Sie für den Einbau und
den Anschluss an Fahrzeugmasse
keine Schrauben oder Muttern
des Lenksystems, Bremssystems,
Tanks oder eines anderen
sicherheitsrelevanten Bauteils des
Fahrzeugs. Dies könnte zur Folge haben,
dass man die Beherrschung über das
Fahrzeug verliert, und auch einen Brand
oder Verkehrsunfall verursachen.
● Prüfen Sie nach Einbau
und Verkabelung, dass die
Bremslichter, Scheinwerfer, Hupe,
Fahrtrichtungsanzeiger und anderen
elektrische Einrichtungen im Fahrzeug
normal arbeiten. Eine Funktionsstörung
solcher Einrichtungen kann einen Brand,
elektrischen Schlag oder Verkehrsunfall
zur Folge haben.
● Versuchen Sie nicht, das Gerät zu
zerlegen oder zu modifizieren. Dies
könnte einen Unfall, Brand oder
elektrischen Schlag zur Folge haben.
● Ersetzen Sie Sicherungen immer durch
Sicherungen mit dem vorgeschriebenen
Nennwert. Die Verwendung anderer
Sicherungen kann einen Brand oder eine
Funktionsstörung zur Folge haben.
● Stellen Sie den Gebrauch sofort ein,
wenn sich eine Funktionsstörung* oder
Abnormalität* bemerkbar macht.
* Wenn kein Ton erzeugt wird oder ein
knisterndes Geräusch oder Verzerrung zu
hören ist.
* Wenn ein Fremdkörper in das Gerät
gelangt oder Wasser auf dem Gerät
verspritzt wird, bei Rauchentwicklung,
oder wenn sich ein ungewöhnliches
Geräusch oder komischer Geruch
bemerkbar macht.
VORSICHT
● Vermeiden Sie den Einbau des Geräts
an einem Ort, wo es Regen, Feuchtigkeit
oder Staub ausgesetzt ist. Eindringen
von Wasser, Feuchtigkeit oder Staub
in das Gerät kann Rauchentwicklung,
einen Brand oder einen Funktionsausfall
verursachen.
● Verwenden Sie unbedingt das Zubehör
und die vorgeschriebenen Teile.
Nichtbeachtung kann einen Unfall oder
Funktionsausfall zur Folge haben.
● Folgen Sie bei Einbau und
Verkabelung den Anweisungen im
Benutzerhandbuch. Verkabelungsfehler
können einen Brand zur Folge haben.
● Achten Sie beim Bohren von Löchern
in der Fahrzeugkarosserie darauf, dass
nicht in Rohrleitungen, Tanks oder
elektrische Leitungen gebohrt wird.
Eine Beschädigung von Leitungen und
anderen Teilen kann einen Brand oder
Unfall zur Folge haben.
● Verwenden Sie zum Reinigen des Geräts
ein weiches, trockenes Tuch. Verwenden
Sie bei starker Verschmutzung
ein weiches, mit einer milden
Reinigungsflüssigkeit angefeuchtetes
Tuch und wischen Sie anschließend mit
einem trockenen Tuch nach. Verwenden
Sie keine organischen Lösungsmittel
wie Benzin, Verdünner, Autoreiniger
usw., da diese Substanzen Oberflächen
angreifen und ein Lösen des Lacks
verursachen können.
AVVERTIMENTO
● L'unità è prevista per l'uso su auto con
alimentazione da 12 V CC con messa a
terra negativa.
● Prima di effettuare i collegamenti,
scollegare il terminale negativo della
batteria. La mancata osservanza di
questa precauzione può causare
cortocircuito e conseguenti scosse
elettriche o incendio.
● Per il montaggio e i collegamenti, evitare
le posizioni che possano interferire con
il normale funzionamento degli airbag,
in quanto ciò potrebbe essere causa di
lesioni personali.
● Nel montaggio e collegamento dei cavi
di terra, non utilizzare bulloni o dadi
facenti parte dell'impianto sterzante,
dell'impianto frenante o di qualsiasi
altro sistema di sicurezza del veicolo.
Ciò potrebbe provocare la perdita
del controllo del veicolo, incendio o
incidente stradale.
● Una volta completati il montaggio
e il collegamento, verificare il
corretto funzionamento di luci dei
freni, clacson, lampeggiatori di
emergenza, indicatori di direzione e
altre apparecchiature elettriche del
veicolo. Il malfunzionamento di tali
apparecchiature può causare incendio,
scosse elettriche o incidente stradale.
● Non tentare di smontare o modificare
l'unità. Ciò può causare incendio,
scosse elettriche o incidente stradale.
● Qualora sia necessario sostituire un
fusibile, assicurarsi di sostituirlo con
uno della capacità specificata. L'uso
di qualsiasi altro fusibile può causare
incendio o malfunzionamento.
● In caso di malfunzionamento* o
anomalia* , interrompere l'uso del
prodotto.
* Se non viene emesso alcun suono o in
presenza di crepitio o distorsione.
* In caso di ingresso di oggetti estranei
all'interno dell'unità, se l'unità viene
bagnata, in presenza di fumo oppure
odori o rumori anomali.
ATTENZIONE
● Non montare l'unità in luoghi in cui
possa essere esposta a pioggia, umidità
o polvere. L'ingresso di acqua, umidità
o polvere all'interno dell'unità può
provocare fumo, incendio o guasto.
● Assicurarsi di utilizzare le parti e gli
accessori specificati. La mancata
osservanza di questa precauzione può
causare incendio o guasto.
● Per il montaggio e i collegamenti,
attenersi al manuale di istruzioni.
L'errato cablaggio può provocare
incendio.
● Nel praticare i fori per il montaggio
dell'unità nel telaio del veicolo,
evitare l'interferenza o il contatto con
tubazioni, serbatoi e cablaggi elettrici.
Il danneggiamento di tubazioni o altre
parti può causare incendio o incidente.
● Per pulire l'unità, utilizzare un panno
morbido asciutto. Se l'unità è molto
sporca, pulirla con un panno morbido
inumidito con un detergente delicato
diluito in acqua e infine asciugarla con
un panno asciutto. Non usare benzene,
diluenti, prodotti di pulizia per auto o
altri solventi organici, poiché potrebbero
causare il deterioramento o il distacco
della vernice.
ADVERTENCIA
● Esta unidad está diseñada para utilizarla
en coches con conexión a tierra
negativa de CC 12 V.
● Antes de realizar las conexiones,
desconecte el terminal negativo de la
batería. Si no lo hace podría provocar un
cortocircuito y este derivar en descarga
eléctrica o en un incendio.
● Al montar o realizar las conexiones,
evite hacerlo en lugares que puedan
interferir con el funcionamiento de los
airbags. El hecho de que el sistema
de airbag no pueda funcionar con
normalidad podría provocar lesiones.
● Al montar y colocar los cables de
conexión a tierra, no utilice pernos ni
tuercas del sistema de dirección, del
sistema de frenos, de los depósitos
ni de ninguna de otras de las piezas
de seguridad del vehículo. Si lo hace,
podría provocar la pérdida de control,
incendios o accidentes de tráfico.
● Tras montar y realizar las conexiones,
compruebe que las luces de
estacionamiento, el claxon, las luces
de advertencia, los intermitentes
y otros dispositivos eléctricos del
vehículo funcionan con normalidad.
El mal funcionamiento de los equipos
podría provocar incendios, descargas
eléctricas o accidentes de tráfico.
● No intente desmontar o modificar la
unidad. Si lo hace, podría provocar
accidentes, incendios o descargas
eléctricas.
● A la hora de cambiar un fusible,
asegúrese de utilizar un fusible que
tenga la capacidad especificada. El
uso de cualquier otro tipo de fusible
podría provocar incendios o fallos de
funcionamiento.
● Si se dan fallos de funcionamiento* o
anomalías* deje de utilizarlo.
* Si no se emite sonido o el sonido está
entrecortado o distorsionado.
* Si accede un objeto extraño al interior la
unidad, si la unidad recibe salpicaduras
de agua, aparece humo o hay olores o
sonidos extraños.
PRECAUCIÓN
● Evite montar la unidad en lugares en
los que se vea expuesta a la lluvia, la
humedad o el polvo. Si acceden a la
unidad agua, humedad o polvo, podría
aparecer humo, producirse fuego o
bloqueos.
● Asegúrese de utilizar los accesorios y
las piezas especificadas. No hacerlo
podría provocar accidentes o bloqueos.
● Siga el manual del usuario para montar
y realizar las conexiones. Un cableado
incorrecto podría provocar incendios.
● Al hacer los taladros en el chasis del
vehículo para montar la unidad, evite
interferir o hacer contacto con los tubos,
los depósitos y el cableado eléctrico.
Dañar tubos u otras piezas podría
provocar un incendio o un accidente.
● Para limpiar la unidad, pase un paño
suave seco. Si la unidad está muy
sucia, límpiela con un paño suave
que contenga un detergente suave
diluido en agua y, posteriormente,
pase un paño seco. No utilice benceno,
disolventes, limpiadores de coche ni
otros disolventes orgánicos, ya que
podrían provocar el deterioro o el
descascarillado de la pintura.
ПРЕДУПРЕЖДЕНИЕ
● Это устройство предназначено для
использования в автомобилях с
напряжением 12 В постоянного тока и
отрицательным заземлением.
● Перед подключением отсоедините
отрицательную клемму аккумулятора.
Невыполнение этого требования
может привести к короткому
замыканию и стать причиной
поражения электрическим током или
пожара.
● При монтаже или подключении
избегайте размещений, которые будут
препятствовать работе подушек
безопасности. Невозможность
системы подушек безопасности
работать надлежащим образом может
привести к травме.
● При монтаже и подключении
проводов заземления не используйте
болты или гайки системы рулевого
управления, тормозной системы,
баков или любых других частей
автомобиля, связанных с его
безопасностью. Это может привести
к потере управления, возгоранию
или дорожно-транспортному
происшествию.
● После монтажа и подключений
убедитесь, что стоп-сигнал, звуковой
сигнал, лампы безопасности,
указатели поворотов и другое
электрическое оборудование
автомобиля работает надлежащим
образом. Неисправность
оборудования может привести к
пожару, поражению электрическим
током или дорожно-транспортному
происшествию.
● Не пытайтесь разбирать и
модифицировать устройство. Это
может привести к аварии, пожару или
поражению электрическим током.
● При замене плавкого предохранителя
убедитесь, что используется
плавкий предохранитель указанной
емкости. Использование любых
других плавких предохранителей
может привести к пожару или
неисправности.
● Прекратите использование в случае
неисправности* или нарушений в
работе*.
* Если отсутствует звук или слышится
треск, или искажения.
* В случае попадания вовнутрь
устройства постороннего предмета,
брызг воды, появления дыма или
странных звуков или запахов.
ПРЕДОСТЕРЕЖЕНИЕ
● Не устанавливайте устройство
там, где оно будет подвергаться
воздействию дождя, влаги или пыли.
Попадание воды, влаги или пыли
вовнутрь устройства может привести
к появлению дыма, возгоранию или
поломке.
● Обязательно используйте
дополнительные принадлежности
и указанные детали. Невыполнение
этого требования может привести к
аварии или поломке.
● Следуйте руководству пользователя
при монтаже и подключениях.
Неправильная прокладка проводов
может привести к возгоранию.
● При выполнении отверстий в
автомобильном шасси для монтажа
устройства избегайте помех
или контакта с трубами, баками
или электрической проводкой.
Поврежденные трубы или другие
детали могут привести к возгоранию
или аварии.
● Для очистки устройства протрите его
мягкой сухой тканью. Если устройство
сильно загрязнено, протрите его
мягкой тканью с нанесенным
нейтральным моющим средством,
разбавленным водой, и вытрите
его сухой тканью. Не используйте
бензин, разбавитель, автомобильный
очиститель или другие органические
растворители, так как это может
привести к повреждению или
отслаиванию краски.
SAFETY PRECAUTIONS / CONSIGNES DE SÉCURITÉ / SICHERHEITSHINWEISE / PRECAUZIONI DI SICUREZZA / PRECAUCIONES DE SEGURIDAD / МЕРЫ ПРЕДОСТОРОЖНОСТИ
PACKAGE CONTENTS / CONTENU DE L'EMBALLAGE / LIEFERUMFANG / CONTENUTO DELLA CONFEZIONE / CONTENIDO DEL PAQUETE / СОДЕРЖИМОЕ КОМПЛЕКТА
1 2 3 4 5 6 7 8 9 0
1
Power supply cord (16.4 ft / 5 m) ............... 1
2
Speaker input cord (16.4 ft / 5 m) .............. 1
3
Remote control unit extension cord
(13.1 ft / 4 m) .............................................. 1
4
Remote control unit (cord 6.6 ft / 2 m) ....... 1
5
Mounting bracket ....................................... 2
6
Screw (M5 mm x 6 mm) ............................. 4
7
Tapping screw (Φ5 mm x 16 mm) .............. 4
8
Speed nut ................................................... 4
9
Hook-and-loop fastener - small
(male/ female) ............................................ 1
0
Hook-and-loop fastener - large
(male/female) ............................................. 2
1
Cordon d'alimentation (5 m) ....................... 1
2
Cordon d'entrée d'enceinte (5 m) ............... 1
3
Rallonge de la télécommande (4 m) .......... 1
4
Télécommande (cordon 2 m) ..................... 1
5
Applique de montage ................................. 2
6
Vis (M5 mm x 6 mm) .................................. 4
7
Vis de taraudage (Φ5 mm x 16 mm) .......... 4
8
Écrou rapide ............................................... 4
9
Petite fermeture velcro
(côté crochet/velours) ................................ 1
0
Grande fermeture velcro
(côté crochet/velours) ................................ 2
1
Stromversorgungskabel (5 m) .................... 1
2
Lautsprechereingangskabel (5 m) ............. 1
3
Fernbedienungsverlängerungskabel
(4 m) ........................................................... 1
4
Fernbedienung (Kabel 2 m) ....................... 1
5
Befestigungshalterung ............................... 2
6
Schraube (M5 mm x 6 mm) ....................... 4
7
Schneidschraube (Φ 5 mm x 16 mm) ........ 4
8
Klemmmutter .............................................. 4
9
Klettband - klein
(Widerhaken/Schlaufen) ............................ 1
0
Klettband - groß
(Widerhaken/Schlaufen) ............................ 2
1
Cavo di alimentazione (5 m) ...................... 1
2
Cavo di ingresso diffusore (5 m) ................ 1
3
Cavo di prolunga del telecomando (4 m) ... 1
4
Telecomando (cavo 2 m) ............................ 1
5
Supporto di montaggio ............................... 2
6
Vite (M5 mm x 6 mm) ................................. 4
7
Vite autofi lettante (Φ 5 mm x 16 mm) ........ 4
8
Piastrina per viti autofi lettanti ..................... 4
9
Elemento di fi ssaggio in velcro - piccolo
(maschio/femmina) .................................... 1
0
Elemento di fi ssaggio in velcro - grande
(maschio/femmina) .................................... 2
1
Cable de la fuente de alimentación (5 m) .. 1
2
Cable de entrada del altavoz (5 m) ............ 1
3
Cable de extensión de la unidad de control
remoto (4m) ............................................... 1
4
Unidad de control remoto (cable de 2 m) ... 1
5
Soporte de montaje .................................... 2
6
Tornillo (M5 mm × 6 mm) ........................... 4
7
Tornillo de roscar (Φ 5 mm × 16 mm) ........ 4
8
Tuerca de velocidad ................................... 4
9
Brida: pequeña (macho/hembra) ............... 1
0
Brida: grande (macho/hembra) .................. 2
1
Шнур питания (5 м) ................................... 1
2
Входной шнур колонки (5 м) .................... 1
3
Удлинительный шнур пульта
дистанционного управления (4 м) ........... 1
4
Блок дистанционного управления
(шнур 2 м).................................................. 1
5
Монтажный кронштейн ............................ 2
6
Винт (M5 мм x 6 мм) ................................. 4
7
Самонарезающий винт
(Ц5 мм x 16 мм) ........................................ 4
8
Гайка скоростного вала ............................ 4
9
Застёжка "липучка" – малая
(выступ/впадина) ...................................... 1
0
Застёжка "липучка" – большая
(выступ/впадина) ...................................... 2
SPECIFICATIONS / CARACTÉRISTIQUES / SPEZIFIKATIONEN / CARATTERISTICHE TECNICHE / ESPECIFICACIONES / ТЕХНИЧЕСКИЕ ХАРАКТЕРИСТИКИ
● Maximum Output : 150W (75W + 75W)
● Rated Output : 74W (37W + 37W)
● Frequency Response : 30 - 200Hz
● Low-Pass Filter Cut-off Frequency : 50 ~
120Hz (75/100Hz click position)
● RCA Input Sensitivity : 60mV - 4V
● Speaker Input Sensitivity : 2 - 5V
● Power Source Voltage : DC14.4V
● Ground : Negative
● Consumption current : 7.0A
● Auto-Fuse Capacity : 10A
● External Dimensions :
• Main Unit : 10-13/16“ (275mm) Width x
2-3/4“ (70mm) Height x 7-11/16” (195mm)
Depth
• Remote Control Unit : 1-1/4“ (32mm) Width
x 1“ (24.5mm) Height x 4-3/8” (111mm)
Depth
● Weight :
• Main Unit : 2,500g (5.5lbs)
• Remote Control Unit : 90g (0.2lbs)
● Sortie maximum : 150 W (75 W + 75 W)
● Sortie nominale : 74 W (37 W + 37 W)
● Réponse en fréquence : 30 - 200 Hz
● Fréquence de coupure du filtre passe-bas :
50 ~ 120 Hz (position de clic75/100 Hz)
● Sensibilité de l'entrée RCA : 60 mV - 4 V
● Sensibilité de l'entrée d'enceinte : 2 - 5 V
● Tension de la source d'alimentation :
14,4 VCC
● Masse:Négative
● Consommation en courant : 7,0 A
● Capacité du fusible automatique : 10 A
● Dimensions externes :
• Unité principale : 275 mm Largeur x 70 mm
Hauteur x 195 mm Profondeur
• Télécommande : 32 mm Largeur x 24,5
mm Hauteur x 111 mm Profondeur
● Poids :
• Unité principale : 2 500 g (5,5 lb)
• Télécommande : 90 g (0,2 lb)
● Höchstleistung : 150 W (75 W + 75 W)
● Nennleistung : 74 W (37 W + 37 W)
● Frequenzgang : 30 - 200 Hz
● Tiefpassfilter-Grenzfrequenz : 50 ~ 120 Hz
(mit Rastpositionen bei 75/100 Hz)
● Empfindlichkeit RCA-Eingang : 60 mV - 4 V
● Empfindlichkeit Lautsprechereingang : 2 - 5
V
● Versorgungsspannung : 14,4 V
Gleichspannung
● Masse : Minus
● Stromaufnahme : 7,0 A
● Automatiksicherung Nennwert : 10 A
● Außenabmessungen :
• Hauptgerät : 275 mm Breite x 70 mm Höhe
x 195 mm Tiefe
• Fernbedienung : 32 mm Breite x 24,5 mm
Höhe x 111 mm Tiefe
● Gewicht :
• Hauptgerät : 2.500 g
• Fernbedienung : 90 g
● Uscita massima : 150 W (75 W + 75 W)
● Uscita nominale : 74 W (37 W + 37 W)
● Risposta in frequenza : 30 - 200 Hz
● Frequenza di taglio del filtro passabasso : 50
~ 120 Hz (posizioni di scatto 75/100 Hz)
● Sensibilità ingresso RCA : 60 mV - 4 V
● Sensibilità ingresso diffusore : 2 - 5 V
● Tensione fonte di alimentazione : 14,4 V CC
● Messa a terra : Negativa
● Corrente assorbita : 7,0 A
● Capacità fusibile automatico : 10 A
● Dimensioni esterne :
• Unità principale : Larghezza 275 mm x
Altezza 70 mm x Profondità 195 mm
• Telecomando : Larghezza 32 mm x Altezza
24,5 mm x Profondità 111 mm
● Peso :
• Unità principale : 2.500 g (5,5 lb)
• Telecomando : 90 g (0,2 lb)
● Potencia máxima de salida : 150 W (75 W + 75 W)
● Potencia nominal de salida : 74 W (37 W + 37 W)
● Respuesta de frecuencia : 30 - 200 Hz
● Frecuencia de corte del filtro pasabajos variable :
50 ~ 120 Hz (posición de clic 75/100 Hz)
● Sensibilidad de entrada de RCA : 60 mV - 4 V
● Sensibilidad de entrada del altavoz : 2 - 5 V
● Voltaje de la fuente de alimentación : 14,4 V CC
● Conexión a tierra : negativa
● Consumo de corriente : 7,0 A
● Capacidad del fusible auto : 10 A
● Dimensiones externas :
• Unidad principal : 275 mm de ancho x 70
mm de alto x 195 mm de largo
• Unidad de control remoto : 32 mm de
ancho x 24,5 mm de alto x 111 mm de
largo
● Peso :
• Unidad principal : 2500 g(5,5 lb)
• Unidad de control remoto : 90 g(0,2 lb)
● Максимальная мощность : 150Вт (75Вт + 75Вт)
● Номинальная мощность : 74Вт (37Вт + 37Вт)
● Частотная характеристика : 30 - 200Гц
● Частота среза фильтра нижних частот : 50 ~
120Гц (положение щелчка 75/100Гц)
● Чувствительность входа RCA : 60мВ - 4В
● Чувствительность входа колонки : 2 - 5В
● Напряжение источника питания : 14,4В
постоянного тока
● Заземление : Отрицательное
● Потребляемый ток : 7,0A
● Емкость автоматического предохранителя :
10A
● Внешние размеры :
• Основной блок : 275мм ширина x 70мм
высота x 195мм глубина
• Блок дистанционного управления : 32мм
ширина x 24.5мм высота x 111мм глубина
● Вес :
• Основной блок : 2500г (5,5фунтов)
• Блок дистанционного управления : 90г
(0,2фунтов)

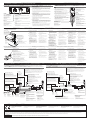
NAMES AND FUNCTIONS OF PARTS / NOMENCLATURE ET FONCTION DES PIÈCES / BEZEICHNUNGEN UND FUNKTIONEN DER TEILE / NOME E FUNZIONE DELLE PARTI / NOMBRES Y
FUNCIONES DE LAS PARTES / НАЗВАНИЕ И НАЗНАЧЕНИЕ ДЕТАЛЕЙ
HOW TO INSTALL / INSTALLATION / EINBAU / INSTALLAZIONE / MÉTODO DE INSTALACIÓN / КАК УСТАНОВИТЬ
CONNECTION EXAMPLE / EXEMPLE DE RACCORDEMENT / ANSCHLUSSBEISPIEL / ESEMPIO DI COLLEGAMENTO / EJEMPLO DE CONEXIÓN / ПРИМЕР ПОДКЛЮЧЕНИЯ
Other / Autre / Sonstiges / Altro / Otro / Другое
■
REAR PANEL / PANNEAU ARRIÈRE / RÜCKWAND / PANNELLO POSTERIORE / PANEL TRASERO / ЗАДНЯЯ ПАНЕЛЬ
INPUT-A
Speaker input terminal
Prise d'entrée d'enceinte
Lautsprechereingang
Terminale di ingresso diffusore
Entrada de altavoz
Входной разъем источника
питания
INPUT-B
RCA input terminal
* Connect the monaural signal input to the L channel
terminal.
Prise d'entrée RCA
* Raccordez l'entrée du signal mono à la prise du canal L.
RCA-Eingang
* Beschalten Sie bei monauraler Signaleingabe die
L-Buchse.
Terminale di ingresso RCA
* Collegare l'ingresso di segnale monoaurale al terminale
del Entrada RCA
canale L.
* Conecte la entrada de señal monoaural a la entrada del
canal L.
Входной разъем RCA
* Подсоедините вход монофонического сигнала к
разъему канала L.
POWER
Power supply input terminal
Prise d'entrée d'alimentation
Stromversorgungseingang
Terminale di ingresso
alimentazione
Entrada de la fuente de
alimentación
Входной разъем колонки
REMOTE CONTROL
Remote control input terminal
* If the woofer level can be controlled from the center unit, the unit can
be used without connecting the remote control unit. (However, gain
and cut-off frequency will be fi xed at 120Hz, and phase at normal)
Prise d'entrée de la télécommande
* Si le niveau du woofer peut être contrôlé depuis l'unité centrale,
l'appareil peut être utilisé sans avoir à raccorder la télécommande.
(Cependant le gain et la fréquence de coupure seront fi xés à 120 Hz
et la phase sur normal)
Fernbedienungseingang
* Wenn der Tieftönerpegel am Zentralgerät regelbar ist, kann dieses
ohne Anschluss der Fernbedienung verwendet werden. (In diesem
Fall sind jedoch die Verstärkung und Grenzfrequenz (120 Hz) fest
vorgegeben, und die Phase ist normal)
Terminale di ingresso del telecomando
* Se il livello del woofer può essere controllato dall'unità centrale,
è possibile utilizzare l'unità senza collegare il telecomando. (Il
guadagno e la frequenza di taglio saranno tuttavia fi ssi a 120 Hz, e la
fase sarà normale)
Entrada de control remoto
* Si el nivel del altavoz puede controlarse desde la unidad central, la
unidad podrá utilizarse sin conectar la unidad de control remoto. Sin
embargo, la ganancia y la frecuencia de corte se fi jarán a 120 Hz, y
la fase a un valor normal.
Входной разъем блока дистанционного управления
* Если уровень низких частот можно контролировать с помощью
центрального блока, устройство может быть использовано без
подключения к блоку дистанционного управления. (Однако,
коэффициент усиления и частота среза будут установлены в
значение 120Гц и нормальную фазу)
■
REMOTE CONTROL UNIT / TÉLÉCOMMANDE / FERNBEDIENUNG / TELECOMANDO
/ UNIDAD DE CONTROL REMOTO / БЛОК ДИСТАНЦИОННОГО УПРАВЛЕНИЯ
GAIN
Gain control knob
Bouton de commande de gain
Verstärkungsregler
Manopola di regolazione guadagno
Control de ganancia
Ручка управления усилением
FREQ
Cut-off frequency adjustment knob
Adjust the cut-off frequency to 50-120Hz. The knob has
a 75Hz and 100Hz click position.
Bouton de réglage de la fréquence de coupure
Réglez la fréquence de coupure sur 50-120Hz. Le
bouton a une position de clic à 75 Hz et 100 Hz.
Grenzfrequenz-Einstellknopf
Stellen Sie die Grenzfrequenz auf 50 - 120 Hz ein. Der
Knopf hat Rastpositionen bei 75 Hz und 100 Hz.
Manopola di regolazione frequenza di taglio
Regolare la frequenza di taglio a 50-120 Hz. La
manopola ha due posizioni di scatto, in corrispondenza
dei 75 Hz e dei 100 Hz.
Control de ajuste del fi ltro pasabajos variable
Permite ajustar la frecuencia de corte a 50-120 Hz. El
control giratorio presenta una posición de encaje en los
valores de 75 Hz y 100 Hz.
Ручка настройки частоты среза
Настройте частоту среза 50-120Гц. Ручка имеет
положение щелчка 75Гц и 100Гц.
POWER INDICATOR
Power indicator
Témoin d'alimentation
Betriebsanzeige
Indicatore di accensione
Indicador de potencia
Индикатор питания
PHASE
Phase switch
Use switch to select the phase
according to the system.
Commutateur de phase
Utilisez cet interrupteur pour régler
la phase en fonction de votre
système.
Phasenschalter
Mit diesem schalter wird die
Phase entsprechend dem System
ausgewählt.
Commutatore di fase
Usare l’interruttore per selezionare
la fase a seconda del sistema.
Interruptor de fase
Use el conmutador para seleccionar
la fase de acuerdo al sistema.
Переключатель фазы
Используется для выбора фазы в
зависимости от системы.
1.
Attach the mounting bracket
5
to the bottom surface
of the main unit using the
screws
6
.
2.
Cut slits in the carpet and
insert the speed nuts
8
.
3.
Fix the mounting bracket to
the carpet using the tapping
screws
7
.
* Attach the other side in the
same way.
* If there is not enough space
to install the unit using the
mounting bracket, attach the
hook-and-loop fastener - large
0
to the mounting surface
of the main unit and fi x to the
carpet.
1.
Fixez l'applique de montage
5
au bas de l'unité principale
avec les vis
6
.
2.
Faites des incisions dans le
tapis et insérez les écrous
rapides
8
.
3.
Fixez l'applique de montage
sur le tapis au moyen des vis
de taraudage
7
.
* Fixez l'autre côté de la même
façon.
* S'il n'y a pas assez de place
pour installer l'appareil avec
l'applique de montage,
attachez la grande fermeture
velcro
0
sur la surface de
montage de l'unité principale
et fi xez-la sur le tapis.
1.
Bringen Sie die
Befestigungshalterung
5
mit den Schrauben
6
an der
Unterseite des Hauptgeräts
an.
2.
Schneiden Sie Schlitze in den
Bodenteppich und setzen Sie
die Klemmmuttern
8
ein.
3.
Sichern Sie die
Befestigungshalterung mit
den Schneidschrauben
7
am Bodenteppich.
* Befestigen Sie die andere
Seite auf dieselbe Weise.
* Sollte der vorhande Platz
für einen Einbau mit
Befestigungshalterungen
nicht ausreichen, bringen Sie
das Klettband - groß
0
an
der Befestigungsfl äche des
Hauptgeräts an und sichern es
so am Bodenteppich.
1.
Fissare il supporto di
montaggio
5
alla superfi cie
inferiore dell'unità principale
utilizzando le viti
6
.
2.
Praticare dei tagli nel tappetto
e inserirvi le piastrine per viti
autofi lettanti
8
.
3.
Fissare il supporto di
montaggio al tappeto
utilizzando le viti autofi lettanti
7
.
* Fissare l'altro lato procedendo
nello stesso modo.
* Se lo spazio non è suffi ciente
a consentire l'installazione
dell'unità con il supporto di
montaggio, fi ssare l'elemento
di fi ssaggio in velcro - grande
0
alla superfi cie di montaggio
dell'unità principale e fi ssarlo
al tappeto.
1.
Acople el soporte de montaje
5
a la superfi cie inferior de
la unidad principal utilizando
los tornillos
6
.
2.
Realice unos cortes en la
alfombra e inserte las tuercas
de velocidad
8
.
3.
Fije el soporte de montaje a
la alfombra con los tornillos
de roscar
7
.
* Acople el otro lado de la
misma forma.
* SI no hay espacio sufi ciente
para instalar la unidad
utilizando el soporte de
montaje, fi je la brida grande
0
a la superfi cie de montaje
de la unidad principal y fíjela a
la alfombra.
1.
Прикрепите монтажный
кронштейн
5
к нижней
поверхности основного
блока с помощью винтов
6
.
2.
Сделайте прорези в ковре и
вставьте гайки скоростного
вала
8
.
3.
Закрепите монтажный
кронштейн на ковре с
помощью самонарезающих
винтов
7
.
* Прикрепите другую сторону
таким же образом.
* Если для установки
устройства с помощью
монтажного кронштейна не
хватает места, прикрепите
застежки "липучки" -
большие
0
к монтажной
поверхности основного
блока и закрепите их на
ковре.
1.
Attach the hook-and-loop
fastener - small (female)
9
to the vehicle.
2.
Attach the hook-and-loop
fastener - small (male)
9
to the bottom surface of
the remote control unit and
fasten the remote control unit
to the vehicle.
* Clean the surface of any dirt
before attaching the fastener.
* Use the remote control unit
extension cord
3
as required.
1.
Fixez la petite fermeture
velcro (côté velours)
9
au
véhicule.
2.
Fixez la petite fermeture
velcro (côté crochet)
9
au
bas de la télécommande et
attachez la télécommande au
véhicule.
* Éliminez la saleté de la surface
avant de fi xer la fermeture.
* Utilisez la rallonge de la
télécommande
3
au besoin.
1.
Bringen Sie das Klettband
- klein (Schlaufen)
9
am
Fahrzeug an.
2.
Bringen Sie das Klettband
- klein (Widerhaken)
9
an der Unterfl äche
der Fernbedienung an
und befestigen Sie die
Fernbedienung am Fahrzeug.
* Entfernen Sie allen Schmutz
von der Befestigungsfl äche,
bevor Sie das Klettband
anbringen.
* Verwenden Sie im Bedarfsfall
das Fernbedienungsverlänger-
ungskabel
3
.
1.
Fissare l'elemento di
fi ssaggio in velcro - piccolo
(femmina)
9
al veicolo.
2.
Fissare l'elemento di
fi ssaggio in velcro - piccolo
(maschio)
9
alla superfi cie
inferiore del telecomando
e fi ssare il telecomando al
veicolo.
* Pulire la superfi cie rimuovendo
ogni traccia di sporco prima
di applicare l'elemento di
fi ssaggio.
* Utilizzare il cavo di prolunga
del telecomando
3
secondo
necessità.
1.
Fije la brida pequeña
(hembra)
9
al vehículo.
2.
Fije la brida pequeña (macho)
9
a la superfi cie inferior de
la unidad de control remoto,
y fi je la unidad de control
remoto al vehículo.
* Limpie la suciedad de la
superfi cie antes de acoplar el
elemento de fi jación.
* Use el cable de extensión de
la unidad de control remoto
3
según resulte necesario.
1.
Прикрепите застежку
"липучку" - малую (впадина)
9
на автомобиль.
2.
Прикрепите застежку
"липучку" - малую (выступ)
9
на нижнюю поверхность
блока дистанционного
управления и закрепите
устройство блока
дистанционного управления
на автомобиль.
* Очистите поверхность
от загрязнений перед
установкой крепления.
* Используйте удлинительный
шнур пульта дистанционного
управления
3
по мере
необходимости.
■
Main unit installation method / Méthode d'installation de l'unité principale / Einbau des Hauptgeräts / Metodo di installazione dell'unità principale / Método de instalación de la unidad principal / Способ
установки основного блока
■
How to attach remote control unit / Comment fi xer la télécommande / Befestigung der Fernbedienung / Fissaggio del telecomando / Cómo acoplar la unidad de control remoto / Как подключить блок
дистанционного управления
■
Input-A (speaker input) wiring method / Méthode de câblage d’entrée-A (entrée d'enceinte) /
Beschaltung von Eingang A (Lautsprechereingang) / Metodo di collegamento Input-A (ingresso
diffusore) / Método para conectar la entrada A (entrada de altavoz) / Способ соединения входа-А
(вход колонки)
Center unit
Unité centrale
Zentralgerät
Unità centrale
Unidad central
Центральный
блок
Main power supply (yellow)
Alimentation principale (jaune)
Hauptstromversorgung (Gelb)
Alimentazione principale (giallo)
Fuente de alimentación principal (amarillo)
Основной источник питания (желтый)
Ground (black) Connect to metal portion of vehicle chassis
Masse (noir) À connecter à la portion métallique du châssis du véhicule
Masse (Schwarz) An einem Metallpunkt der Fahrzeugkarosserie an
Masse legen
Terra (nero) Collegare a una parte metallica del telaio del veicolo
Tierra (negro) Conectar a la parte metálica del chasis del vehículo
Заземление (черный) Подсоедините к металлической части
автомобильного шасси
4
Remote control unit
4
Télécommande
4
Fernbedienung
4
Telecomando
4
Unidad de control
remoto
4
Блок дистанционного
управления
1
Power supply cord
(Connect to power supply input terminal)
1
Cordon d'alimentation
(À connecter à la prise d'entrée de l'alimentation)
1
Stromversorgungskabel
(Mit dem Stromversorgungseingang verbinden)
1
Cavo di alimentazione
(Collegare al terminale di ingresso
alimentazione)
1
Cable de la fuente de alimentación
(Conectar a la entrada de la fuente de
alimentación)
1
Шнур питания
(Подсоедините к входному разъему источника
питания)
Right speaker
Enceinte droite
Rechter Lautsprecher
Diffusore destro
Altavoz derecho
Правая колонка
Left speaker
Enceinte gauche
Linker Lautsprecher
Diffusore sinistro
Altavoz izquierdo
Левая колонка
Speaker rear panel
Panneau arrière de
l'enceinte
Lautsprecher-Rückwand
Pannello posteriore
diffusore
Panel trasero del altavoz
Задняя панель колонки
Gray/Black
Gris/Noir
Grau/Schwarz
Grigio/nero
Gris/Negro
Серый/Черный
White
Blanc
Weiß
Bianco
Blanco
Белый
White/Black
Blanc/Noir
Weiß/Schwarz
Bianco/nero
Blanco/Negro
Белый/Черный
Gray
Gris
Grau
Grigio
Gris
Серый
Amplifi er control (blue/white)
Contrôle de l'amplifi cateur (bleu/blanc)
Verstärkersteuerung (Blau/Weiß)
Comando amplifi catore (blu/bianco)
Control del amplifi cador (azul/blanco)
Управление усилителем (синий/белый)
2
Speaker input cord
(Connect to speaker input terminal)
2
Cordon d'entrée d'enceinte
(À connecter à la prise d'entrée de
l'enceinte)
2
Lautsprechereingangskabel
(Mit dem Lautsprechereingang
verbinden)
2
Cavo di ingresso diffusore
(Collegare al terminale di ingresso
diffusore)
2
Cable de entrada del altavoz
(Conectar a la entrada del altavoz)
2
Входной шнур колонки
(Подсоедините к входному разъему
колонки)
Fuse (10A)
Fusible (10 A)
Sicherung (10 A)
Fusibile (10 A)
Fusible (10 A)
Плавкий предохранитель (10А)
■
Input-B (RCA input) wiring method / Méthode de câblage d’entrée-B (entrée RCA) / Beschaltung von
Eingang B (RCA-Eingang) / Metodo di collegamento Input-B (ingresso RCA) / Metodo para conectar
la entrada B (entrada de RCA) / Способ соединения входа-В (вход RCA)
Center unit
Unité centrale
Zentralgerät
Unità centrale
Unidad central
Центральный
блок
Main power supply (yellow)
Alimentation principale (jaune)
Hauptstromversorgung (Gelb)
Alimentazione principale (giallo)
Fuente de alimentación principal (amarillo)
Основной источник питания (желтый)
Ground (black) Connect to metal portion of vehicle chassis
Masse (noir) À connecter à la portion métallique du châssis du véhicule
Masse (Schwarz) An einem Metallpunkt der Fahrzeugkarosserie an
Masse legen
Terra (nero) Collegare a una parte metallica del telaio del veicolo
Tierra (negro) Conectar a la parte metálica del chasis del vehículo
Заземление (черный) Подсоедините к металлической части
автомобильного шасси
4
Remote control unit
4
Télécommande
4
Fernbedienung
4
Telecomando
4
Unidad de control remoto
4
Блок дистанционного управления
1
Power supply cord
(Connect to power supply input terminal)
1
Cordon d'alimentation
(À connecter à la prise d'entrée de l'alimentation)
1
Stromversorgungskabel
(Mit dem Stromversorgungseingang verbinden)
1
Cavo di alimentazione
(Collegare al terminale di ingresso
alimentazione)
1
Cable de la fuente de alimentación
(Conectar a la entrada de la fuente de
alimentación)
1
Шнур питания
(Подсоедините к входному разъему источника
питания)
Speaker rear panel
Panneau arrière de
l'enceinte
Lautsprecher-Rückwand
Pannello posteriore
diffusore
Panel trasero del altavoz
Задняя панель колонки
Amplifi er control (blue/white)
Contrôle de l'amplifi cateur (bleu/blanc)
Verstärkersteuerung (Blau/Weiß)
Comando amplifi catore (blu/bianco)
Control del amplifi cador (azul/blanco)
Управление усилителем (синий/белый)
Fuse (10A)
Fusible (10 A)
Sicherung (10 A)
Fusibile (10 A)
Fusible (10 A)
Плавкий предохранитель (10А)
RCA pin cord (sold separately)
Cordon de la broche RCA (vendu séparément)
RCA-Cinchkabel (separat erhältlich)
Cavo a spine RCA (venduto separatamente)
Cable pasador RCA (vendido por separado)
Шнур с контактными штырьками RCA (приобретается отдельно)
White
Blanc
Weiß
Bianco
Blanco
Белый
Red
Rouge
Rot
Rosso
Rojo
Красный
Connect to RCA input terminal
À connecter à la prise d'entrée RCA
Mit dem RCA-Eingang verbinden
Collegare al terminale di ingresso RCA
Conectar a la entrada RCA
Подсоедините к входному разъему RCA
This model SRV250 is following the
provisions of Directive 2004/108/EC and
2011/65/EU.
Ce modèle SRV250 respecte les
dispositions de la Directive 2004/108/CE
et 2011/65/UE.
Das Modell SRV250 entspricht den
Bestimmungen der Richtlinien 2004/108/
EG und 2011/65/EG.
Il modello SRV250 è conforme ai requisiti
della Direttiva 2004/108/CE e dalla
Direttiva 2011/65/UE.
Este modelo SRV250 sigue las
disposiciones de las Directivas 2004/108/
EC y 2011/65/EU.
Эта модель SRV250 соответствует
положениям Директивы 2004/108/EC и
Директивы 2011/65/EC.
This unit has been tested and found to comply with the limits for a Class B digital device, pursuant to Part 15 of the FCC Rules.
These limits are designed to provide reasonable protection against harmful interference in a residential installation.
This unit generates, uses, and can radiate radio frequency energy, and, if not installed and used in accordance with the instructions, may cause harmful interference to radio communications. However, there is no guarantee that interference will not occur in a particular installation.
If this unit does cause harmful interference to radio or television reception, which can be determined by turning the equipment off and on, the user is encouraged to consult the dealer or an experienced radio/TV technician for help.
FCC WARNING
Changes or modifi cations not expressly approved by the party responsible for compliance could void the user’s authority to operate the equipment.
9
Hook-and-loop fastener - small (female)
9
Petite fermeture velcro (velours)
9
Klettband - klein (Schlaufen)
9
Elemento di fi ssaggio in velcro - piccolo (femmina)
9
Brida: pequeña (hembra)
9
Застёжка "липучка" – малая (впадина)
4
Remote control unit
4
Télécommande
4
Fernbedienung
4
Telecomando
4
Unidad de control remoto
4
Блок дистанционного управления
9
Hook-and-loop fastener - small (male)
9
Petite fermeture velcro (côté crochet)
9
Klettband - klein (Widerhaken/Schlaufen)
9
Elemento di fi ssaggio in velcro - piccolo (maschio)
9
Brida: pequeña (macho)
9
Застёжка "липучка" – малая (выступ)
7
Tapping screw
7
Vis de taraudage
7
Schneidschraube
7
Vite autofi lettante
7
Tornillo de roscar
7
Самонарезающий винт
8
Speed nut
8
Écrou rapide
8
Klemmmutter
8
Piastrina per viti autofi lettanti
8
Tuerca de velocidad
8
Гайка скоростного вала
6
Screw
6
Vis
6
Schraube
6
Vite
6
Tornillo
6
Винт
5
Mounting bracket
5
Applique de montage
5
Befestigungshalterung
5
Supporto di montaggio
5
Soporte de montaje
5
Монтажный кронштейн
-
 1
1
-
 2
2


Clarion SRV250 Manuale utente
- Categoria
- Accessori per schermi piatti
- Tipo
- Manuale utente
in altre lingue
- English: Clarion SRV250 User manual
- français: Clarion SRV250 Manuel utilisateur
- español: Clarion SRV250 Manual de usuario
- Deutsch: Clarion SRV250 Benutzerhandbuch
- русский: Clarion SRV250 Руководство пользователя