Candy FXMH 7490 X Manuale utente
- Categoria
- Fornelli
- Tipo
- Manuale utente

OVENS
USER INSTRUCTIONS
GB
CANDY HOOVER GROUP S.R.L. • Via Privata Eden Fumagalli • 20047 Brugherio Milano Italy
FORNI
ISTRUZIONI PER L'USO
IT
PEĆNICE
KORIŠTENJE PRIRUČNIK
HR
HORNOS EMPOTRABLES
INSTRUCCIONES DE USO
ES
PIEKARNIKI DO ZABUDOWY
INSTRUKJA OBSŁUGI
PL
TROUBY
NÁVOD K OBSLUZE
CZ
ДУХОВКИ
РУКОВОДСТВО ПОЛЬЗОВАТЕЛЯ
RU
PEČICE
NAVODILA ZA UPORABO
SL
EINBAUBACKÖFEN
BEDIENUNGSANLEITUNG
DE
ANKASTRE FIRIN
KULLANIM KILAVUZU
TR
NOTICE D'EMPLOI ET D'INSTALLATION
DES FOURS ENCASTRABLES
FR
OVEN
GEBRUIKSAANWIJZING
NL

CONTENTS
Safety Instructıons
1. General warnings
1.1 Declaration of compliance
1.2 Safety hints
1.3 Recommendations
1.4 Installation
1.5 Electrical connection
2. Accessories
2.1 Oven equipment
2.2 Rotisserie
2.3 U-SEE
2.4 Removing and cleaning wire racks
3. Cleaning the oven
4. Description of the display
4.1 Before using the oven for the first time
4.2 Using the end of cooking timer
4.3 Setting The Correct Time
4.4 Use Of Touch Control Clock Programmer
4.5 Use The Electronic Programmer
4.6 How to use the oven
4.7 Cooking tips
5. Service centre
GB
........................................................................04
......................................................................05
.........................................................05
...............................................................................05
....................................................................05
.................................................................................05
.................................................................05
...............................................................................06
.......................................................................06
..................................................................................06
......................................................................................06
...........................................06
.....................................................................06
........................................................08
.....................................08
.................................................08
..........................................................09
................................09
..............................................10
................................................................11
.............................................................................11
..........................................................................11
CONTENIDO
Instruccıones Para Un Uso Seguro
1. Advertencias Generales
1.1 Declaracıon De Cumplımıento
1.2 Consejos De Segurıdad
1.3 Recomendacıones
1.4 Instalacıón
1.5 Conexıón Eléctrıca
2. Tecnología Pro/exp’r (depende Del Modelo)
2.1 Equıpo Del Horno (depende Del Modelo)
2.2 Asador (depende Del Modelo)
2.3 U-SEE (depende Del Modelo)
2.4 Extracción y limpieza de las guías laterales
3. Lımpıeza Del Horno
4. Descrıpcıón De La Pantalla
4.1 Antes De Utılızar El Horno Por Prımera Vez
4.2 Uso del temporızador
4.3 Ajuste De La Hora
4.4
4.6 Cómo Utılızar El Horno
4.7 Consejos De cocción
5. Servicio Técnico
Temporizador Táctil
4.5 Uso Del Programador Electronıco
ES
.............................................20
...........................................................21
..................................................21
............................................................21
....................................................................21
.................................................................................21
...................................................................21
..........................22
.................................22
..................................................22
............................................22
.............................22
..................................................................23
......................................................24
............................24
.............................................................24
....................................................................25
................................................................25
..........................................26
............................................................27
...............................................................27
......................................................................27
INDICE
Indıcazıonı Dı Sıcurezza
1. Avvertenze Generali
2. Tecnologia Pro/exp'r
3. Pulizia Del Forno
4. Descrizione Del Display
1.1 Dichiarazione Di Conformità
1.2 Suggerimenti Sulla Sicurezza
1.3 Raccomandazioni
1.4 Installazione
1.5 Collegamenti Elettrici
2.1 Accessori Del Forno
2.2 Girarrosto
2.3 U-SEE
4.1 Prima Di Utilizzare İl Forno Per La Prima Volta
4.2 Uso del temporızzatore
4.3 Regolazıone Ora
4.4 Timer Elettronico A Sfioramento
4.6 Come Utilizzare Il Forno
4.7 Suggerimenti Per La Cottura
5. Assistenza Tecnica
2.4 Rimozione E Pulizia Delle Griglie
4.5 Utilizzo Del Programmatore Elettronico
IT
..............................................................12
...............................................................13
....................................................13
..................................................13
....................................................................13
............................................................................13
...............................................................13
...............................................................14
................................................................14
.................................................................................14
...............................................................................14
......................................................................15
..........................................................16
.......................16
...........................................................16
.....................................................................17
...............................................17
...................................18
...........................................................19
...................................................19
..................................................................19
...........................................14
SPIS TRE CIŚ
Instrukcje Bezpıeczeństwa
2.4 Demontaż i czyszczenie drabinek
1. Wskazówki Ogólne
1.1 Deklaracja Zgodności
1.2 Wskazówki Dotyczące Bezpieczeństwa
1.3 Zalecenia
1.4 Instalacja
1.5 Podłączenie Elektryczne
2. Technologia Pro/expr (W Zależności Od Modelu)
2.1 Wyposażenıe Piekarnika (W Zależności Od Modelu)
2.2 Rożen (W Zależności Od Modelu)
2.3 Oświetlenie Diodowe Led (W Zależności Od Modelu)
3. Czyszczenie Pıekarnika
4. Panel Sterowania
4.1 Przed Użyciem Piekarnika Po Raz Pierwszy
4.2 Korzystanie z wyłącznika konca pieczenia
4.3 Ustawianie Zegara
4.4 Zegar Dotykowy
4.5 Programmator Elektroniczny
4.6 Używanie Piekarnika
4.7 Wskazówki Dotyczące Pieczenia
5. Centrum Serwisowe
PL
.........................................................28
...................................................................29
..............................................................29
..................................29
.................................................................................29
..................................................................................29
..........................................................29
.................30
..............30
...........................................30
.............30
............................................30
...........................................................31
.....................................................................32
...........................32
..............................32
...................................................................33
.......................................................................33
....................................................34
................................................................35
............................................35
...............................................................35
OBSAH
Bezpečnostní Pokyny
1. Všeobecna Upozorněni
1.1 Prohlašeni O Shodě
1.2 Bezpečnostni Tipy
1.3 Doporučeni
1.4 Instalace
1.5 Přıpojeni K Elektricke Siti
2. Pro/exp'r Technologie
2.1 Vybaveni Trouby
2.2 Rožeň
2.3
2.4 Vyjmutí a čištění drátěných úrovní roštů
3. Čıštěnı Trouby
4. Popıs Displeje
4.1 Před Prvnim Použitim Trouby
4.2 Použiti Časovače Na Ukončeni Doby Přıpravy
4.3 Nastavení Správného Času
4.4 Využití Času Dotykové Ovládání Programmer - Programování
4.6 Použití Trouby
4.7 Typy K Pečeni
5. Servısnı Středısko
U-SEE
4.5 Použití Elektronického Programátoru
CZ
..................................................................36
...........................................................37
.................................................................37
....................................................................37
...............................................................................37
...................................................................................37
.........................................................37
..............................................................38
.......................................................................38
.......................................................................................38
................................................................................38
..................................38
..........................................................................39
.........................................................................40
...................................................40
........................40
.....................................................41
.....41
......................................42
..........................................................................43
.........................................................................43
....................................................................43
COДЕРЖАНИЕ
RU
...............................................44
.........................................44
.....................................................45
......................................................45
........................................................................45
...............................................................................45
................................................45
............................................................46
.....................................................46
...................................................................................46
.....................................................46
...........46
......................................................................47
.................................................................48
............................48
.....................48
..................................................49
.....................................49
.........50
...................................................51
........................................51
...................................................................52
Правила Техники Безопасности
1. Общие Меры Предосторожности
1.1 Декларация Соответствия
1.2 Меры Предосторожности
1.3 Рекомендации
1.4 Установка
1.5 Подключение К Электросети
2. Технология Pro/exp'r
2.1 Принадлежности Духовки
2.2 Вертел
2.3 Светодиодное Освещение
2.4 Демонтаж и очистка металлических направляющих
3. Чистка Духовки
4. Описание Дисплея
4.1 Перед Первым Использованием Духовки
4.2 Иcποль30bahиetaйmepa Okohчahия Bpemehи
Пpигotobлehия
4.3
4.4 Таймер С Сенсорным Управлением
4.5
4.6 Как Пользоваться Духовкой
4.7 Советы По Приготовлению Пищи
5. Сервисный Центр

VSEBINA
Varnostna Navodıla
1. Splošna Opozorila
či čenje žičnih vodil
š
4.2 Uporaba Programske Ure Za Konec Pečenja
1.1 Izjava O Skladnosti
1.2 Varnostni Napotki
1.3 Priporočila
1.4 Namestitev In Priključitev
1.5 Priključitev Pečice Na Električno Omrežje
2. Tehnologija Pro/exp'r
2.1 Oprema Pečice (Odvisno Od Modela)
2.2 Raženj (Odvisno Od Modela)
2.3 U-SEE (Odvisno Od Modela)
2.4 Snemanje in š
3 Či čenje Pečice
4. Opis Prikazovalnika
4.1 Pred Prvo Uporabo Pečice
4.3 Nastavljanje Točnega Časa
4.4 Uporaba Elektronske Programske Ure
4.5
4.6 Uporaba Pečice
4.7 Nekaj Koristnih Nasvetov
5. Servisiranje
Uporaba Dotikajte Programske Ure
SL
......................................................................53
....................................................................54
...................................................................54
......................................................................54
.................................................................................54
..........................................................54
................................54
................................................................55
......................................55
...................................................55
..............................................55
.............................................55
.........................................................................56
.................................................................57
......................................................57
..........................57
.....................................................58
....................................58
.........................................59
.......................................................................60
.........................................................60
..............................................................................60
SADRŽAJ
Sıgurnosne Upute
2.4 Uklanjanje i čišćenje rešetke
4.2 Korištenje Programiranja Kraja Kuhanja
Korištenje Elektronskog Programatora S Kontrolama Na Dodir
4.5
1. Općenita Upozorenja
1.1 Izjava O Sukladnosti
1.2 Sigurnosni Savjeti
1.3 Preporuke
1.4 Instalacija
1.5 Električno Spajanje
2. Pro/exp'r Tehnologija (zavisno O Modelu)
2.1 Oprema Pećnice (zavisno O Modelu)
2.2 Ražanj (zavisno O Modelu Pećnice)
2.3 U-SEE (zavisno O Modelu Pe
3. Cleaning The Oven
4. Opis Ekrana
4.1 Prije Prvog Korištenja Pećnice
4.3 Podešavanje Točnog Vremena
4.4
4.6 Kako Koristiti Pećnicu
4.7 Savjeti Za Kuhanje
5. Ovlašteni Servis
ćnice)
Upotreba Elektroničkog Programatora
HR
........................................................................61
...............................................................62
................................................................62
....................................................................62
.................................................................................62
................................................................................62
................................................................62
............................63
.....................................63
.......................................63
..................................63
....................................................63
..................................................................64
.............................................................................65
.................................................65
..................................65
................................................66
.66
.....................................67
...............................................................68
...................................................................68
.......................................................................68
INHALTSVERZEICHNIS
Sıcherheıtsvorschrıften
1. Allgemeine Hinweise
1.1 Konformitätserklärung
1.2 Sicherheitshinweise
1.3 Empfehlungen
1.4 Installation
1.5 Elektrischer Anschluss
2.
2.1 Zubehör (Modellabhängig)
2.2 Grillspieß (Modellabhängig)
2.3 U-SEE
2.4 Entfernen Und Reinigung Des Grillrosts
3.
4. Displaybeschreibung
4.1 Nützliche Hinweise Vor Dem Ersten Betrieb Des Backofens
4.2 Benutzung Des Timers Für Backzeitende
4.3 Eınstellung Der Rıchtıgen Uhrzeıt
4.4 Touch Timer
4.5
4.6 Benutzung Des Backofens
5.7 Tipps
4. Technischer Kundendienst
Pro/Exp'r Technologie (Modellabhängig)
Reinigung
Bedıenung Der Elektronıschen Programmıereınheıt
DE
..............................................................69
..............................................................70
...............................71
.................................................................................72
...............................................................73
...73
.....................................................76
................................................................70
..................................................................70
..........................................................................70
..............................................................................70
.............................................................70
.......................................................71
.....................................................71
................................................................................71
.......................................71
................................73
............................................74
..............................................................................74
...............75
.......................................................76
........................................................................................76
İÇİNDEKİLER
Güvenlik Uyarıları
1. Genel Uyarılar
1.1 Uygunluk Beyanı
1.2 Emniyetle İlgili İpuçları
1.3 Öneriler
1.4 Kurulum
1.5 Elektrik Bağlantısı
2.1 Fırın Ekipmanı
2.2 Şiş
2.3 Led Aydınlatma - U-SEE
2.4 Yan Izgaraların Çırarılması Ve Temizlenmesi
3.
4. Ekran Açıklaması
4.1 Fırını İlk Kez Kullanmadan Önce
4.2 Pişirme Süresi Zamanlayıcısının Ayarlanması
4.3 Saatin Ayarlanması
4.4 Dokunmatik Zamanlayıcı
4.5 Elektronik Programlayıcı Kullanımı
4.6 Fırın Kullanımı
4.7 Pişirme İpuçları
5. Servis Merkezi
Garanti Belgesi
2. Aksesuarlar (Modele Göre)
Fırın Temizlenmesi
TR
...........................................................................77
.............................................................................78
.........................................................79
.....................................................................80
.......................................................................81
...........................................................................84
..............................................................................85
........................................................................78
.................................................................78
......................................................................................78
.....................................................................................78
.......................................................................78
............................................................................79
.............................................................................................79
.............................................................79
................................79
.................................................81
..............................81
.....................................................................82
............................................................82
..............................................83
...........................................................................84
.........................................................................84
SOMMAIRE
Conseils De Sécurité
ACCESSORIES (According to model)
2.4 Retrait Et Nettoyagedes Grilles
Utilisation Du Minuteur Coupe-circuit
1. Instructions générales
1.1 Declaration de conformité
1.2 Consignes de sécurité
1.3 Recommandations
1.4 Installation
1.5 Raccordement éléctrique
2.
2.1 Equipement du four
2.2 Tournebroche
2.3 U-SEE
3. Entretien général du four
4. Présentation du tableau de bord
4.1 Conseils avant la premiere utilisation
4.2
4.3 Reglage De L'heure
4.5 Utilisation Du Prorammateur Electronique
4.6 Recommandations
4.7 Quelques conseils de cuisson
5. Assistance technique
4.4 Horloge À Commande Sensitive
FR
....................................................................86
.............................................................87
.........................................................87
.............................................................87
....................................................................87
.................................................................................87
.........................................................87
......................................88
...................................................................88
............................................................................88
.......................................................................................88
................................................88
.........................................................89
............................................90
......................................90
......................................90
.................................................................91
..............................................91
...............................92
..................................................................93
.................................................93
..............................................................93
INHOUDSOPGAVE
Veiligheidsvoorschriften
1. Algemene Aanwijzingen
1.1 Conformiteit
1.2 Veiligheidsvoorschriften
1.3 Aanbevelingen
1.4 Installatie
1.5 Elektrische Aansluiting
2. Accessorıes (according To Model)
2.1 Uitrusting Van De Oven
2.2 Het Draaispit
2.3
2.4 Verwijderen En Reinigen Van De Zijlingse Roosters
3. Onderhoud Van De Oven
4. Voorstelling Van Het Scherm
4.1 Tips Voorafgaande Aan Een Eerste Gebruik
4.2 Gebruık Van De Tımer Met Uıtschakelfunctıe
4.3 De Juiste Tijd Instellen
4.4 Elektronische Programma's Gebruiken
4.5
4.6 Aanbevelingen
4.7 Raadgevingen Bij Het Bakken
5. Diensten Service
U-SEE
Gebruık Van Het Electronısche Programma
NL
............................................................94
.........................................................95
.............................................................................95
...........................................................95
........................................................................95
.................................................................................95
............................................................95
...........................................96
.........................................................96
...........................................................................96
.......................................................................................96
..............96
.......................................................97
.................................................98
...........................98
..........................98
.............................................................99
....................................99
..........................100
........................................................................101
................................................101
....................................................................101

WARNING: The appliance and its accessible parts become hot during use. Care should be taken to avoid
touching heating elements.
• Children under 8 Year of age must be kept away from the appliance unless they are continuously
supervised.
• This appliance can be used by children aged from 8 years and above and persons with reduced
physical, sensory or mental capabilities or lack of experience and knowledge if they have been given
supervision or instruction concerning use of the appliance in a safe way and understand the hazards
involved.
• Children must not play with the appliance.
• Cleaning and user maintenance shall not be made by children without supervision.
• During use the appliance becomes hot. Care should be taken to avoid touching heating elements inside
the oven.
WARNING: Accessible parts may become hot during use. Young children must be kept away.
• Do not use harsh abrasive cleaners or sharp metal scrapers to clean the oven door glass since they can
scratch the surface, which may result in shattering of the glass.
• The oven must be switched off before removing the guard, after cleaning, the guard must be replaced in
accordance with the instructions.
• Only use the temperature probe recommended for this oven.
• Do not use a steam cleaner for cleaning operations.
• WARNING: Avoid possibility of electric shock - ensure the appliance is switched off before replacing the
lamp.
• The means for disconnection must be incorporated in the fixed wiring in accordance with the wiring
rules.
• The instructions state the type of cord to be used, taking into account the temperature of the rear surface
of the appliance.
• If the supply cord is damaged, it must be replaced by a special cord or assembly available from the
manufacturer or its service agent.
• CAUTION: In order to avoid a hazard due to inadvertent resetting of the thermal cutout, this appliance
must not be supplied through an external switching device, such as a timer, or connected to a circuit that
is regularly switched on and off by the utility.
• CAUTION: Accessible parts may be hot when the grill is in use. Young children must be kept away.
• xcess spillage must be removed before cleaning
• During self-cleaning pyrolytic operation the surfaces may get hotter than usual and children MUST be
kept away.
E .
04 GB
SAFETY INSTRUCTIONS

The parts of this appliance that may come into contact with foodstuffs
comply with the provisions of EEC Directive 89/109.Appliance
complies with European Directives 2006/95/EC and
2004/108/EC, and subsequent amendments.When you have
unpacked the oven, make sure that it has not been damaged in
any way. If you have any doubts at all, do not use it: contact a
professionally qualified person.
Keep packing materials such as plastic bags, polystyrene, or nails out
of the reach of children because they are dangerous to children.
1.2 SAFETY HINTS
•The oven must be used only for the purpose for which it was
designed. It must only be used for cooking food. Any other use, e.g. as
a form of heating, is an improper use of the oven and is therefore
dangerous.
•The manufacturers cannot be held responsible for any damage
caused by improper, incorrect or unreasonable use.
When using any electrical appliance you must follow a few basic rules.
- Do not pull on the power cable to remove the plug from the socket.
- Do not touch the oven with wet or damp hands or feet.
- Do not use the oven unless you are wearing something on your feet.
- It is not generally a good idea to use adapters, multiple sockets for
several plugs or cable extensions.
- If the oven breaks down or develops a fault switch it off at the mains
and do not touch it.
• If the cable is damaged it must be replaced promptly.
When replacing the cable, follow these instructions.
Remove the power cable and replace it with one of the H05VV-F type.
The cable must be able to bear the electrical current required by the
oven.Cable replacement must be carried out by properly qualified
technicians.
The earthing cable (yellow-green) must be 10 mm longer than the
power cable.
Use only an approved service centre for repairs and ensure that only
original parts are used. If the above instructions are not adhered to the
manufacturers cannot guarantee the safety of the oven.
•The oven you have just acquired has the described technical
characteristics and you must not make any modifications to it.
•Do not store flammable products in the oven; they can catch fire if the
oven comes on accidentally.
•Do not press on and do not let children sit on the oven door.
•Use kitchen oven gloves, when putting into or removing a dish from
the oven.
1.1 DECLARATION OF COMPLIANCE
Code produit:
Numéro de série :
1.3 RECOMMENDATIONS
• After each use of the oven, a minimum of cleaning will help keep the
oven perfectly clean.
• Do not line the oven walls with aluminium foil or single-use protection
available from stores. Aluminium foil or any other protection, in direct
contact with the hot enamel, risks melting and deteriorating the
enamel of the insides.
• In order to prevent excessive dirtying of your oven and the resulting
strong smokey smells, we recommend not using the oven at very high
temperature. It is better to extend the cooking time and lower the
temperature a little.
Identification plate
05 GB
•In addition to the
accessories supplied with the oven, we advise you only use dishes
and baking moulds resistant
to very high Temperatures.
1.4 INSTALLATION
The manufacturers have no obligation to carry this out. If the
assistance of the manufacturer is required to rectify faults arising from
incorrect installation, this assistance is not covered by the guarantee.
The installation instructions for professionally qualified personnel
must be followed. Incorrect installation may cause harm or injury to
people, animals or belongings. The manufacturer cannot be held
responsible for such harm or injury.
The kitchen unit in which the oven is to be fitted must be made of
material resistant to temperatures of at least 70°C.
The oven can be located high in a column or under a worktop.
Before fixing, you must ensure good ventilation in the oven space to
allow proper circulation of the fresh air required for cooling and
protecting the internal parts. Make the openings specified on last page
according to the type of fitting.
1.5 ELECTRICAL CONNECTION
THE ELECTRICAL CONNECTION SHOULD BE CARRIED OUT BY
AN APPROVED CONTRACTOR OR TECHNICIAN WITH SIMILAR
QUALIFICATIONS.
The installation receiving the appliance must comply with the standard
in force in the installation country.
The manufacturer does not accept any responsibility if this provision is
not complied with.
Connection to the network must be by earthed socket outlet, or by
means of a multipole circuit-breaker, in compliance with the
installation country.
The installation must be protected by suitable fuses, and have wires
with a large enough cross-section to supply the oven normally.
CONNECTION:
The oven is fitted with a power lead for connecting exclusively to a
voltage of 220-240 V AC across the phases or across phase and
neutral.
Connection must be carried out having first checked:
-the supply voltage indicated on the meter,
The lead protection wire (green/yellow) connected to the earth
terminal of the oven must be connected to the earth terminal of the
installation.
Caution:
•Have the earth continuity of the installation checked by an electrician
before making the connection.
•The manufacturer will not be liable for any incident, or the possible
consequences that may arise from the use of the oven not earthed, or
connected to an earth with defective continuity.
NB: Do not forget that the oven may require after-sales service.
Also, locate the socket outlet so that the oven can be connected once
it is removed from its space.
Power supply cable: If the power supply cable has to be changed,
please have this done by the after-sales service or by someone with
similar qualifications.
1. GENERAL WARNINGS
Read the instructions carefully to make the most of your oven. We recommend you keep the instructions for installation and use for later reference,
and before installing the oven, note its serial number in case you need to get help from the after-sales service.
When you have unpacked the oven, make sure that it has not been damaged in any way. If you have any doubts at all, do not to use it. Contact a
professionally qualified person. Keep packing materials such as plastic bags, polystyrene, or nails out of the reach of children because they are
dangerous to children.
The company shall not be liable if the instructions provided in this document are not complied with.
! NOTE: Functions, properties and accessories of ovens which are mentioned in this manual, can be change depending on oven models.

06 GB
2
1
3
4
2.1 OVEN EQUIPMENT
It is necessary to do an initial cleaning of the equipment before the first
use of each of them. Wash them with a sponge. Rinse and dry off.
The shelf can take moulds and dishes.
The drip tray catches the juices from grilled foods.
Never use he drip tray as a roasting tray as fat deposits can be quickly
spread throughout the oven, which produces excess smoke.
Never place the drip tray directly on the oven bottom.
The pizza stone for a crisper pizza equipped according to the model
with its stand and the pizza roller.
The pastry tray
pastries like choux, biscuits, meringues, etc...
Never place the pastry tray directly on the oven bottom.
must be placed on the shelf. It is for cooking small
2.3
When the oven is in use, any unused accessories should be
removed from the oven.
2. ACCESSORIES (According to model)
2.2 ROTISSERIE
No pre-heating is required for rotisserie cooking.
Cooking with the door closed.
The energy consumption is 90-95% less than traditional system.
1- Grid
2- Spit
3- Hooks & Screws
4- Handle
HOW TO USE TURNSPIT
1. Unscrew the hooks
2. Put the spit into the meat
3. Fix the meat with the hooks
4. Tighten the screws
5. Insert the spit into the motor hole
6. The handle
2.4 REMOVING AND CLEANING WIRE RACKS
1- Remove the wire racks by pulling them in the direction of the arrows
(see below)
2- To clean the wire racks either put them in the dishwasher or use a
wet sponge, ensuring that they are dried afterwards.
3- After the cleaning process install the wire racks in reverse order.
Advantages :
System, besides providing excellent illumination inside the
oven, lasts longer than the traditional light bulb its easier and to
maintain and most of all saves energy.
• Optimum view
• Long life illumination
• Very low energy consumption, -95% in comparison with the
traditional illumination High
“Appliance with white light LED of the 1M Class according to IEC
60825- 1:1993 + A1: 1997 + A2: 2001 (equivalent to EN 60825-1: 1994
+ A1: 2002 + A2: 2001); the maximum light power emitted 459nm <
150uW.
Not observed directly with optical instruments. “
l
Is an illumination system which replaces the traditional « light bulb ».
14 LED lights are integrated within the door. These produce white high
quality illumination which enables to view the inside of the oven with
clarity without any shadows on all the shelves.
•Wait for the oven to cool down before doing any cleaning by hand.
•Never clean your oven with abrasive cleaners, wire wool or sharp
objects, or the enamel may be damaged beyond repair.
•Only use soapy water or bleach (ammonia) cleaners.
•Never line the oven sides with aluminium foil.
GLASS PARTS
We recommend you wipe clean the glass door with absorbent kitchen
paper every time you use the oven. If the spattering is heavy, then you
can clean with a well squeezed sponge and detergent, and rinse.
Do not use harsh abrasive cleaners or sharp metal scrapers to clean
the oven door glass since they can scratch the surface, which may
result in shattering of the glass.
OVEN DOOR SEAL
If this gets dirty, clean the oven seal with a slightly damp sponge.
ACCESSORIES
Clean them with a sponge soaked in soapy water. Rinse with clean
water and dry off. Avoid abrasive cleaners.
DRIP TRAY
After grilling, remove the drip tray from the oven. Take care to pour the
warm grease into a container. Wash and rinse the drip tray in hot water
with a sponge soaked in washing up liquid.
If residues remain attached, soak them off in water and detergent.
It can also go in a dishwasher or be cleaned with a commercial oven
cleaner.
Never place a soiled drip tray in the oven.
3. CLEANING THE OVEN

Bulb characteristics:
230 V AC - 25W- E 14 base Temperature 300°C to change a defective
bulb, just :
•Unscrew the glass cover,
•Unscrew the bulb,
•Replace it with the same type: see characteristics above,
•After replacing the defective bulb, screw back the
protective glass cover.
07 GB
CLEANING THE DOOR GLASS
Internal door glass of this oven can be removed and cleaned.
In order to clean the internal glass follow these instructions;
Picture 1
Picture 3
Picture 4
Picture 5
• Open the door of the oven.
(Picture1)
•
upwards. Picture
Remove the top metallic cover by
pulling it ( 4
• pulling it
out of the door frame Picture
Remove the glass by gently
( 5)
• Remove the screws as shown in
Picture Picture ( 3)
• Lock the hinges as shown in Picture
2 before starting the cleaning
operation.
Unlock the hinges when the cleaning
operation is finished. Picture ( 2)
Picture 2
Picture 7
• ON ALL GLASES LOW-E
sign must be properly
readable and must be
positioned on the left corner of
the door, close to the left side
hinge. In this way the printed
st
surface of the 1 glass will
remain INSIDE the door.
•
reverse
After cleaning the glass re-
assemble the parts in the
order of removal.
1
2
3
• *For ovens, please
d
remove also 2 and glasses .
(Picture 6)
Pyrolytic
n rd
3
Picture 6
SELF-CLEANING OVEN WITH CATALYTIC
Special self-cleaning panels covered in a micro-porous coating are
available as optional extras for all models. If they are fitted, the oven
no longer needs to be cleaned by hand.
The fat that is splattered onto the sides of the oven during roasting is
eliminated by the microporous coating which breaks the fat down by
catalysis and transforms it into gas.
Excessive splattering may nevertheless block the pores and therefore
hinder self-cleaning. The self-cleaning capacity may be restored by
switching on the empty oven to maximum for about 10-20 minutes.
Do not use abrasive products, metal cleaning wads, sharp objects,
rough cloths, or chemical products and detergents that may
permanently damage the catalytic lining.
It is a good idea to use deep roasting trays to roast fatty foods such as
joints of meat etc. and to put a tray underneath the grill to catch surplus
fat.If the walls of the oven are so thickly coated in grease that the
catalytic lining is no longer effective remove surplus grease with a soft
cloth or sponge soaked in hot water.
The lining must be porous for self-cleaning to be effective.
All catalytic linings currently on the market have a working life of
about 300 hours. They should therefore be replaced after about 300
hours.
N.B.:
OVEN LIGHTING
Disconnect the power supply from the oven before cleaning or
replacing the lamp.
The bulb and its cover are made of material resistant to high
temperatures.

4. DESCRIPTION OF THE DISPLAY
08 GB
70
30
40
50
60
80
90
100
110
20
10
120
100
150
200
220
MAX
50
4.1 BEFORE USING THE OVEN FOR THE
FIRST TIME
• PRELIMINARY CLEANING
-Clean the oven before using for the first time:
-Wipe over external surfaces with a damp soft cloth.
-Wash all accessories and wipe inside the oven with a solution of
hot water and washing up liquid.
-Set the empty oven to the maximum temperature and leave on for
about 1 hour, this will remove any lingering smells of newness.
Ensure that the room is well ventilated while this is being done.
• THINGS TO REMEMBER
Confirmation of operation on timer
Modification must be confirmed by pressing the button.
Stopping the oven:
This may be necessary if you have input an incorrect instruction.
To stop the oven .... turn back the function selector knob to the
Stop Position.
Child safety device:
To lock the oven controls, select the child safety device. Refer to
the section entitled “Programming - The child safety device”.
The cooling fan :
This protects the control panel and electronics from heat damage.
It begins and then stops automatically even when the oven is
switched off.
Oven lighting :
By turning to the light symbol, you can switch on the oven light
when it is not in use.
When the oven is in use, the light stays on during all of the oven
functions and when the door is opened.
50
100
150
200
220
MAX
4.2 USING THE END OF COOKING TIMER
This control enables to set the desired cooking time (max. 120
min.) the oven will automatically switch off at the end of the set
time.
The timer will count down from the set time return to the O position
and switch off automatically.
For normal use of oven set the timer to the position.
To set the oven ensure the timer is not on the O position.
70
30
40
50
60
80
90
100
110
20
10
120
auto

•This function is typically used with
“cooking time” function.
For example if the dish has to be
cooked for 45 minutes and needs
to be ready by 12:30, simply select
the required function, set the
cooking time to 45 minutes and the
end of cooking time to 12:30.
•At the end of the cooking set time,
t h e ov e n w i l l s wi t c h of f
automatically and an audible alarm
will ring.
•Cooking will start automatically at
11:45 (12:30 minus 45 mins) and
will continue until the pre-set end-
of-cooking-time, when the oven
will switch itself off automatically.
WARNING.
If the END of cooking is selected
without setting the length of
cooking time, the oven will start
cooking immediately and it will
stop at the END of cooking time
set.
4.4 USE OF TOUCH CONTROL CLOCK PROGRAMMER
FUNCTION
HOW TO ACTIVATE IT
HOW TO SWITCH ITOFF
WHAT IT DOES WHAT IT IS FOR
KEY LOCK
MINUTE
MINDER
COOKING
TIME
END OF
COOKING
•Child Lock function is
activated by touching Set (+)
for a minimum of 5 seconds.
From this moment on all other
function are locked and the
display will flash STOP and
preset time intermittently.
•Child Lock function is
deactivated by touching
touchpad Set (+) again for a
minimum of 5 seconds. From
this moment on all functions
are selectable again.
•Push the central button
1 times
•Press the buttons "-" "+"
to set the required time
•Release all the buttons
•When the set time as elapsed
an audible alarm is activated
(this alarm will stop on its own,
however it can be stopped
immediately by pressing the
button) SELECT.
•Sounds an alarm at the end of
the set time.
•During the process, the
display shows the remaining
time.
•Allows to use the oven as alarm
clock (could be activated either
with operating the oven or with
out operating the oven)
• Push the central button 2 times
• Press the buttons "-" or "+"to
set the lenght of cooking
required
• Release all buttons
• Set the cooking function with
the oven function selector
•When the time is elapsed the
o v e n w i l l s w i t c h o f f
automatically.
Should you wish to stop cooking
earlier either turn the function
selector to 0, or set time to 0:00
(SELECT and "-" "+" buttons)
• It allows to preset the cooking
time required for the recipe
chosen.
• To check how long is left to run
press the SELECT button 2 Times.
• To alter/change the preset time
press SELECT and "-" "+"
buttons.
•Push any button to stop
the signal. Push the central
button to return to the clock
function
•At the time set, the oven
will switch off. To switch
off manually, turn the oven
fu n c t i on s e l e ctor to
position O.
•Enables you to set the end of
cooking time
•To check the preset time p
•To modify the preset time
press buttons SELECT + "-" "+"
ush
the central button 3 times
•
•Press the buttons "-"
"+" to set the time at which you
wish the oven to switch off
• R e l e a se t h e bu t t o n s
•Set the cooking function with
the oven function selector
Push the central button 3
times
WARNING : the first operation to carry out after the oven has
been installed or following the interruption of power supply
(this is recognizable the display pulsating and showing
) is setting the correct time. This is achieved as follows.12:00
4.3 SETTING THE CORRECT TIME
•Push the central button 4 times
•Set time with buttons.
•Release all buttons.
"-" "+"
ATTENTION: The oven will only operate providing the clock is set.
00:00
select
09 GB

5. DESCRIPTION OF THE DISPLAY
4.5 USE THE ELECTRONIC PROGRAMMER
The Led “°” of the temperature indicator pulsates until the pre-set temperature is not reached.
HOT : When a cooking program is finished, if the oven is still hot, « HOT » appears on the display, alternately with the time
displays, even if the two function selectors are switched on OFF.
FUNCTION HOW TO ACTIVATE IT?
HOW TO SWITCH IT OFF? WHAT IT DOES ? WHAT IT IS FOR ?
SILENCE MODE
SET THE TIME
COOKING TIME
DURATION
END OF
COOKING TIME
MINUTEMINDER
CHILD LOCK
• Rotate the left function
selector to the position
" Silence mode “
• Enables you to turn off the
sound of the minute
minder
• Rotate the function
selector to the position
OFF.
• To turn off the sound of the
minute minder
• Rotate the left function
selector to the position
“Set the time”.
• Use the buttons " + " or
" - " to set the time
• Enables you to set the
time which appears on the
display
• Rotate the function
selector to the position
OFF.
• To set the time
NB : Set the time when
you first install your oven
or just after a black out
(the clock is showing a
pulsating 12.00)
• Turn the right function
selector to a cooking
function
• Rotate the left function
selector to the position
"Cooking Time Duration"
• Set the time of cooking
by using buttons " + " and
" - "
• Lighting Auto appears
• It allows to preset the
cooking time required for
the recipe chosen.
• When the cooking time is
set, turn the function
selector toOFF to go back
to actual time.
• To view the cooking time
selected, turn the left
function selector to
Cooking Time duration.
•When the cooking time has
elapsed, the oven switch off
automatically and the alarm
rings for few seconds To stop
the cooking functions early,
turn the function control to
OFF or set the time on 00.00;
by rotating the function
selector to Cooking Time
Duration and by using the
buttons " + " and " - “
• For cooking the desired
recipes
• Turn the right function
selector to a cooking
function
• Rotate the left function
selector to the position
"End of cooking"
• Set the end time of
cooking by using buttons
" + " and " - "
• Lighting Auto appears
• It allows to preset the end
of cooking time you want.
• When the cooking time is
set, turn the function
selector to OFF to go back
to actual time.
• To view the cooking time
selected, turn the left
function selector to End of
cooking Time
• When the cooking time
has elapsed, the oven
switch off automatically.
• To stop the cooking
functions early, turn the
function control to OFF
• This function is used for
cooking we want to program
in advance. For example,
your recipe needs to be
cooked 45 min and to be
ready at 12.30pm ; simply
set the cooking time
duration on 45 min and the
end of cooking time on
12.30pm.
The cooking will start
automatically at 11.45
(12.30 minus 45 min) and
will continue until the preset
end of cooking time,
then the oven will switch
itself off automatically
• Turn the left function
selector to the position
Minute Minder
• Set the time of cooking
by using buttons “+”and “-”
• Sounds an alarm at a few
seconds at the end of the
set time
• Set the time on 00.00 by
turning the left function
selector to the position
Minute Minder, and using
the button " - “
• Allow to use the oven as
alarm even if the oven is
switch off
• Turn the left function
selector to the position
Child lock.
Press the button " + "
during 3 seconds
• Child lock is available
when " STOP " appears
on display
• The oven cannot be used
• Turn back the left function
selector to Child lock and
press button " + " during 3
seconds
• Indication STOP
disappears
Useful especially when
children are at home
1. Minute Minder or Auto light
2. Function with fan*
3. Function with VARIOFAN*
4. Defrost
5. Display for Temperature or Time
6. Setting buttons
7. Function selector knob
8. Function Timer knob
* ACCORDING TO THE MODEL
The first operation to carry out after the oven has been installed or following the interruption of power supply
(this is recognizable the display pulsating and showing12:00) is setting the correct time.
WARNING !
10 GB
COOK
U
auto

11 GB
It is better not to salt meats until after cooking as salt encourages the
meat to spatter fat. This will dirty the oven and make a lot of smoke.
Joints of white meat, pork, veal, lamb and fish can be put into the oven
cold. The cooking time is longer than in a preheated oven, but it cooks
through to the centre better as the heat has more time to penetrate the
joint.
Correct preheating is the basis of successful red meat cookery.
GRILLS
• Before loading the grill:
Remove the meat from the refrigerator a few hours before grilling. Lay
it on several layers of kitchen paper. This improves seizing, making it
tastier and avoids it staying cold at the centre.
Add pepper and spices to the meat before grilling, but add any salt
after cooking. This way it will seize better and stay juicy. Baste all the
food to be cooked with a little oil. This is best done with a wide flat
basting brush.Then sprinkle with more pepper and herbs (thyme,
etc.).
• During cooking:
Never pierce the food during cooking even when you turn it. This lets
the juice out and it becomes dry.
BAKING
Avoid using shiny tins, they reflect the heat and can spoil your cakes. If
your cakes brown too quickly, cover them with greaseproof paper or
aluminium foil.
Caution: The correct way to use foil is with the shiny side in towards
the cake. If not the heat is reflected by the shiny surface and does not
penetrate the food.
Avoid opening the door during the first 20 to 25 minutes of
cooking:
Soufflés, brioches, sponge cakes, etc. will tend to fall.You can check if
cakes are done by pricking the centre with a knife blade or metal
knitting needle. If the blade comes out nice and dry, your cake is ready
and you can stop cooking. If the blade comes out moist or with bits of
cake attached, continue baking but slightly lower the thermostat so
that it is finished off without burning.
4.7 COOKING TIPS
4.6 HOW TO USE THE OVEN
• COOKING MODE
All cooking should be carried out with the door closed.
BOTTOM + FAN - The combination of the bottom heating
element and fan is ideal for fruit flans, tarts, quiches and pastries. It
prevents food from becoming too dry and encourages bread dough to
rise. Place the shelf in the bottom position in the oven.
BOTTOM - Using the lower element. Ideal for cooking all
pastry based dishes. Use this for flans, quiches, tarts, pâté and any
cooking that needs more heat from below.
BOTTOM + TOP - Both top and bottom heating elements
are in use. This method is ideal for all traditional roasting and
baking.When cooking red meat, roast beef, leg of lamb, game, bread
or foil wrapped foods.
BOTTOM + TOP + FAN - Both top and bottom heating
elements are used in conjunction with the fan, which circulates hot air
throughout the oven.We recommend this method for poultry, pastries,
fish and vegetables. By using this method better heat penetration is
achieved and cooking and preheating times are also reduced. The fan
cooking option allows you to cook different foods together at different
positions in the oven all at the same time, providing even heat
distribution but without the risk of mingling tastes and smells. When
cooking different foods at the same time allow a further 10 minutes.
CIRCULAR HEATING ELEMENT + FAN - Air that has been
heated is blown by the fan onto the different levels. It is ideal for
cooking different types of food at the same time (e.g. Meet and fish)
without mixing tastes and smell. It cooks very gently and is ideal for
sponge cakes, pastries, etc.
GRILL - Using the top heating element. Success is
guaranteed for mixed grills, kebabs and gratin dishes. The grill should
be pre-heated to a high temperature for 5 minutes. White meats
should always be placed at some distance from the grill element, the
cooking time is slightly longer but the meat will be more succulent.
Red meat and fish fillets can be placed directly onto the shelf with the
drip tray placed beneath on lower shelf position.
GRILL + FAN - The top heating element is used in
conjunction with the fan which circulates the hot air around the oven.
Pre heating is recommended for red meats but is not necessary for
white meats. Grilling is ideal for cooking thicker food items such as
pork or poultry. Food to be grilled should be placed directly at the
centre of the middle shelf.
By sliding the drip tray underneath the shelf it will ensure that any
juices are collected. For best results always make sure that the food is
not too close to the grill element and turn the food over half way
through the cooking time.
GRILL + TURNSPIT + FAN - The advantage of using the top
oven element at the same time as the fan and rotisserie is that the food
is evenly cooked, preventing it from becoming dry and tasteless. The
rotisserie is programmed to continue rotating for approximately five
minutes after cooking, making full use of the residual oven heat.No
pre-heating is required for rotisserie cooking.
DEFROST - When the dial is set to this position. The fan
circulates hot air around the frozen food so that it defrosts in a few
minutes without the protein content of the food being changed or
altered.
The temperature is preset in 40°C constant, no regulation is possible.
KEEP WARM - This is recommended to reheat precooked
foodstuff, positioning the shelf on the second level from top, or to
defrost bread pizza or pastry by positioning the shelf on the lower
level.
The temperature is preset in 60°C constant, no regulation is possible.
PIZZA - With this function hot air circulated in the oven to
ensure perfect result for dishes such as pizza or cake.
SOFT COOK - Soft cook is the function for the confectionery
and the bread. Thanks to its reduced fan speed, this function
increases oven internal damp. The increased damp creates the ideal
conditions of cooking for those foods that need to maintain an elastic
consistence while they are cooking (ex. cakes, bread, biscuits)
avoiding surface breakages.
5. SERVICE CENTRE
Before calling the Service Centre.
If the oven is not working, we recommend that:
•Check that, if the oven is properly plugged into the power supply.
If the cause of the fault cannot be detected:
•Disconnect the oven from the mains, do not touch the oven and call
the after sales service.
Before calling the Service Centre remember to make a note of the
serial number on the serial number specifications plate.
The oven is supplied with a guarantee certificate that ensures that it
will be repaired free of charge by the Service Centre whilst under
guarantee.
This appliance is marked according to the European
directive 2012/19/EU on Waste Electrical and
Electronic Equipment (WEEE). WEEE contains both
polluting substances (which can cause negative
consequences for the environment) and basic
components (which can be re-used). It is important to
have WEEE subjected to specific treatments, in order
to remove and dispose properly all pollutants, and
recover and recycle all materials.
Individuals can play an important role in ensuring that
WEEE does not become an environmental issue; it is essential to
follow some basic rules:
• WEEE shall not be treated as household waste.
• WEEE shall be handed over to the relevant collection points
managed by the municipality or by registered companies. In many
countries, for large WEEE, home collection could be present.
• When you buy a new appliance, the old one may be returned to the
retailer who has to collect it free of charge on a one-to-one basis, as
long as the equipment is of equivalent type and has the same
functions as the supplied equipment.

12 IT
• ATTENZIONE: l'apparecchio e le parti accessibili diventano calde durante l'uso. Prestare attenzione a
non toccare le parti calde.
• I bambini al di sotto di 8 anni dovrebbero essere tenuti a distanza se non continuamente supervisionati.
• L'apparecchio può essere usato da bambini dagli 8 anni in su e persone con ridotte capacità fisiche,
sensoriali o mentali o senza esperienza e conoscenza del prodotto se supervisionate o dando loro
istruzioni riguardo al funzionamento dell'apparecchio in maniera sicura e coscente del rischio possibile.
• I bambini non dovrebbero giocare con l'apparecchio.
• La pulizia e la manutenzione non dovrebbero essere fatte da bambini senza supervisione
• Durante l’uso l’apparecchio diventa molto caldo. Si dovrebbe fare attenzione a non toccare gli elementi
riscaldanti all’interno del forno.
• ATTENZIONE: Le parti accessibili possono diventare molto calde durante l’uso. I bambini dovrebbero
essere tenuti a distanza.
• Non usare per la pulizia materiali ruvidi abrasivi o raschietti metallici affilati per pulire le porte di vetro del
forno dato che possono graffiare la superficie e causare la frantumazione del vetro.
• Spegnere il forno prima di rimuovere lo schermo di protezione e, dopo la pulizia, rimontarlo secondo le
istruzioni.
• Usare solo la sonda termica raccomandata per questo forno.
• Non utilizzare un pulitore a vapore.
• ATTENZIONE: Assicurarsi che l’apparecchio sia spento prima di sostituire la lampada per evitare la
possibilità di scosse elettriche.
• Il mezzo di disconnessione deve essere incorporato nel cablaggio fisso in accordo con le leggi di
cablaggio.
• Le istruzioni devono indicare quale tipo di cavo debba essere utilizzato, tenendo presente la
temperatura della superficie posteriore dell’apparecchio.
• Se il cavo di alimentazione è danneggiato, esso deve essere sostituito da un cavo o un assieme
speciali disponibili presso il costruttore o il suo servizio assistenza tecnica.
• ATTENZIONE: Al fine di evitare ogni pericolo dovuto al riarmo accidentale del dispositivo termico di
interruzione, il presente apparecchio non deve essere alimentato con un dispositivo di manovra esterno,
quale un temporizzatore oppure essere connesso a un circuito che viene regolarmente alimentato o
disalimentato dal servizio.
• ATTENZIONE: Le parti accessibili possono diventare calde quando il grill è in uso. I bambini dovrebbero
essere tenuti a distanza.
• Gli eccessi di materiale tracimato devono essere tolti prima della pulizia.
• Durante la Pyrolisi le superfici possono scaldarsi più del solito è pertanto consigliato tenere i bambini a
distanza.
INDICAZIONI DI SICUREZZA

13 IT
Tutti i componenti di questo elettrodomestico destinati a venire a
contatto con gli alimenti
sono conformi che le disposizione della Direttiva CEE 89/109.
Il forno è conforme alle Direttive europee 73/23/CEE e
89/336/CEE, sostituite dalle direttive 2006/95/CE e 2004/108/CE e
successive modifiche.
1.1 DICHIARAZIONE DI CONFORMITÀ
1.2 SUGGERIMENTI SULLA SICUREZZA
•Utilizzare il forno solo per lo scopo per cui è stato progettato, ossia
solo per la cottura di alimenti. Qualsiasi altro utilizzo, ad esempio
come fonte di riscaldamento, è considerato improprio e quindi
pericoloso.
•Il produttore declina ogni responsabilità per eventuali danni dovuti a
un uso improprio, errato o irragionevole del forno. Durante l'uso di
elettrodomestici elettrici, è indispensabile attenersi ad alcune semplici
regole di base:
-Non tirare il cavo di alimentazione per staccare la spina dalla presa a
muro
-Non toccare il forno con mani o piedi bagnati o umidi
-Non utilizzare i forno con i piedi scalzi
- È generalmente sconsigliabile utilizzare adattatori, basette di
alimentazione o prolunghe.
- Se il forno si guasta o uno degli interruttori risulta difettoso, spegnerlo
immediatamente e non utilizzarlo.
•Sostituire immediatamente il cavo di alimentazione se danneggiato.
Attenersi alle seguenti istruzioni per sostituire il cavo di alimentazione.
Rimuovere il cavo di alimentazione difettoso e sostituirlo con uno dei
seguenti modelli: H05RR-F, H05VV-F o H05V2V2-F. Verificare che le
specifiche elettriche del cavo di alimentazione corrispondano a quelle
del forno. Fare sostituire il cavo di alimentazione da un tecnico
qualificato. Verificare che il cavo di messa a terra (giallo/verde) sia 10
mm più lungo del cavo di alimentazione. Rivolgersi solo a centri di
assistenza autorizzati e verificare che vengano utilizzate solo parti di
ricambio originali. Il produttore non è in grado di garantire la sicurezza
del forno in caso di mancata osservanza delle istruzioni indicate in
precedenza.
•Il forno ha le caratteristiche tecniche descritte in questo documento e
non deve essere in alcun modo modificato.
•Non utilizzare mai vapore o getti ad alta pressione per pulire il forno.
•Non conservare materiale infiammabile nel forno perché potrebbe
incendiarsi nel caso in cui il forno venga accidentalmente acceso.
•Non esercitare pressione sullo sportello del forno e impedire ai
bambini di sedervisi sopra.
•Utilizzare sempre guanti per inserire e rimuovere le pietanze nel/dal
forno.
Code produit:
Numéro de série :
1.3 RACCOMANDAZIONI
•Dopo l'uso, sono sufficienti alcune semplici operazioni di pulizia per
mantenerlo perfettamente pulito.
•Non rivestire le pareti del forno con fogli d'alluminio da cucina o fogli
monouso commerciali, perché potrebbero fondersi a contatto con le
superfici in smalto caldo e danneggiare le superfici in smalto
all'interno del forno.
•Per evitare di sporcare eccessivamente il forno e prevenire la
diffusione di fumo maleodorante, è consigliabile non utilizzare il forno
a temperature molto alte. È generalmente preferibile impostare un
tempo di cottura più lungo e utilizzare una temperatura più bassa.
Oltre agli accessori forniti con il forno, è consigliabile utilizzare piatti e
teglie resistenti alle alte temperature.
1.4 INSTALLAZIONE
Il produttore non è obbligato a occuparsi dell'installazione. Gli
eventuali interventi di assistenza necessari per correggere problemi
dovuti a un'errata installazione non sono coperti da garanzia.
L'installazione deve essere effettuata da un tecnico qualificato e in
conformità con queste istruzioni. Un'installazione impropria potrebbe
causare infortuni alle persone, agli animali domestici o danni alle
attrezzature. Il produttore declina ogni responsabilità per eventuali
lesioni o danni dovuti a un'errata installazione. L'unità della cucina in
cui viene installato il forno deve essere fabbricato in un materiale in
grado di tollerare una temperatura di almeno 70°C.
Il forno può essere installato sopra una colonna o sotto a un piano di
lavoro.
Prima di fissare in posizione il forno, verificare che lo spazio attorno
allo stesso sia sufficiente a garantire la circolazione del flusso di aria
fresco necessario a garantire il raffreddamento del forno e la
sicurezza dei componenti interni. Realizzare le aperture indicate
nell'ultima pagina del manuale, a seconda del tipo di installazione.
1.5 COLLEGAMENTI ELETTRICI
FARE EFFETTUARE I COLLEGAMENTI ELETTRICI A
UN'ELETTRICISTA O TECNICO QUALIFICATO. La rete di
alimentazione a cui viene collegato il forno deve essere conforme con
le normative in vigore nel paese di installazione. Il produttore declina
ogni responsabilità per eventuali danni derivanti dalla mancata
osservanza di tali disposizioni. Il forno deve essere collegato alla rete
elettrica tramite una presa a muro con messa a terra o tramite un
sezionatore con più poli, a seconda delle disposizioni in vigore nel
paese di installazione. La rete elettrica deve essere protetta mediante
fusibili idonei e devono essere utilizzati cavi con una sezione
trasversale idonea a garantire una corretta alimentazione del forno.
COLLEGAMENTO
Il forno viene fornito con un cavo di alimentazione, che deve essere
collegato solo a una rete elettrica con una tensione di 230 VCA tra le
fasi o tra la fase e il neutro. Prima di collegare il forno alla rete elettrica,
è indispensabile controllare: - la tensione di alimentazione indicata sul
misuratore, - l'impostazione del sezionatore. Il filo di messa a terra
(giallo/verde) collegato al morsetto di terra del forno deve essere
collegato al morsetto di terra della rete elettrica.
Attenzione:
•Prima di collegare il forno alla rete elettrica, far controllare la
continuità della messa a terra della rete elettrica a un elettricista
qualificato.
•Il produttore declina ogni responsabilità per eventuali incidenti o altri
problemi derivanti dal mancato collegamento a terra del forno o dal
suo collegamento a una messa a terra con una continuità difettosa.
Nota: poiché il forno potrebbe richiedere interventi di assistenza, è
consigliabile prevedere la disponibilità di un'ulteriore presa a muro a
cui collegare il forno dopo che è stato rimosso dallo spazio in cui è
stato installato.
Cavo di alimentazione:
sostituito solo dal personale dell'assistenza tecnica o da tecnici con
qualifiche analoghe.
il cavo di alimentazione deve essere
1. AVVERTENZE GENERALI
Per utilizzare in modo ottimale il forno, è consigliabile leggere con attenzione queste istruzioni e conservarle in un luogo sicuro in modo da poterle
consultare in caso di bisogno. Prima di installare il forno, prendere nota del numero di serie in modo da poterlo comunicare al personale del servizio
di assistenza in caso di richiesta di intervento. Dopo aver rimosso il forno dall'imballaggio, verificare che non abbia subito danni durante il trasporto.
In caso di dubbi, non utilizzare il forno e richiedere l'assistenza di un tecnico qualificato. Tenere tutto il materiale da imballaggio, come sacchetti di
plastica, polistirolo e chiodi fuori della portata dei bambini perché potrebbero essere pericolosi.
Il produttore declina ogni responsabilità in caso di mancata osservanza delle istruzioni contenute in questo documento.
NOTA: le funzioni, le proprietà e gli accessori dei forni citati in questo manuale possono variare a seconda dei modelli.

2.1 ACCESSORI DEL FORNO
(A SECONDA DEI MODELLI)
Prima di utilizzare il forno per la prima volta, è necessario pulire tutti gli
accessori, lavandoli con una spugna bagnata, sciacquandoli e
asciugandoli.
La può sostenere e piattigriglia teglie
La serve a raccogliere i che sgocciolano durante
la cottura di alimenti con il grill.
leccarda residui
Non utilizzare la vaschetta di gocciolamento come teglia per gli arrosti
perché i depositi di grasso possono disperdersi rapidamente
all'interno del forno e causare la produzione di un fumo eccessivo.
La piastra per pizza, che consente di cucinare pizze più croccanti, è
munita di una base e di uno stendipizza.
La deve essere collocata sul vassoio e può essere
utilizzata per cucinare pasticcini, come bignè, biscotti, meringhe,
ecc.... Non collocare mai la teglia per i dolci direttamente sul ripiano
inferiore del forno.
teglia per i dolci
2.3
Questo sistema di illuminazione sostituisce le “lampadine”
tradizionali. I 14 LED (sui modelli non pirolitici) o i 10 LED ad alta
potenza (sui modelli pirolitici) sono integrati direttamente nello
sportello. Questi LED producono una luce bianca di alta qualità che
consente di vedere bene tutti i ripiani all'interno del forno senza
ombre.
Vantaggi
Oltre a garantire una buona visibilità all'interno del forno, questo
sistema è più resistente rispetto alla lampadine tradizionali, richiede
una minore manutenzione e consuma meno dei sistemi tradizionali.
- Ottima visibilità
- Illuminazione di lunga durata
-Consumi ultra-ridotti, Consuma il 95% in meno rispetto ai sistemi
tradizionali
«Elettrodomestico con luci LED bianche di classe 1M, conforme a IEC
60825- 1:1993 + A1: 1997 + A2: 2001 (equivalente allo standard EN
60825-1: 1994 + A1: 2002 + A2: 2001); emissione luminosa massima
pari a 459 nm < 150uW.
:
14 IT
Quando il forno è in funzione bisogna togliere dalla cavità tutti
gli accessori inutilizzati.
2.2 FUNZIONE GIRARROSTO
Per arrostire non è richiesto il pre riscaldamento del forno
Effettuare la cottura con la porta forno chiusa
Il consumo di energia è inferiore del 90-95% rispetto al metodo
tradizionale
2
1
3
4
1- riglia
2- Spiedo
3- Ganci e viti
4- Impugnatura
G
MODALITÀ UTILIZZO
GIRARROSTO
1. Svitare i ganci
2. Infilare lo spiedo all'interno
della carne
3. Bloccare la carne con i ganci
4. Stringere le viti dei ganci
5. Inserire lo spiedo all'interno
della cavità del forno
6. Smontare l'impugnatura prima di iniziare la cottura
2. TECNOLOGIA PRO/EXP'R
(A SECONDA DEI MODELLI)
2.4 RIMOZIONE E PULIZIA DELLE GRIGLIE
1. Rimuovere le griglie tirandole verso il senso della freccia
2. Pulire le griglie lavandole in lavastoviglie o con una spugna
bagnata e asciugandole subito dopo
3. Dopo aver pulito le griglie, installarle nuovamente

Caratteristiche della lampadina:
230 VCA 2 5W E 14, temperatura di base 300°C. Per sostituire una
lampadina difettosa:
•Allentare la copertura in vetro.
•Svitare la lampadina.
•Sostituirla con una nuova dello stesso modello (vedere le
caratteristiche descritte in precedenza).
•Dopo aver sostituito la lampadina difettosa, riavvitare la
copertura in vetro.
15 IT
1
2
3
PULIZIA PORTAIN VETRO
È possibile rimuovere e pulire la porta vetro interna.
Al fine di pulire il vetro interno, seguire le seguenti istruzioni:
Figura 1
Figura 5
•
(Figura 1)
Aprire la porta del forno
• Rimuovere il vetro estraendolo con
molta cura dalla controporta del
forno. (Figura 5)
• Prima di iniziare l'operazione di pulizia,
bloccare le cerniere come mostrato
nella Figura 2. Sbloccare le cerniere
una volta terminata l'operazione.
(Figura 2)
Figura 2
Figura 7
• SU TUTTI I VETRI, l'indicazione
"Low-E" deve essere
correttamente leggibile e
posizionata sul lato sinistro
della porta, vicino alla cerniera
laterale sinistra. In questo modo,
l'etichetta stampata del primo
vetro rimarrà INTERNA alla porta.
• Al termine della pulizia del
vetro, riassemblare le parti
nell'ordine opposto alla
rimozione
• * Per i forni pirolitici, rimuovere
anche il secondo e il
terzo vetro. (Figura 6)
Figura 6
Figura 3
• Rimuovere le viti come nella
Figura 3. (Figura 3)
Figura 4
•
superiore tirandola verso l'alto.
(Figura 4)
Rimuovere la copertura metallica
3. PULIZIA DEL FORNO 4. RISOLUZIONE DEI
PROBLEMI
•Attendere che il forno si raffreddi prima di effettuare operazioni di
pulizia manuali.
•Non utilizzare mai detergenti abrasivi, pagliette di ferro o oggetti
appuntiti per la pulizia per non danneggiare in modo irreparabile le
parti smaltate.
•Utilizzare solo acqua e sapone o detergenti a base di candeggina
(ammoniaca).
•Non rivestire mai le pareti del forno con fogli d'alluminio da cucina.
PARTI IN VETRO
È consigliabile pulire lo sportello in vetro con carta assorbente da
cucina dopo ogni utilizzo del forno. Per rimuovere le macchie più
ostinate, è possibile anche utilizzare una spugna imbevuta di
detergente ben strizzata e sciacquare con acqua.
*Non utilizzare mai detergenti abrasivi o oggetti appuntiti perché
potrebbero graffiare la superficie in vetro o frantumarla.
GUARNIZIONE DELLO SPORTELLO DEL FORNO
Se sporca, la guarnizione può essere pulita con una spugna
leggermente inumidita.
ACCESSORI
Pulire gli accessori con una spugna imbevuta con acqua e sapone,
sciacquarli e asciugarli. Evitare di usare detergenti abrasivi.
VASCHETTA DI GOCCIOLAMENTO
Dopo l'uso del grill, rimuovere la vaschetta dal forno. Versare il grasso
caldo in un contenitore. Lavare e sciacquare la vaschetta in acqua
calda utilizzando una spugna e del detergente per piatti. Se
rimangono dei residui di grasso, immergere la vaschetta in acqua e
detergente. In alternativa, è possibile anche lavare la vaschetta nella
lavastoviglie oppure utilizzare un detergente per forni di tipo
commerciale. Non reinserire mai una vaschetta sporca nel forno.
LUCE DEL FORNO
Scollegare il forno dall'alimentazione elettrica prima di pulire o
sostituire la lampadina. La lampadina e la sua copertura sono
fabbricati in materiale plastico resistente alle temperature elevate.

4. DESCRIZIONE DEL DISPLAY
16 IT
70
30
40
50
60
80
90
100
110
20
10
120
100
150
200
220
MAX
50
50
100
150
200
220
MAX
4.1 PRIMA DI UTILIZZARE IL FORNO PER LA
PRIMA VOLTA
PULIZIA PRELIMINARE
-Pulire sempre il forno prima di utilizzarlo per la prima volta:
-Pulire le superfici esterne con un panno morbido leggermente
inumidito.
-Lavare tutti gli accessori e pulire l'interno del forno con del
detergente per piatti ed acqua calda.
-Verificare che il forno sia vuoto, impostare la temperatura massima e
lasciarlo acceso per almeno 1 ora per rimuovere tutti gli odori
normalmente presenti nei forni nuovi. Verificare che la cucina sia ben
ventilata durante l'esecuzione di queste operazioni.
PROMEMORIA
Controllare che il timer funzioni correttamente
Premere il pulsante del timer per verificare che funzioni.
Arresto del forno
Può essere necessario effettuare questa operazione se si seleziona
un comando errato. Per arrestare il forno, ruotare all'indietro il
selettore e portarlo in posizione di arresto.
Blocco dei comandi
Per bloccare i comandi del forno, selezionare il dispositivo di
protezione del forno. Per ulteriori informazioni, consultare la sezione
intitolata “Programmazione del dispositivo di sicurezza”.
Ventola di raffreddamento
Lo scopo della ventola è proteggere il pannello di controllo e
l'elettronica dal calore. La ventola si avvia automaticamente e si
arresta al momento in cui viene spento il forno.
Luce del forno
Ruotando il selettore della luce, è possibile spegnere la luce del forno
quando questo non è in uso. La luce è sempre accesa quando il forno
è in uso e si accende quando si apre lo sportello.
•IMPOSTAZIONE DELL'OROLOGIO
L'orologio deve sempre essere reimpostato quando si collega il forno
all'alimentazione elettrica o dopo un'interruzione prolungata
dell'alimentazione elettrica.
4.2 USO DEL TEMPORIZZATORE
auto

17 IT
•Premere il tasto centrale 4 volte.
• l'ora con i tasti
•Lasciare i tasti.
Imposta "- " "+".
ATTENZIONE: la prima operazione da eseguire dopo
l’installazione o dopo una interruzione di corrente (tali situazioni
si riconoscono perchè sul dispay lampeggia l’ora ) è la
regolazione dell’ora, come di seguito descritto.
12:00
4.4 TIMER ELETTRONICO A SFIORAMENTO
4.3 REGOLAZIONE ORA
ATTENZIONE: .Il forno funziona solo se impostato in modalità manuale o cottura programmata
BLOCCO
BAMBINO
FUNZIONE
COME SI ATTIVA COME SI SPEGNE COSA FA A COSA SERVE
CONTAMINUTI
DURATA
COTTURA
FINE
COTTURA
•
•Premere i tasti
per regolare la durata
•Lasciare i tasti
Premere il tasto centrale
1 volta.
"- " "+"
•Al termine della durata
impostata la funzione si
spegne da sola ed avvisa
con un segnale sonoro (il
segnale sonoro si ferma da
solo; per fermarlo subito
premere il tasto) SELECT.
•Da un segnale sonoro al
termine di un tempo
stabilito
•Durante il funzionamento
il display visualizza il
tempo rimanente.
•Permette di utilizzare il
programmatore del forno
come una sveglia (può
essere usato con forno
funzionante o spento.
•
•Premere i tasti
per regolare la durata
•Lasciare i tasti
•Selezionare la funzione
di cottura con la
manopola commutatore
Premere il tasto centrale
2 volte
"- " "+"
•Al termine della durata
impostata il forno si spegne
da solo; se deve essere
fermato prima si deve
portare la manopola
commutatore in posizione
O oppure portare a 0:00 la
durata della cottura
(tasti SELECT e )."- " "+"
•Permette di impostare la
durata della cottura del
cibo inserito nel forno
•Per visualizzare il tempo
rimanente premere il
tasto SELECT.
•Per modificare il tempo
rimanente premere il
tasto SELECT +"- " "+"
•Per interrompere il segnale
premere un tasto qualsiasi.
Premere il tasto centrale
per tornare alla funzione
orologio.
•
•Premere i tasti
per regolare l’ora di fine
cottura
•Lasciare i tasti
•Selezionare la funzione
di cottura con la
manopola commutatore
Premere il tasto centrale
3 volte
"- " "+"
•All’ora impostata il forno
si spegne da solo; se deve
essere fermato prima
è necessario portare la
manopola commutatore
in posizione O.
•Permette di
memorizzare l’ora di fine
cottura
•Per visualizzare l’ora
programmata p
•Per modificare l’ora
programmata premere i
tasti SELECT +
remere il
tasto centrale 3 volte
"- " "+"
•Tipicamente si utilizza questa
funzione con la funzione DURATA
COTTURA–ad esempio il cibo
desiderato deve cuocere per 45
minuti e desidero che sia pronto per le
ore 12:30; in tal caso:
•Al termine della durata impostata il
forno si spegne automaticamente
ed avvisa con un segnale sonoro.
Selezionare la funzione di cottura
desiderata Impostare la durata
cottura a 45 minuti ( "- " "+")
Impostare la fine cottura alle ore
12:30 ( "- " "+" ) La cottura avrà
auto-maticamente inizio alle 11:45
(12:30 meno 45 minuti), all’ora
impostata come fine cottura il
forno si spegne automaticamente.
ATTENZIONE: impostando solo la
fine cottura e non la durata della
cottura, il forno si accenderà
subito e si spegnerà all’ora di fine
cottura impostata.
•Tenere premuto per 5
secondi il tasto (+), Da
questo momento l
.
o
schermo visualizza
alternativamente “STOP”
e il tempo preimpostato
•Tenere premuto per 5
secondi il tasto (+). Da
questo momento tutle le
funzioni sono riabilitate.
00:00
select

1.Luce: Timer / Modalità automatica
2.Funzione con ventola*
3.Funzione con ventola a sistema
variabile*
4.Modalità scongelamento
5.Display per temperatura o orologio
6.Bottoni di regolazione
7.Manopola di selezione funzione
8.Manopola di selezione programmatore
* SECONDO MODELLO
Attenzione! La prima operazione da fare dopo l’installazione o dopo l'interruzione di corrente (situazioni di questo tipo
possono essere riconosciute in quanto il display è acceso e lampeggia 12:00) è l'impostazione del tempo.
4.5 UTILIZZO DEL PROGRAMMATORE ELETTRONICO
Il Led " ° " della temperatura lampeggia fino a che la temperatura visualizzata non è stata raggiunta
Quando un programma è finito, se il forno è ancora caldo, il display mostra "HOT", in alternanza con il tempo e anche se le
maniglie sono posizionate su "OFF”
FUNZIONI
COME SI UTILIZZANO? COME SI DISATTIVANO? COSA FA A COSA SERVE?
Modalità silenziosa
Impostazione
dell’orologio
Durata di cottura
Fine di cottura
TIMER
Sicurezza
bambini
•Ruotare la manopola del
programmatore sulla
“Modali tà Silenziosa”
• Permette di spegnere il
suono del timer
• Ruotare la manopola sulla
posizione off
• Questa funzione è
utilizzata per spegnere il
suono del timer
• Impostare la manopola
sulla posizione
“impostazione
dell’orologio”
• Usare i tasti + e -
per impostare l'ora.
• Permette di regolare l’ora
che appare sul display
• Ruotare la manopola sulla
posizione off
• Questa funzione vi
permette di regolare l’ora
utilizzando i tasti + e –
Nota: impostare l’ora al
momento dell'installazione
del vostro forno o
subito dopo un’interruzione
di corrente (12:00
lampeggia sullo schermo).
• Selezionare una funzione
di cucina
• Impostare la manopola del
programmatore sulla
durata di cottura
• Regolare il tempo di
cottura utilizzando
i tasti + e -.
• Auto display si illumina.
• Permette di regolare il
tempo di cottura.
• Quando il tempo di cottura
è regolato, posizionare la
manopola su OFF per
ritornare alla visualizzazione
dell’ora attuale.
• Per visualizzare l’ora
selezionata, posizionare il
selettore delle funzioni di
sinistra su Durata di cottura.
• Una volta che il tempo è
trascorso, il forno viene
automaticamente disattivato.
Per fermare la cottura prima,
si deve impostare la
manopola delle funzioni su
OFF, o regolare il tempo di
cottura su 00:00,
posizionando la manopola
sulla Durata della cottura e
utilizzando il tasto + e -.
• Quando il tempo di cottura
è finito, la cottura si
arresta automaticamente
e l'allarme suona per
qualche secondo.
• Selezionare una funzione
di cottura.
• Regolare la manopola sulla
posizione Fine di cottura.
• Regolare l’ora di fine
cottura utilizzando i
tasti + e -.
• Auto display si illumina
• Permette di regolare l’ora
di fine cottura.
• Quando l’ora di fine cottura
è regolata, ruotare il
selettore di funzione su
OFF per ritornare all’ora
attuale.
• Per vedere il tempo di
cottura selezionato, ruotare
il selezionatore di funzione
di sinistra sulla posizione
Fine di cottura.
• Quando la cottura è
terminata, il forno si
spegne automaticamente.
Per bloccare la cottura
anticipatamente, ruotare
la manopola delle funzioni
su OFF.
• Questa funzione è anche
utilizzata per le cotture che
possono essere programmate
in anticipo. Ad esempio, se il
tuo piatto deve essere
cucinato per 45 minuti e deve
essere pronto alle 12.30:
impostare semplicemente la
durata di 45 minuti e l'ora di
Fine cottura alle 12:30.
La cottura inizierà auto-
maticamente alle 11:45 (12:30
meno45min) e proseguirà fino
a che l'ora di fine cottura è
stata raggiunta.
A questo punto il forno si
spegnerà automaticamente.
• Regolare la manopola del
programmatore sulla
posizione TIMER.
• Regolare il tempo di
cottura utilizzando i tasti + e -.
• Questa funzione attiva un
allarme sonoro di qualche
secondo alla fine del
tempo impostato.
• Regolare il tempo su 00:00,
posizionando la manopola
del programmatore sulla
posizione TIMER, ed
utilizzando i tasti + e -.
• Utile per ricordare,
l’allarme sonoro funziona
indipendentemente dal
fatto che il forno sia acceso.
•Regolare la manopola del
programmatore sulla
posizione Sicurezza Bambini.
• Premere sul tasto + per 3
secondi.
• La sicurezza bambini è in
funzione quando sul display
appare STOP.
• Il forno non può essere
utilizzato
• Riposizionare la manopola
sulla funzione Sicurezza
bambini e premere il tasto
– per 3 secondi.
• L’indicazione sul display
sparisce.
•Questa funzione è utile
quando ci sono dei
bambini in casa.
18 IT
COOK
U
auto

• À
ELEMENTO RISCALDANTE INFERIORE In questa
modalità viene utilizzato l'elemento inferiore. Questa modalità è
ideale per cuocere tutti i piatti a base di pasta; ad esempio flan, quiche,
paté e qualsiasi pietanza che richieda più calore e irradiazione dal
basso.
Tenere sempre lo sportello del forno chiuso durante la cottura.
ELEMENTO RISCALDANTE INFERIORE + VENTOLA -
L'uso combinato dell'elemento riscaldante inferiore e della ventola è
ideale per la cottura di torte di frutta, crostate, quiche e dolci.
ELEMENTO RISCALDANTE INFERIORE + SUPERIORE -
In questa modalità di cottura vengono utilizzati entrambi gli elementi
riscaldanti, ossia quello inferiore e superiore. Questo metodo è ideale
per gli arrosti e le pietanze più tradizionali, come la carne rossa, il
roastbeef, le cosce di agnello, la selvaggina, il pane e le pietanze
avvolte in fogli di alluminio.
ELEMENTO RISCALDANTE INFERIORE + SUPERIORE
+ VENTOLA - In questa modalità vengono utilizzati entrambi gli
elementi riscaldanti, ossia quello superiore e inferiore, ma viene
contemporaneamente fatta circolare aria calda all'interno del forno. È
consigliabile utilizzare questo metodo per cucinare carne bianca, torte
salate, pesce e verdura. Questo metodo assicura una maggiore
penetrazione del calore e richiede un tempo di pre-riscaldamento
minore. L'uso della ventola consente di cucinare temporaneamente
tipi di alimenti diversi, perché consente di distribuire uniformemente il
calore senza il rischio che si mescolino sapori e odori. Quando si
cucinano più tipi di alimenti contemporaneamente, è consigliabile
incrementare di 10 minuti il tempo di cottura.
ELEMENTO RISCALDANTE CIRCOLARE + VENTOLA In
questa modalità di cottura vengono contemporaneamente utilizzati gli
elementi riscaldanti inferiore, superiore e circolare, che provvede a far
circolare aria calda all'interno del forno. Questa modalità di cottura è
indicata per le stesse pietanze indicate nella sezione relativa alla
cottura con ventola.
GRILL In questa modalità di cottura viene utilizzato solo
l'elemento riscaldante superiore. Questa modalità di cottura è
particolarmente indicata per i piatti grigliati, gli spiedini e i piatti
gratinati. Il grill deve essere pre-riscaldato a una temperatura alta per
5 minuti. Per ottenere risultati di cottura ottimali e rendere la carne più
succulenta, è consigliabile collocarla a una certa distanza dal grill
anche se i tempi di cottura sono più lunghi. I filetti di carne rossa e
pesce devono essere collocati direttamente sul ripiano con la
vaschetta di gocciolamento posizionata sotto al ripiano inferiore.
GRILL+ VENTOLA In questa modalità di cottura viene
utilizzato l'elemento riscaldante superiore insieme alla ventola per
fare circolare aria calda all'interno del forno. È consigliabile pre-
riscaldare il forno solo per le carni rosse, ma non per quelle bianche. Il
grill è ideale per le pietanze con un maggiore spessore, come la carne
di suino o pollo. Gli alimenti da grigliare devono essere collocati al
centro del ripiano intermedio. Collocare la vaschetta di
gocciolamento sotto al ripiano per raccogliere l'eventuale grasso che
gocciola in fase di cottura. Per ottenere risultati ottimali, non collocare
gli alimenti troppo vicino al grill e girare la carne a metà del ciclo di
cottura.
GRILL+ GIRARROSTO+ VENTOLA - L'uso simultaneo
dell'elemento riscaldante superiore e della ventola e del girarrosto
consentono di cucinare le pietanze in modo uniforme senza che si
secchi e diventi insapore. Il girarrosto è programmato per continuare a
ruotare per circa cinque minuti dopo la cottura, in modo da consentire
l'uso del calore residuo del forno. Quando si utilizza il girarrosto, non è
necessario pre-riscaldare il forno.
SCONGELAMENTO Questa modalità si attiva quando si
sposta il selettore in questa posizione. La ventola fa circolare aria
calda attorno all'alimento congelato e ne consente quindi uno
scongelamento rapido senza alcuna alterazione del sapore originale.
La temperatura è preimpostata su 40°C e non può essere modificata.
RISCALDAMENTO Questa modalità è quella consigliata
per riscaldare alimenti pre-cotti (che devono essere posizionati sul
secondo ripiano in basso dall'alto) o per scongelare pasta o pizza
congelata (in questo caso è necessario utilizzare il ripiano più basso).
La temperatura è preimpostata su 60°C e non può essere modificata.
PIZZA Questa funzione consente di far circolare aria calda
all'interno del forno ed è particolarmente indicata per pietanze come
pizze o dolci.
MODALIT DI COTTURA
4.6 COME UTILIZZARE IL FORNO
19 IT
SOFT COOK - e la funzione ideale per la pasticceria ed il
pane. Grazie alla velocita ridotta della ventola, questa funzione
aumenta l'umidita presente all'interno del forno. Una maggiore
umidita crea le condizioni di cottura ideali per quegli alimenti che
hanno bisogno di mantenere una consistenza elastica mentre
cuociono (es. torte, pane, biscotti) e, di conseguenza, per non
sbriciolarsi.
È
sale favorisce gli schizzi di grasso, che sporca il forno e produce molto
fumo.
I tagli di carne bianca, di maiale, vitello e pesce possono essere inseriti
freddi nel forno. Benché questo accorgimento allunghi i tempi di cottura,
consente di cuocere meglio la porzione centrale del taglio di carne
perché il calore a disposizione più tempo per penetrare nel taglio di
carne.
Per cucinare in modo corretto la carne rossa, è indispensabile pre-
riscaldare in modo appropriato il forno.
GRILL
•Prima di utilizzare il grill
Rimuovere la carne dal congelatore qualche ora prima della cottura.
Collocare la carne su più strati di carta da cucina per mantenere
inalterato il sapore delle pietanze ed evitare che la porzione centrale
rimanga cruda. Aggiungere pepe e spezie alla carne prima di grigliarla,
ma non aggiungere sale per mantenere la carne più succosa e tenera.
Applicare un leggero strato di olio alla carne, preferibilmente con un
pennello da cucina largo. Quindi, cospargere altro pepe e spezie (timo,
ecc.) sulla carne.
• :
Non perforare mai la carne mentre la si gira, perché ciò provoca la
dispersione del sugo e rende la carne più secca.
COTTURA DI DOLCI
Evitare di usare teglie lucide perché riflettono il calore e possono
rovinare la cottura. Se il dolce cuoce troppo rapidamente, coprirlo con
carta oleata o carta d'alluminio. Attenzione: applicare la carta
d'alluminio in modo che il lato lucido sia rivolto verso il dolce perché
altrimenti il calore viene riflesso dalla superficie lucida e non penetra nel
dolce.
Evitare di aprire lo sportello durante i primi 20-15 minuti
L'apertura dello sportello del forno potrebbe provocare lo
“sgonfiamento” di sufflè, brioche, pandispagna, ecc. Per controllare se
il dolce è perfettamente cotto, è sufficiente punzecchiare il centro con la
lama di un coltello o un ago da maglia in metallo. Se l'ago estratto è
asciutto, il dolce è pronto e la cottura può definirsi conclusa. Se l'ago
che si estrae dal dolce è umido o se ci sono pezzetti di dolce attaccati,
proseguire la cottura, abbassando leggermente la temperatura del
forno per evitare che il dolce si bruci.
consigliabile salare la carne solo al termine della cottura, perché il
Durante la cottura
4.7 SUGGERIMENTI PER LA COTTURA
5. ASSISTENZA TECNICA
Prima di rivolgersi all'assistenza tecnica:
Se il forno non funziona, è consigliabile:
•Controllare che il forno sia correttamente collegato all'alimentazione
elettrica.
Se non è possibile individuare la causa del guasto:
•Scollegare il forno dall'alimentazione elettrica, non toccarlo e rivolgersi
all'assistenza tecnica.
Prima di chiamare il centro di assistenza, ricordarsi di prendere nota del
numero di serie riportato sulla targhetta identificativa.
Il forno viene fornito con un certificato di garanzia che ne garantisca la
riparazione gratuita presso un centro di assistenza durante il periodo di
validità della garanzia.
Questo apparecchio è contrassegnato in conformità alla Direttiva
europea 2012/19/EU sulle apparecchiature elettriche ed elettroniche
(WEEE). I WEEE contengono sia le sostanze inquinanti (che possono
provocare conseguenze negative sull'ambiente) che componenti di
base (che possono essere riutilizzati). È importante che i WEEE siano
soggetti a rattamenti specifici, per rimuovere e smaltire correttamente
tutti gli inquinanti e recuperare e riciclare tutti i materiali.
I singoli possono giocare un ruolo importante nell'assicurare che i
WEEE non diventino un problema ambientale; è essenziale seguire
alcune regole di base:
• I WEEE non devono essere trattati come rifiuti domestici.
• I WEEE devono essere portati ai punti di raccolta appositi gestiti dal
comune o da società registrate. In molti Paesi, per i WEEE grandi,
potrebbe essere presente la raccolta domestica.
• Quando si acquista un nuovo apparecchio, quello vecchio potrebbe
essere restituito al rivenditore che deve acquisirlo gratuitamente su
base singola, sempre che l'apparecchio sia del tipo equivalente e abbia
le stesse funzioni di quello acquistato.

20 ES
ADVERTENCIA: El aparato y sus componentes accesibles se calientan durante el uso. Se debe tener
cuidado de no tocar los elementos calefactores.
• Los niños menores de 8 años deben permanecer alejados o supervisados de forma continuada por
una persona adulta.
• Este aparato puede ser usado por niños mayores de 8 años y personas con capacidades físicas,
sensoriales o mentales reducidas o falta de experiencia y conocimiento siempre y cuando hayan sido
supervisadas o instruidas sobre el uso del aparato de forma segura y del conocimiento de los riesgos
que comporta.
• Los niños no deben jugar con el aparato.
• La limpieza y el mantenimiento que debe realizar el usuario no será realizada por niños sin supervisión.
• Durante el uso, se calienta el aparato. Se debe tener cuidado de no tocar los elementos calefactores del
interior del horno.
ADVERTENCIA: Las partes accesibles pueden calentarse durante el uso. Los niños deben permanecer
alejados.
• No utilizar limpiadores abrasivos o rascadores metálicos afilados para limpiar el cristal de la puerta del
horno ya que pueden rayar la superficie, pudiendo comportar la rotura del cristal.
• Se debe apagar el horno antes de retirar la pantalla, después de la limpieza, se debe colocar según las
instrucciones.
• Use solamente el sensor de temperatura recomendado para este horno.
• No utilice limpiadores de vapor para la limpieza del aparato.
ADVERNTENCIA: Asegúrese de que el aparato está apagado antes de sustituir la lámpara para evitar la
posibilidad de una descarga eléctrica.
• Los medios de desconexión deben ser incorporados en el cableado fijo en conformidad con las reglas
del cableado.
• las instrucciones indicarán el tipo de cable a utilizar, teniendo en cuenta la temperature de la parte
posterior del aparato.
• Si el cable de alimentación está dañado, se debe sustituir por un cable o conjunto especial suministrado
por el fabricante o el servicio técnico.
PRECAUCIÓN: Con el fin de evitar peligros derivados de alteraciones en el suministro energético, este
aparato no debe ser suministrado a través de un dispositivo de conmutación externo, como un
temporizador, o conectado a un circuito que sea encendido y apagado frecuentemente por los servicios
públicos.
PRECAUCIÓN: Las partes accesibles se pueden calentar con el uso del grill. Los niños deben
permanecer alejados.
• Se debe eliminar el exceso de derrames antes de la limpieza.
• Durante la operación de auto limpieza pirolítica, las superficies pueden calentarse más de lo habitual;
los niños deben permanecer alejados.
INSTRUCCIONES PARA UN USO SEGURO
La pagina sta caricando ...
La pagina sta caricando ...
La pagina sta caricando ...
La pagina sta caricando ...
La pagina sta caricando ...
La pagina sta caricando ...
La pagina sta caricando ...
La pagina sta caricando ...
La pagina sta caricando ...
La pagina sta caricando ...
La pagina sta caricando ...
La pagina sta caricando ...
La pagina sta caricando ...
La pagina sta caricando ...
La pagina sta caricando ...
La pagina sta caricando ...
La pagina sta caricando ...
La pagina sta caricando ...
La pagina sta caricando ...
La pagina sta caricando ...
La pagina sta caricando ...
La pagina sta caricando ...
La pagina sta caricando ...
La pagina sta caricando ...
La pagina sta caricando ...
La pagina sta caricando ...
La pagina sta caricando ...
La pagina sta caricando ...
La pagina sta caricando ...
La pagina sta caricando ...
La pagina sta caricando ...
La pagina sta caricando ...
La pagina sta caricando ...
La pagina sta caricando ...
La pagina sta caricando ...
La pagina sta caricando ...
La pagina sta caricando ...
La pagina sta caricando ...
La pagina sta caricando ...
La pagina sta caricando ...
La pagina sta caricando ...
La pagina sta caricando ...
La pagina sta caricando ...
La pagina sta caricando ...
La pagina sta caricando ...
La pagina sta caricando ...
La pagina sta caricando ...
La pagina sta caricando ...
La pagina sta caricando ...
La pagina sta caricando ...
La pagina sta caricando ...
La pagina sta caricando ...
La pagina sta caricando ...
La pagina sta caricando ...
La pagina sta caricando ...
La pagina sta caricando ...
La pagina sta caricando ...
La pagina sta caricando ...
La pagina sta caricando ...
La pagina sta caricando ...
La pagina sta caricando ...
La pagina sta caricando ...
La pagina sta caricando ...
La pagina sta caricando ...
La pagina sta caricando ...
La pagina sta caricando ...
La pagina sta caricando ...
La pagina sta caricando ...
La pagina sta caricando ...
La pagina sta caricando ...
La pagina sta caricando ...
La pagina sta caricando ...
La pagina sta caricando ...
La pagina sta caricando ...
La pagina sta caricando ...
La pagina sta caricando ...
La pagina sta caricando ...
La pagina sta caricando ...
La pagina sta caricando ...
La pagina sta caricando ...
La pagina sta caricando ...
La pagina sta caricando ...
La pagina sta caricando ...
La pagina sta caricando ...
-
 1
1
-
 2
2
-
 3
3
-
 4
4
-
 5
5
-
 6
6
-
 7
7
-
 8
8
-
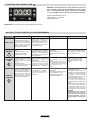 9
9
-
 10
10
-
 11
11
-
 12
12
-
 13
13
-
 14
14
-
 15
15
-
 16
16
-
 17
17
-
 18
18
-
 19
19
-
 20
20
-
 21
21
-
 22
22
-
 23
23
-
 24
24
-
 25
25
-
 26
26
-
 27
27
-
 28
28
-
 29
29
-
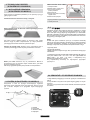 30
30
-
 31
31
-
 32
32
-
 33
33
-
 34
34
-
 35
35
-
 36
36
-
 37
37
-
 38
38
-
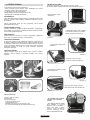 39
39
-
 40
40
-
 41
41
-
 42
42
-
 43
43
-
 44
44
-
 45
45
-
 46
46
-
 47
47
-
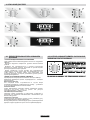 48
48
-
 49
49
-
 50
50
-
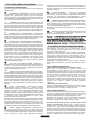 51
51
-
 52
52
-
 53
53
-
 54
54
-
 55
55
-
 56
56
-
 57
57
-
 58
58
-
 59
59
-
 60
60
-
 61
61
-
 62
62
-
 63
63
-
 64
64
-
 65
65
-
 66
66
-
 67
67
-
 68
68
-
 69
69
-
 70
70
-
 71
71
-
 72
72
-
 73
73
-
 74
74
-
 75
75
-
 76
76
-
 77
77
-
 78
78
-
 79
79
-
 80
80
-
 81
81
-
 82
82
-
 83
83
-
 84
84
-
 85
85
-
 86
86
-
 87
87
-
 88
88
-
 89
89
-
 90
90
-
 91
91
-
 92
92
-
 93
93
-
 94
94
-
 95
95
-
 96
96
-
 97
97
-
 98
98
-
 99
99
-
 100
100
-
 101
101
-
 102
102
-
 103
103
-
 104
104


Candy FXMH 7490 X Manuale utente
- Categoria
- Fornelli
- Tipo
- Manuale utente
Documenti correlati
-
Candy FXP629X Manuale utente
-
Candy MECS34TX Manuale utente
-
-
-
-
-
-
-
-