Philips 800 SERIE Manuale utente
- Categoria
- Purificatori d'aria
- Tipo
- Manuale utente

EN User manual 1
DA Brugervejledning 12
DE Benutzerhandbuch 23
ES Manual del usuario 36
FI Käyttöopas 48
FR Mode d’emploi 59
IT Manuale utente 71
NL Gebruiksaanwijzing 83
NO Brukerhåndbok 95
SV Användarhandbok 106
1 2
A
B
C
D
F
E
G
H
I
J
K
© 2019 Koninklijke Philips N.V.
All rights reserved.
3000 042 62081
AC0819
AC0820

CLOSEOPEN
CLOSEOPEN
3
11
5
13
9
6
14
10
4
12
8
77

1EN
English
Contents
1 Important ������������������������������������������������������������������������������2
Safety ��������������������������������������������������������������������������������������������������������������������� 2
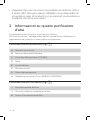
2 Your air purier �������������������������������������������������������������������4
Product overview (g� a) ��������������������������������������������������������������������������4
Controls overview (g� b) ������������������������������������������������������������������������� 4
3 Using the air purier ��������������������������������������������������������� 5
Understanding the air quality light ������������������������������������������������������5
Installing the lter �������������������������������������������������������������������������������������������5
Connecting power ������������������������������������������������������������������������������������������5
Turning on and o ������������������������������������������������������������������������������������������ 5
Changing the mode setting ���������������������������������������������������������������������6
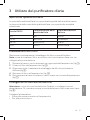
4 Cleaning ���������������������������������������������������������������������������������6
Cleaning schedule �����������������������������������������������������������������������������������������6
Cleaning the body of the air purier ��������������������������������������������������� 7
Cleaning the air quality sensor �������������������������������������������������������������� 7
Cleaning the surface of the lter ����������������������������������������������������������� 7
5 Replacing the lter ������������������������������������������������������������8
Understanding the healthy air protect lock �����������������������������������8
Replacing the lter ����������������������������������������������������������������������������������������8
Filter reset �����������������������������������������������������������������������������������������������������������8
6 Storage �����������������������������������������������������������������������������������9
7 Troubleshooting �����������������������������������������������������������������9
8 Guarantee and service ��������������������������������������������������� 11
Order parts or accessories �����������������������������������������������������������������������11
9 Notices ���������������������������������������������������������������������������������� 11
Electromagnetic elds (EMF) �����������������������������������������������������������������11
Recycling ������������������������������������������������������������������������������������������������������������� 11

2 EN
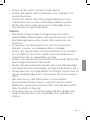
1 Important
Safety
Read this user manual carefully before you use the appliance, and save it for
future reference�
Danger
• Do not clean the appliance with water, any other liquid, or a
(ammable) detergent to avoid electric shock and/or a re
hazard�
• Do not spray any ammable materials such as insecticides
or fragrance around the appliance�
Warning
• Check if the voltage indicated on the appliance corresponds
to the local power voltage before you connect the appliance�
• If the power cord is damaged, you must have it replaced by
Philips, a service center authorized by Philips, or similarly
qualied persons in order to avoid a hazard�
• Do not use the appliance if the adaptor, the power cord, or
the appliance itself is damaged�
• Only use the approved 2-pin plug adapter
(KA1801A-2400750EU) provided with the appliance�
• This appliance can be used by children aged from 8 years
and above and persons with reduced physical, sensory or
mental capabilities or lack of experience and knowledge if
they have been given supervision or instruction concerning
use of the appliance in a safe way and understand the
hazards involved�
• Children shall not play with the appliance�
• Do not block the air inlet and outlet�
• Do not place any items on top of the air outlet, or in front of
the air inlet�
• Make sure that foreign objects do not fall into the appliance
through the air outlet�

3EN
English
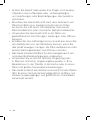
Caution
• This appliance is not a substitute for proper ventilation,
regular vacuum cleaning, or use of an extractor hood or fan
while cooking�
• Always place and use the appliance on a dry, stable, level,
and horizontal surface�
• Leave at least 20cm free space around the appliance and
leave at least 30cm free space above the appliance�
• Do not sit or stand on the appliance� Do not place anything
on top of the appliance�
• Do not place the appliance directly below an air conditioner
to prevent condensation from dripping onto the appliance�
• Only use the original Philips lters specially intended for this
appliance� Do not use any other lters�
• Combustion of the lter may cause irreversible human
hazard and/or jeopardize other lives� Do not use the lter as
fuel or for similar purpose�
• Avoid knocking against the appliance (the air inlet and
outlet in particular) with hard objects�
• Do not insert your ngers or objects into the air outlet or the
air inlet to prevent physical injury or malfunctioning of the
appliance�
• Do not use this appliance when you have used indoor
smoke-type insect repellents or in places with oily residues,
burning incense, or chemical fumes�
• Do not use the appliance near gas appliances, heating
devices or replaces�
• Always turn o the air purier rst, then unplug adapter from
wall outlet, when you want to moving, cleaning appliance,
replacing the lters or carry out other maintenance�
• The appliance is only intended for household use under
normal operating conditions�
• Do not use the appliance in wet surroundings or in
surroundings with high ambient temperatures, such as
the bathroom, toilet, or kitchen, or in a room with major
temperature changes�

4 EN
• The appliance does not remove carbon monoxide (CO)
or radon (Rn)� It cannot be used as a safety device in case
of accidents with combeustion processes and hazardous
chemicals�
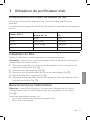
2 Your air purifier
Congratulations on your purchase, and welcome to Philips!
To fully benet from the support that Philips oers, register your product at
www�philips�com/welcome�
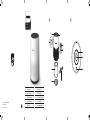
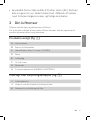
Product overview (g� a)
A Control panel
B Air quality sensor
C NanoProtect lter Series 2 (FY0194)
D Base
E Air outlet
F Power on/o button
G Power socket
H 2 Pin plug adapter (KA1801A-2400750EU)
Controls overview (g� b)
I Air quality light
J Mode switch/Filter reset button
K Filter replacement alert

5EN
English
3 Using the air purifier
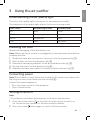
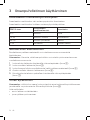
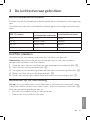
Understanding the air quality light
The color of air quality light corresponds to the ambient air quality�
The brightness of air quality light reects the current running mode�
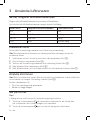
PM2�5 level Air quality light color Air quality level
≤12 Blue Good
13-35 Blue-purple Fair
36-55 Purple-red Poor
>55 Red Very poor
Installing the lter
Remove all packaging of the lter before use�
Note: Make sure the air purier is unplugged from the electrical outlet before
installing the lter�
1 Rotate the base anti-clockwise to remove it from the appliance (g c)�
2 Pull the lter out from the appliance (g d)�
3 Remove all packaging materials of the air purication lter (g e)�
4 Put the lter back into the appliance (g f)�
5 Reattach the base and rotate it clockwise to fasten the base (g g)�
Connecting power
Note: Risk of electric shock! When you unplug the AC power cord, always pull
the plug from the socket� Never pull the cord (g h)�
Connect the power adapter to:
• First, the power socket on the appliance�
• Then, the wall outlet�
Turning on and o
Note:
• For optimum purication performance, close doors and windows�
1 Press the power button on the back of the air purier to switch on�
» The air purier operates in the auto mode by default�
2 Press the power button again to switch o the air purier�

6 EN
Changing the mode setting
You can choose Auto mode, Turbo mode or the Sleep mode by pressing the
mode switch button (g i)� The brightness of air quality light reects the
current running mode:
• Sleep mode-lowest brightness
• Auto mode-mid level brightness
• Turbo mode-highest level brightness
Auto mode
In Auto mode, the appliance selects the fan speed in accordance with the
ambient air quality�
Turbo mode
In Turbo mode, the air purier operates on the highest speed�
Sleep mode
In Sleep mode, the air purier operates quietly at a low speed�
4 Cleaning
Note:
• Never use abrasive, aggressive, or ammable cleaning agents such as
bleach or alcohol to clean any part of the appliance�
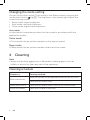
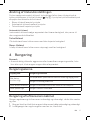
Cleaning schedule
Frequency Cleaning method
When necessary
Wipe the surface of the appliance with a soft dry cloth
Clean the air outlet cover
Every two months Clean the air quality sensor with a dry cotton swab
Every four weeks Clean the surface of the lter

7EN
English
Cleaning the body of the air purier
Regularly clean the inside and outside of the air purier to prevent dust from
collecting�
1 Use a soft, dry cloth to clean both the interior and exterior of the air
purier�
2 The air outlet can also be cleaned with a dry, soft cloth�
Cleaning the air quality sensor
Clean the air quality sensor every two months for optimal functioning of the
appliance�
Note:
• If the air purier is used in a dusty environment, it may need to be cleaned
more often�
• If the humidity level in the room is very high, condensation may develop
on the air quality sensor and the air quality light may indicate a poorer air
quality even though the air quality is actually good� If this occurs, clean the
air quality sensor or use the air purier on a manual speed setting�
1 Switch o the air purier and unplug from the power socket�
2 Clean the inlet and outlet of the air quality sensor with a soft brush (g j)�
3 Open the air quality sensor cover (g k)�
4 Clean the air quality sensor, the dust inlet and the dust outlet with a damp
cotton swab (g l)�
5 Dry all parts thoroughly with a dry cotton swab�
6 Reattach the air quality sensor cover (g m)�
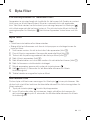
Cleaning the surface of the lter
Wipe the surface of the lter with soft wet cloth or clean the surface of the
lter with a vacuum cleaner (g n)�
Note:
• if you use a high power/ industrial vacuum cleaner, it may damage the lter�

8 EN
5 Replacing the filter
Understanding the healthy air protect lock
This appliance is equipped with the healthy air protect lock to make sure that
the NanoProtect lter is in optimal condition when the appliance is operating�
When the lter is almost expired, the lter replacement alert ( ) lights up
red, which indicates that it needs to be replaced� If you do not replace the
lter in time, the lter replacement alert ( ) will ash� The appliance will stop
operating and get locked�
Replacing the lter
Note:
• The lter is not washable or reusable�
• Always turn o the air purier and unplug from the electrical outlet before
replacing the lter�
1 Rotate the base anti-clockwise to remove it from the appliance (g c)�
2 Pull the lter out from the appliance� Discard the used lter (g d)�
3 Remove all packaging materials of the new lter (g e)�
4 Put the lter into the appliance (g f)�
5 Reattach the base and rotate it clockwise to fasten the base (g g)�
6 Put the plug of the air purier in the power socket�
7 Press the power button to switch on the appliance�
8 Press and hold for 3 seconds to reset the lter lifetime counter�
9 Wash your hands thoroughly after replacing the lter�
Filter reset
You can replace the lter even before lter replacement alert ( ) displays on
the screen� After replacing a lter, you need to reset the lter lifetime counter
manually�
1 Press the power button to turn on the appliance�
2 Within 10 seconds after power on, press and hold the mode switch button
for 5 seconds to reset the lter lifetime counter�

9EN
English
6 Storage
1 Turn o the air purier and unplug from the power socket�
2 Clean the air purier, air quality sensor and the surface of the lter (see
chapter ‘Cleaning’)�
3 Let all parts air dry thoroughly before storing�
4 Wrap the lter in air tight plastic bags�
5 Store the air purier, lter in a cool, dry location�
6 Always thoroughly wash hands after handling a lter�
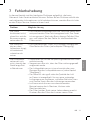
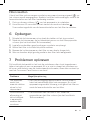
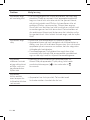
7 Troubleshooting
This chapter summarizes the most common problems you could encounter
with the appliance� If you are unable to solve the problem with the information
below, contact the Consumer Care Center in your country�
Problem Possible solution
The appliance
does not work
even though it is
plugged in�
• The lter replacement alert is on but you have not
replaced the corresponding lter� As a result, the
appliance is now locked� In this case, replace the lter
and reset the lter lifetime counter�
The airow that
comes out of
the air outlet
is signicantly
weaker than
before�
• The surface of the lter is dirty� Clean the surface of the
lter (see the chapter "Cleaning")�
The air quality
does not improve,
even though the
appliance has
been operating
for a long time�
• Check if the packing material is removed from the lter�
• Make sure that the lter is properly installed�
• The air quality sensor is dirty or wet� Clean the air
quality sensor (See the chapter "Cleaning")�
• Room size is large or the outdoor air quality is poor�
For optimum purication performance, please close
the doors and windows when operating the air purier�
• There are indoor pollution resources� For instances,
smoking, cooking, incense�
• Filter reaches the end of life� Replace the lter with a
new one�

10 EN
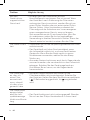
Problem Possible solution
The appliance
produces a
strange smell�
• The rst few times you use the appliance, it may
produce a plastic smell� This is normal� However, if the
appliance produces a burnt smell even if removing
the lter, contact your Philips dealer or an authorized
Philips service center� The lter may produce smell after
being used for a while because of the absorption of
indoor gases� It’s recommended that you reactivate the
lter by putting it in direct sunlight for repeated use� If
odor still exists, replace the lter�
The appliance is
extra loud�
• Check if the packing of the lter is removed�
• The appliance will run in high speed when the air
quality is poor, which will causes higher noises� When
using the appliance in a bedroom at night, choose the
Sleep speed�
• if anything drops into air outlet, it may also cause
abnormal loud sounds� Immediate turn o appliance,
turn appliance upside down, to get foreign objectives
out of appliance�
The appliance still
indicates that I
need to replace a
lter, but I already
did�
• Perhaps you did not reset the lter lifetime counter�
Switch on the appliance� Then press and hold the
mode switch button ( ) for 3 seconds until
disappears�
Appliance keeps
o, but air quality
light blinks for
one minute�
• The appliance has malfunctions� Contact the Consumer
Care Center in your country�

11EN
English
8 Guarantee and service
If you need information or if you have a problem, please visit the Philips
website at www�philips�com or contact the Philips Consumer Care Center
in your country (you can nd its phone number in the worldwide guarantee
leaet)� If there is no Consumer Care Center in your country, go to your local
Philips dealer�
Order parts or accessories
If you have to replace a part or want to purchase an additional part, go to your
Philips dealer or visit www�philips�com/support�
If you have problems obtaining the parts, please contact the Philips Consumer
Care Center in your country (you can nd its phone number in the worldwide
guarantee leaet)�
9 Notices
Electromagnetic elds (EMF)
This Philips appliance complies with all applicable standards and regulations
regarding exposure to electromagnetic elds�
Recycling
This symbol means that this product shall not be disposed of with
normal household waste (2012/19/EU)�
Follow your country’s rules for the separate collection of electrical and
electronic products� Correct disposal helps prevent negative consequences for
the environment and human health�

12 DA
Indhold
1 Vigtigt ����������������������������������������������������������������������������������� 13
Sikkerhed �����������������������������������������������������������������������������������������������������������13
2 Din luftrenser ��������������������������������������������������������������������� 15
Produktoversigt (g� a) ��������������������������������������������������������������������������� 15
Oversigt over betjeningsknapper (g� b) �������������������������������������15
3 Brug af luftrenseren ��������������������������������������������������������16
Om luftkvalitetslyset �����������������������������������������������������������������������������������16
Montering af lteret ������������������������������������������������������������������������������������16
Tilslutning af strøm �������������������������������������������������������������������������������������� 16
Sådan tændes og slukkes apparatet ����������������������������������������������� 16
Ændring af tilstandsindstillingen ���������������������������������������������������������17
4 Rengøring �����������������������������������������������������������������������������17
Rengøringsskema ������������������������������������������������������������������������������������������17
Rengøring af luftrenserens kabinet ����������������������������������������������������17
Rengøring af luftkvalitetssensoren ����������������������������������������������������18
Rengøring af lterets overade �����������������������������������������������������������18
5 Udskiftning af lteret ����������������������������������������������������� 18
Sådan virker beskyttelseslåsen til sund luft ��������������������������������18
Udskiftning af lteret ����������������������������������������������������������������������������������19
Filternulstilling ������������������������������������������������������������������������������������������������ 19
6 Opbevaring �������������������������������������������������������������������������19
7 Fejlnding �������������������������������������������������������������������������� 20
8 Garanti og service ������������������������������������������������������������ 21
Bestilling af dele eller tilbehør �������������������������������������������������������������� 21
9 Bemærkninger ������������������������������������������������������������������22
Elektromagnetiske felter (EMF) ���������������������������������������������������������� 22
Genbrug ������������������������������������������������������������������������������������������������������������ 22

13DA
Dansk
1 Vigtigt
Sikkerhed
Læs denne brugsvejledning omhyggeligt igennem, inden apparatet tages i
brug, og gem den til eventuelt senere brug�
Fare
• Undlad at rengøre apparatet med vand, andre væsker eller
(brandbart) rengøringsmiddel for at undgå elektrisk stød og/
eller brandfare�
• Sprøjt ikke brændbare materialer som f�eks� insektgift eller
parfume omkring apparatet�
Advarsel
• Kontrollér, om den angivne netspænding på apparatet
svarer til den lokale netspænding, før du slutter strøm til
apparatet�
• Hvis netledningen beskadiges, må den kun udskiftes af
Philips, et autoriseret Philips-serviceværksted eller en
tilsvarende kvaliceret fagmand for at undgå enhver risiko�
• Brug aldrig apparatet, hvis adapter, netledning eller selve
apparatet er beskadiget�
• Brug kun det godkendte 2-benede adapterstik
(KA1801A-2400750EU), der følger med apparatet�
• Dette apparat kan bruges af børn fra 8 år og opefter og
af personer med reducerede fysiske, sensoriske eller
mentale evner eller manglende erfaring og viden, hvis de
er blevet instrueret i sikker brug af apparatet og forstår de
medfølgende risici�
• Lad ikke børn lege med apparatet�
• Bloker ikke luftindtag og luftudtag�
• Anbring ikke genstande oven på luftudtaget eller foran
luftindtaget�
• Sørg for, at fremmedlegemer ikke falder ind i apparatet
gennem luftudgangen�

14 DA
Forsigtig
• Apparatet kan ikke bruges som erstatning for grundig
udluftning, støvsugning eller brug af emhætte eller
udsugning under madlavning�
• Anbring og brug altid apparatet på et stabilt, plant og
vandret underlag�
• Der skal være mindst 20 cm fri plads rundt om apparatet, og
der skal være mindst 30 cm fri plads over apparatet�
• Du må ikke sidde eller stå på apparatet� Placer ikke noget
ovenpå apparatet�
• Placer ikke apparatet direkte under et klimaanlæg for at
forhindre, at der drypper kondensvand på apparatet�
• Brug kun de originale ltre fra Philips, der er særligt
beregnede til dette apparat� Anvend ikke andre ltre�
• Afbrænding af lteret kan forårsage alvorlig fare for
mennesker og/eller bringe andres liv i fare� Brug ikke lteret
som brændsel eller lignende formål�
• Undgå at støde mod apparatet (særligt luftindtag og -udtag)
med hårde genstande�
• Stik aldrig dine ngre eller genstande ind i luftudtaget eller
-indtaget for at undgå fysiske skader eller funktionsfejl af
apparatet�
• Brug ikke apparatet, når du har anvendt et indendørs,
rygende insektmiddel, eller på steder med olierester,
brændende røgelse eller kemiske dampe�
• Brug ikke apparatet i nærheden af gasapparater,
varmeapparater eller brændeovne/kaminer�
• Sluk altid først for luftrenseren, og fjern derefter adapteren
fra stikkontakten, når du vil ytte eller rengøre apparatet,
udskifte ltre eller udføre anden vedligeholdelse�
• Apparatet er kun beregnet til husholdningsbrug
under normale driftsforhold�
• Brug ikke apparatet i våde omgivelser eller ved høje
rumtemperaturer, f�eks� bad, toilet eller køkken, eller i et rum
med store temperaturforandringer�

15DA
Dansk
• Apparatet fjerner ikke kulilte (CO) eller radon (Rn)� Det kan
ikke bruges som en sikkerhedsenhed i tilfælde af ulykker
med forbrændingsprocesser og farlige kemikalier�
2 Din luftrenser
Tillykke med dit køb, og velkommen til Philips!
For at få fuldt udbytte af den støtte, Philips tilbyder, skal du registrere dit
produkt på www�philips�com/welcome�
Produktoversigt (g� a)
A Kontrolpanel
B Sensor til luftkvalitet
C NanoProtect-lter i 2-serien* (FY0194)
D Base
E Luftudtag
F On/o-knap
G Strømstik
H 2-benet adapterstik (KA1801A-2400750EU)
Oversigt over betjeningsknapper (g� b)
I Luftkvalitetslys
J Knap til skift af tilstand/nulstilling af lter
K Advarsel for udskiftning af lter

16 DA
3 Brug af luftrenseren
Om luftkvalitetslyset
Farven på luftkvalitetslyset svarer til den omgivende luftkvalitet�
Lysstyrken på luftkvalitetslyset afspejler den aktuelle driftstilstand�
PM2�5-niveau Luftkvalitetslysets farve Luftkvalitetsniveau
≤ 12 Blå God
13-35 Blå-lilla Middel
36-55 Lilla-rød Ringe
> 55 Rød Meget dårlig
Montering af lteret
Fjern al lterets emballage før brug�
Bemærk: Sørg for, at stikket til luftrenseren er taget ud af stikkontakten, før
lteret monteres�
1 Drej bunden mod uret for at fjerne den fra apparatet (g c)�
2 Træk lteret ud af apparatet (g d)�
3 Fjern alle emballagematerialer fra luftrenserlteret (g e)�
4 Sæt lteret tilbage i apparatet (g� f)�
5 Sæt bunden på igen, og drej den med uret for at fastgøre bunden (g g)�
Tilslutning af strøm
Bemærk: Risiko for elektrisk stød! Tag altid stikket ud af kontakten, når
netledningen skal frakobles� Træk aldrig i ledningen (g h)�
Slut strømadapteren til:
• stikket på apparatet�
• derefter stikkontakten�
Sådan tændes og slukkes apparatet
Bemærk:
• Optimal rensning af luften opnås ved at lukke døre og vinduer�
1 Tryk på tænd/slukknappen på bagsiden af luftrenseren for at tænde
apparatet�
» Luftrenseren er som standard i automatisk tilstand�
2 Tryk på Power-knappen igen for at slukke luftrenseren�

17DA
Dansk
Ændring af tilstandsindstillingen
Du kan vælge automatisk tilstand, turbotilstand eller sleep-tilstand ved at
trykke på knappen til skift af tilstand (g i)� Lysstyrken på luftkvalitetslyset
afspejler den aktuelle driftstilstand:
• Sleep-tilstand laveste lysstyrke
• Automatisk tilstand mellem lysstyrke
• Turbotilstand højeste lysstyrke
Automatisk tilstand
I automatisk tilstand vælger apparatet den blæserhastighed, der passer til
den omgivende luftkvalitet�
Turbotilstand
I Turbotilstand kører luftrenseren med den højeste hastighed�
Sleep-tilstand
I sleep-tilstand kører luftrenseren støjsvagt med lav hastighed�
4 Rengøring
Bemærk:
• Anvend aldrig slibende, aggressive eller brændbare rengøringsmidler, f�eks�
klor eller sprit, til at rengøre nogen dele af apparatet�
Rengøringsskema
Hyppighed Rengøringsmetode
Når det er
nødvendigt
Tør apparatets yderside af med en blød og fugtig klud
Rengør luftudtagsdækslet
Hver anden måned Rengør luftkvalitetssensoren med en tør vatpind
Hver fjerde uge Rengør lterets overade
Rengøring af luftrenserens kabinet
Rengør regelmæssigt luftrenseren indvendigt og udvendigt, så der ikke samler
sig støv�
1 Brug en blød, tør klud til at rengøre luftrenseren både indvendigt og udvendigt�
2 Luftafgangen kan også rengøres med en tør, blød klud�

18 DA
Rengøring af luftkvalitetssensoren
Rengør luftkvalitetssensoren hver 2� måned for optimal funktion af apparatet�
Bemærk:
• Hvis luftrenseren anvendes i støvede omgivelser, kan det være nødvendigt
at rengøre den oftere�
• Hvis luftfugtighedsniveauet i rummet er meget højt, kan der dannes
kondens på luftkvalitetssensoren, og luftkvalitetslyset kan indikere en
dårligere luftkvalitet, selvom luftkvaliteten faktisk er god� Hvis dette sker,
rengøres luftkvalitetssensoren, eller luftrenseren anvendes ved en manuel
hastighedsindstilling�
1 Sluk for luftrenseren, og tag stikket ud af stikkontakten�
2 Rengør indløb og udløb på luftkvalitetssensoren med en blød børste
(g j)�
3 Åbn luftkvalitetssensorens dæksel (g k)�
4 Rengør luftkvalitetssensoren samt støvindløb og støvudløb med en let
fugtet vatpind (g l)�
5 Tør alle dele grundigt med en tør vatpind�
6 Sæt luftkvalitetssensorens dæksel på igen (g m)�
Rengøring af lterets overade
Tør overaden af lteret med en blød, fugtig klud, eller rengør lterets
overade med en støvsuger (g n)�
Bemærk:
• Hvis du bruger en støvsuger med høj eekt eller en industristøvsuger, kan du
beskadige lteret�
5 Udskiftning af filteret
Sådan virker beskyttelseslåsen til sund luft
Apparatet er udstyret med en beskyttelseslås til sund luft, der skal sikre, at
NanoProtect-lteret er i optimal stand, når apparatet er i brug� Når lteret
er næsten opbrugt, lyser alarmen for udskiftning af lteret ( ) rødt, hvilket
angiver, at det skal udskiftes� Hvis du ikke udskifter lteret i tide, blinker
udskiftningsalarmen ( )� Apparatet holder op med at fungere og låses�
La pagina si sta caricando...
La pagina si sta caricando...
La pagina si sta caricando...
La pagina si sta caricando...
La pagina si sta caricando...
La pagina si sta caricando...
La pagina si sta caricando...
La pagina si sta caricando...
La pagina si sta caricando...
La pagina si sta caricando...
La pagina si sta caricando...
La pagina si sta caricando...
La pagina si sta caricando...
La pagina si sta caricando...
La pagina si sta caricando...
La pagina si sta caricando...
La pagina si sta caricando...
La pagina si sta caricando...
La pagina si sta caricando...
La pagina si sta caricando...
La pagina si sta caricando...
La pagina si sta caricando...
La pagina si sta caricando...
La pagina si sta caricando...
La pagina si sta caricando...
La pagina si sta caricando...
La pagina si sta caricando...
La pagina si sta caricando...
La pagina si sta caricando...
La pagina si sta caricando...
La pagina si sta caricando...
La pagina si sta caricando...
La pagina si sta caricando...
La pagina si sta caricando...
La pagina si sta caricando...
La pagina si sta caricando...
La pagina si sta caricando...
La pagina si sta caricando...
La pagina si sta caricando...
La pagina si sta caricando...
La pagina si sta caricando...
La pagina si sta caricando...
La pagina si sta caricando...
La pagina si sta caricando...
La pagina si sta caricando...
La pagina si sta caricando...
La pagina si sta caricando...
La pagina si sta caricando...
La pagina si sta caricando...
La pagina si sta caricando...
La pagina si sta caricando...
La pagina si sta caricando...
La pagina si sta caricando...
La pagina si sta caricando...
La pagina si sta caricando...
La pagina si sta caricando...
La pagina si sta caricando...
La pagina si sta caricando...
La pagina si sta caricando...
La pagina si sta caricando...
La pagina si sta caricando...
La pagina si sta caricando...
La pagina si sta caricando...
La pagina si sta caricando...
La pagina si sta caricando...
La pagina si sta caricando...
La pagina si sta caricando...
La pagina si sta caricando...
La pagina si sta caricando...
La pagina si sta caricando...
La pagina si sta caricando...
La pagina si sta caricando...
La pagina si sta caricando...
La pagina si sta caricando...
La pagina si sta caricando...
La pagina si sta caricando...
La pagina si sta caricando...
La pagina si sta caricando...
La pagina si sta caricando...
La pagina si sta caricando...
La pagina si sta caricando...
La pagina si sta caricando...
La pagina si sta caricando...
La pagina si sta caricando...
La pagina si sta caricando...
La pagina si sta caricando...
La pagina si sta caricando...
La pagina si sta caricando...
La pagina si sta caricando...
La pagina si sta caricando...
La pagina si sta caricando...
La pagina si sta caricando...
La pagina si sta caricando...
La pagina si sta caricando...
La pagina si sta caricando...
La pagina si sta caricando...
La pagina si sta caricando...
La pagina si sta caricando...
-
 1
1
-
 2
2
-
 3
3
-
 4
4
-
 5
5
-
 6
6
-
 7
7
-
 8
8
-
 9
9
-
 10
10
-
 11
11
-
 12
12
-
 13
13
-
 14
14
-
 15
15
-
 16
16
-
 17
17
-
 18
18
-
 19
19
-
 20
20
-
 21
21
-
 22
22
-
 23
23
-
 24
24
-
 25
25
-
 26
26
-
 27
27
-
 28
28
-
 29
29
-
 30
30
-
 31
31
-
 32
32
-
 33
33
-
 34
34
-
 35
35
-
 36
36
-
 37
37
-
 38
38
-
 39
39
-
 40
40
-
 41
41
-
 42
42
-
 43
43
-
 44
44
-
 45
45
-
 46
46
-
 47
47
-
 48
48
-
 49
49
-
 50
50
-
 51
51
-
 52
52
-
 53
53
-
 54
54
-
 55
55
-
 56
56
-
 57
57
-
 58
58
-
 59
59
-
 60
60
-
 61
61
-
 62
62
-
 63
63
-
 64
64
-
 65
65
-
 66
66
-
 67
67
-
 68
68
-
 69
69
-
 70
70
-
 71
71
-
 72
72
-
 73
73
-
 74
74
-
 75
75
-
 76
76
-
 77
77
-
 78
78
-
 79
79
-
 80
80
-
 81
81
-
 82
82
-
 83
83
-
 84
84
-
 85
85
-
 86
86
-
 87
87
-
 88
88
-
 89
89
-
 90
90
-
 91
91
-
 92
92
-
 93
93
-
 94
94
-
 95
95
-
 96
96
-
 97
97
-
 98
98
-
 99
99
-
 100
100
-
 101
101
-
 102
102
-
 103
103
-
 104
104
-
 105
105
-
 106
106
-
 107
107
-
 108
108
-
 109
109
-
 110
110
-
 111
111
-
 112
112
-
 113
113
-
 114
114
-
 115
115
-
 116
116
-
 117
117
-
 118
118


Philips 800 SERIE Manuale utente
- Categoria
- Purificatori d'aria
- Tipo
- Manuale utente
in altre lingue
- français: Philips 800 SERIE Manuel utilisateur
- español: Philips 800 SERIE Manual de usuario
- Deutsch: Philips 800 SERIE Benutzerhandbuch
- Nederlands: Philips 800 SERIE Handleiding
- dansk: Philips 800 SERIE Brugermanual
- svenska: Philips 800 SERIE Användarmanual
Documenti correlati
-
Philips AC0819 Manuale utente
-
Philips AC4550/10R1 Manuale utente
-
Philips AC5659/10 Manuale utente
-
-
-
Philips AC2887/10 Manuale utente
-
Philips AC3033 Series 3000i Manuale utente
-
-
Philips AC0820/10 Guida Rapida
-