
CV211 Laptop USB KVM Console Crash Cart Adapter
VM0808HA 8 x 8 4K HDMI Matrix Switch Quick Start Guide
A
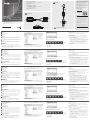
Overview
1
USB Mini B Port
2
USB Type A Connector
3
VGA Connector
4
Cable Clip
B
Setup
1
Connect one end of the USB cable (included with this package) to
the USB port of a laptop, and the other end to the USB port on the
CV211.
2
Connect the CV211’s USB cable to a USB port on the remote computer.
3
Connect the CV211’s VGA cable to a VGA port on the remote
computer.
4
When the two computers are connected the CV211’s Blue LED will
light and a Removable Disk will be installed on the laptop.
C
Operation
Connecting
To connect to the computer from the laptop, do the following:
1. When the CV211 is connected to the laptop, a USB device will install
and a new Removable Disk drive will appear.
Note: If the Removable Disk doesn’t appear check the cable connection
between the CV211 and laptop.
2. Open a fi le explorer window, click on the Removable Disk, and then
double click WinClient.exe.
Note: The WinClient.exe is a read-only fi le but it can be copy and
pasted to the desktop of the laptop.
3. When the WinClient opens it will search for the computer and then
open a remote desktop window once a connection is established.
Note: If the computer can’t be found, check the cable connections and
click Enumerate.
Remote Desktop Toolbar
The WinClient interface provides a convenient toolbar which is hidden at
the top center of the remote desktop window and becomes visible when
you mouse over it. The toolbar provides the following functions:
1. Screen Capture
2. Video Capture
3. On-Screen Keyboard
4. Mouse Pointer*
B
CV211 Package Contents
1 CV211 Laptop USB KVM Console Crash Cart Adapter
1 USB Type A to USB Mini-B Cable
1 User Instructions
CV211CP Package Contents
1 CV211 Laptop USB KVM Console Crash Cart Adapter
1 VC925 DisplayPort to VGA Adapter
1 VC810 HDMI to VGA Adapter
1 USB Type A to USB Mini-B Cable
1 User Instructions
Setup
© Copyright 2019 ATEN
®
International Co., Ltd.
ATEN and the ATEN logo are trademarks of ATEN International Co., Ltd. All rights reserved. All
other trademarks are the property of their respective owners.
Part No. PAPE-1223-G31G Printing Date: 05/2019
Laptop USB KVM Console Crash Cart Adapter
Quick Start Guide
CV211
Adaptateur chariot de sécurité console KVM USB pour ordinateur portable CV211
www.aten.com
Laptop USB KVM Konsole Crash Cart Adapter CV211
www.aten.com
Adaptador para carrito de emergencia de consola KVM USB para ordenador portátil CV211
www.aten.com
Adattatore crash cart console KVM USB per laptop CV211
www.aten.com
Support and Documentation Notice
All information, documentation, fi rmware,
software utilities, and specifi cations
contained in this package are subject to
change without prior notifi cation by
the manufacturer.
To reduce the environmental impact of our
products, ATEN documentation and software
can be found online at
http://www.aten.com/download/
Technical Support
www.aten.com/support
이 기기는 업무용(A급) 전자파적합기기로서 판매자 또는
사용자는 이 점을 주의하시기 바라며, 가정외의 지역에
서 사용하는 것을 목적으로 합니다.
EMC Information
FEDERAL COMMUNICATIONS COMMISSION INTERFERENCE
STATEMENT:
This equipment has been tested and found to comply with the limits
for a Class A digital device, pursuant to Part 15 of the FCC Rules.
These limits are designed to provide reasonable protection against
harmful interference when the equipment is operated in a commercial
environment. This equipment generates, uses, and can radiate radio
frequency energy and, if not installed and used in accordance with
the instruction manual, may cause harmful interference to radio
communications. Operation of this equipment in a residential area
is likely to cause harmful interference in which case the user will be
required to correct the interference at his own expense.
FCC Caution: Any changes or modifi cations not expressly approved by
the party responsible for compliance could void the user's authority to
operate this equipment.
Warning: Operation of this equipment in a residential environment
could cause radio interference
This device complies with Part 15 of the FCC Rules. Operation is subject
to the following two conditions:(1) this device mat not cause harmful
interference, and(2) this device must accept any interference received,
including interference that may cause undesired operation.
Scan for
more information
5. Zoom
6. Confi guration Menu
*Note: If the mouse pointer gets stuck in the remote desktop window,
press [F4] [F5] on the keyboard to show the local cursor.
Firmware Upgrade
To upgrade the fi rmware, download the CV211 fi rmware upgrade
package from our website: (www.aten.com) and do the following:
1. From the remote desktop toolbar, select the Confi guration Menu.
2. Click Firmware Upgrade.
3. Click Browse to choose the fi rmware upgrade fi le.
• If you enable Check Firmware Version, the current fi rmware level is
compared with that of the upgrade fi le. If the current version is equal
to or higher than the upgrade version, a popup message appears, to
inform you of the situation and stops the upgrade procedure.
• If you don’t enable Check Firmware Version, the upgrade fi le is
installed without checking what the fi rmware version is.
4. Click Upgrade.
5. After the upgrade is complete the remote desktop window will close.
4
1
2
3
CV211
1
2 3
A
Vue d'ensemble
1
Port USB Mini B
2
Connecteur USB Type A
3
Connecteur VGA
4
Attache de câble
B
Confi guration
1
Connectez une extrémité du câble USB (inclus avec cet ensemble) au
port USB d’un ordinateur portable, et l’autre extrémité au port USB
du CV211.
2
Connectez le câble USB du CV211 à un port USB de l’ordinateur
distant.
3
Connectez le câble VGA du CV211 à un port VGA de l’ordinateur
distant.
4
Lorsque les deux ordinateurs sont connectés, la LED bleue du CV211
s’allume et un disque amovible est installé sur l’ordinateur portable.
C
Fonctionnement
Connexion
Pour se connecter à l’ordinateur depuis l’ordinateur portable, faites ce
qui suit :
1. Lorsque le CV211 est connecté à l’ordinateur portable, un appareil
USB s’installe et un nouveau lecteur de disque amovible apparaît.
Remarque : Si le disque amovible n’apparaît pas, vérifi ez la connexion du
câble entre le CV211 et l’ordinateur portable.
2. Ouvrez une fenêtre d’explorateur de fi chiers, cliquez sur le disque
amovible, puis double-cliquez sur WinClient.exe.
Remarque : WinClient.exe est un fi chier en lecture seule mais il peut être
copié et collé sur le bureau de l’ordinateur portable.
3. Lorsque WinClient s’ouvre, il recherche l’ordinateur puis ouvre une fenêtre
du bureau à distance une fois une connexion établie.
Remarque : Si l’ordinateur n’est pas trouvé, vérifi ez les connexions du
câble et cliquez sur Énumérer.
Barre d'outils Bureau à distance
L’interface WinClient propose une barre d’outils pratique qui est masquée au
centre de la partie supérieure de la fenêtre du bureau à distance et devient
visible lorsque vous passez la souris au-dessus. La barre d’outils procure les
fonctions suivantes :
1. Capture d’écran
2. Capture vidéo
3. Clavier à l’écran
4. Pointeur de souris*
5. Zoom
6. Menu Confi guration
*Remarque :
Si le pointeur de la souris est bloqué dans la fenêtre du
bureau à distance, appuyez sur [F4] [F5] sur le clavier pour
affi cher le curseur local .
Mise à niveau du fi rmware
Pour mettre à niveau le fi rmware, téléchargez le paquetage de mise à
niveau du fi rmware du CV211 depuis notre site Web : (www.aten.com) et
faites ce qui suit :
1.
Depuis la barre d’outils Bureau à distance, sélectionnez le menu Confi guration.
2. Cliquez sur Mise à niveau du fi rmware.
3.
Cliquez sur Parcourir pour choisir le fi chier de mise à niveau du fi rmware.
• Si vous activez Vérifi er la version du fi rmware, le niveau du fi rmware
actuel est comparé avec celui du fi chier de mise à niveau. SI la
version actuelle est supérieure ou égale à la version mise à niveau,
un message contextuel apparaît pour vous informer de la situation et
arrête la procédure de mise à niveau
• Si vous n’activez pas Vérifi er la version du fi rmware, le fi chier de mise
à niveau est installé sans vérifi er quelle est la version du fi rmware.
4. Cliquez sur Mettre à niveau.
5.
Une fois la mise à niveau terminée, la fenêtre du bureau à distance se ferme.
A
Übersicht
1
USB-Mini-B-Port
2
USB-Typ-A-Anschluss
3
VGA-Anschluss
4
Kabelklemme
B
Einrichtung
1
Verbinden Sie ein Ende des USB-Kabels (im Lieferumfang enthalten)
mit dem USB-Port eines Laptops und das andere Ende mit dem USB-
Port am CV211.
2
Verbinden Sie das USB-Kabel des CV211 mit dem USB-Port an einem
externen Computer.
3
Verbinden Sie das VGA-Kabel des CV211 mit dem VGA-Port an
einem externen Computer.
4
Wenn die beiden Computer verbunden sind, leuchtet die blaue LED
des CV211 und ein Wechseldatenträger wird am Laptop installiert.
C
Bedienung
Verbindung
Gehen Sie zur Verbindung von Computer und Laptop wie folgt vor:
1. Wenn der CV211 mit dem Laptop verbunden ist, wird ein USB-Gerät
installiert und ein neuer Wechseldatenträger erscheint.
Hinweis: Falls kein Wechseldatenträger erscheint, prüfen Sie den
Kabelanschluss zwischen CV211 und Laptop.
2. Öffnen Sie den Explorer, klicken Sie auf den Wechseldatenträger und
doppelklicken Sie dann auf WinClient.exe.
Hinweis: Die Datei WinClient.exe ist schreibgeschützt, kann aber
kopiert und auf dem Desktop des Laptops eingefügt werden.
3. Wenn sich WinClient öffnet, sucht es nach dem Computer und öffnet
dann ein Remote-Desktop-Fenster, sobald die Verbindung hergestellt ist.
Hinweis: Falls der Computer nicht gefunden werden kann, prüfen Sie
die Kabelanschlüsse und klicken Sie auf Aufzählen.
Remote-Desktop-Werkzeugleiste
Die WinClient-Schnittstelle bietet eine komfortable Werkzeugleiste, die
oben in der Mitte des Remote-Desktop-Fensters ausgeblendet ist und
sich Auswahl mit dem Mauszeiger einblendet. Die Werkzeugleiste bietet
folgende Funktionen:
1. Bildschirmaufnahme
2. Videoaufnahme
3. Bildschirmtastatur
4. Mauszeiger*
5. Zoom
6. Konfi gurationsmenü
* Hinweis:
Falls der Mauszeiger im Remote-Desktop-Fenster hängt, drücken
Sie zur Anzeige des lokalen Cursors [F4] [F5] an der Tastatur.
Firmware-Aktualisierung
Laden Sie zur Firmware-Aktualisierung das CV211-Firmware-
Aktualisierungspaket von unserer Webseite herunter (www.aten.com) und
gehen Sie wie folgt vor:
1. Wählen Sie über die Remote-Desktop-Werkzeugleiste das
Konfi gurationsmenü.
2. Klicken Sie auf Firmware-Aktualisierung.
3.
Klicken Sie zur Auswahl der Firmware-Aktualisierungsdatei auf Durchsuchen.
• Wenn Sie Firmware-Version prüfen aktivieren, wird die aktuelle
Firmware-Version mit der Version der Aktualisierungsdatei
verglichen. Falls die aktuelle Version identisch oder aktueller als
die Aktualisierungsversion ist, werden Sie durch Einblendung einer
Mitteilung darüber informiert und die Aktualisierung stoppt.
• Wenn Sie Firmware-Version prüfen nicht aktivieren, wird die
Aktualisierungsdatei ohne Prüfung der Firmware-Version installiert.
4.
Klicken Sie auf Aktualisieren
.
5.
Nach Abschluss der Aktualisierung schließt sich das Remote-Desktop-Fenster.
A
Descrizione
1
Porta USB mini B
2
Connettore USB tipo A
3
Connettore VGA
4
Fermacavo
B
Impostazione
1
Collegare un’estremità del cavo USB (in dotazione con la confezione)
alla porta USB di un notebook e l’altra estremità alla porta USB del
CV211.
2
Collegare il cavo USB del CV211 ad una porta USB del computer
remoto.
3
Collegare il cavo VGA del CV211 ad una porta VGA del computer
remoto.
4
Quando sono collegati i due computer, il LED blu del CV211 si
illumina e sul notebook viene installato un disco rimovibile.
C
Funzionamento
Collegamento
Per il collegamento al computer dal notebook, agire come segue:
1. Quando il CV211 è collegato al notebook, viene installato un
dispositivo USB e viene visualizzato un nuovo disco rimovibile.
Nota: Se il disco rimovibile non viene visualizzato, controllare il
collegamento del cavo tra il CV211 e il notebook.
2. Aprire una fi nestra di Esplora fi le, fare clic sul disco rimovibile, quindi
fare doppio clic su WinClient.exe.
Nota: WinClient.exe è un fi le di sola lettura, ma può essere copiato e
incollato sul desktop del notebook.
3. Quando WinClient lo apre, cerca il computer, quindi apre una fi nestra di
desktop remoto una volta stabilita una connessione.
Nota: Se non si trova il cmputer, controllare il collegamento dei cavi e fare
clic su Enumera.
Barra degli strumenti del desktop remoto
L’interfaccia WinClient fornisce una comoda barra degli strumenti nascosta
sulla parte superiore centrale della fi nestra del desktop remoto e diventa
visibile quando si passa il mouse su di essa. La barra degli strumenti fornisce
le seguenti funzioni:
1. Acquisizione della schermata
2. Acquisizione video
3. Tastiera su schermo
4. Puntatore del mouse*
5. Zoom
6. Menu di confi gurazione
*Nota: Se il puntatore del mouse si blocca nella fi nestra del desktop
remoto, premere [F4] [F5] sulla tastiera per mostrare il cursore
locale.
Aggiornamento fi rmware
Per aggiornare il fi rmware, scaricare il pacchetto di aggiornamento del
fi rmware CV211 dal nostro sito web: (www.aten.com) e agire come segue:
1. Dalla barra degli strumenti del desktop remoto, selezionare il menu di
confi gurazione.
2. Fare clic su Aggiornamento fi rmware.
3. Fare clic su Sfoglia per selezionare il fi le di aggiornamento del fi rmware.
• Se si abilita Controlla versione fi rmware, il livello di fi rmware attuale
viene confrontato con quello del fi le di aggiornamento. Se la versione
attuale è uguale o superiore alla versione di aggiornamento, viene
visualizzato un messaggio popup per informare l’utente della
situazione e arresta la procedura di aggiornamento.
• Se non si abilita Controlla versione fi rmware, il fi le di aggiornamento
viene installato senza controllare la versione fi rmware.
4. Fare clic su Aggiorna.
5.
Al termine dell’aggiornamento, la fi nestra del desktop remoto si chiude.
A
Información general
1
Puerto USB Mini B
2
Conector USB Tipo A
3
Conector VGA
4
Pinza para cable
B
Confi guración
1
Conecte un extremo del cable USB (incluido en este paquete) al
puerto USB de un PC portátil, y el otro extremo al puerto USB del
CV211.
2
Conecte el cable USB del CV211 a un puerto USB en el equipo remoto.
3
Conecte el cable VGA del CV211 a un puerto VGA en el equipo
remoto.
4
Cuando los dos equipos están conectados el LED azul del CV211 se
encenderá y un disco extraíble será instalado en el PC portátil.
C
Funcionamiento
Conectar
Para conectar con el equipo desde el PC portátil, haga lo siguiente:
1. Cuando el CV211 está conectado al PC portátil, un dispositivo USB se
instalará y aparecerá una nueva unidad de disco extraíble.
Nota: Si no aparece el disco extraíble, compruebe la conexión del
cable entre el CV211 y el PC portátil.
2. Abra en una ventana el explorador de archivos, haga clic en el disco
extraíble, y luego haga doble clic en WinClient.exe.
Nota: El WinClient.exe es un archivo solo de lectura, pero puede ser
copiado y pegado al escritorio del PC portátil.
3. Cuando el WinClient abre buscará el PC y abrirá una ventana de
escritorio remoto una vez que se establezca una conexión.
Nota: Si el PC no se puede encontrar, compruebe las conexiones de cable
y haga clic en Enumerar.
Barra de herramientas de escritorio remoto
La interfaz WinClient proporciona una cómoda barra de herramientas que
está oculta en el centro superior de la ventana de escritorio remoto y se hace
visible cuando se pasa el ratón sobre ella. La barra de herramientas ofrece las
siguientes funciones:
1. Captura de pantalla
2. Captura de vídeo
3. Teclado en pantalla
4. Puntero del ratón*
5. Zoom
6. Menú de confi guración
*Nota:
Si el puntero del ratón se queda atascado en la ventana del
escritorio remoto, presione [F4] [F5] en el teclado para mostrar el
cursor local.
Actualización de fi rmware
Para actualizar el fi rmware, descargue el paquete de actualización de
fi rmware del CV211 desde nuestro sitio web: (www.aten.com) y haga lo
siguiente:
2. Haga clic en Actualización de Firmware.
3. Haga clic en Examinar para seleccionar el archivo de actualización del
fi rmware.
3. Fare clic su Sfoglia per selezionare il fi le di aggiornamento del fi rmware.
• Si habilita la comprobación de versión de fi rmware, la versión actual
del fi rmware se comparará con la del archivo de actualización. Si
la versión actual es igual o mayor que la versión de actualización,
aparece un mensaje emergente para informarle de la situación y se
detiene el proceso de actualización.
• Si no se habilita la comprobación de versión de fi rmware, el archivo
de actualización se instalará sin comprobar cuál es la versión del
fi rmware.
4. Haga clic en Actualización.
5. Después de que la actualización se ha completado, la ventana de
escritorio remoto se cerrará.
To prevent damage to your installation from power
surges or static electricity, it is important that all
connected devices are properly grounded.
www.aten.com
A
Overview
La pagina si sta caricando...
-
 1
1
-
 2
2


in altre lingue
- English: ATEN CV211 Quick start guide
- français: ATEN CV211 Guide de démarrage rapide
- español: ATEN CV211 Guía de inicio rápido
- Deutsch: ATEN CV211 Schnellstartanleitung
- русский: ATEN CV211 Инструкция по началу работы
- português: ATEN CV211 Guia rápido
- 日本語: ATEN CV211 クイックスタートガイド
Documenti correlati
-
ATEN CV211KIT01 Guida Rapida
-
ATEN KL1108V Guida Rapida
-
-
ATEN CS661 Guida Rapida
-
-
ATEN CN8000A Guida Rapida
-
ATEN USB DVI Dual View Cat 5 KVM Extender (1024 x 768@60m) Guida Rapida
-
ATEN CE610 Guida Rapida
-
ATEN KN1000A Guida Rapida
-
ATEN CE620 Guida Rapida