
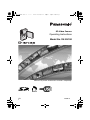
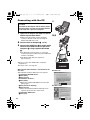
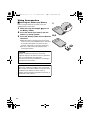
SD Video Camera
Operating Instructions
Model No. SV-AV100
Before use, please read these instructions completely.
VQT0F71
EN
AV100PAL.book 1 ページ 2003年9月4日 木曜日 午前10時35分

O
Before opening the CD-ROM package, please read the following.
båÇ=rëÉê=iáÅÉåëÉ=^ÖêÉÉãÉåí
You (“Licensee”) are granted a license for the Software defined in this End User License Agreement
(“Agreement”) on condition that you agree to the terms and conditions of this Agreement. If Licensee does
not agree to the terms and conditions of this Agreement, promptly return the Software to Matsushita
Electric Industrial Co., Ltd. (“Matsushita”), its distributors or dealers from which you made the purchase.
Article 1 License
Licensee is granted the right to use the Software, including the information recorded or described on the
CD-ROM, instruction manuals, and any other media provided to Licensee (collectively “Software”), but all
applicable rights to patents, copyrights, trademarks and trade secrets in the Software are not transferred
to Licensee.
Article 2 Use by a Third Party
Licensee may not use, copy, modify, transfer or allow any third party, whether free of charge or not, to use,
copy or modify the Software, except as expressly provided for in this Agreement.
Article 3 Restrictions on Copying the Software
Licensee may make a single copy of the Software in whole or in part solely for back-up purpose.
Article 4 Computer
Licensee may use the Software only on one computer, and may not use it on more than one computer.
Article 5 Reverse Engineering, Decompiling or Disassembly
Licensee may not reverse engineer, decompile, or disassemble the Software, except to the extent either
of them is permitted under law or regulation of the country where Licensee resides. Matsushita, or its
distributors will not be responsible for any defects in the Software or damage to Licensee caused by
Licensee’s reverse engineering, decompiling, or disassembly of the Software.
Article 6 Indemnification
The Software is provided “AS-IS” without warranty of any kind, either expressed or implied, including, but
not limited to, warranties of non-infringement, merchantability and/or fitness for a particular purpose.
Further, Matsushita does not warrant that the operation of the Software will be uninterrupted or error free.
Matsushita or any of its distributors will not be liable for any damage suffered by Licensee arising from or
in connection with Licensee’s use of the Software.
Article 7 Export Control
Licensee agrees not to export or re-export to any country the Software in any form without the appropriate
export licenses under regulations of the country where Licensee resides, if necessary.
Article 8 Termination of License
The right granted to Licensee hereunder will be automatically terminated if Licensee contravenes any of
the terms and conditions of this Agreement. Upon termination hereof, Licensee must destroy the Software
and related documentation together with all the copies thereof at Licensee’s own expense.
AV100PAL.book 2 ページ 2003年9月4日 木曜日 午前10時35分

P
`çåíÉåíë
End User License Agreement ...................2
Information for Your Safety........................4
Introduction ...............................................5
mêÉé~ê~íáçå
Standard Accessories ...............................6
Optional Accessory ...................................7
Controls and Components ........................8
Power Supply ..........................................10
Fitting the Camera on the AV Cradle ......11
Inserting a Memory Card ........................12
Using the LCD Monitor............................13
Turn the Power On/Selecting
Operation Modes ...................................15
Using the Menu Screen...........................16
List of Menus...........................................17
Setting Date and Time ............................20
Adjusting Brightness and
Colour Level on the LCD Monitor...........22
_~ëáÅ=cìåÅíáçåë
Before Recording operation ....................23
Clean Up Function ..................................24
Recording Moving Pictures
(MPEG2)................................................25
Recording Moving Pictures
(MPEG4)................................................26
Playing Back Moving Pictures
(MPEG2)................................................27
Playing Back Moving Pictures
(MPEG4)................................................28
Adjusting the Volume ..............................29
Recording Still Pictures...........................30
Playing back Still Pictures .......................31
Play Back All of the Still Pictures
One by One (Slide Show) ......................32
^Çî~åÅÉÇ=cìåÅíáçåë
Zoom In/Out Functions............................33
Backlight Compensation Function...........33
Adjusting White Balance .........................34
Manual Exposure Adjustment .................35
Manual Focus Adjustment.......................35
Recording in Special Situations
(Program AE).........................................36
Image Stabilizer Function........................37
Wind Noise Reduction Function..............37
Using the Play Menu Functions...............38
Playing Back on an external device.........52
Storing on the PC....................................53
Using the DVD Video Recorder
with a Hard Disk.....................................54
lå=~=mÉêëçå~ä=`çãéìíÉê
About the supplied software....................55
USB Driver ..............................................56
MediaStage for AV100 ............................57
Installing MediaStage & USB Driver .......58
Installing USB Driver ...............................59
Connecting with the PC...........................60
Starting the Software...............................61
Disconnecting the USB Cable safely.......61
If you no longer need software
(Uninstall)...............................................61
Constructing a Folder when
the Memory Card is used with a PC ......62
líÜÉêë
Charge the built-in battery for
maintaining the date information............63
Using the Optional Earphones ................63
Using Accessories...................................64
After Use .................................................66
Indications (Recording Mode) .................67
Indications (Playback Mode) ...................69
Notes & Precautions ...............................72
Notes and Hints.......................................75
Before Requesting Service .....................83
Specifications ..........................................86
AV100PAL.book 3 ページ 2003年9月4日 木曜日 午前10時35分

Q
Dear Customer,
We would like to take this opportunity to
thank you for purchasing this Panasonic SD
Video Camera. Please read these
Operating Instructions carefully and keep
them handy for future reference.
fåÑçêã~íáçå=Ñçê=vçìê=
p~ÑÉíó
IMPORTANT
Please respect all copyrights.
Whatever you have recorded and created
can be used for your personal
entertainment only. Under copyright
laws, other materials cannot be used
without obtaining permission from the
holders of the copyrights.
≥Injury or material damage resulting
from any kind of use that is not in
accordance with the operating
Instructions are the sole responsibility
of the user.
≥After long operation, this device can get
warm. This is not a malfunction. The
cautions label is stuck on the surface of
the SD Video Camera.
≥The manufacturer shall in no event be
liable for the loss of recordings due to
malfunction or defect of this SD Video
Camera, its accessories or Memory Card.
≥Please note that the actual controls and
components, menu items, etc. of your SD
Video Camera may look somewhat
different from those shown in the
illustrations in these Operating
Instructions.
≥ : SD logo is a trademark.
≥The SD Video Camera uses copyright-
protected technologies and is protected by
the patented technologies and intellectual
properties of Japan and the U.S. To use
these copyright-protected technologies,
authorization of the Macrovision Company
is required. It is prohibited to disassemble
or modify the SD Video Camera.
≥(l 00) indicates the page to be referred
to.
≥Note that the SD Video Camera may not
play back data recorded or created on
another product and another product may
not play back data recorded on the SD
Video Camera.
≥The nameplate of the SD Video Camera is
fixed on the bottom of the battery
compartment.
WARNING
TO REDUCE THE RISK OF FIRE OR
SHOCK HAZARD AND ANNOYING
INTERFERENCE, USE ONLY THE
RECOMMENDED ACCESSORIES AND
DO NOT EXPOSE THIS EQUIPMENT TO
RAIN OR MOISTURE. DO NOT REMOVE
THE COVER (OR BACK); THERE ARE
NOT USER SERVICEABLE PARTS
INSIDE. REFER SERVICING TO
QUALIFIED SERVICE PERSONNEL.
The SOCKET OUTLET SHALL BE
INSTALLED NEAR THE EQUIPMENT
AND SHALL BE EASILY ACCESSIBLE.
CAUTION
Danger of explosion if battery is
incorrectly replaced.
Replace only with the same or
equivalent type recommended by the
manufacturer.
Dispose of used batteries according to
the manufacturer’s instructions.
AV100PAL.book 4 ページ 2003年9月4日 木曜日 午前10時35分

R
fåíêçÇìÅíáçå
This SD Video Camera can record MPEG2/MPEG4
moving pictures and still pictures. Additionally, using
the viewer software, MediaStage for AV100 (supplied
accessory), the MPEG2/MPEG4 moving pictures data
can be edited on the personal computer.
ª Charging the Battery
Be sure to charge the supplied battery before use.
≥Refer to Page 10 for the procedures to attach and
charge the battery.
ª Clock setting
When you purchase the SD Video Camera, the
clock setting has not been performed. To start,
please set the year, month, date and time. (l 20)
AV100PAL.book 5 ページ 2003年9月4日 木曜日 午前10時35分

S
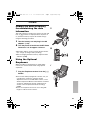
mêÉé~ê~íáçå
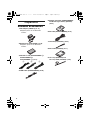
pí~åÇ~êÇ=^ÅÅÉëëçêáÉë
1 AC Adaptor (VSK0617) (l 11)
≥Supplies power to the SD Video
Camera.
2 Battery Pack (CGA-S302E) (l 10)
≥Supplies power to the SD Video
Camera.
3 AC Mains Lead (K2CR2DA00004
A/
K2CA2CA00020
B/
K2CJ2DA00002
C) (l 11)
4 USB Cable (K2KZ4CB00002) (l 60)
5 Remote Controller (N2QACC000005)
and Button-Type-Battery (CR2025)
(l 65)
6 AV Cable (K2KC4CB00009) (l 52)
7 Hand Strap (VFC4012) (l 65)
8 AV Cradle (VSK0654) (l 11)
9 Lens Cap (VGQ7448) and
Lens Cap Cord (VFC4035) (l 65)
ABC
AV100PAL.book 6 ページ 2003年9月4日 木曜日 午前10時35分

T
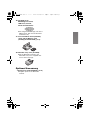
10 CD-ROM (l 55)
MediaStage for AV100,
USB Driver, DirectX,
Adobe Acrobat Reader
≥For using the MediaStage, refer to the
PDF manual. This manual describes
installation only.
11 Card Case/Movie Stand (VFC4032)
(l 66) and SD Memory Card
(512 MB) (RP-SDH512VE0) (l 12)
12 Wearable Carry Case (VFC4020)
≥Put the SD Video Camera in the
Wearable Carry Case supplied after
use or when carrying it.
léíáçå~ä=^ÅÅÉëëçêó
1 Battery Pack (CGA-S302E/1B) (l 10)
≥Supplies power to the SD Video
Camera.
512
AV100PAL.book 7 ページ 2003年9月4日 木曜日 午前10時35分

U
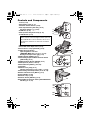
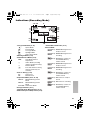
`çåíêçäë=~åÇ=`çãéçåÉåíë
1 Lens (l 73)
2 Recording Lamp (l 17)
3 Remote Control Sensor (l 65)
4 AV Output Socket [A/V OUT] (l 52)
Earphone Socket [ ] (l 63)
5 USB Port (l 60)
6 DC Input Socket [DC IN 4.9V] (l 10)
7 LCD Monitor (l 13)
8 Memory Card Slot (l 12)
9 Card Slot Cover Open Lever (l 12)
10 Card Access Lamp [ACCESS] (l 76)
11 Multi-function Button
Operating/Select Function
[6/;/5/∫/1 SET] (l 16, 27, 31, 32)
Backlight Compensation [
ª] (l 33)
12 Menu Button [MENU] (l 16)
13 Recording/Playback Mode Selector Button
[REC/PLAY] (l 15)
14 Mode Selector Button [MODE] (l 15)
15 Microphone (built-in, stereo)
16 Reset Button [RESET] (l21, 84)
17 Speaker
18 Zoom Lever [T/W] (l 33)
Volume Adjustment Lever [rVOLs] (l 29)
19 Recording Start/Stop Button (l 25, 26, 30)
20 AV Cradle Connector [MULTI] (l 11)
21 Strap Holder (l 65)
22 Power Lamp (l 10)
23 Power Switch [ON/OFF] (l 15)
24 Auto/Manual Selector Switch [AUTO/MANUAL/
SELECT] (l 34, 35)
Due to limitations in LCD production technology,
there may be some tiny bright or dark spots on
the LCD Monitor screen. However, this is not a
malfunction and does not affect the recorded
picture.
1
2
3
4
5
6
7
11
12
13
14
8
9
10
17
18
19
21
23
22
24
20
16
15
Í
AV100PAL.book 8 ページ 2003年9月4日 木曜日 午前10時35分

V
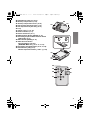
25 White Balance Sensor (l 34)
26 Battery Compartment (l 10)
27 Battery Compartment Cover (l 10)
28 DC Input Socket [DC IN 4.9V] (l 11)
29 AV Output Socket [A/V OUT] (l 52)
30 Tray
31 Power Lamp [Í] (l 10)
32 Release Button (l 11)
33 Device Connector (l 11)
34 Mode Selector Button [MODE] (l 15)
35 Recording/Playback Mode Selector Button
[REC/PLAY] (l 15)
36 Menu Button [MENU] (l 16)
37 Multi-function Button
Operating/Select Function
[6/;/5/∫/1 SET] (l 16, 27, 31, 32)
38 Recording Start/Stop Button (l 25, 26, 30)
39 Zoom Button [T/W] (l 33)
Volume Adjustment Button [rVOLs] (l 29)
25
26
27
30
31
32
33
35
34
36
37
38
39
28 29
AV100PAL.book 9 ページ 2003年9月4日 木曜日 午前10時35分

NM
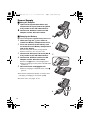
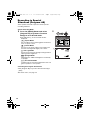
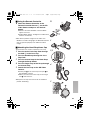
mçïÉê=pìééäó
ª Using AC Adaptor
N Open the DC Input Socket Cover and
connect the DC Input Lead to the [DC IN
4.9V] socket on the SD Video Camera.
O Connect the AC Mains Lead to the AC
Adaptor and the AC mains socket.
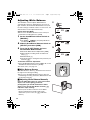
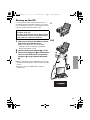
ª Charging the Battery
Be sure to charge the supplied battery before use.
1 While pressing the A part, slide it to
remove the Battery Compartment Cover.
2 Press the terminals of the battery onto
the terminals of the Battery Compartment
and set the battery.
≥Fit the battery with its label facing upward.
≥After the battery is set, close the cover.
3 Connect the DC Input Lead to the [DC IN
4.9V] socket on the SD Video Camera.
4 Connect the AC Mains Lead to the AC
Adaptor and the AC mains socket.
≥Power Lamp 1 flashes, and Charging starts.
≥When recharging, turn the power of the SD Video
Camera off.
5 Wait until Power Lamp 1 goes off.
≥When recharging is completed, Power Lamp 1
goes off.
≥If the Power Lamp flashes quickly (or slowly) when
recharging, recharging is not normal. (l 75)
≥For other notes, see pages 73, 75.
O
N
1
1
2
4
3
AV100PAL.book 10 ページ 2003年9月4日 木曜日 午前10時35分

NN
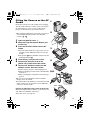
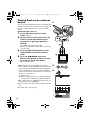
cáííáåÖ=íÜÉ=`~ãÉê~=çå=íÜÉ=^s=
`ê~ÇäÉ
Fitting the Camera on the AV Cradle eases charging.
The AV Cradle allows the Camera to be connected to
the external device, such as a TV in order for the
pictures on this Device to be viewed on the TV.
≥The charging configuration is the same as the one for
connecting the DC Input Lead to the SD Video
Camera. (l 10)
N Open the [MULTI] Cover. A
O While pressing the Release Button, pull
out the tray.
P Place the SD Video Camera on the AV
Cradle.
≥If the DC Input Socket cover B is open, it is not
possible to fit the SD Video Camera on the AV
Cradle.
≥The grooves 1 of the SD Video Camera fit in the
leading protrusions 2.
Q Push the tray until you hear it click.
R Connect the DC Input Lead to the
[DC IN 4.9V] socket on the AV Cradle.
S Connect the AC Mains Lead to the AC
Adaptor and the AC mains socket.
≥Power Lamp C flashes, and Charging starts.
≥When recharging, turn the power of the SD Video
Camera off.
≥When recharging is completed, Power Lamp
C
goes off.
≥Be sure to turn the SD Video Camera off before
fitting it on the AV Cradle.
≥If the AV Cable or AC Adaptor is connected to the SD
Video Camera, it is not possible to fit the SD Video
Camera on the AV Cradle.
Remove the SD Video Camera from the AV Cradle
While pressing the Release Button 1, pull out the tray
and remove the SD Video Camera 2.
≥For other notes, see page 76.
C
A
B
12
N
P
Q
RIS
O
1
2
AV100PAL.book 11 ページ 2003年9月4日 木曜日 午前10時35分

NO
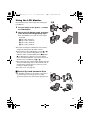
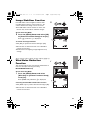
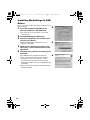
fåëÉêíáåÖ=~=jÉãçêó=`~êÇ
An SD Memory Card can be used for this SD Video
Camera.
N Open the LCD Monitor and slide the Card
Slot Cover Open Lever to open the Card
Slot Cover.
O Hold the Memory Card placing the cut off
corner
1 at the front with the label 2
facing up, and then insert it fully into the
Memory Card Slot horizontally.
≥Turn off the SD Video Camera before inserting/
removing a Card.
P Close the Card Slot Cover securely.
ª Removing the Memory Card
Open the Card Slot Cover and press the centre of
the Card
A and then pull it straight out B.
≥After removing the Card, close the Card Slot
Cover.
≥The SD Video Camera may be damaged if the
Card is forced out when the Card is fully inserted.
≥Keep the SD Memory Card out of the reach of
children to prevent swallowing.
≥For other notes, see page 76.
1
2
A
B
N
O
AV100PAL.book 12 ページ 2003年9月4日 木曜日 午前10時35分

NP
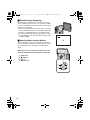
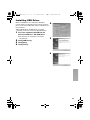
rëáåÖ=íÜÉ=i`a=jçåáíçê
Record and play the video image while viewing the
LCD Monitor.
N Put your finger on the groove 1 to open
the LCD Monitor.
O Adjust the LCD Monitor angle according
to the desired recording/playing angle.
≥The LCD Monitor can rotate up to the angles
illustrated.
1: Up to 90
° maximum
2: Up to 130
° maximum
3: Up to 140
° maximum
4: Up to 130
° maximum
≥Forcefully rotating the LCD Monitor beyond these
ranges will damage the SD Video Camera.
≥If the position of the LCD Monitor is set to 2 or 4,
when you select the Recording Mode only the
indication which is limited (REC pause [¥;], REC
[¥] or Warning [°]) appears on screen display.
If you desired the indication returned to normal, set
position of the LCD Monitor to 1 or 3.
≥The LCD image may appear slightly brighter than the
actual recorded image. This is done intentionally to
provide better visibility when the camera is used
outdoors in bright sunlight.
≥For other notes, see page 76.
ª Vertical Style and Horizontal Style
This SD Video Camera can be used in 2 way styles.
1 Vertical Style: Use mainly when recording.
2 Horizontal Style: Use mainly when playing back.
1
2
3
4
1
NIO
1
2
AV100PAL.book 13 ページ 2003年9月4日 木曜日 午前10時35分

NQ
ª Portrait Picture Recording
By opening the LCD Monitor and turning it so that it
faces forward (to the lens side), you can let the subject
in front of the SD Video Camera monitor the shot while
shooting is in progress.
≥If you set the LCD Monitor to this position, an image
on the LCD Monitor will be reversed when displayed.
However, recording images are recorded normally.
≥If a general Warning indication [°] appears, return
the LCD Monitor to the Vertical style in order to verify
contents. (l 68)
ª Using the Multi-function Button
In this SD Video Camera, the Multi-function Button is
tilted to the right to 45 degrees in order to make it easy
to do operation in both the Vertical and Horizontal
Style.
Move the cursor and selection of the item on the
display by the Multi-function Button of main unit:
A: 6 (LEFT)
B: ∫ (DOWN)
C: ; (UP)
D: 5 (RIGHT)
D
CA
B
AV100PAL.book 14 ページ 2003年9月4日 木曜日 午前10時35分

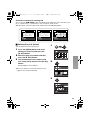
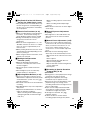
NR
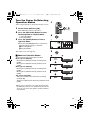
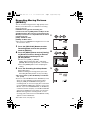
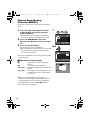
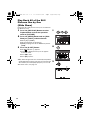
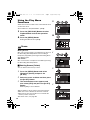
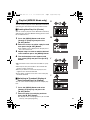
qìêå=íÜÉ=mçïÉê=låLpÉäÉÅíáåÖ=
léÉê~íáçå=jçÇÉë
Select a desired mode on the mode selection screen.
N Set the Power Switch to [ON].
≥The SD Video Camera is turned on.
O Press the [REC/PLAY] Button to select
Recording Mode or Playback Mode.
1: Recording Mode
2: Playback Mode
P Press the [MODE] Button to select a
Operation Mode.
≥Every time the [MODE] Button is pressed, the
Operation Mode changes as followed.
1: Recording Mode
2: Playback Mode
≥For other notes, see page 76.
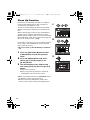
ª About the Operation Modes
Six operation modes are provided as follows.
Moving picture [MPEG2]:
Moving picture (MPEG2 format) recording mode
(l 25)
Moving picture (MPEG2 format) playback mode
(l 27)
Moving picture [MPEG4]:
Moving picture (MPEG4 format) recording mode
(l 26)
Moving picture (MPEG4 format) playback mode
(l 27)
Still picture [PICTURE]:
Still picture (JPEG format still picture) recording
mode (l 30)
Still picture (JPEG format still picture) playback mode
(l 31)
≥When you use the battery to supply the power with
the SD Video Camera, it is automatically turned off if
you leave it for more than approx. 5 minutes without
any operation.
SET/
g
SET/
SET/
SET/
SET/
O
12
P
12
Í
N
AV100PAL.book 15 ページ 2003年9月4日 木曜日 午前10時35分

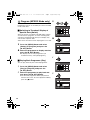
NS
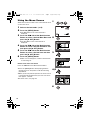
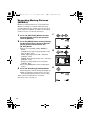
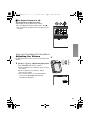
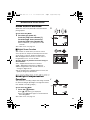
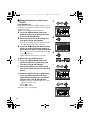
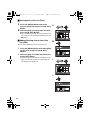
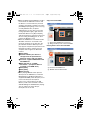
rëáåÖ=íÜÉ=jÉåì=pÅêÉÉå
Allows the functions usable in the selected mode to be
set from the menu.
N Select a desired mode. (l 15)
O Press the [MENU] Button.
≥The Main Menu in the selected mode is
displayed.
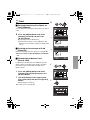
P Press the ;/∫ side of the Multi-function
Button to select a desired Main Menu and
press the [1 SET] Button.
≥The Sub-Menu in the selected mode is
displayed.
Q Press the ;/∫ side of the Multi-function
Button to select a desired Sub-Menu and
then press the [1 SET] Button.
R Press the ;/∫ side of the Multi-function
Button to select a desired item and then
press the [1 SET] Button.
S Press the [MENU] Button.
≥Menu screen disappears, and the selected item
is now being set.
Return to the menu one before
Press the 6 side of the Multi-function Button.
≥Press the [MENU] Button when playing back the
moving picture or still picture to edit the file being
played back.
≥When you do not perform operation the menu screen
is automatically disappeared if you leave it for more
than approx. 1 minute.
≥For other notes, see page 76.
g
g
SET/
Menu
g
g
SET/
Menu
g
g
SET/
Menu
g
g
P
O
QIR
S
N
AV100PAL.book 16 ページ 2003年9月4日 木曜日 午前10時35分

NT
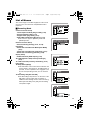
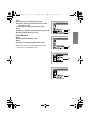
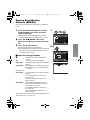
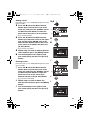
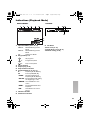
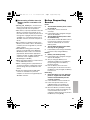
iáëí=çÑ=jÉåìë
The menu images used differ slightly from the actual
menus. These are offered for simplified illustration
purposes.
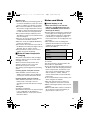
ª Recording Mode
Camera Functions Setup
1 Auto Exposure Mode [Program AE] (l 36)
2 Image Stabilizer [SIS] (l 37)
3 Digital Zoom [Dig. Zoom] (l 33)
4 Wind Noise Reduction [Wind Cut] (l 37)
≥This function appears [MPEG2] mode and
[MPEG4] mode.
Record Functions Setup
5 Picture Quality [Quality] (l 25, 26, 30)
Date Setup
6 Date and Time Indication Mode [Date Mode]
(l 21)
7 Date and Time Indication [Indication] (l 21)
8 Date and Time Setting [Date Set] (l 20)
Display Setup
9 OSD Indication [OSD Output] (l 23)
10 LCD Brightness Adjustment [LCD Bright]
(l 22)
11 LCD Colour Adjustment [LCD Colour] (l 22)
Initial Setup
12 Beep Sound [Beep]
≥This SD Video Camera will emit sound when the
power switch is changed over, the REC Button is
pressed, or other operations are engaged. If you
do not need operating sound, you can switch it
off.
13 Recording LED [Record LED]
≥The Recording Lamp which is on the front of the
SD Video Camera lights while recording, in
addition flashes during remote control receiving.
When [Record LED] set to [Off], the Recording
Lamp will not light.
13
12
g
10
11
9
g
g
1
2
3
4
5
8
6
7
AV100PAL.book 17 ページ 2003年9月4日 木曜日 午前10時35分

NU
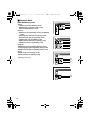
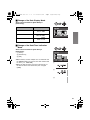
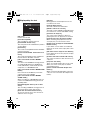
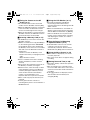
ª Playback Mode
[MPEG2/MPEG4] mode
Scene
1 Deleting a Scene [Delete] (l 38)
2 Setting the Lock [File Lock] (l 39)
3 Scene Detail [Detail] (l 39)
PlayList*
4 Selecting and switching a Play List [Switch]
(l 41)
5 Playing back the Play List [Play] (l 42)
6 Creating the Play List [Create] (l 41)
7 Editing the Play List [Edit] (l 42)
8 Edit a title of the Play List [Title] (l 44)
9 Deleting a Play List [Delete] (l 45)
Program*
10 Switching a Programme [Switch] (l 46)
11 Playing back the Programme [Play] (l 46)
12 Edit a title of the Programme [Title] (l 47)
Go To
13 Go to Top of List [Top] (l 48)
14 Go to End of List [End] (l 48)
*[MPEG2] mode only.
1
2
3
ETC.
4
5
6
7
8
9
ETC.
10
11
12
ETC.
g
ETC.
13
14
AV100PAL.book 18 ページ 2003年9月4日 木曜日 午前10時35分

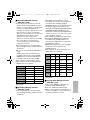
NV
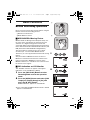
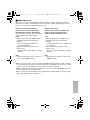
Card
15 Capacity of a Card [Capacity] (l 49)
16 Recover writing speed of the data to a Card
[Clean Up] (l 24)
17 Formatting a Card [Format Card] (l 49)
Others
18 Setting a Repeat Playback [Repeat Play] (l 50)
19 Display Mode [Display] (l 51)
[PICTURE] mode
Scene
20 Setting DPOF [DPOF] (l 40)
Others
21 Setting a Slide Show [Slide Show] (l 51)
≥The other functions of [PICTURE] mode are the
same as those of [MPEG4] mode.
18
19
ETC.
ETC.
15
16
17
20
ETC.
ETC.
21
AV100PAL.book 19 ページ 2003年9月4日 木曜日 午前10時35分

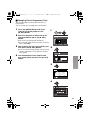
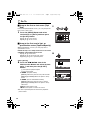
OM
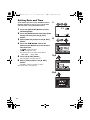
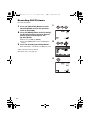
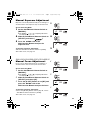
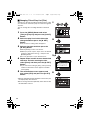
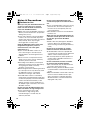
pÉííáåÖ=a~íÉ=~åÇ=qáãÉ
At the time of purchase of the SD Video Camera,
the date and time are not set. First, set the date
and time, then use the SD Video Camera.
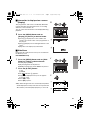
N Press the [REC/PLAY] Button to select
Recording Mode.
O Press the [MENU] Button and select [Date
Setup] and then press the [1 SET]
Button.
P Select [Date Set] and press the [1 SET]
Button.
Q Press the ;/∫/6/5 side of the
Multi-function Button to set the desired
Date and Time.
≥6/5: Select the item
≥;/∫: Change the value
≥Year will cycle in the order shown below.
2003, 2004, ..., 2079, 2003, ...
R Press the [1 SET] Button.
≥A verification message appears.
S Select [YES] and press the [1 SET]
Button.
≥If [NO] is selected, returns to step 4.
≥For other notes, see page 76.
SET/
Menu
SET/
Menu
SET/
RIS
PIQ
N
O
AV100PAL.book 20 ページ 2003年9月4日 木曜日 午前10時35分
La pagina sta caricando ...
La pagina sta caricando ...
La pagina sta caricando ...
La pagina sta caricando ...
La pagina sta caricando ...
La pagina sta caricando ...
La pagina sta caricando ...
La pagina sta caricando ...
La pagina sta caricando ...
La pagina sta caricando ...
La pagina sta caricando ...
La pagina sta caricando ...
La pagina sta caricando ...
La pagina sta caricando ...
La pagina sta caricando ...
La pagina sta caricando ...
La pagina sta caricando ...
La pagina sta caricando ...
La pagina sta caricando ...
La pagina sta caricando ...
La pagina sta caricando ...
La pagina sta caricando ...
La pagina sta caricando ...
La pagina sta caricando ...
La pagina sta caricando ...
La pagina sta caricando ...
La pagina sta caricando ...
La pagina sta caricando ...
La pagina sta caricando ...
La pagina sta caricando ...
La pagina sta caricando ...
La pagina sta caricando ...
La pagina sta caricando ...
La pagina sta caricando ...
La pagina sta caricando ...
La pagina sta caricando ...
La pagina sta caricando ...
La pagina sta caricando ...
La pagina sta caricando ...
La pagina sta caricando ...
La pagina sta caricando ...
La pagina sta caricando ...
La pagina sta caricando ...
La pagina sta caricando ...
La pagina sta caricando ...
La pagina sta caricando ...
La pagina sta caricando ...
La pagina sta caricando ...
La pagina sta caricando ...
La pagina sta caricando ...
La pagina sta caricando ...
La pagina sta caricando ...
La pagina sta caricando ...
La pagina sta caricando ...
La pagina sta caricando ...
La pagina sta caricando ...
La pagina sta caricando ...
La pagina sta caricando ...
La pagina sta caricando ...
La pagina sta caricando ...
La pagina sta caricando ...
La pagina sta caricando ...
La pagina sta caricando ...
La pagina sta caricando ...
La pagina sta caricando ...
La pagina sta caricando ...
La pagina sta caricando ...
La pagina sta caricando ...
-
 1
1
-
 2
2
-
 3
3
-
 4
4
-
 5
5
-
 6
6
-
 7
7
-
 8
8
-
 9
9
-
 10
10
-
 11
11
-
 12
12
-
 13
13
-
 14
14
-
 15
15
-
 16
16
-
 17
17
-
 18
18
-
 19
19
-
 20
20
-
 21
21
-
 22
22
-
 23
23
-
 24
24
-
 25
25
-
 26
26
-
 27
27
-
 28
28
-
 29
29
-
 30
30
-
 31
31
-
 32
32
-
 33
33
-
 34
34
-
 35
35
-
 36
36
-
 37
37
-
 38
38
-
 39
39
-
 40
40
-
 41
41
-
 42
42
-
 43
43
-
 44
44
-
 45
45
-
 46
46
-
 47
47
-
 48
48
-
 49
49
-
 50
50
-
 51
51
-
 52
52
-
 53
53
-
 54
54
-
 55
55
-
 56
56
-
 57
57
-
 58
58
-
 59
59
-
 60
60
-
 61
61
-
 62
62
-
 63
63
-
 64
64
-
 65
65
-
 66
66
-
 67
67
-
 68
68
-
 69
69
-
 70
70
-
 71
71
-
 72
72
-
 73
73
-
 74
74
-
 75
75
-
 76
76
-
 77
77
-
 78
78
-
 79
79
-
 80
80
-
 81
81
-
 82
82
-
 83
83
-
 84
84
-
 85
85
-
 86
86
-
 87
87
-
 88
88


in altre lingue
Documenti correlati
-
Panasonic SVAV100 Istruzioni per l'uso
-
-
-
-
-
-
-