
DOS281SP
DOS331SP
DOSV401SP
IT
GB
DE
FR
ES
PT
NL
ITALIANO
Istruzioni per l’istallazione, l’uso, la manutenzione
ENGLISH
Installation, use and maintenance instructions
DEUTSCH
Anweisungen für die Installation, den Gebrauch, die Wartung
FRANÇAIS
instructions pour l’installation, l’utilisation, l’entretien
ESPAÑOL
Instrucciones para la instalación, el uso, el mantenimiento
PORTUGUÊS
Instruções para instalação, utilização e manutenção
NEDERLANDS
Instructies voor installatie, gebruik, onderhoud
IT
NL

IT
GB
2
919
NORMATIVE-AVVERTENZE E CONSIGLI IMPORTANTI
STANDARDS-WARNINGS AND RECOMMENDATIONS
Si ringrazia per la scelta della macchina.
La preghiamo di leggere attentamente queste brevi note scritte per lei e
per poter utilizzare al massimo tutte le prestazioni che può ottenere
La qualità dell’apparecchio è garantita poiché ogni nostro prodotto è
controllato al 100% a fi ne produzione, con lunghe prove e con diversi
tipi di TEST. La usi e vedrà quante soddisfazioni otterrà.
Questo prodotto è conforme alle vigenti normative europee di sicurezza
relative alle apparecchiature elettriche.
E’ stato sottoposto a lunghe prove e meticolosi test per valutarne la sicurezza
e l’affi dabilità.
Prima di utilizzare l’apparecchio, leggere attentamente questo manuale, in
modo da sapere esattamente cosa fare e cosa non fare.
Un uso inappropriato dell’apparecchio può essere pericoloso, soprattutto
per i bambini.
Prima di collegare l’apparecchio accertarsi che i dati in targa siano corri-
spondenti a quelli del vostro impianto.
Non disperdere i materiali riciclabili dell’imballaggio nell’ambiente ma portarli
ad un impianto di smaltimento affi nché possano essere riciclati.
La sicurezza elettrica di questo apparecchio è assicurata soltanto quando
è collegato ad un impianto elettrico munito di un’effi cace presa di terra, a
norma di legge.
E’ obbligatorio verifi care questo fondamentale requisito di sicurezza.
Thank you for purchasing one of our appliances.
Please read these notes thoroughly as they have been written to help you
obtain the maximum performance from the appliance.
The quality of the appliance is guaranteed as each one of our products is
fully tested as it comes off the production line.
Use the appliance and you will see just how much satisfaction you will
get.
This product complies with current European safety standards governing
electrical appliances.
It has been subjected to thorough and meticulous testing to assess its safety
and reliability.
Before using the appliance, read this manual carefully as it will tell you what
to do and what not to do.
Improper use of the appliance can be dangerous, above all for children.
Before connecting the appliance, make sure that the data on the rating plate
complies with that of the domestic supply.
Do not dispose of the recyclable packing materials in an unauthorised
manner.
Take them to an appropriate plant for recycling.
The electrical safety of this appliance is only guaranteed when it has been
connected to a mains supply with an effi cient earthing system as provided
for by law.
La pagina si sta caricando...

IT
GB
4
919
NORMATIVE-AVVERTENZE E CONSIGLI IMPORTANTI
In caso di dubbio, richiedere un controllo accurato dell’impianto da parte di
un tecnico qualifi cato (legge 46/9O).
L’uso di questa macchina, così come di un qualsiasi apparecchio elettrico,
comporta l’osservanza di alcune regole fondamentali:
• non toccare l’apparecchio con mani o piedi bagnati o umidi;
• non tirare il cavo di alimentazione per staccare la spina dalla presa;
• non lasciare esposto l’apparecchio agli agenti atmosferici;
• non permettere che l’apparecchio sia usato dai bambini senza sorveglianza;
non staccare o inserire la spina nella presa con le mani bagnate; - prima
di effettuare qualsiasi operazione di pulizia o di manutenzione, disinserire
l’apparecchio dalla rete di alimentazione elettrica o staccando la spina o
spegnendo l’interruttore generale dell’impianto:
• in caso di guasto o di cattivo funzionamento, spegnere l’apparecchio, e
non manometterlo.
Questo apparecchio è contrassegnato in conformità alla Direttiva Europea
2002/96/EC, Waste Electrical and Electronic Equipment (WEEE).
Assicurandosi che questo prodotto sia smaltito in modo corretto, l’utente
contribuisce a prevenire le potenziali conseguenze negative per l’ambiente
e la salute.
Il simbolo sul prodotto o sulla documentazione di accompagnamento
indica che questo prodotto non deve essere trattato come rifi uto domestico
ma deve essere consegnato presso l’idoneo punto di raccolta per il riciclag-
STANDARDS-WARNINGS AND RECOMMENDATIONS
This is an important safety requirement and must be complied with.
In case of doubt, have the mains supply checked by a qualifi ed electrician.
As with any other electrical appliance, a few fundamental rules must be
observed during use:
• do not touch the appliance with wet or damp hands or feet.
• do not pull the power cable to remove the plug from its socket.
• do not expose the appliance to atmospheric agents.
• do not allow the appliance to be used by unsupervised children.
• do not plug-in or unplug the appliance using wet hands. - before carrying
out any cleaning or maintenance operation, disconnect the appliance from the
mains supply by either unplugging it or switching the mains power supply
off at the main switch:
• in the case of a fault or malfunction, switch off the appliance and do not
attempt any repairs.
This appliance is marked as complying with European Directive 2002/96/EC,
Waste Electrical and Electronic Equipment (WEEE).
Make sure that the product is disposed of in a correct manner. The user is
obliged to contribute towards preventing any negative consequences for
health and the environment.
The symbol affi xed to the product or accompanying documents signifi es
that the product must not be treated as normal domestic refuse, but must
be delivered to an authorised collection centre to enable the electric and
electronic equipment to be recycled.
La pagina si sta caricando...

IT
GB
6
919
NORMATIVE-AVVERTENZE E CONSIGLI IMPORTANTI
gio di apparecchiature elettriche ed elettroniche. Disfarsene seguendo le
normative locali per lo smaltimento dei rifi uti. Per ulteriori informazioni sul
trattamento, recupero e riciclaggio di questo prodotto, contattare l’idoneo
uffi cio locale, il servizio di raccolta dei rifi uti domestici o il negozio presso
il quale il prodotto è stato acquistato.
ATTENZIONE! Al termine della vita funzionale dell’apparecchio che
utilizza gas refrigerante R 600a (isobutano) e gas infi ammabile nella
schiuma Isolante, lo stesso dovrà essere messo in sicurezza prima
dell’invio in discarica. Per questa operazione rivolgersi al Vs. nego-
ziante e all’ente Locale preposto.
ATTENZIONE! Quando installate il vostro apparecchio frigorifero
è importante tener conto della classe climatica del prodotto. Per
conoscere la classe climatica del vostro apparecchio controllate la
targa dati qui riportata. L’apparecchio funziona correttamente nel
campo di temperatura ambiente indicato in tabella, secondo la classe
climatica.
ATTENZIONE! Mantenere libere da ostruzioni le aperture di ventila-
zione nell’involucro dell’apparecchio o nella struttura da incasso.
ATTENZIONE! In caso di lunga assenza (vacanze), l’apparecchio
deve essere disinserito, vuotato completamente, pulito ed asciugato
avendo cura di lasciare le porte aperte per evitare la formazione di
cattivi odori.
ATTENZIONE: Non danneggiare il circuito di refrigerazione.
STANDARDS-WARNINGS AND RECOMMENDATIONS
When disposing of the appliance, comply with local waste disposal regula-
tions. For further information on the treatment, recovery and recycling of
this product, refer to the appropriate offi ces, local domestic waste collection
service or the retailer from where the appliance was purchased.
WARNING! At the end of the useful life of an appliance that makes
use of R 600a refrigeration gas (isobutane) and fl ammable gas in the
insulation foam, it must be made safe prior to being transported to the
place of disposal. To do this, refer to the retailer or the appropriate
local authority.
WARNING! When installing the appliance, consideration must be given
to the climatic category of the product itself. The climatic category of
the appliance is written on the rating plate. The appliance will function
correctly within the ambient temperature range in the table for the
particular climatic category.
WARNING! Make sure that the ventilation openings in the appliance
body or built-in units are not obstructed.
WARNING! if the appliance is to be left unused for a long period of
time, e.g. holidays, it must be unplugged, emptied, cleaned and dried.
The door must be left open to prevent the formation of bad smells.
WARNING: Do not damage the cooling circuit.
La pagina si sta caricando...

IT
GB
919
8
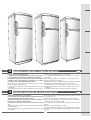
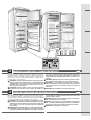
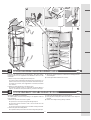
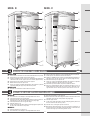
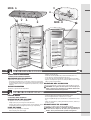
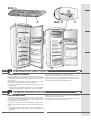
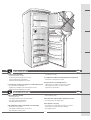
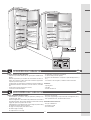
DESCRIZIONE MACCHINA
Gli apparecchi Frigocongelatori verticali, sono elettrodomestici di grande ca-
pienza che permettono di congelare, conservare e refrigerare qualsiasi cibo.
La STRUTTURA portante è stata realizzata in pannelli di lamiera trattati e
verniciati elettrostaticamente per resistere ai maltrattamenti e rimanere
bella e lucente nel tempo. Gli ISOLAMENTI sono stati scelti per mantenere
costante la temperatura INTERNA e avere grossi spazi interni. Lo SPAZlO
INTERNO è stato studiato per poter conservare qualsiasi tipo di cibo grazie
alla facilità di spostamento dei ripiani.
1 TERMOSTATO
2 RIPIANI REGOLABILI
3 CASSETTO FRUTTA E VERDURA CON PIANO ESTRAIBILE
4 CASSETTI FREEZER
5 BALCONCINO PORTASCATOLE
6 BALCONCINO BOTTIGLIE
7 LUCE INTERNA
8 LIBRETTO D’ISTRUZIONE
9 BACINELLA GHIACCIO
10 DISTANZIALI
11 SPATOLA GHIACCIO
12 CERNIERA
13 TAPPO PER ZOCCOLO
3
1
5
6
9
10
11
DESCRIPTION OF THE APPLIANCE
4
2
7
5
6
3
1
2
8
12
13
Upright units are large capacity domestic appliances for freezing, storing and refrig-
erating any types of food.
The load-bearing STRUCTURE has been fabricated in steel panels which have been
treated and electrostatically painted to resist mistreatment and to ensure that its
“new” look remains unaltered over time. The INSULATION MATERIALS have been
specially selected to ensure that the INTERNAL temperature remains constant and to
provide maximum storage space. The internal STORAGE SPACE has been designed
to store any type of food thanks to the easily removable shelves.
1 THERMOSTAT
2 ADJUSTABLE SHELVES
3 FRUIT AND VEG BOX WITH REMOVABLE SHELF
4 FREEZER DRAWERS
5 CONTAINER SHELF
6 BOTTLE SHELF
7 INTERNAL LIGHT
8 INSTRUCTION BOOK
9 ICE TRAY
10 SPACERS
11 ICE SPATULA
12 HINGE
13 PLINTH COVER PLATE
La pagina si sta caricando...

IT
GB
10
919
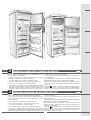
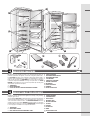
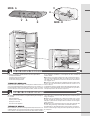
RIMOZIONE DELLE PROTEZIONI PER IL TRASPORTO
Controllate che l’apparecchio non sia danneggiato. I danni subiti durante
il tra sporto devono essere segnalati al Vo stro Rivenditore entro 24 ore dal
ricevi mento.
1 Rimuovere la protezione dalla guarnizione della porta .
La protezione evita i possibili danni della guarnizione dovuti al trasporto. La
protezione deve essere rimossa per poter chiudere ermeticamente la porta.
Per togliere la protezione, tirare leggermente un’estremità, ruotandola
verso l’esterno.
2 Rimuovere i dispositivi di blocco dei ripiani in vetro.
Tali elementi in plastica evitano lo spostamento dei ripiani durante il
trasporto. Per rimuovere i dispositivi di blocco, procedere come segue:
1
a) Afferrare gli elementi in plastica, ruotandoli fi no a disimpegnarli total-
mente dal ripiano.
b) Estrarre gli elementi tirandoli verso l’esterno.
2
A B
REMOVING THE TRANSPORT PROTECTION DEVICES
Check that the appliance is undamaged.
The retailer must be informed of any damage to the appliance within 24
hours of delivery.
1 Remove the protection from the door gasket.
The protection is used to protect the gasket during transport.
The protection must be removed in order to ensure that the door seal
functions correctly.
To remove the protection, lightly pull one end while rotating it outwards.
2 Remove the glass shelf locking devices.
These plastic elements prevent the shelves from moving during transport.
To remove the shelf locking devices, proceed as follows:
a) Grasp the plastic locking device and rotate it until it comes away from
the shelf.
b) Remove the locking device by pulling it outwards.
La pagina si sta caricando...

IT
GB
919
12
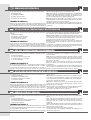
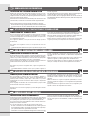
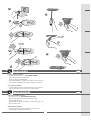
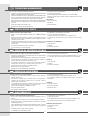
POSIZIONAMENTO E MESSA IN OPERA
POSITIONING AND INSTALLING THE APPLIANCE
1 Una volta sballato controllare che la tensione di rete sia la stessa indicata
sulla targhetta caratteristiche.
2 Se l’apertura delle porte è secondo l’esigenza passare al Punto 3. In caso
contrario invertire i punti di incernieramento. Per questa operazione è
consigliabile posizionare l’elettrodomestico in orizzontale adagiandolo
molto delicatamente sullo schienale, usando appositi spessori per evitare
lo schiacciamento del condensatore e il danneggiamento del gruppo
compressore.
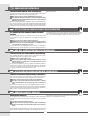
MODELLO A
2a. Smontare la cerniera centrale e togliere simultaneamente la porta supe-
riore e la porta inferiore, chiudere i fori utilizzando i tappini posizionati
sul lato opposto.
2b. Togliere il perno “A” e la rondella dalla cerniera inferiore.
2c. Smontare lo zoccolo inferiore esercitando una lieve trazione su tutta la
superfi cie, coprire l’asola “B” della cerniera con il tappo in dotazione
ed estrarre il tappo opposto.
2d. Togliere la cerniera inferiore e rimontare sul lato opposto quella fornita
in dotazione.
2e. Svitare il perno superiore e avvitarlo sul lato opposto.
2f. Rimontare lo zoccolo inferiore.
2g. Rimontare il perno “A” e la rondella sulla cerniera inferiore.
2h. Posizionare la porta superiore “E” inserendola nel perno superiore “D”.
2i. Posizionare la porta inferiore “F” inserendola nel perno inferiore “A”.
2l.
Posizionare la cerniera centrale “H” inserendola nelle bussole “I” delle due porte.
2a
A
D
H
B
2b
2c
2d
2e
E
F
1 Once the appliance has been unpacked, check that the mains voltage is
the same as that indicated on the rating plate.
2 If the door opening direction is as required, go to Point 3.
Otherwise reverse the hinges. To do this, carefully place the appliance
on its back. Use spacers to prevent crushing the condenser pipes and
damaging the compressor unit.
MODEL A
2a.
Remove the centre hinge and, at the same time, remove both the upper and
lower doors. Close off the holes using the plugs from the other side.
2b. Remove pin “A” and washer from the bottom hinge.
2c. Remove the bottom plinth by pulling lightly over the entire surface. Cover
hinge slot “B” using the cover plate supplied and remove the cover plate
from the other side.
2d. Remove the bottom hinge. Fit the hinge supplied on the opposite side.
2e. Unscrew the top pin and screw it in on the opposite side.
2f. Replace the bottom plinth.
2g. Replace pin “A” and washer on the bottom hinge.
2h. Position the upper door “E” by inserting it in top pin “D”.
2i. Position the lower door “F” by inserting it in bottom pin “A”.
2l.
Position the centre hinge “H” by inserting in bushes “I” of the two doors.
MOD. A
La pagina si sta caricando...

IT
GB
919
14
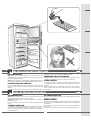
POSIZIONAMENTO E MESSA IN OPERA
POSITIONING AND INSTALLING THE APPLIANCE
6
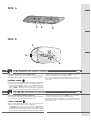
MOD. B MOD. C
MODELLO B
2a.
Svitare le due viti che fi ssano la cerniera intermedia 4 e liberare la portina 5.
2b. Svitare il perno 6 e montarlo sulla cerniera sinistra.
2c. Togliere, in ambedue le porte, le bussole e relativi tappi dai rispettivi fori
e rimontare il tutto sul lato opposto (bussole a sinistra, tappi a destra).
2d. Svitare il perno 2 e montarlo sulla cerniera opposta.
2e. Quindi rimontare la porta superiore 5.
2f. Fissare la cerniera intermedia 4 unitamente alla piastrina in plastica
sottostante dalla parte opposta per bloccare la portina.
MODELLO C
2a. Smontare la cerniera 2 in modo di liberare la porta 3.
2b.
Svitare le due viti che fi ssano la cerniera intermedia 4 e liberare la portina 5.
2c. Svitare il perno 6 e montarlo sulla cerniera sinistra.
2d. Togliere, in ambedue le porte, le bussole e relativi tappi dai rispettivi fori e
rimontare il tutto sul lato opposto (bussole a sinistra, tappi a destra).
2e. Quindi rimontare la porta superiore 5.
2f. Fissare la cerniera intermedia 4 unitamente alla piastrina in plastica
sottostante dalla parte opposta per bloccare la portina.
2g. Rimontare la porta invertendo la posizione della bussolina 7.
2h. Dopo aver opportunamente girato la cerniera 2 rimontare il perno 1,
quindi rimontare il piedino nella stessa sede cerniera, dal quale e stato
opportunamente rimosso. Bloccare quindi la cerniera inferiore con le 2 viti.
6
5
5
4
4
3
3
7
7
2
2
2
MODEL B
2a.
Unscrew the two screws fi xing the centre hinge 4 and free the door 5.
2b. Unscrew pin 6 and fi t it to the left hinge.
2c. Remove the bushes and relative plugs from their holes in both doors
and refi t them on the opposite side (bushes left, plugs right).
2d. Unscrew pin 2 and fi t it to the opposite hinge.
2e. Refi t the upper door 5.
2f. Fit the centre hinge 4 together with the underlying plastic plate from
the other side to fi x the door in position.
MODEL C
2a. Remove hinge 2 to free the door 3.
2b. Unscrew the two screws fi xing the centre hinge 4 and free the door 5.
2c. Unscrew pin 6 and fi t it to the left hinge.
2d. Remove the bushes and relative plugs from their holes in both doors and
refi t them on the opposite side (bushes left, plugs right).
2e. Refi t the upper door 5.
2f. Fit the centre hinge 4 together with the underlying plastic plate from
the other side to fi x the door in position.
2g. Refi t the door, reversing the position of bush 7.
2h. After having rotated the hinge to the correct position 2, replace pin 1,
then refi t foot in the same hinge housing from where it was removed.
Fix the lower hinge in position using the two screws.
La pagina si sta caricando...

IT
GB
919
16
POSIZIONAMENTO E MESSA IN OPERA
POSITIONING AND INSTALLING THE APPLIANCE
2l
2n
2m
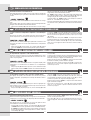
INVERSIONE MANIGLIA VERTICALE
Se il vostro apparecchio è dotato della maniglia verticale montata, ma decidete
di cambiare la parte di apertura bisognerà procedere all’inversione anche
della maniglia verticale nel seguente modo:
2i Smontare la maniglia tramite le due viti di sostegno.
2l Estrarre tramite leggera pressione, i tappi salvaforo che troverete nel
lato opposto della porta.
2m Ruotare la maniglia di 180° e riposizionare le due viti, quindi rinfi lare i
tappi salvaforo sul lato opposto
FITTING THE VERTICAL HANDLE
If the appliance is supplied with a separate vertical handle, it can be fi tted
as follows:
2m Take the handle and screws supplied.
2m Position the handle over the holes and fi x it in position using the screws
supplied.
MONTAGGlO MANIGLIA VERTICALE
Se il vostro apparecchio è dotato della maniglia verticale e non è montata,
per il montaggio procedere come segue:
2m Prendere la maniglia e le viti in dotazione.
2m Posizionare la maniglia in corrispondenza dei fori e fi ssarla con le viti in
dotazione.
REVERSING THE VERTICAL HANDLE
If the appliance is delivered with the vertical handle already fi tted and the
door opening direction needs to be changed, the handle itself must also be
moved as follows:
2i Remove the handle by unscrewing the two fi xing screws.
2l Remove the hole plugs on the opposite side of the door by pressing
them lightly.
2m Rotate the handle 180° and fi t it in place using the two fi xing screws.
Insert the plugs in the holes left on the opposite side.
La pagina si sta caricando...

IT
GB
919
18
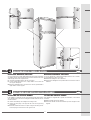
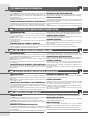
POSIZIONAMENTO E MESSA IN OPERA
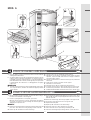
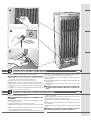
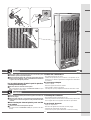
3 Livellare il frigorifero agendo sugli appositi piani regolabili.
Nell’installare oc corre osservare i seguenti punti:
A Non installatelo vicino a sorgenti di calore come stufe, termosifoni, cucine
etc. ed evitare la sua esposizione alla luce diretta del sole.
B Sistemate l’apparecchio in un posto asciutto e ben aerato.
C Non installatelo in spazi non areati come nicchie o rientranze del muro.
D Assicuratevi che durante lo sbrinamento automatico l’acqua che scorre
lungo la parete posteriore della cella sia convogliata nell’apposito canale
di scari co.
E Se l’apparecchio è dotato di distanziali applicateli sulla parte superiore del
condensatore posto sulla parete po steriore.
F Dopo aver installato l’apparecchio nel luogo prescelto, lasciatelo fermo
per cir ca un’ora prima di collegarlo alla presa di corrente.
G Prima di immagazzinare i cibi, assi curatevi del perfetto funzionamento
dell’apparecchio .
H Lasciare una distanza di almeno 5 cm fra la parte superiore dell’apparecchio
ed eventuali pensili.
I Alcuni apparecchi sono dotati di ruote posteriori per consentire un facile
spostamento.
ATTENZIONE: NON COLLOCARE L’APPARECCHIO VICINO A SORGENTI
DI CALORE E LASCIARE ALMENO 5 CM DI ARIA SULLA PARTE SUPE-
RIORE
3
E
POSITIONING AND INSTALLING THE APPLIANCE
3 Level the fridge by adjusting the feet.
When installing the appliance, remember the
following:
A Do not install it near to sources of heat such as heaters, radiators, cookers,
etc. or in direct sunlight.
B Position the appliance in a dry well-ventilated location.
C Do not install the appliance in non-ventilated spaces such as wall nich-
es.
D Make sure that during the automatic defrost, any water on the back wall
of the compartment runs into the drain channel.
E If the appliance is supplied with spacers, fi t them to the upper part of the
condenser on the back.
F After the appliance has been placed in its fi nal position, leave it for about
an hour before connecting it to the power supply.
G Make sure that the appliance is working properly before placing any food
in it.
H Leave a space of at least 5 cm between the top of the appliance and any
wall cupboards.
I Some appliances are fi tted with rear wheels to enable them to be moved
easily.
WARNING: DO NOT INSTALL THE APPLIANCE NEAR TO ANY HEAT
SOURCES AND LEAVE A GAP OF AT LEAST 5 CM ABOVE IT
I
La pagina si sta caricando...

IT
GB
919
20
COLLEGAMENTO ELETTRICO
Controllare che la tensione dell’impianto elettrico corrisponda a quella
indicata sulla targhetta caratteristiche posta sul lato sinistro in basso nella
parte interna dello scomparto congelatore.
Se la presa a muro è priva di contatto a terra, o se la spina non è adatta al
vostro impianto vi consigliamo di rivolgervi ad un elettricista specializzato.
Non impiegare adattatori o derivatori che potrebbero causare riscaldamenti
e bruciature.
ELECTRICAL CONNECTION
Green and
Yellow to Earth
Blue to
Neutral
13 amp Fuse
Brown
to Live
Cord Clamp
Check that the mains voltage complies with that indicated on the rating plate
located on the bottom left of the freezer compartment.
If the mains socket does not have an earth connection or if the plug is not
suitable for the mains supply system, refer to a qualifi ed electrician.
Do not use adapters or extension leads, as these may overheat and burn.
Warning: this appliance must be earthed
If the appliance has been fi tted with a non-rewirable plug of the incorrect
type for the mains socket, cut off the plug and fi t a new one. The removed
plug must be thrown away. Inserting an unsuitable plug into a 13 Amp
socket is likely to cause an electrical hazard. When a non rewirable plug or
rewirable 13 Amp (BS1363) plug is used, it must be fi tted with a 15 Amp
ASTA approved (BS1362) fuse. If any other type of plug is used it must be
wired as follows.
Connect the GREEN & YELLOW wire to the earth terminal marked with the
letter “E” or earth symbol, or coloured green or green & yellow.
Connect the BLUE wire to the neutral terminal marked with the letter “N”
or coloured black.
Connect the BROWN coloured wire to the live terminal marked with the letter
“L” or coloured red.
La pagina si sta caricando...

IT
GB
919
22
USO DEL REPARTO FRIGORIFERO
DISPOSITIVO DI REGOLAZIONE
1 TERMOSTATO ELETTRONICO FRIGORIFERO
DESCRIZIONE DELL’APPARECCHIO
L’apparecchio è costituito da due celle:
-
Un frigorifero (
parte inferiore
) per la conservazione di cibi freschi e delle bevande.
-
Un congelatore (
parte superiore
) per la conservazione a lunga durata dei prodotti
surgelati (scomparto inferiore) e la congelazione di prodotti freschi (scomparto
superiore).
USO DEL FRIGORIFERO
Avviamento e regolazione della temperatura
- Collegare la spina alla rete.
- Posizionare la manopola K in una posizione intermedia (fra 1 e 5).
- La luce interna si accenderà all’apertura della porta.
- La spia verde V si accenderà indicando il funzionamento dei comparti.
- Regolare la temperatura agendo sulla manopola K da posizione 1 (più
caldo) a posizione 5 (più freddo).
DESCRIZIONE DELL’APPARECCHIO
L’arresto del funzionamento si ottiene ponendo la manopola K in posizione 0.
ATTENZIONE! Se l’apparecchio viene spento e riacceso dopo poco
tempo, il compressore si avvierà dopo circa 10 minuti. Questo rientra
nel normale funzionamento dell’apparecchio
USING THE FRIDGE COMPARTMENT
K
A
1
1
K
V
V
A
MOD. A
MOD. B
- Position knob K at an intermediate position between 1 and 5.
- The internal light will switch on when the door is opened.
- The green light V will light up to indicate that the compartments are work-
ing.
- Adjust the temperature by rotating knob K from position 1 (warmest) to
position 5 (coldest).
DESCRIPTION OF THE APPLIANCE
The appliance is switched off by placing knob K at position 0.
WARNING!! If the appliance is switched off and then switched back
on soon after, the compressor will start up after approximately 10
minutes. This is part of the normal operation of the appliance.
CONTROL DEVICE
1 ELECTRONIC FRIDGE THERMOSTAT
DESCRIPTION OF THE APPLIANCE
The appliance consists of two compartments:
- A fridge (lower part) for storing fresh food and drinks
- A freezer (upper part) for long-term storing of frozen products (bottom
compartment) and for freezing fresh products (top compartment).
USING THE FRIDGE
Switching on and regulating the temperature
- Connect the plug to the mains supply.
La pagina si sta caricando...

IT
GB
919
24
USO DEL REPARTO FRIGORIFERO
Il freddo va, comunque, regolato tenendo conto dei seguenti fattori:
- la temperatura ambiente
- la frequenza di apertura delle porte
- la quantità di alimenti conservati
- la collocazione dell’apparecchio
TERMOSTATO MODELLO B
Sulle posizioni di massimo freddo, con temperature ambiente elevate, ed
una notevole quantità di alimenti, il funzionamento può essere continuo, con
formazioni di brina e ghiaccio sull’evaporatore. In questo caso è necessario
ruotare la manopola su una posizione di minor freddo, in modo da consen-
tire lo sbrinamento automatico e, in conseguenza, un minor consumo di
corrente elettrica.
Non introdurre nel comparto vivande troppo calde o liquidi in evaporazione,
coprire o avvolgere alimenti soprattutto se contengono aromi, non disporre
sulle griglie, carte o plastiche che ostacolino la circolazione dell’aria attra-
verso le griglie stesse.
Non mettere a contatto dell’evaporatore gli alimenti poiché viene ad incollarsi
la carta, che in fase di sbrinamento potrebbe andare ad ostruire il foro di
scarico condensa.
Lo sbrinamento di questo comparto avviene automaticamente durante il fun-
zionamento; l’acqua di sbrinamento viene raccolta tramite uno sgocciolatoio
ed evaporata per mezzo del calore del compressore.
USING THE FRIDGE COMPARTMENT
The temperature should, however, be regulated bearing the following fac-
tors in mind:
- ambient temperature
- frequency of door opening
- quantity of food stored
- the location of the appliance.
THERMOSTAT MODEL B
On the maximum cold position with high ambient temperatures and a con-
siderable quantity of food, functioning may be continuous with the formation
of frost and ice on the evaporator. In this case the knob must be turned to
K
A
K
V
V
A
MOD. A
MOD. B
a less cold position to allow automatic defrosting and, consequently, lower
energy consumption.
Do not put very hot steaming food or drinks in the fridge. Cover or wrap
the food, especially if it contains herbs or spices. Do not cover the shelves
with paper or plastic as this would prevent the circulation of air through the
shelves themselves.
Do not place food in contact with the evaporator as the paper wrap will stick
to it and, during defrosting, could block the condensation drain hole.
The fridge defrosts automatically during normal operation: the water pro-
duced is collected through a drip system and evaporated by the heat from
the compressor.
La pagina si sta caricando...

IT
GB
919
26
USO DEL REPARTO FRIGORIFERO
USING THE FRIDGE COMPARTMENT
LAMPADA INTERNA SCOMPARTO FRIGORIFERO
Con l’apparecchio alimentato, la lampada interna si accende all’apertura del
comparto frigo. E si spegne alla chiusura della stessa.
Attenzione che il foro di scarico sia libero.
N. B. In caso di porta aperta per lungo tempo, la lampada viene spenta
automaticamente. La riaccensione è possibile dopo la chiusura e
riapertura della porta.
Sulla posizione del massimo freddo (Pos. 5) e temperature ambiente ele-
vate il funzionamento continuo, può causare grosse formazioni di brina sul
fondo, consumare molta energia elettrica e il frigorifero rende meno. Quindi
abbassare l’indicatore su una posizione di minor freddo.
K
K
MOD. A
MOD. B
FRIDGE COMPARTMENT LIGHT
When the appliance is connected to the mains supply, the fridge compartment
light switches on when the door is opened, and switches off when the
door is closed.
Warning: make sure that the drain hole is not blocked.
N.B. If the door is left open for a long time, the light will switch off
automatically. The light can only be switched on again after the door
has been closed.
On the maximum cold position (Pos. 5) with high ambient temperatures and
a considerable quantity of food, functioning may be continuous with the
formation of frost and ice on the evaporator. In this case the knob must be
turned to a less cold position to allow automatic defrosting and, consequently,
lower energy consumption.
La pagina si sta caricando...

IT
GB
919
28
A
K
V
MOD. A
MOD. B
K
V
A
USO DELLO SCOMPARTO CONGELATORE
USING THE FREEZER COMPARTMENT
Il comparto congelatore viene avviato automaticamente
Dopo la messa in funzione sono necessarie circa tre ore prima che venga rag-
giunta la temperatura adeguata di conservazione degli alimenti surgelati.
FUNZIONE “SUPER”
Questa funzione è stata studiata per ottenere il congelamento rapido e deve
essere inserita all’introduzione degli alimenti nel comparto congelatore.
- Ponete la manopola (K) oltre la posizione “5”; la spia arancione (A) si
accende (la funzione SUPER è attiva solo quando la spia è accesa). La
funzione “SUPER” resta attiva per circa 24 ore ma può essere disattivata in
qualsiasi momento ruotando la manopola (K) in senso antiorario, fi no a far
spegnere la spia (A). Durante le 24 ore della fase “SUPER” il compressore
funziona per 65 minuti acceso e per 30 minuti spento.
- Dopo 24 ore riposizionate la manopola (K) in posizione intermedia (fra
1 e 5) altrimenti l’apparecchio continua a funzionare come se fosse in
posizione 5.
The freezer compartment is switched on automatically
Once the appliance is switched on, approximately three hours are needed to
reach the temperature at which frozen foods can be stored.
“SUPER” FUNCTION
This function has been designed to freeze foods quickly and must be acti-
vated when introducing foods in the freezer compartment.
- Set knob (K) beyond position “5”. The orange indicator (A) will light up
(the SUPER function is only active if this light is on). The “SUPER” function
will remain active for approximately 24 hours, though can be switched
off at any time by rotating knob (K) anticlockwise until indicator light (A)
switches off. During the 24 hours of the “SUPER” function, the compres-
sor operates in cycles of 65 minutes on and 30 minutes off.
- After 24 hours, rotate the knob (K) back to an intermediate position (be-
tween 1 and 5), otherwise the appliance will continue to function as if it
were set at position 5.
La pagina si sta caricando...

IT
GB
919
30
K
MOD. A
MOD. B
K
USO DELLO SCOMPARTO CONGELATORE
CONGELAMENTI CIBI FRESCHI
Dopo aver preparato i cibi da congelare in piccole porzioni (1Kg. max),
avvolgerli adeguatamente in appositi fogli di politene e alluminio, sigillarli
possibilmente a chiusura ermetica, annotare le date sugli stessi e riporli nel
ripiano stabilito.
Per la congelazione degli alimenti non è necessario variare la posizione della
manopola termostato da quella del normale funzionamento.
Per ottenere un’esatto processo di congelazione è opportuno dare alcuni
consigli importanti:
- La quantità max. degli alimenti freschi che si possono congelare, in Kg/24h,
è riportata sulla targhetta delle caratteristiche tecniche, situata a fi anco
della scatola verdure a sinistra, nello scomparto frigorifero.
- Dividere le derrate da congelare, in piccole parti, in maniera di favorire la
rapidità di congelazione e lo scongelamento della quantità occorrente.
- Evitare di mettere cibi da congelare a contatto di quelli già congelati, onde
evitare un’innalzamento di temperatura di quest’ultimi.
USING THE FREEZER COMPARTMENT
FREEZING FRESH FOODS
Prepare the food to be frozen in small portions (max 1 kg) for ease of
freezing and eventual thawing. Wrap the food in purpose made polythene
or aluminium foil, if possible airtight. Make a note of the date of freezing on
the wrap and place it in the freezer drawer.
The thermostat setting does not need to be altered when freezing food. To
make freezing easier and more effi cient, follow the recommendations given
below:
- The maximum quantity of fresh food to freeze is reported in kg/24 hrs on
the rating plate inside the fridge located on the left alongside the fruit
and veg box.
- Divide the food to be frozen into small portions to ensure rapid freezing
and defrosting of the quantity required.
- Avoid placing food to be frozen into contact with already frozen food to
prevent the latter from increasing in temperature.
La pagina si sta caricando...

IT
GB
919
32
USO DELLO SCOMPARTO CONGELATORE
RACCOMANDAZIONI:
NON mettere in bocca i cubetti di ghiaccio e non consumare i bastoncini
gelati (ghiaccioli), subito dopo averli tolti dal congelatore, perché possono
provocare bruciature da freddo.
NON introdurre nel congelatore contenitori sigillati con liquidi quali bibite o altro tipo.
I cibi e le bevande calde devono essere raffreddate prima di porle nel congelatore.
CONSERVAZIONE CIBI SURGELATI
Per i cibi surgelati l’effettivo periodo di conservazione non può essere sta-
bilito con precisione perché varia notevolmente per la diversa natura degli
alimenti.
Rispettando rigorosamente le istruzioni riportate sull’involucro dei cibi
surgelati sarete sempre sicuri di agire nel migliore dei modi.
PRODUZIONE CUBETTI DI GHIACCIO
Riempite la bacinella del ghiaccio per 3/4 di acqua; riponetela nel vano
congelatore e nell’apposito cassetto scorrevole (se in dotazione).
ALCUNI CONSIGLI:
Assicurarsi che l’involucro sia intatto e non presenti delle macchie di umido
o rigonfi amento perché in questi casi il prodotto surgelato può già essersi
deteriorato.
I cibi che hanno iniziato lo scongelamento non devono essere assoluta-
mente ricongelati. Non conservare i cibi surgelati più a lungo di quanto
raccomandato.
USING THE FREEZER COMPARTMENT
RECOMMENDATIONS:
NEVER place ice cubes in the mouth or eat ice-lollies that have just been
taken out of the freezer, as these can cause ice burns.
DO NOT place sealed containers containing liquids such as soft-drinks or
similar in the freezer.
Hot foods and drinks must be allowed to cool before being placed in the
freezer.
STORING FROZEN FOOD
It is impossible to accurately predict the effective storage period for frozen food
in that this varies considerably according to the nature of the food itself.
To be safe, always follow the instructions reported on the packaging of
frozen food products.
ICE-CUBE PRODUCTION
Fill the ice-tray 3/4 full with water. Place it in the sliding drawer (where fi tted)
in the freezer compartment.
GENERAL ADVICE:
Make sure that the packaging is intact and that there are no damp marks
or swelling, in that these indicate that the frozen product may already have
deteriorated.
Any food that has started to thaw out must not under any circumstances
be re-frozen.
Do not store frozen foods for longer than the recommended time period.
La pagina si sta caricando...

IT
GB
919
34
SBRINAMENTO
In mancanza di corrente, accertarsi sulla durata della sospensione. Se
la previsione non supera le 12 ore, lasciate gli alimenti nel congelatore e
tenete chiusa la porta. Se la mancanza di corrente dovesse superare tale
periodo di 12 ore e una parte degli alimenti si dovesse scongelare, è op-
portuno consumare quest’ultimi al più presto. La brina che si forma sulle
griglie di raffreddamento deve essere tolta quando lo strato raggiunge uno
spessore di circa 3-4 mm. perché altrimenti peggiora la trasmissione del
freddo e aumenta il consumo di energia. La rimozione dello strato di brina
deve essere effettuata usando l’apposito raschietto di plastica in dotazio-
ne. Qualsiasi danno derivato dall’uso di questi oggetti non è coperto dalla
garanzia. Generalmente il congelatore deve essere sbrinato almeno 2 volte
l’anno operando nel modo seguente:
- Togliere gli alimenti e avvolgerli in più strati di carta a giornale e conservarli
in frigorifero o in un luogo fresco.
- Tenere presente che un aumento di temperatura degli alimenti riduce
sensibilmente la durata di conservazione degli stessi.
- Rimuovere i cestelli, la bacinella dei cubetti di ghiaccio e lasciare la porta aper-
ta.
- Raccogliere con una spuna, l’acqua di sbrinamento che si deposita nella
parte bassa dell’apparecchio.
- Per accellerare il processo di sbrinamento si può raschiare lo strato di
brina formatosi utilizzando la spatola in dotazione.
AVVERTENZA! non usare dispositivi meccanici o altri metodi artifi ciali
per accellerare il processo di sbrinamento, diversi da quelli racco-
mandati dal costruttore.
ATTENZIONE: Non usare apparecchi elettrici all’interno dello scom-
parto conservatore di cibi, se questi non sono di tipo raccomandato
dal costruttore.
DEFROSTING
If a power cut should occur, try to establish its duration. If the forecast is
less than 12 hours, leave the food in the freezer and keep the door closed.
If the power cut lasts for longer than 12 hours and part of the food starts to
thaw out, this should be consumed as soon as possible. Frost that forms
on the cooling grids must be removed when it reaches a thickness of ap-
proximately 3-4 mm. Otherwise, the cold transfer will be impeded and the
energy consumption will increase. The layer of frost must be removed using
the plastic scraper supplied. Any damage caused by the use of the scraper
is not covered by the guarantee.
Generally speaking, the freezer should be defrosted at least twice a year as
follows:
- Remove the food, wrap it in several layers of newspaper and place it in
the fridge or in a cool location.
- Remember that an increase in the temperature of the food will greatly
reduce its storage life.
- Remove the racks, ice-trays and leave the door open.
- Use a sponge to mop up the water that collects at the bottom of the ap-
pliance.
- To accelerate the defrosting action, scrape off the layer of frost using the
spatula supplied.
WARNING! Do not use any mechanical devices or other artifi cial
methods other that those recommended by the manufacturer for ac-
celerating the defrosting process.
WARNING: Unless otherwise approved by the manufacturer, do not
use electrical appliances inside the food storage compartment.
La pagina si sta caricando...

IT
GB
919
36
1
PULIZIA
Disinserite sempre l’apparecchio dalla presa di corrente, prima
d’effettuare qualsiasi operazione di pulizia.
Nessuna protezione (griglia a fi lo, carter) deve essere rimossa da parte
di personale non qualifi cato: evitate assolutamente di far funzionare
l’apparecchio senza queste protezioni.
Per la pulizia interna di tutte le parti in plastica
e della guarnizione porta
Non usate abrasivi e detersivi di alcun genere.
- Usate esclusivamente una soluzione di bicarbonato di sodio in acqua
tiepida 2 cucchiai in 2 litri di acqua.
1 Pulizia del condensatore
- Da compiere almeno due volte l’anno.
- Utilizzate un aspirapolvere per uso domestico o una spazzola. Un con-
densatore sporco infl uisce negativamente sull’apparecchio riducendone
le prestazioni.
Per assenze prolungate
- Vuotate i comparti.
- Disinserite l’apparecchio dalla rete elettrica.
- Pulite entrambi i comparti e asciugateli.
-
Lasciate aperte le porte per impedire la formazione di cattivi odori o muffe.
CLEANING
Before starting any cleaning, disconnect the appliance from the mains
electricity supply.
The protections (wire grill, covers) must not be removed by unquali-
fi ed personnel: do not use the appliance if the protections have been
removed.
When cleaning the internal plastic parts and the
door gasket:
do not use abrasives or detergents of any kind.
- Use a warm solution of bicarbonate of soda (two spoonfuls in two litres
of water).
1 Cleaning the condenser
- This should be carried out at least twice a year.
- Clean using a domestic vacuum cleaner or a brush. A dirty condenser will
have a negative effect on the appliance and reduce its performance.
For prolonged absences
- Empty the compartments.
- Disconnect the appliance from the mains electricity supply.
- Clean both the compartments and dry them.
- Leave the doors open to prevent bad smells or mould from forming.
La pagina si sta caricando...

IT
GB
919
38
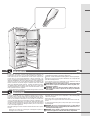
R
V
Pulizia scarico acqua
Contemporaneamente alla pulizia del condensatore, verifi cate che il tubo R
di scarico, sia libero da ostruzioni.
- Estraete il tubo R di scarico dalla vaschetta V e se necessario provvedete
alla sua pulizia.
Cavo di alimentazione
- Ispezionate periodicamente il cavo di alimentazione al fi ne di controllare
la sua integrità.
- Nel caso di cavo danneggiato, non utilizzate l’apparecchio e non tentate
la
riparazione ma rivolgetevi a personale qualifi cato per la sua sostituzione.
PULIZIA
CLEANING
Cleaning the water drain
When cleaning the condenser, check that the rear drain pipe R is not
blocked.
- Remove drain pipe R from the container V and if necessary clean it.
Power supply cable
- Periodically inspect the power cable to check its condition.
- If the cable is damaged, do not use the appliance and do not attempt any
repairs. Call a qualifi ed technician to replace the faulty cable.
La pagina si sta caricando...
La pagina si sta caricando...
La pagina si sta caricando...
La pagina si sta caricando...
La pagina si sta caricando...
La pagina si sta caricando...
La pagina si sta caricando...
La pagina si sta caricando...
La pagina si sta caricando...
La pagina si sta caricando...
-
 1
1
-
 2
2
-
 3
3
-
 4
4
-
 5
5
-
 6
6
-
 7
7
-
 8
8
-
 9
9
-
 10
10
-
 11
11
-
 12
12
-
 13
13
-
 14
14
-
 15
15
-
 16
16
-
 17
17
-
 18
18
-
 19
19
-
 20
20
-
 21
21
-
 22
22
-
 23
23
-
 24
24
-
 25
25
-
 26
26
-
 27
27
-
 28
28
-
 29
29
-
 30
30
-
 31
31
-
 32
32
-
 33
33
-
 34
34
-
 35
35
-
 36
36
-
 37
37
-
 38
38
-
 39
39
-
 40
40
-
 41
41
-
 42
42
-
 43
43
-
 44
44
-
 45
45
-
 46
46
-
 47
47
-
 48
48


Domeos DOSV401SP Manuale del proprietario
- Tipo
- Manuale del proprietario
in altre lingue
- English: Domeos DOSV401SP Owner's manual
- français: Domeos DOSV401SP Le manuel du propriétaire
- español: Domeos DOSV401SP El manual del propietario
- Deutsch: Domeos DOSV401SP Bedienungsanleitung
- Nederlands: Domeos DOSV401SP de handleiding
- português: Domeos DOSV401SP Manual do proprietário
Altri documenti
-
EUDORA BDA Ardo COF2110SAX Manuale del proprietario
-
Candy cil170, rbla 160 Manuale utente
-
Aeg-Electrolux NEWPOL XV85EL Manuale del proprietario
-
 New Pol XR1851EL Instructions For Installation, Maintenance And Use
-
Smeg CW350R Manuale utente
-
 New Pol XR1750 Manuale del proprietario
-
-
 New Pol XR2001NF Manuale del proprietario
-
-
 Maunfeld MBF.177BFW Manuale utente


