ARIETE Konsuelo Plus Manuale utente
- Categoria
- Macchine da caffè
- Tipo
- Manuale utente

Via San Quirico, 300
50013 Campi Bisenzio (FI)
E-Mail: [email protected]
Internet: www.ariete.net
MOD. 1333
827070

Fig. 12 Fig. 13
Fig. 3
Fig. 5
SRQP
O
N
Fig. 2
Fig. 14
Fig. 9 Fig. 10
Fig. 6
Fig. 1
A
E
J
I
F
K
L
B
D
G
H
M
Fig. 4
Fig. 8
B
D
Fig. 7
Fig. 15 Fig. 16
Fig. 17 Fig. 18 Fig. 19
Fig. 20 Fig. 21 Fig. 22
Fig. 11
C
C

3
EN
WITH REGARD TO THIS MANUAL
Even if the appliances are made in conformity with the European regulatory specications in force and therefore all poten-
tially hazardous parts are protected. Carefully read these warnings and use the appliance only for the use it is designed for
in order to prevent accidents and damage. Keep this manual close by for future consultation. If you should decide to give
this appliance to other people, remember to also include these instructions.
The information provided in this manual is marked with the following symbols indicating:
Danger for children
Warning of burns
Danger due to electricity Warning - material damage
Danger of damage originating from other causes
INTENDED USE
You may use your Konsuelo Plus to prepare coffee and cappuccino. This appliance is designed to be used with Kimbo pods,
or with pods bearing the E.S.E. standard mark.
This appliance is designed only for private use, and is therefore to be considered unsuitable for commercial or industrial
purposes.
No other use of the machine is contemplated by the manufacturer, which is exempt from any liability for all types of dam-
ages caused by improper use of the machine. Improper use also results in any form of warranty being forfeited.
RESIDUAL RISKS
The construction characteristics of the appliance this publication refers to do not allow the user to be protected from a direct
jet of steam or hot water.
Warning!
Danger of burns - When dispensing hot water and steam, do not direct the jets towards others or yourself. Hold only
the plastic part of the tube.
Use only containers made of material “for foods”.
IMPORTANT SAFEGUARDS
READ THE INSTRUCTIONS CAREFULLY BEFORE USE.
• This appliance is designed only for private use, and is therefore to be considered unsuitable for commercial or industrial
purposes.
• We decline any responsibility resulting from misuse or any use other than those covered in this booklet.
• We suggest you keep the original box, as our free-of-charge service does not cover transportation damage due to inad-
equate packaging of the product when sent to an Authorised Service Centre.
• This product complies with the 2006/95/CE Directive and EMC Directive 2004/108/EEC.
Danger for children
• This appliance is not suitable for use by people (children included) with physical, sensorial or mental disabilities. Users
lacking experience and knowledge of the appliance, or those who have not been given the user’s instructions, must be
supervised by a person responsible for their safety.
• Children must be supervised at all times to ensure they do not play with the appliance.
• Do not leave the packing components near children because they are potentially dangerous.
•
In the event that this appliance is to be disposed of, it is recommended that the power chord be cut. It is also recommended
that all potentially dangerous components are rendered harmless to prevent children from hurting themselves when playing
with the apparatus.
Danger due to electricity
• Before connecting the appliance to the power supply, make sure that the voltage indicated on the plate on the bottom of
the machine corresponds to the local mains voltage.
• The use of extension leads, which have not been authorised by the appliance manufacturer, may cause damage and
accidents.
• Before lling the tank with water, remember to always disconnect the appliance at the socket.

4
EN
• If the electric cable is damaged it must be replaced by the manufacturer or its Technical Assistance Service, or in any case by a person
with similar qualications.
• Never let the live parts come into contact with water: this may cause a short circuit!
• Unplug before any cleaning or maintenance operations.
• DO NOT IMMERSE THE APPLIANCE IN WATER OR OTHER LIQUIDS.
• Unplug the appliance from the electricity supply immediately in the case of faults, defects or suspected defects after drop-
ping. Never operate the appliance if defective. REPAIRS MAY ONLY BE CARRIED OUT BY AUTHORIZED ASSISTANCE
SERVICE CENTRES. The manufacturer disclaims all responsibility for any damage caused by incorrect repair work.
Danger of damage originating from other causes
• Do not lift the appliance by grasping its water tank, but only by grasping its body.
• Choose a sufciently well lit and clean environment, with an easily accessible electric socket.
• Avoid putting excessive quantities of water into the tank.
• The appliance is not to be used if it has been dropped, if there are visible sign of damage or if it is leaking. To prevent any
accident, all repairs, including the replacement of the power cord, must be carried out by an Ariete Authorised Service
Centre or, in any case, by qualied personnel.
• Do not use the appliance if the power cord appears to be damaged, with parts showing burns, etc.; an Ariete Authorised
Service Centre must repair and replace the power cable, under penalty of the warranty being forfeited.
Warning of burns
• Never direct the steam or hot water jet towards parts of the body; handle the steam/hot water spout with care: risk of
scalding!
• The appliance’s external metallic parts must not be touched when the machine is functioning as it could cause burns.
• If water does not come out of the lter holder, it may be because the Thermocream® lter is clogged. Stop the brewing
and wait ten seconds. Remove and disconnect the lter holder because any remaining pressure could cause splashes or
squirts. Then clean as explained in the relevant paragraph.
Warning - material damage
• Place the machine on a stable surface where it cannot be knocked over.
• Never use the machine without water because the pump will burn out.
• Never ll the water tank with hot or boiling water.
• Do not place the machine on very hot surfaces or near open ames in order to prevent damage to the body.
• The cable must not touch any hot parts of the machine.
• Do not use sparkling water (with added carbon dioxide).
• Never put substances other than coffee into the lter holder. They could cause serious damage to the appliance.
• Do not leave the machine at a room temperature below 0°C because the water remaining in the boiler could freeze and
cause damage.
• Never use the appliance outdoors.
• Do not expose the appliance to atmospheric agents (rain, sun …).
• Before cleaning the appliance always unplug it and allow it cool down. Clean only with a non-abrasive cloth that has been
slightly dampened with water, adding a few drops of mild, non-aggressive detergent (never use solvents that damage
plastic).
•
KEEP THESE INSTRUCTIONS IN A SAFE PLACE
DESCRIPTION OF THE APPLIANCE
A - Removable grill K - Rubber handle
B - Pod lter L - Cappuccino maker
C - Drain pan M - Power cord + Plug
D - Filter holder N - ON/OFF switch
E - Cup-resting grill O - ON/OFF indicator light
F - Drip tray P - Coffee supply switch
G - Drip tray Q - Boiler temperature indicator light
H - Tank cover R - Steam switch
I - Water tank S - Steam indicator light
J - Steam tap

5
EN
Identication data
The following machine identication data are shown on the plate found underneath the machine’s standing base:
• manufacturer and CE mark
• model (Mod.)
• serial number (SN)
• electrical supply voltage (V) and frequency (Hz)
• absorbed electric power (W)
• assistance toll-free number
Always give the model and serial number to the Authorised Service Centres when requesting assistance.
PRELIMINARY PHASES FOR USE
Starting the appliance
Check that the voltage of the domestic network is the same as that indicated on the technical information plate of the appli-
ance. Place the appliance on a at surface.
Before using the appliance for the rst time wash the tank. Fill it up with fresh cool water and insert it in its housing (Fig.
4). Insert the plug into the socket, which must be earthed.
Starting the rst time
After having lled the tank with cool tap water, start the machine by pressing the button (N). Indicator lamps (O) turn on to
indicate that the machine is on and that the internal boiler has started to heat up. The machine will be ready for the coffee
when the indicator lamp (Q) turns on. Press the coffee dispensing switch (P) until you see water come out of the lter holder
seat (Fig. 6).
If you are starting the machine for the rst time or after a period of time during which it has not been used, it is
recommended that at least one cup of water be allowed to pass through the boiler’s hydraulic circuit. Also open the
steam tap (J) by slightly turning it anti-clockwise after having placed a container underneath the Maxi Cappuccino
device wand (L) Fig. 7.
Then close the steam tap (J) by turning it clockwise, and press the coffee dispensing switch (P) to make the water stop
coming out.
HOW TO MAKE COFFEE
Put the drip tray (C) and pod lter (B) inside the lter holder (D).
Place the pod in the lter ring (Fig. 8).
Push the pod towards the bottom of the lter with your ngers (Fig. 9). The pod must be well centred and placed inside
the lter.
Now it is possible to put the lter holder in its seat.
Warning!
Tighten well by turning it from left to right while making sure you have hooked it properly onto the ange (Fig. 11).
f the pod is not inserted well, or if the lter holder is not tightened rmly, a few drops of water could leak from the
lter holder.
It is a good idea to start dispensing the coffee only when the indicator lamp (Q) is on, and this is true for both the rst cup
and those that follow.
To start dispensing, press the switch (P): the coffee will start coming out of the spouts of the lter holder. Press the switch
(P) again to stop it.
The maximum serving of coffee is 50 ml.
Warning!
Like in professional coffee machines, do not remove the lter holder when the dispensing switch (O) is on; danger
of burns!
Warning!
Wait about ten seconds after the coffee has been dispensed before removing the lter holder. To remove it, turn it
slowly from right to left so as to prevent splashes or spurts of water or coffee.
The pod could remain stuck in the upper part of the machine after making the coffee and when removing lter
holder. To remove it, tilt the lter holder (Fig. 14) so the pod can fall onto it.
When the machine is in stand-by, the lamp (Q) will turn on and off periodically. This shows that the boiler thermostat is trip-

6
EN
ping, which serves to keep the water temperature optimum.
If small puffs of steam come out of the lter holder coupling seat, this phenomenon is to be considered absolutely
normal.
This machine is specically designed to guarantee an excellent espresso coffee using Kimbo pods.
It is advisable to let the lter holder heat up a few minutes in its seat before making a cup of coffee so that the rst cup is
piping hot, too. This will not be necessary for the cups of coffee that follow.
Filling the water tank during use
No special operation is necessary when the water in the tank runs out as the machine is equipped with a special self-priming
device. Just unplug the machine, pull out the tank and ll it with fresh cool water again.
HOW TO MAKE CAPPUCCINO
To prepare a cappuccino or hot chocolate or to heat any other beverage, press the switch (R) Fig. 15; the indicator lamp (S)
turns on, ad indicare che è stata inserita la funzione vapore. When the lamp (Q) turns on, the machine is ready to generate
steam.
When warming up, your appliance may release small puffs of steam from the lter holder; this is perfectly nor-
mal.
Warning!
Danger of burns! The metal cappuccino maker may reach high temperatures. Use the rubber part to move the
cappuccino maker (Fig. 16).
Now open the steam tap (J) anti-clockwise, having the foresight to position a cup underneath the Maxi Cappuccino device
(L) Fig. 17: at rst a little water will come out, immediately followed by a strong jet of steam.
Plunge the wand all the way into the pot of milk (Fig. 18) and open the dispensing cock (J) again until you get the result
you want. During these operations you may notice that the warning light (Q) goes on and off from time to time, indicating
that the boiler thermostat is keeping the water required for the steam supply at the right temperature.
It is opportune you start dispensing the steam only when this indicator lamp is off. Dispense the steam for a few
seconds after every use in order to free the hole of any milk residue.
After the cappuccino is prepared, press the switch (R) to cut out the steam function.
MAKING FURTHER CUPS OF COFFEE
To prepare a cup of coffee right after making cappuccino, it is necessary to bring the boiler back to the coffee preparation
temperature by performing these operations: press the steam function switch (R). You may notice that the indicator lamp
(Q) is on. This luminous indication serves to tell you that the temperature in the boiler is still high, i.e. it is still that for steam;
you must therefore wait a few seconds until the lamp (Q) turns off. Wait until the lamp (Q) turns back on before dispensing
the coffee.
If you want to cool down the boiler faster, place a container underneath the cappuccino maker, press switch (P) and at the
same time keep the cock (J) open. Make water come out of the Maxi Cappuccino device until when the indicator lamp (Q)
turns back on. Now close the cock (J) and turn the switch (P) off. Wait for the lamp (Q) to turn off before making another
cup of coffee.
HOW TO MAKE TEA OR TISANES
When the machine is in the coffee-ready position, i.e. with the lamp (Q) on, place a cup underneath the spout (L) and press
the coffee dispensing switch (P). Open the steam dispensing cock (I) immediately afterwards; in this way hot water will come
out of the spout. The maximum quantity for two cups is 200 ml.
CLEANING THE APPLIANCE
Warning!
All cleaning operations described below must be performed with the machine off and with the electric plug discon-
nected from the socket-outlet.
Warning!
Regular maintenance and cleaning preserve and keep the machine efcient for a longer amount of time. Never
wash machine components in the dishwasher. Do not use direct jets of water.

7
EN
Warning!
All operations must be performed when the machine is cold.
Cleaning the lter holder.
Start dispensing with the lter holder connected and without the pod inside by pressing the button (P) after having placed
a glass underneath the lter holder. In this way any coffee residue or impurities present in the lter holder will dissolve and
be removed.
Cleaning the lter holder seat
With time, coffee residue may accumulate on the lter holder seat. It can be removed with a toothpick, a sponge (Fig. 19),
or by letting water run through without tting the lter holder (Fig. 6).
Cleaning the cappuccino maker
Warning!
Perform this operation when the chrome-plated pipe is cold so as to prevent burns.
Unscrew the device (L) from the small pipe and wash it with running water. The small pipe can be cleaned with a non-abra-
sive cloth. Screw the cappuccino maker back on as far as it will go. If necessary, clean the small steam outlet hole again with
a pin. After use, always let the steam nozzle run for a few seconds so to free the outlet from any possible residue.
Cleaning the tank
Periodically clean the inside of the tank with a sponge or damp cloth.
Cleaning the drip tray
Remember to empty the drip tray (G) from time to time.
Remove the grill (E) Fig. 21 and wash it under running water. Remove the drip tray (G) from the machine together with the
tray (F) Fig. 22. Empty them and wash them under running water.
Cleaning the machine body
Warning!
Clean the xed parts of the machine using only a damp, non-abrasive cloth so as to not damage the body.
DECALCIFICATION
Good maintenance and regular cleaning preserve and keep the machine efcient for a longer amount of time, considerably
limiting the risks of lime deposits forming inside the appliance. However, should your coffee machine fail to work properly as
a result of the frequent use of hard, high calcium content water, you may perform a decalcication procedure to restore its
operational efciency. Ariete does not assume any responsibility whatsoever for damage to components inside the coffee
machine caused by the use of non-compliant products containing chemical additives. Should you need to decalcify your
appliance, please follow the instructions which come with the decalcifying product.
PUTTING OUT OF SERVICE
If you want to put the machine out of service, you must disconnect it electrically, empty the water tank and drip tray and clean
it (see the paragraph on “Cleaning the appliance”).
In the case of scrapping, you must separate the various materials used in making the machine and dispose of them based
on their composition and on the legal provisions in force in the country of use.

8
EN
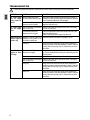
TROUBLESHOOTING
If there are problems with operation, immediately turn off the machine and unplug it from the socket-outlet.
PROBLEM CAUSE SOLUTIONS
The coffee maker
does not supply
boiling water for
tisanes.
Air has probably entered the
circuit and deactivated the pump.
Make sure the tank is properly inserted and that the water is
not below the minimum level. Repeat the operations described
in the “Preliminary phases for use” paragraph.
The steam exit hole on the
dispenser wand is clogged.
Unclog any deposits that may have formed in the hole of the
dispenser wand with a pin.
The coffee maker
does not supply
steam.
There is little water and the pump
does not suck it up.
Check that the water level in the tank is correct. If necessary,
ll it with cool tap water
The steam exit hole on the
dispenser wand is clogged.
Unclog any deposits that may have formed in the hole of the
dispenser wand with a pin.
Coffee overowing from the edges of the lter ring.
Coffee overowing
from the edges of
the lter ring.
Residues of ground coffee have
remained on the gasket of the
lter holder coupling seat.
Clean the seal with a toothpick or a sponge (Fig. 19).
Faulty pod. Slowly remove and disconnect the lter holder because any
remaining pressure could cause splashes or squirts. Clean the
coupling seat with a sponge (Fig. 19). Replace the pod in the
lter holder.
The coffee is not
supplied or ows
too slowly.
The holes of the lter holder cou-
pling seat are clogged
Turn on the machine without the lter holder, making the water
run. Perform decalcication following the instructions provided
with the product.
The tanks is not inserted well. Fit the tank securely by pushing it as far as it will go.
There is little water and the pump
does not suck it up.
Check that the water level in the tank is correct. If necessary,
ll it with cool tap water.
Faulty pod. Slowly remove and disconnect the lter holder because any
remaining pressure could cause splashes or squirts. Clean the
coupling seat with a sponge (Fig. 19). Replace the pod in the
lter holder.
Broken pod. Slowly remove and disconnect the lter holder because any
remaining pressure could cause splashes or squirts. Clean the
coupling seat with a sponge (Fig. 19). Replace the pod in the
lter holder.
-
 1
1
-
 2
2
-
 3
3
-
 4
4
-
 5
5
-
 6
6
-
 7
7
-
 8
8


ARIETE Konsuelo Plus Manuale utente
- Categoria
- Macchine da caffè
- Tipo
- Manuale utente
in altre lingue
- English: ARIETE Konsuelo Plus User manual
Documenti correlati
Altri documenti
-
Silvercrest SEMR 850 A1 Operating Instructions Manual
-
Bialetti Mokona Instructions For Use Manual
-
Rancilio CLASSE 10 Use And Maintenance
-
Candy BMC 60 X Manuale utente
-
la Pavoni EUROPICCOLA ERG LEVIER Manuale utente
-
Rowenta SILVER ART Manuale del proprietario
-
-
-
Silvercrest SDM 1500 A1 Manuale utente
-