Candy CCHE 260 Manuale utente
- Categoria
- Frigo-congelatori
- Tipo
- Manuale utente

NL
D
GB
F
I
E
P
Gebrauchs- und Wartungsanleitung
Operating and Maintenance instructions
Mode d’emploi et entretien
Libretto istruzioni per l’uso e la manutenzione
Instrucciones para el uso y el mantenimiento
Instruções de uso e manutenção
Gebruiks- en onderhoudshandleiding
Models:
Modèles :
Models:
Modelli:
Modelos:
Modelos:
Modellen:
HCF-100
HCF-130
HCF-220
HCF-300
HCF-350
HCF-400
HCF-210 S
HCF-270 S
HCF-330 S1
HCF-330 S2
HCF-410 S1
HCF-410 S2

2
Deutsch Seite 3-6, 31-32
English Page 7-10, 31-32
Français Page 11-14, 31-32
Italiano Pag. 15-18, 31-32
Español Pag. 19-22, 31-32
Português Pàg. 23-26, 31-32
Nederlands Pag. 27-30, 31-32

3
D
Im folgenden finden Sie alle für die richtige Bedienung des Geräts erforderlichen Angaben.
Diese Bedienungsanleitung ist für mehrere Geräte gültig; daher kann es je nach Gerätemodell zu
geringfügigen Abweichungen kommen.
Bewahren Sie diese Bedienungsanleitung auf. Sollten Sie das Gerät weiterverkaufen, händigen Sie sie bitte dem Käufer aus.
LESEN SIE DIE BEDIENUNGSANLEITUNG VOR DER INSTALLATION UND INBETRIEBNAHME DES GERÄTS
AUFMERKSAM DURCH.
- JEDE WARTUNGSOPERATION - HIERZU GEHÖRT AUCH DAS AUSWECHSELN DES NETZKABELS - DARF
AUSSCHLIESSLICH VON UNSEREM KUNDENDIENST ODER VON QUALIFIZIERTEM FACHPERSONAL
DURCHGEFÜHRT WERDEN.
Dieses Gerät darf mit Lebensmitteln in Berührung kommen und entspricht dem ital. Gesetzerlass 108 vom 25.01.1992 (EG-
Richtlinie 89/109).
Dieses Produkt wurde gemäß folgenden Richtlinien entworfen, hergestellt und auf den Markt gebracht:
Sicherheitsanforderungen der EG-Richtlinie 73/23 zur NIEDERSPANNUNG
EG-Richtlinie EMC 89/336
EG-Richtlinie zur Kennzeichnung 93/68
EG-Richtlinie zum Gütegrad 96/57
• UMWELTRELEVANTE ANGABEN
Dieses Produkt wurde mit größter Sorgfalt und unter Einsatz von umweltfreundlicher Technologie entwickelt und hergestellt.
Aufgrund der Verwndung von umweltbelastenden und entflammbaren Materialien wie z. B. im Kompressor enthaltenem Schmiermittel
ist bei seiner Entsorgung die gleiche Sorgfalt aufzuwenden. Belasten Sie mit dem Gerät daher nicht die Umwelt, sondern vertrauen
Sie die Entsorgung einem qualifizierten Fachunternehmen an.
Dieses Gerät ist FCKW-frei (der Kältekreislauf enthält R134a) oder FKW-frei (der Kältekreislauf enthält R600a - ISOBUTAN). Zur
genauen Identifizierung des in Ihrem Gerät enthaltenen Gases bitte Typenschild am Gerät einsehen.
• Betrifft die Geräte mit Isobutan (R600a)
Isobutan ist ein Naturgas ohne umweltschädigende Auswirkungen, es ist jedoch entflammbar. Die Leitungen des Kältekreislaufs sind
daher unbedingt auf ihre Unversehrtheit zu überprüfen, bevor das Gerät an das Netz angeschlossen wird.
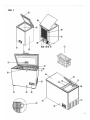
INSTALLATION
- Zur Installation des Geräts sind zwei Personen erforderlich, um Personen- oder Sachschäden zu vermeiden.
Das Gerät muss auf einem waagerechten und standfesten Untergrund abgestellt werden. Nur auf diese Weise wird die freie Zirkulation
des Kältemittels gewährleistet. Nivellieren Sie das Gerät an den Stellfüßen (V).
- Setzen Sie das Gerät nicht der direkten Sonnenstrahlung aus.
Im Idealfall sollten Sie Ihr Gerät an einem kühlen, trockenen und gut belüfteten Ort aufstellen, also nicht in der Nähe von Wärmequellen
(Heizungen, Öfen) oder dem Sonnenlicht direkt ausgesetzt. Stellen Sie auf den Kühl-/Gefrierschrank keine wärmeabstrahlenden
Elektrogeräte, wie:
Mikrowellen, Toaster, usw.
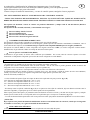
- Auf dem Typenschild (Rückseite) können Sie die Klimaklasse des Geräts ablesen: Abb.1 (W)
falls: “SN” geeignet für Umgebungstemperaturen zwischen +10°C und +32°C;
falls: “N” geeignet für Umgebungstemperaturen zwischen +16°C und +32°C;
falls: “ST” geeignet für Umgebungstemperaturen zwischen +18°C und +38°C;
falls: “T” geeignet für Umgebungstemperaturen zwischen +18°C und +43°C;
- Stellen Sie niemals das Lüftungsgitter Abb.1 (F) zu. Besitzt Ihr Gerät kein Lüftungsgitter, so halten Sie einen angemessenen Abstand
zwischen Gefrierschrankrückseite und Wand ein, um die warme Abluft entweichen zu lassen.
Dieser Abstand sollte mindestens 20 mm zur Rückwand und 100 mm zu eventuell über dem Gerät angebrachten Hängeschränken
betragen. Verwenden Sie die Abstandhalter (falls mitgeliefert). Abb. 1 (U).
- Die Steckdose muss zugänglich sein, um in Notfällen den Netzstecker ziehen zu können.
ACHTUNG!
Nach dem Aufstellen des Gerätes sollten Sie mindestens 2 Stunden warten, bevor Sie es an das Netz anschließen, damit das
Kältemittel seine volle Funktionstüchtigkeit erreichen kann und Betriebsstörungen vermieden werden.
• TYPENSCHILD
Das Typenschild mit den technischen Daten befindet sich auf dem Gehäuse an der Rückseite (W) des Geräts.
ELEKTRISCHER ANSCHLUSS

4
HINWEISE ZUR SICHERHEIT
- Der Anschluss des Geräts an eine korrekt geerdete Steckdose ist gesetzlich vorgeschrieben. Aus diesem Grund ist das Gerät mit
einem Netzstecker mit Erdungsleiter ausgerüstet, der in eine Steckdose vom selben Typ gesteckt werden muss. Der Hersteller
haftet nicht für eventuelle Personen- und Sachschäden, die infolge Nichtbeachtung der o. g. Vorschrift entstehen sollten.
- Prüfen Sie, ob die auf dem Typenschild auf der Rückseite angegebene Spannung mit der in Ihrer Wohnung übereinstimmt.
- Unterlassen Sie jeglichen mechanischen Eingriff in das Kühlsystem, insbesondere in die folgenden, leicht zugänglichen Komponenten:
Rückseitiger Verdichter(Q)(S); Kompressor (N); Kapillarrohr/Rücklaufrohr (R); Entwässerungsfilter (O); Gebläse (P); Zu
Eingriffen in das Kühlsystem ist nur qualifiziertes Fachpersonal befugt.
INBETRIEBNAHME DES GERÄTES
Packen Sie das Gerät vollständig aus
Entfernen Sie alle Styroporteile aus dem Kompressorfach (falls vorhanden) (M)
Entfernen Sie aus dem Kompressorfach im Geräteinneren alle Dokumente und eventuell vorhandenen Zubehörteile
Reinigen Sie das Geräteinnere mit lauwarmem Essigwasser und reiben Sie es anschließend mit einem Tuch gründlich trocken.
Schließen Sie das Gerät
Stecken Sie den Netzstecker in die Steckdose
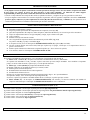
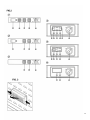
Drehen Sie den Thermostaten bis zur Position MAX. Abb. 2 (A)
Die grüne (B) und rote Kontrollleuchte (C) leuchten auf. Abb. 2
Betätigen Sie die SCHNELLGEFRIERTASTE (E) (falls vorhanden). Die gelbe Kontrollleuchte(D) leuchtet auf
Öffnen Sie das Gerät in den folgenden 4 Stunden oder solange nicht, bis die rote Kontrollleuchte nicht erlischt. Nur auf diese
Weise kann im Innenraum die korrekte Kühltemperatur aufgebaut werden.
Jetzt können die Lebensmittel, die schnellgefroren werden sollen, in den Tiefkühlteil gelegt werden, (siehe hierzu “Maximale
Stapelhöhe”)
Nach 24 Stunden kann die SCHNELLGEFRIERTASTE wieder gedrückt werden.
KONTROLLLEUCHTEN
Falls Ihr Gerät Kontrollleuchten besitzt, so haben diese je nach Farbe die folgenden Bedeutungen. Abb. 2
Grüne Kontrollleuchte – CONTROL (Betrieb) (B) das Gerät ist an das Netz angeschlossen und in Betrieb.
Die grüne Kontrollleuchte muss immer leuchten, wenn das Gerät an das Netz angeschlossen und eingeschaltet ist. Dieser Zustand ist
auch Voraussetzung für die Funktionstüchtigkeit der roten und gelben Kontrollleuchte, die z. B. infolge eines Spannungsabfalls
verloren geht.
Rote Kontrollleuchte – ALARM (Alarm) (C) zu hohe Temperatur
Unter den folgenden Bedingungen ist das Aufleuchten der roten Kontrollleuchte normal:
ERSTMALIGE INBETRIEBNAHME DES GERÄTES
Erneute Inbetriebnahme nach dem Abtauen
Einfrieren von frischen Lebensmitteln
Die rote Kontrolllampe erlischt automatisch, wenn die Innentemperatur ca. –18°C erreicht hat
Betätigen Sie die Schnellgefriertaste (E) (falls vorhanden).
Bleibt die rote Kontrollleuchte jedoch auch nach 12-24 Stunden leuchten, liegt möglicherweise eine Störung vor.
Gelbe Kontrollleuchte (D) – Die SCHNELLGEFRIERTASTE ist eingeschaltet und die Thermostatfunktion ausgeschaltet.
Der Kompressor arbeitet solange ununterbrochen, bis die SCHNELLGEFRIERTASTE wieder gedrückt wird.
MODELLVARIANTEN (Abb. 2) (G)
1
a
Integrierte Modellvariante: mit getrennter Schnellgefriertaste (E).
2
a
Integrierte Modellvariante: mit Schnellgefriertaste. Ohne Kontrollleuchte für die Schnellgefrierfunktion (D).
3
a
Integrierte Modellvariante: ohne Schnellgefrierfunktion.
4
a
Modellvariante: mit EIN/AUS-Taste (F) und Schnellgefriertaste (E).
5
a
Modellvariante: nur mit Schnellgefriertaste (E).
6
a
Modellvariante: ohne Schnellgefrierfunktion.
TEMPERATURREGLER (Thermostat)
Mit dem Temperaturregler wird die Tiefkühltemperatur eingestellt.

5
Einschalten: Regler im Uhrzeigersinn drehen > (A) Abb. 2
Regeln Sie die Temperatur je nach Bedarf zwischen:
Min (niedrigste Kälteleistung) und
Max (höchste Kälteleistung)
Abschalten: Regler gegen den Uhrzeigersinn drehen < (A) Abb. 2
In der Stellung “0” ist das Gerät ausgeschaltet.
Bei der Temperatureinstellung sind folgende Faktoren zu berücksichtigen: 1) Kühlschrank-Umgebungstemperatur; 2) Eingelagerte
Lebensmittelmenge; 3) Häufigkeit der Türöffnungen.
•
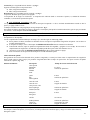
INNENBELEUCHTUNG (falls vorhanden) Abb. 1 (C)
Die mit Innenbeleuchtung ausgestatteten Geräte haben einen eingebauten Schalter. Die Beleuchtung wird beim Öffnen der Tür
automatisch ein- und beim Schließen wieder ausgeschaltet.
Die Glühbirne ist durch eine transparente Abdeckung geschützt. Abb. 3
Zum Auswechseln der Glühbirne verfahren Sie wie folgt: ziehen Sie den Netzstecker heraus oder schalten Sie die Hauptsicherung ab und
nehmen Sie die Lampenabdeckung durch Zusammendrücken an ihren Enden ab. Verwenden Sie ausschließlich Ersatzbirnen mit einer
Leistung von max. 15 W.
EINLAGERUNG/EINFRIEREN
Lagern sie frische Lebensmittel im Seitenfach Abb. 1 (I) (dies ist nicht bei allen Modellen vorhanden) oder möglichst weit unten im
Gefrierschrank, wo die Temperatur am tiefsten ist. (E)
Zwischen den beiden Fächern ist eine Trennwand, die je nach Modell fix oder herausnehmbar sein kann. Abb. 1 (H)
Lagern Sie innerhalb von 24 Stunden nur so viele Lebensmittel ein, wie die Gefrierleistung Ihres Geräts zulässt. Diese können
Sie dem Typenschild entnehmen.
Drücken Sie, falls vorhanden, die SCHNELLGEFRIERTASTE, bevor Sie die Lebensmittel einlagern.
Lagern Sie das Gefriergut nach 24 Stunden vom Boden in einen Gefrierkorb (L) um, damit der Schnellgefrier- bzw.
Bodenbereich für die Einlagerung von frischen Lebensmitteln frei wird.
Drücken Sie die SCHNELLGEFRIERTASTE Abb. 2 (E) (die gelbe Kontrollleuchte erlischt)
Stellen Sie den Temperaturregler auf einen dem Beladungszustand des Geräts entsprechenden Wert.
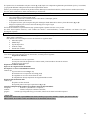
Maximale Stapelhöhe
Um eine optimale Konservierung des Gefrierguts zu gewährleisten, wird empfohlen, das Gefrierfach nicht bis zum oberen Rand
aufzufüllen. Zwischen dem Deckel und dem Gefriergut sollte stets ein gewisser Abstand verbleiben. Überschreiten Sie daher die obere
Beladungsmarke nicht Abb. 1 (T).
Lebensmittelsymbol Beschreibung Konservierungsdauer
Hackfleisch
Würste/Salami 2-3 Monate
Fisch in Polyäthylenbeuteln
Speiseeis
Obst
Käse 4 Monate
Brot in Polyäthylenbeuteln
Süßspeisen/Kekse
Schweinefleisch 6 Monate
Rindfleisch in Aluminiumfolie
Kaninchen/Lamm
Pilze/Spargel in Polyäthylenbeuteln
Schnittgemüse in Aluminiumfolie
Huhn/Truthahn 8 Monate
Ente/Gans
Blumenkohl 10-12 Monate
Bohnen/Paprika in Polyäthylenbeuteln
Konserven in Gefrierbehältern
Kompott in Aluminiumfolie.
REINIGUNG UND PFLEGE
Ziehen Sie vor jeder Reinigungs- und Wartungsarbeit den Netzstecker.

6
Reinigen Sie den Innenraum und die Zubehörteile mit lauwarmem Essigwasser. Verwenden Sie keine Scheuermittel, Reinigungsmittel
oder Seife.
Falls der Verdichter Ihres Geräts sich außen befindet, Abb. 1 (S), so muss dieser von Zeit zu Zeit von angesammeltem Schmutz und
Staub gesäubert werden, da es sonst zu einem Wärmestau kommen kann.
Eis- und Reifbildung an den Innenwänden wirkt sich negativ auf die Kälteleistung aus und muss in regelmäßigen Abständen entfernt
werden. Benutzen Sie zu diesem Zweck nur die vom Hersteller mitgelieferten Instrumente.
ABTAUEN
Zum Abtauen verfahren Sie wie folgt:
- Drehen Sie den Thermostaten in die Stellung 0; Abb. 2 (A)
- Ziehen Sie den Netzstecker aus der Steckdose oder schalten Sie die Hauptsicherung ab;
- Entnehmen Sie alle Lebensmittel;
- Ziehen Sie die Stopfen der Tauwasserabflüsse im Geräteinneren und außen am Einbauschrank (wo vorhanden) heraus; Abb. 1 (Z)
- Fangen Sie das herauslaufende Wasser in einem unter den Außenabfluss gestellten Behälter auf;
- trocknen Sie die Innenwände ab.
Bei normalem Gebrauch (3-4 Türöffnungen pro Tag) sollte der Gefrierschrank ein- bis zweimal im Jahr abgetaut werden.
Verwenden Sie zum Abtauen des Geräts niemals elektrische Heizgeräte, wie Haartrockner, Heizlüfter oder gar Hilfsmittel mit offener
Flamme.
KUNDENDIENST
Wenden Sie sich erst dann an den Kundendienst, wenn Sie die Lösung des Problems nicht selbst gefunden haben. Lesen Sie hierzu auch
die Hinweise im Kapitel “Fehlersuche/Ursachen/Abhilfe”
Halten Sie im Interesse einer möglichst schnellen Bearbeitung Ihrer Anfrage die Identifikationsdaten Ihres Geräts bereit, bevor Sie
den Kundendienst anrufen:
• Marke des Geräts;
• Modell/Typ;
• Art der Störung;
• Kaufdatum;
• Name des Händlers;
FEHLERSUCHE/URSACHEN/ABHILFE
Nicht immer ist eine Störung auf einen Gerätedefekt zurückzuführen, sondern in vielen Fällen auf eine nicht fachgerechte Installation
oder Benutzung des Geräts. Berücksichtigen Sie folgende Punkte, wenn Sie die mit einer voreiligen Kundendienstanfrage verbundenen
Kosten vermeiden möchten:
Das Gerät funktioniert nicht
Kontrollieren Sie, ob:
Der Thermostat nicht auf 0 gestellt ist.
Der Netzstecker in einwandfreiem Zustand und korrekt angeschlossen ist.
Liegt vielleicht ein Stromausfall vor?
Die Kälteleistung des Geräts ist unbefriedigend
Der Tiefgefriervorgang dauert zu lange
Der Kompressor springt zu häufig an
Kontrollieren Sie, ob:
Die Tür korrekt geschlossen ist; Abb. 1 (A)
Der Thermostat sich in der richtigen Stellung befindet; Abb. 2 (A)
Der Gefrierschrank nicht in der Nähe einer Wärmequelle aufgestellt ist;
Die Reifschicht im Tiefkühlfach nicht zu dick ist;
Das Gerät verursacht ein zu lautes Betriebsgeräusch.
Kontrollieren Sie, ob:
Das Gerät korrekt nivelliert ist;
Die hintere Kühlschlange nicht die Rückwand berührt; Abb. 1 (S)
Die folgenden Betriebsgeräusche sind als durchaus normal anzusehen:
Klickgeräusche verursacht durch das Anspringen und Abschalten des Kompressors;
Brummgeräusche diese treten unmittelbar nach dem Anspringen des Kompressors auf;
Gurgelgeräusche diese treten auf, wenn das Kältemittel in die Leitungen läuft oder nach dem Anspringen des Kompressors;
ACHTUNG!
Der Hersteller lehnt jede Verantwortung für eventuelle Schäden an Personen, Haustieren oder Sachen ab, die infolge
Nichtbeachtung der in dieser Bedienungsanleitung enthaltenen Vorschriften direkt oder indirekt entstehen.

7
GB
This booklet contains important instructions concerning the use of your appliance.
These instructions cover a number of appliances, therefore depending on the type of appliance,
some details may vary slightly.
Keep this booklet for consultation and if you sell the appliance give it to the new buyer.
READ CAREFULLY BEFORE INSTALLING OR USING THE APPLIANCE.
- ALL MAINTENANCE OPERATIONS, INCLUDING REPLACEMENT OF THE POWER SUPPLY CABLE, SHOULD THIS
BECOME NECESSARY, MUST BE CARRIED OUT BY THE AFTER-SALES SERVICE OR A QUALIFIED ELECTRICIAN.
This appliance is intended to come into contact with foodstuffs and conforms to D.L. 108 of 25.01.1992 (European Directive
89/109/EEC).
This appliance has been designed, manufactured and retailed in compliance with:
LOW VOLTAGE Directive 73/23/EEC
EMC Directive 89/336/EEC
Marking Directive 93/68/EEC
Energy Efficiency Directive 96/57/EEC
• ENVIRONMENTAL INFORMATION
This appliance has been designed and manufactured taking into account the need to safeguard the environment.
To ensure the same care when of scrapping, given the presence of pollutants or inflammable materials such as lubrication oil in the
compressor, dispose of the appliance with care, delivering it to your local authorized collection centre for waste disposal and
scrapping.
This appliance does not contain CFCs (the refrigerant circuit contains R134a) or HFC (the refrigerant circuit contains R600a –
ISOBUTANE). To check which gas your appliance contains, refer to the appliance data plate.
• For appliances with ISOBUTANE (R600a)
Isobutane is a naturally occurring low environmental impact gas. Caution is required, however, because Isobutane is flammable.
Therefore, before connecting the appliance to the power supply, it is essential to ensure that refrigerant pipelines are not damaged.
INSTALLATION
- Appliance installation should be carried out by two persons in order to avoid injury to persons or damage to objects.
The appliance must be installed upright on a strong, sturdy surface. This is the only way to guarantee no obstacles in the refrigerant
circuit. Use the adjustable feet (V) to level the appliance.
- Do not expose the appliance to high ambient temperatures or direct sunlight.
Ideally, the appliance should be installed in a cool, dry, well ventilated area, away from sources of heat such as radiators, heaters or direct
sunlight. Do not place any heat-producing appliances (microwave ovens, toasters, etc.) on top of the refrigerator/freezer.
- For the climatic class of your appliance, refer to the data plate affixed to the rear of the appliance: fig.1 (W)
if “SN”: appliance operates at ambient temperatures between +10°C and +32°C;
if “N”: appliance operates at ambient temperatures between +16°C and +32°C;
if “ST”: appliance operates at ambient temperatures between +18°C and +38°C;
if “T”: appliance operates at ambient temperatures between +18°C and +43°C;
- Never obstruct the air vent fig.1 (F). For appliances not equipped with an air vent, ensure sufficient space is left between the rear of the
freezer and the wall so as to allow hot air to exit freely.
Leave a space of at least 20mm between the rear of the appliance and the wall, and 100mm between the top of the appliance and any
overhead wall units. Use the spacers if supplied. fig.1 (U).
- Ensure easy access to the power socket so that the appliance can be disconnected from the mains when necessary.
IMPORTANT!
Wait at least two hours before connecting the appliance to the power supply in order to ensure the refrigerant circuit is fully
efficient and avoid possible malfunctions.
• RATING PLATE
The identification plate is affixed to the rear of the (W) appliance.

8
ELECTRICAL CONNECTION
SAFETY WARNINGS
- The appliance must be connected to the mains by means of a socket with an earth connection in accordance with current
regulations. For this reason, the appliance is fitted with a plug with a suitable earth connection, to be inserted in a power socket of
the same type. The manufacturer declines all liability for injury to persons or animals and for damage to property resulting from
failure to observe these recommendations.
- Check that the voltage indicated on the appliance data plate corresponds to the supply voltage.
- Do not expose the refrigerant circuit to any mechanical stress, especially the following accessible components: Rear condenser (Q)(S);
Compressor (N); Capillary pipeline/Return pipeline (R); Drying filter (O); Fan (P); Any maintenance operations on the
refrigeration circuit must be carried out by authorized qualified technicians only.
SWITCHING ON THE APPLIANCE
Fully unpack the appliance
Remove all polystyrene from the compressor compartment (if fitted) (M)
Remove all documentation and any accessories supplied from the compressor compartment
Clean the inside of the appliance with warm water and vinegar and dry thoroughly
Close the appliance
Insert the power plug into the mains socket
Turn the temperature regulator clockwise to MAX. fig.2 (A)
The green (B) and red (C) indicator lights come on. fig.2
If present, select the FAST-FREEZE (E) function (the yellow LED (D) also comes on)
Do not open the door for approx. 4 hours until the red indicator light switches off, in order to allow the compartment to reach a
suitably cold temperature.
Food can then be placed in the freezer for fast freezing (see “maximum height for stacking”)
After 24 hours, press the FAST-FREEZE button again to cancel the function.
OPERATION INDICATOR LIGHTS
If your appliance features indicator lights, they denote the following: fig.2
Green indicator light – CONTROL (B) the appliance is connected to the electrical power supply and is switched on.
The green indicator light must always be visible when the appliance is plugged in and switched on. This indicator light is particularly
important since in the event of a power cut the red and yellow indicator lights do not work.
Red indicator light – ALARM (C) Temperature too high
It is normal for the red indicator light to come on under the following circumstances:
Initial switch-on of the appliance
Switch-on following defrosting
Introduction of fresh food in the freezer
The red indicator light switches off automatically when the internal temperature reaches approx. –18°C
Select, if supplied, the fast freeze function (E).
If, however, the red indicator light remains lit after 12-24 hours, the appliance may have a technical fault.
Yellow indicator light (D) – The FAST-FREEZE function is selected and the thermostat function is cancelled. The compressor
continues to work to lower the temperature until the FAST-FREEZE function is cancelled.
DESIGN VARIATIONS (FIG. 2) (G)
1
st
Design Variation: with separate switch for fast freeze function (E).
2
nd
Design Variation: with switch for fast freeze function. No fast freeze function indicator light (D).
3
rd
Design Variation: no fast freeze function.
4
th
Design Variation: with ON/OFF (F) switch and fast freeze (E) switch.
5
th
Design Variation: with fast freeze (E) switch only.
6
th
Design Variation: no fast freeze function.
TEMPERATURE REGULATOR (thermostat)
The thermostat is used to set the freezer temperature.

9
To select: turn the regulator clockwise > (A) fig. 2
Set the temperature, according to requirements, between:
Min (minimum temperature) and
Max (maximum temperature)
To cancel: turn the regulator anti-clockwise < (A) fig. 2
The position “ 0 ” indicates the appliance is not operating (switched off).
When setting the temperature, take into account: 1) the ambient temperature in the room where the appliance is installed; 2) the quantity
of food in the compartment; 3) the frequency of door opening.
•
INSIDE LIGHT (if provided ) fig.1 (C)
Appliances fitted with an inside light also feature a switch for the light. The light switches on automatically when the door is opened and
switches off again when the door is closed.
The incandescent bulb is protected by a transparent cover. fig.3
To replace the bulb, proceed as follows: unplug the appliance or switch off the domestic power supply at the main switch, remove the
cover, squeezing the end. Replace with a new bulb, max 15 W.
STORING/FREEZING
Place fresh foods in the side compartment fig.1 (I) (not provided on all models) or in the bottom of the freezer, where the temperature is
lowest. (E)
The two compartments are divided by a separator panel, which is fixed or mobile, depending on the model. fig.1 (H)
Within 24 hours place the fresh food in the freezer. Do not exceed the quantity of fresh food that can be frozen by your
appliance. Refer to the appliance data plate for details.
If provided, select FAST-FREEZE before placing food in the freezer.
After 24 hours remove the frozen food from the bottom of the freezer and place in a basket (L) so that the pre-freezing
compartment or bottom of the freezer is free again for fresh food to be frozen.
Switch off FAST-FREEZE fig.2 (E) (the yellow indicator light switches off)
Set the temperature regulator to a suitable position, taking into account how full the appliance is.
Maximum stacking height
To guarantee optimal storage of frozen food, do not fill the freezing compartment to the top level. Always leave a reasonable gap between
frozen food stacked and the appliance lid. Never exceed the maximum stacking height indicated on the appliance by the manufacturer fig.1
(T).
Food Symbol Description Storage Time/Packing
Minced meat
Sausages/cold cuts 2-3 months
Fish in polythene freezer bags
Ice cream
Fruit
Cheese 4 months
Bread in polythene freezer bags
Sweets/Biscuits
Pork 6 months
Beef in tinfoil
Rabbit/lamb or mutton
Mushrooms/Asparagus in polythene freezer bags
Vegetables (cut) in tinfoil
Chicken/Turkey 8 months
Duck/Goose
Cauliflower 10-12 months
Beans/Peppers in polythene freezer bags
Preserves in glass containers
Cooked Fruit in tinfoil
CARE AND MAINTENANCE
Unplug the appliance before any cleaning or maintenance operations.
To clean the inside of the appliance, use a solution of water and vinegar; never use abrasive products, detergents or soap.

10
If the appliance is provided with a condenser on the external wall fig.1 (S), periodically remove any dust and dirt from it, since these
prevent heat being vented from the appliance.
The formation of ice and frost on the inside walls has a detrimental effect on the appliance's ability to chill, and should therefore be
removed periodically. For removal of frost and ice, adhere strictly to the manufacturer's recommendations.
DEFROSTING
To carry out defrosting proceed as follows:
- turn the thermostat to 0; fig.2 (A)
- unplug the appliance or switch off the domestic power supply at the main switch;
- remove all food from the freezer;
- remove the defrost water drain plug inside the compartment and on the outside of the housing, where provided.; fig.1 (Z)
- place a container next to the external drain outlet to collect the defrost water;
- dry the inside walls.
With normal use (the appliance is opened 3-4 times a day) the freezer should be defrosted once or twice a year.
Never use electrical appliances such as hairdryers, fan heaters or a naked flame for defrosting.
AFTER-SALES SERVICE
Only contact after-sales service if you are unable to solve the problem yourself with the help of the “Troubleshooting
guide/Causes/Solutions” (supplied with the appliance).
To facilitate the job of the after-sales service, before calling take note of the following information to identify your appliance:
• Appliance brand;
• Model/Type;
• Type of problem;
• Date of purchase;
• Name of retailer;
TROUBLESHOOTING GUIDE/CAUSES/SOLUTIONS
Abnormal operation is not always caused by an actual malfunction of the appliance, but by incorrect installation or use. To avoid needless
call-outs and the relative bill for after-sales service, observe the following:
The appliance is not working
Check that:
The thermostat is not at 0.
The power plug is in good condition and properly inserted in the socket
There is no power cut.
The appliance does not freeze sufficiently
Freezing takes too long
The compressor runs too much
Check that:
The door is closed properly; fig.1 (A)
The thermostat is set to the correct position; fig.2 (A)
The freezer is not too near a heat source;
There is not an excessive build-up of frost in the low temperature compartment;
The appliance is too noisy
Check that:
The appliance is properly level;
The rear coil is not touching the wall; fig.1 (S)
Bear in mind that it is normal for the appliance to produce the following noises:
clicking noises caused by the compressor starting and stopping;
humming noises when the compressor begins running;
gurgling noises as the refrigerant gas flows through the pipelines, even once the compressor stops;
IMPORTANT!
The manufacturer declines all liability for injury to persons or animals and for damage to property resulting directly or indirectly
from failure to observe the procedures and reminders given in this instruction booklet.

11
F
Vous trouverez-ci-après toutes les consignes importantes pour utiliser correctement l'appareil.
Ces consignes d'utilisation sont valables pour plusieurs appareils, raison pour laquelle il peut y avoir
des pièces différentes selon le type d'appareil.
Toujours conserver le mode d'emploi et le remettre au nouveau propriétaire en cas de vente de l'appareil.
LIRE ATTENTIVEMENT AVANT D'INSTALLER ET D'UTILISER L'APPAREIL.
- TOUTE INTERVENTION D'ENTRETIEN, Y COMPRIS L'EVENTUEL REMPLACEMENT DU CABLE
D'ALIMENTATION, DOIT ETRE EFFECTUÉE PAR LE SERVICE D'ASSISTANCE TECHNIQUE OU PAR DU
PERSONNEL AGREE.
Cet appareil est destiné à entrer en contact avec des denrées alimentaires et est conforme au Décret Législatif 108 du 25-01-92
(Directive européenne 89/109CE).
Cet appareil a été conçu, construit et commercialisé conformément à :
la Directive BASSE TENSION 73/23 CE
la Directive EMC 89/336 CE
la Directive marquage CE 93/68/CE
la Directive efficacité énergétique 96/57/CE
• INFORMATIONS RELATIVES A L'ENVIRONNEMENT
Cet appareil a été conçu et construit avec un maximum de soin et de respect pour l'environnement.
Pour garantir le même soin lors de la démolition compte tenu de la présence de substances polluantes ou inflammables comme, par
exemple, l'huile lubrifiante du compresseur, il est conseillé de ne jamais abandonner l'appareil dans la nature et de s'adresser à des
organismes locaux compétents pour leur collecte et leur élimination.
Cet appareil est sans CFC (le circuit réfrigérant contient du R134a) ou sans HFC (le circuit réfrigérant contient du R600a –
ISOBUTANE). Pour vérifier le gaz utilisé, consulter la plaque signalétique avec les données techniques apposée sur l'appareil.
• Pour les appareils avec ISOBUTANE (R600a)
L'isobutane est un gaz naturel qui est sans danger pour l'environnement mais inflammable. Il est donc indispensable de vérifier que les
tuyaux du circuit réfrigérant ne sont pas détériorés avant de raccorder l'appareil au réseau d'alimentation.
INSTALLATION
- L’appareil devrait être installé par deux personnes afin d'éviter tout dommage à des personnes ou à des objets.
L’appareil doit être placé à l'horizontale sur un sol résistant. Ce n'est que de cette façon qu'il est possible de garantir une bonne circulation
du réfrigérant. Utiliser les pieds réglables (V) pour mettre l'appareil d'aplomb.
- Eviter absolument une température ambiante élevée et les rayons directs du soleil.
Le lieu idéal pour l'installation de votre appareil est un lieu frais, bien aéré et sec, à l'écart de sources de chaleur comme les radiateurs, les
poêles, les rayons du soleil. Ne poser sur le réfrigérateur/congélateur aucun appareil dégageant de la chaleur comme :
un four à micro-ondes, un grille-pain, etc.
- Lire la classe climatique de l'appareil sur la plaque signalétique située au dos : fig. 1 (W)
si : “SN” (fonctionne avec une température ambiante comprise) de +10°C à +32°C.
si : “N” (fonctionne avec une température ambiante comprise) de +16°C à +32°C.
si : “ST” (fonctionne avec une température ambiante comprise) de +18°C à +38°C.
si : “T” (fonctionne avec une température ambiante comprise) de+18°C à +43°C.
- Ne jamais obstruer la grille d'aération fig.1 (F). Pour les appareils sans grille d'aération, maintenir une distance suffisante entre le dos du
congélateur et le mur de façon à ce que l'air chauffé puisse sortir librement.
Entre la partie arrière et le mur, il doit y avoir une distance minimum de 20 mm et de 100 mm par rapport à d'éventuels éléments
suspendus au-dessus de l'appareil. Utiliser les entretoises spéciales fournies si prévues. fig.1 (U).
- Il faut toujours garantir l'accès à la prise électrique de l'appareil pour pouvoir sortir la fiche en cas de nécessité.
ATTENTION !
Laisser l'appareil dans la position d'installation finale pendant 2 heures au moins avant de le brancher de façon à ce que le
réfrigérant se stabilise et à éviter d'éventuels dysfonctionnements.
• PLAQUE SIGNALETIQUE - DONNEES TECHNIQUES
La plaque signalétique avec les données techniques se trouve sur le logement, au dos (W) de l’appareil.

12
BRANCHEMENT ELECTRIQUE
PRECAUTIONS DE SECURITE
- La connexion de l'appareil avec prise équipée d'un contact de terre est obligatoire conformément à la réglementation. Pour cette
raison, l'appareil est équipé d'une fiche spéciale avec un contact de terre qui doit être introduite dans une prise du même type. Le
fabricant décline toute responsabilité en cas d'éventuels dommages à des personnes ou des objets suite à l'inobservation de cette
norme.
- Contrôler la tension sur la plaque signalétique située au dos et s'assurer qu'elle correspond à la tension de secteur.
- S'abstenir de toute action mécanique sur le système réfrigérant, notamment sur les éléments accessibles : Condensateur dos (Q)(S),
Compresseur (N), Tube Capillaire/Tuyau de retour (R), Filtre de séchage (O), Ventilateur (P); Les interventions sur le système
réfrigérant ne peuvent être effectuées que par des techniciens compétents et agréés.
MISE EN SERVICE DE L'APPAREIL
Sortir entièrement l'appareil de son emballage.
Enlever les parties en polystyrène dans le logement du compresseur (si présentes) (M)
Enlever du logement du compresseur interne de l'appareil toute la documentation et les accessoires éventuellement présents.
Nettoyer le logement interne avec de l'eau tiède contenant du vinaigre et le sécher à fond avec un chiffon.
Fermer l'appareil.
Introduire la fiche dans la prise.
Tourner à droite le régulateur de température jusqu'à la position MAX. fig. 2 (A)
Le voyant vert (B) et le voyant rouge (C) s'allument. fig. 2
Si présent, activer l'interrupteur de SUPER-CONGELATION (E) (le voyant jaune (D) s'allume également).
Ne pas ouvrir l'appareil tant que le voyant rouge ne s’est pas éteint (4 heures environ) de façon à ce que le logement interne crée
le froid nécessaire.
Il est alors possible d'introduire les aliments à congélation rapide (voir “hauteur maximum d'empilage ”).
Après 24 heures, arrêter l'interrupteur de SUPER-CONGELATION.
VOYANTS DE FONCTIONNEMENT
Si votre appareil a des voyants, ces derniers ont les fonctions suivantes selon leur éclairage. fig. 2
Voyant Vert – CONTROL (contrôle) (B) L’appareil est branché à l'alimentation électrique et est en marche.
Le voyant vert doit toujours être allumé si l'appareil est branché à l'alimentation électrique et est allumé. La présence de cette
condition est particulièrement importante car, en cas de chute de tension, le voyant rouge ou le voyant jaune perdent leur fonction et
ne peuvent rien signaler.
Voyant Rouge – ALARM (alarme) (C) Température trop élevée
Il y a des circonstances pendant lesquelles l'allumage du voyant rouge est normal, à savoir :
Première mise en service de l'appareil.
Remise en marche après dégivrage.
Introduction d'aliments frais.
Le voyant rouge s'éteint automatiquement lorsque la température à l'intérieur a atteint –18°C environ.
Si présent, activer l'interrupteur de super-congélation (E).
Si le voyant rouge reste quand même allumé après 12-24 heures, il est possible qu'il se soit produit une véritable panne.
Voyant jaune (D) – L’interrupteur de SUPER-CONGELATION est activé et la fonction thermostat est annulée. Le
compresseur exerce sa fonction de refroidissement jusqu'à ce que l'interrupteur de SUPER-CONGELATION soit de nouveau
arrêté.
VARIANTES ESTHETIQUES (FIG. 2) (G)
1
ère
Variante Esthétique intégrée : avec interrupteur séparé pour fonction super-congélation (E).
2
ème
Variante Esthétique intégrée : avec interrupteur pour fonction super-congélation. Sans voyant lumineux fonction super-
congélation (D).
3
ème
Variante Esthétique intégrée : sans fonction super-congélation.
4
ème
Variante Esthétique : avec interrupteur ON/OFF (F) et interrupteur de super-congélation (E).
5
ème
Variante Esthétique : avec interrupteur de super-congélation seulement (E).
6
ème
Variante Esthétique : sans fonction de super-congélation.
REGULATEUR DE TEMPERATURE (thermostat)
Le régulateur de température permet de régler la température de refroidissement.

13
Mise en marche : tourner le régulateur à droite > (A) fig. 2
Selon les nécessités, régler la température entre :
Min. (réfrigération minimum) et
Max. (réfrigération maximum)
Arrêt : tourner le régulateur à gauche < (A) fig. 2
La position “0” indique que le fonctionnement de l'appareil est interrompu (éteint).
Le réglage de la température doit être en fonction de : 1) la température ambiante de la pièce où l'appareil est installé ; 2) la
quantité d'aliments contenus ; 3) la fréquence d'ouverture de l'appareil.
•
ECLAIRAGE INTERNE (si présent) fig.1 (C)
Un interrupteur est incorporé dans les appareils avec éclairage intérieur. A l'ouverture de la porte, l'éclairage s'allume automatiquement et
s'éteint à la fermeture.
L'ampoule à incandescence est protégée par un couvercle transparent. fig.3
Pour remplacer l'ampoule interne, procéder comme suit : débrancher la fiche d'alimentation ou éteindre l'interrupteur principal de
l'installation domestique, enlever le couvercle de protection de l'ampoule en appuyant sur ses extrémités. Utiliser exclusivement des
ampoules de rechange de 15 W maximum.
CONSERVATION/CONGELATION
Remettre les aliments frais dans le logement latéral fig. 1 (I) (non présent sur tous les modèles) ou sur le fond du congélateur où la
température est la plus basse. (E)
Les deux compartiments sont divisés par un séparateur fixe ou mobile en fonction des modèles. fig. 1 (H)
Dans les 24 heures suivantes, introduire les produits de façon à avoir seulement la quantité d'aliments frais adaptée à la capacité
de congélation de votre appareil. Consulter les données figurant sur la plaque d'homologation.
Si présent, activer l'interrupteur SUPER-CONGELATION avant d'introduire les denrées.
Après 24 heures, enlever les produits congelés du fond du congélateur et les mettre dans une corbeille (L) de façon à ce que le
compartiment de pré-congélation ou le fond du congélateur puissent être libérés pour la congélation d'éventuels aliments frais.
Arrêter l'interrupteur de SUPER-CONGELATION fig. 2 (E) (le voyant jaune s'éteint)
Régler le régulateur de température sur une position adaptée au niveau de remplissage de l'appareil.
Hauteur maximum d'empilage
Pour garantir une bonne conservation des produits congelés, il est conseillé de ne jamais remplir le compartiment de congélation jusqu'à la
marque supérieure. Entre le couvercle et les produits congelés, il doit toujours y avoir une certaine distance. Ne pas dépasser la marque
d'empilage faite par le fabricant fig. 1 (T).
Symbole Aliment Description Temps de Conservation/Conditionnement
Viande hachée
Saucisses/charcuterie 2-3 mois
Poisson sous sachet de polyéthylène
Glaces
Fruits
Fromage 4 mois
Pain sous sachet de polyéthylène
Gâteaux/biscuits
Viande de porc 6 mois
Viande de Boeuf dans feuille d'aluminium
Lapin/viande Ovine
Champignons/Asperges sous sachet de polyéthylène
Légumes (coupés) dans feuilles d'aluminium
Poulet/Dinde 8 mois
Canard/Oie
Chou fleur 10-12 mois
Haricots/Poivrons sous sachet de polyéthylène
Conserves dans récipients en verre
Fruits Cuits dans feuilles d'aluminium.
NETTOYAGE ET ENTRETIEN
Enlever la fiche de la prise de courant avant de procéder à n'importe quelle intervention.

14
Pour le nettoyage de l'intérieur de l'appareil et des accessoires, il est conseillé d'utiliser une solution d'eau et de vinaigre ; ne jamais utiliser
de produits abrasifs, de détergents ou de savon.
Si l'appareil est équipé d'un condensateur dans la paroi extérieure, fig. 1 (S), enlever de temps en temps la saleté et la poussière car elles
obstruent l'évacuation de chaleur provenant du compartiment intérieur.
La glace et le givre qui se forment sur les parois internes influent sur le transfert du froid et doivent être enlevés de temps à autres. Pour ce
faire, ne pas utiliser de dispositifs autres que ceux fournis par le constructeur de l'appareil.
DEGIVRAGE
Pour effectuer le dégivrage procéder comme suit :
- Tourner le thermostat en position 0 ; fig. 2 (A)
- Sortir la fiche de la prise de courant ou arrêter l'interrupteur général.
- Enlever tous les aliments à l'intérieur.
- Enlever les bouchons du robinet d'écoulement de l'eau à l'intérieur du compartiment cellule et à l'extérieur de l'armoire, si
prévus ; fig. 1 (Z)
- Recueillir l'eau qui se forme dans un récipient placé à proximité du trou d'évacuation vers l'extérieur.
- Sécher les parois internes.
En cas d'utilisation normale (3-4 ouvertures par jour), il faut dégivrer le congélateur une à deux fois par an.
Ne jamais utiliser d'appareils électriques tels que sèche-cheveux, thermoventilateurs ou dispositifs auxiliaires à flamme vive pour dégivrer
l'appareil.
ASSISTANCE
S'adresser au service d'assistance clientèle seulement lorsqu'il n'est pas possible de déceler la cause d'une panne possible. A ce sujet,
lire les instructions pour la “Recherche des pannes/Causes/Remèdes”
Pour obtenir une assistance rapide, il est conseillé de garder à la portée de la main les informations importantes pour l'identification
de l'appareil lors de l'appel :
• Marque de l'appareil
• Modèle/type
• Genre de panne
• Date d'achat
• Nom du vendeur
RECHERCHE DES PANNES/CAUSES/REMEDES
Un fonctionnement irrégulier n'est pas toujours dû à un défaut de l'appareil mais à une mauvaise installation ou utilisation.
Pour éviter toute intervention inutile et les frais d'appel du service d'assistance, il est conseillé de faire les contrôles suivants :
Aucun fonctionnement : l'appareil ne fonctionne pas.
Contrôler que :
Le thermostat n'est pas en position 0.
La fiche de l'appareil est en bon état et introduite correctement dans la prise.
Qu'il y a du courant.
L’appareil ne refroidit pas assez.
Le processus de congélation dure trop.
Le compresseur s'active trop souvent.
Contrôler que :
La porte est correctement fermée ; fig. 1 (A)
Le thermostat est sur la bonne position ; fig. 2 (A)
Le congélateur n'est pas à proximité d'une source de chaleur.
Dans le compartiment à basse température, qu'il n'y a pas une présence excessive de givre.
L’appareil fait trop de bruit.
Contrôler que :
L’appareil est bien d'aplomb.
Le serpentin arrière ne touche pas le mur de fond ; fig. 1 (S)
Attention : la machine peut produire les formes de bruit très limitées ci-dessous :
déclenchements dus à la mise en marche et à l'arrêt du compresseur.
ronflement dès que le compresseur commence à marcher.
gargouillement lorsque le gaz réfrigérant s'écoule dans les tuyaux, même après l'arrêt du compresseur.
ATTENTION !
Le fabricant décline toute responsabilité en cas d'éventuels dommages dérivant, directement ou indirectement, de personnes,
d'objets ou d'animaux domestiques suite à l'inobservation de toutes les consignes données dans le mode d'emploi.

15
I
Qui di seguito troverete tutte le indicazioni importanti ai fini dell’utilizzo dell’apparecchio.
Le presenti istruzioni per l’uso sono valide per vari apparecchi e quindi possono emergere differenze
di particolari a seconda del tipo di apparecchio.
Conservare sempre il libretto di istruzioni e in caso di vendita dell’apparecchio consegnatelo al nuovo proprietario.
LEGGERE ATTENTAMENTE PRIMA DI INSTALLARE E UTILIZZARE L’APPARECCHIO.
- QUALSIASI MANUTENZIONE COMPRESA L’EVENTUALE SOSTITUZIONE DEL CAVO DI ALIMENTAZIONE, DEVE
ESSERE ESEGUITA DAL SERVIZIO DI ASSISTENZA TECNICA O COMUNQUE DA PERSONALE QUALIFICATO.
Questo apparecchio è destinato a venire in contatto con i prodotti alimentari ed è conforme al D.L. 108 del 25-01-92 (Direttiva
europea 89/109CE)
Questo apparecchio è stato concepito, costruito e messo sul mercato in conformità a:
Direttiva di BASSA TENSIONE 73/23 CE
Direttiva EMC 89/336 CE
Direttiva marcatura CE 93/68/CE
Direttiva efficienza energetica 96/57/CE
• INFORMAZIONI RELATIVE ALL’AMBIENTE
Questo apparecchio è stato progettato e costruito con la massima cura e rispetto per l’ambiente.
Per garantire la medesima cura anche all’atto della demolizione, data la presenza di materiali inquinanti o infiammabili come ad esempio
l’olio lubrificante del compressore, si raccomanda di non abbandonare mai l’apparecchio nell’ambiente e di rivolgersi agli enti
locali istituzionalmente predisposti per la raccolta e il relativo smaltimento.
Questo apparecchio è senza CFC (il circuito refrigerante contiene R134a) o senza HFC (il circuito refrigerante contiene R600a –
ISOBUTANO). Per verificare il gas utilizzato riferirsi alla targa dati tecnici sull’apparecchio.
• Per gli apparecchi con ISOBUTANO (R600a)
L’isobutano è un gas naturale senza effetti sull’ambiente, ma infiammabile. E’ quindi indispensabile accertarsi che i tubi del circuito
refrigerante non siano danneggiati, prima di collegare l’apparecchio alla rete di alimentazione.
INSTALLAZIONE
- L’apparecchio dovrebbe essere installato da due persone allo scopo di evitare danni a persone o a cose.
L’apparecchio deve essere ubicato orizzontalmente su di un fondo resistente. Solo in questo modo è possibile garantire una circolazione
priva di ostacoli del refrigerante. Utilizzare la regolabilità dei piedini (V) per mettere a livello il prodotto.
- Evitare assolutamente temperature ambiente elevate l’irraggiamento solare diretto.
Il luogo ideale per l’installazione del Vostro apparecchio è un locale fresco, ben areato e secco, lontano da fonti di calore, quali
termosifoni, stufe, raggi solari. Non poggiare sul frigorifero/congelatore nessun apparecchio che emani calore, quali:
forno a microonde, tostapane, ecc.
- Leggere la classe climatica dell’apparecchio sulla targa dati tecnici posta sul retro: fig.1 (W)
se: “SN” (funziona con temperature ambientali comprese) da +10°C a +32°C;
se: “N” (funziona con temperature ambientali comprese) da +16°C a +32°C;
se: “ST” (funziona con temperature ambientali comprese) da +18°C a +38°C;
se: “T” (funziona con temperature ambientali comprese) da +18°C a +43°C;
- Non ostruire mai la griglia di ventilazione fig.1 (F). Per gli apparecchi senza griglia di ventilazione, mantenere una distanza sufficiente
tra il retro del congelatore e la parete, in modo che l’aria riscaldata possa fuoriuscire senza impedimenti.
Fra la parte posteriore dell’apparecchio e il muro ci deve essere una distanza di almeno 20mm e 100mm verso eventuali pensili posti
sopra l’apparecchio. Utilizzare gli appositi distanziatori a corredo se previsti. fig.1 (U).
- Occorre sempre garantire l’accesso alla presa di allacciamento dell’apparecchio per poter disinserire la spina in caso di necessità.
ATTENZIONE!
Lasciare l’apparecchio nella posizione d’installazione finale per almeno 2 ore prima di collegarlo, in modo che il refrigerante in
circolo si stabilizzi e per evitare possibili anomalie di funzionamento.
• TARGA DATI TECNICI
La targhetta matricola che riporta i dati tecnici è ubicata sull’alloggiamento sul retro (W) dell’apparecchio.

16
COLLEGAMENTO ELETTRICO
AVVERTENZE DI SICUREZZA
- Il collegamento dell’apparecchio con presa provvista di contatto di terra è obbligatorio in termini di legge. Per questo motivo
l’apparecchio è corredato di una apposita spina munita di contatto di terra che va inserita in una presa dello stesso tipo. La casa
costruttrice declina ogni responsabilità per eventuali danni a persone o a cose derivanti dalla mancata osservazione di questa
norma.
- Controllare il voltaggio indicato sulla targa dati tecnici posta sul retro, e assicurarsi che corrisponda alla tensione di rete.
- Astenersi da qualsiasi azione meccanica esercitata sul sistema refrigerante, in particolare sui seguenti componenti accessibili:
Condensatore retro(Q)(S); Compressore(N); Tubo Capillare/Tubo di ritorno(R); Filtro di essiccazione(O); Ventilatore(P); Gli
interventi sul sistema refrigerante sono ammessi solo da parte della manodopera qualificata autorizzata.
MESSA IN FUNZIONE DELL’APPARECCHIO
Disimballare completamente l’apparecchio
Rimuovere le parti in polistirolo nel vano compressore (se presenti) (M)
Rimuovere dal vano compressore interno dell’apparecchio tutta la documentazione e gli accessori eventualmente presenti
Pulire il vano interno con acqua tiepida addizionata di aceto ed asciugarlo a fondo con uno straccio
Chiudere l’apparecchio
Inserire la spina nella presa
Ruotare verso destra il regolatore di temperatura fino alla posizione MAX. fig2 (A)
La spia verde(B) e rossa(C) si accendono. fig.2
Laddove presente, inserire l’interruttore di SUPER-CONGELAMENTO (E) (anche la spia gialla(D) si accende)
Non aprire l’apparecchio per ca. 4 ore fino a quando la spia rossa non si è spenta in modo che il vano interno possa creare il
freddo necessario.
A questo punto è possibile inserire gli alimenti a congelazione rapida (si veda “altezza massima impilaggio”)
Dopo 24 ore disinserire l’interruttore di SUPER-CONGELAMENTO.
SPIE DI FUNZIONAMENTO
Se il vostro apparecchio dispone di spie , le spie hanno i seguenti significati a seconda dell’illuminazione.fig.2
Spia Verde – CONTROL (controllo) (B) l’apparecchio è collegato all’alimentazione elettrica ed è in funzione.
La spia verde deve essere sempre accesa se l’apparecchio è collegato all’alimentazione elettrica ed è inserito. La presenza di questa
condizione è di particolare importanza in quanto in caso di cadute di tensione la spia rossa o la spia gialla perdono la loro funzione e
non possono segnalarVi nulla.
Spia Rossa – ALARM (allarme) (C) Temperatura troppo elevata
Esistono condizioni in cui l’accensione della spia rossa è normale, quali:
Prima messa in funzione dell’apparecchio
Rimessa in funzione dopo lo sbrinamento
Inserimento di alimenti freschi
La spia rossa si spegne automaticamente quando la temperatura all’interno ha raggiunto ca. –18°C
Inserire, se presente, l’interruttore di supercongelamento (E).
Se tuttavia la spia rossa resta illuminata anche dopo 12-24 ore è possibile che sia presente un guasto vero e proprio.
Spia Gialla (D) – L’interruttore di SUPER-CONGELAMENTO è inserito e la funzione termostato è annullata. Il compressore
esercita la sua funzione di raffreddamento fino a quando l’interruttore di SUPER-CONGELAMENTO viene di nuovo
disinserito.
VARIANTI ESTETICHE (FIG. 2) (G)
1
a
Variante Estetica integrata: con interruttore separato per funzione supercongelamento (E).
2
a
Variante Estetica integrata: con interruttore per funzione supercongelamento. Senza spia luminosa funzione supercongelamento(D).
3
a
Variante Estetica integrata: senza funzione supercongelamento.
4
a
Variante Estetica: con interruttore ON/OFF (F) e interruttore di supercongelamento(E).
5
a
Variante Estetica: con solo interruttore di supercongelamento(E).
6
a
Variante Estetica: senza funzione di supercongelamento.
REGOLATORE DELLA TEMPERATURA (termostato)
Mediante il regolatore della temperatura è possibile impostare la temperatura di raffreddamento.

17
Inserimento: ruotare il regolatore verso destra> (A) fig. 2
A seconda della necessità, impostare la temperatura tra:
Min (refrigerazione minima) e
Max (refrigerazione massima)
Disinserimento: ruotare il regolatore verso sinistra < (A) fig. 2
La posizione “0” indica funzionamento interrotto dell’apparecchio (spento).
L’impostazione della temperatura deve essere commisurata: 1) alla temperatura dell’ambiente in cui è ubicato l’apparecchio; 2) alla
quantità di alimenti contenuti; 3) alla frequenza di apertura dell’apparecchio.
•
ILLUMINAZIONE INTERNA (dove presente) fig.1 (C)
Negli apparecchi dotati di illuminazione interna è incorporato un interruttore. All’apertura della porta, l’illuminazione si attua
automaticamente e durante la chiusura di disattiva.
La lampadina ad incandescenza è protetta per mezzo di un coperchio trasparente. fig.3
Per la sostituzione della lampadina interna procedere come descritto: staccare la spina di alimentazione o spegnere l’nterruttore principale
dell’impianto domestico, rimuovere il coprilampada premendone le estremità. Utilizzare esclusivamente lampadine di ricambio max 15
W.
CONSERVAZIONE/CONGELAZIONE
Riporre gli alimenti freschi nel vano laterale fig.1 (I) (non presente in tutti i modelli) o sul fondo del congelatore dove è presente la
temperatura più bassa. (E)
I due vani sono divisi da un separatore, che può essere fisso o mobile a seconda dei modelli.fig.1 (H)
Entro 24h inserire i prodotti in modo da raggiungere solo la quantità di alimenti freschi adeguata per la capacità di congelamento
del Vostro apparecchio. Si vedano i dati riportati sulla targhetta di omologazione.
Se presente, inserire l’interruttore SUPER-CONGELAMENTO , prima di inserire il cibo.
Dopo 24 ore rimuovere i prodotti congelati dal fondo del congelatore e sistemarli in un cestello (L) in modo che il vano di
precongelamento o il fondo del congelatore possono essere liberati per il congelamento di eventuali alimenti freschi.
Disinserire l’interruttore di SUPER-CONGELAMENTO fig.2 (E) (la spia gialla si spegne)
Impostare il regolatore della temperatura in una posizione adeguata per il grado di riempimento dell’apparecchio.
Altezza massima di impilaggio
Per garantire una conservazione ottimale dei prodotti congelati, si consiglia di non riempire mai il vano di congelamento fino al margine
superiore. Tra il coperchio ed i prodotti congelati deve essere sempre presente un certo margine di distanza. Non superare il contrassegno
d’impilaggio riposto dal produttore fig.1 (T).
Simbolo Alimento Descrizione Tempi di Conservazione/Confezionamento
Carne macinata
Salsicce/salumi 2-3 mesi
Pesce in sacchetti di polietilene
Gelati
Frutta
Formaggio 4 mesi
Pane in sacchetti di polietilene
Dolci/Biscotti
Carne di Maiale 6 mesi
Carne di Manzo in fogli di alluminio
Coniglio/carne Ovina
Funghi/Asparagi in sacchetti di polietilene
Verdura(tagliata) in fogli di alluminio
Pollo/Tacchino 8 mesi
Anatra/Oca
Cavolfiore 10-12 mesi
Fagioli/Peperoni in sacchetti di polietilene
Conserve in recipienti di vetro
Frutta Cotta in fogli di alluminio.
PULIZIA E MANUTENZIONE
Togliere la spina dalla presa di corrente prima di procedere a qualsiasi tipo di intervento.

18
Per la pulizia dell’interno dell’apparecchio e degli accessori si consiglia di usare una soluzione composta da acqua e aceto; non usare mai
abrasivi, detergente o sapone.
Se l’apparecchio è dotato di condensatore nella parete esterna fig.1(S), di tanto in tanto rimuovere da questo componente sporco e polvere
in quanto questi ultimi ostruiscono l’evacuazione del calore dal vano interno.
Il ghiaccio e la brina che si formano sulle pareti interne, influiscono sul trasferimento del freddo e devono essere rimosse di tanto
in tanto. A tale scopo non utilizzare mezzi diversi da quelli forniti dal costruttore dell’apparecchio.
SBRINAMENTO
Per effettuare lo sbrinamento procedere come segue:
- ruotare il termostato sulla posizione 0; fig.2 (A)
- togliere la spina dalla presa di corrente, o disinserire l’interruttore generale;
- togliere tutti gli alimenti all’interno;
- togliere i tappi del rubinetto scolo acqua all’interno del vano cella ed all’esterno dell’armadio, dove previsti.;fig.1 (Z)
- raccogliere l’acqua che si forma in un recipiente posto in prossimità del foro di scarico esterno;
- asciugare le pareti interne.
In caso di uso normale (3-4 aperture al giorno) occorre sbrinare il congelatore da una a due volte l’anno.
Non utilizzare mai apparecchi elettrici come asciugacapelli, termoventilatori o mezzi ausiliari a fiamma viva per lo sbrinamento
dell’apparecchio.
ASSISTENZA
Rivolgersi al servizio assistenza clienti solo quando non si è in grado di trovare la causa di un possibile guasto. A questo proposito, si
leggano le istruzioni di “Ricerca guasti/Cause/Rimedi”
Per ottenere una pronta assistenza si consiglia di tenere a portata di mano i dati importanti per l’identificazione del Vostro
apparecchio al momento della chiamata:
• Marca dell’apparecchio;
• Modello/Tipo;
• Genere di guasto;
• Data di acquisto;
• Nome venditore;
RICERCA GUASTI/CAUSE/RIMEDI
Non sempre il funzionamento irregolare è dovuto ad un difetto dell’apparecchio, ma piuttosto è causato da un’installazione o da un
impiego errato. Per evitare inutili interventi e le spese relative alla chiamata di assistenza, si consiglia di regolarsi quanto segue:
Nessun funzionamento: l’apparecchio non funziona
Controllate che:
La posizione del termostato non sia in posizione 0.
La spina dell’apparecchio è in buono stato ed è inserita correttamente nella presa
Non manchi la corrente.
L’apparecchio non fa abbastanza freddo
Il processo di congelamento dura troppo
Il compressore si aziona troppo spesso
Controllate che:
La porta sia chiusa correttamente; fig.1 (A)
Il termostato sia sulla posizione corretta; fig.2 (A)
Il congelatore non sia vicino ad una fonte di calore;
Nel comparto a bassa temperatura non ci sia eccessiva presenza di brina;
L’apparecchio è eccessivamente rumoroso
Controllate che:
L’apparecchio sia ben livellato;
La serpentina posteriore non tocchi la parete di fondo;fig.1 (S)
Attenzione la macchina può produrre le seguenti forme di rumore molto contenute:
scatti dovuti all’inserimento e ad disinserimento del compressore;
ronzio non appena il compressore inizia a lavorare;
gorgoglio quando il gas refrigerante fluisce nei tubi, anche dopo il disinserimento del compressore;
ATTENZIONE!
La casa costruttrice declina ogni responsabilità per eventuali danni che possono, direttamente o indirettamente, derivare da
persone, cose o animali domestici, in conseguenza della mancata osservanza di tutte le prescrizioni indicate sul libretto di
istruzioni.

19
E
A continuación se detallan todas las informaciones importantes para el uso del aparato.
Las presentes instrucciones de uso son válidas para distintos aparatos, por lo cual pueden presentar
alguna diferencia con el que posea cada usuario.
Conserve siempre el manual de instrucciones y, en caso de venta del aparato, entréguelo al nuevo propietario.
LEA ATENTAMENTE EL MANUAL ANTES DE INSTALAR Y UTILIZAR EL APARATO.
- TODOS LOS TRABAJOS DE MANTENIMIENTO, INCLUIDA LA SUSTITUCIÓN DEL CABLE DE ALIMENTACIÓN,
DEBEN SER REALIZADOS POR EL SERVICIO DE ASISTENCIA TÉCNICA O POR OTRO TÉCNICO CUALIFICADO.
Este aparato está destinado a entrar en contacto con productos alimentarios y cumple el D.L.It. 108 del 25-01-92 (Directiva
europea 89/109CE)
Este aparato ha sido concebido, fabricado y comercializado con arreglo a:
Directiva de Baja Tensión 73/23 CE
Directiva CEM 89/336 CE
Directiva sobre marcado CE 93/68/CE
Directiva sobre eficiencia energética 96/57/CE
• CONSIDERACIONES MEDIOAMBIENTALES
Este aparato ha sido proyectado y fabricado con el máximo respeto por el medio ambiente.
Para garantizar el mismo respeto también a la hora del desguace, y dada la presencia de materiales contaminantes o inflamables, como el
aceite lubricante del compresor, se recomienda entregar el aparato a una compañía habilitada para su recogida y eliminación.
Este aparato no contiene CFC (el circuito refrigerante está cargado con R134a) ni HFC (el circuito refrigerante contiene R600a -
ISOBUTANO). El gas utilizado se indica en la chapa de datos técnicos del aparato.
• Para los aparatos con ISOBUTANO (R600a)
El isobutano es un gas natural, sin efectos sobre el ambiente pero inflamable. Por lo tanto, antes de conectar el aparato a la red de
alimentación es indispensable comprobar que los tubos del circuito refrigerante no estén dañados.
INSTALACIÓN
- El aparato debe ser instalado por dos personas para evitar daños personales o materiales.
El aparato debe ubicarse horizontalmente sobre un fondo resistente. Sólo de este modo es posible garantizar la libre circulación del
refrigerante. Nivele correctamente el aparato mediante los pies regulables (V).
- El aparato no debe exponerse a una temperatura ambiente elevada ni a las radiaciones solares directas.
El emplazamiento ideal para instalar el aparato es un lugar fresco, seco, bien aireado y alejado de fuentes de calor como radiadores,
estufas y rayos solares. No apoye el frigorífico/congelador sobre ningún aparato que emane calor, como:
horno de microondas, tostadora, etc.
- La clase climática del aparato figura en la chapa de datos técnicos aplicada en la parte posterior: fig. 1 (W)
"SN": funciona con temperatura ambiente de +10°C a +32°C.
"N": funciona con temperatura ambiente de +16°C a +32°C.
"ST": funciona con temperatura ambiente de +18°C a +38°C.
"T": funciona con temperatura ambiente de +18°C a +43°C
- No obstruya nunca la rejilla de ventilación fig. 1 (F). Si su aparato no tiene rejilla de ventilación, deje una distancia suficiente entre la
trasera del congelador y la pared para que el aire caliente pueda salir sin impedimentos.
Entre la parte posterior del aparato y la pared debe haber una distancia no inferior a 20 mm, y 100 mm entre la parte superior y cualquier
mueble que esté encima de ella. Si corresponde, utilice los espaciadores que se incluyen en el suministro; fig. 1 (U).
- La toma de alimentación del aparato debe estar en una posición accesible para poderlo desenchufar rápidamente en caso de necesidad.
¡ATENCIÓN!
Deje el aparato en la posición de instalación final durante dos horas como mínimo antes de conectarlo, a fin de que el refrigerante
se estabilice en el circuito y no se generen anomalías de funcionamiento.
• CHAPA DE DATOS TÉCNICOS
La chapa con el número de serie y los datos técnicos está aplicada en la trasera (W) del aparato.
CONEXIÓN ELÉCTRICA

20
ADVERTENCIAS DE SEGURIDAD
- La ley impone conectar el aparato a una toma de corriente provista de descarga a tierra. Por este motivo, el aparato está dotado
de una clavija con contacto de tierra que debe insertarse en una toma compatible. El fabricante no asume ninguna
responsabilidad por daños personales o materiales derivados de la inobservancia de esta norma.
- Controle el voltaje indicado en la chapa de datos técnicos, aplicada en la trasera, y asegúrese de que sea igual al de la red eléctrica.
- No ejerza ninguna acción mecánica en el sistema refrigerante; en particular, sobre los siguientes componentes accesibles: condensador
posterior (Q)(S); compresor (N); tubo capilar/tubo de retorno (R); filtro de desecación (O) y ventilador (P). Las operaciones en el
sistema refrigerante deben ser realizadas exclusivamente por un técnico autorizado.
PUESTA EN FUNCIONAMIENTO DEL APARATO
Desembale completamente el aparato.
Saque las piezas de poliestireno del compartimento del compresor (si las hay) (M).
Quite del compartimento del compresor, dentro del aparato, toda la documentación y los accesorios que allí se encuentren.
Limpie el compartimento interior con agua templada y vinagre, seque a fondo con un paño.
Cierre el aparato.
Enchufe la clavija en la toma de corriente.
Gire el regulador de temperatura hacia la derecha hasta la posición MÁX., fig. 2 (A)
Los pilotos verde (B) y rojo (C) se encienden; fig. 2.
Si el aparato lo tiene, active el interruptor de SUPERCONGELACIÓN (E) (el piloto (D)se enciende).
No abra el aparato durante unas cuatro horas, hasta que el piloto rojo se apague, a fin de que en el compartimento interior se
genere el frío necesario.
Entonces puede introducir los alimentos de congelación rápida (vea " Altura máxima de apilado")
A las 24 horas, desactive el interruptor de SUPERCONGELACIÓN.
PILOTOS DE FUNCIONAMIENTO
Si su aparato está dotado de pilotos luminosos, vea a continuación el significado de cada uno; fig. 2.
Piloto verde – CONTROL (B) - El aparato está conectado a la alimentación eléctrica y funcionando.
Si el aparato está enchufado a la red y activado, el piloto verde tiene que estar siempre encendido. Esta condición es importante
porque, en caso de caída de tensión, el piloto rojo y el verde dejan de funcionar.
Piloto rojo - ALARM (alarma) (C) Temperatura demasiado elevada.
En algunas condiciones el encendido del piloto rojo es normal, a saber:
Primera puesta en marcha del aparato
Reanudación del funcionamiento tras la descongelación
Introducción de alimentos frescos
El piloto rojo se apaga automáticamente cuando la temperatura interior llega a -18°C aproximadamente.
Si el aparato lo incluye, active el interruptor de supercongelación (E).
Si, aún así, el piloto rojo permanece encendido durante más de 12-24 horas, es posible que haya un fallo.
Piloto amarillo (D) - El interruptor de SUPERCONGELACIÓN está activado y la función termostato está anulada. El
compresor enfría hasta que el interruptor de SUPERCONGELACIÓN se vuelve a desactivar.
VARIANTES ESTÉTICAS (FIG. 2) (G)
1
a
variante estética integrada: con interruptor separado para función supercongelación (E).
2
a
variante estética integrada: con interruptor para función supercongelación. Sin piloto luminoso función supercongelación (D).
3
a
variante estética integrada: sin función supercongelación.
4
a
variante estética: con interruptor ON/OFF (F) e interruptor de supercongelación (E).
5
a
variante estética: sólo con interruptor de supercongelación (E).
6
a
variante estética: sin función de supercongelación.
REGULADOR DE TEMPERATURA (termostato)
Con el termostato es posible ajustar la temperatura de enfriamiento.
La pagina si sta caricando...
La pagina si sta caricando...
La pagina si sta caricando...
La pagina si sta caricando...
La pagina si sta caricando...
La pagina si sta caricando...
La pagina si sta caricando...
La pagina si sta caricando...
La pagina si sta caricando...
La pagina si sta caricando...
La pagina si sta caricando...
La pagina si sta caricando...
-
 1
1
-
 2
2
-
 3
3
-
 4
4
-
 5
5
-
 6
6
-
 7
7
-
 8
8
-
 9
9
-
 10
10
-
 11
11
-
 12
12
-
 13
13
-
 14
14
-
 15
15
-
 16
16
-
 17
17
-
 18
18
-
 19
19
-
 20
20
-
 21
21
-
 22
22
-
 23
23
-
 24
24
-
 25
25
-
 26
26
-
 27
27
-
 28
28
-
 29
29
-
 30
30
-
 31
31
-
 32
32


Candy CCHE 260 Manuale utente
- Categoria
- Frigo-congelatori
- Tipo
- Manuale utente
Documenti correlati
Altri documenti
-
 New Pol XV185CEL Manuale utente
-
 New Pol XV185CEL Manuale utente
-
Beko CN232220X Manuale del proprietario
-
-
Aeg-Electrolux AG77250-8I Manuale utente
-
-
-
-
IKEA F 90 Manuale utente
-
Whirlpool GTW 2550 A++ Guida utente

