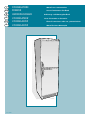
New Pol XV185CEL Manuale utente
- Categoria
- Frigo-congelatori
- Tipo
- Manuale utente

461304175 25/10/01 Litograf s.r.l. Jesi
GCS28H-rel.100701

Rel. 250601
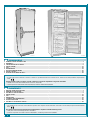
CONGELATORE
Manuale uso e manutenzione
FREEZER
Use and maintenance handbook
GEFRIERSCHRANK
Bedienungs- und Wartungshandbuch
CONGÉLATEUR
Livret d’instructions et d’entretien
CONGELADOR
Libro de instrucciones sobre uso y mantenimiento
CONGELADOR
Manual de Uso e Manutenção
I
GB
D
F
ES
P
GC2906-010

2
1 PRIMA DI USARE L’APPARECCHIO....................................................................................................................................................................... 4
2 DISIMBALLO ............................................................................................................................................................................................................ 6
3 CARATTERISTICHE TECNICHE .............................................................................................................................................................................. 8
4 INSTALLAZIONE .................................................................................................................................................................................................... 12
5 USO......................................................................................................................................................................................................................... 18
6 SBRINAMENTO...................................................................................................................................................................................................... 24
7 PULIZIA E MANUTENZIONE ................................................................................................................................................................................. 26
8 RICERCA GUASTI ................................................................................................................................................................................................. 28
9 SERVIZIO ASSISTENZA TECNICA ....................................................................................................................................................................... 28
1 BEFORE USING THE APPLIANCE ......................................................................................................................................................................... 4
2 REMOVAL OF PACKAGING .................................................................................................................................................................................... 6
3 TECHNICAL SPECIFICATIONS............................................................................................................................................................................... 8
4 INSTALLATION....................................................................................................................................................................................................... 12
5 USE ......................................................................................................................................................................................................................... 18
6 DEFROSTING......................................................................................................................................................................................................... 24
7 CLEANING AND MAINTENANCE ......................................................................................................................................................................... 26
8 TROUBLESHOOTING ............................................................................................................................................................................................ 28
9 TECHNICAL ASSISTANCE SERVICE ................................................................................................................................................................... 28
• Questo apparecchio è destinato a venire in contatto con i prodotti alimentari ed è conforme al D.L. 108 del 25.01.1992 (Direttiva Europea 89/109/
CEE).
Questo prodotto è stato concepito, costruito e immesso sul mercato rispettando le seguenti conformità:
• obiettivi di sicurezza della Direttiva “Bassa Tensione” 73/23/CEE;
• requisiti di protezione della Direttiva “EMC” 89/336/CEE, modificata dalla Direttiva 93/68/CEE.
DICHIARAZIONE DI CONFORMITÀ
SOMMARIO
I
CONTENTS
• This appliance will come into contact with food products and complies with the Executive Order 108 of 25.01.1992 (European Directive 89/109/
EEC).
This product was designed, manufactured and marketed in compliance with the following norms:
• safety aims of the “Low Voltage” Directive 73/23/EEC;
• protection requisites of the “EMC” Directive 89/336/EEC, modified by the Directive 93/68/EEC.
DECLARATION OF CONFORMITY
GC2906-030
GB
GC2906-010

3
1 VOR DER INBETRIEBNAHME DES GERÄTS ................................................................................................................................................... 4
2 ENTFERNUNG DER VERPACKUNG .................................................................................................................................................................. 7
3 TECHNISCHE EIGENSCHAFTEN ...................................................................................................................................................................... 9
4 AUFSTELLUNG................................................................................................................................................................................................. 13
5 GEBRAUCH ....................................................................................................................................................................................................... 19
6 ABTAUEN .......................................................................................................................................................................................................... 25
7 REINIGUNG UND WARTUNG ........................................................................................................................................................................... 27
8 FUNKTIONSTÖRUNGEN .................................................................................................................................................................................. 29
9 TECHNISCHER KUNDENDIENST .................................................................................................................................................................... 29
• Dieses Gerät ist für die Aufbewahrung von Lebensmitteln vorgesehen und entspricht der Vorschrift D.L. 108 vom 25.01. 1992 (Europäische Richtlinie
87/308/EWG).
Dieses Produkt wurde unter Berücksichtigung der folgenden Konformitätsvorschriften entworfen, hergestellt und auf den Markt gebracht:
• Sicherheitsvorschriften der Richtlinie „Niederspannung“ 73/23/EWG;
• Schutzvorrichtungen entsprechend der Richtlinie „EMC“ 89/336/EWG, modifiziert durch die Richtlinie 93/68/EWG.
KONFORMITÄTSERKLÄRUNG
INHALT
D
1 AVANT D’UTILISER L’APPAREIL ........................................................................................................................................................................... 5
2 DEBALLAGE ........................................................................................................................................................................................................... 7
3 DONNEES TECHNIQUES ....................................................................................................................................................................................... 9
4 INSTALLATION...................................................................................................................................................................................................... 13
5 UTILISATION ......................................................................................................................................................................................................... 19
6 DEGIVRAGE .......................................................................................................................................................................................................... 25
7 NETTOYAGE ET ENTRETIEN ............................................................................................................................................................................... 27
8 EVENTUELLES PANNES ..................................................................................................................................................................................... 29
9 SERVICE D’ASSISTANCE TECHNIQUE .............................................................................................................................................................. 29
• Cet appareil est destiné au contact avec des produits alimentaires et il est conforme au D.L. 108 du 25.01.1992 (Directive Européenne 87/308/
CEE).
Ce produit a été conçu, construit et mis en commerce en respectant les conformités suivantes:
• Objectifs de sécurité de la Directive “Basse Tension” 73/23/CEE ;
• Caractéristiques de protection de la Directive “EMC” 89/336/CEE, modifiée par la Directive 93/68/CEE.
DECLARATION DE CONFORMITE
SOMMARIE
F
1 ANTES DE USAR EL APARATO ............................................................................................................................................................................. 5
2 DESEMBALADO ...................................................................................................................................................................................................... 7
3 CARACTERISTICAS TECNICAS ............................................................................................................................................................................. 9
4 INSTALACION ........................................................................................................................................................................................................ 13
5 USO......................................................................................................................................................................................................................... 19
6 DESCONGELADO.................................................................................................................................................................................................. 25
7 LIMPIEZA Y MANTENIMIENTO ............................................................................................................................................................................. 27
8 BUSQUEDA DE AVERIAS ..................................................................................................................................................................................... 29
9 SERVICIO DE ASISTENCIA TECNICA .................................................................................................................................................................. 29
• Este aparato, destinado a ponerse en contacto con productos alimenticios es conforme al Decreto Ley 108 del 25/01/1992 (Directiva Europea
87/308 CEE).
Este producto está concebido, construido y colocado en el mercado, respetando las siguientes conformidades:
• Objetivos de seguridad de la Directiva “Baja Tensión" 73/23/CEE;
• Requisitos de protección de la Directiva “EMC" 89/336/CEE, modificada por la Directiva 93/ 68/CEE.
DECLARACION DE CONFORMIDAD
SUMARIO
E
1 ANTES DE USAR O APARELHO ............................................................................................................................................................................ 5
2 DESEMBALAGEM.................................................................................................................................................................................................... 7
3 CARACTERÍSTICAS TÉCNICAS ............................................................................................................................................................................. 9
4 INSTALAÇÃO .........................................................................................................................................................................................................13
5 USO......................................................................................................................................................................................................................... 19
6 DESCONGELAMENTO .......................................................................................................................................................................................... 25
7 LIMPEZA E MANUTENÇÃO .................................................................................................................................................................................. 27
8 PROCURA DEFEITO .............................................................................................................................................................................................. 29
9 SERVIÇO DE ASSISTÊNCIA TÉCNICA ................................................................................................................................................................ 29
• Este aparelho é destinado a estar em contacto com produtos alimentares e é em conformidade com o DL. 108 de 25.01.1992 (Diretiva Européia
87/308/CE).
Este produto foi elaborado, construído e colocado no mercado respeitando as seguintes conformidades:
• objectivos de segurança da Diretiva “Baixa Tensão” 73/23/CEE;
• requisitos de proteção da Diretiva “EMC”89/336/CEE, modificada através da Diretiva 93/68/CEE.
DECLARAÇÃO DE CONFORMIDADE
SOMMARIO
P

4
Non mangiate cubetti di ghiaccio o ghiaccioli subito dopo averli
tolti dal comparto congelatore poiché potrebbero causare bru-
ciature da freddo.
• Conservate questo libretto per future consultazioni.
• Dopo aver disimballato l’apparecchio, accertatevi che non sia danneggia-
to. Eventuali danni devono essere comunicati al rivenditore entro 24 ore.
• L’apparecchio che avete acquistato è ad uso esclusivamente domestico.
• Il comparto congelatore consente una perfetta congelazione di
cibi freschi e cotti, la produzione di cubetti di ghiaccio e la conservazione di
alimenti surgelati e congelati.
Per utilizzare al meglio il vostro apparecchio, raccomandiamo di leg-
gere attentamente le istruzioni per l’uso in cui troverete consigli utili
per la conservazione dei cibi.
Consigliamo di attendere almeno due ore prima di mettere in
funzione l’apparecchio, per dar modo al circuito refrigerante di
essere perfettamente efficiente.
• Accertatevi che l’installazione ed il collegamento elettrico siano effettuati
da un tecnico qualificato, secondo le istruzioni del fabbricante e le norme
locali in vigore. L’impianto elettrico deve essere munito di un efficace pre-
sa di terra, a norma di legge (46/90).
1.1 PRECAUZIONE E SUGGERIMENTI GENERALI
• Usate il:
- comparto congelatore solo per la conservazione di alimenti surgelati,
il congelamento di alimenti freschi, la produzione di cubetti di ghiaccio.
Prima di qualsiasi operazione di manutenzione o pulizia,
disinserite la spina dalla presa di corrente.
• Non tirate il cavo di alimentazione per staccare la spina dalla presa di
corrente.
• Dopo l’installazione, accertatevi che l’apparecchio non poggi sul
cavo di alimentazione.
1 PRIMA DI USARE L’APPARECCHIO
I
ATTENZIONE! Mantenete libere da ostruzioni le aperture di ventilazione
nell’involucro dell’apparecchio o nella struttura ad incasso.
Do not eat ice cubes or ice lollies as soon as you have removed
them from the freezer because they could cause frost burns.
• Keep this book for later use.
• When you have removed the packaging, make sure that the appliance is
not damaged. Any damage must be reported to your dealer within 24 hours.
• The appliance you have purchased is designed for household use only.
• The freezer compartment freezes fresh and cooked food
perfectly, it produces ice cubes and stores frozen food.
In order to use your appliance to its best, we advise reading these
instructions carefully as they contain useful information on how to
store food.
We advise you to wait for at least two hours before switching on
the appliance, in order to ensure that the refrigerating circuit is
completely efficient.
• Make sure that installation and electrical wiring are carried out by a quali-
fied technician according to the manufacturer’s instructions and to the local
norms in force. The electrical system must be equipped with an effective
earth according to the law (46/90).
1.1 GENERAL PRECAUTIONS AND SUGGESTIONS
• Use the:
- freezer compartment only to store frozen food, to freeze fresh food, to
produce ice cubes.
Before carrying out any maintenance or cleaning operation,
remove the plug from the mains socket.
• Do not pull on the supply cable in order to remove the plug from the socket.
• When the appliance has been installed, make sure it is not resting on the
mains supply cable.
1 BEFORE USING THE APPLIANCE
GB
WARNING! Keep ventilation openings in the appliance enclosure or in the
structure for building in, clear obstruction.
• Non introducete nel comparto congelatore contenitori di vetro con liquidi
poiché potrebbero esplodere.
• Per evitare il rischio di soffocamento e di intrappolamento, non permet-
tete ai bambini di giocare o di nascondersi all’interno dell’apparecchio.
• Non toccate l’apparecchio con mani o piedi bagnati o umidi.
• Do not place glass containers with liquids in the freezer compartment as
they could explode.
• Do not allow children to play or hide inside the appliance as they could
remain trapped and suffocate.
• Do not touch the appliance with wet, damp hands or feet.
Eiswürfel oder Wassereis dürfen nicht direkt nach an ihrer
Entnahme aus dem Gefrierfach verzehrt werden, weil dadurch
Erfrierungen verursacht werden können.
• Bewahren Sie das Handbuch auf, sodass Sie es jederzeit zu Rate ziehen können.
• Nachdem Sie die Verpackung entfernt haben, vergewissern Sie sich, dass
an dem Gerät kein Schaden entstanden ist. Eventuelle Schäden müssen
dem Händler innerhalb von 24 Stunden mitgeteilt werden.
• Dieses Produkt wurde ausschließlich für den privaten Haushalt konzipiert.
• Das Eisfach ermöglicht Ihnen das perfekte Einfrieren von rohen
und zubereiteten Lebensmitteln, die Herstellung von Eiswürfeln und die
Aufbewahrung von Tiefkühlkost und eingefrorenen Speisen.
Um den optimalen Einsatz des Geräts garantieren zu können, empfiehlt
der Hersteller, die Bedienungsanleitung aufmerksam zu lesen, die auch
nützliche Hinweise für das Einfrieren von Lebensmitteln bietet.
Der Hersteller empfiehlt, vor der ersten Inbetriebnahme des
Geräts mindestens zwei Stunden zu warten, damit der
Kühlkreislauf seine volle Leistungsfähigkeit erreichen kann.
• Sorgen Sie dafür, dass die Aufstellung und der Anschluss des Geräts an
das Stromnetz von qualifiziertem Personal vorgenommen wird,
entsprechend der Anweisungen des Herstellers und in Übereinstimmung
mit den örtlichen Sicherheitsvorschriften.
• Benutzen Sie:
-
das Gefrierfach nur für die Aufbewahrung von tiefgefrorenen Lebensmitteln, für
das Einfrieren von frischen Lebensmitteln und für die Herstellung von Eiswürfeln.
• Ziehen Sie aber nicht am Stromkabel, um den Stecker aus der Steckdose
zu entfernen.
• Nach der Aufstellung des Geräts vergewissern Sie sich, dass das Gerät
nicht auf dem Stromkabel aufliegt.
1 VOR DER INBETRIEBNAHME DES GERÄTS
D
ACHTUNG! Die Belüftungsöffnungen des Standgerät-Gehäuses oder die
der Einbaustruktur dürfen nicht verstopft werden.
• Legen Sie keine mit Flüssigkeit gefüllten Glasbehälter in das Gefrierfach,
da diese explodieren können.
• Kinder dürfen nicht im Innern des Gefrierschranks spielen oder sich dort
verstecken. Sie laufen Gefahr, zu ersticken oder im Gefrierschrank
eingeschlossen zu werden.
•
Berühren Sie den Gefrierschrank nicht mit feuchten oder nassen Händen oder Füßen.
1.1 VORSICHTSMASSNAHMEN UND ALLGEMEINE
HINWEISE
Vor jeder Wartungsarbeit und bei jeder Reinigung muss der
Stecker vom Stromnetz gelöst werden.
La pagina si sta caricando...

6
ME160699-020
C
R
R
B
F
S
1
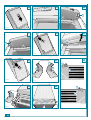
2 DISIMBALLO
I
• Ponete l’apparecchio nel punto d’installazione (cap. 4- INSTALLAZIONE).
• Tagliate le reggette R e sfilate il cartone o sacco in plastica esterno C.
• Eliminate subito i sacchi in plastica S i quali possono rappresentare pericolo per i bambini.
• Una volta liberato l’apparecchio dal suo imballo eliminate ancora i fianchi F e quindi il basamento B.
Questa operazione deve essere
compiuta da almeno due persone.
2.1 CONSIGLI PER LA SALVAGUARDIA DELL’AMBIENTE
2 REMOVAL OF PACKAGING
GB
• Place the appliance in its installation site (chap. 4 - INSTALLATION).
• Cut straps R and remove the box or plastic bag C.
• Immediately destroy the plastic bags S as they could be dangerous for children.
• Once the appliance is free from its packaging, remove the side protections F and then the base B.
This operation must be carried out
by at least two people.
2.1 ADVICE ON HOW TO PROTECT THE ENVIRONMENT
Imballo
Il materiale di imballo è riciclabile al 100%. Per lo
smaltimento seguite le normative locali. Il materiale
di imballaggio (sacchetti di plastica, parti in
polistirolo, ecc.) deve essere tenuto fuori dalla
portata dei bambini in quanto potenziale fonte di
pericolo.
Prodotto
L’apparecchio è stato fabbricato con materiale
riciclabile. La rottamazione dovrà avvenire
seguendo le normative locali per lo smaltimento
dei rifiuti. L’apparecchio da rottamare dovrà essere
reso inservibile tagliando il cavo elettrico di
alimentazione. L’apparecchio da rottamare non
dovrà essere disperso nell’ambiente, ma
consegnato presso gli appositi centri di raccolta
per il recupero dei gas refrigeranti e oli lubrificanti.
Informazione
Questo apparecchio è senza CFC (il circuito refri-
gerante contiene R134a) o senza HFC (il circuito
refrigerante contiene R600a Isobutano).
Per maggiori dettagli, riferitevi alla targhetta ma-
tricola posta all’interno dell’apparecchio (paragra-
fo 3).
Packaging
Packaging material is 100% recyclable.
For its disposal follow your local regulations.
The packaging material (plastic bags, polystyrene
parts etc.) must be kept out of children’s reach as
it could be dangerous.
Product
The appliance has been manufactured with
recyclable material.
Scrapping must be carried out according to your
local regulations on the disposal of waste materials.
Before scrapping the appliance, cut the electrical
supply cable so that it can no longer be used.
The appliance must not be left in the environment,
it must be handed over to a collection centre
specialized in the recovery of refrigerating gases
and lubrificating oils.
Information
This appliance is CFC-free (if the refrigerating circuit
contains R134a) or HFC-free (if the refrigerating
circuit contains R600a Isobutane).
For more details, see matriculation plate inside the
appliance (paragraph 3).
La pagina si sta caricando...

8
GO31BH-010
GC2906-030
2
H
L
P
TOTAL GROSS VOLUME l ...
l ...
R134a
FREEZER kg ...
...-... V ~ ... Hz
... W
Model. ..........
000000000
CLASS . .. kg/24h
H 185 cm
P 60 cm
L 60 cm
...
Kg
min 10°C max 32°C
min 16°C max 32°C
min 18°C max 38°C
min 18°C max 43°C
SN
N
ST
T
STRUTTURA PORTANTE: realizzata in pannelli di lamiera trattati e verniciati
elettrostaticamente per resistere ai maltrattamenti e rimanere bella e lucente
nello stesso tempo.
ISOLAMENTI: scelti per mantenere costante la temperatura interna e avere
grandi spazi interni.
SPAZIO INTERNO: studiato per poter ospitare qualsiasi forma di cibo da
conservare con una facilità di spostamento dei ripiani.
SBRINAMENTO: manuale.
CONTROLLO TEMPERATURA: Tramite il potenziometro, accessibile con
porta superiore aperta.
ATTENZIONE! Quando installate il vostro apparecchio è importante tener conto della classe climatica del prodotto. Per
conoscere la classe climatica del vostro apparecchio controllate la targa dati qui riportata.
L’apparecchio funziona correttamente nel campo di temperatura
ambiente indicato in tabella, secondo la classe climatica.
3 CARATTERISTICHE TECNICHE
I
CARRYING STRUCTURE: made of electrostatically treated and painted plate
panels to resist heavy duty wear and tear and keep its beautiful shine as
well.
INSULATION: selected to keep internal temperature constant and to give
large internal spaces.
INTERNAL SPACE: designed to store any kind of food with easy to move
shelves.
DEFROSTING: manual.
TEMPERATURE CONTROL: Use the temperature dial, which can be
accessed when the upper door is open.
3 TECHNICAL SPECIFICATIONS
GB
The appliance will function correctly within the ambient temperature
range indicated in the tabel, according to its climatic rating.
WARNING! When you install your appliance, it is important to bear in mind the climatic rating of the appliance.
In order to find out the climatic rating of your appliance, check the data rating plate.
3
La pagina si sta caricando...

10
4
O
GC2906-040
QUADRO COMANDI (fig. 4)
L FREEZER TEMPERATURE ADJUSTMENT
M RUNNING WARNING LIGHT
N ALARM WARNING LIGHT
O WARNING LIGHT THAT FREEZER IS RUNNING CONTINUOUSLY
P FREEZER CONTINUOUS RUNNING PUSH-BUTTON FOR RAPID FREEZING
I
CONTROL PANEL (fig. 4)
3.1 GENERAL DESCRIPTION OF THE APPLIANCE
GB
L REGOLAZIONE TEMPERATURA CONGELATORE
M SPIA DI FUNZIONAMENTO
N SPIA DI ALLARME
O SPIA DI FUNZIONAMENTO CONTINUO DEL CONGELATORE
P PULSANTE FUNZIONAMENTO CONTINUO DEL CONGELATORE PER
CONGELAMENTO RAPIDO
3.1 DESCRIZIONE GENERALE DELL’APPARECCHIO
NM
L P

11
L RÉGLAGE TEMPÉRATURE CONGÉLATEUR
M LAMPE-TÉMOIN DE FONCTIONNEMENT
N LAMPE-TÉMOIN D’ALERTE
O LAMPE-TÉMOIN DE FONCTIONNEMENT CONTINU DU CONGÉLATEUR
P BOUTON FONCTIONNEM
L REGULACIÓN DE LA TEMPERATURA DEL
CONGELADOR.
M PILOTO DE FUNCIONAMIENTO.
N PILOTO DE ALARMA.
O PILOTO DE FUNCIONAMIENTO CONTINUO
DEL CONGELADOR.
P PULSADOR DE FUNCIONAMIENTO CONTINUO
DEL CONGELADOR PARA CONGELADO RÁPIDO.
L. REGULAGEM DE TEMPERATURA DO FREEZER
M. BOTÃO LUMINOSO DE FUNCIONAMENTO
N. BOTÃO LUMINOSO DE ALARME
O. BOTÃO LUMINOSO DE FUNCIONAMENTO
CONTÍNUO DO FREEZER
P. BOTÃO DE FUNCIONAMENTO CONTÍNUO DO
FREEZER PARA CONGELAMENTO RÁPIDO.
KONTROLLSCHALTER (Abb. 4)
3.1 BESCHREIBUNG DES GERÄTS
D
TABLEAU DE COMMANDE (fig. 4)
3.1 DESCRIPTION GENERALE DE L’APAPREIL
CUADRO DE MANDOS (fig. 4)
3.1 DESCRIPCION GENERAL DEL APARATO
E
QUADRO DE COMANDOS (fig. 4)
3.1 DESCRIÇÕES GERAIS DO APARELHO
P
F
L REGULIERUNG DER GEFRIERGERÄTTEMPERATUR
M BETRIEBSKONTROLLEUCHTE
N ALARMKONTROLLEUCHTE
O
KONTROLLEUCHTE FÜR DIE KONTINUIERLICHE FUNKTION DES GEFRIERGERÄTS
P
GEFRIERGERÄTS BEIM SCHNELLEINFRIEREN

12
GH2901-080
GH2601-140
GC2906--052
GH2601-070
GC2906-050
5
P
AN0807-115
AN0807-070
Z
V
V
V
C
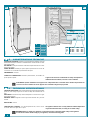
Make sure that the appliance is on a level.
• Adjust the front feet P, if necessary.
• The appliance is equipped with rear wheels so that it may be moved
easly
• Do not install the appliance near a source of heat.
• Put it in a dry, well ventilated place.
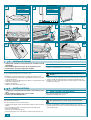
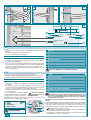
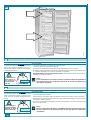
4 INSTALLATION
The position of the door can be inverted on all models in order to fit in better
with the kitchen furnishings.
In order to invert the door proceed as follows:
• Slightly tilt the appliance and rest it against the wall in order to reach the
bottom.
• Raise cover Z by pushing the fastening tabs from behind (fig. 8).
• Remove scews V (fig. 9).
• Remove the lower hinge C (fig. 10).
• Remove the freezer door in the direction shown by the arrow (fig. 11).
This operation must be carried out by at least two people.
6 7
8 9 10
11
Accertatevi che l’apparecchio sia livellato.
• Regolate i piedini P anteriori se necessario.
• L’apparecchio è dotato di ruote posteriori per consentire un facile
spostamento.
• Non installate l’apparecchio vicino ad una sorgente di calore.
• Posizionatelo in un luogo asciutto e ben ventilato.
Tutti i modelli sono predisposti per l’inversione dell’apertura della porta, per
un più coordinato allineamento con l’arredo cucina.
Per effettuare l’inversione della porta procedete nel seguente modo:
• Inclinate leggermente l’apparecchio e appoggiatelo al muro per accede-
re alla parte inferiore.
• Sollevate la mascherina Z spingendo da dietro in corrispondenza delle
alette di bloccaggio (fig. 8).
• Svitate le viti V (fig. 9).
• Sfilate la cerniera inferiore C (fig. 10).
Questa operazione deve essere compiuta da almeno due
persone.
ME160699-120
ME160699-110
I
K
12
13
• Sfilate la porta del congelatore nel senso indicato dalla freccia (fig. 11).
• Svitate le viti K che tengono fissata la cerniera intermedia I (fig. 12).
• Estraete la cerniera intermedia aprendo la porta superiore come indica-
to dalla freccia (fig. 13).
• Remove screws K which hold the middle hinge I in place (fig. 12).
• Open the upper door in order to remove the middle hinge in the direction
of the arrow (fig. 13).
4.1 LIVELLAMENTO
4 INSTALLAZIONE
I
4.2 INVERSIONE APERTURA PORTA
GB
4.1 HOW TO LEVEL THE APPLIANCE
4.2 INVERSION OF DOOR OPENING
VISTA LATERALE
SIDE VIEW
SEITENANSICHT
VUE LATERALE
VISTA LATERAL
VISTA LATERAL
VISTA ANTERIORE
FRONT VIEW
FRONTANSICHT
VUE DE FACE
VISTA ANTERIOR
VISTA ANTERIOR
4 INSTALLATION
La pagina si sta caricando...

14
GO31BH-130
14
ME160699-140
15
A
ME160699-150
16
S
17
ME160699-160
S
GH2601-110
ME160699-170
18 19
20 21
S
GO31BH-140
I
S
F
C
AN0807-090
Y
K
GH2601-050
24
M
AN00807-110
23
S
GH2601-130
GH2601-120
Z
Z
22

15
• Sfilate via la porta superiore nel senso indicato dalla freccia (fig. 14).
• Estraete il piastrino A dalla parte sinistra e inseritelo nella zona destra
(occupata precedentemente dalla cerniera intermedia) (fig. 15).
• Svitate il perno superiore S (fig. 16).
• Riavvitate il perno superiore S nella parte sinistra (fig. 17).
• Inserite la porta superiore accoppiando correttamente il perno S (fig. 18).
• Inserite la cerniera intermedia I e fissatela con le proprie viti (fig. 19).
Per facilitare il montaggio agite contemporaneamente sulla chiusura della
porta.
I
• Remove the upper door in the direction of the arrow (fig. 14).
• Remove plate A on the left-hand side and insert it in the right-hand side
(previously occupied by the middle hinge) (fig. 15).
• Unscrew the upper pin S (fig. 16).
• Screw the upper pin S back into the left-hand side (fig. 17).
• Insert the upper door so that pin S fits in correctly (fig. 18).
• Insert the middle hinge I and use its own screws to fasten it (fig. 19).
To facilitate assembly move the door lock at the same time.
• Saquen la puerta superior en el sentido indicado por la flecha (fig. 14).
• Quiten la plaquita A colocada en la parte izquierda y pónganla en la parte
derecha (ocupada anteriormente por la bisagra intermedia) (fig. 15).
• Desenrosquen el perno superior S (fig. 16).
• Enrosquen el perno superior S en la parte izquierda (fig. 17).
• Coloquen la puerta superior colocando correctamente el perno S (fig. 18).
• Coloquen la bisagra intermedia I y sujétenla con sus propios tornillos (fig.
19). Para facilitar el montaje, actúen contemporáneamente en el cierre de
la puerta.
• Tirar a porta superior no sentido indicado pela seta (fig. 14).
• Tirar a chapa A da parte esquerda e inserí-la na parte direita (ocupada
anteriormente pela dobradiça intermediária) (fig. 15).
• Desaparafusar o eixo superior S (fig. 16).
• Aparafusar novamente o eixo superior S na parte esquerda (fig. 17).
• Inserir a porta superior juntando corretamente o eixo S (fig. 18).
• Inserir a dobradiça intermediária I e fixá-la com os próprios parafusos (fig.
19). Para facilitar a montagem, operar contemporaneamente no
fechamento da porta.
• Ziehen Sie die obere Tür des Gefrierschranks in Pfeilrichtung heraus (Abb.
14).
• Ziehen Sie das Plättchen A auf der linken Seite heraus und setzen Sie es
auf der rechten Seite ein, dort wo zuvor das mittlere Scharnier befestigt
war (Abb. 15).
• Lösen Sie den oberen Stift S (Abb. 16).
• Schrauben Sie den oberen Stift S jetzt auf der linken Seite fest (Abb. 17).
• Setzen Sie die obere Tür ein. Der Bolzen S muss sich korrekt einpassen
(Abb. 18).
• Setzen Sie das Zwischenscharnier I ein und befestigen Sie es mit den
Scharnierschrauben. Um die Montage zu Erleichtern, wirken Sie gleichzeitig
auf den Verschluss der Tür ein (Abb. 19).
• Otez la porte supérieure dans le sens indiqué par la flèche (fig. 14).
• Enlevez la plaquette A de la partie gauche et introduisez-la dans la partie
droite (occupée précédemment par la charnière intermédiaire) (fig. 15).
• Dévissez la cheville supérieure S (fig. 16).
• Revissez la cheville supérieure S dans la partie gauche (fig. 17).
• Introduisez la porte supérieure en assemblant correctement la cheville S
(fig. 18).
• Introduisez la charnière intermédiare I et fixez-la avec ses propres vis (fig.
19). Pour faciliter le montage intervenez en même temps sur la fermeture
de la porte.
• Insert the freezer door so that it fits on to the hinge correctly (fig. 20).
• Unscrew pin F from hinge C (right-hand side) and insert it into hinge S
(left-hand side) supplied with the appliance (fig. 21).
• Remove the left disc Y from the lower case Z (fig. 22).
• Insert the included right disk K.
• Insert cover M by pushing the fastening tabs (fig. 23).
• Replace the lower hinge S on the left-hand side and use the screws to
fasten it into position (fig. 24).
• Setzen Sie die Tür des Eisschrankes ein (Abb. 20).
Das Zwischenscharnier muss sich korrekt einpassen.
• Entfernen sie den Stift F von Scharnier C (rechts) und montieren sie ihn
an das beigefügte Scharnier S (links) (Abb. 21).
• Entfernen sie das linke Scheibchen Y von der unteren Verkleidung Z (Abb.
22).
• Fügen sie das beigefügte rechte Scheibchen K ein.
• Bringen sie die Verkleidung M an, indem sie an den Haltebereichen Druck
ausüben (Abb. 23).
• Bringen sie nun das untere Scharnier S links an und befestigen sie es mit
den Schrauben (Abb. 24).
D
F
• Introduisez la porte du congélateur en assemblant correctement la
charnière intermédiare (fig. 20).
• Dévissez la cheville F de la charnière inférieure C (droite) et montez-la
dans la charnière S (gauche) fournie avec l’appareil (fig. 21).
• Enlever la plaque gauche Y de la calandre inférieure Z (fig. 22).
• Remettre la plaque droite K fournie.
• Insérez la plinthe M en poussant en correspondance des ailettes de blocage
(fig. 23).
• Remontez la charnière inférieure S sur le côté gauche et fixez-la avec les
vis (fig. 24).
• Coloquen la puerta del congelador poniendo en posición correcta la bisagra
intermedia (fig. 20).
• Desenrosquen el perno F de la bisagra inferior C (derecha) y móntenla en
la bisagra S (izquierda ) que se entrega con el aparato (fig. 21).
• Saquen la plaquita izquierda Y de la máscara inferior Z (fig. 22).
• Coloquen la plaquita derecha K que se entrega con el aparato.
• Coloquen la mascarita M empujando en las aletas de bloqueo (fig. 23).
• Monten la bisagra inferior S en el lado izquierdo y sujétenla con los tornillos
(fig. 24).
• Inserir a porta do freezer juntando corretamente a dobradiça intermediária
(fig. 20).
• Desaparafusar o eixo F da dobradiça C (direita) e montá-lo na dobradiça
S (esquerda) que acompanha o aparelho (fig. 21).
• Retirar a chapa esquerda Y da tampa inferior Z (fig. 22).
• Inserir a chapa direita K que acompanha a aparelhagem.
• Inserir a tampa M empurrando em correspondência às travas de bloqueio
(fig. 23).
• Montar novamente a dobradiça inferior S no lado esquerdo e fixá-la com
os parafusos (fig. 24).
P
E
GB
• Inserite la porta del congelatore accoppiando correttamente la cerniera
intermedia (fig. 20).
• Svitate il perno F dalla cerniera C (destra) e montatelo nella cerniera S
(sinistra) in dotazione (fig. 21).
• Sfilate il piastrino sinistro Y dalla mascherina inferiore Z (fig. 22).
• Inserite il piastrino destro K in dotazione (posizione destra).
•
Rimonate la cerniera inferiore S sul lato sinistro e fissatela con le viti (fig. 23).
• Inserite la mascherina M spingendo in corrispondenza delle alette di
bloccaggio (fig. 24).

16
GO1810-300
GO1810-280
GO1810-290
25 26 27
T
V
GC2906-030
28
TOTAL GROSS VOLUME l ...
R134a
FREEZER. kg ...
...-... V ~ ... Hz
... W
Model. ..........
000000000
COMPRESSION SYSTEM
TYPE:
...
CLASS . .. kg/24h
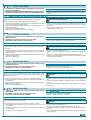
1 11 7
8
9
10
2
3
4
5
6
I
GB
• Svitate le viti V che tengono fissate le maniglie alle porte del congelatore
(fig. 25)
.
• Riavvitate le maniglie dalla parte opposta
(fig. 26)
.
• Inserite i tappetti T (in dotazione)
(fig. 27)
.
• I collegamenti elettrici devono essere conformi alle normative di sicurezza elettrica.
• Controllate che il voltaggio sulla targhetta matricola corrisponda alla ten-
sione della vostra abitazione.
• La messa a terra dell’apparecchio è obbligatoria a termini di legge. Il fab-
bricante declina ogni responsabilità per eventuali danni subiti da persone,
animali o cose, derivanti dalla mancata osservanza di queste norme.
• Se la spina e la presa non sono dello stesso tipo, fate sostituire la spina da
un tecnico qualificato.
Non usate adattatori, prese multiple o prolunghe.
4.3 COLLEGAMENTO ELETTRICO
1 MODELLO
2 TENSIONE DI ALIMENTAZIONE E FREQUENZA
3 ASSORBIMENTO MASSIMO
4 CAPACITÀ LORDA TOTALE
5 NUMERO DI TIPO
6 MARCHIO DI CONFORMITÀ CE
7 CLASSE CLIMATICA
8 CAPACITÀ DI CONGELAMENTO
9 TIPO DI REFRIGERANTE
10 QUANTITÀ REFRIGERANTE
11 NUMERO DI MATRICOLA
• Insert the stoppers T (supplied with the appliance)
(fig. 25)
.
• Remove screws V that fasten the handle to the appliance door
(fig. 26)
.
• Screw the handles back on to the doors on the opposite side
(fig. 27)
.
• The electrical wiring must comply with the norms on electrical safety.
• Check that the voltage on the rating plate corresponds to the voltage in
your home.
• The appliance must have an earth according to the laws in force. The
manufacturer declines all responsibility for any damage to persons, animals
or things as a result of failure to comply with these norms.
• If the plug and the socket are not of the same kind, ask a qualified technician
to change the plug.
4.3 ELECTRICAL WIRING
For your convenience the flexible supply
cable is supplied already connected to a B.
S. 1363 fused plug with a 13 amp fuse.
Should this plug not fit the socket outlets in your home, it should be cut off
and replaced with a suitable plug, as follows:
This plug cannot be used for any other appliance and should therefore be
properly disposed of and not left where children might find it and plug it
into a supply socket with the obvious this implies danger. We recommend
the use of good quality plugs and wall sockets that can be switched off
when the machine is not in use.
1 GREEN AND YELLOW EARTH
2 BLUE NEUTRAL
3 BROWN LIVE
4 13 AMP FUSE
5 CABLE CLAMP
ME160699-370
As the colours of the wires in the mains lead of this appliance may not correspond
to the coloured markings identifying the terminals in your plug, proceed as follows:
• the wire which is coloured green and yellow must be connected to the
terminal in the plug which is marked with the letter E or by the earth symbol
or coloured green or green and yellow;
• the wire which is coloured blue must be connected to the terminal which is
marked with the letter N or coloured black;
• the wire which is coloured brown must be connected to the terminal which
is marked with the letter L or coloured red.
WARNING! THIS APPLIANCE
MUST BE EARTHED
Do not use adaptors,
multiple sockets or
extensions.
1
2
3
4
5
IMPORTANT: the wires in the mains lead fitted to this appliance are coloured as
follows.
1 MODEL
2 SUPPLY VOLTAGE AND FREQUENCY
3 MAXIMUM ABSORPTION
4 TOTAL GROSS VOLUME
5 TYPE NUMBER
6 EEC CONFORMITY CHECKMARK
7 CLIMATIC CLASS
8 FREEZER CAPACITY
9 TYPE OF REFRIGERANT
10 QUANTITY OF FREEZER REFRIGERANT
11 MATRICULATION NUMBER
La pagina si sta caricando...

18
29
5 USO
I
5.1 MESSA IN FUNZIONE
5USE
GB
5.1 START-UP
L’arresto del funzionamento si ottiene ponendo la manopola L in posizione O.
The compartment can be turned off by setting the switches L to the 0-Position.
• L’apparecchio viene avviato automaticamente (posizione
manopola L diversa da O).
• La spia N rimane accesa, fino al raggiungimento della tem-
peratura critica di allarme.
La spia N inoltre si accende quando:
- l’apparecchio viene collegato per la prima volta alla rete
elettrica;
- la porta del congelatore è rimasta aperta a lungo;
- è stata caricata una quantità di alimenti da congelare
superiore a quella indicata sulla targhetta matricola;
- la temperatura del comparto congelatore non è adeguata.
Attenzione!
La temperatura viene regolata agendo sulla
manopola L dalla posizione 1 (più calda) alla
posizione 5 (più fredda).
Posizione consigliata tra 2 e 3.
• Dopo la messa in funzione sono necessarie circa 3 ore prima
che vengano raggiunte le temperature adeguate di conserva-
zione degli alimenti surgelati.
Warning!
The temperature can be adjusted by
turning knob L from 1 (the warmest
temperature) to 5 (the coldest
temperature).
The ideal temperature range is
between 2 and 3.
• The appliance is turned on automatically (if the switch
L in not in the 0-position).
• The warning light N will remain switched on until the critical
alarm temperature has been reached.
The warning light N will also switch on when:
- the appliance is connected to the mains for the first time;
- the freezer door has been left open for a long time;
- more food than the quantity shown on the rating plate
has been stored in order to be frozen;
- the temperature of the freezer compartment is not cor-
rect.
• Once the freezer has switched on, about 3
hours are needed before it reaches the cor-
rect temperature for preserving frozen food.
GC2906-040
L
N
P
La pagina si sta caricando...

20
Il comparto congelatore permette il
congelamento degli alimenti. La quantità di alimenti
freschi che può essere congelata in 24 ore, è
indicata sulla targhetta matricola (vedi paragrafo
“Collegamento elettrico”).
ME160699-330
Gli alimenti da sur-
gelare devono es-
sere preparati in
piccole porzioni:
1 kg max
1 kg MAX
Nota
In caso di interruzione di corrente, il comparto congelatore mantiene la temperatura di
conservazione per 19 ore circa. Durante l’interruzione di corrente, non aprite la porta
del comparto congelatore.
I
Come procedere:
• 5 ore prima di procedere al congelamento di alimenti freschi:
- premete il pulsante di congelamento rapido P.
• A congelazione ultimata disinserite il pulsante P per evitare inutili consumi di energia.
• Avvolgete e sigillate l’alimento in: fogli alluminio, pellicola trasparente, imballi impermeabili di plasti-
ca, contenitori di polietilene con coperchi, contenitori da congelatore.
• Sistemate l’alimento nei comparti indicati lasciando sufficiente spazio attorno ai pacchetti per-
permettere la circolazione dell’aria.
The freezer compartment makes it
possible to freeze food. The quantity of fresh food
which can be frozen in 24 hours is shown on the
rating plate (see paragraph entitled “Electrical
wiring”).
ME160699-330
The food that has to
be frozen should be
prepared in small
portions: max. 1 kg.
1 kg MAX
Nota
If there is a power failure, the freezer compartment will keep its preserving temperature
for about 19 hours. During the power failure, do not open the door of the freezer
compartment.
GB
Proceed as follows:
• 5 hours before freezing fresh food:
- press the rapid freezer button P.
• Once freezing has terminated, release the button P to prevent unnecessary energy consumption.
• Wrap the food in: aluminium foil, transparent film, plastic waterproof packaging, covered polyethyle-
ne containers, freezer containers.
• Place the food in the indicated compartment and leave enough space around each package to allow
the air to circulate freely.
5.2
COME CONGELARE GLI ALIMENTI FRESCHI
5.2
HOW TO FREEZE FRESH FOOD
GC2906-030
30
La pagina si sta caricando...
La pagina si sta caricando...

23
Cuando se compran alimentos congelados tengan presentes siempre los siguientes factores:
• Los paquetes o las confecciones tienen que estar intactos porque si no, se podrían deteriorar los alimentos. Si un paquete está hinchado o presenta
manchas de humedad, significa que no se conservó en las condiciones óptimas y que puede haber sufrido un principio de descongelación.
• Compren los alimentos congelados en el último momento y usen bolsas térmicas para transportarlos.
• Nada más llegar a casa colóquenlos inmediatamente en el congelador.
• Eviten o reduzcan al mínimo las variaciones de temperatura.
• Respeten las fechas de caducidad que aparecen en las confecciones de productos congelados.
• Sigan siempre las instrucciones que aparecen en el paquete y que se refieren a la conservación de alimentos congelados.
•
La cantidad máxima de alimentos frescos que se pueden congelar (tantos Kg. en 24 horas) aparece en la placa en la que se exponen las características técnicas.
• Eviten colocar los alimentos que hay que congelar en contacto con los que están ya congelados para evitar que aumente la temperatura de estos
últimos.
Importante
Durante los meses de conservación de los alimentos frescos congelados, respeten las instrucciones que aparece en la puerta interna
del congelador (fig. 33).
No congelen nuevamente los alimentos parcialmente descon-
gelados, más bien, consúmanlos antes de 24 horas.
E
Producción de cubitos de hielo
• Llenen el recipiente del hielo en sus 3/4 partes de agua y colóquenlo en
el primer cajón del congelador.
Quando comprar alimentos congelados, tenha sempre presente os seguintes fatores:
• A embalagem devem estar intacta, senão o alimento pode deteriorar-se. Caso a embalagem esteja inchada ou apresentar manchas de úmido, a
mesma não foi conservada nas condições ideais e pode ter sofrido um início de descongelamento.
• Comprar os alimentos congelados por último e utilizar sacolas térmicas para o transporte.
• Assim que chegar em casa, recoloque imediatamente os alimentos congelados no compartimento do congelador.
• Evitar ou reduzir ao mínimo as variações de temperatura.
• Respeitar o prazo de validade marcado nas confecções dos congelados.
• Seguir sempre as instrucções da embalagem para a conservação dos alimentos congelados.
• A quantidade máxima dos alimentos frescos que podem ser congelados, em kg/24h, está sempre marcada na tabela das características técnicas.
• Evitar de colocar os alimentos a serem congelados em contacto com aqueles já congelados, para evitar a elevação da temperatura destes últimos.
Importante
Para o tempo de conservação dos alimentos frescos que foram congelados, verificar a tabela que se encontra na parede interna do
freezer (fig. 33).
Não recongelar os alimentos parcialmente descongelados e
consumi-los EM 24 horas.
P
Produção de cubos de gelo
• Preencher a forma de gelo com de água e recolocá-la na primeira gaveta
do compartimento do congelador.
Beim Einkauf tiefgefrorener Produkte sollten Sie folgende Regeln beachten:
• Die Verpackung oder der Karton dürfen keine Beschädigungen aufweisen. Andernfalls kann der Inhalt schlecht werden.
Wenn eine Verpackung aufgebläht ist oder feuchte Flecken hat, ist das ein Zeichen, dass das Produkt nicht unter optimalen Bedingungen konserviert
wurde und dass der Auftauprozess möglicherweise eingesetzt hatte.
• Kaufen Sie die tiefgefrorener Produkte zuletzt und verwenden Sie zu deren Transport Kühltaschen.
• Wenn Sie zu Hause ankommen, legen Sie die tiefgefrorenen Lebensmittel sofort in das Gefrierfach.
• Vermeiden Sie Temperaturschwankung oder reduzieren Sie diese auf ein Minimum.
• Respektieren Sie das Verfalldatum, das auf den Verpackungen der Tiefkühlprodukte angegeben ist.
• Folgen Sie immer den Anweisungen auf der Verpackung beim Einfrieren von tiefgefrorenen Lebensmitteln.
• Die maximale Einfriermenge für frische Lebensmittel ist auf dem Schild mit den Kenndaten des Geräts vermerkt.
Wichtiger Hinweis
Für die Dauer der Aufbewahrung der frischen eingefrorenen Lebensmittel sollten Sie sich nach den Angaben auf der inneren Tür des Gefrierschranks richten (Abb. 33).
Frieren Sie teilweise aufgetaute Lebensmittel nicht wieder ein,
tauen Sie diese ganz auf und verbrauchen Sie sie innerhalb
von 24 Stunden.
D
Die Herstellung von Eiswürfeln
• Füllen Sie die Eisschale zu 3/4 mit Wasser und stellen Sie diese dann in
die erste Schublade des Gefrierfachs.
Lorsque vous achetez des aliments surgelés, prenez toujours en considération les facteurs suivants:
• L’emballage ou le paquet doivent être intacts, car l’aliment peut se déteriorer. Si un paquet est gonflé ou montre des taches d’humidité, il n’a pas été
conservé dans des conditions optimales et il a peut être subi un début de décongélation.
• Au moment des achats, prenez les aliments surgelés en dernier et utilisez des sacs thermiques pour le transport.
• Dès votre arrivée, rangez immédiatement les aliments surgelés dans le compartiment congélateur.
• Evitez ou réduisez au minimum les variations de température.
• Respectez les dates limites reportées sur la confection des surgelés.
• Reportez-vous toujours aux instructions de l’emballage pour la conservation des aliments congelés.
• A quantité maximale d’aliments frais que vous pouvez congeler, exprimée en kg/24h est indiquée sur la plaquette des données techniques.
• Evitez de mettre des aliments à congeler près d’aliments déjà congelés pour empêcher une hausse de température à ces derniers.
Important
Pour la durée de conservation des aliments frais congelés, reportez-vous au tableau situé à l’intérieur de la porte du congélateur (fig. 33).
Ne recongelez jamais les aliments décongelés en partie mais
consommez-les avant 24 heures.
F
Production de glaçons
• Remplissez d’eau le bac à glaçon aux 3/4 environ et rangez-le dans le
premier tiroir du compartiment de congélation.

24
32
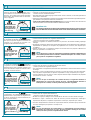
6 SBRINAMENTO
I
33
GC2906-064GC2906-062
R
Lo sbrinamento avviene manualmente:
• spegnete l’apparecchio ed aprite le porte; per accelerare il processo potete inserire una baci-
nella di acqua tiepida T nel comparto in basso dopo aver tolto i cassetti;
• asciugate con una spugna.
Non usate dispositivi meccanici o altri metodi artificiali per accelerare il processo di sbrinamento, diversi da quelli raccomandati dal
costruttore.
Non usate apparecchi elettrici all’interno dello scomparto di conservazione dei cibi se questi non sono di tipo raccomandato dal costruttore.
6 DEFROSTING
GB
The defrosting is done manually:
- turn off the appliance and open the doors; to accelerate the process you can place a bowl
with warm water (T) at the bottom of the compartment, after removing the containers;
- use a sponge to dry the water.
Do not use any tools or methods other than the one described above by the manufacturer to accelerate the defrosting process.
Do not use electrical appliance inside de food storage of the appliances, unless they are of the type recommended by the manufacturer.
GO23B1211-270
GO23B1211-270
R
T
T
La pagina si sta caricando...

26
ME160699-040
34
VISTA POSTERIORE
REAR VIEW
RÜCKWÄRTIGE ANSICHT
VUE POSTERIEURE
VISTA POSTERIOR
VISTA POSTERIOR
I
GB
ATTENZIONE! Non danneggiate il circui-
to di refrigerazione.
7 PULIZIA E MANUTENZIONE
Disinserite sempre l’apparecchio dalla presa di corrente, prima di effettuare qualsiasi
operazione di pulizia.
Nessuna protezione (griglia a filo, carter) deve essere rimossa da parte di personale non
qualificato: evitate assolutamente di far funzionare l’apparecchio senza queste protezioni.
Pulizia del condensatore
• Da compiere almeno due volte l’anno.
• Utilizzate un aspirapolvere per uso domestico
o una spazzola. Un condensatore sporco influ-
isce negativamente sull’apparecchio riducendo-
ne le prestazioni.
Cavo di alimentazione
• Ispezionate periodicamente il cavo di alimenta-
zione al fine di controllare la sua integrità.
• Nel caso di cavo danneggiato, non utilizzate l’ap-
parecchio e non tentate la riparazione ma rivol-
getevi a personale qualificato per la sua sostitu-
zione.
Per la pulizia interna di tutte le parti
in plastica e della guarnizione porta
Non usate abrasivi e detersivi di alcun
genere.
• Usate esclusivamente una soluzione di bicar-
bonato di sodio in acqua tiepida 10 cucchiai in
2 litri di acqua.
Per assenze prolungate
• Vuotate i comparti.
• Disinserite l’apparecchio dalla rete elettrica.
• Pulite entrambi i comparti e asciugateli.
• Lasciate aperte le porte per impedite la forma-
zione di cattivi odori o muffe.
Al termine della vita funzionale dell’apparecchio
che utilizza gas refrigerante R600a (isobutano)
e gas infiammabile nella schiuma isolante, lo
stesso dovrà essere messo in sicurezza prima
dell’invio in discarica.
Per questa operazione rivolgetevi al vostro ne-
goziante o all’ente locale preposto.
7 CLEANING AND MAINTENANCE
WARNING! Do not damage the refrige-
rant circuit.
Always disconnect the appliance from the mains socket before carrying out any cleaning
operation whatsoever.
No protection device (wire grating, guard) should be removed by unqualified personnel: never
use the appliance without these protection devices.
Cleaning of the condenser
• The condenser should be cleaned at least twice
a year.
• Use a household vacuum cleaner or a brush.
A dirty condenser can influence the functioning of
the appliance (reduction of power).
Supply cable
• Regularly check the supply cable to see that it
is in good condition.
• If the cable is damaged, do not use the applian-
ce and do not try to repair it. Contact a qualified
electrician to replace it.
To clean all the inner plastic parts and
the door seal
Do not use any kind of abrasives or de-
tergents.
When the refrigerator is not going
to be used for long periods
• Empty the compartments.
• Disconnect the appliance from the mains supply.
• Clean and dry both compartments.
• Leave the doors open to prevent the formation
of unpleasant odours or mould.
At the end of the functional life of the equip-
ment which uses cooling gas R600a (isobutane),
and inflammable gas inside the insulating foam
it must be placed in safety before sending it to
the waste disposal.
For this operation contact your dealer and the
local authorities.
• Use only a solution of 10 tablespoons of bicar-
bonate of soda dissolved in 2 litres of water.
La pagina si sta caricando...

28
8 RICERCA GUASTI
I
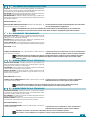
1) L’apparecchio non funziona
• C’è un’interruzione di corrente?
• La spina è ben inserita nella presa di corrente?
• Il cavo di alimentazione è danneggiato?
• Il termostato è sulla posizione Stop?
2) La temperatura all’interno dei comparti non è sufficientemente bassa
• Le porte chiudono correttamente?
• L’apparecchio è installato vicino ad una sorgente di calore?
• Il termostato è sulla posizione corretta?
• Il condensatore è pulito?
3) L’apparecchio è eccessivamente rumoroso
• L’apparecchio è in contatto con altri mobili, o oggetti?
• I tubi nella parte posteriore si toccano o vibrano?
• L’apparecchio è ben livellato?
8 TROUBLESHOOTING
GB
1) The appliance is not working
• Is there a power failure?
• Is the plug inserted correctly into the mains socket?
• Is the supply cable damaged?
• Is the thermostat set in the
STOP
position?
2) The temperature inside the compartments is not low enough
• Do the doors close correctly?
• Is the appliance installed near a source of heat?
• Is the thermostat set in the correct position?
• Is the condenser clean?
3) The appliance is too noisy
• Is the appliance touching other pieces of furniture or objects?
• Are the tubes at the back touching each other or do they vibrate?
• Is the appliance on a level?
9 SERVIZIO ASSISTENZA TECNICA
Prima di contattare il Servizio Assistenza:
• Verificate se è possibile eliminare da soli i guasti (vedere “Guida Ricerca
Guasti”).
• Riavviate l’apparecchio per accertarvi che l’inconveniente sia stato elimi-
nato. Se il risultato è negativo, disinserite nuovamente l’apparecchio e ri-
petete l’operazione dopo un’ora.
Se l’apparecchio non funziona bene o addirittura non funziona affatto prima
di chiedere l’intervento di un tecnico, nel vostro interesse, controllate che:
• la spina sia bene inserita nella presa di corrente;
• ci sia tensione nella linea elettrica;
• il termostato sia nella posizione consigliata di funzionamento;
• le chiusure delle porte siano perfette;
• la tensione di alimentazione corrisponda a quella dell’apparecchio (± 6%).
• Se il risultato è ancora negativo, contattate il Servizio Assistenza.
Comunicare:
• il tipo di guasto
• il modello
• Il numero di matricola
9 TECHNICAL ASSISTANCE SERVICE
Before contacting your Assistance Service:
• Check that it is impossible to eliminate the fault by yourself (refer to the
chapter entitled “Troubleshooting”)
• Switch the appliance back on to see if the problem has been solved. If not,
disconnect the appliance once again and repeat the operation an hour
later.
If the appliance is not working well or is not working at all, before you contact
a technician it is worth checking that:
• the plug is inserted correctly into the mains socket;
• that there is on-line voltage;
• the thermostat is in the correct running position;
• the doors are perfectly shut;
• the supply voltage corresponds to the one marked on the appliance (±
6%);
• If the result is still negative, contact your Assistance Service.
Advise them of:
• the type of fault;
• the model;
• the matriculation number (see data tag).

29
8 FUNKTIONSTÖRUNGEN
D
1) Das Gerät funktioniert nicht
• Ist das Stromnetz unterbrochen?
• Ist der Stecker richtig eingesteckt?
• Ist das Stromkabel beschädigt?
• Ist der Thermostat auf die
STOP
Position eingestellt?
2) Die Fächer kühlen nicht ausreichend ab
• Schließen die Türen perfekt?
• Wurde das Gerät in der Nähe einer Wärmequelle aufgestellt?
• Ist der Thermostat auf die richtige Position eingestellt?
• Ist der Kondensator sauber?
3) Das Gerät ist ungewöhnlich laut
• Berührt das Gerät andere Möbel oder Gegenstände?
• Berühren sich die Rohre auf der Rückseite oder vibrieren sie?
• Steht das Gerät richtig in der Waagerechten?
8 EVENTUELLES PANNES
F
1) L’appareil ne fonctionne pas
• Est-ce qu’il y a une panne de courant?
• Est-ce que la fiche est bien branchée à la prise de courant?
• Est-ce que le cordon d’alimentation est endommagé?
• Le thermostat est-il positionné sur le Stop
2) La température à l’intérieur des compartiments n’est pas assez basse
• Est-ce que les portes se ferment correctement?
• Est-ce que l’appareil est installé près d’une source de chaleur?
• Le thermostat est-il positionné correctement ?
• Est-ce que le condensateur est propre?
3) L’appareil fait trop de bruit
• Est-ce que l’appareil touche d’autres meubles ou objets?
• Est-ce que les tubes de la partie postérieure se touchent ou vibrent ?
• Est-ce que l’appareil est bien mis à niveau?
8 BUSQUEDA DE AVERIAS
E
1) El aparato no funciona
• Hay una interrupción de corriente eléctrica?
• El enchufe está colocado bien en el enchufe de la pared?
• El cable de alimentación está estropeado?
• El termostato está en la posición de Stop?
2)
La temperatura del interior de los departamentos no es lo suficientemente baja
• Las puertas se cierran correctamente?
• El aparato está instalado cerca de una fuente de calor?
• El termostato está en la posición correcta?
• El condensador está limpio?
3) El aparato hace demasiado ruido
• El aparato está en contacto con otros muebles o con otros objetos?
• Los tubos colocados en la parte de atrás, se tocan o vibran?
• El aparato está bien nivelado?
8 PROCURA DEFEITO
P
1) O aparelho não funciona
• Houve uma interrupção de corrente elétrica?
• A tomada está bem inserida na parede?
• O cabo de alimentação está danificado?
• O termostato está na posição stop?
2)
A temperatura no interior dos compartimentos não é suficientemente baixa
• As portas fecham corretamente?
• O aparelho está instalado perto de uma fonte de calor?
• O termostato está na posição correta?
• O condensador está limpo?
3) O aparelho apresenta rumores em excesso
• O aparelho está em contato com outros móveis ou objetos?
• Os tubos da parte posterior se encostam ou vibram?
• O aparelho está bem nivelado?
9 TECHNISCHER KUNDENDIENST
Bevor Sie den technischen Kundendienst anrufen:
• Prüfen Sie, ob Sie an Hand der oben aufgeführten. Fragen nicht alleine in der
Lage sind den Defekt zu finden und zu beheben (Kapitel “Funktionsstörungen”).
• Schalten Sie das Gerät erneut ein, um festzustellen, ob der Defekt behoben
wurde. Ist das Ergebnis negativ, dann schalten Sie das Gerät aus und
wiederholen Sie den Vorgang noch einmal nach einer Stunde.
Wenn das Gerät nicht richtig oder gar nicht funktioniert, überprüfen Sie in Ihrem
Interesse noch einmal, bevor Sie den technischen Kundendienst rufen, ob:
• der Stecker richtig in der Steckdose sitzt;
• strom in der Leitung ist;
• der Temperaturregler auf der empfohlenen Position steht;
• die Türen perfekt schließen;
• die Spannung der Stromversorgung mit der des Geräts (± 6%) übereinstimmt;
• wenn das Resultat wieder negativ ausfällt, rufen Sie bitte den Kundendienst
an.
Geben Sie an:
• Die Art der Störung
• Gerätemodell
• Die Matrikelnummer (siehe Datenschild)
9 SERVICE D’ASSISTANCE TECHNIQUE
Avant de contacter le Service d’Assistance:
• Vérifiez s’il vous est possible d’éliminer la panne (Chapitre “EVENTUELLES PANNES”).
• Remettez en fonctionnement l’appareil pour vérifier que le problème ait été éli-
miné. Dans le cas contraire, débranchez à nouveau l’appareil et répétez l’opéra-
tion une heure après.
Si l’appareil ne fonctionne pas bien ou pas du tout, avant même d’appeler un tech-
nicien pour une intervention et dans votre intérêt, n’oubliez pas de contrôler si:
• la fiche est bien branchée à la prise de courant;
• il y a bien la tension dans la ligne;
• le thermostat est à la position conseillée pour le fonctionnement;
• le portes se ferment correctement;
• la tension d’alimentation correspond à celle de l’appareil (± 6%);
• s’il ne fonctionne toujours pas, contactez le Service d’Assistance.
N’oubliez pas de comuniquer:
• Le type de panne.
• Le modèle.
• Numéro de matricule
9 SERVICIO DE ASISTENCIA TECNICA
Antes de ponerse en contacto con el Servicio Técnico:
• Comprueben si pueden eliminar ustedes solos las averías (capítulo “ Guía a
la búsqueda de averías“).
• Pongan de nuevo en marcha el aparato para asegurarse de que se eliminaron
los problemas existentes. Si el resultado es negativo, desconecten el aparato
y repitan la operación nuevamente después de que pasó una hora.
Si el aparato no funciona bien o no funciona para nada, antes de llamar a la
asistencia para que intervenga un técnico, en interés suyo comprueben que:
• el enchufe esté colocado correctamente en el enchufe de la corriente;
• que haya tensión en la línea eléctrica;
• que el termostato esté en la posición de funcionamiento aconsejada;
• que las puertas estén cerradas perfectamente;
• que la tensión de alimentación corresponda a la del aparato (+/- 6 %);
• si el resultado es todavía negativo, llamen al servicio de asistencia técnica.
Comuniquen:
• El tipo de avería,
• El modelo.
• El número de matrícula.
9 SERVIÇO DE ASSISTÊNCIA TÉCNICA
Antes de contactar o Serviço de Assistência Técnica:
• Verificar se é possível eliminar os defeitos sem a ajuda de pessoal quali-
ficado (Ítem “Guia Procura Defeitos”);
• Reativar o aparelho para certificar-se de que o inconveniente tenha sido
eliminado. Se o resultado for negativo, desinserir novamente o aparelho e
repetir a operação depois de uma hora;
Se o aparelho não funciona bem ou mesmo não funciona antes de procurar
a intervenção de um técnico, para o seu interesse, verifique se;
• a tomada está bem inserida na parede;
• há tensão na linha;
• o termostato está na posição aconselhada de funcionamento;
• o fechamento das portas é perfeito;
• a tensão de alimentação corresponde a do aparelho (± 6%);
• caso o resultado seja ainda negativo, contactar o Serviço de Assistência
Técnica.
Comunicar:
• o tipo de defeito;
• o modelo.
• o número de inscrição.
-
 1
1
-
 2
2
-
 3
3
-
 4
4
-
 5
5
-
 6
6
-
 7
7
-
 8
8
-
 9
9
-
 10
10
-
 11
11
-
 12
12
-
 13
13
-
 14
14
-
 15
15
-
 16
16
-
 17
17
-
 18
18
-
 19
19
-
 20
20
-
 21
21
-
 22
22
-
 23
23
-
 24
24
-
 25
25
-
 26
26
-
 27
27
-
 28
28
-
 29
29
-
 30
30


New Pol XV185CEL Manuale utente
- Categoria
- Frigo-congelatori
- Tipo
- Manuale utente
in altre lingue
- English: New Pol XV185CEL User manual
- français: New Pol XV185CEL Manuel utilisateur
- español: New Pol XV185CEL Manual de usuario
- Deutsch: New Pol XV185CEL Benutzerhandbuch
- português: New Pol XV185CEL Manual do usuário
Altri documenti
-
Candy CBCA260 Manuale del proprietario
-
Candy CCHE 260 Manuale utente
-
Fagor CIV-41UK Manuale del proprietario
-
Whirlpool wbc 3746 a x Manuale del proprietario
-
Whirlpool KGE356 PROFRESH A++ IN Guida utente
-
Whirlpool ART 315/R/ A+ Guida utente
-
Whirlpool GKI 9001 A++ Guida utente
-
Whirlpool WH2312 A+E Guida utente
-
-
Whirlpool WV1510 W Guida utente