
1
Frigo DC VAK
1.
1.
4x 8x
4x
M8M8 Ø24M8x25
+
–
M8 Ø24
M8 Ø24
M8 Ø24
M8 Ø24
M8x25
M8x25
M8x25
M8
M8
M8
M8
4x
2.
1.
1.
1
2
3
1
2
1
4
5
3
1
3
4
2
5
6
leaflet_figures.fm Seite 1 Dienstag, 4. Juni 2019 7:46 07

2
YOUR LOCAL DEALER
dometic.com/dealer
YOUR LOCAL SALES OFFICE
dometic.com/sales-offices
A complete list of Dometic companies, which comprise the Dometic Group, can be found in the public filings of:
DOMETIC GROUP AB Hemvärnsgatan 15 SE-17154 Solna Sweden
YOUR LOCAL SUPPORT
dometic.com/contact
4x
M8 Ø24
M8 Ø24
M8x25
M8
M8
4x
1.
2.
2.
2.
2.
7
8
4445102873 06/2019
leaflet_figures.fm Seite 2 Dienstag, 4. Juni 2019 7:46 07

REFRIGERATION
FRIGO
Frigo DC VAK
Vehicle Adapter Kit for chassis
Installation Manual . . . . . . . . . . . . . . . . . . 3
Vehicle Adapter Kit für
Fahrgestelle
Montageanleitung . . . . . . . . . . . . . . . . . . 9
Kit d’adaptateur du véhicule pour
châssis
Instructions de montage. . . . . . . . . . . . . .16
Vehicle Adapter Kit para chasis
Instrucciones de montaje . . . . . . . . . . . . 23
Kit adaptador de veículo para
chassi
Instruções de montagem . . . . . . . . . . . . 30
Kit adattatore veicolo per telaio
Indicazioni di montaggio . . . . . . . . . . . . 37
Voertuigadapterset voor chassis
Montagehandleiding . . . . . . . . . . . . . . . 43
Køretøjsadaptersæt til chassis
Monteringsvejledning . . . . . . . . . . . . . . 50
Adapterutrustning för
fordonschassi
Monteringsanvisning . . . . . . . . . . . . . . . 57
Kjøretøyadaptersett for chassis
Monteringsanvisning . . . . . . . . . . . . . . . 63
Vehicle Adapter Kit -sarja
koriasennusta varten
Asennusohje . . . . . . . . . . . . . . . . . . . . . . 69
Адаптерный комплект для шасси
Инструкция по монтажу. . . . . . . . . . . . . 75
Vehicle Adapter Kit do podwozia
Instrukcja montażu . . . . . . . . . . . . . . . . . 82
Súprava adaptéra vozidla
pre podvozok
Návod na montáž . . . . . . . . . . . . . . . . . . .89
Sada adaptéru vozidla pro
podvozek
Návod k montáži. . . . . . . . . . . . . . . . . . . .95
Jármű adapterkészlet alvázhoz
Szerelési útmutató . . . . . . . . . . . . . . . . . 101
EN
DE
FR
ES
PT
IT
NL
DA
SV
NO
FI
RU
PL
SK
CS
HU
VAK_Frigo-DC--I.book Seite 1 Dienstag, 4. Juni 2019 8:33 08

VAK_Frigo-DC--I.book Seite 2 Dienstag, 4. Juni 2019 8:33 08

3
EN
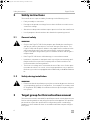
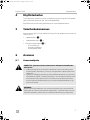
FrigoDCVAK Explanation of symbols
Please read this manual carefully before starting the device. Keep it in
a safe place for future reference. If the device is passed on to another
person, this manual must be handed over to the user along with it.
The manufacturer cannot be held liable for damage resulting from
improper usage or incorrect operation.
Table of contents
1 Explanation of symbols . . . . . . . . . . . . . . . . . . . . . . . . . . . . . . . . . . 3
2 Safety instructions . . . . . . . . . . . . . . . . . . . . . . . . . . . . . . . . . . . . . . 4
3 Target group for this instruction manual . . . . . . . . . . . . . . . . . . . . 4
4 Intended use . . . . . . . . . . . . . . . . . . . . . . . . . . . . . . . . . . . . . . . . . . . 5
5 Scope of delivery . . . . . . . . . . . . . . . . . . . . . . . . . . . . . . . . . . . . . . . 5
6 Installation. . . . . . . . . . . . . . . . . . . . . . . . . . . . . . . . . . . . . . . . . . . . . 5
1 Explanation of symbols
!
!
A
I
WARNING!
Safety instruction: Indicates a hazardous situation that, if not avoided, could
result in death or serious injury.
CAUTION!
Safety instruction: Indicates a hazardous situation that, if not avoided, could
result in minor or moderate injury.
NOTICE!
Indicates a situation that, if not avoided, can result in property damage.
NOTE
Supplementary information for operating the product.
VAK_Frigo-DC--I.book Seite 3 Dienstag, 4. Juni 2019 8:33 08

EN
Safety instructions FrigoDCVAK
4
2 Safety instructions
The manufacturer accepts no liability for damage in the following cases:
• Faulty assembly or connection
• Damage to the product resulting from mechanical influences and incorrect
connection voltage
• Alterations to the product without express permission from the manufacturer
• Use for purposes other than those described in the operating manual
2.1 General safety
!
WARNING!
• Only use the Frigo DC VAK for the purpose specified by the manufacturer
and do not make any alterations or structural changes to the device. The
Frigo DC VAK vehicle-specific holder is only approved for installation in the
vehicle specified in this instruction manual and in conjunction with the
Frigo DC transport refrigeration system. Installation in other vehicle types is
not permitted.
• If the Frigo DC VAK shows visible damage, it must not be mounted.
• Installation, maintenance and repair work may only be carried out by quali-
fied personnel from a specialist company who are familiar with the risks
involved and the relevant regulations.
• The electrical cooling unit is mounted in the area of the recess for the spare
tire under the vehicle. As a result, it is no longer possible to carry a spare tire.
Make sure your vehicle is equipped with an additionally available breakdown
kit.
2.2 Safety during installation
!
WARNING!
• Please note that the installation may only be carried out by persons who have
a corresponding certificate of competence, for example in accordance with
EC Regulation 307/2008, for installation and start-up of transport refrigera-
tion systems.
3 Target group for this instruction manual
This instruction manual is intended for qualified personnel at workshops who are
familiar with the guidelines and safety precautions to be applied. The qualified
personnel has a specialist qualification in refrigeration and air conditioning
equipment, which authorizes them to assemble and fill the transport refrigera-
tion system.
VAK_Frigo-DC--I.book Seite 4 Dienstag, 4. Juni 2019 8:33 08

5
EN
FrigoDCVAK Intended use
4 Intended use
For the installation of the DC unit, the specific Frigo DC VAK holder was
designed, which is installed under the vehicle on the frame rails of a chassis.
Any use other than or beyond that purpose constitutes use other than intended.
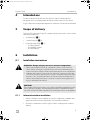
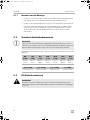
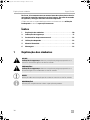
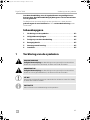
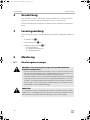
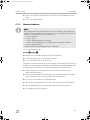
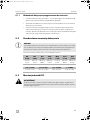
5 Scope of delivery
The Frigo DC VAK for the Frigo DC transport refrigeration system consists of the
following components:
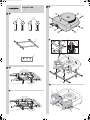
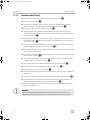
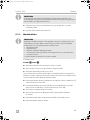
• 4 x holders (fig. 1 1)
• 1 x base frame (fig. 1 2)
• Fastening material (fig. 1 3):
– 4 x M8 x 25 bolts
– 8 x M8 Ø24 washers
– 4 x M8 stop nuts
6 Installation
6.1 Installation instructions
!
!
6.1.1 Information before installation
• Before installation, check whether any vehicle components could be dam-
aged or have their function impaired as a result of the installation.
• Check the completeness of the Frigo DC VAK according to the scope of
delivery.
WARNING! Danger of injury due to live electrical components!
• When connecting the electrical components, there is a risk of electric
shock. Before starting any installation work, disconnect the battery and
make sure that no voltage can be transferred to the electrical components.
• Improper interventions, such as the use of branch connectors in the vehi-
cle’s electrical system and electronics system, can lead to impairment of the
functions. This can lead to the failure of vehicle-mounted components or
vehicle safety equipment and as a result to accidents involving personal
injury or damage to the vehicle.
CAUTION!
The transport refrigeration system may only be installed by qualified personnel
from a specialist company. The following information is intended for techni-
cians who are familiar with the guidelines and safety precautions to be applied.
VAK_Frigo-DC--I.book Seite 5 Dienstag, 4. Juni 2019 8:33 08

EN
Installation FrigoDCVAK
6
• When installing the transport refrigeration system and the electrical connec-
tion, observe the original instructions of the vehicle manufacturer and the
instructions of the vehicle body manufacturer for the equipping of refriger-
ated vehicles.
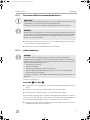
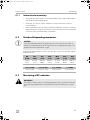
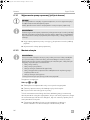
6.2 Standard tightening torques
A
Recommended tightening torques if no other tightening torque is specified:
6.3 Installing the DC unit
!
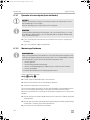
6.3.1 Removing the spare tire (if present)
A
I
➤ Remove the spare tire from the retaining frame as described in the owner’s
manual of the vehicle.
NOTICE!
Do not exceed the specified tightening torque under any circumstances. This
is the only way to avoid unintentional loosening of screw connections or tear at
high loads, if the fasteners were tightened too tight.
M5
(0.80)
M6
(1.00)
M8
(1.25)
M10
(1.25)
M10
(1.50)
M12
(1.50)
M12
(1.75)
4Nm to
6Nm
8Nm to
12 Nm
20 Nm to
30 Nm
40 Nm to
55 Nm
37 Nm to
52 Nm
70 Nm to
90 Nm
60 Nm to
85 Nm
5/8" 18 UNF 3/4" 16 UNF 7/8" 14 UNF 1" 14 UNS
2Nm to 4Nm 3Nm to 5.5Nm 4Nm to 6Nm 4Nm to 6Nm
WARNING!
When installing the Frigo DC VAK, observe the original instructions of the vehi-
cle manufacturer and the installation manual for the Frigo DC electric cooling
system.
NOTICE!
Make sure that the vehicle is equipped with a suitable tire repair kit if no spare
tire is carried.
Inform the vehicle owner about the removal of the spare tire.
NOTE
Observe the operating instructions for the vehicle when removing the spare
tire. If openings are made on the vehicle after removing the spare tire holder
and its attachments (jack), these must be closed again.
VAK_Frigo-DC--I.book Seite 6 Dienstag, 4. Juni 2019 8:33 08

7
EN
FrigoDCVAK Installation
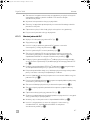
➤ Remove the spare tire storage holder.
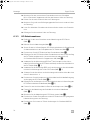
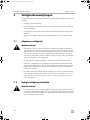
6.3.2 Installing the holder
I
Proceed as follows:
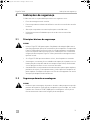
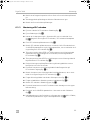
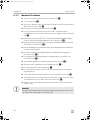
See fig. 2 and fig. 3:
➤ Identify a suitable location on the frame rails of the vehicle.
➤ Mark two drill holes for each of the rear holders.
➤ Attach the two holders to the frame rails.
These installation steps are used to ensure the exact installation position of the
two front holders on the vehicle. With the pre-assembled VAK, you must deter-
mine the distance for marking the attachment points for the front holders.
➤ Install the front holders to the base frame with two M8 x 25 bolts and two M8
stop nuts.
➤ Mount the pre-assembled base frame to the rear holders on the vehicle with
two M8 x 25 bolts and two M8 stop nuts.
➤ Align the two front holders on the vehicle.
➤ Mark the two attachment points for each of the two front holders on the
vehicle.
➤ Unscrew both bolts of the rear holders from the base frame again.
➤ Attach the front holders to the vehicle.
NOTE
Use self-locking bolts (not included in the scope of delivery, as the lengths may
vary) for fastening the holders to the frame rail. If standard bolts/nuts have to be
replaced, bolts/nuts must only be used with the
• same diameter
• same strength
• same bolt standard or bolt type
• same surface coating (corrosion protection, coefficient of friction)
• same thread pitch.
The specifications of the vehicle manufacturer must be observed!
VAK_Frigo-DC--I.book Seite 7 Dienstag, 4. Juni 2019 8:33 08

EN
Installation FrigoDCVAK
8
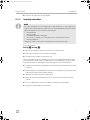
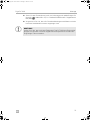
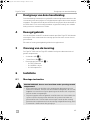
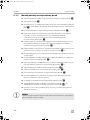
6.3.3 Installing the DC unit
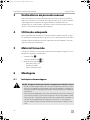
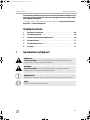
➤ Remove the nine bolts from the cover of the DC unit (fig. 4).
➤ Remove the cover (fig. 4).
➤ Insert the 4 x dampers and 4 x spacer sleeves included in the scope of
delivery of the DC unit into the base plate of the DC unit (fig. 5).
➤ Position the DC unit on the base frame (fig. 5).
➤ Attach the DC unit to the base frame with the 4 x M8 x 25 Allen screws,
4 x M8 Ø24 washers and 4 x M8 stop nuts included in the scope of delivery
of the DC unit (fig. 5).
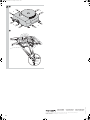
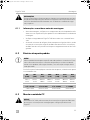
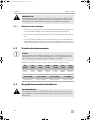
➤ Connect the negative lead (Ø35 mm
2
) of the compressor connection cable
(included in the scope of delivery of the DC unit) with the connection block
in the DC unit (fig. 6 1).
➤ Connect the positive lead (Ø35 mm
2
) of the compressor connection cable
with the high-power relay in the DC unit (fig. 6 2).
➤ Protect the connections on the high-power relay and connection block with
a protective wax or similar.
➤ Position the compressor connection cable to the cable attachment at the out-
put of the DC unit (fig. 6 3).
➤ Attach the compressor connection cable with the cable tie included in the
scope of delivery of the DC unit (fig. 6 3).
➤ Secure the connection cable in the area of the compressor (fig. 6 4).
➤ Secure the cover of the relay block with a cable tie (fig. 6 5).
➤ Reattach the cover of the DC unit (fig. 7 ).
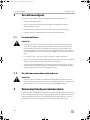
➤ Position the base frame with the DC unit under the vehicle using a suitable lift-
ing device.
➤ In the lower part of the holders, position the 4 x M8 Ø24 washers (fig. 8 ).
➤ Insert the base frame into the four holders and secure it with 4 x M8 x 25
bolts, 8 x M8 Ø24 washers and 4 x M8 stop nuts (fig. 8 ).
➤ Make sure that all screw connections and nuts are tightened to the correct
tightening torques.
A
NOTICE!
Make sure that after installing the Frigo DC VAK, there is no interference
between the components you have attached and the parts on the vehicle.
VAK_Frigo-DC--I.book Seite 8 Dienstag, 4. Juni 2019 8:33 08

9
DE
Frigo DC VAK Erklärung der Symbole
Bitte lesen Sie diese Anleitung vor der Inbetriebnahme sorgfältig
durch und bewahren Sie sie auf. Geben Sie sie im Falle einer Weiter-
gabe des Kühlgerätes an den Nutzer weiter.
Der Hersteller haftet nicht für Schäden, die durch nicht bestimmungs-
gemäßen Gebrauch oder falsche Bedienung verursacht werden.
Inhaltsverzeichnis
1 Erklärung der Symbole . . . . . . . . . . . . . . . . . . . . . . . . . . . . . . . . . . 9
2 Sicherheitshinweise . . . . . . . . . . . . . . . . . . . . . . . . . . . . . . . . . . . . . 9
3 Zielgruppe der Anleitung . . . . . . . . . . . . . . . . . . . . . . . . . . . . . . . 10
4 Bestimmungsgemäßer Gebrauch . . . . . . . . . . . . . . . . . . . . . . . . .11
5 Lieferumfang. . . . . . . . . . . . . . . . . . . . . . . . . . . . . . . . . . . . . . . . . . .11
6 Montage . . . . . . . . . . . . . . . . . . . . . . . . . . . . . . . . . . . . . . . . . . . . . .11
1 Erklärung der Symbole
!
!
A
I
2 Sicherheitshinweise
Der Hersteller übernimmt in folgenden Fällen keine Haftung für Schäden:
• Montage- oder Anschlussfehler
• Beschädigungen am Produkt durch mechanische Einflüsse und falsche
Anschlussspannung
WARNUNG!
Sicherheitshinweis auf eine Gefahrensituation, die zum Tod oder zu
schwerer Verletzung führen kann, wenn sie nicht vermieden wird.
VORSICHT!
Sicherheitshinweis auf eine Gefahrensituation, die zu einer leichten oder
mittelschweren Verletzung führen kann, wenn sie nicht vermieden wird.
ACHTUNG!
Hinweis auf eine Situation, die zu Sachschäden führen kann, wenn sie nicht
vermieden wird.
HINWEIS
Ergänzende Informationen zur Bedienung des Produktes.
VAK_Frigo-DC--I.book Seite 9 Dienstag, 4. Juni 2019 8:33 08

DE
Zielgruppe der Anleitung Frigo DC VAK
10
• Veränderungen am Produkt ohne ausdrückliche Genehmigung vom
Hersteller
• Verwendung für andere als die in der Anleitung beschriebenen Zwecke
2.1 Allgemeine Sicherheit
!
WARNUNG!
• Benutzen Sie das Frigo DC VAK nur für den vom Hersteller angegebenen
Verwendungszweck und führen Sie keine Änderungen oder Umbauten am
Gerät durch. Der fahrzeugspezifische Halter Frigo DC VAK ist nur zugelassen
für den Einbau in das in dieser Anleitung angegebene Fahrzeug und in Kom-
bination mit der Transportkühlanlage Frigo DC. Ein Einbau in andere Fahr-
zeugtypen ist nicht zulässig.
• Wenn das Frigo DC VAK sichtbare Beschädigungen aufweist, darf es nicht
montiert werden.
• Die Installation, Wartung und etwaige Reparatur dürfen nur durch einen
Fachbetrieb erfolgen, der mit den damit verbundenen Gefahren bzw. ein-
schlägigen Vorschriften vertraut ist.
• Die elektrische Kühlanlageneinheit ist im Bereich der Mulde für das Reserve-
rad unter dem Fahrzeug montiert. Dadurch ist es nicht mehr möglich ein
Reserverad mitzuführen. Stellen Sie sicher, das Ihr Fahrzeug mit einem
zusätzlich erhältlichen Pannenset ausgerüstet ist.
2.2 Sicherheit bei der Montage
!
WARNUNG!
• Beachten Sie, dass die Montage nur durch Personen erfolgen darf, welche
einen entsprechenden Sachkundenachweis, z. B. gemäß EG-Verordnung
307/2008, zur Montage und erstmaligen Inbetriebnahme von Transport-
kühlanlagen besitzen.
3 Zielgruppe der Anleitung
Diese Anleitung richtet sich an Fachpersonal in Werkstätten, die mit den anzu-
wendenden Richtlinien und Sicherheitsvorkehrungen vertraut sind. Das Fach-
personal hat eine Fachqualifikation im Bereich Kälte- und Klimatechnik, die sie
ermächtigt, die Transportkühlanlage zu montieren und zu befüllen.
VAK_Frigo-DC--I.book Seite 10 Dienstag, 4. Juni 2019 8:33 08

11
DE
Frigo DC VAK Bestimmungsgemäßer Gebrauch
4 Bestimmungsgemäßer Gebrauch
Für die Montage der DC-Einheit wurde der spezifische Halter Frigo DC VAK
konstruiert, der unter dem Fahrzeug an den Rahmenlängsträgern eines Fahrge-
stells verbaut wird.
Eine andere oder darüber hinausgehende Benutzung gilt als nicht bestim-
mungsgemäß.
5 Lieferumfang
Das Frigo DC VAK für die Transportkühlanlage Frigo DC besteht aus folgenden
Komponenten:
• 4 x Halter (Abb. 1 1)
• 1 x Grundrahmen (Abb. 1 2)
• Befestigungsmaterial (Abb. 1 3):
– 4 x Schrauben M8 x 25
– 8 x Scheiben M8 Ø24
– 4 x Stoppmuttern M8
6Montage
6.1 Montagehinweise
!
!
WARNUNG! Verletzungsgefahr durch unter Spannung stehende
elektrische Komponenten!
• Beim Anschließen der elektrischen Komponenten besteht die Gefahr eines
elektrischen Schlages. Klemmen Sie vor Beginn aller Montagearbeiten die
Batterie ab und stellen Sie sicher, dass sich keine Spannung auf die elektri-
schen Komponenten übertragen kann.
• Unsachgemäße Eingriffe, wie die Verwendung von Abzweigverbindern in
der Fahrzeugelektrik und Fahrzeugelektronik, können zu Beeinträchtigun-
gen der Funktionen führen. Dies kann zum Ausfall von fahrzeugseitigen
Komponenten oder sicherheitsrelevanten Fahrzeugeinrichtungen und als
Folge zu Unfällen mit Personenschäden oder Schäden am Fahrzeug führen.
VORSICHT!
Die Montage der Transportkühlanlage darf ausschließlich von entsprechend
ausgebildeten Fachbetrieben durchgeführt werden. Die nachfolgenden Infor-
mationen richten sich an Fachkräfte, die mit den anzuwendenden Richtlinien
und Sicherheitsvorkehrungen vertraut sind.
VAK_Frigo-DC--I.book Seite 11 Dienstag, 4. Juni 2019 8:33 08

DE
Montage Frigo DC VAK
12
6.1.1 Hinweise vor der Montage
• Prüfen Sie vor der Montage, ob durch den Einbau Fahrzeugkomponenten
beschädigt oder in ihrer Funktion beeinträchtigt werden können.
• Prüfen Sie die Vollständigkeit des Frigo DC VAK anhand des Lieferumfangs.
• Beachten Sie bei der Montage der Transportkühlanlage und beim elektri-
schen Anschluss die Originalanleitung des Fahrzeugherstellers und die
Anweisungen des Fahrzeugaufbauhersteller zur Ausrüstung von Kühl-
fahrzeugen.
6.2 Standard-Anziehdrehmomente
A
Empfohlene Anziehdrehmomente, falls kein anderes Anziehdrehmoment ange-
geben ist:
6.3 DC-Einheit montieren
!
ACHTUNG!
Überschreiten Sie keinesfalls das angegebene Anziehdrehmoment. Nur so
können Sie vermeiden, dass sich Schraubverbindungen unbeabsichtigt lösen
oder bei hohen Belastungen reißen, falls sie zu fest angezogen wurden.
M5
(0.80)
M6
(1.00)
M8
(1.25)
M10
(1.25)
M10
(1.50)
M12
(1.50)
M12
(1.75)
4 Nm bis
6Nm
8 Nm bis
12 Nm
20 Nm bis
30 Nm
40 Nm bis
55 Nm
37 Nm bis
52 Nm
70 Nm bis
90 Nm
60 Nm bis
85 Nm
5/8" 18 UNF 3/4" 16 UNF 7/8" 14 UNF 1" 14 UNS
2 Nm bis 4 Nm 3 Nm bis 5,5 Nm 4 Nm bis 6 Nm 4 Nm bis 6 Nm
WARNUNG!
Beachten Sie für den Einbau des Frigo DC VAK die Originalanleitung des
Fahrzeugherstellers und die Montageanleitung für die elektrische Kühlanlage
Frigo DC.
VAK_Frigo-DC--I.book Seite 12 Dienstag, 4. Juni 2019 8:33 08

13
DE
Frigo DC VAK Montage
6.3.1 Reserverad (falls vorhanden) demontieren
A
I
➤ Entfernen Sie das Reserverad, wie in der Betriebsanleitung des Fahrzeugs
beschrieben, aus dem Halterahmen.
➤ Entfernen Sie den Aufnahmehalter des Reserverads.
6.3.2 Halter montieren
I
Gehen Sie wie folgt vor:
Siehe Abb. 2 und Abb. 3:
➤ Bestimmen Sie eine geeignete Stelle an den Rahmenlängsträgern des Fahr-
zeugs.
➤ Markieren Sie jeweils zwei Bohrungen für die hinteren Halter.
➤ Befestigen Sie die beiden Halter an den Rahmenlängsträgern.
Diese Einbauschritte dienen zur genauen Montageposition der zwei vorderen
Halter am Fahrzeug. Mit dem vormontierten VAK müssen Sie den Abstand ermit-
teln, um die Befestigungspunkte für die vorderen Halter zu markieren.
➤ Montieren Sie die vorderen Halter mit zwei Schrauben M 8 x 25 und zwei
Stoppmuttern M 8 am Grundrahmen.
ACHTUNG!
Stellen Sie sicher, dass das Fahrzeug mit einem geeigneten Reifenreparaturset
ausgestattet ist, wenn kein Reserverad mitgeführt wird.
Informieren Sie den Fahrzeughalter über den Wegfall des Reserverads.
HINWEIS
Beachten Sie für den Ausbau des Reserverads die Betriebsanleitung des Fahr-
zeugs. Sollten nach dem Ausbau der Reserveradhalterung und deren Anbau-
teile (Hebevorrichtung) Öffnungen am Fahrzeug entstehen, müssen diese
wieder verschlossen werden.
HINWEIS
Verwenden Sie für die Befestigung der Halter am Rahmenlängsträger
selbstsichernde Schrauben (nicht im Lieferumfang enthalten, da die Längen
variieren können). Müssen serienmäßige Schrauben/Muttern ersetzt werden,
dürfen nur Schrauben/Muttern mit
• gleichem Durchmesser
• gleicher Festigkeit
• gleicher Schraubennorm oder Schraubenart
• gleicher Oberflächenbeschichtung (Korrosionsschutz, Reibungszahl)
• gleicher Gewindesteigung
verwendet werden. Es sind hierbei die Vorgaben des Fahrzeugherstellers zu
beachten!
VAK_Frigo-DC--I.book Seite 13 Dienstag, 4. Juni 2019 8:33 08

DE
Montage Frigo DC VAK
14
➤ Montieren Sie den vormontierten Grundrahmen mit zwei Schrauben
M 8 x 25 und zwei Stoppmuttern M 8 an die hinteren Halter am Fahrzeug.
➤ Richten Sie die zwei vorderen Halter am Fahrzeug aus.
➤ Markieren Sie jeweils zwei Befestigungspunkte für die zwei vorderen Halter
am Fahrzeug.
➤ Lösen Sie die beiden Schrauben der hinteren Halter wieder vom Grundrah-
men.
➤ Befestigen Sie die vorderen Halter am Fahrzeug.
6.3.3 DC-Einheit montieren
➤ Entfernen Sie die neun Schrauben an der Abdeckung der DC-Einheit
(Abb. 4).
➤ Nehmen Sie die Abdeckung ab (Abb. 4).
➤ Setzen Sie die im Lieferumfang der DC-Einheit enthaltenen 4 x Dämpfer und
4 x Abstandshülsen in der Grundplatte der DC-Einheit ein (Abb. 5).
➤ Positionieren Sie die DC-Einheit auf den Grundrahmen (Abb. 5).
➤ Befestigen Sie die DC-Einheit auf den Grundrahmen mit den im Lieferumfang
der DC-Einheit enthaltenen 4 x Innensechskantschrauben M8 x 25,
4 x Scheiben M8 Ø24 und 4 x Stoppmuttern M8 (Abb. 5).
➤ Verbinden Sie die Minusleitung (Ø35 mm
2
) des Kompressor-Anschluss-
kabels (im Lieferumfang der DC-Einheit enthalten) mit dem Anschlussblock in
der DC-Einheit (Abb. 6 1).
➤ Verbinden Sie die Plusleitung (Ø35 mm
2
) des Kompressor-Anschlusskabels
mit dem Hochleistungsrelais in der DC-Einheit (Abb. 6 2).
➤ Schützen Sie die Anschlüsse am Hochleistungsrelais und Anschlussblock mit
einem Schutzwachs o. ä.
➤ Positionieren Sie das Kompressor-Anschlusskabel auf die Kabelbefestigung
am Ausgang der DC-Einheit (Abb. 6 3).
➤ Befestigen Sie das Kompressor-Anschlusskabel mit dem im Lieferumfang der
DC-Einheit enthaltenen Kabelband (Abb. 6 3).
➤ Fixieren Sie das Anschlusskabel im Bereich des Kompressors (Abb. 6 4).
➤ Fixieren Sie die Abdeckung des Relaisblocks mit einem Kabelband
(Abb. 6 5).
➤ Montieren Sie die Abdeckung der DC-Einheit wieder (Abb. 7).
➤ Positionieren Sie den Grundrahmen mit der DC-Einheit mit einer geeigneten
Hubeinrichtung unter das Fahrzeug.
➤ Positionieren Sie im unteren Teil der Halterungen 4 x Scheiben M8 Ø24
(Abb. 8).
VAK_Frigo-DC--I.book Seite 14 Dienstag, 4. Juni 2019 8:33 08

15
DE
Frigo DC VAK Montage
➤ Setzen Sie den Grundrahmen in die vier Halterungen ein und befestigen Sie
ihn mit 4 x Schrauben M8 x 25, 8 x Scheiben M8 Ø24 und 4 x Stoppmuttern
M8 (Abb. 8).
➤ Vergewissern Sie sich, dass alle Schraubverbindungen und Muttern mit den
korrekten Anziehdrehmomenten angezogen sind.
A
ACHTUNG!
Stellen Sie sicher, dass nach dem Einbau des Frigo DC VAK keine Beeinträchti-
gungen zwischen den von Ihnen angebrachten Komponenten und den fahr-
zeugseitigen Teilen entstehen.
VAK_Frigo-DC--I.book Seite 15 Dienstag, 4. Juni 2019 8:33 08

FR
Signification des symboles FrigoDCVAK
16
Veuillez lire ce manuel avec attention avant de mettre l’appareil en
service. Conservez ensuite ce manuel. En cas de passer de l’appareil,
veuillez le transmettre au nouvel acquéreur.
Le fabricant décline toute responsabilité en cas de dommages provoqués par
une utilisation non-conforme de l'appareil ou par des erreurs de mani-
pulation.
Sommaire
1 Signification des symboles . . . . . . . . . . . . . . . . . . . . . . . . . . . . . . 16
2 Consignes de sécurité. . . . . . . . . . . . . . . . . . . . . . . . . . . . . . . . . . . 16
3 Groupe cible de ce manuel . . . . . . . . . . . . . . . . . . . . . . . . . . . . . . 17
4 Usage conforme . . . . . . . . . . . . . . . . . . . . . . . . . . . . . . . . . . . . . . . 18
5 Contenu de la livraison. . . . . . . . . . . . . . . . . . . . . . . . . . . . . . . . . . 18
6 Installation . . . . . . . . . . . . . . . . . . . . . . . . . . . . . . . . . . . . . . . . . . . . 18
1 Signification des symboles
!
!
A
I
2 Consignes de sécurité
Le fabricant décline toute responsabilité pour des dommages dans les cas
suivants :
• des défauts de montage ou de raccordement
• des sollicitations mécaniques et une tension de raccordement incorrecte
ayant endommagé le matériel
AVERTISSEMENT !
Consigne de sécurité signalant une situation dangereuse qui peut entraîner
la mort ou de graves blessures si elle n’est pas évitée.
ATTENTION !
Consigne de sécurité signalant une situation dangereuse qui peut entraîner
des blessures de gravité moyenne ou légère si elle n’est pas évitée.
AVIS !
Remarque signalant une situation qui peut entraîner des dommages matériels
si elle n’est pas évitée.
REMARQUE
Informations complémentaires sur l'utilisation du produit.
VAK_Frigo-DC--I.book Seite 16 Dienstag, 4. Juni 2019 8:33 08

17
FR
FrigoDCVAK Groupe cible de ce manuel
• des modifications apportées au produit sans autorisation explicite de la part
du fabricant
• une utilisation différente de celle décrite dans la notice
2.1 Sécurité générale
!
AVERTISSEMENT !
• N’utilisez le Frigo DC VAK que pour l’usage prévu par le fabricant et n’effec-
tuez aucune modification ou transformation du produit. Le support de
Frigo DC VAK spécifique au véhicule est uniquement approuvé pour une ins-
tallation dans le véhicule spécifié dans ce manuel et en combinaison avec le
système de refroidissement pour le transport Frigo DC. Une installation dans
d’autres types de véhicule est interdite.
• Si le Frigo DC VAK présente un dommage visible, il ne doit pas être monté.
• Seules des entreprises spécialisées et parfaitement informées des dangers et
règlements spécifiques à ces manipulations sont habilitées à effectuer l’instal-
lation, les réparations et l’entretien.
• Le groupe frigorifique électrique est monté dans la zone du logement prévu
pour la roue de secours sous le véhicule. Il n’est donc plus possible de trans-
porter une roue de secours. Assurez-vous que votre véhicule est équipé d’un
kit de dépannage supplémentaire.
2.2 Sécurité pendant l’installation
!
AVERTISSEMENT !
• Veuillez noter que l’installation doit uniquement être effectuée par des per-
sonnes détenant un certificat de compétence correspondant, conforme par
exemple au règlement CE 307/2008, pour le montage et la mise en service
de systèmes de refroidissement pour le transport.
3 Groupe cible de ce manuel
Ce manuel est destiné à un personnel d’atelier qualifié, familiarisé avec les direc-
tives et consignes de sécurité à observer. Le personnel qualifié doit bénéficier
d’une spécialisation dans le domaine des équipements de refroidissement et de
climatisation l’autorisant à assembler et remplir le système de refroidissement
pour le transport.
VAK_Frigo-DC--I.book Seite 17 Dienstag, 4. Juni 2019 8:33 08

FR
Usage conforme FrigoDCVAK
18
4 Usage conforme
Le support de Frigo DC VAK spécifique a été conçu pour l’installation du groupe
DC sous le véhicule sur les traverses d’un châssis.
Toute autre utilisation ou toute utilisation au-delà du fonctionnement prévu est
considérée comme utilisation non conforme.
5 Contenu de la livraison
Le Frigo DC VAK pour le système de refroidissement pour le transport Frigo DC
est constitué des composants suivants :
• 4 x supports (fig. 1 1)
• 1 x cadre de base (fig. 1 2)
• Matériel de fixation (fig. 1 3) :
– 4xboulonsM8x25
– 8 x rondelles M8 Ø24
– 4 x écrous d’arrêt M8
6 Installation
6.1 Instructions de montage
!
!
AVERTISSEMENT ! Risque de blessures par des composants
électriques sous tension !
• Il y a un risque de choc électrique lors du raccordement des composants
électriques. Avant de commencer les travaux de montage, débranchez la
batterie et assurez-vous qu’aucune tension ne peut être transmise aux com-
posants électriques.
• Des interventions incorrectes, telles que l’utilisation de cosses de dériva-
tion sur les systèmes électrique et électronique du véhicule, peut entraver
le fonctionnement. Ceci peut entraîner une panne des composants montés
sur le véhicule ou de l’équipement de sécurité du véhicule et, ainsi, des
accidents impliquant des blessures corporelles ou un endommagement du
véhicule.
ATTENTION !
Seule une entreprise spécialisée possédant le savoir-faire nécessaire est habili-
tée à effectuer l’installation du système de refroidissement pour le transport.
Les informations suivantes sont destinées à un personnel qualifié, informé des
directives et des consignes de sécurité à appliquer.
VAK_Frigo-DC--I.book Seite 18 Dienstag, 4. Juni 2019 8:33 08
La pagina si sta caricando...
La pagina si sta caricando...
La pagina si sta caricando...
La pagina si sta caricando...
La pagina si sta caricando...
La pagina si sta caricando...
La pagina si sta caricando...
La pagina si sta caricando...
La pagina si sta caricando...
La pagina si sta caricando...
La pagina si sta caricando...
La pagina si sta caricando...
La pagina si sta caricando...
La pagina si sta caricando...
La pagina si sta caricando...
La pagina si sta caricando...
La pagina si sta caricando...
La pagina si sta caricando...
La pagina si sta caricando...
La pagina si sta caricando...
La pagina si sta caricando...
La pagina si sta caricando...
La pagina si sta caricando...
La pagina si sta caricando...
La pagina si sta caricando...
La pagina si sta caricando...
La pagina si sta caricando...
La pagina si sta caricando...
La pagina si sta caricando...
La pagina si sta caricando...
La pagina si sta caricando...
La pagina si sta caricando...
La pagina si sta caricando...
La pagina si sta caricando...
La pagina si sta caricando...
La pagina si sta caricando...
La pagina si sta caricando...
La pagina si sta caricando...
La pagina si sta caricando...
La pagina si sta caricando...
La pagina si sta caricando...
La pagina si sta caricando...
La pagina si sta caricando...
La pagina si sta caricando...
La pagina si sta caricando...
La pagina si sta caricando...
La pagina si sta caricando...
La pagina si sta caricando...
La pagina si sta caricando...
La pagina si sta caricando...
La pagina si sta caricando...
La pagina si sta caricando...
La pagina si sta caricando...
La pagina si sta caricando...
La pagina si sta caricando...
La pagina si sta caricando...
La pagina si sta caricando...
La pagina si sta caricando...
La pagina si sta caricando...
La pagina si sta caricando...
La pagina si sta caricando...
La pagina si sta caricando...
La pagina si sta caricando...
La pagina si sta caricando...
La pagina si sta caricando...
La pagina si sta caricando...
La pagina si sta caricando...
La pagina si sta caricando...
La pagina si sta caricando...
La pagina si sta caricando...
La pagina si sta caricando...
La pagina si sta caricando...
La pagina si sta caricando...
La pagina si sta caricando...
La pagina si sta caricando...
La pagina si sta caricando...
La pagina si sta caricando...
La pagina si sta caricando...
La pagina si sta caricando...
La pagina si sta caricando...
La pagina si sta caricando...
La pagina si sta caricando...
La pagina si sta caricando...
La pagina si sta caricando...
La pagina si sta caricando...
La pagina si sta caricando...
La pagina si sta caricando...
La pagina si sta caricando...
La pagina si sta caricando...
La pagina si sta caricando...
-
 1
1
-
 2
2
-
 3
3
-
 4
4
-
 5
5
-
 6
6
-
 7
7
-
 8
8
-
 9
9
-
 10
10
-
 11
11
-
 12
12
-
 13
13
-
 14
14
-
 15
15
-
 16
16
-
 17
17
-
 18
18
-
 19
19
-
 20
20
-
 21
21
-
 22
22
-
 23
23
-
 24
24
-
 25
25
-
 26
26
-
 27
27
-
 28
28
-
 29
29
-
 30
30
-
 31
31
-
 32
32
-
 33
33
-
 34
34
-
 35
35
-
 36
36
-
 37
37
-
 38
38
-
 39
39
-
 40
40
-
 41
41
-
 42
42
-
 43
43
-
 44
44
-
 45
45
-
 46
46
-
 47
47
-
 48
48
-
 49
49
-
 50
50
-
 51
51
-
 52
52
-
 53
53
-
 54
54
-
 55
55
-
 56
56
-
 57
57
-
 58
58
-
 59
59
-
 60
60
-
 61
61
-
 62
62
-
 63
63
-
 64
64
-
 65
65
-
 66
66
-
 67
67
-
 68
68
-
 69
69
-
 70
70
-
 71
71
-
 72
72
-
 73
73
-
 74
74
-
 75
75
-
 76
76
-
 77
77
-
 78
78
-
 79
79
-
 80
80
-
 81
81
-
 82
82
-
 83
83
-
 84
84
-
 85
85
-
 86
86
-
 87
87
-
 88
88
-
 89
89
-
 90
90
-
 91
91
-
 92
92
-
 93
93
-
 94
94
-
 95
95
-
 96
96
-
 97
97
-
 98
98
-
 99
99
-
 100
100
-
 101
101
-
 102
102
-
 103
103
-
 104
104
-
 105
105
-
 106
106
-
 107
107
-
 108
108
-
 109
109
-
 110
110


Dometic Frigo DC VAK Guida d'installazione
- Tipo
- Guida d'installazione
- Questo manuale è adatto anche per
in altre lingue
- français: Dometic Frigo DC VAK Guide d'installation
- español: Dometic Frigo DC VAK Guía de instalación
- Deutsch: Dometic Frigo DC VAK Installationsanleitung
- português: Dometic Frigo DC VAK Guia de instalação
- slovenčina: Dometic Frigo DC VAK Návod na inštaláciu
- dansk: Dometic Frigo DC VAK Installationsvejledning
Documenti correlati
-
Dometic Frigo DC VAK Guida d'installazione
-
-
-
-
-
Waeco Waeco CA-800 Guida d'installazione
-
-