
ENGLISH
TIME FEATURE
1. LCD count-down timer.
2. 4 digits display showing minute time ("M" mark) and
second time ("S" mark).
3. Timer can be programmed up to a maximum of 99 minutes,
59 seconds and counts down at 1 second intervals.
4. Buzzer alarm output when timer counts down at 1 second
intervals.
5. Timer memory recall function.
6. Individual buttons for minute and second setting.
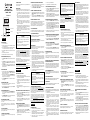
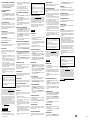
TIMER TIME SETTING [FIG. 1]
1. Press MIN and SEC buttons at the same time to reset timer
to zero.
2. Press MIN button to advance minute digits (sound can be
heard). Press and hold MIN button to advance minute digits
more quickly.
3. Press SEC button to advance second digits (beep sound
can be heard). Press and hold SEC button to advance second
digits more quickly.
TIME START/STOP
1. After time setting is ready, press START/STOP button once
and timer will start to count down, "M" and "S" marks will
flash when timer is running.
2. When timer is counting down, press START/STOP button
once and timer will stop. "M" and "S" marks will stop
flashing and remain on the display.
3. Press START/STOP button once and timer will resume
counting again.
TIME BUZZER ALARM
1. When timer counts down to 00M and 00S, timer buzzer
alarm will sound for 30 seconds.
2. Timer buzzer alarm can be stopped by either pressing MIN,
SEC or START/STOP buttons.
TIMER MEMORY RECALL
1. After timer buzzer alarm stops, press START/STOP button
once to recall pre-set timer and timer will count down for
another lap.
2. Press START/STOP button second time can start timer and
timer will count down for another lap.
BATTERY REPLACEMENT
Follow the arrow direction to open the battery cover at back
side of timer.
Remove old battery, insert a new 1.5V "AAA" battery as
indicated by the polarity symbols (+&-) marked and close
battery cover.
CLIP ATTACHMENT
The timer can clip onto a thin board or shirt pocket, using the
plastic clip at rear of timer.
MAGNETIC ATTACHMENT
The timer can attach to iron or steel surfaces, using the magnet
at rear of timer.
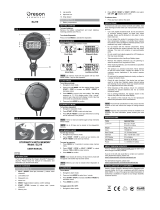
MIN SEC START/STOP
MEMORY
CLEAR
PLASTIC CLIP
MAGNET
FIG. 1
TABLE TOP USE
The timer can stand on table surface, flip out the metal stand
bar at rear of timer.
PRECAUTION
When handled properly, this unit is engineered to give you years
of satisfactory service. Here are a few product care instructions:
1. Do not immerse the unit in water. If the unit comes in
contact with water, dry it immediately with a soft lint-free
cloth.
2. Do not clean the unit with alcohol containing detergent,
abrasive or corrosive materials. Abrasive cleaning agents
may scratch the plastic parts and corrode the electronic
circuit.
3. Do not subject the unit to excessive: force, shock, dust,
temperature, or humidity. Such treatment may result in
malfunction, a shorter electronic life span, damaged
batteries, or distorted parts.
4. Do not tamper with the unit's internal components. Doing
so will terminate the unit's warranty and may cause damage.
The unit contains no user-serviceable parts.
5. Only use new batteries as specified in this instruction
manual. Do not mix new and old batteries as the old
batteries may leak.
6. Read this instruction manual thoroughly before operating
the unit.
CAUTION
- The content of this manual and the product
specifications are subject to change without further
notice.
- The technical specifications of this product are subject
to change without notice.
- The contents of this manual may not be reproduced
without the permission of the manufacturer.
ABOUT OREGON SCIENTIFIC
Visit our website (www.oregonscientific.com) to learn more
about Oregon Scientific products such as digital cameras; MP3
players; children's electronic learning products and games; pro-
jection clocks; health and fitness gear; weather stations; and
digital and conference phones. The website also includes con-
tact information for our customer care department in case you
need to reach us, as well as frequently asked questions and
customer downloads.
We hope you will find all the information you need on our
website, however if you'd like to contact the Oregon Scientific
Customer Care department directly, please visit:
www2.oregonscientific.com/service/support OR Call 949-608-
2848 in the US.
For international enquiries, please visit:
http://www2.
oregonscientific.com/about/international/default.asp
FRANÇAIS
INDICATION DU TEMPS:
1. Minuteur à affichage à cristaux liquides.
2. Affichage à 4 chiffres indiquant les minutes (indicateur ‘M’)
et les secondes (indicateur ‘S’).
3. Le minuteur peut être programmé jusqu’a 99 minutes, 59
secondes et compte à rebours avec une résolution de 1
seconde.
4. Le vibrateur d’alarme se declenche quand le minuteur est
arrivé à zéro.
5. Fonction rappel mémoire.
6. Boutons indiciduels pour le réglage des minutes et des
secondes.
REGLAGE DU TEMPS DU MINUTEUR [FIG. 1]
1. Appuyez sur les boutons MIN et SEC en même temps pour
remettre le minuteur à zéro.
2. Appuyez sur le bouton MIN pour faire avancer les chiffres
des minutes (un bip est active). Maintenez votre pression
pour un réglage accéléré.
3. Appuyez sur le bouton SEC pour faire avancer les chiffres
des secondes (un bip est active). Maintenez votre pression
pour un réglage accéléré.
MINUTEUR MARCHE/ARRET
1. Quand le réglage du temps est effectué, appuyez sur le
bouton START / STOP pour déclencher le minuteur. Les
indications ‘M’ et ‘S’ clignotent quand le minuteur est en
marche.
2. Quand le minuteur est en marche, appuyez sur START /
STOP pour arréter le minuteur. Les indications ‘M’ et ‘S’
arrétent de clignoter et restent affichées.
3. Appuyez sur le bouton START / STOP et le minuteur
reprend le décompte.
MIN/SEC 3 KEYS
COUNTDOWN TIMER
MODEL: TR112
User Manual
VIBRATEUR D’ALARME DU MINUTEUR
1. Quand le Minuteur atteint 00M et 00S, le vibrateur du
minuteur se déclenche pendant 30 secondes.
2. Le vibrateur peut être arrêtré en appuyant sur l’un des
boutons MIN, SEC ou START / STOP.
RAPPEL MEMORIE DU MINUTEUR
1. Aprês arrêt de l’alarme du vibrateur, appuyez sur le bouton
START / STOP pour rappeler le temps pré-réglé du
minuteur.
2. Appuyez sur le bouton START / STOP une deuxième fois
et le minuteur reprend sa fonction pour un deuxième cycle.
REMPLACEMENT DE LA PILE
En utilisant une pièce, suivez le sens de la flêche pour ouvrir le
couvercle du compartiment à pile au dos du minuteur.
Enlevez la pile usagée, et insérez une pile neuve 1.5V G-13
(assurez-vous que la face ‘+’ positive soit bien tournée vers le
haut) et refermez le couvercle du compartiment à pile.
ATTACHE PAR PINCE
Le minuteur peut s’accrocher sur une planche fine ou une poche
de chemise en utilisant la pince plastique au dos du minuteur.
ATTACHE MAGNETIQUE
Le minuteur peut s’accrocher sur une surface en fer ou en acier,
grâce à l’aimant au dos du minuteur.
UTILISATION SUR UN BUREAU
Le minuteur peut être posé sur un bureau, sortez la barre de
support métallique au dos du minuteur.
PRECAUTIONS
Ce produit a été conçu pour assurer un bon fonctionnement
pendant plusieurs années à condition d’en prendre soin.
Certaines précautions s’imposent:
1. Ne pas immerger l’appareil.
2. Ne pas nettoyer l’appareil à l’aide de produits abrasifs ou
corrosifs. Ces produits peuvent rayer les parties en plastique
et attaquer les circuits électroniques.
3. Ne pas exposer l’appareil aux chocs excessifs, ni aux excès
de force, poussière, chaleur, froid ou humidité qui pourraient
résulter en un mauvais fonctionnement, le raccourcissement
de la vie de l’appareil, l’endommagement des piles et la
déformation des composants.
4. Ne pas toucher les composants internes de l’appareil. Ceci
rendra nul la garantie et peut causer des dommages.
L’appareil ne contient aucun composant pouvant être réparé
par l’utilisateur.
5. Utiliser uniquement des piles neuves du type préconisé dans
le manuel d’utilisation. Ne pas mélanger piles neuves et
piles usées afin d’éviter les fuites.
6. Lire soigneusement le manuel d’instructions avant de faire
fonctionner l’appareil.
ATTENTION
- Le contenu de ce livret est susceptible de modifications
sans avis préalable.
- En raison des restrictions imposées par l’impression,
les affichages figurant dans ce livret peuvent différer
de ceux du produit.
- Le contenu de ce livret ne peut être reproduit sans
l’autorisation du fabricant.
A PROPOS D'OREGON SCIENTIFIC
En consultant notre site internet (www.oregonscientific.fr), vous
pourrez obtenir des informations sur les produits Oregon
Scientific: photo numérique; lecteurs MP3; produits et jeux
électroniques éducatifs; réveils; sport et bien-être; stations
météo; téléphonie. Le site indique également comment joindre
notre service après-vente.
Nous espérons que vous trouverez toutes les informations dont
vous avez besoin sur notre site, néanmoins, si vous souhaitez
contacter le service client Oregon Scientific directement, allez
sur le site
www2.oregonscientific.com/service/support ou
appelez le 949-608-2848 aux US.
Pour des demandes internationales, rendez vous sur le site:
www2.oregonscientific.com/about/international/default.asp
DEUTSCH
EIGENSCHAFTEN:
1. Kurzzeitmesser mit Flüssigkristallanzeige.
2. 4-stellige Anzeige mit Minuten (Zeichen ‘M’) und
Sekunden (Zeichen ‘S’).
3. Laufzeit kann bis zu 99 Minuten 59 Sekunden betragen,
die Rückzählung erfolgt in Schritten von 1 Sekunde.
4. Summer-Alarm, wenn die eingestellte Zeit in 1
Sekundenintervall abläuft.
5. Laufzeit – Speicherabruffunktion.
6. Separate Minuten – und Sekundeneinstellung.
LAUFZEITEINSTELLUNG [FIG. 1]
1. Betätigen Sie die MIN und SEC Tasten gleichzeitig, um
das Gerät auf ‘0’ zurückzusetzen.
2. Betätigen Sie die MIN-Taste, um die Minuten einzustellen
(Piepton hörbar). Halten Sie die MIN-Taste gedrückt, um
die MIN schnell durchlaufen zu lassen.
3. Betätigen Sie die SEC-Taste, um die Sekunden einzustellen
(Piepton hörbar). Halten Sie die SEC-Taste gedrückt, um
die SEC schnell durchlaufen zu lassen.
KURZZEITMESSER EIN-/ AUSSCHALTEN
1. Betätigen Sie die (START / STOP) – Taste einmal, wenn
die Zeit wunschgemäß eingestellt ist. Der Kurzeitmesser
wird eingeschaltet (Laufzeit beginnt). Zeichen ‘M’ und ‘S’
blinken, solange der Kurzzeitmesser läuft.
2. Während der Ablaufzeit kann der Kurzzeitmesser durch
einmaliges Drücken der START / STOP – Taste angehalten
werden. Zeichen ‘M’ und ‘S’ blinken dann nicht mehr,
werden aber weiterhin angezeigt.
3. Betätigen Sie die START / STOP – Taste erneut, um den
Kurzzeitmesser wieder einzuschalten
SUMMER-ALARM DES KURZZEITWECKERS
1. Wenn die Laufzeit bis auf 00M und 00S abgelaufen ist,
ertönt der Summer-Alarm 30 Sekunden lang.
2. Der Alarm kann durch Drücken der MIN-TASTE, SEK-
TASTE oder START / STOP – Taste abgestellt werden.
LAUFZEIT – SPEICHERABRUF
1. Wenn der Alarm aufgehört hat, kann die eingestellte
Laufzeit durch einmaliges Drücken der START / STOP –
Taste abgerufen werden.
2. Auf ein zweites Drücken der START / STOP-Taste ist der
Kurzzeitmesser eingeschaltet und beginnt wieder zu zählen.
BATTERIEWECHSEL
Batteriefachdeckel an der Rückseite des Gerätes in Pfeilrichtung
schieben.
Nehmen Sie die alte Batterie heraus und legen Sie eine neue
Batterie der Größe ‘AAA’ 1.5V entsprechend den
Polaritätsangaben + und – im Inneren des Batterienfachs, ein.
HINWEIS ZUM SCHUTZ UNSERER UMWELT/
BATTERIEENTSOR GUNG
Batterien gehören nicht in den Hausmüll. Als Verbraucher sind
Sie gesetzlich verpflichtet, gebrauchte Batterien zurückzugeben.
Sie können Ihre alten Batterien bei den öffentlichen
Sammelstellen in Ihrer Gemeinde oder überall dort abgeben,
wo Batterien der betreffenden Art verkauft werden.
KLAMMERBEFESTIGUNG
Mit der Plastikklammer an seiner Rückseite kann der
Kurzzeitmesser an dünnem Karton oder an einer Hemdentasche
o. ä befestigt werden.
MAGNETBEFESTIGUNG
Mittels des Magnets an der Rückseite kann der Kurzzeitmesser
auf einer Eisen-oder Stahlfläche angebracht werden.
AUFSTELLEN
Klappen Sie den Metallständer an der Rückseite des Gerätes
heraus, um den Kurzzeitmesser aufzustellen.
VORSICHTSMASSNAHMEN
Dieses Gerät wird Ihnen bei schonender Behandlung viele Jahre
nützlich sein. Beachten Sie dennoch die wenigen nachfolgenden
Vorsichtsmaßnahmen:
1. Tauchen Sie das Gerät nicht in Wasser.
2. Reinigen Sie das Gerät niemals mit scheuernden oder
scharfen Reinigern. Diese könnten die Plastikteile
beschädigen, und die elektronischen Schaltkreise
korrodieren.
3. Setzen Sie das Gerät nicht irgendwelcher
Gewalteinwirkung, Erschütterungen, Staub, extremen
Temperaturen oder Feuchtigkeit aus, da dadurch
Funktionsstörungen, kürzere Lebensdauer und
Batterieschäden sowie Gehäuseverformungen verursacht
werden können.
4. Nehmen Sie keine Änderungen an den inneren
Komponenten des Gerätes vor. Dadurch erlischt die
Garantie für das Gerät und es können andere Schäden
verursacht werden. Im Inneren des Gerätes befinden sich
keine Teile, die vom Benutzer selbst gewartet werden
müssen.
5. Verwenden Sie nur neue Batterien des in der
Bedienungsanleitung angegebenen Typs. Mischen Sie
niemals alte und neue Batterien, da alte Batterien auslaufen
können.
VORSICHT
- Aufgrund von Einschränkungen der
Druckmöglichkeiten kann die Darstellung der Anzeige
in dieser Bedienungsanleitung von der tatsächlichen
Anzeige abweichen.
- Der Inhalt dieser Bedienungsanleitung darf nicht ohne
die Zustimmung des Herstellers vervielfältigt werden.
- Änderungen vorbehalten
OVER OREGON SCIENTIFIC
Bezoek onze website (www.oregonscientific.com) om meer te
weten over uw nieuwe product en andere Oregon Scientific
producten zoals digitale fototoestellen, gezondheids- en
fitnessuitrusting en weerstations. Op deze website vindt u tevens
de informatie over onze klantendienst, voor het geval u ons
wenst te contacteren.
ITALIANO
CARATTERISTICHE DELL’ORA:
1. Timer con conto alla rovescia e display LCD.
2. Display a 4 cifre che mostra i minuti (segno “M”) e i secondi
(segno “S”).
3. Il timer può essere programmato fino a un massimo di 99
minuti, 59 secondi e esegue il conto alla rovescia a intervalli
di 1secondo.
4. Allarme acustico quando il timer esegue il conto alla
rovescia a intervalli di 1 secondo.
5. Funzione di richiamo della memoria del timer.
6. Tasti singoli per l’impostazione dei minuti e dei secondi.
IMPOSTAZIONE DEL TIMER [FIG. 1]
1. Premere i tasti MIN e SEC contemporaneamente per
riportare il timer a zero.
2. Premere il tasto MIN per far avanzare le cifre relative ai
minuti (si avverte un suono). Tenere premuto il tasto MIN
per far avanzare più velocemente le cifre relative ai minuti.
3. Premere il tasto SEC per far avanzare le cifre relative ai
secondi (si avverte un beep). Tenere premuto il tasto SEC
per far avanzare più velocemente le cifre relative ai secondi.
AVVIO ED INTERRUZIONE DEL TIMER
1. Dopo aver impostato l’ora, premere una volta il tasto
START/STOP e il timer inizierà il conto alla rovescia. Le
lettere"M" e "S" lampeggiano quando il timer è in funzione.
2. Quando il timer sta eseguendo il conto alla rovescia ,
premere una volta il tasto START/STOP e il timer si
interromperà. Le lettere"M" e "S" smetteranno di
lampeggiare e rimarranno sul display.
3. Premere una volta il tasto START/STOP e il timer
riprenderà nuovamente a contare.
ALLARME ACUSTICO
1. Quando il timer raggiunge 00M e 00S, l’allarme acustico
suonerà per 30 secondi.
2. L’allarme acustico può essere interrotto premendo i tasti
MIN, SEC o START/STOP.
RICHIAMO DELLA MEMORIA DEL TIMER
1. Dopo che l’allarme acustico si interrompe, premere il tasto
START/STOP una volta per richiamare il timer
programmato.
2. Premere il tasto START/STOP una seconda volta per
riavviare il timer e il timer eseguirà un nuovo conto alla
rovescia.
SOSTITUZIONE DELLA BATTERIA
Seguire la direzione della freccia per aprire il coperchio del
vano batteria sul retro del timer.
Rimuovere la vecchia batteria, inserirne una nuova del tipo
"AAA" da 1,5 V, seguendo i simboli indicanti le polarità (+ e
-), e richiudere il coperchio del vano batteria.
ATTACCO A CLIP
Il timer può essere attaccato a un sostegno sottile o alla tasca
della camicia, utilizzando la clip in plastica posta sul retro del
timer.
ATTACCO MAGNETICO
Il timer può essere attaccato a superfici di ferro o di acciaio,
utilizzando il magnete posto sul retro del timer.
SUPPORTO DA TAVOLO
Il timer può essere posto sulla superficie di un tavolo, estraendo
la barra di metallo di supporto posta sul retro del timer.
PRECAUZIONI
Se utilizzata correttamente, questa unità è progettata per fornire
molti anni di servizio soddisfacente. Di seguito sono riportate
alcune istruzioni per la manutenzione:
1. Non immergere l’unità in acqua. Se l’unità viene a contatto
con l’acqua, asciugarla immediatamente usando un panno
morbido che non lascia fili.
2. Non pulire l’unità con detergente contenente alcool, o altro
materiale abrasivo o corrosivo. L’uso di agenti abrasivi per
la pulizia potrebbe provocare danni alle parti in plastica e
corrosione del circuito elettronico.
3. Non sottoporre l’unità a urti, forza eccessiva, polvere,
temperatura o umidità estreme. Questi trattamenti
potrebbero causare il malfunzionamento, una minore durata
della vita elettronica dell’unità, danneggiare le batterie.
4. Non manomettere i componenti interni dell’apparecchio.
Questo comporterà la perdita del diritto alla garanzia e danni
all’unità. Quest’ultima contiene parti che non sono riparabili
dall’utente.
5. Utilizzare solo batterie nuove come specificato nel presente
manuale d’uso. Non mischiare batterie vecchie con batterie
nuove, poiché le batterie usate potrebbero perdere del
liquido.
6. Leggere attentamente e per intero il presente manuale d’uso
prima di mettere in funzione l’unità.
AVVERTENZE
- Il contenuto di questo manuale e le specifiche del
prodotto sono soggetti a modifiche senza preavviso.
-Le specifiche tecniche di questo prodotto sono soggette
a modifiche senza preavviso.
- Il contenuto di questo manuale non può essere
riprodotto senza il permesso del produttore.
INFORMAZIONI SU OREGON SCIENTIFIC
Per avere maggiori informazioni sui nuovi prodotti Oregon
Scientific, come le fotocamere digitali, il lettori MP3, i com-
puter didattici per ragazzi, gli orologi con proiezione dell’ora,
le stazioni barometriche, gli orologi da polso multifunzione,
gli strumenti per la cura della persona ed il fitness, ed altro
ancora, visita il nostro sito internet
www.oregonscientific.com
Puoi trovare anche le informazioni necessarie per contattare il
nostro servizio clienti, le risposte ad alcune domande più
frequenti (FAQ) o i software da scaricare gratuitamente.
Sul nostro sito internet potrai trovare tutte le informazioni di
cui hai bisogno, ma se desideri contattare direttamente il nostro
Servizio Consumatori puoi visitare il sito
www2.
oregonscientific.com/service/support oppure chiamare al 949-
608-2848 (numero valido esclusivamente per gli USA). Per
ricerche di tipo internazionale puoi visitare invece il sito
www2.
oregonscientific.com/about/international/default.asp
ESPAÑOL
CARACTERÍSTICAS:
1. Cronómetro de cuenta atrás con pantalla LCD.
2. Pantalla de 4 dígitos que muestra el tiempo en minutos
(marca ‘M’) y el tiempo en segundos (marca ‘S’).
3. El cronómetro puede programarse hasta un máximo de 99
minutos, 59 segundos y cuenta atrás a una resolución de 1
segundo.
4. Salida de alarma de zumibido cuando el cronómetro cuenta
atrás a una resolución de 1 segundo.
5. Función de Ilamada de memoria del cronómetro.
6. Botones individuales para el ajuste de minutos y segundos.
AJUSTE DE HORA DEL CRONOMETRO
[FIG.1]
1. Pulsar los botones MIN y SEC al mismo tiempo para poner
el cronómetro a cero.
2. Pulsar el botón MIN para avanzar los dígitos de los minutos
(se oirá un sonido grave). Pulsar y mantener oprimido el
botón MIN para un ajuste rápido.
3. Pulsar el botón SEC para avanzar los dígitos de los segundos
(se oirá un sonido agudo). Pulsar y mantener oprimido el
botón SEC para un ajuste rápido.
ARRANQUE / PARADA DEL CRONOMETRO
1. Tras ajustar la hora, pulsar el botón de START / STOP una
vez y el cronómetro empezará la cuenta atrás. Las marcas
‘M’ y ‘S’ destellarán cuando el cronómetro está en marcha.
2. Cuando el cronómetro está contando, pulsar el botón de
START / STOP una vez para pararlo. Las marcas ‘M’ y
‘S’ dejarán de destellar y permanecerán en la pantalla.
3. Pulsar el botón de START / STOP una vez y el cronómetro
reanudará el conteo.
La pagina si sta caricando...
-
 1
1
-
 2
2


in altre lingue
- English: Oregon Scientific TR112 User manual
- français: Oregon Scientific TR112 Manuel utilisateur
- español: Oregon Scientific TR112 Manual de usuario
- Deutsch: Oregon Scientific TR112 Benutzerhandbuch
- Nederlands: Oregon Scientific TR112 Handleiding
- português: Oregon Scientific TR112 Manual do usuário
- svenska: Oregon Scientific TR112 Användarmanual
Documenti correlati
-
Oregon TR118 Manuale utente
-
 Oregon Scientific EB833 Manuale utente
-
 Oregon Scientific KT239N Manuale utente
-
 Oregon Scientific TR119 Manuale utente
-
 Oregon Scientific HR308 / HR318 Manuale utente
-
Oregon Scientific SE190 Guida utente
-
 Oregon Scientific SA880SSX Manuale utente
-
Oregon Scientific World Time Alarm Clock with USB Hub RAS200 Manuale utente
-
 Oregon Scientific SL210 Manuale utente
-
 Oregon Scientific RA103 Istruzioni per l'uso


