
AirWave 8.3.0
Best Practices Guide

Copyright Information
© Copyright 2023 Hewlett Packard Enterprise Development LP
Open Source Code
This product includes code licensed under the GNU General Public License, the GNU Lesser
General Public License, and/or certain other open source licenses. A complete machine-readable
copy of the source code corresponding to such code is available upon request. This offer is valid
to anyone in receipt of this information and shall expire three years following the date of the final
distribution of this product version by Hewlett-Packard Enterprise Company. To obtain such
source code, send a check or money order in the amount of US $10.00 to:
Hewlett-Packard Enterprise Company
Attn: General Counsel
6280 America Center Drive
San Jose, CA 95002
USA

AirWave 8.3.0 | Best Practices Guide Contents | 3
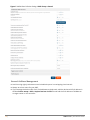
Contents
Contents 3
Contacting Support 4
Terminology Change 4
Overview 5
Understanding Aruba Topology 5
Prerequisites for Integrating Aruba Infrastructure 5
Configuring AirWave for Global Aruba Infrastructure 7
Disabling Rate Limiting in AMP Setup > General 7
Entering Credentials in Device Setup > Communication 8
Setting Up Recommended SNMP Timeout and Retries 9
Setting Up Time Synchronization 10
Enabling Support for Channel Utilization And Statistics 10
Configuring anAruba Group 15
Basic Monitoring Configuration 15
Advanced Configuration 16
Discovering Aruba Infrastructure 17
Discovering or Adding Conductor Controllers 17
Local Controller/Managed Devices Discovery 19
Thin AP Discovery 19
AirWave and Aruba Integration Strategies 21
Integration Goals 21
Example Use Cases 21
Prerequisites for Integration 22
Define AirWave as a Trap Host Using the ArubaOS CLI 22
Aruba Specific Capabilities 25
Aruba Traps for RADIUS Auth and IDS Tracking 25
Remote AP Monitoring 26
ARM and Channel Utilization Information 27
Viewing Controller License Information 32
Rules-Based Controller Classification 32
Changing RAPIDS Based on Controller Classification 33
Best Practices for Switch Setup 34
Instant AP and Instant GUI Config 35
Best Practices while Using VisualRF 36
AirWave Data Acquisition Methods 39
Increasing Location Accuracy 45
Understand Band Steering's Impact on Location 45
Leveraging RTLS to Increase Accuracy 45

Contacting Support
Main Site arubanetworks.com
Support Site asp.arubanetworks.com
Airheads Social Forums and Knowledge
Base
community.arubanetworks.com
North American Telephone 1-800-943-4526 (Toll Free)
1-408-754-1200
International Telephone arubanetworks.com/support-services/contact-support/
Software Licensing Site lms.arubanetworks.com
End-of-life Information arubanetworks.com/support-services/end-of-life/
Security Incident Response Team (SIRT) Site: arubanetworks.com/support-services/security-bulletins/
Email: [email protected]
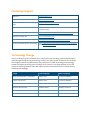
Terminology Change
As part of advancing HPE's commitment to racial justice, we are taking a much-needed step in
overhauling HPE engineering terminology to reflect our belief system of diversity and inclusion.
Some legacy products and publications may continue to include terminology that seemingly
evokes bias against specific groups of people. Such content is not representative of our HPE
culture and moving forward, Aruba will replace racially insensitive terms and instead use the
following new language:
Usage Old Language New Language
Campus Access Points + Controllers Master-Slave Conductor-Member
Instant Access Points Master-Slave Conductor-Member
Switch Stack Master-Slave Conductor-Member
Wireless LAN Controller Mobility Master Mobility Conductor
Firewall Configuration Blacklist, Whitelist Denylist, Allowlist
Types of Hackers Black Hat, White Hat Unethical, Ethical

Chapter 1
Overview
Overview
This document provides best practices for leveraging AirWave to monitor and manage your Aruba
infrastructure, which provides a wealth of functionality such as firewall, VPN, remote AP, IDS, IPS, and
ARM, as well as an abundance of statistical information.
Follow the simple guidelines in this document to garner the full benefit of your Aruba infrastructure.
This overview chapter contains the following topics:
nUnderstanding Aruba Topology
nPrerequisites for Integrating Aruba Infrastructure
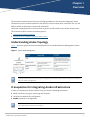
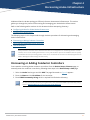
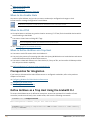
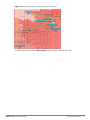
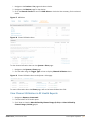
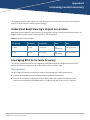
Understanding Aruba Topology
Figure 1 depicts a typical conductor-local deployment for the AirWave Wireless Management System
(AWMS):
Figure 1 Typical Aruba Deployment
There should never be a local controller managed by an AirWave server whose conductor controller is
also not under management.
Prerequisites for Integrating Aruba Infrastructure
In order to integrate your Aruba infrastructure, you need the following information:
nSNMP community string for monitoring and discovery
nTelnet/SSH credentials for configuration
nEnable password for configuration
Without proper Telnet/SSH credentials, AirWave will not be able to acquire license, serial information,
and monitoring schema from controllers.
AirWave 8.3.0 | Best Practices Guide 5


Chapter 2
Configuring AirWave for Global Aruba
Infrastructure
Configuring AirWave for Global Aruba Infrastructure
This section explains how to configure AirWave to globally manage your Aruba infrastructure.
nDisabling Rate Limiting in AMP Setup > General
nEntering Credentials in Device Setup > Communication
nSetting Up Recommended SNMP Timeout and Retries
nSetting Up Time Synchronization
nEnabling Support for Channel Utilization And Statistics
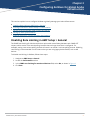
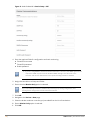
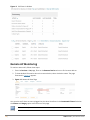
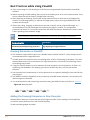
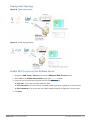
Disabling Rate Limiting in AMP Setup > General
The SNMP Rate Limiting for Monitored Devices option adds a small delay between each SNMP GET
request, which results in the actual polling intervals that are longer than what is configured. For
example, setting a ten-minute polling interval will result in an actual 12-minute polling interval. Disabling
rate limiting is recommended in most cases unless you are using legacy Aruba devices, such as M2
devices.
To disable rate limiting in AirWave, follow these steps:
1. Navigate to AMP Setup > General.
2. Locate the Performance section.
3. In the SNMP rate limiting for monitored devices field, select No, as shown in Figure 2.
4. Click Save.
AirWave 8.3.0 | Best Practices Guide 7

8|AirWave 8.3.0 | Best Practices Guide
Figure 2 SNMP Rate Limiting in AMP Setup > General > Performance
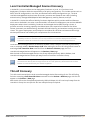
Entering Credentials in Device Setup > Communication
AirWave requires several credentials to properly interface with Aruba devices. To enter these
credentials, follow these steps:
1. Navigate to Device Setup > Communication.
2. In the Default Credentials section, click Edit link next to Aruba. The page illustrated in Figure 3
appears.
3. Enter the SNMP Community String.
Be sure to note the community string because it must match the SNMP trap community string.
Refer toDefine AirWave as a Trap Host Using the ArubaOS CLI.

AirWave 8.3.0 | Best Practices Guide Configuring AirWave for Global Aruba Infrastructure | 9
Figure 3 Credentials in Device Setup > Communication
a. Enter the required information for configuration and basic monitoring:
nTelnet/SSH user name
nTelnet/SSH password
nEnable mode password
4. Click Save.
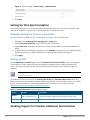
Setting Up Recommended SNMP Timeout and Retries
1. In the Device Setup > Communication page, locate the SNMP Settings section.
2. Change the SNMP Timeout setting to a value or either 3,4, or 5. This is the number of seconds
that AirWave will wait for a response from a device after sending an SNMP request, so a smaller
number is more ideal.
3. Change the SNMP Retries value to 10. This value represents the number of times AirWave tries
to poll a device when it does not receive a response within the SNMP Timeout Period or the
Group’s Missed SNMP Poll Threshold setting (1-100).
Although the upper limit for SNMP Retries value is 40, some SNMP libraries still have a hard
limit of 20 retries. In these cases, any retry value that is set above 20 will still stop the retry at
20.

10 |AirWave 8.3.0 | Best Practices Guide
Figure 4 Timeout settings in Device Setup > Communication
4. Click Save.
Setting Up Time Synchronization
You can set the clock on a controller manually or by configuring the controller to use a Network Time
Protocol (NTP) server to synchronize its system clock with a central time source.
Manually Setting the Clock on a Controller
You can use either the WebUI or CLI to manually set the time on the controller’s clock.
1. Navigate to the Configuration > Management > Clock page.
2. Under Controller Date/Time, set the date and time for the clock.
3. Under Time Zone, enter the name of the time zone and the offset from Greenwich Mean Time
(GMT).
4. To adjust the clock for daylight savings time, click Enabled under Summer Time. Additional fields
appear that allow you to set the offset from UTC and the start and end recurrences.
5. Click Apply.
Setting Up NTP
On the AMP Setup >Network page, locate the Network Time Protocol (NTP) section. The Network
Time Protocol is used to synchronize the time between AirWave and your network reference NTP
server. NTP servers synchronize with external reference time sources, such as satellites, radios, or
modems.
Specifying NTP servers is optional. NTP servers synchronize the time on the AirWave server, not on
individual access points.
To disable NTP services, clear both the Primary NTP Server and Secondary NTP Server fields. Any
problem related to communication between AirWave and the NTP servers creates an entry in the event
log. For more information on ensuring that AirWave servers have the correct time, please see
http://support.ntp.org/bin/view/Servers/NTPPoolServers.
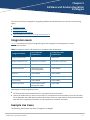
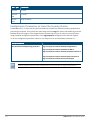
Setting Default Description
Primary ntp1.yourdomain.com Sets the IP address or DNS name for the primary NTP server.
Secondary ntp2.yourdomain.com Sets the IP address or DNS name for the secondary NTP server.
Table 1: Network Time (NTP) Fields and Default Values
Enabling Support for Channel Utilization And Statistics

AirWave 8.3.0 | Best Practices Guide Configuring AirWave for Global Aruba Infrastructure | 11
To enable support for channel utilization statistics, your AirWave server and ArubaOS and Aruba Instant
devices must be running the following versions of software:
nAirWave 7.6 or later
nArubaOS 6.0.1 or later
nAruba Instant 3.3 or later
Devices running ArubaOS 6.0.1 can report RF utilization metrics, but ArubaOS 6.1 or later is necessary
to also obtain classified interferer information.
AirWave Setup
1. Navigate to AMP Setup > General.
2. In the Additional AMP Services section, set Enable AMON Data Collection to Yes, and set
Prefer AMONvs SNMP Polling to Yes.
3. Click Save.

12 |AirWave 8.3.0 | Best Practices Guide
Figure 5 AMON Data Collection Setting in AMP Setup > General
General AirWave Management
nAvoid running nightly maintenance and scheduled reports in overlapping time intervals.
nAlways set a host name for your AMP.
nIf you manage the devices with IPv6, IPv4 addresses as dual-stack, add the devices with IPv6 address in
AirWave Device setup > Add or Import Devices via CSV file and add the IPv6 address of AirWave as
an mgmt-server on the controller.

AirWave 8.3.0 | Best Practices Guide Configuring AirWave for Global Aruba Infrastructure | 13
Controller Setup (Conductor And Local)
Enabling these commands on ArubaOS versions prior to 6.0.1.0 can result in performance issues on
the controller. If you are running previous firmware versions such as ArubaOS 6.0.0.0, you should
upgrade to ArubaOS 6.0.1 (to obtain RF utilization metrics) or 6.1 (to obtain RF utilization and classified
interferer information) before you enter this command.
Using ArubaOS 6.x
The following commands are for ArubaOS versions 6.3.1 and later 6.x releases. To get the commands
for other versions of ArubaOS 6.x, refer to the Command-Line Interface Reference Guide for that version.
Use SSH to access the controller’s command-line interface, enter enable mode, and issue the following
commands:
(Controller-Name) # configure terminal
Enter Configuration commands, one per line. End with CNTL/Z
(Controller-Name) (config) # mgmt-server type amp primary-server <AMP-IP>
(Controller-Name) (config) # mgmt-server profile <profile-name>
(Controller-Name) (config) # write mem
You can add up to four <AMP-IP> addresses in a Mobility Conductor setup.
You can add up to three <AMP-IP> addresses in a managed devices setup.
Using ArubaOS 8.x
The following commands are for ArubaOS versions 8.4 and earlier 8.x releases. To get the commands
for other versions of ArubaOS 8.x, refer to the Command-Line Interface Reference Guide for that version.
Use SSH to access Mobility Conductor’s command-line interface, enter enable mode, and issue the
following commands:
(host) [mynode] # configure terminal
Enter Configuration commands, one per line. End with CNTL/Z
(host) [mynode] (config) #mgmt-server primary-server <AMP-IP>
(host) [mynode] (config) #profile default-amp
(host) [mynode] (config) #write memory
You can add up to four <AMP-IP> addresses in a Mobility Conductor setup.
You can add up to three <AMP-IP> addresses in a managed devices setup.
Reducing AMON Messages from controller
nTo reduce AMON messages from the controller, disable the unnecessary management profiles on the
Aruba controller.
nTo reduce AMON_STATION_RSSI_INFO_V2_MESSAGE incoming from the controller, reduce the RSSI
interval to 60/120 seconds from the default 5 seconds on the controller.


Chapter 3
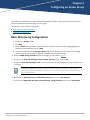
Configuring anAruba Group
Configuring an Aruba Group
It is prudent to establish one or more Aruba Groups within AirWave. During the discovery process you
will move new discovered controllers into this group.
This section contains the following topics:
nBasic Monitoring Configuration
nAdvanced Configuration
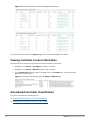
Basic Monitoring Configuration
1. Navigate to Groups > List.
2. Click Add.
3. Enter a Name that represents the Aruba device infrastructure from a security, geographical, or
departmental perspective and Click Add.
4. You will be redirected to the Groups > Basic page for the Group you just created. On this page
you will need to verify and/or change the following Aruba-specific settings.
a. Find the SNMP Polling Periods section of the page, as illustrated in Figure 6.
b. Verify that the Override Polling Period for Other Services option is set to Yes.
c. Verify that Client Data Polling Period is set to 10 minutes. Do not configure this interval lower than
5 minutes.
Enabling the SNMP Rate Limiting for Monitored Devices option in the previous chapter adds a
small delay between each SNMP Get request, thus the actual polling interval is 12 minutes for 10
minute polling interval.
d. Verify that the Device-to-Device Link Polling Period option is set to 30 minutes.
e. Verify that the Rogue AP and Device Location Data Polling Period option is set to 30 minutes.
AirWave 8.3.0 | Best Practices Guide 15

16 |AirWave 8.3.0 | Best Practices Guide
Figure 6 SNMP Polling Periods section of Groups > Basic
5. Locate the Aruba section of this page. See Figure 7.
6. Configure the proper SNMP Version for monitoring the Aruba infrastructure.
Figure 7 Group SNMP Version for Monitoring
7. Click Save and Apply.
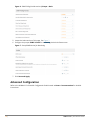
Advanced Configuration
Refer to the AirWave 8.2.x Controller Configuration Guide located at Home > Documentation for detailed
instructions.

Chapter 4
Discovering Aruba Infrastructure
Discovering Aruba Infrastructure
AirWave utilizes the Aruba topology to efficiently discover downstream infrastructure. This section
guides you through the process of discovering and managing your Aruba device infrastructure.
Refer to the following earlier sections in this document before attempting discovery:
nConfiguring AirWave for Global Aruba Infrastructure
nConfiguring anAruba Group
The following topics in this chapter walk through the basic procedure for discovering and managing
Aruba infrastructure:
nDiscovering or Adding Conductor Controllers
nLocal Controller/Managed Devices Discovery
nThin AP Discovery
Always add one controller and its affiliated Thin APs into management or monitoring mode in a serial
fashion, one at a time. Adding new devices is a very CPU intensive process for AirWave and can quickly
overwhelm all of the processing power of the server if hundreds of Thin APs are added (migrated from
New to Managed or Monitoring) simultaneously.
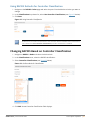
Discovering or Adding Conductor Controllers
Scan networks containing Aruba conductor controllers from the Device Setup > Discover page, or
manually enter the conductor controller by following these steps in the Device Setup > Add page:
1. Select the Aruba Device type and click Add. The page illustrated on Figure 8 appears.
2. Enter the Name and the IP Address for the controller.
3. Enter SNMP Community String, which is required field for device discovery.
Be sure to note the community string because it must match the SNMP trap community string.
Refer to Define AirWave as a Trap Host Using the ArubaOS CLI.
AirWave 8.3.0 | Best Practices Guide 17

18 |AirWave 8.3.0 | Best Practices Guide
Figure 8 Aruba Credentials in Device Setup > Add
4. Enter the required fields for configuration and basic monitoring:
nTelnet/SSH user name
nTelnet/SSH password
nEnable password
nIf you are using SNMPv3, and the controller's date/time is incorrect, the SNMP agent will not
respond to SNMP requests from the AirWave SNMP manager. This will result in the
controller and all of its downstream access points showing as Down in AirWave.
5. Assign the controller to a Group and Folder.
6. Ensure that the Monitor Only option is selected.
If you select Manage read/write, AirWave will push the group setting configuration, and
existing device configurations will be deleted/overwritten.
7. Click Add.
8. Navigate to the Devices > New page.
9. Select the Aruba conductor controller you just added from the list of new devices.
10. Ensure Monitor Only option is selected.
11. Click Add.

AirWave 8.3.0 | Best Practices Guide Discovering Aruba Infrastructure | 19
Local Controller/Managed Devices Discovery
In ArubaOS 6.x, the controllers can be deployed as Conductor or Local. In a Conductor-Local
deployment, Conductor holds the responsibility of all policy configurations. This include services such as
WIPS, Initial AP configurations, user roles, and authentication-related configurations, etc. The local
controller/managed devices terminates AP tunnels, processes and forwards user traffic (including
authentication), manages ARM (Adaptive Radio Management), mobility features, and QoS.
In ArubaOS 8.x, Aruba also offers a Mobility Conductor Appliance which provides additional features
which are not available in the other controller models. In ArubaOS 8.x deployment, we can have MM-MD
deployment where there is a Mobility Conductor and managed devices (MD) forming a cluster. It
provides controller clustering capability that allows better user experience via features like Hitless
failover, Automatic user load balancing, Automatic AP load balancing, and seamless roaming across the
cluster. This type of deployment could perhaps be considered for sensitive environments where high
wireless performance and reliability are a requirement for critical services.
ArubaOS 8.X is necessary with Mobility Conductor Appliance. APs cannot terminate on any Conductor
or Mobility Conductor controllers, APs can only terminate on controllers deployed in local mode.
ArubaOS 6.X allows AP termination on either Conductor or local controllers/managed devices.
Local controllers/managed devices are added to AirWave via the Conductor controller by a discovery
scan, or manually added in Device Setup > Add. After waiting for the Thin AP Polling Period interval or
executing a Poll Controller Now command from the Devices > Monitor page, the local
controllers/managed devices will appear on the Devices > New page.
Add the local controller/managed device to the Group defined previously. Within AirWave, local
controllers/managed devices can be split away from the Conductor controller's Group.
Local Controller/managed device Discovery/monitoring may not work as expected if AirWave is unable
to communicate directly with the target device. Be sure and update any ACL/Firewall rules to allow
AirWave to communicate with your network equipment.
Thin AP Discovery
Thin APs are discovered via the local controller/managed device. After waiting for the Thin AP Polling
Period or executing a Poll Controller Now command from the Devices > Monitor page, thin APs will
appear on the Devices > New page.
Add the thin APs to the Group defined previously. Within AirWave, thin APs can be split away from the
controller's Group. You can split thin APs into multiple Groups if required.

La pagina si sta caricando...
La pagina si sta caricando...
La pagina si sta caricando...
La pagina si sta caricando...
La pagina si sta caricando...
La pagina si sta caricando...
La pagina si sta caricando...
La pagina si sta caricando...
La pagina si sta caricando...
La pagina si sta caricando...
La pagina si sta caricando...
La pagina si sta caricando...
La pagina si sta caricando...
La pagina si sta caricando...
La pagina si sta caricando...
La pagina si sta caricando...
La pagina si sta caricando...
La pagina si sta caricando...
La pagina si sta caricando...
La pagina si sta caricando...
La pagina si sta caricando...
La pagina si sta caricando...
La pagina si sta caricando...
La pagina si sta caricando...
La pagina si sta caricando...
La pagina si sta caricando...
La pagina si sta caricando...
La pagina si sta caricando...
La pagina si sta caricando...
La pagina si sta caricando...
-
 1
1
-
 2
2
-
 3
3
-
 4
4
-
 5
5
-
 6
6
-
 7
7
-
 8
8
-
 9
9
-
 10
10
-
 11
11
-
 12
12
-
 13
13
-
 14
14
-
 15
15
-
 16
16
-
 17
17
-
 18
18
-
 19
19
-
 20
20
-
 21
21
-
 22
22
-
 23
23
-
 24
24
-
 25
25
-
 26
26
-
 27
27
-
 28
28
-
 29
29
-
 30
30
-
 31
31
-
 32
32
-
 33
33
-
 34
34
-
 35
35
-
 36
36
-
 37
37
-
 38
38
-
 39
39
-
 40
40
-
 41
41
-
 42
42
-
 43
43
-
 44
44
-
 45
45
-
 46
46
-
 47
47
-
 48
48
-
 49
49
-
 50
50


Aruba AirWave Guida utente
- Tipo
- Guida utente
- Questo manuale è adatto anche per
in altre lingue
- English: Aruba AirWave User guide
Documenti correlati
Altri documenti
-
Dell W-Airwave Guida Rapida
-
-
Casella VAPex Air Sampling Pump Manuale utente
-
-
Yamaha YSP 3000 Manuale del proprietario
-
Yamaha YSP-4000 Manuale del proprietario
-
Yamaha YSP-3050BL Manuale utente
-
-
-
Yamaha YSP-1100 Manuale del proprietario