
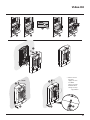
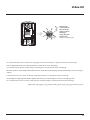
365711 - 365721
Video Kit
Manuale installatore • Installation manual
LE07588AD-02PC-17W18
La pagina si sta caricando...
La pagina si sta caricando...
La pagina si sta caricando...

Video Kit
5
•
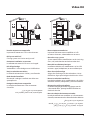
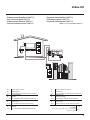
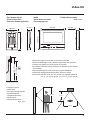
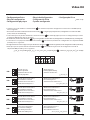
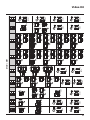
Schema monofamigliare (366711)
•
One-family diagram (366711)
•
Schéma mono-familial (366711)
•
Schema Einfamilienhaus (366711)
•
Esquema monofamiliar (366711)
•
Schema eensgezins (366711)
•
Esquema monofamiliar (366711)
)366711
BUS
PL S+
S-
PS
BUS TK
BUS PI
346830
BUS 2 1
230 Vac
IP30
PRI
PRI 230 V~ 50 - 60 Hz 260 mA
346000
}
BUS
2 - 1
27V 1,2A
CEBEC
N
N
F
N
= –
= –
T = –
S = –
P
= –
–
=
A
ON
OFF
P
= –
= –
= –
= –
M
J2
J1
N
= –
= –
BUS
B
• A Pulsante apertura serratura.
B Chiamata al piano.
S+ S- 18 V; 4 A impulsivi. 250 mA mantenimento (30 max).
• A Door lock pushbutton.
B Floor call.
S+ S- 18 V; 4 A impulsive. 250 mA holding current (30 max).
• A Poussoir d’ouverture serrure.
B Appel à l’étage.
S+ S- 18 V; 4 A impulsifs. 250 mA entretien (30 max).
• A Schalter Türöffner.
B Etagenruf.
S+ S- 18 V; 4 A impulsstrom. 250 mA Haltestrom (30 max).
• A Pulsador de apertura de cerradura.
B Llamada al piso.
S+ S- 18 V; 4 A por impulsos. 250 mA mantenimiento (30 max).
• A Drukknop opening.
B Oproep aan verdieping.
S+ S- 18 V; 4 A impulsief; 250 mA onderhoud (30 max).
• A Botão para abertura do trinco.
B Chamada ao piso.
S+ S- 18 V; 4 A instantâneos. 250 mA continuos (30 max).
A •
B
250418
30
S+ S

6
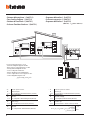
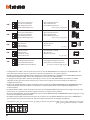
• Schema bifamigliare 1 (366721)
• Two-family diagram 1 (366721)
• Schéma bi-familiale 1 (366721)
• Schema Zweifamilienhaus 1 (366721)
• Esquema bifamiliar 1 (366721)
• Schema tweegezins 1 (366721)
• Esquema bifamiliar 1 (366721)
)3667211
BUS
PL S+
S-
PS
BUS TK
BUS PI
346830
BUS 2 1
230 Vac
IP30
PRI
PRI 230 V~ 50 - 60 Hz 260 mA
346000
}
BUS
2 - 1
27V 1,2A
CEBEC
N
N
F
A
N
= –
= –
T = –
S = –
P
= –
–
=
ON
OFF
ON
OFF
BUS
B
BUS
B
P
= –
= –
= –
= –
M
J2
J1
N
= –
= *1
P
= –
= –
= –
= –
M
J2
J1
N
= –
= –
* • Inserire il configuratore fornito a corredo.
• Connect the configurator supplied as standard.
• Mettre en place le configurateur fourni à cet effet.
• Den mitgelieferten Konfigurator einsetzen.
• Inserte el configurador suministrado.
• Breng de standaard geleverde configurator aan.
• Inserir o configurador fornecido no equipamento base.
• Inserire il configuratore fornito a crredo.
• A Pulsante apertura serratura.
B Chiamata al piano.
S+ S- 18 V; 4 A impulsivi. 250 mA mantenimento (30 max).
• A Door lock pushbutton.
B Floor call.
S+ S- 18 V; 4 A impulsive. 250 mA holding current (30 max).
• A Poussoir d’ouverture serrure.
B Appel à l’étage.
S+ S- 18 V; 4 A impulsifs. 250 mA entretien (30 max).
• A Schalter Türöffner.
B Etagenruf.
S+ S- 18 V; 4 A impulsstrom. 250 mA Haltestrom (30 max).
• A Pulsador de apertura de cerradura.
B Llamada al piso.
S+ S- 18 V; 4 A por impulsos. 250 mA mantenimiento (30 max).
• A Drukknop opening.
B Oproep aan verdieping.
S+ S- 18 V; 4 A impulsief; 250 mA onderhoud (30 max).
• A Botão para abertura do trinco.
B Chamada ao piso.
S+ S- 18 V; 4 A instantâneos. 250 mA continuos (30 max).
A •
B
250418
30
S+ S

Video Kit
7
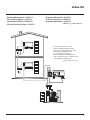
• Schema bifamigliare 2 (366721)
• Two-family diagram 2 (366721)
• Schéma bi-familiale 2 (366721)
•
Schema Zweifamilienhaus 2 (366721)
• Esquema bifamiliar 2 (366721)
• Schema tweegezins 2 (366721)
• Esquema bifamiliar 2 (366721)
)3667212
BUS
PL S+
S-
PS
BUS TK
BUS PI
346830
BUS 2 1
230 Vac
IP30
PRI
PRI 230 V~ 50 - 60 Hz 260 mA
346000
}
BUS
2 - 1
27V 1,2A
CEBEC
N
N
F
A
N
= –
= –
T = –
S = –
P
= –
=
ON
OFF
ON
OFF
BUS
B
BUS
B
P
= –
= –
= –
= –
M
J2
J1
N
= –
= *1
P
= –
= –
= –
= –
M
J2
J1
N
= –
= –
* • Inserire il configuratore fornito a corredo.
• Connect the configurator supplied as standard.
• Mettre en place le configurateur fourni à cet effet.
• Den mitgelieferten Konfigurator einsetzen.
• Inserte el configurador suministrado.
• Breng de standaard geleverde configurator aan.
• Inserir o configurador fornecido no equipamento base.
• Inserire il configuratore fornito a corredo.
La pagina si sta caricando...

Video Kit
9
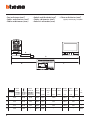
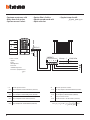
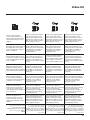
• Dati dimensionali
• Dimensional data
• Données dimensionnelles
• Maße
• Datos dimensionales
• Formaatgegevens
• Dados dimensionais
35 mm
106 mm
185 mm
194 mm
162 mm
25 mm
115 cm
50 cm
240 cm
• Campo di ripresa
• Field of view
• Éclairage cadrage caméra
• Aufnahmebereich
• Campo de filmación
• Opnameveld
• Campo de filmagem
160 – 165 cm
90–130 cm
• Altezza consigliata salvo diversa normativa vigente.
• Recommended height, unless different regulations are specified.
• Hauteur conseillée sauf autre norme en vigueur.
• Empfohlene Höhe falls die gesetzlichen Vorschriften nichts anderes
vorschreiben.
• Altura recomendada salvo normativa vigente diferente.
• Aanbevolen hoogte behoudens andere normen in voege.
• Altura aconselhada a não ser se a norma em vigor for diferente.

10
1 - Activação/desactivação do sinal de confirmação da
abertura da fechadura.
2 - Regulação do volume (veja as próxima página).
3 - Indicadores luminosos verde: indicação de porta aberta.
4 - Indicadores luminosos verde: comunicação activa.
5 - Indicador luminoso lampejante Verde: chamada enviada;
Indicador luminoso lampejante Vermelho: sistema cupado.
6 - Alojamento configurador.
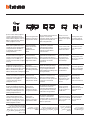
• Posto esterno
• Entrance panel
• Poste extérieur
• Türstation
• Placa exterior
• Externe plaats
• Unidade externa
1 - Habilitación/deshabilitación del tono de confirmación de
apertura de la cerradura.
2 - Regulación del volumen (véase la pág. siguiente).
3 - Led verde: indicación puerta abierta.
4 - Led verde: comunicación activada.
5 - Led parpadenate Verde: llamada enviada;
Led parpadenate Rojo: sistema ocupado.
6 - Alojamiento configuradores.
1 - Enabling/disabling of door lock opening
confirmation tone.
2 - Adjustment volume (see the following page).
3 - Green LED: door open indication.
4 - Green LED: communication active.
5 - Green flashing LED; call forwarded;
Red flashing LED: system busy.
6 - Configurator seat.
1 - Abilitazione/disabilitazione tono conferma apertura
serratura.
2 - Regolazione del volume (vedi pag. seguente).
3 - Led verde: indicazione porta aperta.
4 - Led verde: comunicazione attiva.
5 - Led lampeggiante Verde: chiamata inoltrata; Led
lampeggiante Rosso: sistema occupato.
6 - Sede configuratori.
1 - Aktivierung/Deaktivierung des Bestätigungssignals nach
erfolgter Türöffnung.
2 - Einstellung der Lautstärke (siehe nachfolgende Seiten).
3 - Grüne Led: Meldet offene Tür.
4 - Grüne Led: Kommunikation aktiv.
5 - Grüne blinkende Led: Ruf gesendet;
Rote blinkende Led: System belegt.
6 - Sitz der Konfiguratoren.
1 - Activation/désactivation tonalité de confirmation
ouverture serrure.
2 - Réglage du volume (voir page suivante).
3 - Diode verte: indication porte ouverte.
4 - Diode verte: communication active.
5 - Témoin clignotant vert - appel passé;
Témoin clignotant rouge: système occupé.
6 - Logement configurateurs.
1 - Activering/desactivering toon bevestiging opening slot.
2 - De geluidssterkte regelen (zie de volgende pagina’s).
3 - Groene led: aanduiding open deur.
4 - Groene led: communicatie actief.
5 - Groene knipperende led: oproep doorgestuurd; Rode
knipperende led: systeem bezet.
6 - Plaats van de configuratiemodules.
ON OFF
3
4
5
1
6
2
1
2
3
4
5
6

Video Kit
11
• Se si manifestasse il disturbo del fischio, (effetto Larsen), ridurre prima la potenza del microfono , agendo
con un cacciavite sul potenziometro corrispondente, fino ad un livello accettabile. Qualora il fenomeno persista,
agire sul potenziometro dell’altoparlante in modo da eliminare l’inconveniente. Se il volume è troppo basso,
aumentare prima il volume dell’altoparlante ed eventualmente anche quello del microfono, tenendo presente
che è preferibile una trasmissione chiara e priva di disturbi, che una al limite dell’innesco (Larsen).
• In case of a whistle (Larsen effect), first reduce the microphones
power, adjusting the corresponding
potentiometers with a screw driver, until an acceptable level is reached. Should the whistle persist, adjust the
loudspeakers volume in order to eliminate the trouble. If the volume is too low level then, increase first the
potentiometer of the loudspeaker and secondly the one for the microphone, bearing in mind that a clear and
noise free reception is preferable than one just before whistling (Larsen).
• Lors de sifflement (effet de Larsen), reduire d’abord la puissance du micro
sur le potentiomètre
correspondant, à l’aide d’un tournevis, jusqu’à l’obtention d’un niveau satisfaisant. Si le sifflement persiste, régler
le potentiomètre du hautparleur jusqu’à l’élimination de celui-ci. Si le volume est trop bas, augmenter
d’abord la puissance du haut-parleur et éventuellement celle du micro, en considérant qu’une réception claire et
sans parasite est préférable à une communication à la limite de l’accrochage (effet de Larsen).
• Beim etwaigen Auftreten eines Pfeiftones (Larsen-Effekt), zuerst die Lautstärke des Mikrophones
bis auf einen
annehmbaren Wert herabsetzen, indem man das entsprechende Potentiometer mit einem Schraubendreher
einstellt. Sollte die Störung weiterhin bestehen, dann das Potentiometer des Lautsprechers bis zur Beseitigung
des Pfeiftones einstellen. Ist die Lautstärke nun zu niedrig, dann zuerst die des Lautsprechers und erst danach
evtl. auch die des Mikrophones erhohen, wobei ein deutlicher und störungsfreier Empfang einem an der
Störungsgrenze liegendem (Larsen-Effekt) vorzuziehen ist.
• Si se manifesta el silbido de acoplamiento, (efecto Larsen), reducir primero la potencia del micrófono
, girando con un destornillador el potenciómetro correspondiente, hasta obtener un nivel aceptable. Si el
fenómeno persistiera, regular el potenciómetro del altavoz hasta eliminar la interferencia. Si el volumen
es demasiado bajo, aumentar primero el volumen del altavoz y eventualmente también el del micrófono,
teniendo en cuenta que es preferible una transmissión clara y limpia de interferencias, que una al limite del
acoplo (Larsen).
• Als er een fluittoon hoorbaar is (effect van Larsen): verminder eerst het vermogen van de microfoon
met behulp van een schroevendraaier zijn stroomregelaar zo te regelen dat de geluidssterkte van het gefluit
aanvaardbaar is. Als het verschijnsel niet verdwijnt, dan moet u ook de stroomregelaar van de luidspreker
bijstellen. Als de geluidssterkte nu te klein is, verhoog dan eerst de geluidssterkte van de luidspreker en daarna
eventueel ook die van de microfoon, en denk er bij het bijstellen aan dat een duidelijk hoorbaar en ongestoord
geluid beter is dan een harder geluid op de grens van het Larsen effect.
• Se se manifestar uma interferência no som (efeito de Larsen), começar por diminuir a potência do microfone
, rodando o potenciómetro correspondente com uma chave de parafusos, até obter um nível aceitável.
Se o fenómeno persistir, regular o potenciómetro do altifalante de modo a eliminar o problema. Se o
volume estiver demasiado baixo, começar por aumentar o volume do altifalante e depois, se necessário,
o do microfone, tendo presente que é melhor ter uma transmissão clara e sem interferências, que uma no
limiar de início de efeitos Larsen.
.)Larsen

12
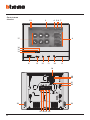
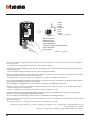
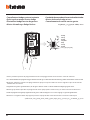
• Posto interno
• Handset
18
21
22
2323
19
20
24252627
1 2 3 4 5 7 6
16
15
14
17
91011
12
139
8

Video Kit
13
L’immagine rappresenta il dispositivo con tutte le
funzioni abilitate. Verifica sul manuale installatore
come abilitare le funzioni.
1 - Display 7” (16 : 9)
2 - Tasto spegnimento
3 - Data e ora
4 - Esclusione suoneria
5 - Attivazione Studio professionale
6 - Microfono
7 - Attivazione Segreteria
8 - Azioni rapide
9 - Guide tattili per non vedenti
10 - Tasto connessione:
l’accensione del led verde lampeggiante indica una
chiamata in arrivo
l’accensione del led verde fisso indica la
comunicazione in corso
11 - Autoaccensione/Ciclamento:
alla pressione del tasto il LED rosso si accende
12 - Tasto Preferiti:
alla pressione del tasto il LED rosso si accende
(Configurazione base = LUCE SCALE. Per una diversa
configurazione fare riferimento alla tabella della
configurazione fisica alle pagine successive.)
13 - Tasto apertura serratura:
alla pressione del tasto il LED rosso si accende
14 - Stato Segreteria:
Led rosso fisso = segreteria attiva
Led rosso lampeggiante = presenza registrazione/i
non visionata/e
15 - Stato presenza note:
Led rosso lampeggiante = nuova/e note non lette
16 - Stato Esclusione suoneria:
Led rosso acceso = Suoneria chiamata disattivata
17 - Funzioni (compaiono solo le icone delle funzioni
configurate)
18 - Sede dei configuratori
19 - Configuratore J1: estrai per alimentazione
supplementare
20 - Configuratore J2: Master/Slave, estrai per Slave
21 - Microinterruttore ON/OFF di terminazione di tratta
22 - Presa mini USB per aggiornamento Firmware
dispositivo
23 - Altoparlante
24 - Morsetti (1 - 2) per alimentazione supplementare
25 - Morsetti per il collegamento al BUS SCS 2 FILI
26 - Morsetti ( ) per il collegamento di un pulsante
esterno di chiamata al piano
27 - Morsetti (1 - 5M) per il collegamento di una suoneria
supplementare. Devi effettuare il collegamento punto
- punto sui morsetti delle suonerie supplementari
1 - 7” (16 : 9) display
2 - OFF key
3 - Date and time
4 - Bell exclusion
5 - Office activation
6 - Microphone
7 - Answering machine activation
8 - Quick actions
9 - Tactile guides for the blinds
10 - Connection key:
The green LED flashes to indicate an incoming call
The green LED comes on steady to indicate that there
is an active call
11 - Auto-switching on/Cycling:
The red LED turns on when the key is pressed
12 - Favorites Key:
The red LED turns on when the key is pressed
(Basic configuration = STAIRCASE LIGHT. For
a different configuration refer to the physical
configuration table in the following pages.)
13 - Door lock release key:
The red LED turns on when the key is pressed
14 - Answering machine Status:
Red LED steady = answering machine active
Red LED flashing = new recording/s
15 - Message status:
Red LED flashing = new unread note/s
16 - Bell exclusion Status:
Red LED on = Call bell disabled
17 - Functions (only the icons for the configured functions
are displayed)
18 - Configurator seat
19 - Configurator J1: remove for additional power supply
20 - J2 configurator: Master/Slave, remove for Slave
21 - Line termination ON/OFF micro-switch
22 - Mini USB socket for device Firmware update
23 - Loudspeaker
24 - Additional power supply clamps (1 - 2)
25 - 2 WIRE SCS/BUS connection clamps
26 - Clamps ( ) for the connection of an external call
to the floor pushbutton
27 - Additional bell connection clamps (1 - 5M) Point-to-
Point connections are required on the clamps of the
additional bells
The image shows the device with all its functions
enabled. Check on the Installer Manual how to enable
the functions.
La pagina si sta caricando...
La pagina si sta caricando...
La pagina si sta caricando...
La pagina si sta caricando...
La pagina si sta caricando...
La pagina si sta caricando...

20
• Installazione posto esterno
• Entrance panel installation
•
Installation du poste extérieur
• Installation der Türstation
•
Instalación de la placa exterior
• Installatie externe plaats
•
Instalação da unidade externa
2
1
3
Ø 5 mm
max
4
5
6
La pagina si sta caricando...
La pagina si sta caricando...

Video Kit
23
• Configurazione posto esterno
• Entrance panel configuration
• Configuration poste extérieur
• Konfiguration Türstation
• Configuración placa exterior
• Configuratie externe plaats
•
Configuração unidade externa
P T S N
– 1 2 3 4 5 6 7
4 s 1 s 2 s 3 s
- Come pulsante.
- As pushbutton.
- Comme poussoir.
- Wie taste.
- Come pulsador.
- Als de drukknop.
- Como botão.
6 s 8 s 10 s
• P - Possono non essere configurati.
- They do not need to be configured.
- Composants principaux des KITS.
- Brauchen nicht konfiguriert zu werden.
- Pueden no precisar configuración.
- Kunnen niet worden geconfigureerd.
- Podem não serconfigurados.
N
S
T
- Temporizzatore serratura (vedi tabella).
- Door lock timer relay (see table).
-
Ils peuvent ne pas être configurés (voir tableau).
-
Zeitgeber schlossrelaiscerradura (siehe Tabelle)
.
- Temporizador relé cerradura
(véase la tabla)
.
- Timer deurslotrelais
(zie de tabel).
-
Tem
porizador do relé da fechadura (veja a tabela).
• Tutte le volte che si modifica la configurazione è necessario togliere e ridare l’alimentazione
all’impianto, attendendo circa 1 minuto.
• Every time the configuration is altered the system must be switched off and back on again, waiting for
about 1 minute.
• Chaque fois que l’on modifie la configuration, il faut retirer, puis redonner l’alimentation à
l’installation, après avoir attendu environ 1 minute.
• Jedes Mal, wenn die Konfiguration geändert wird, den Strom abschalten, etwa 1 Minute warten und
dann wieder einschalten.
• Cada vez que modifica la configuración, es necesario cortar y volver a dar alimentación a la
instalación, después de esperar aproximadamente 1 minuto.
• Na iedere wijziging in de configuratie moet de installatie ongeveer 1 minuut van het elektriciteitsnet
worden afgesloten.
• Todas as vezes que se modificar a configuração é necessário ligar e desligar a instalação da energia
eléctrca, esperando cerca de 1 minuto.
•

24
• Programmazione Badge
• Badge programming
• Programmation des badges
• Badge programmieren
• Programación de credenciales
• Badge Programmeren
•
Programação do Crachá
• Badge gestore impianto
Nuovo badge gestore impianto
Per motivi di sicurezza è previsto un badge “Gestore“
programmato direttamente dall’installatore, tramite il
quale è possibile l’accesso alla programmazione degli altri
badge (residenti).
Il posto esterno segnalerà l’avvenuta accettazione o
cancellazione del badge con segnali acustici e visivi dei led
presenti sul posto esterno.
La presentazione di un badge non riconosciuto o un
errore di programmazione, comporta l’interruzione della
programmazione, la segnalazione tramite un beep lungo e
l’accensione LED rosso di occupato.
• Manager master badge
New manager master badge
For safety reasons, a “MASTER” badge is required, directly
programmed by the installer, providing access to the
programming of the other badges (residents).
The entrance panel will notify that the badge has been
accepted or deleted by means of sound notifications, as well
as visual indications using the LEDs on the entrance panel.
The presentation of an unrecognised badge, or a
programming error, will cause the interruption of the
programming procedure, and an extended beep; the red
“busy” LED will also come on.
• Badge master de gestion
Nouveau badge master de gestion
Pour des raisons de sécurité, est prévu un badge “MASTER“
programmé directement par l’installateur, à travers lequel,
il est possible d’accéder à la programmation des autres
(résidents).
Le poste externe signale l’acceptation ou l’élimination du
badge par des signaux sonores et visuels et par l’allumage
des leds présents sur le poste externe.
La présentation d’un badge non reconnu ou une
erreur de programmation provoque l’interruption de la
programmation, l’émission d’un bip prolongé et l’allumage
du LED rouge occupé.
• Master-Verwaltungs-Badge
Neuer Master-Verwaltungs-Badge
Aus Sicherheitsgründen ist ein „MASTER“-Badge vorgesehen,
der direkt vom Installateur programmiert wird. Damit können
die anderen Badges (Bewohner) programmiert werden.
Die Türstation meldet die erfolgte Annahme oder Löschung
des Badges durch akustische und visuelle Led-Signale, die an
derselben vorgesehen sind.
Wenn ein Badge nicht erkannt wird oder ein Fehler bei der
Programmierung aufgetreten ist, wird letztere unterbrochen
und ein langer Piepton erzeugt sowie die rote LED (belegt)
eingeschaltet.
• Credencial maestra de administrador
Nueva credencial maestra de administrador
Por razones de seguridad se prevé una credencial
“maestra” programada directamente por el instalador
mediante la cual es posible programar las demás
credenciales (residentes).
La placa exterior indicará si acepta o cancela unacredencial
con unaseñal acústica y visual de los leds incorporados en
la placa exterior.
La presentación de una credencial no reconocida o un
error de programación interrumpe la programación, que
se señala con un bip largo y la iluminación del LED rojo
ocupado.
• Badge master beheerder
Nieuwe master beheerder badge
Wegens veiligheidsredenen wordt door de installateur een
“Master” badge geprogrammeerd die de programmering van
de andere badges (inwoners) mogelijk maakt.
Het externe punt geeft met behulp van geluids- en
lichtsignalen van de leds op het externe punt aan of de badge
geaccepteerd of gewist is.
Door de presentatie van een niet-herkende badge of een fout
in de programmering wordt de programmering onderbroken,
hoort u een lange pieptoon en gaat de rode Led bezet
branden.
• Crachá master gestor
Novo crachá master gestor
Por razões de segurança é previsto um crachá “MASTER“,
programado directamente pelo instalador, por meio do
qual é possível o acesso à programação dos outros crachás
(residentes).
A unidade externa sinalizará a ocorrida aceitação ou
cancelamento do crachá com sinais acústicos e visuais dos
led presentes na unidade externa.
A apresentação de um crachá não reconhecido ou um erro
de programação, comporta a interrupção da programação,
a sinalização por meio de um beep longo e o acendimento
do LED vermelho de ocupado.
La pagina si sta caricando...
La pagina si sta caricando...

Video Kit
27
• Se la memorizzazione non va a buon fine, lampeggia il LED rosso occupato e il dispositivo emette un beep lungo.
• If the saving operation fails, the red busy LED flashes, and the device emits a long beep.
•
Si la mémorisation échoue, le LED rouge occupé clignote et le dispositif émet un bip long.
• Wenn das Speichern nicht erfolgreich beendet worden ist, blinkt die rote LED für belegt und die Vorrichtung erzeugt einen langen
Piepton.
• Si la memorización no se realiza, el LED rojo ocupado parpadeará y el dispositivo emite un bip largo.
• Als de badge niet opgeslagen kan worden, gaat de rode LED systeem bezet knipperen en hoort een lange pieptoon.
• Se a memorização não tiver sucesso, o LED vermelho ocupado lampeja e o dispositivo emite um beep longo.
•
1 beep lungo
1 extended beep
1 bip prolongé
1 langer Piepton
1 bip largo
1 lange pieptoon
1 beep longo
La pagina si sta caricando...
La pagina si sta caricando...

30
• Badge residente
Nuovo badge residente
Per accedere alla programmazione di un badge
“RESIDENTE” è necessario essere in possesso di un
badge gestore impianto.
Il posto esterno segnalerà l’avvenuta accettazione o
cancellazione del badge con segnali acustici e visivi dei
led presenti sul posto esterno.
La presentazione di un badge non riconosciuto o un
errore di programmazione, comporta l’interruzione
della programmazione, la segnalazione tramite un
beep lungo e l’accensione LED rosso di occupato.
• Resident badge
New resident badge
In order to access to the programming of a “RESIDENT”
badge, a system manager badge is required.
The entrance panel will notify that the badge has been
accepted or deleted by means of sound notifications, as
well as visual indications using the LEDs on the entrance
panel.
The presentation of an unrecognised badge, or a
programming error, will cause the interruption of the
programming procedure, and an extended beep; the red
“busy” LED will also come on.
• Badge résident
Nouveau badge résident
Pour accéder à la programmation d’un badge
“RÉSIDENT”, il est nécessaire de disposer d’un badge
master de gestion installation.
Le poste externe signale l’acceptation ou l’élimination
du badge par des signaux sonores et visuels et par
l’allumage des leds présents sur le poste externe.
La présentation d’un badge non reconnu ou une
erreur de programmation provoque l’interruption de
la programmation, l’émission d’un bip prolongé et
l’allumage du LED rouge occupé.
• Bewohner-Badge
Neuer Bewohner-Badge
Um die Programmierung eines Badges „BEWOHNER“
abrufen zu können, ist das Badge des Anlagenbetreibers
erforderlich.
Die Türstation meldet die erfolgte Annahme oder
Löschung des Badges durch akustische und visuelle Led-
Signale, die an derselben vorgesehen sind.
Wenn ein Badge nicht erkannt wird oder ein Fehler
bei der Programmierung aufgetreten ist, wird letztere
unterbrochen und ein langer Piepton erzeugt sowie die
rote LED (belegt) eingeschaltet.
• Credencial de residente
Nueva credencial de residente
Para ingresar a la programación de una credencial
“RESIDENTE”, es necesario poseer una credencial de
administrador del sistema.
La placa exterior indicarási acepta o cancelala
credencial con una señal acústica y visual de los leds
incorporadosen la placa exterior.
La presentación de una credencial no reconocida o un
error de programación interrumpe la programación,
que se señala con un bip largo y la iluminación del LED
rojo ocupado.
• Inwoner badge
Nieuwe inwoner badge
Voor toegang tot de programmering van een
“INWONERBADGE” moet u in het bezit zijn van een
installatiebeheerder badge.
Het externe punt geeft met behulp van geluids- en
lichtsignalen van de leds op het externe punt aan of de
badge geaccepteerd of gewist is.
Door de presentatie van een niet-herkende badge of een
fout in de programmering wordt de programmering
onderbroken, hoort u een lange pieptoon en gaat de rode
Led bezet branden.
• Crachá residente
Novo crachá residente
Para ter acesso à programação de um crachá
“RESIDENTE” é necessário estar em posse de um
crachá gestor da instalação.
A unidade externa sinalizará que interveio a aceitação
ou o cancelamento do crachá com sinais acústicos e
visuais dos leds presentes na unidade externa.
A apresentação de um crachá não reconhecido ou
um erro de programação, comporta a interrupção
da programação, a sinalização por meio de um beep
longo e o acendimento do LED vermelho de ocupado.
La pagina si sta caricando...
La pagina si sta caricando...

Video Kit
33
• Se la memorizzazione non va a buon fine, lampeggia il LED rosso occupato e il dispositivo emette un beep lungo.
• If the saving operation fails, the red busy LED flashes and the device emits a long beep.
• Si la mémorisation échoue, le LED rouge occupé clignote et le dispositif émet un bip long.
• Wenn das Speichern nicht erfolgreich beendet worden ist, blinkt die rote LED für belegt und die Vorrichtung erzeugt einen langen Piepton.
• Si la memorización no se realiza, el LED rojo ocupado parpadeará y el dispositivo emite un bip largo.
• Als de badge niet opgeslagen kan worden, gaat de rode LED systeem bezet knipperen en hoort een lange pieptoon.
• Se a memorização não for bem sucedida, o LED vermelho ocupado lampeja e o dispositivo emite um beep longo.
•
1 beep lungo
1 extended beep
1 bip prolongé
1 langer Piepton
1 bip largo
1 lange pieptoon
1 beep longo
La pagina si sta caricando...

Video Kit
35
• Riavvicinare per 2 volte consecutive il badge gestore impianto. Quando la cancellazione è avvenuta si accende il LED verde
serratura e il dispositivo emette 2 beep.
• Move the system manager badge close twice in succession. When the cancellation is completed, the door lock green LED comes,
on and the device emits 2 beeps.
•
Approcher à nouveau 2 fois de suite le badge master de gestion installation. Une fois l’effacement obtenu, le LED
vert serrure s’allume et le dispositif émet 2 bips.
• Das Badge des Anlagetreibers 2 Mal nähern. Nach erfolgter Löschung leuchtet die grüne LED des Schlosses auf und die
Vorrichtung erzeugt 2 Pieptöne.
• Acerque 2 veces seguidas la credencial maestra de administrador del sistema.Cuando se produce la cancelación, se ilumina
el LED verde cerradura y el dispositivo emite 2 bips.
• Houd de installatiebeheerder badge 2 maal voor het leesapparaat. De groene LED slot gaat branden en u hoort 2 pieptonen als
de badges zijn gewist.
• Voltar a aproximar, por 2 vezes consecutivas, o crachá gestor da instalação. Uma vez que interveio o cancelamento, acende-
se o LED verde da fechadura e o dispositivo emite 2 beep.
•
• 2 volte Gestore impianto
• Twice Manager master
• 2 fois Master de gestion
• 2 Mal Master Verwaltung
• 2 veces Credencial maestra de
administrador
• 2 maal Master beheerder
• 2 vezes Master gestor
2 beep
2 beeps
2 beep
2 Pieptöne
2 bips
2 beep
2 beep

36
• Reset
Nel caso si avesse la necessità di cancellare tutti i
badge (gestore impianto e residenti) precedentemente
memorizzati è possibile resettare il posto esterno.
• Reset
In order to cancel all the previously saved badges (system
manager and residents) the entrance panel can be reset.
• Réinitialisation
Dans le cas où il serait nécessaire d’éliminer tous les
badges (master de gestion installation et résidents)
précédemment mémorisés, il est possible de
réinitialiser le poste externe.
• Reset
Falls alle zuvor gespeicherten Badges (Anlagenbetreiber
und Bewohner) gelöscht werden sollen, kann die
Türstation zurückgestellt werden.
• Reset
En caso de que fuera necesario cancelar todas las
credenciales memorizadas(administrador del sistema y
residentes), es posible restablecer la placa exterior.
• Reset
U kunt alle badges (installatiebeheerder en inwonerbadges)
uit het geheugen wissen door het externe punt te resetten.
• Rearme
No caso que houvesse a necessidade de cancelar
todos os crachás (gestor da instalação e residentes),
memorizados anteriormente, será possível fazer o
rearme (reset) da unidade externa.
ON
ON
OFF
OFF
•
Togliere il BUS; tenendo premuto il pulsante di programmazione, ridare alimentazione. Mantenere premuto il pulsante di
programmazione fino all’accensione alternata dei LED serratura e connessione + beep lungo.
•
Remove the BUS; press and hold down the programming pushbutton, reconnect the power supply. Press and hold down the
programming pushbutton until the door lock and the connection LEDs start flashing in succession; a long beep is also heard.
•
Retirer le BUS ; rétablir l’alimentation en maintenant enfoncée la touche de programmation. Maintenir enfoncée la
touche de programmation jusqu’à ce que les LEDs serrure et connexion clignotent alternativement + bip long.
•
Den BUS abtrennen, die Programmierungstaste gedrückt halten und wieder Strom geben. Die Programmierungstaste gedrückt
halten, bis die LEDs des Schlosses und der Verbindung abwechselnd aufleuchten und ein langes Bestätigungssignal ertönt.
•
Desconecte el BUS, mantenga apretado el pulsador de programación y vuelva a conectar la alimentación. Mantenga
apretado el pulsador de programaciónhasta el encendido alternado de los LEDS cerradura y conexión + bip largo.
•
Verwijder de BUS, houd de programmeringsknop ingedrukt en heractiveer de voeding.
Houd de programmeringsknop ingedrukt tot de led slot en de LED verbinding gaan knipperen en u een lange pieptoon hoort.
•
Remova o BUS; mantendo carregado o botão de programação, volte a ligar a alimentação. Mantenha carregado o botão de
programação até o acendimento alternado dos LED da fechadura e da conexão + beep longo.

Video Kit
37
• Installazione del posto interno
• Handset installation
• Installation du poste interne
• Installation der Hausstation
• Instalación de la unidad interior
• Installatie van het intern punt
• Instalação da unidade interna
1
2
• È possibile installare il dispositivo su base da tavolo (344632) acquistabile separatamente.
• It is possible to install the device on table-top base (344632) to be purchased separately.
• Il est possible d’installer le dispositif sur base de table (344632) vendue séparément.
• Das Gerät kann auf eine separat zu erwerbende Tischunterlage (344632) installiert werden.
• El dispositivo se puede instalar sobre una base de sobremesa (344632) en venta por separado.
• Het apparaat kan geïnstalleerd worden op de apart te bestellen tafelsteun (344632).
• É possível instalar o dispositivo em uma base para mesa (344632) adquirível separadamente.
344632
3
4

38
• Configurazione posto interno
• Internal unit configuration
• Configuration poste interne
• Konfiguration einer Hausstation
• Configuración de la unidad
interior
• Het interne punt configureren
• Configuração da unidade interna
J1
J2
N
P
M
M
J1
• Estrai se è presente l’alimentazione supplementare (morsetto 1 & 2)
• Remove if the additional power supply is present (clamp 1 and 2)
• Extraire en présence de l’alimentation supplémentaire (bornes 1 et 2)
•
Abziehen, wenn ein zusätzliche Stromversorgung vorhanden ist (Klemme 1&2)
• Extraiga con presencia de la alimentación adicional (borne 1 & 2)
• uitnemen als een extra voeding aanwezig is (aansluitklem 1 & 2)
• Extrai caso esteja presente a alimentação adicional (borne 1 & 2)
21
•
J2
• Master/Slave (estrai per slave)
• Master/Slave (remove for slave)
• Master/Slave (extraire pour Slave)
• Master/Slave (abziehen für Slave)
• Master/Slave (extraiga para slave)
• Master/Slave (uitnemen voor slave)
• Master/Slave (extrai para Slave)
•
NN
• Indirizzo del dispositivo
• Device address
• Adresse du dispositif
• Adresse der Vorrichtung
• Dirección del dispositivo
• Adres van het apparaat
• Endereço do dispositivo
•
PP
• Indirizzo del PE di cui apri la Serratura con PI a riposo e a cui indirizzi
l’autoaccensione
• Address of the EP of which you can open the Door Lock with Handset idle, and to which
you can send the auto-on command
• Adresse du PE dont la serrure est ouverte avec PI au repos et auquel est adressé
l’auto-allumage
• Adresse der TS mit dem zu öffnenden Schloss, mit HS im Ruhestand, der die
Selbstschaltung bestimmt ist
• Dirección PE de la que abre la Cerradura con UI en reposo y a la que dirige el
autoencendido
• Adres van buitenpost waar het slot van wordt ontgrendeld met binnenpost in
ruststand en waar de automatische inschakeling naar wordt gestuurd
• Endereço da UE através da qual você abre a fechadura com a UI em repouso e à
qual endereça o autoacendimento
•
MM
•
Modalità di funzionamento secondo le tabelle alle pagine seguenti
M unità = Configurazione del tasto capacitivo Preferiti
M decine = Configurazione delle AZIONI RAPIDE in Home page
•
Mode of operation according to the tables on the following pages
M units = Configuration of the PREFERRED capacitive key
M tenths = Configuration of the QUICK ACTIONS in the Home page
•
Modalité de fonctionnement conformément aux tableaux des pages suivantes
M unité = Configuration de la touche capacitive FAVORIS
M dizaines = Configuration des ACTIONS RAPIDES sur Page d’accueil
•
Funktionsmodus laut Tabellen in den nachfolgenden Seiten
M Einheit = Konfiguration der kapazitiven Taste FAVORITEN
M Zehner = Konfiguration der SCHNELLFUNKTIONEN in Homepage
• Modo de funcionamiento según las tablas de las páginas siguientes
M unidad = Configuración de la tecla capacitiva FAVORITOS
M decenas = Configuración de los ACCIONES RÁPIDAS en la Página de inicio
• Functioneringswijze volgens de tabellen op de volgende pagina’s
M eenheden = Configuratie van de capacitieve toets FAVORIETEN
M tienen = Configuratie van de SNELTOETSEN op de homepagina
• Modalidade de funcionamento segundo as tabelas das próximas páginas
M unidade = Configuração do botão capacitivo PREFERIDOS
M dezenas = Configurando das AÇÕES RÁPIDAS em Home page
•
M
M“
La pagina si sta caricando...

40
MM =
5
• Autoaccensione diretta del P+2
• P+2 direct auto-switching on
• Auto-allumage direct du P+2
• Direkte Selbstschaltung der P+2
• Autoencendido directo del P+2
• Directe automatische P+2
• Autoacendimento direto do P+2
P+2
•
P
+1
MOD=9
P
+1
P
2
3
1 32
346210
1
P
+2
MOD=9
P
+2
2
3
1 32
346210
1
P
+3
MOD=9
P
+3
2
3
1 32
346210
1
MM =
6
• Autoaccensione diretta del P+3
• P+3 direct auto-switching on
• Auto-allumage direct du P+3
• Direkte Selbstschaltung der P+3
• Autoencendido directo del P+3
• Directe automatische P+3
• Autoacendimento direto do P+3
P+3
•
P
+1
MOD=9
P
+1
P
2
3
1 32
346210
1
P
+2
MOD=9
P
+2
2
3
1 32
346210
1
P
+3
MOD=9
P
+3
2
3
1 32
346210
1
MM =
7
• Intercom Generale
• General Intercom
• Intercom Général
• Intercom Allgemein
• Intercomunicación General
• Algemene intercom
• Intercom Geral
•
MM =
8
• Intercom su se stesso
• Internal intercom
• Intercom sur soi-même
• Intercom auf sich selbst
• Intercomunicación en sí misma
• Intercom op zich
• Intercom sobre si mesmo
•
MM =
9
• Attivazione/Disattivazione studio professionale
• Enabling/disabling Office function
• Activation/Désactivation Bureau
• Büro-Funktion aktivieren/deaktivieren
• Activación/Desactivación Oficina Profesional
• Activering/Deactivering professionele studio
• Ativação/Desativação do Estúdio profissional
•
J1 J2 N
P M
• Il configuratore fisico MM – (decine) decide quali sono le 4 icone di AZIONI RAPIDE che compaiono sulla HOME PAGE e che
puoi attivare dal touch del display. Ti riportiamo le possibili configurazioni nella tabella seguente.
• The MM - (tenths) physical configurator decides which are the 4 QUICK ACTIONS icons that appear on the HOME PAGE, and can be
activated by touching the display. The possible configurations are shown in the following table.
• Le configurateur physique MM – (dizaines) établit quelles sont les 4 icônes d’ACTIONS RAPIDE qui s’affiche sur la PAGE
D’ACCUEIL et qu’il est possible d’activer depuis l’écran tactile. Dans le tableau suivant sont indiquées les différentes
configurations possibles.
• Der physische Konfigurator MM - (Zehner) entscheidet welche 4 Symbole der SCHNELLFUNKTIONEN auf der HOMEPAGE angezeigt
werden und über den Touchscreen aktiviert werden können. In nachstehender Tabelle sind die möglichen Konfigurationen
zusammengefasst.
• El configurador físico MM – (decenas) decide los 4 iconos de las ACCIONES RÁPIDAS que aparecen en la Página de Inicio y que
puede activar en la pantalla táctil. La tabla siguiente contiene las configuraciones posibles.
• De fysieke configurator MM – (tienden) bepaalt welke 4 iconen van de SNELTOETSEN op de HOMEPAGINA worden weergegeven en op
het touchscreen geactiveerd kunnen worden.
• O configurador físico MM - (dezenas) decide quais são os quatro ícones de AÇÕES RÁPIDAS que aparecem na HOME PAGE e
que você pode ativar mediante o toque do display. De volgende tabel bevat de mogelijke configuraties.
4MM
La pagina si sta caricando...
La pagina si sta caricando...
La pagina si sta caricando...
La pagina si sta caricando...
La pagina si sta caricando...
La pagina si sta caricando...
La pagina si sta caricando...
La pagina si sta caricando...
La pagina si sta caricando...
La pagina si sta caricando...
La pagina si sta caricando...
La pagina si sta caricando...
-
 1
1
-
 2
2
-
 3
3
-
 4
4
-
 5
5
-
 6
6
-
 7
7
-
 8
8
-
 9
9
-
 10
10
-
 11
11
-
 12
12
-
 13
13
-
 14
14
-
 15
15
-
 16
16
-
 17
17
-
 18
18
-
 19
19
-
 20
20
-
 21
21
-
 22
22
-
 23
23
-
 24
24
-
 25
25
-
 26
26
-
 27
27
-
 28
28
-
 29
29
-
 30
30
-
 31
31
-
 32
32
-
 33
33
-
 34
34
-
 35
35
-
 36
36
-
 37
37
-
 38
38
-
 39
39
-
 40
40
-
 41
41
-
 42
42
-
 43
43
-
 44
44
-
 45
45
-
 46
46
-
 47
47
-
 48
48
-
 49
49
-
 50
50
-
 51
51
-
 52
52


Bticino 365711 Istruzioni per l'uso
- Tipo
- Istruzioni per l'uso
- Questo manuale è adatto anche per
in altre lingue
- English: Bticino 365711 Operating instructions
- français: Bticino 365711 Mode d'emploi
- español: Bticino 365711 Instrucciones de operación
- Deutsch: Bticino 365711 Bedienungsanleitung
- Nederlands: Bticino 365711 Handleiding
- português: Bticino 365711 Instruções de operação
Documenti correlati
-
Bticino 365711 Guida d'installazione
-
-
-
Bticino 369711 Manuale utente
-
Bticino 344642 Istruzioni per l'uso
-
-
-
-
-
Bticino 352500 Manuale utente
