La pagina si sta caricando...
La pagina si sta caricando...
La pagina si sta caricando...
La pagina si sta caricando...
La pagina si sta caricando...
La pagina si sta caricando...
La pagina si sta caricando...

8
Trójkąt równoramienny z symbolem błyskawicy oznacza niezaizolowane, „niebezpieczne” napięcie w urządzeniu, które może
spowodować niebezpieczne dla zdrowia porażenie prądem.
Trójkąt równoramienny z wykrzyknikiem oznacza ważne wskazówki dotyczące obsługi i wskazówki ostrzegawcze.
UWAGA NA WYSOKI POZIOM GŁOŚNOŚCI PRODUKTÓW AUDIO!
To urządzenie przewidziane jest do profesjonalnych zastosowań. Komercyjne stosowanie tego urządzenia podlega obowiązującym w danym kraju
przepisom i wytycznym dotyczącym zapobiegania wypadkom. Firma Adam Hall jest jako producent zobowiązana do wyraźnego informowania o
potencjalnym zagrożeniu dla zdrowia. Utrata słuchu w wyniku wysokiego poziomu głośności i długotrwałego narażenia: podczas stosowania tego
produktu może powstać wysoki poziom ciśnienia akustycznego (SPL), który może doprowadzić do nieodwracalnego uszkodzenia słuchu u artystów,
pracowników i widzów. Należy unikać długotrwałego narażenia na wysoki poziom głośności powyżej 90 dB.
Aby zapobiec ewentualnemu uszkodzeniu słuchu, unikać słuchania przy dużym poziomie głośności przez dłuższy czas.
Głośny dźwięk może prowadzić do uszkodzenia słuchu nawet przy krótkim okresie oddziaływania. Głośność należy zawsze
utrzymywać na przyjemnym dla ucha poziomie.
IT
MISURE PRECAUZIONALI
1. Leggere attentamente il presente manuale di istruzioni.
2. Conservare tutte le indicazioni e le istruzioni in un luogo sicuro.
3. Seguire le istruzioni.
4. Rispettare tutte le avvertenze. Non rimuovere dal dispositivo le indicazioni sulla sicurezza o altre informazioni.
5. Utilizzare il dispositivo solo nei modi previsti dal manuale.
6. Utilizzare esclusivamente stativi e fissaggi stabili e adatti (per installazioni fisse). Verificare che i supporti a parete siano installati e fissati a regola
d‘arte. Verificare che il dispositivo sia installato in modo stabile e non possa cadere.
7. Durante l‘installazione, osservare le normative sulla sicurezza in vigore nel proprio Paese.
8. Non installare né azionare il dispositivo in prossimità di radiatori, accumulatori termici, stufe o altre fonti di calore. Accertarsi che il dispositivo sia
sempre installato in modo che venga raffreddato a sufficienza e non possa surriscaldarsi.
9. Non appoggiare sul dispositivo fonti di combustione, quali candele accese.
10. Le fessure di areazione non devono essere bloccate. Evitare l‘esposizione diretta ai raggi solari.
11. Non attivare il dispositivo nelle immediate vicinanze di acqua (questo punto non interessa i dispositivi specifici per l‘esterno, per i quali valgono le
speciali indicazioni riportate di seguito). Non portare mai il dispositivo a contatto con materiali, liquidi o gas infiammabili.
12. Accertarsi che all‘interno del dispositivo non possa penetrare acqua per gocciolamento o spruzzo. Non collocare sul dispositivo oggetti contenenti
liquidi, quali vasi, tazze o bicchieri.
13. Assicurarsi che non sia possibile la caduta di oggetti nel dispositivo.
14. Azionare il dispositivo esclusivamente con gli accessori appositamente consigliati e previsti dal produttore.
15. Non aprire né modificare il dispositivo.
16. Una volta collegato il dispositivo, verificare tutti i cavi per evitare danni o incidenti, ad esempio per inciampo.
17. Durante il trasporto, assicurarsi che il dispositivo non possa cadere e causare possibili danni a cose e/o persone.
18. Se il dispositivo non funzionasse più correttamente, vi fosse caduto sopra del liquido o un oggetto o fosse stato danneggiato in altro modo, speg-
nerlo immediatamente e staccare la spina (se si tratta di un dispositivo attivo). La riparazione del dispositivo deve essere affidata esclusivamente a
personale qualificato autorizzato.
19. Per la pulizia del dispositivo utilizzare un panno pulito.
20. Rispettare le leggi sullo smaltimento in vigore nel Paese di installazione. Al momento di smaltire l‘imballo, separare la plastica dalla carta e dal cartone.
21. I sacchetti di plastica devono essere tenuti lontani dalla portata dei bambini.
DISPOSITIVI CON ALLACCIAMENTO DI RETE
22. ATTENZIONE: se il cavo di rete è dotato di contatto di protezione, deve essere collegato a una presa di rete con messa a terra. Non disattivare mai
la connessione di messa a terra di un cavo di rete.
23. Non accendere il dispositivo subito dopo essere stato sottoposto a forti variazioni di temperatura (ad esempio dopo il trasporto). Umidità e
condensa potrebbero danneggiare il dispositivo. Accendere il dispositivo solo dopo che ha raggiunto la temperatura ambiente.
24. Prima di collegare il dispositivo alla presa, controllare innanzitutto se la tensione e la frequenza della rete elettrica coincidono con i valori indicati
sul dispositivo stesso. Nel caso di dispositivo munito di selettore di tensione, collegarlo alla presa unicamente se i valori del dispositivo coincidono
con quelli della rete elettrica. Se il cavo di rete o l‘adattatore di rete forniti in dotazione non sono compatibili con la presa, rivolgersi a un elettricista.
25. Non calpestare il cavo di rete. Accertarsi che i cavi sotto tensione, in particolare della presa di rete o dell‘adattatore di rete, non vengano pizzicati.
26. Durante il cablaggio del dispositivo, verificare sempre che il cavo di rete e l‘adattatore di rete siano costantemente accessibili. Staccare sempre
il dispositivo dall‘alimentazione di rete quando non è utilizzato o durante la pulizia. Per staccare dalla presa il cavo di rete e l‘adattatore di rete, tirare
sempre dalla spina o dall‘adattatore e non dal cavo. Non toccare mai il cavo di alimentazione e l’alimentatore con le mani umide.
27. Evitare per quanto possibile di accendere e spegnere velocemente il dispositivo per non pregiudicarne la durata.
28. NOTA IMPORTANTE: Sostituire i fusibili esclusivamente con fusibili dello stesso tipo e valore. Se un fusibile continua a saltare, rivolgersi a un
centro di assistenza autorizzato.
29. Per staccare completamente il dispositivo dalla rete elettrica, rimuovere il cavo di rete o l‘adattatore di rete dalla presa.
30. Per staccare un dispositivo provvisto di presa Volex, è prima necessario sbloccare la relativa spina Volex del dispositivo stesso. Tirando il cavo di
rete, però, il dispositivo potrebbe spostarsi e cadere, provocando danni alle persone o di altro genere. Prestare quindi la più scrupolosa attenzione
durante la posa dei cavi.
31. In caso di pericolo di caduta di fulmine, o se il dispositivo rimane inutilizzato a lungo, staccare sempre il cavo di rete e l‘adattatore di rete dalla presa.

9
INTRODUCTION / EINFÜHRUNG / INTRODUCTION / INTRODUCCIÓN / WPROWADZENIE /
INTRODUZIONE
EN
Introduction
The LD Systems Roadbuddy is the ideal solution for voice and music transmission on the go. The 2-way speaker with a 6" custom woofer and a 1"
compression driver is operated with a rechargeable battery for up to 5 hours and is powered by a class D power amplifier with a highly efficient power
supply. The Roadbuddy relies fully on wireless transmission: it has an FM radio receiver which operates in the license-free 863 - 865 MHz range, and
is available either with a handheld transmitter or a beltpack transmitter with headset. The on-board Bluetooth player with backlit multifunction display,
equalizer, USB port and SD card slot supports the mp3, wma and wav formats.
Scope of delivery LDRBUD6: Roadbuddy speaker, IR remote control, power cable, hand-held transmitter.
Scope of delivery LDRBUD6HS: Roadbuddy speaker, IR remote control, power cable, beltpack transmitter & headset.
DE
Einführung
Der LD Systems Roadbuddy ist die ideale Lösung zur Sprach- und Musikübertragung unterwegs. Der 2-Weg-Lautsprecher mit einem 6" Custom-
Woofer und 1" Kompressionstreiber ist mit seinem wiederaufladbaren Akku bis 5 Stunden betriebsfähig und wird von einer Class D Endstufe mit
hocheffizientem Schaltnetzteil angetrieben. Der Roadbuddy setzt voll und ganz auf drahtlose Übertragung: Er besitzt einen FM-Funkempfänger, der im
anmeldefreien 863 – 865 MHz-Bereich arbeitet und ist entweder mit Handsender, oder Taschensender mit Headset erhältlich. Der bordeigene Blue-
tooth-Player mit hinterleuchtetem Multifunktions-Display, Equalizer, USB-Port und SD-Kartenschacht unterstützt die Formate .mp3, .WMA und .WAV.
Lieferumfang LDRBUD6: Roadbuddy Lautsprecher, IR Fernbedienung, Netzkabel, Handsender.
Lieferumfang LDRBUD6HS: Roadbuddy Lautsprecher, IR Fernbedienung, Netzkabel, Taschensender & Headset.
FR
Introduction
Le LD Systems Roadbuddy constitue une solution idéale pour la sonorisation mobile de voix et de musique. Cette enceinte 2 voies, munie d'un boomer
de 6" et d'un tweeter à compression de 1", s'alimente sur accumulateur rechargeable (autonomie maximale : 5 heures) et possède un amplificateur
travaillant en Classe D et une alimentation à découpage de haute efficacité. Le Roadbuddy assure une restitution équilibrée et présente, et travaille
sans fil. Il possède un récepteur UHF intégré, travaillant dans la bande des 863-865 MHz (sans licence). Il est livré avec un émetteur à main ou un
serre-tête sur bodypack (relié à un émetteur de poche). Le récepteur Bluetooth intégré, doté d'un écran LCD rétro-éclairé, offre également un égaliseur,
un port USB et un slot pour carte SD, reliés à un lecteur compatible avec les formats .mp3, .WMA et .WAV.
Contenu du carton du LDRBUD6 : Enceinte amplifiée Roadbuddy, télécommande infrarouge, câble secteur, émetteur à main
Contenu du carton du LDRBUD6HS : Enceinte amplifiée Roadbuddy, télécommande infrarouge, câble secteur, émetteur de poche et serre-tête
ES
Introducción
El Roadbuddy de LD Systems es la solución portátil ideal para transmitir música y voz. El altavoz de 2 vías con un woofer Custom Made de 6" y un mo-
tor de agudos de 1" está alimentado por una batería recargable que proporciona hasta 5horas de funcionamiento continuo. Incorpora un amplificador
de claseD con fuente de alimentación conmutada de alto rendimiento. El Roadbuddy se basa totalmente en la transmisión inalámbrica: está equipado
con un receptor FM que opera en la banda de 863 a 865MHz sin licencia, y está disponible con micrófono transmisor de mano o petaca transmisora
con micrófono de diadema. El reproductor de audio Bluetooth integrado, con pantalla multifunción retroiluminada, ecualizador, puerto USB y ranura
para tarjeta SD, es compatible con los formatos MP3, WMA y WAV.
CAUTION
RISK OF ELECTRIC SHOCK
DO NOT OPEN
ATTENZIONE
non togliere mai il coperchio di protezione per evitare il pericolo di scosse elettriche. L’interno del dispositi-
vo non contiene parti che possono essere riparate o sottoposte a manutenzione da parte dell’utente. Le
riparazioni dovranno essere realizzate esclusivamente da tecnici qualificati.
Il triangolo isoscele con il simbolo del fulmine indica la presenza nel dispositivo di tensioni non isolate, “pericolose”, che possono
provocare scosse dannose alla salute.
Il triangolo isoscele con punto esclamativo avverte di importanti segnalazioni relative all’uso e alla manutenzione.
ATTENZIONE: ELEVATI LIVELLI SONORI NEI PRODOTTI AUDIO!
Questo dispositivo è destinato a uso professionale. Di conseguenza, se viene destinato ad un uso commerciale, sarà soggetto alle norme e ai
regolamenti dell’Associazione per la prevenzione di infortuni del rispettivo settore professionale. In qualità di produttore, Adam Hall è tenuto per legge
a informare espressamente gli utenti degli eventuali rischi per la salute.
Danni all’udito provocati da un’esposizione prolungata a un livello SPL elevato: dall’utilizzo di questo prodotto si possono generare elevati livelli di
pressione sonora (SPL) che possono provocare danni irreparabili all’udito di artisti, collaboratori e spettatori. Evitare l’esposizione prolungata a livelli
sonori elevati, superiori a 90 dB.
Per evitare possibili danni all‘udito, evitare l‘ascolto ad un volume elevato per periodi prolungati.
L‘esposizione al volume elevato può causare danni all‘udito anche se è di breve durata. Mantenere sempre il volume ad un livello
gradevole.

10
MIXER UNIT / MISCHPULT-EINHEIT / SECTION MIXEUR / MÓDULO MEZCLADOR / JEDNOSTKA
PULPITU MIKSERSKIEGO / UNITÀ MIXER
1 4
2
3
5
6
9
10
8
7
14
12
13
11
1
CH 1 MIC / LINE INPUT
EN
Balanced microphone or line input (XLR / 6.3 mm jack combo) It is also possible to use an unbalanced microphone cable (mono jack). Pay
attention to the setting of switch 2, as described below.
DE
Symmetrischer Mikrofon-, bzw. Line-Eingang (XLR / 6,3 mm Klinke Combo). Die Nutzung eines unsymmetrischen Mikrofonkabels (Mono-
Klinke) ist ebenfalls möglich. Achten Sie auf die Einstellung des Schalters 2, wie nachfolgend beschrieben.
FR
Entrée micro/ligne symétrique (sur connecteur Combo, mixte XLR / jack 6,35 mm) Cette entrée est compatible avec un signal asymétrique (issu
d'un microphone possédant un connecteur jack mono). Attention à la position du sélecteur 2, comme décrit ci-après.
ES
Entrada balanceada de línea/micro (combo XLR/jack de 6,3mm). Es posible usar un cable de micro no balanceado (jack mono). Tenga en cuen-
ta la posición del botón2 (ver a continuación).
PL
Symetryczne wejście mikrofonowe lub liniowe (XLR/combo jack 6,3 mm). Możliwe jest także użycie niesymetrycznego kabla mikrofonowego
(jack mono). Należy zwrócić uwagę na ustawienie przycisku 2, jak opisano poniżej.
IT
Ingresso di linea o microfono bilanciato (combo XLR/jack da 6,3mm). È anche possibile utilizzare un cavo microfono non bilanciato (jack
mono). Prestare attenzione all'impostazione dell'interruttore2, come descritto di seguito.
Suministrado con LDRBUD6: altavoz Roadbuddy, mando a distancia por infrarrojos, cable eléctrico, micrófono transmisor de mano.
Suministrado con LDRBUD6HS: altavoz Roadbuddy, mando a distancia por infrarrojos, cable eléctrico, petaca transmisora y micrófono de diadema.
PL
Wprowadzenie
Urządzenie LD Systems Roadbuddy to idealne przenośne rozwiązanie do transmisji mowy i muzyki. Ten wyposażony w akumulator głośnik dwudrożny
z głośnikiem niskotonowym 6” oraz z przetwornikiem ciśnieniowym 1” może pracować do 5 godzin. Jest on zasilany końcówką mocy klasy D z nie-
zwykle wydajnym zasilaczem impulsowym. System Roadbuddy oferuje całkowicie bezprzewodową transmisję. System wyposażony jest w odbiornik
radiowy FM, który pracuje w zakresie częstotliwości nie wymagającym zezwolenia: 863–865 MHz. Jest on dostępny w opcji z nadajnikiem ręcznym
lub kieszonkowym z zestawem nagłownym. Zintegrowany odtwarzacz, wyposażony w podświetlany ekran wielofunkcyjny, interfejs Bluetooth, korektor,
port USB i złącze do karty SD, obsługuje formaty .mp3, .WMA oraz .WAV.
Zakres dostawy LDRBUD6: głośnik Roadbuddy, pilot na podczerwień, kabel sieciowy, nadajnik ręczny.
Zakres dostawy LDRBUD6HS: głośnik Roadbuddy, pilot na podczerwień, kabel sieciowy, nadajnik kieszonkowy z zestawem nagłownym.
IT
Introduzione
Il Roadbuddy di LD Systems è la soluzione ideale per rappresentazioni vocali e musicali di strada. L'altoparlante a 2vie, caratterizzato da woofer
Custom da 6", driver di compressione da 1" e alimentazione a batteria ricaricabile, ha un'autonomia di 5ore ed è azionato da un finale di potenza di
classeD con alimentatore switching ad alta efficienza. Il Roadbuddy funziona completamente senza fili grazie al ricevitore radio FM attivo nella banda
di frequenza 863 - 865MHz che non richiede licenza, ed è disponibile nella versione con trasmettitore a mano o con trasmettitore tascabile e microfono
ad archetto. Il lettore Bluetooth integrato, con display multifunzione retroilluminato, equalizzatore, porta USB e slot per scheda SD è compatibile con i
formati .MP3, .WMA e .WAV.
In dotazione con LDRBUD6: altoparlante Roadbuddy, telecomando IR, cavo di alimentazione, trasmettitore a mano.
In dotazione con LDRBUD6HS: altoparlante Roadbuddy, telecomando IR, cavo di alimentazione, trasmettitore tascabile e microfono ad archetto.

11
2
CH 1 LINE / MIC
EN
When a microphone is connected to the input CH 1, move the switch to the pressed position; for the connection of a line-level signal in the
external playback device, leave it in the unpressed position.
DE
Wird ein Mikrofon an den Eingang CH 1 angeschlossen, bringen Sie den Schalter in die heruntergedrückte Position, bei Anschluss eines
Zuspielgeräts mit Line-Pegel in die nicht heruntergedrückte Position.
FR
Si vous branchez un microphone sur l'entrée CH 1, appuyez sur le sélecteur ; pour travailler au niveau ligne, laissez le sélecteur en position non
enfoncée.
ES
Si conecta un micrófono a la entrada CH1, deje pulsado el botón; si conecta un reproductor con nivel de línea, deje el botón sin pulsar.
PL
Jeśli na wejściu CH 1 podłączony jest mikrofon, należy ustawić przycisk w pozycji wciśniętej, a w przypadku podłączenia urządzenia
zewnętrznego z poziomem liniowym, w pozycji niewciśniętej.
IT
Se un microfono viene collegato all'ingresso CH1, l'interruttore deve essere premuto, se invece viene collegato a un dispositivo di riproduzione
con livello linea, l'interruttore non deve essere premuto.
3
CH 1 LEVEL
EN
Volume controller for channel 1 (CH 1). Turning the dial to the right increases the volume and turning it to the left decreases it.
DE
Lautstärkeregler für den Kanal 1 (CH 1). Nach links gedreht verringert sich, nach rechts gedreht erhöht sich die Lautstärke.
FR
Potentiomètre de réglage de niveau du canal 1 (CH 1). Tournez le potentiomètre vers la droite pour augmenter le volume sonore, vers la gauche
pour le baisser.
ES
Control de nivel del canal 1 (CH 1). Gire a la izquierda para disminuir el nivel, o a la derecha para aumentarlo.
PL
Regulator głośności dla kanału 1 (CH 1). Obrót w lewo powoduje zmniejszenie, a w prawo – zwiększenie głośności.
IT
Regolatore di volume del canale 1 (CH 1). Ruotando il pomolo verso sinistra si abbassa il volume, verso destra si alza.
4
CH 2 MIC / LINE INPUT
EN
Balanced microphone or line input (XLR / 6.3 mm jack combo) It is also possible to use an unbalanced microphone cable (mono jack). Pay
attention to the setting of switch 5, as described below.
DE
Symmetrischer Mikrofon-, bzw. Line-Eingang (XLR / 6,3 mm Klinke Combo). Die Nutzung eines unsymmetrischen Mikrofonkabels (Mono-
Klinke) ist ebenfalls möglich. Achten Sie auf die Einstellung des Schalters 5, wie nachfolgend beschrieben.
FR
Entrée micro/ligne symétrique (sur connecteur Combo, mixte XLR / jack 6,35 mm) Cette entrée est compatible avec un signal asymétrique (issu
d'un microphone possédant un connecteur jack mono). Attention à la position du sélecteur 5, comme décrit ci-après.
ES
Entrada balanceada de línea/micro (combo XLR/jack de 6,3mm). Es posible usar un cable de micro no balanceado (jack mono). Tenga en cuen-
ta la posición del botón5 (ver a continuación).
PL
Symetryczne wejście mikrofonowe lub liniowe (XLR/combo jack 6,3 mm). Możliwe jest także użycie niesymetrycznego kabla mikrofonowego
(jack mono). Należy zwrócić uwagę na ustawienie przycisku 5, jak opisano poniżej.
IT
Ingresso di linea o microfono bilanciato (combo XLR/jack da 6,3mm). È anche possibile utilizzare un cavo microfono non bilanciato (jack
mono). Prestare attenzione all'impostazione dell'interruttore5, come descritto di seguito.
5
CH 2 LINE / MIC
EN
When a microphone is connected to the input CH 2, move the switch to the pressed position; for the connection of a line-level signal in the
external playback device, leave it in the unpressed position.
DE
Wird ein Mikrofon an den Eingang CH 2 angeschlossen, bringen Sie den Schalter in die heruntergedrückte Position, bei Anschluss eines
Zuspielgeräts mit Line-Pegel in die nicht heruntergedrückte Position.
FR
Si vous branchez un microphone sur l'entrée CH 2, appuyez sur le sélecteur ; pour travailler au niveau ligne, laissez le sélecteur en position non
enfoncée.
ES
Si conecta un micrófono a la entrada CH2, deje pulsado el botón; si conecta un reproductor con nivel de línea, deje el botón sin pulsar.
PL
Jeśli na wejściu CH 2 podłączony jest mikrofon, należy ustawić przycisk w pozycji wciśniętej, a w przypadku podłączenia urządzenia
zewnętrznego z poziomem liniowym, w pozycji niewciśniętej.
IT
Se un microfono viene collegato all'ingresso CH2, l'interruttore deve essere premuto, se invece viene collegato a un dispositivo di riproduzione
con livello linea, l'interruttore non deve essere premuto.
6
CH 2 LEVEL
EN
Volume controller for channel 2 (CH 2). Turning the dial to the right increases the volume and turning it to the left decreases it.
DE
Lautstärkeregler für den Kanal 2 (CH 2). Nach links gedreht verringert sich, nach rechts gedreht erhöht sich die Lautstärke.
FR
Potentiomètre de réglage de niveau du canal 2 (CH 2). Tournez le potentiomètre vers la droite pour augmenter le volume sonore, vers la gauche
pour le baisser.
ES
Control de nivel del canal2 (CH2). Gire a la izquierda para disminuir el nivel, o a la derecha para aumentarlo.
PL
Regulator głośności dla kanału 2 (CH 2). Obrót w lewo powoduje zmniejszenie, a w prawo – zwiększenie głośności.
IT
Regolatore di volume del canale2 (CH2). Ruotando il pomolo verso sinistra si abbassa il volume, verso destra si alza.

12
7
CH 3 LINE IN
EN
Unbalanced line input (RCA) for connecting an external audio source (e.g. CD player, laptop). An incoming stereo signal is mono summed
internally. To activate the RCA input, switch 9 (MP3/AUX) on the control panel should not be pressed down, the incoming signal is now on channel 3
(CH 3). If the socket of the mini-jack input is in use, the RCA jacks of channel 3 are muted.
DE
Unsymmetrischer Line-Eingang mit Cinch-Buchsen zum Anschließen eines Zuspielgeräts (z.B. CD-Spieler, Laptop). Ein anliegendes
Stereo-Signal wird intern Mono summiert. Zur Aktivierung des Cinch-Eingangs muss sich Schalter 9 (MP3 / AUX) auf dem Bedienfeld in herunterge-
drückter Position befinden, das anliegende Signal liegt nun auf Kanal 3 (CH 3). Ist die Buchse des Mini-Klinken-Eingangs belegt, sind die
Cinch-Buchsen des Kanals 3 stumm geschaltet.
FR
Entrée ligne asymétrique avec connecteurs cinch, pour branchement d'une source de signal externe (lecteur de CD, ordinateur portable...). Ce
signal stéréo est sommé en mono en interne. Pour activer l'entrée cinch, il faut que le sélecteur 9 (AUX / MP3) du panneau utilisateur soit enfoncé.
Le signal sera envoyé sur le canal 3 (CH 3). Si un connecteur est introduit dans l'embase mini-jack, il est prioritaire par rapport aux connecteurs
cinch du canal 3, qui sont alors coupés.
ES
Entrada de línea no balanceada por RCA para la conexión de un equipo, como un reproductor de CD o un portátil. Internamente, una señal
estéreo se pasa a mono. Para seleccionar la señal de la entrada RCA en el canal3 (CH3), el botón9 (MP3/AUX) del panel de control debe estar
pulsado. Si hay algún conector en el minijack de entrada, se silenciarán los RCA del canal3.
PL
Niesymetryczne wejście liniowe z gniazdami cinch do podłączania urządzeń zewnętrznych (np. odtwarzacza CD, laptopa). Sygnał stereo jest
wewnętrznie sumowany do sygnału mono. Aby wejście cinch było aktywne, przycisk 9 (MP3/AUX) na panelu obsługi musi znajdować się w pozycji
wciśniętej. Sygnał podawany jest na kanale 3 (CH 3). Jeśli gniazdo wejścia minijack jest zajęte, gniazda cinch kanału (CH 3) będą wyciszone.
IT
Ingresso di linea non bilanciato con prese RCA per il collegamento di un dispositivo di riproduzione (come lettore CD, laptop). Internamente, un
segnale stereo presente passa a mono. Per attivare l'ingresso della presa RCA, l'interruttore9 (MP3/AUX) sul pannello di comando deve essere
premuto; il segnale ora è presente sul canale3 (CH3). Se la presa dell'ingresso del mini jack è occupata, le prese RCA del canale3 sono silenziate.
8
CH 3 AUX IN
EN
Unbalanced line input with 3.5 mm jack for connecting an external audio source (e.g. tablet, smartphone). An incoming stereo signal is mono
summed internally. To activate the mini-jack input, switch 9 (AUX / MP3) on the control panel should not be pressed down, the incoming signal is
now on channel 3 (CH 3). If the socket of the mini-jack input is in use, the RCA jacks of channel 3 are muted.
DE
Unsymmetrischer Line-Eingang mit 3,5 mm Klinken-Buchse zum Anschließen eines Zuspielgeräts (z.B. Tablet, Smartphone). Ein anliegendes
Stereo-Signal wird intern Mono summiert. Zur Aktivierung des Mini-Klinken-Eingangs muss sich Schalter 9 (AUX / MP3) auf dem Bedienfeld in
heruntergedrückter Position befinden, das anliegende Signal liegt nun auf Kanal 3 (CH 3). Ist die Buchse des Mini-Klinken-Eingangs belegt, sind die
Cinch-Buchsen des Kanals 3 stumm geschaltet.
FR
Entrée asymétrique au niveau ligne sur connecteur mini-jack 3,5 mm, pour connexion d'une source de signal (par exemple, tablette ou
smartphone). Ce signal stéréo est sommé en mono en interne. Pour activer l'entrée mini-jack, il faut que le sélecteur 9 (AUX / MP3) du panneau
utilisateur soit enfoncé. Le signal ne sera présent que sur le canal 3 (CH 3). Si un connecteur est introduit dans l'embase mini-jack, il est prioritaire
par rapport aux connecteurs cinch du canal 1 (CH 3), qui sont alors coupés.
ES
Entrada de línea no balanceada por minijack de 3,5mm para la conexión de un equipo, como una tableta o un teléfono inteligente.
Internamente, una señal estéreo se pasa a mono. Para seleccionar la señal de la entrada minijack en el canal3 (CH3), el botón9 (AUX/MP3) del
panel de control debe estar pulsado. Si hay algún conector en el minijack de entrada, se silenciarán los RCA del canal3.
PL
Niesymetryczne wejście liniowe z gniazdem jack 3,5 mm do podłączania urządzeń zewnętrznych (np. tabletu, smartfona). Sygnał stereo jest
wewnętrznie sumowany do sygnału mono. Aby wejście minijack było aktywne, przycisk 9 (AUX/MP3) na panelu obsługi musi znajdować się w pozycji
wciśniętej. Sygnał podawany jest na kanale 3 (CH 3). Jeśli gniazdo wejścia minijack jest zajęte, gniazda cinch kanału (CH 3) będą wyciszone.
IT
Ingresso di linea non bilanciato con prese mini jack da 3,5mm per il collegamento di un dispositivo di riproduzione (come tablet, smartphone).
Internamente, un segnale stereo presente passa a mono. Per attivare l'ingresso del mini jack, l'interruttore9 (AUX/MP3) sul pannello di comando
deve essere premuto; il segnale così ora è disponibile sul canale3 (CH3). Se la presa dell'ingresso del mini jack è occupata, le prese RCA del
canale3 sono silenziate.
9
CH 3 MP3 / AUX
EN
Select the input source for channel 3 (CH 3). When the switch is pressed down, the MP3 player is selected as a signal source; when the switch
is not pressed down, the RCA or mini-jack input is selected.
DE
Wahl der Signal-Quelle für Kanal 3 (CH 3). Ist der Schalter nicht heruntergedrückt, ist der MP3-Spieler als Signal-Quelle ausgewählt, ist der
Schalter heruntergedrückt, der Cinch- bzw. Mini-Klinken-Eingang.
FR
Sélecteur de signal pour le canal 3 (CH 3). Si le sélecteur n'est pas enfoncé, c'est le lecteur MP3 qui est sélectionné comme source de signal ;
s'il est enfoncé, c'est l'entrée cinch ou mini-jack qui est sélectionnée.
ES
Permite seleccionar la fuente de señal para el canal3 (CH3). Si el botón no está pulsado, se seleccionará el reproductor MP3 como fuente de
señal, y si el botón está pulsado, se seleccionará la entrada RCA o la entrada minijack.
PL
Wybór źródła sygnału dla kanału 3 (CH 3). Jeśli przycisk jest niewciśnięty, jako źródło sygnału wybrany jest odtwarzacz MP3. Jeśli przycisk jest
wciśnięty, źródłem sygnału jest wejście cinch lub minijack.
IT
Selezione della sorgente del segnale per il canale3 (CH3). Se l'interruttore non è premuto, come sorgente di segnale viene selezionato il
lettore MP3, mentre se l'interruttore è premuto, viene selezionato l'ingresso della presa RCA o del mini jack.
10
CH 3 LEVEL
EN
Volume controller for channel 3 (CH 3). Turning the dial to the right increases the volume and turning it to the left decreases it.
DE
Lautstärkeregler für den Kanal 3 (CH 3). Nach links gedreht verringert sich, nach rechts gedreht erhöht sich die Lautstärke.

13
FR
Potentiomètre de réglage de niveau du canal 3 (CH 3). Tournez le potentiomètre vers la droite pour augmenter le volume sonore, vers la gauche
pour le baisser.
ES
Control de nivel del canal3 (CH3). Gire a la izquierda para disminuir el nivel, o a la derecha para aumentarlo.
PL
Regulator głośności dla kanału 3 (CH 3). Obrót w lewo powoduje zmniejszenie, a w prawo – zwiększenie głośności.
IT
Regolatore di volume del canale3 (CH3). Ruotando il pomolo verso sinistra si abbassa il volume, verso destra si alza.
11
TONE
EN
Tone controller for the summing channel of the speaker. At the resting point of the controller, the sound is not affected; rotation to the left
reduces the highs, rotation to the right increases them.
DE
Klangregler für den Summenkanal des Lautsprechers. In der Mittelstellung des Reglers (Rastpunkt) erfolgt keine Klangbeeinflussung, Drehung
nach links über den Rastpunkt hinaus reduziert die Höhen, Drehung nach rechts hebt sie an.
FR
Correcteur de tonalité global de l'enceinte. En position médiane du potentiomètre (crantée), le son n'est pas modifié. Tourner vers la gauche
atténue les aigus, tourner vers la droite les accentue.
ES
Control de tono para el canal principal del altavoz. En la posición centrada (se siente un clic) no se cambia el sonido; a la izquierda se reducen
los agudos, y a la derecha se incrementan.
PL
Regulator brzmienia dla kanału sumy głośnika. Ustawienie regulatora w pozycji centralnej nie wpływa na dźwięk. Przekręcenie pokrętła w lewo
do momentu kliknięcia redukuje wysokość dźwięku, a obrót w prawo ją zwiększa.
IT
Regolatore del suono per il canale di missaggio dell'altoparlante. Nella posizione intermedia del regolatore (si sente un clic) il suono non si
modifica; girando a sinistra - oltre il clic - si riducono gli acuti, a destra si alzano.
12
MASTER VOLUME
EN
Volume control for the summing channel. When turned to the left, overall volume levels are lowered, when turned to the right, they are raised.
DE
Lautstärkeregler des Summenkanals. Nach links gedreht wird die Gesamtlautstärke abgesenkt, nach rechts gedreht angehoben.
FR
Réglage de niveau de sortie. Tourner vers la gauche pour baisser le niveau, vers la droite pour l'augmenter.
ES
Control de volumen del canal principal. Girar a la izquierda para disminuir el volumen general y a la derecha para subirlo.
PL
Regulator głośności kanału sumy. Obrót w lewo powoduje zmniejszenie, a obrót w prawo – zwiększenie głośności ogólnej.
IT
Regolatore di volume del canale di missaggio. Ruotare a sinistra per abbassare il volume generale, a destra per alzarlo.
13
POWER / CLIP
EN
The LED lights up green when the device is properly connected to a mains supply and is turned on, or is operated with the built-in rechargeable
battery. The LED lights up red when the loudspeaker is operating in the clipping range. To avoid a distorted sound and damage to the speakers,
please reduce the volume on the MASTER VOLUME (No. 12) volume controller.
DE
Die LED leuchtet grün, sobald das Gerät korrekt am Stromnetz angeschlossen und eingeschaltet ist, bzw. mit dem integrierten Akku betrieben
wird. Die LED leuchtet rot auf, wenn der Lautsprecher im oberen Grenzbereich betrieben wird (CLIP). Um einen verzerrten Klang und Schäden am
Lautsprecher zu vermeiden, reduzieren Sie bitte in diesem Fall die Lautstärke am Lautstärkeregler MASTER VOLUME (Nr. 12).
FR
Cette LED s'allume en vert dès que l'appareil est branché correctement sur secteur (ou sur accumulateurs) et se trouve sous tension. La LED
passe au rouge dès que l'enceinte arrive à ses limites de fonctionnement (CLIP). Pour éviter toute distorsion et tout dommage à l'enceinte, réduisez
alors le volume de l'enceinte via le potentiomètre MASTER VOLUME (12).
ES
El LED se ilumina de color verde cuando el equipo está encendido y correctamente enchufado a la red eléctrica, o cuando funciona con la
batería incorporada. El LED se ilumina de color rojo cuando el equipo está operando en su límite (CLIP). Para no distorsionar el sonido y evitar daños
en el altavoz, disminuya el volumen mediante el control12 MASTER VOL.
PL
Dioda LED świeci się na zielono, gdy urządzenie zostanie prawidłowo podłączone do sieci elektrycznej i włączone lub gdy jest ono zasilane
poprzez zintegrowany akumulator. Dioda LED świeci się na czerwono, gdy głośnik pracuje w górnym zakresie granicznym (CLIP). Aby uniknąć
zniekształceń dźwięku i uszkodzenia głośników, należy zmniejszyć na głośniku regulację głośności MASTER VOLUME (nr 12).
IT
Il LED si accende con colore verde quando il dispositivo è correttamente collegato alla rete elettrica o alimentato dalla batteria integrata. Il LED
si accende in rosso se l'altoparlante viene azionato nella gamma limite superiore (CLIP). Per evitare la distorsione del suono e danni all'altoparlante,
ridurre il volume con il regolatore MASTER VOL (n.12).
14
LINE IN / OUT
EN
This 6.3 mm jack socket can be used either as unbalanced line input, or unbalanced line output. A line signal is fed directly ahead of the power
amplifier of the device and does not interrupt the mixer signal (merging of both signals). The line output signal is equivalent to the sum signal of the
built-in mixer.
DE
Diese 6,3 mm Klinkenbuchse kann entweder als unsymmetrischer Line-Eingang, oder unsymmetrischer Line-Ausgang verwendet werden. Die
Einspeisung eines Line-Signals erfolgt direkt vor der Endstufe des Geräts und unterbricht das Mischpult-Signal nicht (Zusammenführung beider
Signale). Das Line-Ausgangssignal entspricht dem Summen-Signal des integrierten Mischpults.
FR
Cette embase jack 6,35 mm sert aussi bien d'entrée ligne que de sortie ligne (asymétrique dans les deux cas). Le signal d'entrée vient se
sommer au signal de sortie du mixeur intégré, juste avant l'entrée de l'amplificateur. Le signal de sortie est celui du mixeur intégré.
ES
Este jack de 6,3mm se puede utilizar como entrada o como salida de línea no balanceada. La inserción de la señal de línea se realiza antes de
la etapa de salida del equipo y no interrumpe la señal de mezcla (es decir, se suman ambas señales). La señal de salida de línea será la suma de
señales del mezclador integrado.
La pagina si sta caricando...

15
FR
S'allume pendant la charge de l'accumulateur intégré. Une fois l'accumulateur complètement chargé, l'indicateur CHARGE s'éteint. Pour
charger l'accumulateur, il faut brancher un câble secteur à l'embase (15). La charge de l'accumulateur s'effectue quelle que soit la position de
l'interrupteur ON/OFF.
ES
Se ilumina durante el proceso de carga de la batería interna. Si la batería está totalmente cargada, el LED CHARGE estará apagado. Para cargar
la batería, deberá conectarse un cable eléctrico adecuado a la toma (15) del equipo. La carga de las baterías se realiza independientemente de la
posición del interruptor ON/OFF.
PL
Dioda świeci się podczas ładowania zintegrowanego akumulatora. Kiedy bateria zostanie naładowana do pełna, dioda CHARGE-LED gaśnie. Aby
naładować baterię, należy podłączyć odpowiedni kabel sieciowy do gniazda sieciowego (nr 15) urządzenia. Ładowanie akumulatora następuje
niezależnie od pozycji włącznika ON/OFF.
IT
Si accende durante la procedura di ricarica della batteria interna. Se la batteria è completamente carica, il LED CHARGE si spegne. Per caricare
la batteria è necessario che un cavo di rete adatto sia collegato alla presa di rete (n.15) del dispositivo. La batteria si ricarica indipendentemente
dalla posizione dell'interruttore ON/OFF.
19
BATTERY LEVEL-LEDS
EN
The 4-segment LED chain displays the charge status of the built-in battery. When all three green LEDs are lit, the battery is fully charged. The
battery is discharged when the red LED is lit.
DE
Die 4-Segment LED-Kette zeigt den Ladestatus des integrierten Akkus an. Leuchten alle 3 grünen LEDs, ist der Akku voll geladen, ist der Akku
entladen, leuchtet nur die rote LED.
FR
Cet indicateur à 4 LED indique la charge de l'accumulateur intégré. Si les 3 LED vertes sont allumées, c'est que l'accumulateur est
complètement rechargé. S'il est déchargé, seule la LED rouge s'allume.
ES
La escala de 4LEDs indica el nivel de carga de la batería integrada. Si los 3LEDs de color verde están iluminados significa que la batería está
completamente cargada; si solo se ilumina el LED rojo, la batería está descargada.
PL
4-segmentowy ciąg diod LED sygnalizujący status naładowania zintegrowanego akumulatora. Jeśli świecą się wszystkie trzy zielone diody
LED, oznacza to, że akumulator jest całkowicie naładowany. Gdy akumulator jest rozładowany, świeci się jedynie czerwona dioda LED.
IT
La colonna di LED a 4segmenti indica lo stato di ricarica della batteria integrata. Se sono accesi tutti e 3 i LED verdi, la batteria è completa-
mente carica, mentre a batteria scarica si accende solo il LED rosso.
MP3 PLAYER
20
28
27
26
21 22 23 24 25
20
SD
EN
Slot for SD memory card up to 32 GB capacity. Please make sure you insert the card in the right direction: the contact row of the SD memory
card should be to the right. The choice of signal source for the MP3 player is made using the MODE button.
DE
Steckplatz für SD-Speicherkarten bis 32 GB Kapazität. Beim Einstecken bitte auf die Einsteckrichtung achten: Kontaktreihe der SD-Speicher-
karte nach rechts. Die Wahl der Signal-Quelle des MP3-Spielers erfolgt mit Hilfe des MODE-Tasters.
FR
Port pour carte SD, d'une capacité maximale de 32 Go. Lors de l'introduction de la carte, veuillez respecter la bonne direction : rangée de
contacts de la carte SD vers la droite. Le choix de la source de signal du lecteur MP3 s'effectue via la touche MODE.
ES
Ranura para tarjetas de memoria SD de hasta 32GB. Al insertar la tarjeta, asegúrese de que los contactos de la tarjeta de memoria SD miren
hacia la derecha. Para seleccionar el reproductor MP3 como fuente de señal, utilice el botón MODE.
PL
Złącze do kart pamięci typu SD o pojemności do 32 GB. Przy wkładaniu karty należy zachować właściwy kierunek: złącze karty pamięci SD w
prawo. Wyboru źródła sygnału odtwarzacza MP3 dokonuje się przy użyciu przycisku MODE.
IT
Slot per scheda SD con capacità fino a 32GB. Quando si inserisce la scheda, prestare attenzione al senso di inserimento: Serie di contatto della
scheda di memoria SD a destra. Per selezionare la sorgente segnale del lettore MP3 si utilizza il tasto MODE.
21
MODE
EN
Choice of signal source for the MP3 player (SD card / USB memory stick / Bluetooth), and other system settings.
DE
Wahl der Signal-Quelle des MP3-Spielers (SD-Karte / USB-Stick / Bluetooth) und weitere Systemeinstellungen.
FR
Permite seleccionar la fuente de señal (tarjeta SD/llave USB/Bluetooth) del reproductor MP3 y otros parámetros del sistema.

16
ES
Permite seleccionar la fuente de señal (tarjeta SD/llave USB/Bluetooth) del reproductor MP3 y otros parámetros del sistema.
PL
Wybór źródła sygnału odtwarzacza MP3 (karta SD/pendrive/Bluetooth) oraz inne ustawienia systemowe.
IT
Selezione della sorgente di segnale del lettore MP3 (scheda SD/memory stick USB/Bluetooth) e altre impostazioni di sistema.
22
EN
Press the PLAY / PAUSE button to start the playback of a track. Pressing again, places the player in the pause mode, playback is stopped.
DE
Drücken Sie die PLAY / PAUSE-Taste um die Wiedergabe eines Titels zu starten. Erneutes Drücken stellt den MP3-Spieler in den Pause-Modus,
die Wiedergabe wird angehalten.
FR
Appuyez sur la touche PLAY/ PAUSE pour lancer la lecture d'un morceau. Appuyez de nouveau pour placer le lecteur MP3 en mode Pause : la
lecture est alors suspendue.
ES
Pulse el botón REPRODUCIR/PAUSA para iniciar la reproducción de una pista. Pulse de nuevo este botón para poner en modo Pausa el
reproductor MP3; la reproducción se detiene.
PL
Nacisnąć przycisk PLAY/PAUSE, aby rozpocząć odtwarzanie ścieżki. Po ponownym naciśnięciu przycisku odtwarzacz MP3 przejdzie w tryb
pauzy, a odtwarzanie zostanie wstrzymane.
IT
Premere il tasto PLAY/PAUSE per avviare la riproduzione di una traccia. Se si preme di nuovo, il lettore MP3 passa in modalità Pausa e la
riproduzione si sospende.
23
EN
Playback of the current track is stopped by pressing the STOP button.
DE
Durch Drücken der STOP-Taste wird die Wiedergabe des laufenden Titels gestoppt.
FR
Appuyez sur STOP pour arrêter la lecture du morceau en cours.
ES
Pulse el botón Detener para detener la reproducción de la pista en curso.
PL
Po naciśnięciu przycisku STOP odtwarzanie bieżącej ścieżki zostanie zatrzymane.
IT
Premendo il tasto Stop, la riproduzione della traccia in esecuzione si arresta.
24
EN
Six different playback modes are available for selection (Normal / Random / Browse / All / Repeat One / Repeat Folder).
DE
Sechs verschiedene Wiedergabemodi stehen zur Auswahl (Normal / Random / Browse / All / Repeat One / Repeat Folder).
FR
Six modes de lecture différents sont disponibles (Normal / Random / Browse / All / Repeat One / Repeat Folder).
ES
Permite elegir entre seis modos de reproducción: Normal, Aleatorio, Intro, Todo, Repetir 1, Repetir carpeta.
PL
Do wyboru jest sześć różnych trybów odtwarzania (Normal/Random/Browse/All/Repeat One/Repeat Folder).
IT
Sono disponibili per la selezione sei diverse modalità di riproduzione: Normal/Random/Browse/All/Repeat One/Repeat Folder (Normale/Casuale/
Scorri/Tutti/Ripeti uno/Ripeti cartella).
25
EN
Press briefly to select the previous or next track. By pressing and holding (> 1 sec) the volume of the MP3 player can be changed (
=
quieter,
= louder).
DE
Durch kurzes Drücken wählen Sie den vorherigen bzw. nächsten Titel aus. Durch langes Drücken (> 1 Sek.) kann die Lautstärke des
MP3-Spielers verändert werden (
= leiser, = lauter).
FR
Appuyez brièvement pour passer au titre précédent / suivant. En appuyant plus longuement (> 1 s), vous pouvez modifier le volume du lecteur
MP3 (
= moins fort, = plus fort).
ES
Pulse brevemente el botón para seleccionar la pista siguiente o la pista anterior. Mantenga pulsado el botón (>1segundo) para cambiar el volu-
men del reproductor MP3 (
=bajar volumen, =subir volumen).
PL
Krótkie naciśnięcie przycisku powoduje wybór poprzedniej lub następnej ścieżki. Długie naciśnięcie (> 1 sekundy) umożliwia zmianę głośności
odtwarzacza MP3 (
= ciszej, = głośniej).
IT
Premendo brevemente si sceglie la traccia precedente o successiva. Premendo più a lungo (>1sec.) è possibile variare il volume del lettore
MP3 (
=più basso, =più alto).
26
USB IN
EN
Slot for USB memory stick up to 32 GB capacity. The choice of signal source for the MP3 player is made using the MODE button.
DE
Steckplatz für USB-Speichersticks bis 32 GB Kapazität. Die Wahl der Signal-Quelle des MP3-Spielers erfolgt mit Hilfe des MODE-Tasters.
FR
Port pour clé USB, d'une capacité maximale de 32 Go. Le choix de la source de signal du lecteur MP3 s'effectue via la touche MODE.
ES
Conector para memorias USB de hasta 32 GB. Para seleccionar el reproductor MP3 como fuente de señal, utilice el botón MODE.
PL
Złącze do pendrive’a o pojemności do 32 GB. Wyboru źródła sygnału odtwarzacza MP3 dokonuje się przy użyciu przycisku MODE.
IT
Slot per il memory stick USB con capacità fino a 32GB. Per selezionare la sorgente segnale del lettore MP3 si utilizza il tasto MODE.

17
27
IR
EN
Infrared interface. In order to control the MP3 player via the supplied remote control, be sure to position the infrared interface of the remote
control in direct visual contact with the infrared interface of the Roadbuddy speaker. A further infrared interface can be found at the back of the
speaker chassis.
DE
Infrarot-Schnittstelle. Um den MP3-Spieler über die mitgelieferte Fernbedienung steuern zu können, achten Sie darauf, die Infrarot-Schnittstelle
der Fernbedienung in direktem Sichtkontakt zu der Infrarot-Schnittstelle des Road Buddy Lautsprechers zu positionieren. Eine weitere Infrarot-
Schnittstelle befindet sich auf der Vorderseite des Lautsprechers.
FR
Port de réception infrarouge. Pour télécommander le lecteur MP3 de façon fiable, veillez à viser le port infrarouge de l'enceinte Roadbuddy
avec la télécommande livrée (contact visuel direct). Un autre port de réception infrarouge se trouve en face avant de l'enceinte.
ES
Receptor de infrarrojos. Para poder controlar el reproductor de MP3 mediante el mando a distancia suministrado, asegúrese de que haya una
línea visual directa entre el puerto de infrarrojos del mando a distancia y el receptor del altavoz Roadbuddy. En el frontal del altavoz se encuentra
otro sensor de infrarrojos.
PL
Interfejs podczerwieni. Aby możliwa była obsługa odtwarzacza MP3 za pomocą dołączonego pilota, należy pamiętać, aby interfejs podczerwieni
pilota umieścić w bezpośrednim „kontakcie wzrokowym” z interfejsem podczerwieni głośnika Roadbuddy. Dodatkowy interfejs podczerwieni
znajduje się na przednim panelu głośnika.
IT
Interfaccia a infrarossi. Per comandare il lettore MP3 tramite il telecomando in dotazione, ricordare che l'interfaccia a infrarossi del
telecomando deve essere orientata direttamente verso l'interfaccia a infrarossi dell'altoparlante Road Buddy. Un'altra interfaccia a infrarossi si trova
sul pannello anteriore dell'altoparlante.
28
DISPLAY
EN
Multifunctional LC display with backlight.
DE
Multifunktionales LC-Display mit Beleuchtung.
FR
Écran LCD rétro-éclairé multifonctions
ES
Pantalla LCD multifuncional retroiluminada.
PL
Wielofunkcyjny wyświetlacz LCD z podświetleniem.
IT
Display LCD multifunzione con illuminazione.
RADIO RECEIVER / FUNKEMPFÄNGER / PARTIE RÉCEPTEUR HF / RECEPTOR RF / ODBIORNIK
RADIOWY / RICEVITORE RADIO
29
31
30
29
AF-LEVEL
EN
The 5-segment AF-LEVEL LED chain displays the volume level of the incoming audio signal.
DE
Die 5-Segment AF-LEVEL LED-Kette zeigt den Pegel des anliegendes Audio-Signals an.
FR
Cet indicateur à 5 LED indique la charge de l'accumulateur intégré.
ES
La escala de 5LEDs de AF-LEVEL indica el nivel de la señal de audio.
PL
5-segmentowy ciąg diod AF-LEVEL sygnalizujący poziom sygnału audio.
IT
La colonna di LED AF-LEVEL a 5segmenti indica il livello del segnale audio presente.
30
RF-LED
EN
As soon as a wireless connection between transmitter and receiver is established, the red RF LED lights up.
DE
Sobald eine Funkverbindung zwischen Sender und Empfänger besteht, leuchtet die rote RF-LED.
FR
Dès qu'une liaison HF est établie entre l'émetteur et le récepteur, la LED rouge RF s'allume.
ES
El LED rojo RF se enciende cuando se establece una conexión de radio entre emisor y receptor.
PL
Gdy istnieje połączenie radiowe między nadajnikiem a odbiornikiem, świeci się czerwona dioda LED RF.
IT
Non appena si stabilisce il collegamento radio fra trasmettitore e ricevitore, il LED RF rosso si accende.
31
POWER-VOL
EN
Turn the controller to the right beyond the resting point, to turn the receiver on, and to the left beyond the resting point, to turn it off (OFF).
Turning it to the right increases the volume and turning it to the left reduces it.

18
DE
Drehen Sie den Regler nach rechts über den Rastpunkt, um den Empfänger einzuschalten, nach links über den Rastpunkt, um ihn auszuschal-
ten (OFF). Drehung nach rechts hebt die Lautstärke an, Drehung nach links reduziert sie.
FR
Tournez le potentiomètre à droite, au-delà du cran pour allumer le récepteur, à fond à gauche pour l'éteindre (jusqu'au cran). Tourner vers la
droite augmente le volume, tourner vers la gauche le réduit.
ES
Para encender el receptor, gire el control en sentido horario hasta sentir un clic; para apagarlo, gírelo en sentido antihorario hasta sentir un clic
(OFF). Gírelo a la derecha para aumentar el volumen, o a la izquierda para bajarlo.
PL
Aby włączyć odbiornik, obrócić pokrętło w prawo do momentu kliknięcia. Aby wyłączyć urządzenie (OFF), obrócić pokrętło w lewo do momentu
kliknięcia. Obrót w prawo zwiększa, a obrót w lewo zmniejsza głośność.
IT
Per accendere il trasmettitore, girare il regolatore verso destra fino a sentire un clic; per spegnerlo girarlo invece verso sinistra fino a sentire un
clic (OFF). Girando a destra si alza il volume, a sinistra si abbassa.
HANDHELD TRANSMITTER (LDRBUD6) / HANDSENDER (LDRBUD6) / ÉMETTEUR À MAIN
(LDRBUD6) / MICRÓFONO TRANSMISOR DE MANO (LDRBUD6) / NADAJNIK RĘCZNY (LDRBUD6) /
TRASMETTITORE A MANO (LDRBUD6)
32
33
34
36
37
35
32
MICROPHONE HEAD / MIKROFONKOPF / TÊTE MICROPHONE / CABEZA DEL MICRÓFONO / MIKROFON NAGŁOWNY / TESTA DEL
MICROFONO
EN
Microphone head with a dynamic microphone capsule
DE
Mikrofonkopf mit dynamischer Mikrofonkapsel.
FR
Tête microphone, équipée d'une capsule dynamique.
ES
Cabeza del micrófono con cápsula dinámica.
PL
Mikrofon nagłowny z dynamiczną kapsułą mikrofonową.
IT
Testa del microfono con capsula dinamica.
33
GAIN
EN
Setting the microphone volume. Turning the knob to the right increases the volume and turning it to the left decreases it. Adjust the volume so
that when a signal is present (voice, vocals, guitar...), the green 0 dBu signal LED on the receiver lights up. As soon as the red 3 dBu signal LED lights
up, reduce the level accordingly, otherwise undesirable distortion may occur.
DE
Einstellung der Mikrofonlautstärke. Nach links gedreht verringert sich, nach rechts gedreht erhöht sich der Signal-Pegel. Stellen Sie den Pegel
so ein, dass bei anliegendem Signal (Sprache, Gesang...) maximal die grüne 0 dBu Signal-LED des Empfängers leuchtet. Sobald die rote 3 dBu
Signal-LED leuchtet, reduzieren Sie den Pegel entsprechend, da andernfalls unerwünschte Verzerrungen auftreten können.
FR
Réglage du volume du micro Tournez le potentiomètre vers la droite pour augmenter le volume sonore, vers la gauche pour le baisser. Réglez le
niveau de façon à ce que, sur des signaux "normaux" (voix, chant...), la LED verte "0 dB" du récepteur clignote à peine. Dès que la LED rouge (+3
dBu) s'allume, réduisez le volume du microphone, afin d'éviter toute distorsion indésirable.
ES
Ajuste del nivel de micrófono. Gire a la izquierda para disminuir el nivel, o a la derecha para aumentarlo. Ajuste el nivel de modo que cuando la
recepción sea buena (voz, canto…), se ilumine el LED de señal «0 dBu» del receptor. Si se enciende el LED rojo «3 dBu», disminuya el nivel y así
evitará distorsiones.
PL
Regulacja głośności mikrofonu. Przekręcenie regulatora w lewo powoduje zmniejszenie, a w prawo – zwiększenie poziomu sygnału. Wartość
należy ustawić na takim poziomie, aby przy podawanym sygnale (mowa, śpiew itp.) w maksymalnym zakresie świeciła się zielona dioda
sygnalizacyjna 0 dBu na odbiorniku. Gdy zaświeci się czerwona dioda sygnalizacyjna LED 3 dBu, należy odpowiednio zredukować poziom, gdyż w
przeciwnym razie mogą wystąpić niepożądane zniekształcenia.
IT
Impostazione del volume del microfono. Ruotando il pomolo verso sinistra si abbassa il livello di segnale, verso destra si alza. Impostare il livello
in modo che in presenza di segnale (voce, canto...) il LED verde di segnale 0dBu del ricevitore si accenda. Non appena il LED di segnale 3dBu rosso
si accende, ridurre il livello adeguatamente per evitare che insorgano distorsioni indesiderate.

19
34
RF POWER H/L
EN
For a majority of applications, set the switch to H (= high power). To increase battery life, switch to L (= low power) for applications with a short
distance between transmitter and receiver. Before the event, please check which of the two settings is better suited.
DE
Für einen Großteil aller Anwendungen stellen Sie den Schalter auf H (= hohe Sendeleistung). Um die Batterielaufzeit zu erhöhen, kann bei
Anwendungen, bei denen eine geringe Distanz zwischen Sender und Empfänger besteht, der Schalter auf L (= niedrige Sendeleistung) gestellt
werden. Bitte vor Veranstaltung prüfen, welche der beiden Einstellungen die geeignete ist.
FR
Pour la plupart des applications, réglez le sélecteur en position H (haute puissance d'émission HF). Pour augmenter l'autonomie des piles, vous
pouvez, si la distance séparant l'émetteur du récepteur est modérée, placer le sélecteur en position L (puissance d'émission HF réduite). Dans ce
cas, vérifiez bien, avant la prestation, que cette portée réduite est quand même suffisante.
ES
Para la mayoría de los casos, coloque el conmutador en la posición «H» (alta potencia). Para aumentar la autonomía de las pilas, cuando exista
una pequeña distancia entre el transmisor y el receptor, puede cambiar el conmutador a «L» (baja potencia). Compruebe que la posición es correcta
antes de utilizar el micrófono en una actuación real.
PL
Dla większości zastosowań przełącznik powinien być ustawiony w pozycji H (= wysoka moc nadawcza). Aby wydłużyć czas działania baterii,
można w przypadku zastosowań, podczas których między nadajnikiem a odbiornikiem jest niewielka odległość, ustawić przełącznik w pozycji L (=
niska moc nadawcza). Przed planowaną imprezą należy sprawdzić, które z obu ustawień jest odpowiednie.
IT
Per la maggior parte delle applicazioni, impostare l'interruttore su H (= potenza di trasmissione elevata). Per aumentare la durata utile delle
pile, nelle applicazioni che implicano una distanza ridotta tra trasmettitore e ricevitore, è possibile impostare l'interruttore su L (= potenza di
trasmissione ridotta). Prima dell'evento controllare quale delle due impostazioni è più adatta.
35
BATTERY COMPARTMENT / BATTERIEFACH / COMPARTIMENT PILES / COMPARTIMENTO DE PILAS / KOMORA BATERII / SCOMPARTO
BATTERIE
EN
Insert two 1.5 V AA size alkaline batteries (LR6 Mignon) as in the illustration inside the battery compartment. If the transmitter is not in use for a
long period of time, remove the batteries from the battery compartment to avoid damage caused by defective batteries.
DE
Legen Sie zwei 1,5 V Alkaline Batterien der Größe AA (LR6, Mignon) gemäß der Abbildung im Batteriefachboden ein. Ist die Sendeanlage für
längere Zeit nicht in Gebrauch, entnehmen Sie bitte die Batterien aus dem Batteriefach, um Schäden durch schadhafte Batterien zu vermeiden.
FR
Placez deux piles 1,5 V de type AA (LR06, Mignon) comme gravé dans le compartiment à piles. Si l'émetteur ne doit pas servir pendant quelque
temps, nous vous recommandons d'enlever les piles, afin d'éviter tout dommage en cas de fuite de piles par exemple.
ES
Inserte dos pilas de 1,5V alcalinas de tipo AA (LR6) en el interior del compartimiento de pilas, según indica la figura. Si no va a usar el
transmisor durante mucho tiempo, retire las pilas de su compartimento para evitar averías causadas por pilas descargadas.
PL
W komorze na baterie umieścić dwie baterie alkaliczne 1,5 V typu AA (LR6, Mignon) zgodnie z rysunkiem. Jeśli system nadawczo-odbiorczy nie
jest używany przez dłuższy czas, należy wyjąć baterie z komory, aby zapobiec uszkodzeniom spowodowanym przez wyciekające baterie.
IT
Inserire due pile alcaline da 1,5V di grandezza AA (LR6, mignon) nell'apposito scomparto, come indicato in figura. Se l'impianto trasmittente
resta inutilizzato a lungo, estrarre le pile dallo scomparto per evitare eventuali danni.
36
BATT-LED
EN
As soon as the red LED lights up to indicate battery status, replace the batteries immediately.
DE
Sobald die rote LED für die Batteriestatus-Anzeige leuchtet, ersetzen Sie bitte umgehend die Batterien.
FR
Dès que cette LED d'état des piles s'allume en rouge, il faut remplacer les piles.
ES
Si se ilumina el LED rojo de nivel de las pilas, cambie inmediatamente las pilas.
PL
Gdy zaświeci się czerwona dioda LED sygnalizująca poziom naładowania baterii, należy natychmiast wymienić baterie.
IT
Quando si accende il LED rosso indicante lo stato delle pile, sostituire le pile immediatamente.
37
ON / OFF SWITCH
EN
When the transmitter is turned on, the red LED flashes briefly to indicate the battery status and goes out immediately if batteries with sufficient
charge are inserted.
DE
Beim Einschalten des Senders blinkt die rote LED für die Batteriestatus-Anzeige kurz auf und erlischt sofort wieder, wenn Batterien mit
ausreichendem Ladestatus eingelegt sind.
FR
Lors de l'allumage de l'émetteur, la LED rouge d'état de piles clignote brièvement pour indiquer l'état des piles ; elle s'allume dès que le niveau
des piles devient insuffisant.
ES
Con el transmisor encendido, si el LED rojo de estado de las pilas parpadea, indicará que las pilas instaladas tienen un buen nivel de carga.
PL
Po włączeniu nadajnika przez krótką chwilę pulsuje czerwona dioda LED sygnalizująca status baterii, a następnie gaśnie, jeśli włożono
odpowiednio naładowane baterie.
IT
All'accensione del trasmettitore il LED rosso lampeggia brevemente per indicare lo stato delle pile e si spegne subito se le pile sono
sufficientemente cariche.
BATTERY REPLACEMENT / BATTERIEWECHSEL / REMPLACEMENT DES PILES / SUSTITUCIÓN DE LAS PILAS / WYMIANA BATERII /
SOSTITUZIONE DELLE PILE
EN
As soon as the red LED lights up for battery status display, please replace the batteries by unscrewing the battery cover counter-clockwise
from the transmitter and after changing the batteries screw it back on in the opposite direction.

20
DE
Sobald die rote LED für die Batteriestatus-Anzeige leuchtet, ersetzen Sie bitte die Batterien, indem Sie die Batteriefachabdeckung gegen den
Uhrzeigersinn vom Sender und nach dem Wechsel der Batterien wieder in entgegengesetzter Richtung auf den Sender schrauben.
FR
Dès que la LED rouge d'état des piles s'allume, il faut remplacer les piles. Pour ce faire, dévissez le couvercle du compartiment à piles (en le
tournant dans le sens inverse des aiguilles d'une montre) ; après avoir remplacé les piles, remettez-le en place en le vissant dans le sens des
aiguilles d'une montre.
ES
Si se ilumina el LED rojo de estado de pilas, deberá cambiar las pilas. Para ello, desenrosque la carcasa del compartimento de pilas del
transmisor, sustituya las pilas y luego enrósquela en sentido horario.
PL
Gdy świeci się czerwona dioda LED sygnalizująca poziom naładowania baterii, należy wymienić baterie. W tym celu należy odkręcić pokrywę
komory na baterie w kierunku przeciwnym do ruchu wskazówek zegara, a po wymianie baterii przykręcić pokrywę w odwrotnym kierunku.
IT
Non appena il LED rosso indicante lo stato delle pile si accende, sostituire le pile del trasmettitore svitando il coperchio dell'apposito scomparto
in senso antiorario; dopo la sostituzione, avvitare nel senso opposto.
BELT PACK TRANSMITTER INCL. HEADSET (LDRBUD6HS) / TASCHENSENDER INKL. HEADSET
(LDRBUD6HS) / ÉMETTEUR DE POCHE AVEC SERRE-TÊTE (LDRBUB6HS) / PETACA TRANSMISORA
CON MICRÓFONO DE DIADEMA (LDRBUD6HS) / NADAJNIK KIESZONKOWY Z ZESTAWEM
NAGŁOWNYM (LDRBUB6HS) / TRASMETTITORE TASCABILE CON MICROFONO AD ARCHETTO
(LDRBUD6HS)
43
44
38
42
41
45
40 39
38
TRANSMITTER ANTENNA / SENDERANTENNE / ANTENNE ÉMETTEUR / ANTENA TRANSMISORA / ANTENA NADAJNIKA / ANTENNA
TRASMETTITORE
EN
To ensure optimal radio transmission, do not touch, bend or cover the antenna.
DE
Um eine optimale Funkübertragung zu gewährleisten, berühren, knicken und verdecken Sie die Antenne nicht.
FR
Pour obtenir une liaison HF optimale, ne touchez pas l'antenne, ne la pliez pas, ne la masquez pas.
ES
Para que la transmisión sea óptima, no toque, doble ni tape la antena.
PL
Aby zapewnić optymalną transmisję radiową, anteny nie wolno dotykać, zginać ani zasłaniać.
IT
Per assicurare una trasmissione radio ottimale, non toccare, piegare o coprire l'antenna.
39
INPUT
EN
3-pin mini XLR input for headset, lavalier and instrument microphones, as well as guitar cable.
DE
3-poliger Mini-XLR Eingang für Headset-, Lavalier- und Instrumentenmikrofone sowie Gitarrenkabel.
FR
Entrée sur mini-XLR 3 points pour serre-tête; micro cravate ou micro instrument, compatible câble guitare.
ES
Entrada mini-XLR de 3pines para un micrófono de diadema, Lavalier, de instrumento o un cable de guitarra.
PL
3-stykowe wejście mini XLR dla mikrofonów z zestawem nagłownym, mikrofonów lavalier i mikrofonów do instrumentów, jak również dla kabli
do gitary.
IT
Mini ingresso XLR a tre poli per i microfoni ad archetto, Lavalier e degli strumenti. oltre che per il cavo chitarra.
40
MIC / 0DB / -10DB
EN
Adjust the input sensitivity. Adjust the sensitivity so that when a signal is present (voice, vocals, guitar...), the green 0 dBu signal LED on the
receiver lights up. As soon as the red 3 dBu signal LED lights up, reduce the sensitivity by turning the 3 stage MIC / 0 dB / -10 dB switch to the next
lowest value, otherwise unwanted distortion may occur.
DE
Einstellung der Eingangsempfindlichkeit. Stellen Sie die Empfindlichkeit so ein, dass bei anliegendem Signal (Sprache, Gesang, Gitarre...)
maximal die grüne 0 dBu Signal-LED des Empfängers leuchtet. Sobald die rote 3 dBu Signal-LED leuchtet, reduzieren Sie die Empfindlichkeit indem
Sie den 3-stufigen Schalter MIC / 0dB / -10dB auf den nächstniedrigeren Wert stellen, da andernfalls unerwünschte Verzerrungen auftreten können.
La pagina si sta caricando...

22
ES
Si se ilumina el LED rojo de estado de pilas, deberá cambiar las pilas. Para ello, presione la tapa del compartimento de pilas en la marca
«OPEN» y deslícela hacia un lado. Inserte dos pilas alcalinas de 1,5V de tipo AA (LR6) en la parte posterior del transmisor (según la figura), cierre la
tapa del compartimento de pilas presionando la marca «CLOSE» de la tapa y deslícela a su posición. Si no va a usar el transmisor durante mucho
tiempo, retire las pilas de su compartimento.
PL
Gdy świeci się czerwona dioda LED sygnalizująca poziom naładowania baterii, należy wymienić baterie. W tym celu nacisnąć pokrywę komory
na baterie w zaznaczonym miejscu (OPEN) i przesunąć ją w bok. Włożyć dwie baterie alkaliczne 1,5 V typu AA (LR6, Mignon) zgodnie z rysunkiem
znajdującym się z tyłu nadajnika i zamknąć komorę na baterie, naciskając zaznaczone miejsce (CLOSE) pokrywy i przesuwając ją w bok. Jeśli
system nadawczo-odbiorczy nie jest używany przez dłuższy czas, należy wyjąć baterie z komory.
IT
Non appena il LED rosso indicante lo stato delle pile si accende, sostituire le pile premendo il coperchio del relativo scomparto sul punto
segnato (OPEN) e spingendolo di lato. Inserire due pile alcaline da 1,5V di grandezza AA (LR6, mignon) come illustrato nella figura sul retro del
trasmettitore, chiudere lo scomparto premendo il punto segnato (CLOSE) del coperchio e spingerlo quindi di lato. Se il trasmettitore resta inutilizzato
a lungo, estrarre le pile dal relativo scomparto.
45
CHARGE
EN
Low voltage socket for 3.5 mm barrel connector for charging size AA batteries ( + inside, - outside).
- Use only a charger suitable for the batteries used and be aware of the maximum permissible charging time.
- Please note that batteries inserted in the battery compartment are switched in series!
- Never try to charge non-rechargeable batteries
Failure to comply with above instructions may result in a fire or explosion hazard!
DE
Kleinspannungsbuchse für 3,5 mm Hohlstecker zum Aufladen von Akkus der Größe AA (+ innen, - außen).
- Verwenden Sie ausschließlich ein für die von Ihnen verwendeten Akkus geeignetes Ladegerät und achten auf deren maximal zulässigen Ladezeit!
- Beachten Sie, dass im Batteriefach eingelegte Akkus in Reihe geschaltet sind!
- Versuchen Sie niemals nichtaufladbare Batterien aufzuladen!
Bei Nichteinhaltung obenstehender Hinweise besteht Brand- und Explosionsgefahr!
FR
Embase pour connecteur coaxial 3,5 mm, pour charge des accumulateurs de type AA (+ au centre, - à l'extérieur).
- Utilisez exclusivement un chargeur conçu pour les accumulateurs, et veillez à ne pas dépasser la durée maximale de charge !
- Vérifiez que les accumulateurs sont correctement insérés dans le compartiment à piles.
- N'essayez jamais de recharger des piles non rechargeables !
Si vous ne respectez pas ces instructions il existe des risques réels d'incendie et d'explosion.
ES
Toma de continua para conector de 3,5mm que sirve para cargar pilas de tipo AA (+ interno, - externo).
- Utilice sólo el cargador adecuado para las pilas utilizadas y ¡tenga en cuenta el tiempo máximo de carga!
- ¡Tenga en cuenta que las pilas instaladas en el compartimento están conectadas en serie!
- ¡No recargue pilas que no sean recargables!
¡Hay peligro de incendio y explosión!
PL
Gniazdo niskiego napięcia na wtyk 3,5 mm do ładowania akumulatorów typu AA (+ wewnątrz, - na zewnątrz).
– Stosować wyłącznie ładowarkę pasującą do akumulatorów stosowanych przez użytkownika i przestrzegać maksymalnego dozwolonego czasu
ładowania!
– Należy pamiętać, że akumulatory umieszczone w komorze są połączone szeregowo!
– Nigdy nie ładować baterii jednorazowego użytku!
W razie nieprzestrzegania powyższych wskazówek istnieje ryzyko pożaru i wybuchu!
IT
Presa di bassa tensione per connettore coassiale da 3,5mm per la ricarica di pile di grandezza AA (+ interno, - esterno).
- Utilizzare esclusivamente un caricatore adatto alle pile utilizzate e non superare il tempo massimo di ricarica consentito!
- Accertarsi che le pile inserite nell'apposito scomparto siano attivate in sequenza!
- Non cercare mai di caricare pile non ricaricabili!
La mancata osservanza delle indicazioni sopra riportate può provocare pericolo di incendio ed esplosione!
La pagina si sta caricando...

24
A = All. Wszystkie ścieżki znajdujące się na nośniku pamięci są powtarzane. Jeśli karta pamięci SD i pamięć USB znajdują się w swoich gniazdach,
po odtworzeniu wszystkich ścieżek z danego nośnika pamięci automatycznie następuje przełączenie na inny nośnik pamięci.
1 = Repeat One. Wybrana ścieżka jest przez cały czas powtarzana.
F = Repeat Folder. Wszystkie ścieżki z danego folderu na nośniku pamięci są powtarzane.
IT
N = Normale. Tutte le tracce presenti sul supporto di memoria vengono riprodotte in sequenza. Quando termina l'esecuzione dell'ultima
traccia, la riproduzione si arresta.
R = Random (casuale). Tutte le tracce presenti sul supporto di memoria vengono riprodotte in successione casuale.
I = Intro (scorrere). Vengono eseguiti uno dopo l'altro i primi 10secondi di ogni traccia presente sul supporto di memoria.
A = All (tutti). Tutte le tracce presenti sul supporto di memoria vengono ripetute. Se nei relativi slot sono inseriti una scheda di memoria SD e un
memory stick USB, dopo l'esecuzione di tutte le tracce di un supporto di memoria si accede automaticamente all'altro supporto.
1 = Ripetere 1. La traccia selezionata viene ripetuta continuamente.
F = Folder (Ripetere cartella). Tutte le tracce di una cartella del supporto di memoria vengono ripetute.
48
TRACK NUMBER / TITELNUMMER / NUMÉRO DU MORCEAU / NÚMERO DE PISTA / NUMER ŚCIEŻKI / NUMERO TRACCIA
EN
Track number of the currently playing track.
DE
Titelnummer des aktuell wiedergegebenen Titels.
FR
Numéro du morceau en cours de lecture.
ES
Número de la pista que se está reproduciendo.
PL
Numer aktualnie odtwarzanej ścieżki.
IT
Numero della traccia in riproduzione.
49
NUMBER OF TRACKS / TITELANZAHL / NOMBRE TOTAL DE MORCEAUX / TOTAL DE PISTAS / NUMER ŚCIEŻKI
EN
Number of tracks on the selected storage medium.
DE
Anzahl der auf dem ausgewählten Speichermedium befindlichen Titel.
FR
Nombre total de morceaux stockés sur le support mémoire.
ES
Número total de pistas que contiene el medio de almacenamiento.
PL
Numer aktualnie odtwarzanej ścieżki.
IT
50
EQUALIZER / EQUALIZER / ÉGALISEUR / ECUALIZADOR / KOREKTOR / EQUALIZZATORE
EN
Displays the currently selected equalizer presets.
DE
Anzeige des aktuell ausgewählten Equalizer-Presets.
FR
Affichage du preset d'égaliseur en cours.
ES
Muestra el preajuste del ecualizador actualmente seleccionado.
PL
Wskazanie aktualnie wybranych ustawień korektora.
IT
Visualizzazione del preset dell'equalizzatore selezionato.
51
FILE FORMAT / DATEIFORMAT / FORMAT DES DONNÉES / FORMATO DE ARCHIVO / FORMAT PLIKU / FORMATO FILE
EN
Displays the file format of the currently playing track.
DE
Zeigt das Dateiformat des aktuell wiedergegebenen Titels an.
FR
Indique le format de données du morceau en cours de lecture.
ES
Muestra el formato de archivo de la pista que se está reproduciendo.
PL
Wskazanie formatu pliku aktualnie odtwarzanej ścieżki.
IT
Indica il formato file della traccia in riproduzione.
52
STORAGE MEDIUM / SPEICHERMEDIUM / SUPPORT MÉMOIRE / MEDIO DE ALMACENAMIENTO / NOŚNIK PAMIĘCI / SUPPORTO DI
MEMORIA
EN
Displays the currently selected storage medium (SD memory card or USB memory stick).
DE
Anzeige des aktuell ausgewählten Speichermediums (SD-Speicherkarte bzw. USB-Speicherstick).
FR
Visualisation du support mémoire en cours de sélection (carte SD ou clé USB).
ES
Muestra el medio de almacenamiento actualmente seleccionado (tarjeta SD o llave USB).
PL
Wskazanie aktualnie wybranego nośnika pamięci (karta pamięci SD lub pendrive).
IT
Visualizza il supporto di memoria attualmente selezionato (scheda di memoria SD o memory stick USB).
53
PLAY TIME / ABSPIELZEIT / DURÉE ÉCOULÉE / TIEMPO TRANSCURRIDO / CZAS ODTWARZANIA / TEMPO DI ESECUZIONE
EN
Display of time elapsed for the currently playing track in minutes and seconds.
DE
Anzeige der bereits abgespielten Zeit des aktuell wiedergegebenen Titels in Minuten und Sekunden.
La pagina si sta caricando...
La pagina si sta caricando...
La pagina si sta caricando...

28
utilisateur, les autres appareils Bluetooth disponibles. Choisissez l'entrée "LD SYSTEMS", puis couplez votre appareil Bluetooth avec le module
lecteur MP3. La mention "Connecting" apparaît alors à l'écran du lecteur MP3, puis apparaît le nom de votre appareil Bluetooth (par exemple,
smartphone). Les deux appareils sont alors couplés, et la liaison établie entre eux. Vous pouvez alors lancer la lecture du titre.
ES
El reproductor MP3 está equipado con Bluetooth, por lo tanto, los archivos de audio de otros dispositivos Bluetooth (por ejemplo, smartphones)
se pueden reproducir en el altavoz Roadbuddy (a una distancia máxima de 10metros entre los dispositivos). Para emparejar el reproductor MP3 con
otro dispositivo Bluetooth, pulse repetidamente el botón MODE hasta que en la pantalla aparezca «Bluetooth» y «BT NOT LINK». Active Bluetooth en el
dispositivo Bluetooth y busque los dispositivos disponibles. Seleccione la opción «LD SYSTEMS» para emparejar el dispositivo Bluetooth con el
reproductor MP3. En la pantalla del reproductor MP3 se mostrará «Connecting» y luego aparecerá el dispositivo Bluetooth (por ejemplo, «Smartpho-
ne») emparejado y conectado. Ahora puede reproducirse la canción.
PL
Odtwarzacz MP3 jest wyposażony w łącze Bluetooth, dzięki czemu głośnik Roadbuddy może odtwarzać pliki audio z innego urządzenia
Bluetooth (np. smartfona). Maksymalna odległość między oboma urządzeniami wynosi ok. 10 metrów. Aby połączyć odtwarzacz MP3 z urządzeniem
Bluetooth, należy naciskać przycisk MODE do momentu, gdy na wyświetlaczu będzie widoczna funkcja „Bluetooth” i „BT NOT LINK”. Aktywować
Bluetooth na urządzeniu Bluetooth i wyszukać dostępne urządzenia. Wybrać opcję „LD SYSTEMS” i połączyć w ten sposób swoje urządzenie
Bluetooth z odtwarzaczem MP3. Na wyświetlaczu odtwarzacza MP3 pojawi się napis „Connecting”, a następnie zostanie wyświetlone urządzenie
Bluetooth (np. smartfon). Oznacza to aktywne połączenie. Można rozpocząć odtwarzanie ścieżek.
IT
Grazie alla funzione Bluetooth del lettore MP3, sull'altoparlante Roadbuddy è possibile riprodurre i file audio di un altro dispositivo Bluetooth (ad
esempio smartphone), a condizione che la distanza massima tra i due dispositivi non superi i 10metri circa. Per accoppiare e collegare il lettore MP3
a un dispositivo Bluetooth, premere brevemente il tasto MODE fino a quando sul display appare "Bluetooth" e "BT NOT LINK". Attivare la funzione
Bluetooth sul proprio dispositivo Bluetooth e cercare i dispositivi disponibili sull'interfaccia utente. Selezionare l'inserimento "LD SYSTEMS" e
utilizzarlo per accoppiare il dispositivo Bluetooth al lettore MP3. Sul display del lettore MP3 appare "Connecting" e viene quindi visualizzato il
dispositivo Bluetooth (ad esempio smartphone), che risulta perciò accoppiato e collegato. Ora è possibile avviare la riproduzione delle tracce.
Music
Eq
Play Mode
Change Device
Music
Eq
Play Mode
Change Device
Music
Eq
Play Mode
Change Device
Music
Play Mode
Change Device
Exit
00 : 00 : 00
NOR
BT NOT LINK
00 : 00 : 00
NOR
Smartphone
BT NOT LINK
Bluetooth
Bluetooth
Smartphone
Music
Eq
Play Mode
Change Device
Music
Eq
Play Mode
Change Device
Music
Eq
Play Mode
Change Device
Music
Play Mode
Change Device
Exit
00 : 00 : 00
NOR
BT NOT LINK
00 : 00 : 00
NOR
Smartphone
BT NOT LINK
Bluetooth
Bluetooth
Smartphone
OPERATION OF THE MP3 PLAYER IN THE BLUETOOTH MODE / BEDIENUNG MP3-PLAYER IN DER
BLUETOOTH BETRIEBSART / UTILISATION DU LECTEUR MP3 EN MODE BLUETOOTH / OPERACIÓN
DEL REPRODUCTOR MP3 EN MODO BLUETOOTH / OBSŁUGA ODTWARZACZA MP3 W TRYBIE
PRACY BLUETOOTH / FUNZIONAMENTO DEL LETTORE MP3 IN MODALsITÀ BLUETOOTH
F
BT DISCONNECT / FONCTION BT DISCONNECT
EN
To terminate the connection to a Bluetooth device, in order to connect the MP3 player to another Bluetooth device, for example, press the
MODE button for approx. 1 second, while the MP3 player is in Bluetooth mode, and use the
and buttons to select the "BT Disconnect"
(light background) menu item and confirm with the PLAY / PAUSE button. The display will show "BT NOT LINK" and you can now connect another
Bluetooth device to the MP3 player.
DE
Um die Verbindung mit einem Bluetooth-Gerät zu beenden, um beispielsweise ein anderes Bluetooth-Gerät mit dem MP3-Spieler zu verbinden,
drücken Sie, während sich der MP3-Spieler in der Bluetooth-Betriebsart befindet, die MODE-Taste für ca. 1 Sekunde und wählen mit Hilfe der Tasten
und den Menüpunkt „BT Disconnect“ (hell hinterlegt) und bestätigen mit der PLAY / PAUSE Taste. Im Display erscheint „BT NOT LINK“
und Sie können nun ein anderes Bluetooth-Gerät mit dem MP3-Spieler verbinden.
FR
Pour déconnecter l'appareil Bluetooth (par exemple, pour en coupler un autre), vérifiez que le lecteur MP3 se trouve bien en mode Bluetooth,
puis maintenez enfoncée la touche MODE pendant environ 1 seconde et sélectionnez, avec les touches
et , l'élément de menu "BT
Disconnect" (qui passe en surbrillance), et validez en appuyant sur la touche PLAY / PAUSE. Dans l'affichage apparaît alors la mention "BT NOT
LINK" ; vous pouvez alors coupler un autre appareil Bluetooth au lecteur MP3.
ES
Si desea desconectar un dispositivo Bluetooth para conectar otro al reproductor de MP3, ponga el reproductor MP3 en modo Bluetooth, pulse el
botón MODE durante 1segundo aproximadamente, y con los botones
y seleccione la opción «BT Disconnect» (quedará resaltada) y
confirme con el botón REPRODUCIR/PAUSA. En la pantalla se mostrará «BT NOT LINK» y ahora podrá conectar el otro dispositivo Bluetooth al
reproductor MP3.
PL
Aby zakończyć połączenie z urządzeniem Bluetooth, przykładowo w celu połączenia innego urządzenia Bluetooth z odtwarzaczem MP3,
nacisnąć przycisk MODE i przytrzymać go przez ok. 1 sekundę, gdy odtwarzacz MP3 pozostaje w trybie Bluetooth. Za pomocą przycisków
i
wybrać punkt menu „BT Disconnect” (zaznaczony jasnym kolorem) i potwierdzić wybór przyciskiem PLAY/PAUSE. Na ekranie wyświetli się
„BT NOT LINK”, co oznacza, że użytkownik może połączyć inne urządzenie Bluetooth z odtwarzaczem MP3.
La pagina si sta caricando...
La pagina si sta caricando...

31
Bluetooth
BT Disconnect
Eq
Delete paired in
Bluetooth
BT Disconnect
Eq
Delete paired in
Bluetooth
Recently reconne
Eq
Delete paired in
Bluetooth
BT Disconnect
Eq
Delete paired in
Bluetooth
Eq
Delete paired in
Device Informat
NOTE / HINWEIS / ATTENTION / NOTA / WSKAZÓWKA / NOTA
EN
The playback of the connected Bluetooth device can be interrupted by pressing the PLAY / PAUSE button of the MP3 player and started again.
DE
Die Wiedergabe des verbundenen Bluetooth-Geräts kann durch Drücken der PLAY / PAUSE-Taste des MP3-Spielers unterbrochen und wieder
gestartet werden.
FR
Pour arrêter/reprendre la lecture du flux provenant de l'appareil Bluetooth relié, appuyez sur la touche PLAY / PAUSE du lecteur MP3.
ES
La reproducción del dispositivo Bluetooth conectado se puede parar o reiniciar con el botón REPRODUCIR/PAUSA del reproductor MP3.
PL
Odtwarzanie dźwięku z podłączonego urządzenia Bluetooth można przerwać lub ponownie uruchomić naciskając przycisk PLAY/PAUSE na
odtwarzaczu MP3.
IT
Per interrompere e riprendere la riproduzione del dispositivo Bluetooth collegato premere il tasto PLAY/PAUSE del lettore MP3.
INFRARED REMOTE CONTROL (USB, SD CARD) / INFRAROT FERNBEDIENUNG (USB, SD-CARD) /
TÉLÉCOMMANDE INFRAROUGE (CLÉ USB, CARTE SD) / MANDO A DISTANCIA POR INFRARROJOS
(USB, TARJETA SD) / PILOT NA PODCZERWIEŃ (USB, KARTA SD) / TELECOMANDO A INFRAROSSI
(USB, SCHEDA SD)
59
61
62
58
57
60
63
EN
Point the infrared remote control directly at the USB slot or at the infrared sensor built in under the front grille. The maximum range is
approximately 8 metres on the back and about 3 metres on the front panel.
DE
Richten Sie die Infrarot-Fernbedienung in Sichtverbindung direkt auf den über dem USB-Steckplatz, oder den unter dem Frontgitter verbauten
Infrarot-Sensors. Die maximale Reichweite beträgt ca. 8 Meter auf der Rück- und ca. 3 Meter auf der Frontseite.
FR
Orientez la télécommande infrarouge vers les ports infrarouges de l'enceinte Roadbuddy (contact visuel direct) : l'un se trouve au-dessus du
port USB, l'autre sous la grille frontale. Portée maximale de la télécommande : environ 8 mètres pour le port arrière, environ 3 mètres pour le port
avant.
ES
Apunte el mando a distancia por infrarrojos directamente al sensor de infrarrojos situado encima del puerto USB o debajo de la rejilla frontal. El
alcance máximo es de unos 8metros en la parte posterior y de 3 metros en la parte frontal.
PL
Pilota na podczerwień skierować „w polu widzenia” bezpośrednio w stronę czujnika podczerwieni znajdującego się nad gniazdem USB lub pod
przednią kratką. Zasięg maksymalny wynosi ok. 8 metrów z tyłu i ok. 3 metrów z przodu.
IT
Dirigere il telecomando a infrarossi direttamente verso il sensore a infrarossi dello slot USB o verso il sensore a infrarossi che si trova sotto la
griglia frontale. La portata massima è di circa 8metri sul lato posteriore e di circa 3metri sul lato frontale.
57
PLAY / PAUSE
EN
Press the Play / Pause button to start playback of a track. Pressing again places the player in the pause mode, playback is stopped.
DE
Drücken Sie die PLAY / PAUSE-Taste um die Wiedergabe eines Titels zu starten. Erneutes Drücken stellt den MP3-Spieler in den Pause-Modus,
die Wiedergabe wird angehalten.
FR
Appuyez sur la touche PLAY / PAUSE pour lancer la lecture d'un morceau. Appuyer de nouveau sur la touche place le lecteur de MP3 en mode
Pause, la lecture est alors suspendue.
ES
Pulse el botón PLAY/PAUSE para iniciar la reproducción de una pista. Pulse de nuevo este botón para poner en modo Pausa el reproductor MP3;
la reproducción se detiene.
PL
Nacisnąć przycisk PLAY/PAUSE, aby rozpocząć odtwarzanie ścieżki. Po ponownym naciśnięciu przycisku odtwarzacz MP3 przejdzie w tryb
pauzy, a odtwarzanie zostanie wstrzymane.
IT
Premere il tasto PLAY/PAUSE per avviare la riproduzione di una traccia. Se si preme di nuovo, il lettore MP3 passa in modalità Pausa e la
riproduzione si sospende.
58
EQ

32
EN
Seven different equalizer settings are available and can be accessed by repeatedly pressing the button.
DE
Sieben verschiedene Equalizer-Einstellungen stehen zur Verfügung und können durch wiederholtes Drücken der Taste abgerufen werden.
FR
Septs presets d'égalisation différents sont à votre disposition ; pour les appeler, appuyez plusieurs fois de suite sur cette touche.
ES
Pulse repetidamente este botón para seleccionar uno de los siete preajustes de ecualización existentes.
PL
Za pomocą wielokrotnego naciskania przycisku można wybrać jedno z siedmiu ustawień korektora.
IT
Per l'equalizzatore sono disponibili sette diverse impostazioni che è possibile richiamare premendo ripetutamente il tasto.
59
VOL- / VOL+
EN
Volume of the MP3 player (0 to 15). Pressing VOL- lowers the volume, pressing VOL+ increases it.
DE
Lautstärkeneinstellung des MP3-Spielers (0 bis 15). Drücken auf VOL- verringert, Drücken auf VOL+ erhöht die Lautstärke.
FR
Réglage de volume du lecteur MP3 (de 0 à 15). Appuyez sur VOL- pour réduire le volume, sur VOL+ pour l'augmenter.
ES
Controles de volumen del reproductor MP3 (de 0 a 15). Pulse VOL- para disminuir el volumen y pulse VOL+ para aumentarlo.
PL
Regulacja głośności odtwarzacza MP3 (od 0 do 15). Naciśnięcie VOL- zmniejsza, a naciśnięcie VOL+ zwiększa głośność.
IT
Impostazioni del volume del lettore MP3 (da 0 a 15). Il volume si abbassa premendo VOL− e si alza premendo VOL+.
60
PREV / NEXT
EN
To select the previous track, press briefly on the PREV button; to select the next track, press briefly on the NEXT button. By pressing and holding
the buttons, fast rewind and fast forward are activated.
DE
Um den vorherigen Titel anzuwählen, drücken Sie kurz die PREV-Taste, um den nächsten Titel anzuwählen die NEXT-Taste. Halten Sie die
Tasten gedrückt, werden schneller Rück- und schneller Vorlauf aktiviert.
FR
Pour revenir au morceau précédent, appuyez brièvement sur la touche PREV ; pour passer au morceau suivant, appuyez brièvement sur la
touche NEXT. Si vous maintenez PREV ou NEXT enfoncée, vous activez la lecture rapide arrière/avant.
ES
Pulse brevemente el botón PREV para seleccionar la pista anterior; pulse brevemente el botón NEXT para seleccionar la pista siguiente.
Mantenga pulsados estos botones para activar el retroceso rápido y el avance rápido.
PL
Aby wybrać poprzednią ścieżkę, krótko nacisnąć przycisk PREV, aby wybrać następną ścieżkę – przycisk NEXT. Przytrzymanie wciśniętego
przycisku aktywuje szybkie przewijanie w przód lub w tył.
IT
Per selezionare la traccia precedente, premere brevemente il tasto PREV, per selezionare il tasto successivo premere NEXT. Se si tiene il tasto
premuto, si attivano le funzioni per andare avanti o tornare indietro rapidamente.
61
DIRECT TRACK SELECTION / TITELDIREKTWAHL / SÉLECTION DIRECTE DU MORCEAU / SELECCIÓN DE PISTA / BEZPOŚREDNI WYBÓR
ŚCIEŻKI / SELEZIONE DIRETTA DELLE TRACCE
EN
To select a track directly, use the numeric buttons 0 to 9. For example: If you want to select track number 29, press briefly the button with the
number 2, and then the button with the number 9 (the display shows "0029" for a short time).
DE
Um einen Titel direkt anwählen zu können, verwenden Sie die Zifferntasten 0 bis 9. Beispiel: Wollen Sie Titelnummer 29 anwählen, drücken Sie
einmal kurz die Taste mit der Ziffer 2 und dann die Taste mit der Ziffer 9 (im Display wird „0029“ für kurze Zeit angezeigt).
FR
Pour sélectionner directement un morceau, utilisez les touches numériques 1 à 9. Exemple : Si vous voulez lire directement le morceau numéro
29, appuyez brièvement sur la touche "2" puis, rapidement derrière, sur la touche "9" (à l'écran, la mention "0029" apparaît brièvement).
ES
Para seleccionar una pista directamente, utilice los botones numéricos 0 a 9. Por ejemplo: para seleccionar la pista 29, pulse brevemente el
botón2 y luego el botón9 (en la pantalla aparecerá brevemente «0029»).
PL
Aby dokonać bezpośredniego wyboru ścieżki, użyć przycisków z cyframi od 0 do 9. Przykład: aby wybrać numer ścieżki 29, nacisnąć krótko
przycisk z cyfrą 2, a następnie przycisk z cyfrą 9 (na wyświetlaczu przez krótki czas będzie wyświetlać się „0029”).
IT
Per selezionare una traccia direttamente, utilizzare i tasti numerici da 0 a 9. Esempio: Se la traccia che si intende selezionare è, ad esempio, la
29 premere una volta brevemente il tasto2 e poi il tasto9 (sul display appare brevemente "0029").
62
ENTER
EN
Press the ENTER button to enter the menu to select the equalizer, the playback mode and the signal source.
DE
Durch Drücken der Taste ENTER gelangen Sie in das Menü für die Auswahl des Equalizers, des Wiedergabemodus und der Signalquelle.
FR
En appuyant sur ENTER, vous passez du menu de choix de preset d'égaliseur au menu de choix de mode de lecture puis au menu de choix de
source de signal.
ES
Al pulsar el botón ENTER se accede al menú de selección del ecualizador, del modo de reproducción y de la fuente de señal.
PL
Naciśnięcie przycisku ENTER powoduje otwarcie menu wyboru korektora, trybu odtwarzania i źródła sygnału.
IT
Premendo il tasto ENTER si accede al menu per la selezione dell'equalizzatore, della modalità di riproduzione e della sorgente del segnale.
EQUALIZER (Eq)
EN
To select one of the seven equalizer presets, press the ENTER button, and using the PREV and NEXT buttons, select the menu item "Eq" (bright
background) and confirm by pressing the PLAY / PAUSE button. Now you can activate one of seven equalizer presets by selecting it using the PREV
and NEXT buttons, and confirm by pressing the PLAY / PAUSE button.
DE
Um eines der sieben Equalizer-Presets auszuwählen, drücken Sie die ENTER-Taste und wählen dann mit Hilfe der PREV- und NEXT-Tasten den
La pagina si sta caricando...
La pagina si sta caricando...

35
INFRARED REMOTE CONTROL (BLUETOOTH) / INFRAROT FERNBEDIENUNG (BLUETOOTH) /
TÉLÉCOMMANDE INFRAROUGE (BLUETOOTH) / MANDO A DISTANCIA POR INFRARROJOS
(BLUETOOTH) / PILOT NA PODCZERWIEŃ (BLUETOOTH) / TELECOMANDO A INFRAROSSI
(BLUETOOTH)
65
67
64
66
68
64
PLAY / PAUSE
EN
Press the PLAY / PAUSE button to start the playback of a track. Pressing again places the player in the pause mode, playback is stopped.
DE
Drücken Sie die PLAY / PAUSE-Taste um die Wiedergabe eines Titels zu starten. Erneutes Drücken stellt den MP3-Spieler in den Pause-Modus,
die Wiedergabe wird angehalten.
FR
Appuyez sur la touche PLAY / PAUSE pou rlancer la lecture d'un morceau. Appuyer de nouveau sur la touche place le lecteur de MP3 en mode
Pause, la lecture est alors suspendue.
ES
Pulse el botón PLAY/PAUSE para iniciar la reproducción de una pista. Pulse de nuevo este botón para poner en modo Pausa el reproductor MP3;
la reproducción se detiene.
PL
Nacisnąć przycisk PLAY/PAUSE, aby rozpocząć odtwarzanie ścieżki. Po ponownym naciśnięciu przycisku odtwarzacz MP3 przejdzie w tryb
pauzy, a odtwarzanie zostanie wstrzymane.
IT
Premere il tasto PLAY/PAUSE per avviare la riproduzione di una traccia. Se si preme di nuovo, il lettore MP3 passa in modalità Pausa e la
riproduzione si sospende.
65
VOL- / VOL+
EN
Volume of the MP3 player (0 to 15). Pressing VOL- lowers the volume, pressing VOL+ increases it.
DE
Lautstärkeneinstellung des MP3-Spielers (0 bis 15). Drücken auf VOL- verringert, Drücken auf VOL+ erhöht die Lautstärke.
FR
Réglage de volume du lecteur MP3 (de 0 à 15). Appuyez sur VOL- pour réduire le volume, sur VOL+ pour l'augmenter.
ES
Pulse el botón PLAY/PAUSE para iniciar la reproducción de una pista. Pulse de nuevo este botón para poner en modo Pausa el reproductor MP3;
la reproducción se detiene.
PL
Nacisnąć przycisk PLAY/PAUSE, aby rozpocząć odtwarzanie ścieżki. Po ponownym naciśnięciu przycisku odtwarzacz MP3 przejdzie w tryb
pauzy, a odtwarzanie zostanie wstrzymane.
IT
Premere il tasto PLAY/PAUSE per avviare la riproduzione di una traccia. Se si preme di nuovo, il lettore MP3 passa in modalità Pausa e la
riproduzione si sospende.
66
PREV / NEXT
EN
To select the previous track on an album, press the PREV button briefly, or the NEXT button to select the next track.
DE
Um den vorherigen Titel eines Albums anzuwählen, drücken Sie kurz die PREV-Taste, um den nächsten Titel anzuwählen die NEXT-Taste.
FR
Pour lire le titre précédent, appuyez brièvement sur la touche PREV ; pour passer au titre suivant, appuyez brièvement sur la touche NEXT.
ES
Pulse brevemente el botón PREV para seleccionar la pista anterior; pulse brevemente el botón NEXT para seleccionar la pista siguiente.
PL
Aby wybrać poprzednią ścieżkę z danego albumu, krótko nacisnąć przycisk PREV, aby wybrać następną ścieżkę – przycisk NEXT.
IT
Per selezionare la traccia precedente di un album, premere brevemente il tasto PREV, per selezionare la traccia successiva premere NEXT.
67
ENTER
EN
Pressing the ENTER button will take you to the Bluetooth menu. Operation and adjustment are carried out as described in detail in the chapter
"OPERATING IN THE BLUETOOTH MODE".
DE
Durch Drücken der Taste ENTER gelangen Sie in das Bluetooth-Menü. Bedienung und Einstellung erfolgen wie im Kapitel „BEDIENUNG IN DER
BLUETOOTH BETRIEBSART“ ausführlich beschrieben.
FR
Appuyer sur la touche ENTER appelle le menu Bluetooth. L'utilisation et le paramétrage sont décrits de façon détaillée dans le chapitre
"UTILISATION EN MODE BLUETOOTH".
ES
Pulse el botón ENTER para entrar en el menú Bluetooth. La operación y los ajustes se describen en el apartado «OPERACIÓN EN MODO
BLUETOOTH».
PL
Naciśnięcie przycisku ENTER umożliwia przejście do menu Bluetooth. Obsługa i ustawienia zgodnie ze szczegółowym opisem w rozdziale
„OBSŁUGA W TRYBIE BLUETOOTH”.
La pagina si sta caricando...
La pagina si sta caricando...
La pagina si sta caricando...
La pagina si sta caricando...
La pagina si sta caricando...
La pagina si sta caricando...
La pagina si sta caricando...
La pagina si sta caricando...
La pagina si sta caricando...
La pagina si sta caricando...
La pagina si sta caricando...
La pagina si sta caricando...

48
IT
Codice prodotto: LDRBUD6 LDRBUD6HS
Tipo di prodotto: Altoparlante PA portatile con trasmettitore a mano senza fili Altoparlante PA portatile con trasmettitore tascabile e microfono ad archetto
Tipo: Attivo Attivo
Dimensioni driver bassi/medi: 6" 6"
Dimensioni driver bassi/medi (mm): 170 mm 170 mm
Magnete woofer: Ferrite Ferrite
Marca woofer: Custom Made Custom Made
Driver acuti: Driver di compressione acuti da 1" Driver di compressione acuti da 1"
Dimensioni driver acuti (mm): 25,4 mm 25,4 mm
Magnete driver acuti: Ferrite Ferrite
Marca driver acuti: Custom Made Custom Made
Amplificatore: Classe D Classe D
Potenza (RMS): 50 W 50 W
Potenza di picco: 200 W 200 W
Risposta in frequenza: 110 - 18.000 Hz 110 - 18.000 Hz
THD: 0,03% 0,03%
Sensibilità 1W/1m 92 dB 92 dB
SPL massimo: 120 dB 120 dB
Circuiti di protezione: Protezione di sovraccarico, sovracorrente, corto circuito Protezione di sovraccarico, sovracorrente, corto circuito
Controlli: Master Vol, Tone, interruttore AUX/MP3, Channel1 Level, Channel2 Level,
Channel3 Level, 2interruttori MIC/LINE
Master Vol, Tone, interruttore AUX/MP3, Channel1 Level, Channel2 Level,
Channel3 Level, 2interruttori MIC/LINE
Display/LED: Stato ricarica/batteria, Acceso Stato ricarica/batteria, Acceso
Ingressi di linea: 4 4
Connettori ingressi di linea: 2 RCA, mini jack da 3,5 mm, 2 XLR/jack 6,3mm 2 RCA, mini jack da 3,5 mm, 2 XLR/jack 6,3mm
Ingressi microfono: 2 XLR/jack 6,3 mm 2 XLR/jack 6,3 mm
Lettore multimediale:
Supporti compatibili: Bluetooth, memory stick USB, scheda SD Bluetooth, memory stick USB, scheda SD
Formati compatibili: File WMA, file MP3, file WAV File WMA, file MP3, file WAV
Comandi lettore multimediale: Mode (Menu/Bluetooth/SD/USB), Play/Pause, Stop, Ripetere, Traccia prece-
dente, Traccia successiva, Volume
Mode (Menu/Bluetooth/SD/USB), Play/Pause, Stop, Ripetere, Traccia prece-
dente, Traccia successiva, Volume
Elementi di visualizzazione lettore
multimediale:
Display LCD multifunzione retroilluminato Display LCD multifunzione retroilluminato

49
Dispositivo senza fili:
Frequenza RF: 863,100 MHz 863,100 MHz
Tipo di modulazione: FM analogico FM analogico
Canali: 1 1
Larghezza banda audio: 50 Hz - 17 kHz 50 Hz - 17 kHz
Controlli: Potenziometro Power/Vol Potenziometro Power/Vol
Display: LED RF (rosso), LED AF LEVEL (verde da -30, -20, -10, 0, rosso 3dBu) LED RF (rosso), LED AF LEVEL (verde da -30, -20, -10, 0, rosso 3dBu)
Potenza di uscita RF: 10 mW 10 mW
Peso del trasmettitore a mano: 285 g
Materiale del trasmettitore a mano: Alluminio, ABS
Peso del trasmettitore portatile: 80 g (senza batterie)
Materiale del trasmettitore portatile: ABS
Specifiche generali:
Tensione di esercizio: Selezione di tensione alternata, 100 - 120V AC / 60Hz, 220 - 240V AC /
50Hz tramite connettore CEI
Selezione di tensione alternata, 100 - 120V AC / 60Hz, 220 - 240V AC /
50Hz tramite connettore CEI
Batterie ricaricabili: 2 Li-Ion da 11,1 VDC 1.500 mAh 2 Li-Ion da 11,1 VDC 1.500 mAh
Tempo di ricarica batteria: 6 ore 6 ore
Autonomia batteria: Fino a ore Fino a ore
Materiale cassa: PP, nero PP, nero
Struttura cassa: Bass reflex Bass reflex
Larghezza: 245 mm 245 mm
Altezza: 377 mm 377 mm
Profondità: 205 mm 205 mm
Peso: 5,6 kg 5,6 kg
Intervallo temperatura: 0 °C - 50°C 0 °C - 50°C
Intervallo umidità: 10% - 70% rel. 10% - 70% rel.
Altre caratteristiche: Stativo 36mm, maniglia di trasporto, telecomando IR per lettore multime-
diale (retro e fronte)
Stativo 36mm, maniglia di trasporto, telecomando IR per lettore multime-
diale (retro e fronte)
La pagina si sta caricando...
La pagina si sta caricando...
La pagina si sta caricando...
-
 1
1
-
 2
2
-
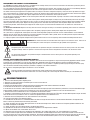 3
3
-
 4
4
-
 5
5
-
 6
6
-
 7
7
-
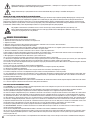 8
8
-
 9
9
-
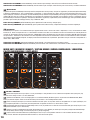 10
10
-
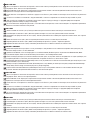 11
11
-
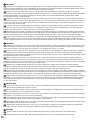 12
12
-
 13
13
-
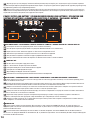 14
14
-
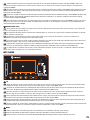 15
15
-
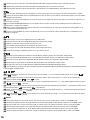 16
16
-
 17
17
-
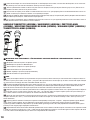 18
18
-
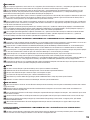 19
19
-
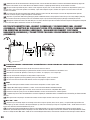 20
20
-
 21
21
-
 22
22
-
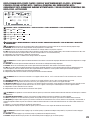 23
23
-
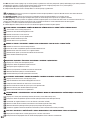 24
24
-
 25
25
-
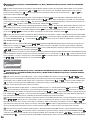 26
26
-
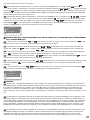 27
27
-
 28
28
-
 29
29
-
 30
30
-
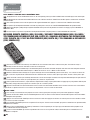 31
31
-
 32
32
-
 33
33
-
 34
34
-
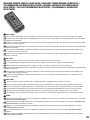 35
35
-
 36
36
-
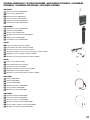 37
37
-
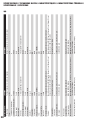 38
38
-
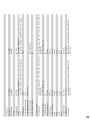 39
39
-
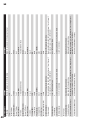 40
40
-
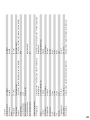 41
41
-
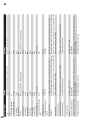 42
42
-
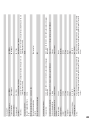 43
43
-
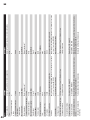 44
44
-
 45
45
-
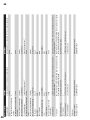 46
46
-
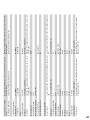 47
47
-
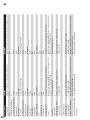 48
48
-
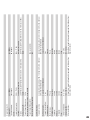 49
49
-
 50
50
-
 51
51
-
 52
52


in altre lingue
- English: LD Systems LDRBUD10 User manual
- français: LD Systems LDRBUD10 Manuel utilisateur
- español: LD Systems LDRBUD10 Manual de usuario
Documenti correlati
Altri documenti
-
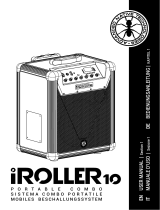 ADVANCED NATIVE TECHNOLOGIES iRoller 10 Manuale utente
-
 ITALIAN STAGE FR15AWV2 Manuale utente
-
Trevi K 755 USB Guida utente
-
Sharp PS-940 Manuale del proprietario
-
 Denon Professional Audio Commander Manuale utente
-
LIVARNO 427736 Manuale del proprietario
-
Teufel BOOMSTER GO Guida utente
-
Wentronic 95197 Manuale utente
-
NGS WILDDISCO Manuale utente
-
Monacor PAK-15DMP Manuale utente


