Iomega 7-IN-1 Manuale utente
- Categoria
- Dischi rigidi esterni
- Tipo
- Manuale utente
Questo manuale è adatto anche per

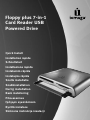
Floppy plus 7-in-1
Card Reader USB
Powered Drive
Quick Install
Installation rapide
Schnellstart
Installazione rapida
Instalación rápida
Instalação rápida
Snelle installatie
Snabbinstallation
Hurtig installation
Rask installering
Pika-asennus
Γρήγορη εγκατάσταση
Rychlá instalace
Skrócona instrukcja insalacji
La pagina sta caricando ...

Contents • Matières • Inhalt • Sommario • Contenido
Conteúdo • Inhoudsopgave • Innehåll • Indhold • Innhold
Sisällys • Περιεχόµενα • Obsah • Spis treści
Quick Install . . . . . . . . . . . . . . . . . . . . . . . . . . . . . . . . . . . . . . . . . . . . . . . . . 4
Installation rapide
. . . . . . . . . . . . . . . . . . . . . . . . . . . . . . . . . . . . . . . . . . . . . . 4
Schnellstart . . . . . . . . . . . . . . . . . . . . . . . . . . . . . . . . . . . . . . . . . . . . . . . . . .
5
Installazione rapida
. . . . . . . . . . . . . . . . . . . . . . . . . . . . . . . . . . . . . . . . . . . . . 6
Instalación rápida
. . . . . . . . . . . . . . . . . . . . . . . . . . . . . . . . . . . . . . . . . . . . . . 7
Instalação rápida
. . . . . . . . . . . . . . . . . . . . . . . . . . . . . . . . . . . . . . . . . . . . . . 7
Snelle installatie
. . . . . . . . . . . . . . . . . . . . . . . . . . . . . . . . . . . . . . . . . . . . . . . 8
Snabbinstallation
. . . . . . . . . . . . . . . . . . . . . . . . . . . . . . . . . . . . . . . . . . . . . . 9
Hurtig installation
. . . . . . . . . . . . . . . . . . . . . . . . . . . . . . . . . . . . . . . . . . . . . 10
Rask installering
. . . . . . . . . . . . . . . . . . . . . . . . . . . . . . . . . . . . . . . . . . . . . . 11
Pika-asennus
. . . . . . . . . . . . . . . . . . . . . . . . . . . . . . . . . . . . . . . . . . . . . . . . 11
Γρήγορη εγκατάσταση . . . . . . . . . . . . . . . . . . . . . . . . . . . . . . . . . . . . . . . . . . . 12
Rychlá instalace
. . . . . . . . . . . . . . . . . . . . . . . . . . . . . . . . . . . . . . . . . . . . . . 13
Skrócona instrukcja insalacji
. . . . . . . . . . . . . . . . . . . . . . . . . . . . . . . . . . . . . . . 14
CE (European Community) . . . . . . . . . . . . . . . . . . . . . . . . . . . . . . . . . . . . . . . . .
15
Customer Support
. . . . . . . . . . . . . . . . . . . . . . . . . . . . . . . . . . . . . . . . . . . . . 16
Assistance clientèle
. . . . . . . . . . . . . . . . . . . . . . . . . . . . . . . . . . . . . . . . . . . . 16
Kundenunterstützung
. . . . . . . . . . . . . . . . . . . . . . . . . . . . . . . . . . . . . . . . . . . 16
Assistenza clienti
. . . . . . . . . . . . . . . . . . . . . . . . . . . . . . . . . . . . . . . . . . . . . 16
Asistencia al cliente
. . . . . . . . . . . . . . . . . . . . . . . . . . . . . . . . . . . . . . . . . . . . 16
Suporte ao cliente
. . . . . . . . . . . . . . . . . . . . . . . . . . . . . . . . . . . . . . . . . . . . . 16
Klantenondersteuning . . . . . . . . . . . . . . . . . . . . . . . . . . . . . . . . . . . . . . . . . . .
16
La pagina sta caricando ...
La pagina sta caricando ...

6
• Entfernen Sie immer die Medien aus dem Laufwerk, bevor Sie es an den Computer anschließen oder vom
Computer trennen.
• Verwenden Sie nicht mehr als einen Medientyp auf einmal.
• Stellen Sie sicher, dass die LED zur Anzeige der Laufwerksaktivität
NICHT blinkt, bevor Sie Medien dem
Laufwerk entnehmen.
• Speichern bzw. schließen Sie Dateien, bevor der Computer in den Energiesparmodus versetzt wird (oder
deaktivieren Sie den Energiesparmodus). Ist eine Datei vom Diskettenlaufwerk geöffnet und der Computer
wird in den Energiesparmodus versetzt, so gehen nicht gespeicherte Änderungen möglicherweise verloren.
• Lesen Sie die im Handbuch enthaltenen ausführlichen Anweisungen zur Verwendung des Iomega
Diskettenlaufwerks und Kartenlesegeräts genau durch.
Die neuesten Informationen zu diesem Thema und die neuesten Treiber (zum Herunterladen) finden Sie unter
www.iomega.com
.
Installation Instructions
Utenti PC:
1. Inserire il CD Soluzioni. Per poter utilizzare l’unità è NECESSARIO installare i driver. Per installare i driver,
fare clic sulla relativa icona e selezionare Click to Install (Fare clic per installare).
2. Per completare l’installazione del software, seguire le istruzioni visualizzate sullo schermo. Collegare il cavo
USB a una qualsiasi porta USB del computer. Riavviare il computer.
3. L’icona dell’unità Floppy USB verrà visualizzata in Risorse del computer o in Gestione risorse/Esplora
risorse.
NOTA: in caso di collegamento corretto, dovrebbero risultare visualizzate in totale tre nuove icone di unità.
Utenti Mac:
1. Collegare il cavo USB a una qualsiasi porta USB del computer.
2. L’icona del disco compare sulla Scrivania del computer Mac quando si inserisce un supporto.
Perché non approfittare dei vantaggi che Iomega offre al momento della registrazione? Se questa non è ancora
stata effettuata, visitare la pagina www.iomegareg.com. La procedura di registrazione è facile e veloce.
ATTENZIONE! i limiti di potenza di USB richiedono all’utente di prestare particolare attenzione a quanto segue:
Le periferiche USB alimentate dall’host dispongono di una quantità di potenza limitata, che deve essere
condivisa tra tutti i dispositivi collegati. Durante l’esecuzione contemporanea di varie operazioni, adottare alcune
precauzioni. Rimuovere sempre i supporti dall’unità quando questa non viene utilizzata. Per evitare possibili
perdite di dati, attenersi alle seguenti linee guida:
• Non inserire un MicroDrive quando l’unità floppy è in uso e non tentare di utilizzare l’unità floppy quando
MicroDrive è in uso.
• Rimuovere sempre tutti i supporti dall’unità prima di collegarla o scollegarla dal computer.
• Evitare di utilizzare più di un tipo di supporto per volta.
• Prima di estrarre i supporti verificare che il LED di attività NON stia lampeggiando.
• Salvare e/o chiudere sempre i file prima che nel computer si attivi la modalità sospensione (in alternativa,
disattivare tale modalità). Se il computer entra in modalità sospensione quando il file è aperto sull’unità
floppy, tutte le modifiche non salvate possono andare perse.
• Consultare il manuale dell’utente per reperire istruzioni dettagliate su come utilizzare correttamente l’unità
Iomega Floppy con il lettore di schede.
La pagina sta caricando ...
La pagina sta caricando ...
La pagina sta caricando ...
La pagina sta caricando ...
La pagina sta caricando ...
La pagina sta caricando ...
La pagina sta caricando ...
La pagina sta caricando ...
La pagina sta caricando ...

Copyright © 2006 Iomega Corporation. All rights reserved. Iomega, the stylized “i” logo, and all Iomega brand blocks are either registered
trademarks or trademarks of Iomega Corporation in the United States and/or other countries. Microsoft and Windows are either registered
trademarks or trademarks of Microsoft Corporation in the United States and/or other countries. Mac is either a registered trademark or
trademark of Apple Computer, Inc. in the United States and/or other countries. Certain other product names, brand names, and company
names may be trademarks or designations of their respective owners.
31630500 5/02/06 b
For service and support for your Iomega product, visit us at www.iomega.com.
Pour obtenir du service et de l’assistance pour votre produit Iomega, visitez notre site à l’adresse suivante :
www.iomega.com
.
Servicedienstleistungen und Kundendienst für Ihr Iomega Produkt finden Sie unter www.iomega.com.
Per ottenere assistenza e supporto per il prodotto Iomega in uso, visitare il sito Web all’indirizzo www.iomega.com.
Para obtener información sobre servicio y asistencia técnica para su producto Iomega, visítenos en www.iomega.com.
Para obter serviços e suporte para seu produto Iomega, visite-nos no site www.iomega.com.
Voor service en ondersteuning van uw Iomega-product kunt u terecht op onze website www.iomega.com.
Customer Support • Assistance clientèle • Kundenunterstützung
Assistenza clienti • Asistencia al cliente • Suporte ao cliente
Klantenondersteuning
-
 1
1
-
 2
2
-
 3
3
-
 4
4
-
 5
5
-
 6
6
-
 7
7
-
 8
8
-
 9
9
-
 10
10
-
 11
11
-
 12
12
-
 13
13
-
 14
14
-
 15
15
-
 16
16


Iomega 7-IN-1 Manuale utente
- Categoria
- Dischi rigidi esterni
- Tipo
- Manuale utente
- Questo manuale è adatto anche per
in altre lingue
- English: Iomega 7-IN-1 User manual
- français: Iomega 7-IN-1 Manuel utilisateur
- español: Iomega 7-IN-1 Manual de usuario
- Deutsch: Iomega 7-IN-1 Benutzerhandbuch
- Nederlands: Iomega 7-IN-1 Handleiding
- português: Iomega 7-IN-1 Manual do usuário
- dansk: Iomega 7-IN-1 Brugermanual
- čeština: Iomega 7-IN-1 Uživatelský manuál
- polski: Iomega 7-IN-1 Instrukcja obsługi
- svenska: Iomega 7-IN-1 Användarmanual
- suomi: Iomega 7-IN-1 Ohjekirja
Documenti correlati
-
Iomega FLOPPY USB DRIVE Manuale del proprietario
-
-
-
Iomega UltraMax Plus Guida Rapida
-
-
Iomega EN55022 Manuale utente
-
