AEG LAVAMAT W 1270 Manuale utente
- Categoria
- Lavatrici
- Tipo
- Manuale utente
Questo manuale è adatto anche per

LAVAMAT W 1270
Washing machine
Instruction book

2
Dear customer,
Please read these user instructions carefully.
Above all, observe the "Safety" section in the first pages. Keep these
user instructions in a safe place for future reference. Please pass them
along to future owners of the appliance.
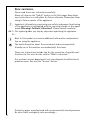
1
Important information concerning your safety and proper functioning
of the appliance is highlighted with the warning triangle or the signal
words (Warning!, Caution!, Attention!). Please observe carefully.
0 1. This symbol guides you step by step when operating the appliance.
2. ...
3
Next to this symbol you receive additional information and practical
tips on using the appliance.
2
Tips and information about the economical and environmentally
friendly use of the machine are marked with the clover.
These user instructions include tips for the correction of possible mal-
functions by the user. See the section "What to do when...".
Our customer service department is at your disposal should technical
problems occur. See also the "Service" section.
Printed on paper manu
f
actured with environmentally sound processes.
He who thinks ecologically acts accordingly ...

Contents
3
CONTENTS
Operating instructions . . . . . . . . . . . . . . . . . . . . . . . . . . . . . . . . . . . . 6
Safety . . . . . . . . . . . . . . . . . . . . . . . . . . . . . . . . . . . . . . . . . . . . . . . . . . . . . . . . 6
Disposal . . . . . . . . . . . . . . . . . . . . . . . . . . . . . . . . . . . . . . . . . . . . . . . . . . . . . . 8
Environmental protection tips . . . . . . . . . . . . . . . . . . . . . . . . . . . . . . . . . . 8
Appliance Description . . . . . . . . . . . . . . . . . . . . . . . . . . . . . . . . . . . . . . . . . . 9
Front view . . . . . . . . . . . . . . . . . . . . . . . . . . . . . . . . . . . . . . . . . . . . . . . . . . . . 9
Drawer for Detergent and Conditioner . . . . . . . . . . . . . . . . . . . . . . . . . . . . 9
Control panel . . . . . . . . . . . . . . . . . . . . . . . . . . . . . . . . . . . . . . . . . . . . . . . . . 10
Program Selector . . . . . . . . . . . . . . . . . . . . . . . . . . . . . . . . . . . . . . . . . . . . 10
Temperature Selector . . . . . . . . . . . . . . . . . . . . . . . . . . . . . . . . . . . . . . . . . 12
(ON/OFF) Button . . . . . . . . . . . . . . . . . . . . . . . . . . . . . . . . . . . . . . . . . . . . 12
Consumption Data and Time Required . . . . . . . . . . . . . . . . . . . . . . . . . . . 12
Before Washing for the First Time . . . . . . . . . . . . . . . . . . . . . . . . . . . . . . . 13
Prepare washing cycle . . . . . . . . . . . . . . . . . . . . . . . . . . . . . . . . . . . . . . . . . . 14
Sort washing and prepare . . . . . . . . . . . . . . . . . . . . . . . . . . . . . . . . . . . . . . . . 14
Washing Types and Care Symbols . . . . . . . . . . . . . . . . . . . . . . . . . . . . . . . . . 15
Detergent and conditioner . . . . . . . . . . . . . . . . . . . . . . . . . . . . . . . . . . . . . . . 15
Which detergent and conditioner? . . . . . . . . . . . . . . . . . . . . . . . . . . . . . 15
How much detergent and conditioner? . . . . . . . . . . . . . . . . . . . . . . . . . 16
Using Water Softener . . . . . . . . . . . . . . . . . . . . . . . . . . . . . . . . . . . . . . . . . . . 16
Performing a Washing Cycle . . . . . . . . . . . . . . . . . . . . . . . . . . . . . . . . . . . . 17
Brief Instructions . . . . . . . . . . . . . . . . . . . . . . . . . . . . . . . . . . . . . . . . . . . . . . . 17
Loading the Washing . . . . . . . . . . . . . . . . . . . . . . . . . . . . . . . . . . . . . . . . . . . . 17
Adding Detergent/Conditioner . . . . . . . . . . . . . . . . . . . . . . . . . . . . . . . . . . . 18
Setting the Washing Program . . . . . . . . . . . . . . . . . . . . . . . . . . . . . . . . . . . . 19
Starting the Washing Program . . . . . . . . . . . . . . . . . . . . . . . . . . . . . . . . . . . 19
Changing the Spin Speed or Selecting Rinse Hold . . . . . . . . . . . . . . . . . . . . 20
During the Washing Program . . . . . . . . . . . . . . . . . . . . . . . . . . . . . . . . . . . . . 20
Washing Cycle Complete/Removing the Washing . . . . . . . . . . . . . . . . . . . . 21

Contents
4
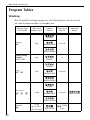
Program Tables . . . . . . . . . . . . . . . . . . . . . . . . . . . . . . . . . . . . . . . . . . . . . . . . 22
Washing . . . . . . . . . . . . . . . . . . . . . . . . . . . . . . . . . . . . . . . . . . . . . . . . . . . . . . 22
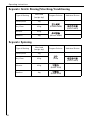
Washing with a Pre Wash . . . . . . . . . . . . . . . . . . . . . . . . . . . . . . . . . . . . . . . . 23
Separate Rinsing . . . . . . . . . . . . . . . . . . . . . . . . . . . . . . . . . . . . . . . . . . . . . . . 23
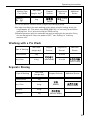
Separate Gentle Rinsing/Starching/Conditioning . . . . . . . . . . . . . . . . . . . 24
Separate Spinning . . . . . . . . . . . . . . . . . . . . . . . . . . . . . . . . . . . . . . . . . . . . . 24
Cleaning and Caring . . . . . . . . . . . . . . . . . . . . . . . . . . . . . . . . . . . . . . . . . . . 25
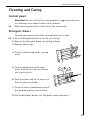
Control panel . . . . . . . . . . . . . . . . . . . . . . . . . . . . . . . . . . . . . . . . . . . . . . . . . . 25
Detergent drawer . . . . . . . . . . . . . . . . . . . . . . . . . . . . . . . . . . . . . . . . . . . . . . . 25
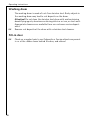
Washing drum . . . . . . . . . . . . . . . . . . . . . . . . . . . . . . . . . . . . . . . . . . . . . . . . . 26
Fill-in door . . . . . . . . . . . . . . . . . . . . . . . . . . . . . . . . . . . . . . . . . . . . . . . . . . . . 26
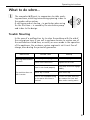
What to do when… . . . . . . . . . . . . . . . . . . . . . . . . . . . . . . . . . . . . . . . . . . . . 27
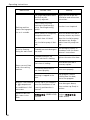
Trouble Shooting . . . . . . . . . . . . . . . . . . . . . . . . . . . . . . . . . . . . . . . . . . . . . . . 27
If the washing results are not satisfactory . . . . . . . . . . . . . . . . . . . . . . . . . . 30
Performing an Emergency Drain . . . . . . . . . . . . . . . . . . . . . . . . . . . . . . . . . . 30
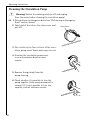
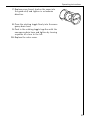
Cleaning the Circulation Pump . . . . . . . . . . . . . . . . . . . . . . . . . . . . . . . . . . . 32
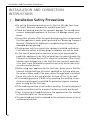
Installation and Connection Instructions . . . . . . . . . . . . . . . . 34
Installation Safety Precautions . . . . . . . . . . . . . . . . . . . . . . . . . . . . . . . . . . 34
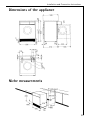
Dimensions of the appliance . . . . . . . . . . . . . . . . . . . . . . . . . . . . . . . . . . . 35
Niche measurements . . . . . . . . . . . . . . . . . . . . . . . . . . . . . . . . . . . . . . . . . . 35
Installation of the appliance . . . . . . . . . . . . . . . . . . . . . . . . . . . . . . . . . . . . 36
Transporting the appliance . . . . . . . . . . . . . . . . . . . . . . . . . . . . . . . . . . . . . . . 36
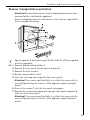
Remove transportation protection . . . . . . . . . . . . . . . . . . . . . . . . . . . . . . . . 37
Prepare the installation place . . . . . . . . . . . . . . . . . . . . . . . . . . . . . . . . . . . . 38
Installation on a concrete base . . . . . . . . . . . . . . . . . . . . . . . . . . . . . . . . 38
Installation on vibrating floors . . . . . . . . . . . . . . . . . . . . . . . . . . . . . . . . . 38
Levelling on uneven floors . . . . . . . . . . . . . . . . . . . . . . . . . . . . . . . . . . . . . . . 39
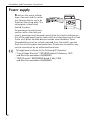
Power supply . . . . . . . . . . . . . . . . . . . . . . . . . . . . . . . . . . . . . . . . . . . . . . . . . . 40
Water connection . . . . . . . . . . . . . . . . . . . . . . . . . . . . . . . . . . . . . . . . . . . . . 41
Permissible water pressure . . . . . . . . . . . . . . . . . . . . . . . . . . . . . . . . . . . . . . . 41
Water feed . . . . . . . . . . . . . . . . . . . . . . . . . . . . . . . . . . . . . . . . . . . . . . . . . . . . 42
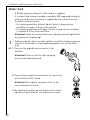
Water drain-off . . . . . . . . . . . . . . . . . . . . . . . . . . . . . . . . . . . . . . . . . . . . . . . . 43
Delivery heights above 1m . . . . . . . . . . . . . . . . . . . . . . . . . . . . . . . . . . . . . . . 43

Contents
5
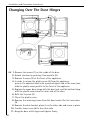
Changing Over The Door Hinges . . . . . . . . . . . . . . . . . . . . . . . . . . . . . . . . . 44
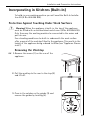
Incorporating in Kitchens (Built-In) . . . . . . . . . . . . . . . . . . . . . . . . . . . . . 45
Protection Against Touching Under Work Surfaces . . . . . . . . . . . . . . . . . . . 45
Removing the Worktop . . . . . . . . . . . . . . . . . . . . . . . . . . . . . . . . . . . . . . . 45
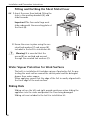
Fitting and Earthing the Sheet Metal Cover . . . . . . . . . . . . . . . . . . . . . . 46
Water Vapour Protection for Work Surfaces . . . . . . . . . . . . . . . . . . . . . . . . 46
Sliding Rails . . . . . . . . . . . . . . . . . . . . . . . . . . . . . . . . . . . . . . . . . . . . . . . . . . . 46
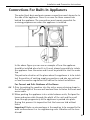
Connections For Built-In Appliances . . . . . . . . . . . . . . . . . . . . . . . . . . . . . 47
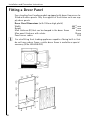
Fitting a Decor Panel . . . . . . . . . . . . . . . . . . . . . . . . . . . . . . . . . . . . . . . . . . 48
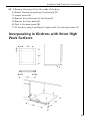
Incorporating in Kitchens with 90cm High Work Surfaces . . . . . . . . . 49
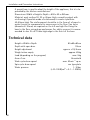
Technical data . . . . . . . . . . . . . . . . . . . . . . . . . . . . . . . . . . . . . . . . . . . . . . . . 50
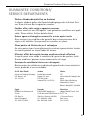
Guarantee Conditions/Service Departments . . . . . . . . . . . . 51
Index . . . . . . . . . . . . . . . . . . . . . . . . . . . . . . . . . . . . . . . . . . . . . . . . . . . . . . . . 54
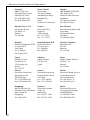
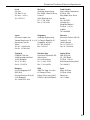
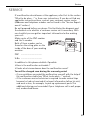
Service . . . . . . . . . . . . . . . . . . . . . . . . . . . . . . . . . . . . . . . . . . . . . . . . . . . . . . 55

6
OPERATING INSTRUCTIONS
1 Safety
The safety standards of AEG electric appliances are in keeping with the
recognised rules of technology and the law governing the safety of
appliances. Nevertheless as a manufacturer we are committed to famil-
iarise you with the following safety instructions:
Prior to initial start-up
• Observe the "Installation and Connection Instructions" below in
these user instructions.
• If the appliance is delivered during the winter and temperatures are
below freezing, allow the appliance to stand at room temperature for
24 hours before operation
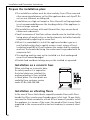
Intended use
• The washing machine is intended exclusively for the washing of nor-
mal household washing in the home. If the appliance is used for pur-
poses other than those intended, or if it is improperly operated, the
manufacturer can assume no liability for damages which may occur.
• Additions or modifications to the washing machine are strictly for-
bidden due to safety reasons.
• Use only those detergents which are suitable for the washing
machine. Observe instructions provided by the detergent manufactu-
rer.
• Laundry to be washed may not contain any flammable solvents. This
must also be taken into consideration when washing pre-washed
laundry.
• Do not use the washing machine for dry-cleaning.
• Dyes and bleaches may only be used in the washing machine if such
use has been expressly endorsed by the manufacturer of these pro-
ducts. We can assume no liability for damages which may occur.
• Use tap water only. Rain water and industrial water may only be used
if they fulfil requirements in accordance with DIN1986 and DIN1988.
• Damage due to frost is not covered by the guarantee! If the washing
machine is located in a room in which below freezing temperatures
might occur, emergency draining must be carried out if danger of
freezing occurs (see "Emergency Draining"). Furthermore, the inlet
hose must be disconnected from the tap and laid on the floor.

Operating instructions
7
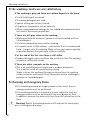
Safety of children
• Packaging materials (e.g. sheet and Styrofoam) can be dangerous for
children. Danger of asphyxiation! Keep packaging materials at a safe
distance from children.
• Children are often unable to recognise the dangers involved with
electrical appliances. Provide for proper supervision during operation,
and do not allow children to play with the washing machine – the
danger exists that a child might lock itself into the appliance.
• Make certain that children or small animals do not climb into the
drum of the washing machine.
• If the washing machine needs to be disposed of, remove the mains
plug, destroy the door lock, cut off the electrical cable and dispose of
the plug and remaining cable separately. In this way children are pre-
vented from locking themselves in and are not exposed life threate-
ning danger.
General Safety
• Repairs to the washing machine may only be carried out by trained
personnel. Improper repairs can give rise to significant hazards. If
repairs are required, contact customer service or your dealer.
• Never use the washing machine if the mains cable is damaged or the
control panel, the work surface, or the plinth are damaged to such an
extent that components inside the machine are openly accessible.
• Switch off the washing machine before cleaning, maintenance and
servicing. In addition, unplug from the mains or – in the case of per-
manent connection – pull the circuit breaker, or completely remove
screw type fuses.
• Never remove the mains plug by pulling on the cable. Always grip the
plug.
• Octopus plugs, couplings and extension cables may not be used. Dan-
ger of overheating!
• Do not clean the washing machine with a jet of water. There is a risk
of electric shock!
• When high temperature washing programs are selected, the glass in
the door becomes hot. Do not touch!
• Leave the water in the machine to cool down before performing an
emergency drain or cleaning the circulation pump.
• Small animals may gnaw at electrical power cables and water hoses.
There is a risk of electric shock and damage from water leaks! Keep
small animals away from the washing machine.

Operating instructions
8
2 Disposal
Dispose of the packaging!
Dispose of washing machine packaging materials properly. All packa-
ging materials are environmentally sound and can be safely disposed
of, or burned in a refuse incineration plant.
The plastic parts can be reused:
• The external plastic cover and the bags inside are made of polyethy-
lene (marking >PE<).
• The padding is made of CFC free expanded polystyrene
(marking >PS<).
Corrugated components are made from recycled paper and should be
disposed of at a paper recycling station.
Dispose of your old appliance!
If, at some point in time, the service life of the appliance has expired,
please take it to your nearest recycling centre, or to your appliance
dealer, who will accept the old appliance for a minimal fee.
2 Environmental protection tips
• No pre-wash is required for normally soiled washing. This saves you
detergent, water and time (and is good for the environment!).
• If the indicated load capacities are taken full advantage of, the
washing machine is especially efficient.
• For small loads, use only one half to one third of the recommended
detergent quantity.
• Stains and soiling confined to given areas can be removed by means
of appropriate pre-treatment. You can then wash at lower tempera-
tures.
• Wash lightly to medium soiled cottons with the energy saving pro-
gram.
• Softeners are often not required. Try it! If you use a dryer, your
washing will be soft and fluffy, even without softeners.
• A water softener should be used for water within a hardness range of
mid to high (as of hardness level II, see "Detergents and Conditio-
ners"). Detergent can then always be dosed for water hardness level I
(= soft).

Operating instructions
9
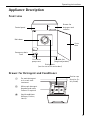
Appliance Description
Front view
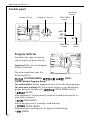
Drawer for Detergent and Conditioner
Drawer for
detergent and
softener
Control panel
Main door
Circulation
pump cover
Threaded feet
(height adjustable)
Rating plate
(on the rear of the main door)
Outer
door
Emergency drain
hose
k Pre wash detergent
or in-wash stain
treatment
l Main wash detergent
(powder) and water
softener if required
w Liquid conditioner
(softener, finisher,
starch)
Suction cap
(must be fir-
mly fitted)

Operating instructions
10
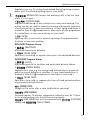
Control panel
Program Selector
You define the type of washing
cycle using the program selector.
Important! Only turn the program
selector clockwise!
The various positions have the
following effect:
(COTTONS/LINEN), (EASY-
CARES+button) Program Group
For cottons/linen: Set the program selector to the desired programme.
For easy-care washing: Set the program selector to the desired pro-
gramm and then also press the (EASY-CARES) button.
• (STAIN)
Stain program for treating heavily soiled or stained washing with in-
wash stain treatment.
• (MAIN WASH)
Main washing cycle for normally soiled washing.
• (QUICK WASH)
Shortened main washing cycle for lightly soiled washing.
• (RINSE)
Program Selector
S
p
i
n
S
pee
d
Button
RINSE HOLD
Button
Temperature Selector
EASY-CARES
Button
ON/OFF
Button

Operating instructions
11
Separate rinse, e.g. for rinsing hand washed fabrics (spinning in accor-
dance with the selected washing type or rinse hold).
3 (RINSE HOLD) means: the washing is left in the last rinse
water, it is not spun.
• (CONDITIONER)
Separate conditioning of wet cotton/linen or easy-care washing. This
setting can also be used for separate starching and separate treatment
of wet cotton/linen or easy-care washing. (1 rinse, liquid conditioner is
washed in from the w compartment, spinning as per the programmes
for cotton/linen or easy-care washing, or rinse hold.)
• (SPIN)
Spinning after a rinse hold or separate spinning of hand washed cot-
ton/linen or easy-care washing.
DELICATES Program Group
• (DELICATES)
Main washing cycle for delicates.
• (SHORT SPIN)
Spin after a rinse hold, or separate short spin of hand washed delicates.
WOOLLENS Program Group
• (WOOL)
Main washing cycle for woollens and particularly delicate fabrics.
• (GENTLE RINSE)
Separate short rinse, e.g. for rinsing hand washed fabrics or separate
gentle rinsing of delicates or woollens. (1 rinse, liquid conditioner is
washed in from the w compartment, short spin or rinse hold.)
• (SHORT SPIN)
Spin after a rinse hold, or separate short spin of hand washed woollens
or particularly delicate fabrics.
(PUMP OUT)
Pumps out the water after a rinse hold (without spinning).
(PRE WASH)
Pre wash (approx. 15 minutes, temperature limited to max. 40 °C) prior
to the main washing cycle that follows automatically.
(PRE WASH) can only be combined with (COTTONS/
LINEN) and (EASY-CARES).

Operating instructions
12
Temperature Selector
On the temperature selector you can set
the temperature for the washing cycle;
the temperature is continuously variable
from (COLD) to 95 °C.
2 E Position (Energy Saving): Energy saving
program at approx. 67 °C for lightly to
normally soiled cotton washing.
(ON/OFF) Button
This button is used to switch on the washing
machine and start the selected program, or
to switch off the washing machine.
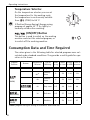
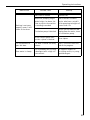
Consumption Data and Time Required
The values given in the following table for selected programs were cal-
culated under standard conditions. They provide a useful guide for ope-
ration in the home.
Program
Selector
Button
Temperature
Selector
Type of
Washing
Load
in kg
Water
in litres
Energy
in kWh
Time in
minutes
(MAIN
WASH)
95 Cottons 5 59 1.80 119
60
1)
1) Note: program setting for testing in accordance with EN 60 456
Cottons/
Linen
5 59 1.10 119
40
Cottons/
Linen
5 59 0.60 119
(EASY-CARES)
40 Easy-cares 2.5 48 0.40 86
(DELICATES)
30 Delicates 2.5 57 0.45 67
(WOOL)
30 Woollens 2 52 0.35 67

Operating instructions
13
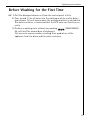
Before Washing for the First Time
0 1.Pull the detergent drawer out from the control panel a little.
2. Pour around 1 litre of water into the washing machine via the deter-
gent drawer. This will ensure when the washing machine is started that
the water container is closed and that the ECO valve can function cor-
rectly.
3. Perform a washing cycle without any washing, (MAIN WASH)
95, with half the normal dose of detergent.
This serves to remove residues resulting from production of the
appliance from the drum and the water container.

Operating instructions
14
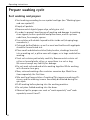
Prepare washing cycle
Sort washing and prepare
• Sort washing according to care symbol and type (see "Washing types
and care symbols").
• Empty all pockets.
• Remove metal objects (paper clips, safety pins etc.).
• In order to prevent bunching up of washing and damage to washing,
close zippers, button up duvets and pillow cases, and tie up loose
ends from, for example, aprons.
• Turn articles with double layered textiles inside out (sleeping bags,
anoraks etc.).
• Coloured, knitted fabrics, as well as wool and textiles with appliqués
should be turned inside out.
• Place small and delicate articles (baby booties, stockings, bras etc.)
into a washing net, a pillow case with zipper, or in large socks before
washing.
• Treat net curtains particularly carefully. Remove metal curtain rail
rollers or burred plastic rollers, or wrap these in a net or bag.
We cannot accept any liability for damage.
• Do not wash coloured and white washing together. White washing
will otherwise turn grey.
• New, coloured washing often contains excessive dye. Wash these
items separately the first time.
• Mix small and large articles of washing! This improves washing effi-
ciency, and the washing is more favourably distributed during the
spin cycle.
• Fluff washing before placing into the washing machine.
• Do not place folded washing into the drum.
• Observe tips for proper care such as "wash separately" and "wash
separately several times"!.

Operating instructions
15
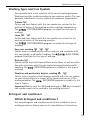
Washing Types and Care Symbols
Care symbols assist in the selection of the correct washing program.
Washing should be sorted according to type and care symbol. The tem-
peratures indicated in the care symbols are maximum temperatures.
Cottons ç
Cotton and linen fabrics with this care symbol are resistant to the
mechanical action of the washing machine and high temperatures.
The (COTTONS/LINEN) program is suitable for this type of
washing.
Linen èë
Cotton and linen fabrics with this care symbol are resistant to the
mechanical action of the washing machine.
The (COTTONS/LINEN) program is suitable for this type of
washing.
Easy-care washing êíî
Fabrics such as treated cottons, cotton mixtures and synthetics with
this care symbol need careful handling. The (EASY-CARES)
program is suitable for this type of washing.
Delicates ì
Fabrics such as those with layered fibres, micro-fibres, as well as synthe-
tics and net curtains with this care symbol need particularly careful
handling. The (DELICATES) program is suitable for this type of
washing.
Woollens and particularly delicate washing 9ì
Fabrics such as woollens, wool mixtures and silk with this care symbol
are particularly delicate in respect of the mechanical action of the
washing machine. The (WOOLLENS) program is suitable for this
type of fabrics.
Important! Fabrics with the
ï (hand washing) or ñ (do not wash!)
care symbols must not be washed in the washing machine!
Detergent and conditioner
Which detergent and conditioner?
Use only detergents and conditioners which are suitable for use in
washing machines. Always observe the manufacturer’s instructions.

Operating instructions
16
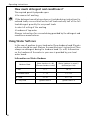
How much detergent and conditioner?
The required quantity depends upon:
• the amount of washing
2 If the detergent manufacturer does not include dosing instructions for
reduced loads, use one third less for half loads and only half of the full
load detergent quantity for very small loads.
• extent of soiling of the washing
• hardness of tap water
Observe instructions for use and dosing provided by the detergent and
conditioner manufacturer.
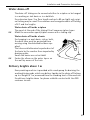
Using Water Softener
In the case of medium to very hard water (from hardness band II) water
softener should be used. Observe the manufacturer’s instructions! Then
always use detergent dosing for hardness band I (= soft). Information
on the hardness of the water in your area is provided by your local
water board.
Information on Water Hardness
Hardness Band
Water hardness in °dH
(German hardness scale)
Water hardness in mmol/l
(millimol per litre)
I – soft 0 – 7 to 1.3
II – medium-hard 7 – 14 1.3 – 2.5
III – hard 14 – 21 2.5 – 3.8
IV – very hard greater than 21 greater than 3.8

Operating instructions
17
Performing a Washing Cycle
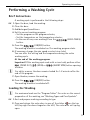
Brief Instructions
A washing cycle is performed in the following steps:
0 1.Open the door, load the washing.
2. Close the door.
3. Add detergent/conditioner.
4. Set the correct washing program:
– Set the program on the program selector;
– Set the temperature on the temperature selector;
– In the case of easy-care washing: Press the (EASY-CARES)
button.
5. Press the (ON/OFF) button.
The washing machine is switched on. The washing program starts.
6. If necessary, change the spin speed or select rinse hold.
You can alter this setting and the temperature during the entire
washing cycle.
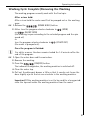
At the end of the washing program:
Important! If the washing cycle ends with a rinse hold, perform either
(PUMP OUT), (SPIN) or (SHORT SPIN) before opening
the door.
3 For safety reasons, the door remains locked for 1-2 minutes after the
end of the program.
7. Open thedoor, remove the washing.
8. Press the (ON/OFF) button.
The washing machine is switched off.
Loading the Washing
3 For maximum loads see the "Program Tables". For notes on the correct
preparation of the washing, see "Washing Types and Care Symbols".
0 1.Sort and prepare washing according to type.
2. Press and release the outer door in area of the sticker on the top
left (top right for doors hinged on the left). The outer door will spring
open.

Operating instructions
18
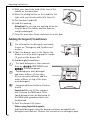
3. With your hand, take hold of the rear of the
handle on the main door.
4. Move the sliding button on the handle to the
right with your thumb and hold it there (1).
5. Pull the door handle (2).
6. Load the washing.
Attention! Do not trap any washing when clo-
sing the door! The fabrics and the machine
could be damaged!
7. Close the main door firmly and close the outer door.
Adding Detergent/Conditioner
3 For information on detergents and condi-
tioners see "Detergents and Conditioners"
section.
0 1.Open the drawer: press in the flap on the
drawer so as to be able to grasp the handle
(1), pull out the drawer (2).
2. Add detergent/conditioner.
k
Pre wash detergent or stain remover.
Only for (PRE WASH) and
(STAIN) programs.
l
Powdered main wash detergent
and water softener, if necessary.
(If you use water softener, add the
water softener on top of the main
wash detergent.)
w
Liquid conditioner (softener, finisher,
starch)
Important! Do not fill the compart-
ment beyond the MAX mark. Thick
liquid detergents can be diluted up to
the MAX mark, powdered starch can
be dissolved.
3. Push the drawer fully home.
When using liquid detergents:
Add liquid detergent using the dosing containers provided by the
detergent manufacturer. Observe the instructions on detergent pack.

Operating instructions
19
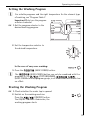
Setting the Washing Program
3 For suitable programs and the right temperature for the relevant type
of washing, see "Program Tables".
Important! Only turn the program
selector clockwise!
0 1.Set the program selector to the
desired washing program.
2. Set the temperature selector to
the desired temperature.
In the case of easy-care washing:
3. Press the (EASY-CARES) button.
3 The (EASY-CARES) button can only be combined with the
programs in the (COTTONS/LINEN),
(EASY-CARES+button) program group; in all other cases the button has
no effect.
Starting the Washing Program
0 1.Check whether the water tap is opened.
2. Switch on the washing machine:
Press the (ON/OFF) button.
The ON/OFF indicator illuminates, the
washing program starts.

Operating instructions
20
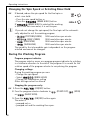
Changing the Spin Speed or Selecting Rinse Hold
0 If desired, reduce the spin speed for the final spin or
select rinse hold:
– Press the spin speed button or
– Press the (RINSE HOLD) button.
If (RINSE HOLD) is selected, the washing
is left in the last rinse water, it is not be spun.
3 If you do not change the spin speed, the final spin will be automati-
cally adjusted to suit the washing program:
The speed for the intermediate spin is dependent on the program
selected and cannot be changed.
During the Washing Program
Program progress indicator
The program selector serves as a program progress indicator by rotating
in a clockwise direction to the end of the program. It is normal for the
rotation speed of the program selector to vary during the program.
Changing settings:
During the washing program you can:
– Change the spin speed
– Select (RINSE HOLD)
– Change the temperature setting
Other settings cannot be altered.
Stopping the program early:
0 1.Press the (ON/OFF) button.
2. Turn the program selector clockwise to (PUMP OUT), (SPIN)
or (SHORT SPIN).
3. Press the (ON/OFF) button again.
The water is
– pumped out or
– pumped out and the washing then spun.
– (COTTONS/LINEN) 1200 revolutions per minute
– (EASY-CARES) 1000 revolutions per minute
– (DELICATES) 1000 revolutions per minute
– (WOOLLENS) 1000 revolutions per minute
La pagina si sta caricando...
La pagina si sta caricando...
La pagina si sta caricando...
La pagina si sta caricando...
La pagina si sta caricando...
La pagina si sta caricando...
La pagina si sta caricando...
La pagina si sta caricando...
La pagina si sta caricando...
La pagina si sta caricando...
La pagina si sta caricando...
La pagina si sta caricando...
La pagina si sta caricando...
La pagina si sta caricando...
La pagina si sta caricando...
La pagina si sta caricando...
La pagina si sta caricando...
La pagina si sta caricando...
La pagina si sta caricando...
La pagina si sta caricando...
La pagina si sta caricando...
La pagina si sta caricando...
La pagina si sta caricando...
La pagina si sta caricando...
La pagina si sta caricando...
La pagina si sta caricando...
La pagina si sta caricando...
La pagina si sta caricando...
La pagina si sta caricando...
La pagina si sta caricando...
La pagina si sta caricando...
La pagina si sta caricando...
La pagina si sta caricando...
La pagina si sta caricando...
La pagina si sta caricando...
La pagina si sta caricando...
-
 1
1
-
 2
2
-
 3
3
-
 4
4
-
 5
5
-
 6
6
-
 7
7
-
 8
8
-
 9
9
-
 10
10
-
 11
11
-
 12
12
-
 13
13
-
 14
14
-
 15
15
-
 16
16
-
 17
17
-
 18
18
-
 19
19
-
 20
20
-
 21
21
-
 22
22
-
 23
23
-
 24
24
-
 25
25
-
 26
26
-
 27
27
-
 28
28
-
 29
29
-
 30
30
-
 31
31
-
 32
32
-
 33
33
-
 34
34
-
 35
35
-
 36
36
-
 37
37
-
 38
38
-
 39
39
-
 40
40
-
 41
41
-
 42
42
-
 43
43
-
 44
44
-
 45
45
-
 46
46
-
 47
47
-
 48
48
-
 49
49
-
 50
50
-
 51
51
-
 52
52
-
 53
53
-
 54
54
-
 55
55
-
 56
56


AEG LAVAMAT W 1270 Manuale utente
- Categoria
- Lavatrici
- Tipo
- Manuale utente
- Questo manuale è adatto anche per
in altre lingue
- English: AEG LAVAMAT W 1270 User manual
