Philips 29PT9521/12 Manuale utente
- Categoria
- TV LCD
- Tipo
- Manuale utente
Questo manuale è adatto anche per

32PW9551 HD Prepared TV
29PT9521 Nagy felbontású TV
28PW9551 Телевизор с поддержкой
стандарта HD
Odbiornik telewizyjny
przystosowany do HD
Televizor HD Prepared
TV prijímač s prípravou na HD
HD Ayarlı TV
Polski MagyarTürkçe Slovenský Česky English

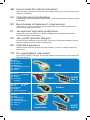
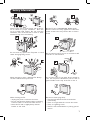
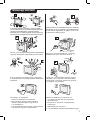
GB: How to make the optimal connection
(only RF cable is provided, for the rest of the cables consult your consumer electronics
dealer for availability)
HU: Optimális kapcsolat létesítése
(tartozékként csak antennakábelt mellékeltünk, a többi kapcsolatban keresse fel a helyi
szaküzletet)
RU: Выполнение оптимального подключения
(прилагается только РЧ-кабель, для приобретения других кабелей обратитесь
в магазин бытовой электроники)
PL : Jak wykonać optymalne podłączenie
(dostarczany jest tylko kabel RF, w sprawie dostępności pozostałych kabli należy
skonsultować się ze sprzedawcą)
CZ : Jak vytvořit optimální připojení
(S televizorem je dodáván pouze kabel RF. Informace o dostupnosti ostatních kabelů
získáte u vašeho prodejce spotřební elektroniky.)
SK : Optimálne pripojenie
(dodáva sa len kábel RF, dostupnosť ďalších káblov si overte u predajcu spotrebnej
elektroniky)
TR : En uygunbağlantı nasıl yapılır
(yalnızca RF kablosu verilmiştir, geriye kalan kabloları temin etmek için ticari elektronik
satıcınıza danışın)
HDMI
YPbPr
SCART
(Ext 1)
S-Video
SCART
(Ext 2)
RF
Composite
Audio/Video
GB: Best
HU : Leg-jobb
RU : Наивысшее
PO : Najlepiej
CZ : Nejvhodnější připojení
SL : Najlepšie
TR : En İyi
GB: Better
HU : Jobb
RU : Высокое
PO : Lepiej
CZ : Vhodnější
připojení
GB: Good
HU : Jó
RU : Хорошее
PO : Dobrze
CZ : Vhodné připojení
GB: Basic
HU : Alap
RU : Стандартное
PO : Podstawowy
CZ : Základní připojení
SL : Základné
TR : Temel
SL: Lepšie
TR: Daha İyi
SL: Dobré
TR: İyi

1
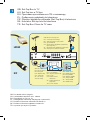
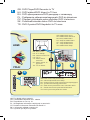
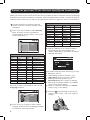
GB: Set-Top Box to TV
HU: Set-Top box a TV-hez
RU: Приставка для кабельного ТВ к телевизору
PL
: Podłączenie nadstawki do telewizora
CZ :
Připojení digitálního přijímače (Set-Top Box) k televizoru
SK : Konvertor Set-top box do televízora
TR : Set-Top Box Cihazı ile TV arası
HDMI
RF
GB: Back of set-top box
HU :
A set-top box hátulja
RU : Задняя панель приставки
PO: Tył nadstawki
CZ : Zadní strana digitálního přijímače
(Set-Top Box)
SL : Zadná strana digitálneho prijímača
TR : Set-top box cihazının arkası
TO
TV/VCR
CABLE
IN
IR
USB
DVD-D OUT
AUDIO IN
SPDIF
VIDEO
IN OUT
S-VIDEO
R L
AUDIO OUT
TV
PASS CARD
Y Pb Pr
OPTICAL
SPDIF
GB: Back of TV
HU: A TV hátulja
RU: Задняя панель ТВ
PO: Tył TV
CZ : Zadní strana
televizoru
SL : Zadná strana TV
prijímača
TR : TV’nin arkası
A
B
GB: HDMI Input
HU: HDMI bemenet
RU: Вход HDMI
PO: Wejście HDMI
CZ :
Vstup HDMI
SL : Vstup HDMI
TR
: HDMI Girişi
B
GB: RF Input
HU: RF bemenet
RU: Вход RF
PO: Wejście RF
CZ : Vstup RF
SL : RF vstup
TR : RF Girişi
DISH
IN
A
GB: For details refer to page 21.
HU: A részletekért lapozzon a 21. oldalra.
RU: Подробнее см. на стр. 21.
PL : Szczegółowe informacje znajdują się na stronie 21.
CZ : Podrobné informace naleznete na straně 21.
SK : Podrobné informácie nájdete na strane 21.
TR : Ayrıntılar için sayfa 21’ye bakın.

2
HDMI
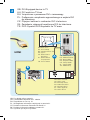
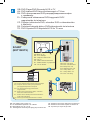
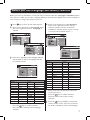
GB: HDTV receiver
HU: HDTV vevő
RU: Ресивер HDTV
PO: Odbiornik HDTV
CZ : Přijímač HDTV
SL : HDTV prijímač
TR : HDTV alıcısı
B
A
OUT
OUT
L
R
AUDIO
VIDEO
GB:
Back of TV
HU:
A TV hátulja
RU: Задняя панель ТВ
PO:
Tył TV
CZ: Zadní strana
televizoru
SL : Zadná strana
TV prijímača
TR: TV’nin arkası
GB: HDMI Input
HU: HDMI bemenet
RU: Вход HDMI
PO: Wejście HDMI
CZ : Vstup HDMI
SL : Vstup HDMI
TR : HDMI Girişi
GB: For details refer to page 21.
HU: A részletekért lapozzon a 21. oldalra.
RU: Подробнее см. на стр. 21.
PL : Szczegółowe informacje znajdują się na stronie 21.
CZ : Podrobné informace naleznete na straně 21.
SK : Podrobné informácie nájdete na strane 21.
TR : Ayrıntılar için sayfa 21’ye bakın.
GB: DVI-Equipped device to TV
HU: DVI eszköz a TV-hez
RU: Устройство с разъемом DVI к телевизору
PL : Podłączenie urządzenia wyposażonego w wejście DVI
do telewizora
CZ : Připojení zařízení s rozhraním DVI k televizoru
SK : Zariadenie vybavené konektorom DVI do televízora
TR : DVD Oynatıcı/DVD Kaydedici ile TV arası

3
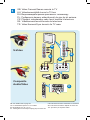
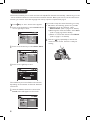
GB: DVD Player/DVD Recorder to TV
HU: DVD lejátszó/DVD felvevő a TV-hez
RU: DVD-проигрыватель/DVD-рекордер к телевизору
PL : Podłączenie odtwarzacza/nagrywarki DVD do telewizora
CZ : Připojení přehrávače nebo rekordéru DVD k televizoru
SK : Prehrávač/rekordér diskov DVD do televízora
TR : DVD Oynatıcı/DVD Kaydedici ile TV arası
HDMI
S-VIDEO
OUT
OUT
OUT
L
R
AUDIO
VIDEO
COMP VIDEO
Y
Pb
Pr
B
GB: Back of TV
HU: A TV hátulja
RU: Задняя панель ТВ
PO: Tył TV
CZ : Zadní strana
televizoru
SL : Zadná strana TV
prijímača
TR : TV’nin arkası
GB: HDMI/YPbPr Input
HU: HDMI/YPbPr bemenet
RU: Вход HDMI/YPbPr
PO: Wejście HDMI/YPbPr
CZ : Vstup HDMI/YPbPr
SL : Vstup HDMI/YPbPr
TR : HDMI/YPbPr Girişi
C
GB: Back of DVD Player/Recorder
HU: A DVD lejátszó/felvevő hátulja
RU: Задняя панель DVD-проигрывателя/рекордера
PO: Tył odtwarzacza/nagrywarki DVD
CZ : Zadní strana přehrávače nebo rekordéru DVD
SL : Zadná strana DVD prehrávača/rekordéra
TR : DVD Oynatıcı/Kaydedicinin arkası
A
A
B
GB: For details refer to page 21.
HU: A részletekért lapozzon a 21. oldalra.
RU: Подробнее см. на стр. 21.
PL : Szczegółowe informacje znajdują się na stronie 21.
CZ : Podrobné informace naleznete na straně 21.
SK : é informácie nájdete na strane 21.
TR : Ayrıntılar için sayfa 21’ye bakın.
YPbPr

4
SCART
(EXT1/EXT2)
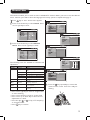
GB: DVD Player/DVD Recorder/VCR to TV
HU: DVD lejátszó/DVD felvevő/videomagnó a TV-hez
RU: DVD-проигрыватель/DVD-рекордер/видеомагнитофон
к телевизору
PL
: Podłączenie odtwarzacza DVD/nagrywarki DVD/
magnetowidu do telewizora
CZ
: Připojení přehrávače DVD, rekordéru DVD a videorekordéru
k televizoru
SK
: Prehrávač/rekordér diskov DVD/videorekordér do televízora
TR
: DVD Oynatıcı/DVD Kaydedici/VCR ile TV arası
GB: Back of DVD Player/Recorder/VCR
HU: A DVD lejátszó/felvevő/videomagnó hátulja
RU: Задняя панель DVD-проигрывателя/
рекордера/видеомагнитофона
PO: Tył odtwarzacza/nagrywarki DVD/
magnetowidu
CZ : Zadní strana přehrávače DVD, rekordéru
DVD nebo videorekordéru
SL : Zadná strana DVD prehrávača/rekordéra/
VHS videorekordéra
TR : DVD Oynatıcı/Kaydedici/VCR’nin arkası
B
GB: Back of TV
HU: A TV hátulja
RU: Задняя панель ТВ
PO: Tył TV
CZ : Zadní strana televizoru
SL : Zadná strana TV prijímača
TR : TV’nin arkası
GB: EXT 1/2 Input
HU: EXT 1/2 bemenet
RU: Вход EXT 1/2
PO: Wejście EXT 1/2
CZ :
Vstup EXT 1/2
SL : Vstup EXT 1/2
TR
: EXT 1/2 Giriş
Ext 1
Ext 2
A
GB: For details refer to page 22.
HU: A részletekért lapozzon a 22. oldalra.
RU: Подробнее см. на стр. 22.
PL : Szczegółowe informacje znajdują się na stronie 22.
CZ: Podrobné informace naleznete na straně 22.
SK: Podrobné informácie nájdete na strane 22.
TR: Ayrıntılar için sayfa 22’ye bakın.

GB: DVD Player/DVD Recorder/VCR to TV
HU: DVD lejátszó/DVD felvevő/videomagnó a TV-hez
RU: DVD-проигрыватель/DVD-рекордер/видеомагнитофон
к телевизору
PL
: Podłączenie odtwarzacza DVD/nagrywarki DVD/
magnetowidu do telewizora
CZ
: Připojení přehrávače DVD, rekordéru DVD a videorekordéru
k televizoru
SK
: Prehrávač/rekordér diskov DVD/videorekordér do televízora
TR
: DVD Oynatıcı/DVD Kaydedici/VCR ile TV arası
5
S-Video
C
VIDEO
AUDIOL R
B
A
VIDEOS-VIDEO AUDIOL
R
B
A
Composite
Audio/Video
GB: For details refer to page 22.
HU: A részletekért lapozzon a 22. oldalra.
RU: Подробнее см. на стр. 22.
PL : Szczegółowe informacje znajdują się na stronie 22.
CZ: Podrobné informace naleznete na straně 22.
SK: Podrobné informácie nájdete na strane 22.
TR: Ayrıntılar için sayfa 22’ye bakın.
CZ: Podrobné informace naleznete na straně 22.
SK: Podrobné informácie nájdete na strane 22.
TR: Ayrıntılar için sayfa22’e bakın.
GB: Video Camera/Games console to TV
HU: Videokamera/játék konzol a TV-hez
RU: Видеокамера/игровая приставка к телевизору
PL :
Podłączenie kamery wideo/konsoli do gier do tel ewizora
CZ :
Připojení videokamery nebo herní konzole k televizoru
SK : Videokamera/herná konzola do televízora
TR : Video Kamera/Oyun konsolu ile TV arası

i
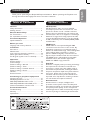
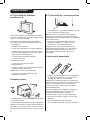
Introduction
Thank you for purchasing this Philips HD Prepared television. Before opearting the TV, please read
through this manual thoroughly and retain it for future reference.
Table of Contents
General
Safety information .................................................. 1
Getting started ....................................................... 2
Remote Control keys
For TV functions ..................................................... 3-4
For audio/video functions .................................... 5
First Time Operation
Quick Installation ................................................... 6
Before you start
Language and country selection ......................... 7
Installation
Auto Store .............................................................. 8
Manual Store ........................................................... 9
Sort (rearrange channels’ sequence) ................. 10
Name (personalise channel) ................................ 11
Fav. Program (quick access to channels) ........... 12
Operation
Picture settings ........................................................ 13
Sound settings ......................................................... 14
Features settings - General .................................. 15
Features settings - Timer ...................................... 16
Features settings - Parental Control .................. 17
Features settings - Demo.......................................18
Teletext ..................................................................... 19
Picture Formats ....................................................... 20
Connecting to peripheral equipments
Set-top box to TV .................................................. 21
DVI-Equipped Device to TV ................................. 21
DVD Player/DVD Recorder to TV .................... 21
DVD Player/DVD Recorder/VCR to TV .......... 22
Video Camera/Game console to TV ................. 22
Practical Information
Troubleshooting ..................................................... 23
Glossary ................................................................... 24
Specification ............................................................ 25
Special Features
HD Prepared
HD Prepared TV offers you more detailed
and sharper picture than current TV sets. The
picture are shown in such a realistic and vivid
brillance that you will feel that you watching live
entertainment. This TV is euipped to receive high
definition TV signal and is fully prepared for HD
sources like HDTV broadcast. It can also handle
all HD connectivity such as HDMI (HDCP), YPbPr
and DVI audio.
HDMI input
HDMI makes an uncompressed digital RGB
connection from the source to the screen. By
eliminating conversion to an analogue signal, it
delivers an unblemished image. The non-degraded
signal reduces flicker and leads to a clearer
picture. HDMI intelligently communicates the
highest output resolution with the source device.
The HDMI input is fully backward compatible
with DVI sources but includes digital audio.
HDMI uses HDCP copy protection.
Pixel Plus
Pixel Plus is a digital picture processing technology
that improves the resolution of still and mov-
ing pictures. It does more than adding pixels, it
also makes the pixels better, resulting incredible
sharpness and picture depth every time and from
any source. And it does not just improve the
resolution either, because you also benet from
improved color reproduction, resulting in the n-
est color details and superior brilliance.
Active Control
Active Control is a unique, intelligent and
proactive control system. Noise and sharpness
improvement settings are continuously optimized
for optimal picture quality. It also incorporates
ambient light sensor which automatically compen-
sate for any change in ambient light environment.
English

1
Safety Information
Do not place your TV set under direct sunlight or
heat. Do not place naked flame sources, such as
lighted candles on the top of the TV or near it.
Do not expose your TV to rain or moisture. It will
cause fire or shock hazard.
When cleaning the TV:
• Unplug the power cord from the mains.
• Do not use abrasive cleaning agents containing
acetone, toulene or alcohol to clean the TV.
• Clean the TV with a slightly damp chamois
leather or soft cloth.
Do not touch any part of the TV, power or aerial
cables during lightning storms.
Leave at least 10 cm around each side of the TV
set to allow for proper ventilation. Place the
set on a stable, level surface. Do not cover the
ventilation slots of the TV with a cloth or other
material. It may cause overheating.
Never attempt to repair a defective TV. Always
consult a skilled service personnel.
Disconnect mains plug when:
• The blue light below the TV screen flashes
continuously.
• There is a bright white line across the screen.
• There is a lightning storm.
• The TV is left unattended for a prolong period
of time.
Plug the TV into a 220-240 V AC, 50 Hz supply.
Do not connect too many applinaces to the same
power socket as this may result in re or electric
shock.

2
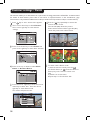
Switching on/off the TV set
• To switch on/off the TV set, press the power
(
;) key.
When the set is switched on, a blue indicator will
be lighted near the power button. If the screen
is not activated within a few minutes, the TV is
probably in standby mode.
• P
ress either one of the PROGRAM
keys on the TV
control or the P – or + key on the remote
control to switch on the TV.
Note: Do not leave your set on standby mode for
a prolonged period of time. In standby mode, the
TV consumes less than 1W. In order to be more
environmental friendly, please switch off the set.
Using the Remote Control
• Insert the two batteries (supplied) correctly,
with the + and – aligned as marked on the unit.
You are now ready to use your remote control.
Note: The batteries supplied do not contain mercury
or nicker cadmium. Always remember to dispose
your used batteries in an environmental friendly way.
Replace with the same type of batteries.
CAUTION:
To prevent battery leakage which may result in
bodily injury, property damage or damage to the
unit
• Make sure you insert the batteries using the
correct polarities.
• Do not mix batteries (old and new or carbon
and alkaline etc.)
• Remove batteries when the unit is not in use
for a prolong period.
Getting started
The control keys on the TV
The television set has a power key (;) to switch
on/off the set. It is located at the front of the TV.
In the absence of the remote control, you can use
these keys, located either on the top or side of
the TV to do some basic operations:
“VOLUME” keys:
• press either one to adjust the sound level
• press the two keys together and hold will call
up the menu (only for TVs without “Menu” key).
• when in a menu, press either one to select an
item in the menu.
“PROGRAM” keys:
• press either one to select channels.
• when in a menu, press either one to highlight
an item in the menu.
“MENU” key (available in some models):
• press to call up or remove the main menu.
Connections
• Insert the aerial plug into the : socket at
the back of the set.
• Insert the mains plug into a wall socket.
Note: For details on connecting other peripheral
equipment, please refer to the pages on connection in
this manual.

3
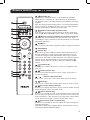
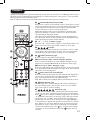
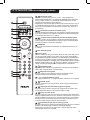
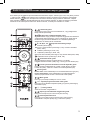
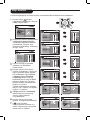
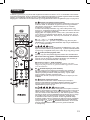
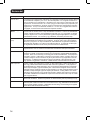
1
Standby key
Press once to switch the TV on or off temporarily (standby).
When the TV is switched on, a blue indicator on the TV lights
up. When the TV is in standby mode, the blue indicator becomes
brighter.
Note: For environmental and safety reason, it is recommended that the
TV set is not left on standby mode when not in use. Switch off the TV
with the power button or disconnect from the mains.
2
Select audio/video equipment key
Press this key to use the remote control to operate equipment
such as VCR, DVD, SAT, AMP and CD. Refer to page 5 for details.
3
Display source List/Select an external source key
Press this key once will display the external source list. Press
repeatedly to select a channel to view the playback of a connected
peripheral equipment.
4
·¢ÊÆÆÆ
Use to operate audio/video equipment. Refer to page 5 for details.
5
Unused key
6
Cursor key
Press cursor up (above OK key), down (below OK key), left (on
the left of OK key) or right (on the right of OK key) to move
around the menu and select adjustments. Cursor up or down is
also used to select the possible characters in the "Name" channel
function and as adjustment keys for picture format with a " "
symbol. Cursor left and right also selects the different picture
format.
7
Conrm key
Press once to conrm selection in a menu or to display the pro-
gram list.
8
Freeze picture key
Press once to freeze the picture on the screen. Press again to
resume movement.
9
+ – Volume adjustment key
Press + to increase and – to decrease audio volume of the TV.
10
Mute key
Press once to switch off sound and press again to resume sound.
11
On screen information key
Press once to display information such as channel number, channel
name, sleeptimer status and sound mode.
12
Active Control key
Press once to switch on active control function. Press the second
time to switch on Light Sensor. Press the third time to switch off.
Press and hold for a few seconds to start the active control demo
mode. Press the key again to switch off the demo mode.
13
Split screen (video and text) key
Press once to split the screen into half, left for video and right for
teletext information.
Note: Will not work for TV equipped with the conventional (4:3) screen
and external channels EXT4 and EXT5.
1
2
3
4
5
6
7
8
9
10
11
12
13
Remote control keys for TV functions

4
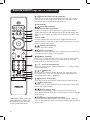
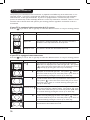
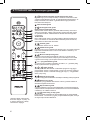
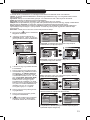
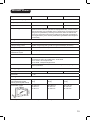
Remote control keys for TV functions
16
14
Pixel Plus demo mode on/off key
Press once to switch on the Pixel Plus demo mode. The screen is
split into two to show the picture quality with and without Pixel
Plus. Press again to switch the demo mode off.
15
Unused key
16
Surround mode key
Dolby Virtual* Surround mode
In stereo transmission, press this key to toggle between Dolby
Virtual and Stereo mode. Dolby Virtual is the optimal setting with
Dolby surround signals. It enables you to experience a rear sound
effect.
Spatial mode
In mono transmission, press this key to toggle between Spatial
Sound and mono mode. When this mode is selected, you can expe-
rience a pseudo stereo effect.
17
Teletext function key
Refer to page 18 for details.
18
Timer menu key
Press once to call up the Timer menu. Details and use of the Timer
menu, please refer to page 16 of the manual.
19
Menu on/off key
Press once to call up the main menu. Press again to remove menu
from the screen. When you are in any menu, press this key will
bring you back to the previous level.
20
+ P – Channel selection key
Press + to select a higher numbered channel or – to select a lower
numbered channel.
21
to Digit key
Press to key in a channel number directly. For single digit chan-
nel number, press once. For two-digit channel number, press the
second digit before the “–” disappears.
22
Previous channel key
Press this to call up the previous channel that you have watched.
23
Dual sound key
In Dual sound or stereo transmission, press this key to select alter-
nate sound mode available.
24
Picture format key
Press this key repeatedly to select the picture format that you
want. Details and use of the Picture format, please refer to page 20
of the manual.
25
Smart Sound and Picture key
Press to select pre-dened picture and sound settings. “Personal”
refers to the personal preference settings selected in the sound and
picture menu.
17
18
19
20
21
22
23
24
25
14
15
*Manufactured under license from
Dolby Laboratories. “Dolby” and
the double-D symbols are trade-
marks of Dolby Laboratories.

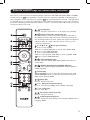
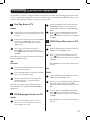
5
Remote control keys for audio/video functions
This remote control operates the following Philips equipment: VCR, DVD, SAT (RC6), AMP (+ TUNER)
and CD. Press the key repeatedly to operate any of the equipment indicated on the display. An-
other equipment can be selected by pressing the key repeatedly within 2 seconds. The light indica-
tor will blink slowly to indicate the equipment is active. While the equipment is active, you can operate
it with the relevant keys described below. When no action is carried out within 60 seconds, the remote
control goes back to TV mode.
1
Standby key
Press to switch the equipment on or off temporarily (standby).
2
Select audio/video equipment key
Press repeatedly to operate any of the equipment indicated on
the display. Another equipment can be selected by pressing the
key repeatedly within 2 seconds. When the respective equipment
indication lights up, it means that the remote control is set to
control the equipment.
3
·, ¢, Ê, Æ, ÆÆ ,
Basic operation keys
· Press to record (VCR)
¢ Press to rewind (VCR, CD), to search down (DVD, AMP)
Ê Press to stop (VCR, DVD, CD)
Æ Press to play (VCR, DVD, CD)
ÆÆ Press to fast forward (VCR, CD), to search up (DVD, AMP)
Press to pause (VCR, DVD, CD)
4
Title/information key
Press to select title (DVD), RDS display (AMP), information on
screen (CD)
5
Subtitle language/news/shufe play key
Press to select subtitle language (DVD), RDS news/TA (AMP), to
shufe play (CD).
6
Cursor key
cursor up/down Press to select the next/previous disc (CD)
cursor left/right Press to select the previous/following track
(CD), search up/down (AMP).
7
Menu key
Press to switch on/off menu.
8
+ P – Chapter/channel/track key
Press to select chapter (DVD), channel (VCR), track (CD).
9
0 to 9 Digit key
Press to enter digit.
10
On screen information key
Press to display information.
11
Index/chapter/frequency
Press to display tape index (VCR), select a chapter (DVD), select a
frequency (AMP).
1
2
3
4
5
6
7
8
9
10
11
3

6
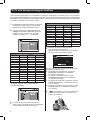
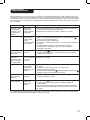
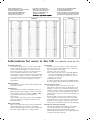
Languages available for selection
Display
on TV
Language
Display
on TV
Language
English English Svenska Swedish
Dansk Danish Hrvatski Croatian
Nederlands Dutch
Česky
Czech
Suomi Finnish Magyar Hungarian
Français French Polski Polish
Deutsch German Romana Romanian
EÏÏËÓıη
Greek Russsian
Italiano
Italian Slovenský Slovakian
Norsk
Norwegian Slovenski Slovenian
Português Portuguese Türkçe Turkish
Español Spanish
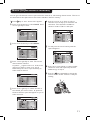
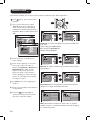
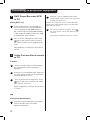
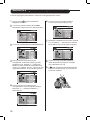
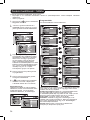
4 Press the OK key to start quick installation.
The installation process will take a few
minutes, depending on the number of channels
detected and stored.
If you wish to keep the tuned channels, go to step
5. Otherwise, you can:
a) Automatically search for channels : go to
Auto Store (refer to page 8 for details).
b) Manually search for channels : go to
Manual Store (refer to page 9 for details).
c) Rearrange the channel numbers: go to Sort
(refer to page 10 for details).
d) Name or rename the channel: go to
Name
(refer to page 11 for details).
5 Press the key repeatedly to remove the
menu from the screen. Your TV is ready for
viewing.
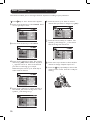
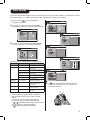
Switch on your new TV for the first time/Quick Installation
When you switch on your new TV for the rst time, you will be prompt to select the country and language
desired for the TV’s quick installation of channels. If you accidentally switch off and on the TV, the quick in-
stallation will not work. You can still use the “Auto Store” function on page 8 to store your TV channels.
1 Connect the TV to the antenna input and
switch on the TV. A country selection menu
will appear.
2 Press cursor up or down to select Country.
Refer to the list of country available for
selection, below. If your country is not in the
list provided, select “
- - -”.
Countries available for selection
Display
on TV
Country
Display
on TV
Country
A Austria NL Netherlands
B Belgium P Portugal
CH Switzerland S Sweden
D Germany CZ Czech Republic
DK Denmark H Hungary
E Spain HR Crotia
F France PL Poland
FI Finland RO Romania
GB Great Britain RUS Russia
GR Greece SK Slovakia
I Italy SLO Slovenia
IRL Ireland TR Turkey
L Luxemburg - - - Others
N Norway
Once this is done, press the OK to move to the
Language selection.
3 Press cursor up or down to select a desire
language. Refer to the list of language available
for selection, in the next column.

7
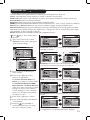
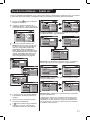
4 Press cursor down key to select Country.
Press cursor right key to enter country
selection. Refer to the list of countries
available for selection, below. If your country
is not in the list provided, select “- - -”.
Countries available for selection
Display
on TV
Country
Display
on TV
Country
A Austria NL Netherlands
B Belgium P Portugal
CH Switzerland S Sweden
D Germany CZ Czech Republic
DK Denmark H Hungary
E Spain HR Crotia
F France PL Poland
FI Finland RO Romania
GB Great Britain RUS Russia
GR Greece SK Slovakia
I Italy SLO Slovenia
IRL Ireland TR Turkey
L Luxemburg - - - Others
N Norway
• Press cursor up or down key to select the
country you are in.
• Press the key to conrm selection.
• Press the cursor left to leave country
selection.
5 Press the key repeatedly to remove the
menu from the screen. Your TV is prepared
for further installation in the next few pages.
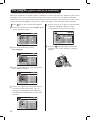
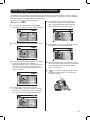
Before you start-Language and country selection
Before you start any installation or view your TV, you need to select the Language and Country option.
This option is enables you to select a language which you want the text display on the screen to appear in
and a country to assign a TV system to your set.
1 Press key to start. A main menu appears.
2 Press cursor down key to select Install. Press
the cursor right key to enter. Language is
selected.
3 Press cursor right key to enter language selection
option. Refer to the list of language available
for selection, below.
Languages available for selection
Display
on TV
Language
Display
on TV
Language
English English Svenska Swedish
Dansk Danish Hrvatski Croatian
Nederlands Dutch
Česky
Czech
Suomi Finnish Magyar Hungarian
Français French Polski Polish
Deutsch German Romana Romanian
EÏÏËÓıη
Greek Russsian
Italiano
Italian Slovenský Slovakian
Norsk
Norwegian Slovenski Slovenian
Português Portuguese Türkçe Turkish
Español Spanish
• Press cursor up or down key to select a language.
• Press the key to conrm selection.
• Press the cursor left key to leave language
selection.

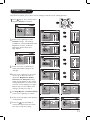
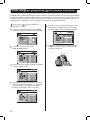
8
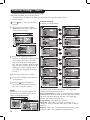
Auto Store
1 Press key to start. A main menu appears.
2 Press cursor down key to select Install and the
cursor right key to enter..
3 Press cursor down key to select Auto Store.
4 Press cursor right key to start.
The installation process will take a few minutes,
depending on the number of channels detected
and stored.
5 After all available channels are stored, the
Install menu will appear on the screen.
This function enables you to search and store all available TV channels automatically. After that, go to the
“Sort and “Name” function to customise the stored TV channels. Before you start to use the “Auto Store”
function, you need to select the language and country options as explained in page 7.
If you wish to keep the tuned channels, go to step
6. Otherwise, the following options are possible
a) Manually search for channels : select
Manual Store (refer to page 9 for details).
b) Rearrange the channel numbers: select
Sort
(refer to page page 10 for details).
c) Name or rename the channel: select Name
(refer to page 11 for details).
6 Press the key repeatedly to remove the
menu from the screen. Your TV is ready for
viewing.

9
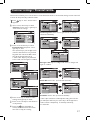
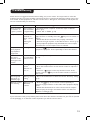
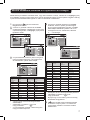
Manual Store
1 Press key to start. A main menu appears.
2 Press cursor down key to select Install. Press
cursor right key to enter.
3 Press cursor down key to select Manual
Store. Press cursor right key to enter.
The following items are available for selection and
adjustment.
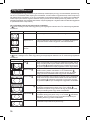
Item Content Selection/adjustment
Level 1 Level 2 Level 3
System Europe Detects of TV system automati-
cally.
France Sets TV system to LL’ standard.
UK Sets TV system to I standard.
West Europe Sets TV system to BG standard.
East Europe Sets TV system to DK standard.
Search TV frequency
Search automatically or key in
directly.
Program
No.
TV channel
number
Key in a channel number to the
frequency detected.
Fine
Tune
Tuning bar Fine adjustment to improve
poor reception.
Store Yes Stores the settings done in the
memory.
• Press cursor right key to move to a higher level
or start searching.
• Press cursor left key to move to a lower level.
• Press cursor up or down key to select item or
adjustments in a level.
• Press the digit to to key in TV frequency
or channel number.
• Press key to conrm.
This function enables you to search and store individual TV channel. Before you start to use the “Manual
Store” function, you need to select the language and country options as explained in page 7.
6 Press the key repeatedly to remove the
menu from the screen. Your TV is ready for
viewing.

10
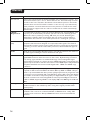
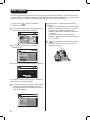
6 Press the cursor up or down to select a
channel that you want to change to (e.g. 001).
7 Press the cursor left key to conrm. The
symbol È will change to ¬. This shows
that the change has been done.
8 Press cursor up or down to select another
channel to change. Repeat steps 5 to 7.
9 Press the key repeatedly to remove the
menu from the screen. Your TV is ready for
viewing.
Sort (rearrange channels’ sequence)
1 Press key to start. A main menu appears.
2 Press cursor down key to select Install. Press
cursor right key to enter.
3 Press cursor down key to select Sort.
4 Press cursor right key to enter. The current
channel (e.g. 004) will be selected. A symbol
¬ appears next to it. If this is the channel
you want to rearrange, go to step 5.
Otherwise press cursor up or down key to
select another channel.
5 Press cursor right key to conrm that this is
the channel you want to change from. The
symbol ¬ will change to È.
This function enables you to rearrange channels’ sequence according to your preference.

11
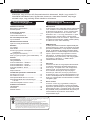
6 Press the cursor up or down to select a
character. You can key up to maximum of 5
characters. The characters available for
selection are A to Z, 0 to 9 and space.
7 To end, press the cursor left key until the
square disppears.
8 Press cursor up and down to select another
channel to name and repeat steps 5 and 7.
Otherwise go to step 9.
9 Press the key repeatedly to remove the
menu from the screen. Your TV is ready for
viewing.
Name (to personalise channels)
1 Press key to start. A main menu appears.
2 Press cursor down key to select Install. Press
cursor right key to enter.
3 Press cursor down key to select Name.
4 Press cursor right key to enter. The current
channel will be selected.
A symbol ¬ appears next to it. If this is the
channel you want to name, go to step 5.
Otherwise, press cursor up or down key to
select another channel.
5 Press cursor right key to conrm that this is
the channel you want to name. A square for
the rst character space will appear for you to
select character.
You can give a 5-character name to personalise the channels or edit existing channel names. This has to
be selected from the alpha numeric characters available in the TV’s memory.

12
Fav. program (quick access to channels)
1 Press key to start. A main menu appears.
2 Press cursor down key to select Install. Press
cursor right key to enter.
3 Press cursor down key to select
Fav. Program.
4 Press cursor right key to enter. The current
channel will be selected.
5 Press cursor right key to delete the channel
from the favourite program list. The “$”
disappears, conrming that the channel has
been deleted. To add channels to the list, do
the same.
After auto installation, all channels found are added into a favourite program list. Channels in this list can
be quickly access via the channel selection keys on the remote control. You can delete or add back
channels into this list using the Fav. Program function in the Install menu. The channels not in this list can
only be call up via the digit 0 to 9 keys. A “X” symbol will appear in front of these channel numbers.
6 Press the cursor up or down to select another
channel to add/delete. When you have
completed your list, go to the next step.
7 Press the key repeatedly to remove the
menu from the screen. Your TV is ready for
viewing.
La pagina si sta caricando...
La pagina si sta caricando...
La pagina si sta caricando...
La pagina si sta caricando...
La pagina si sta caricando...
La pagina si sta caricando...
La pagina si sta caricando...
La pagina si sta caricando...
La pagina si sta caricando...
La pagina si sta caricando...
La pagina si sta caricando...
La pagina si sta caricando...
La pagina si sta caricando...
La pagina si sta caricando...
La pagina si sta caricando...
La pagina si sta caricando...
La pagina si sta caricando...
La pagina si sta caricando...
La pagina si sta caricando...
La pagina si sta caricando...
La pagina si sta caricando...
La pagina si sta caricando...
La pagina si sta caricando...
La pagina si sta caricando...
La pagina si sta caricando...
La pagina si sta caricando...
La pagina si sta caricando...
La pagina si sta caricando...
La pagina si sta caricando...
La pagina si sta caricando...
La pagina si sta caricando...
La pagina si sta caricando...
La pagina si sta caricando...
La pagina si sta caricando...
La pagina si sta caricando...
La pagina si sta caricando...
La pagina si sta caricando...
La pagina si sta caricando...
La pagina si sta caricando...
La pagina si sta caricando...
La pagina si sta caricando...
-
 1
1
-
 2
2
-
 3
3
-
 4
4
-
 5
5
-
 6
6
-
 7
7
-
 8
8
-
 9
9
-
 10
10
-
 11
11
-
 12
12
-
 13
13
-
 14
14
-
 15
15
-
 16
16
-
 17
17
-
 18
18
-
 19
19
-
 20
20
-
 21
21
-
 22
22
-
 23
23
-
 24
24
-
 25
25
-
 26
26
-
 27
27
-
 28
28
-
 29
29
-
 30
30
-
 31
31
-
 32
32
-
 33
33
-
 34
34
-
 35
35
-
 36
36
-
 37
37
-
 38
38
-
 39
39
-
 40
40
-
 41
41
-
 42
42
-
 43
43
-
 44
44
-
 45
45
-
 46
46
-
 47
47
-
 48
48
-
 49
49
-
 50
50
-
 51
51
-
 52
52
-
 53
53
-
 54
54
-
 55
55
-
 56
56
-
 57
57
-
 58
58
-
 59
59
-
 60
60
-
 61
61


Philips 29PT9521/12 Manuale utente
- Categoria
- TV LCD
- Tipo
- Manuale utente
- Questo manuale è adatto anche per
in altre lingue
- English: Philips 29PT9521/12 User manual
- slovenčina: Philips 29PT9521/12 Používateľská príručka
Documenti correlati
-
Philips 32PW9520/12 Manuale utente
-
Philips 29PT8650/12 Manuale utente
-
Philips 42HF7443 Manuale del proprietario
-
Philips 42PF9830/69-79 Manuale utente
-
-
-
Philips 50PF7320/10 Manuale utente
-
-
Philips 19PFL3404/60 Manuale utente
Altri documenti
-
Thomson 29DX400S Scheda dati
-
Changhong Electric LED40D2080ST2 Istruzioni per l'uso
-
Samsung PS50A558S1F Manuale utente
-
Proline L3217HD LED Manuale utente
-
Samsung PS50A40 Manuale utente
-
-
Panasonic DMRE53 Istruzioni per l'uso
-
LG DX325B Manuale utente
-
Panasonic KXF120B Istruzioni per l'uso