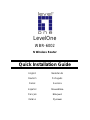
LevelOne WBR-6002 Quick Installation Manual
- Categoria
- Componenti del dispositivo di sicurezza
- Tipo
- Quick Installation Manual
Questo manuale è adatto anche per

LevelOne
WBR-6002
N Wireless Router
Quick Installation Guide
English
Nederlands
Deutsch
Português
Dansk
Svenska
Español
Français
Italiano

2
Table of Contents
English ........................................................................ 3
Deutsch ..................................................................... 16
Dansk ........................................................................ 29
Español ..................................................................... 42
Français .................................................................... 55
Italiano ...................................................................... 68
Nederlands ............................................................... 81
Português ................................................................. 94
Svenska .................................................................. 107
............................................................ 120
................................................................. 133
.................................................................. 146

3
English
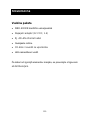
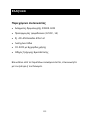
Package Contents
WBR-6002 N Wireless Router
Power Adapter (12VDC, 1A)
RJ-45 LAN Ethernet Cable
Rubber Feet
CD-ROM with User Manual
Quick Installation Guide
If any of the above items are missing, please contact your retailer
or distributor.

4
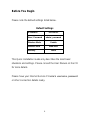
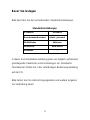
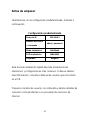
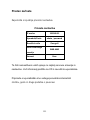
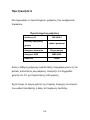
Before You Begin
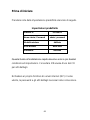
Please note the default settings listed below.
Default Settings
IP Address
192.168.0.1
User / Password
admin / password
Wireless Mode
Enable
Wireless SSID
WBR-6002
Security
None
This Quick Installation Guide only describes the most basic
situations and settings. Please consult the User Manual on the CD
for more details.
Please have your Internet Service Prov
or other connection details ready.

5
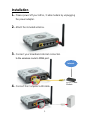
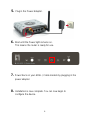
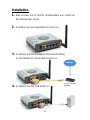
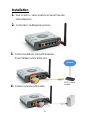
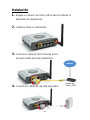
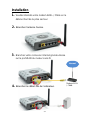
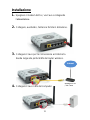
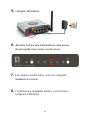
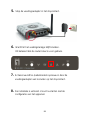
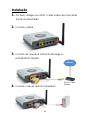
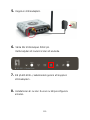
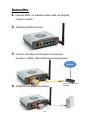
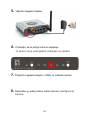
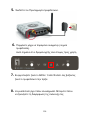
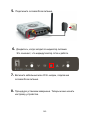
Installation
3. Connect your broadband internet connection
4. Connect the Computer LAN cable.
2. Attach the included antenna.
1. Please power off your ADSL / Cable modem by unplugging
the power adapter.
Internet
ADSL / Cable
Modem

6
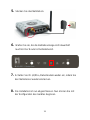
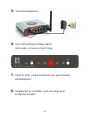
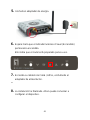
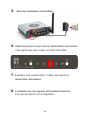
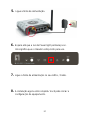
6. Wait until the Power light remains on.
This means the router is ready for use.
5. Plug in the Power Adapter.
8. Installation is now complete. You can now begin to
configure the device.
7. Power back on your ADSL / Cable modem by plugging in the
power adapter.

7
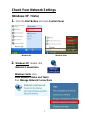
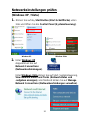
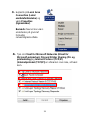
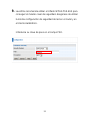
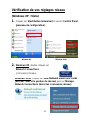
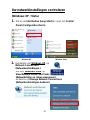
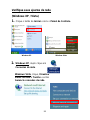
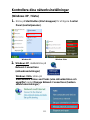
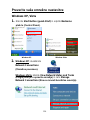
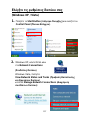
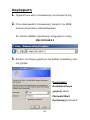
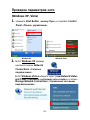
Check Your Network Settings
(Windows XP / Vista)
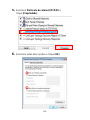
1. Click the Start Button and open Control Panel.
Windows Vista, click
View Network Status and Tasks
then Manage Network Connections
2. Windows XP, double click
Network Connections
Windows XP
Windows Vista

8
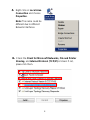
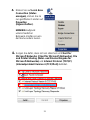
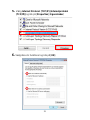
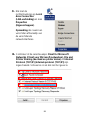
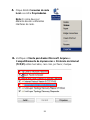
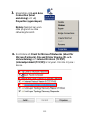
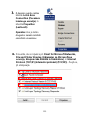
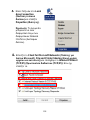
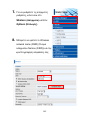
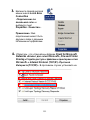
3. Right click on Local Area
Connection and choose
Properties.
Note: The name could be
different due to different
Network Interfaces.
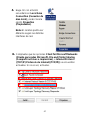
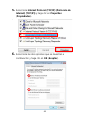
4. Check the Client for Microsoft Networks, File and Printer
Sharing, and Internet Protocol (TCP/IP) is ticked. If not,
please tick them.

9
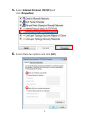
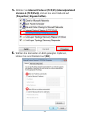
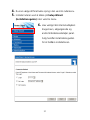
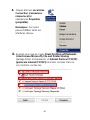
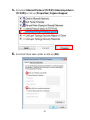
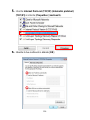
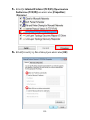
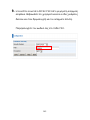
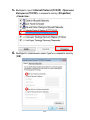
6. Select these two options and click [OK].
5. Select Internet Protocol (TCP/IP) and
click [Properties]

10
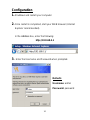
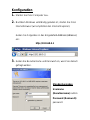
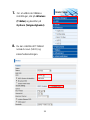
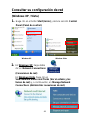
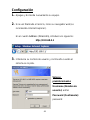
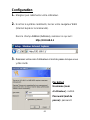
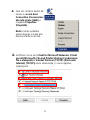
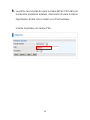
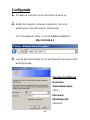
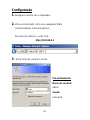
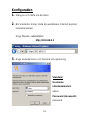
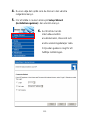
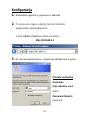
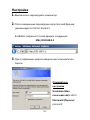
Configuration
1. Shutdown and restart your computer.
2. Once restart is completed, start your WEB browser (Internet
Explorer recommended).
In the Address box, enter the following:
http://192.168.0.1
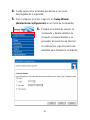
3. Enter the Username and Password when prompted.
Defaults
Username: admin
Password: password

11
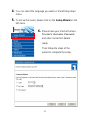
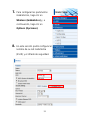
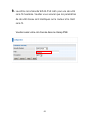
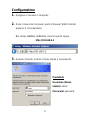
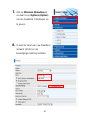
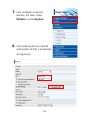
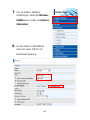
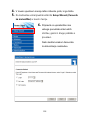
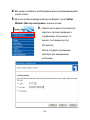
4. You can select the language you want on the left drop down
menu.
5. To set up the router, please click on the Setup Wizard on the
left menu.
6. Please have your Internet Service
and other connection details
ready.
Then follow the steps of the
wizard to complete the setup.

12
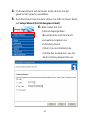
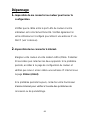
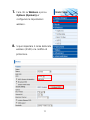
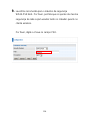
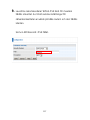
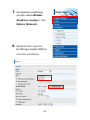
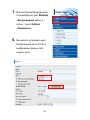
8. You can set your Wireless network
name (SSID) and security
encryption.
7. To set wireless settings, please
click Wireless and then
Options.

13
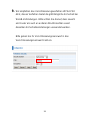
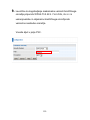
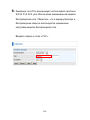
9. LevelOne recommends WPA2-PSK AES for maximum
wireless security. Please ensure that the same network
security settings are used on both the router and wireless
client.
Please type your passkey in the PSK field.

14
Troubleshooting
1. I cannot connect to the wireless router to start
configuration.
Check that you have connected the cable correctly between
computer is set to obtain an IP Address via DHCP (see above).
2. I cannot connect to the Internet.
Try to turn off the router and your ADSL/Cable modem. Wait 30
seconds and then turn the devices back on. If you still have
check whether the router has obtained an Internet IP Address
in the Status page.
If the above does not work, please contact your Internet
Service Provider to check whether there are any problems with
the connection or settings.

15
3. I cannot connect to the wireless network.
Check whether the SSID network name and wireless security
are the same on both the client and router. If you still have
problems, then power off and on your router and restart your
computer.
Your last solution will be forced to reset the router to factory
default settings.
ON. Then press and hold the WPS and WLAN buttons for more
than 10 seconds until you see the Power light blink 2 times,
then release the buttons. The router is now reset to factory
defaults.

16
Deutsch
Lieferumfang
WLAN-Router WBR-6002 N
Netzteil (12 V Gleichspannung, 1 A)
RJ-45-Kabel (LAN/Ethernet)
Gummifüße
CD mit Bedienungsanleitung
Kurzinstallationsanleitung
Falls etwas fehlen sollte, wenden Sie sich bitte an Ihren Händler
oder Distributor.

17
Bevor Sie loslegen
Bitte beachten Sie die nachstehenden Standardeinstellungen.
Standardeinstellungen
IP-Adresse
192.168.0.1
Benutzername/Kennwort
admin / password
WLAN-Modus
Aktivieren
WLAN-SSID
WBR-6002 N
Sicherheit
/
In dieser Kurzinstallationsanleitung gehen wir lediglich auf absolut
grundlegende Situationen und Einstellungen ein. Detaillierte
Informationen finden Sie in der vollständigen Bedienungsanleitung
auf der CD.
Bitte halten Sie Ihre Internet-Zugangsdaten und weitere Angaben
zur Verbindung bereit.

18
Installation
3. Schließen Sie Ihre Breitband-Internetverbindung
an den WAN-Port des WLAN-Routers an.
4. Schließen Sie das LAN-Kabel an.
Computer an.
2. Schließen Sie die mitgelieferte Antenne an.
1. Bitte schalten Sie Ihr (A)DSL-/Kabelmodem aus, indem Sie
den Netzstecker ziehen.
(A)DSL-/Kabel
modem
Internet

19
5. Stecken Sie das Netzteil ein.
6. Warten Sie ab, bis die Betriebsanzeige-LED dauerhaft
leuchtet. Der Router ist betriebsbereit.
8. Die Installation ist nun abgeschlossen. Nun können Sie mit
der Konfiguration des Gerätes beginnen.
7. Schalten Sie Ihr (A)DSL-/Kabelmodem wieder ein, indem Sie
den Netzstecker wieder einstecken.

20
Netzwerkeinstellungen prüfen
(Windows XP / Vista)
1. Klicken Sie auf den Start Button (Start-Schaltfläche) unten
links und öffnen Sie die Control Panel (Systemsteuerung).
Unter Windows Vista klicken Sie auf Start, Systemsteuerung,
View Network Status and Tasks (Netzwerkstatus und
-aufgaben anzeigen), anschließend klicken Sie auf Manage
Network Connections (Netzwerkverbindungen verwalten).
2. Unter Windows XP
doppelklicken Sie auf
Network Connections
(Netzwerkverbindungen).
Windows XP
Windows Vista
La pagina si sta caricando...
La pagina si sta caricando...
La pagina si sta caricando...
La pagina si sta caricando...
La pagina si sta caricando...
La pagina si sta caricando...
La pagina si sta caricando...
La pagina si sta caricando...
La pagina si sta caricando...
La pagina si sta caricando...
La pagina si sta caricando...
La pagina si sta caricando...
La pagina si sta caricando...
La pagina si sta caricando...
La pagina si sta caricando...
La pagina si sta caricando...
La pagina si sta caricando...
La pagina si sta caricando...
La pagina si sta caricando...
La pagina si sta caricando...
La pagina si sta caricando...
La pagina si sta caricando...
La pagina si sta caricando...
La pagina si sta caricando...
La pagina si sta caricando...
La pagina si sta caricando...
La pagina si sta caricando...
La pagina si sta caricando...
La pagina si sta caricando...
La pagina si sta caricando...
La pagina si sta caricando...
La pagina si sta caricando...
La pagina si sta caricando...
La pagina si sta caricando...
La pagina si sta caricando...
La pagina si sta caricando...
La pagina si sta caricando...
La pagina si sta caricando...
La pagina si sta caricando...
La pagina si sta caricando...
La pagina si sta caricando...
La pagina si sta caricando...
La pagina si sta caricando...
La pagina si sta caricando...
La pagina si sta caricando...
La pagina si sta caricando...
La pagina si sta caricando...
La pagina si sta caricando...
La pagina si sta caricando...
La pagina si sta caricando...
La pagina si sta caricando...
La pagina si sta caricando...
La pagina si sta caricando...
La pagina si sta caricando...
La pagina si sta caricando...
La pagina si sta caricando...
La pagina si sta caricando...
La pagina si sta caricando...
La pagina si sta caricando...
La pagina si sta caricando...
La pagina si sta caricando...
La pagina si sta caricando...
La pagina si sta caricando...
La pagina si sta caricando...
La pagina si sta caricando...
La pagina si sta caricando...
La pagina si sta caricando...
La pagina si sta caricando...
La pagina si sta caricando...
La pagina si sta caricando...
La pagina si sta caricando...
La pagina si sta caricando...
La pagina si sta caricando...
La pagina si sta caricando...
La pagina si sta caricando...
La pagina si sta caricando...
La pagina si sta caricando...
La pagina si sta caricando...
La pagina si sta caricando...
La pagina si sta caricando...
La pagina si sta caricando...
La pagina si sta caricando...
La pagina si sta caricando...
La pagina si sta caricando...
La pagina si sta caricando...
La pagina si sta caricando...
La pagina si sta caricando...
La pagina si sta caricando...
La pagina si sta caricando...
La pagina si sta caricando...
La pagina si sta caricando...
La pagina si sta caricando...
La pagina si sta caricando...
La pagina si sta caricando...
La pagina si sta caricando...
La pagina si sta caricando...
La pagina si sta caricando...
La pagina si sta caricando...
La pagina si sta caricando...
La pagina si sta caricando...
La pagina si sta caricando...
La pagina si sta caricando...
La pagina si sta caricando...
La pagina si sta caricando...
La pagina si sta caricando...
La pagina si sta caricando...
La pagina si sta caricando...
La pagina si sta caricando...
La pagina si sta caricando...
La pagina si sta caricando...
La pagina si sta caricando...
La pagina si sta caricando...
La pagina si sta caricando...
La pagina si sta caricando...
La pagina si sta caricando...
La pagina si sta caricando...
La pagina si sta caricando...
La pagina si sta caricando...
La pagina si sta caricando...
La pagina si sta caricando...
La pagina si sta caricando...
La pagina si sta caricando...
La pagina si sta caricando...
La pagina si sta caricando...
La pagina si sta caricando...
La pagina si sta caricando...
La pagina si sta caricando...
La pagina si sta caricando...
La pagina si sta caricando...
La pagina si sta caricando...
La pagina si sta caricando...
La pagina si sta caricando...
La pagina si sta caricando...
La pagina si sta caricando...
La pagina si sta caricando...
La pagina si sta caricando...
La pagina si sta caricando...
La pagina si sta caricando...
-
 1
1
-
 2
2
-
 3
3
-
 4
4
-
 5
5
-
 6
6
-
 7
7
-
 8
8
-
 9
9
-
 10
10
-
 11
11
-
 12
12
-
 13
13
-
 14
14
-
 15
15
-
 16
16
-
 17
17
-
 18
18
-
 19
19
-
 20
20
-
 21
21
-
 22
22
-
 23
23
-
 24
24
-
 25
25
-
 26
26
-
 27
27
-
 28
28
-
 29
29
-
 30
30
-
 31
31
-
 32
32
-
 33
33
-
 34
34
-
 35
35
-
 36
36
-
 37
37
-
 38
38
-
 39
39
-
 40
40
-
 41
41
-
 42
42
-
 43
43
-
 44
44
-
 45
45
-
 46
46
-
 47
47
-
 48
48
-
 49
49
-
 50
50
-
 51
51
-
 52
52
-
 53
53
-
 54
54
-
 55
55
-
 56
56
-
 57
57
-
 58
58
-
 59
59
-
 60
60
-
 61
61
-
 62
62
-
 63
63
-
 64
64
-
 65
65
-
 66
66
-
 67
67
-
 68
68
-
 69
69
-
 70
70
-
 71
71
-
 72
72
-
 73
73
-
 74
74
-
 75
75
-
 76
76
-
 77
77
-
 78
78
-
 79
79
-
 80
80
-
 81
81
-
 82
82
-
 83
83
-
 84
84
-
 85
85
-
 86
86
-
 87
87
-
 88
88
-
 89
89
-
 90
90
-
 91
91
-
 92
92
-
 93
93
-
 94
94
-
 95
95
-
 96
96
-
 97
97
-
 98
98
-
 99
99
-
 100
100
-
 101
101
-
 102
102
-
 103
103
-
 104
104
-
 105
105
-
 106
106
-
 107
107
-
 108
108
-
 109
109
-
 110
110
-
 111
111
-
 112
112
-
 113
113
-
 114
114
-
 115
115
-
 116
116
-
 117
117
-
 118
118
-
 119
119
-
 120
120
-
 121
121
-
 122
122
-
 123
123
-
 124
124
-
 125
125
-
 126
126
-
 127
127
-
 128
128
-
 129
129
-
 130
130
-
 131
131
-
 132
132
-
 133
133
-
 134
134
-
 135
135
-
 136
136
-
 137
137
-
 138
138
-
 139
139
-
 140
140
-
 141
141
-
 142
142
-
 143
143
-
 144
144
-
 145
145
-
 146
146
-
 147
147
-
 148
148
-
 149
149
-
 150
150
-
 151
151
-
 152
152
-
 153
153
-
 154
154
-
 155
155
-
 156
156
-
 157
157
-
 158
158


LevelOne WBR-6002 Quick Installation Manual
- Categoria
- Componenti del dispositivo di sicurezza
- Tipo
- Quick Installation Manual
- Questo manuale è adatto anche per
in altre lingue
- français: LevelOne WBR-6002
- español: LevelOne WBR-6002
- dansk: LevelOne WBR-6002
Documenti correlati
-
LevelOne WBR-6020 Quick Installation Manual
-
LevelOne WUA-0614 Quick Installation Manual
-
-
LevelOne WBR-6802 Quick Installation Manual
-
LevelOne WUA-0605 Quick Installation Manual
-
-
LevelOne WBR-6801 Quick Installation Manual
-
-
-