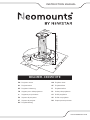
Neomounts BEAMER-C80WHITE Manuale utente
- Tipo
- Manuale utente

BEAMER-C80WHITE
IT
EN
NL
DE
FR
ES
PT
DK
Projector mount
Projectorsteun
Projektor Halterung
Support pour videoprojecteur
Supporto per proiettore
Soporte de proyector
Suporte de projetor
Projektorbeslag
NO
SE
FI
PL
CS
SK
RO
Projektor feste
Projektorfäste
Projektoriteline
Uchwyt do projektora
Držák projektoru
Držiak na projektor
Suport pentru proiector
85mm
±15° tilt
178mm
130mm- 320mm
130mm or 200mm
360°
WWW.NEOMOUNTS.COM
INSTRUCTION MANUAL

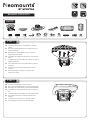
PARTS
BEAMER-C80WHITE
13-20 cm
0-15 kg |
0-33,1 lbs
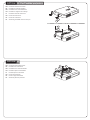
Install the ceiling plate on a solid brick or concrete
ceiling
Bevestig de plafondplaat aan een stevige stenen of
betonnen plafond
Befestigen der Deckenplatte an einer massiven
Ziegel- oder Betondecke
Installation de la plaque de plafond sur un plafond en
béton
Installare la piastra del soffitto su un mattone solido o
soffitto in cemento
Fije la placa del techo a una piedra sólida o techo de
hormigón
Instale a placa de teto em tijolo sólido ou teto de
cimento
Zamontować płytę sufitową na ceglanym lub
betonowym suficie
EN
NL
DE
FR
IT
ES
PT
PL
Install the ceiling plate on a wooden joist
Bevestig de plafondplaat aan een houten dwarsbalk
Befestigen der Deckenplatte auf einer Holzoberfläche
Installation de la plaque de plafond sur une solive en
bois
Installare la piastra del soffitto su un travetto in legno
Fije la placa del techo a una barra transversal de
madera
Instale a placa de teto em uma viga de madeira
Zamontuj płytę sufitową na drewnianej belce
EN
NL
DE
FR
IT
ES
PT
PL
Tool Drill
A. (x1) B. (x1) C. (x1) D. (x3) E. (x1) F. (x1)
M-A. M4x14
(x4)
M-B. M5x20
(x3)
M-C. M6x12
(x3)
M-D. (x1) M-E. (x3) M-F. (x3) M-G. (x2) M-H. (x6) W-A. (x3) W-B. (x3) W-C. (x6)
A
STEP 1
B
STEP 1
W-B
W-C
W-C
W-A
W-A

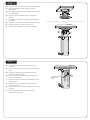
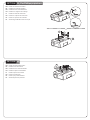
Place the cover and connect the pole to the ceiling plate
Plaats de afdekkap en sluit de stang aan op de
plafondplaat
Montage der Abdeckung und verbinden der Stange mit
der Deckenplatte
Placez le cache et installez le tube à la plaque de
plafond
Posizionare il coperchio e collegare il palo alla piastra
del soffitto
Coloque la tapa y conecte el mastil a la placa de techo
Coloque a tampa e conecte o poste ao teto
Umieść osłony i podłącz rurkę do płyty sufitowej
EN
NL
DE
FR
IT
ES
PT
PL
STEP 2
STEP 3
Secure the bracket and ensure the bolt is facing
outwards
Borg de steun en zorg ervoor dat de bout naar buiten
wijst
Sichern die Halterung und sicherstellen, dass die
Schraube nach außen zeigt
Fixez le support et assurez-vous que le boulon est
tourné vers l'extérieur
Fissare la staffa e assicurarsi che il bullone sia rivolto
verso l'esterno
Asegure el soporte y asegúrese de que el tornillo
apunta hacia afuera
Prenda o suporte e verifique se o parafuso está voltado
para fora
Zamocuj wspornik i upewnij się, że śruba jest
skierowana na zewnątrz
EN
NL
DE
FR
IT
ES
PT
PL
M-D
Turn bolt outside
for maximum
safety.

STEP 4
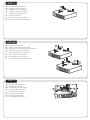
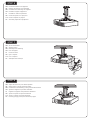
Install the extension brackets
Installeer de extensie haakjes
Installieren der Zusatzklammern
Installez les supports de rallonge
Installa le staffe di estensione
Instale los extensores
Instale os suportes de extensão
Zainstaluj przedłużki ramion uchwytu
EN
NL
DE
FR
IT
ES
PT
PL
Use spacers if necessary
Gebruik afstandhouders indien nodig
Montage der Distanzscheiben sofern notwendig
Utilisez des entretoises si nécessaire
Utilizzare distanziatori se necessario
Utilice separadores si necesario
Utilize separadores se necessário
Użyj dystansów jeśli jest taka potrzeba
EN
NL
DE
FR
IT
ES
PT
PL
OPTION
Install the intermediate piece
Installeer het tussenstuk
Installieren des Zwischenstücks
Installez la pièce intermédiaire
Installa il pezzo intermedio
Instale la pieza intermedia
Instale a peça intermedia
Zainstaluj element pośredni
EN
NL
DE
FR
IT
ES
PT
PL
STEP 5
M-B
M-B
M-B
M-H
M-C
M-D
M-F
W-C
M-H

Install the intermediate piece
Installeer het tussenstuk
Installieren des Zwischenstücks
Installez la pièce intermédiaire
Installa il pezzo intermedio
Instala el espaciador
Instale a peça intermedia
Zainstaluj element pośredni
EN
NL
DE
FR
IT
ES
PT
PL
Install the extension brackets
Installeer de extensie haakjes
Installieren der Zusatzklammern
Installez les supports de rallonge
Installa le staffe di estensione
Instale los extensores
Instale os extensores
Zainstaluj przedłużki ramion uchwytu
EN
NL
DE
FR
IT
ES
PT
PL
For Toshiba projectors
A
OPTION
B
OPTION
M-A
M-G
M-D
M-F
W-C
M-C
M-B
M-H

Install the intermediate piece
Installeer het tussenstuk
Installieren des Zwischenstücks
Installez la pièce intermédiaire
Installa il pezzo intermedio
Instala el espaciador
Instale a peça intermediária
Zainstaluj element pośredni
EN
NL
DE
FR
IT
ES
PT
PL
Install the extension brackets
Installeer de extensie haakjes
Installieren der Zusatzklammern
Installez les supports de rallonge
Installa le staffe di estensione
Instale los soportes de extensión
Instale os suportes de extensão
Zainstaluj przedłużki ramion uchwytu
EN
NL
DE
FR
IT
ES
PT
PL
For Philips projectors
A
OPTION
B
OPTION
M-E
M-B
M-C
M-F
W-C
M-D
M-H

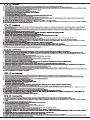
Install the bracket to the projector
Monteer de projector aan de beugel
Installieren die Halterung am Projektor
Installez le support à projecteur
Installare la staffa sul proiettore
Instale el soporte en el proyector
Instale o suporte no projetor
Zainstaluj wspornik na projektorze
EN
NL
DE
FR
IT
ES
PT
PL
STEP 6
Secure the bracket
Zeker de steun
Befestigen die Halterung
Fixer le support
Fissare la staffa
Fijar el soporte
Fixar o suporte
Zabezpieczenie uchwytu
EN
NL
DE
FR
IT
ES
PT
PL
STEP 7
Adjust the mount to your desired position
Stel de steun in op de gewenste positie
Positionieren die Halterung in der gewünschten Position
Ajustez le support à la position souhaitée
Regolare il supporto nella posizione desiderata
Ajuste el soporte a la posición deseada
Ajuste o suporte na posição desejada
Dostosuj pozycję uchwytu do twoich wymagań
EN
NL
DE
FR
IT
ES
PT
PL
STEP 8
M-D

-
 1
1
-
 2
2
-
 3
3
-
 4
4
-
 5
5
-
 6
6
-
 7
7
-
 8
8


Neomounts BEAMER-C80WHITE Manuale utente
- Tipo
- Manuale utente
in altre lingue
Altri documenti
-
Newstar BEAMER-C200 Manuale utente
-
Sanus Projector Accessories VP1 Manuale utente
-
-
-
Sanus VMPR1 Manuale utente
-
Peerless PRGS-ALU0811 Manuale utente
-
-
-