
2
3
4
1
2
1
1
2
PART. U2660C
Istruzioni d’uso
Instruction sheet
Notice d’emploi
Gebrauchsanweisungen
Instrucciones de uso
Gebruiksaanwijzing
Instruções para o uso
09/15-01 PC
3445
1
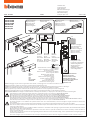
INSTALLAZIONE
INSTALLATION
INSTALLATION
INSTALLATION
INSTALACIÓN
INSTALLATIE
INSTALAÇÃO
LED: Due lampeggi rossi per indicare la segnalazione di un allarme; se il lampeggio è uno solo indica che la batteria è scarica.
LED: Two red flashes to indicate an alarm signal; one flash indicates that the battery is flat.
VOYANT: deux clignotements rouges correspondent à un signal d’alarme; un unique clignotement indique que la batterie est déchargée.
LED: Die rote LED blinkt zwei Mal um einen Alarm zu melden; wenn sie nur ein Mal blinkt, ist die Batterie erschöpft.
LED: dos parpadeos rojos indican la señalización de una alarma; si parpadea una sola vez, significa que la batería está agotada
LED: Twee rode knipperlichten om een alarmmelding aan te duiden; een enkel knipperlicht wijst erop dat de batterij ontladen is.
SINALIZADOR LUMINOSO: Dois lampejos vermelhos indicam a sinalização de um alarme; se o lampejo for só um indica que a bateria está descarregada.
TAMPER/APPRENDIMENTO
TAMPER/SETUP CYCLE
TAMPER/APPRENTISSAGE
TAMPER/LERNFUNKTION
ANTISABOTAJE/APRENDIZAJE
TAMPER/LEERPROCES
TAMPER/AJUSTE
LED
LED
VOYANT
LED
LED
LED
SINALIZADOR
LUMINOSO
Z N
M
D
O
A
X
U
Sede configuratori
Configurator socket
Logement configurateurs
Sitz der Konfiguratoren
Alojamiento de los
configuradores
Behuizing configurators
Sede configuradores
Rivelatore avvolgibile
Roller blind detector
Détecteur volets
Wickelbares Fühlgerät
Detector de persianas
Detector rolluiken
Detector de enrolar
+
C
–
Apertura sensore
Open sensor
Ouverture capteur
Öffnen des Sensors
Apertura del sensor
Opening sensor
Abertura do sensor
Batteria
Battery
Batterie
Batterie
Batería
Batterij
Bateria
Filo verde
Green wire
Fil vert
Grüner Leiter
Hilo verde
Groene draad
Fio verde
Filo nero
Black wire
Fil noire
Schwarzer Leiter
Hilo negro
Zwarte draad
Fio preto
1,5m
Filo rosso
Red wire
Fil rouge
Roter Leiter
Hilo rojo
Rode draad
Fio vermelho
Prima di fissare in modo permanente l’oggetto verificare la comunicazione radio con il ricevitore art. HC/HS/HD/L/N/NT4618.
Before setting the device permanently, check the radio communication with the receiver item HC/HS/HD/L/N/NT4618.
Avant de fixer l’accessoire de manière définitive, contrôler la communication radio avec le récepteur réf. HC/HS/HD/L/N/NT4618.
Bevor der Gegenstand dauerhaft befestigt wird, die Funkverbindung mit dem Empfänger Art. HC/HS/HD/L/N/NT4618 prüfen.
Antes de fijar en modo permanente el objeto, verifique la comunicación vía radio con el receptor art. HC/HS/HD/L/N/NT4618.
Voordat men het voorwerp op permanente manier bevestigt, moet men de radio-communicatie met de ontvanger art. HC/HS/HD/L/N/NT4618 verifiëren.
Antes de fixar permanentemente o objecto verificar a comunicação rádio com o receptor art. HC/HS/HD/L/N/NT4618.
Per attivare il magnete occorre effettuare una apertura/chiusura entro 12 ore dall’alimentazione; rivelatore avvolgibile e magnete trasmettono l’allarme sullo
stesso indirizzo.
To activate the magnet open/close within 12 hours from switching on; roller detector and magnet transmit the alarm on the same address.
Pour activer l’aimant, il est nécessaire de commander une ouverture/coupure de l’alimentation dans les 12 heures; détecteur enrouleur et aimant transmettent
l’alarme sur la même adresse.
Um den Magnet zu aktivieren, muss ein Öffnen/Schließen innerhalb von 12 Stunden ab der Speisung vorgenommen werden; der Rollladen-Detektor und der
Magnet senden den Alarm an dieselbe Adresse.
Para activar el imán, es necesario efectuar una apertura/cierre antes de las 12 horas a partir de la alimentación; el detector enrollable y el imán transmiten la
alarma. a la misma dirección.
Om de magneet te activeren moet men een opening/sluiting uitvoeren binnen de 12 uren vanaf de voeding; sensor oprolmechanisme en magneet geven het
alarm door op hetzelfde adres.
Para activar o magneto é preciso abrir/fechar até 12 horas depois da alimentação; detector enrolável e magneto transmitem o alarme ao mesmo endereço.
Smaltire la batteria secondo le norme
vigenti
Dispose of the battery according to
the current regulations
Éliminer la batterie conformément aux
normes en vigueur
Die Batterie gemäß geltenden
Vorschriften entsorgen
Eliminar la batería según las normas
vigentes
Verwijder de batterij volgens de
toepasselijke normen
Eliminar a bateria em plena
observância das normas vigentes
Apertura magnete
Magnet opening
Ouverture aimant
Magnetöffnung
Apertura magneto
Openen magneet
Abertura ímã

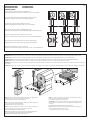
2
La fune deve trovarsi tra la finestra e la tapparella.
Controllare periodicamente lo stato della fune e del suo scorrimento
Das Seil muss zwischen Fenster und Rollladen liegen.
Periodisch den Zustand des Seils und das Gleiten desselben kontrollieren.
Le câble doit se trouver entre la fenêtre et le volet.
Contrôler régulièrement l’état du câble et son coulissement.
The rope must be between the window and the rolling shutter.
Check the condition of the rope and its sliding regularly
El cable se debe tender entre la ventana y la persiana.
Controle periódicamente el estado del cable y el relativo desplazamiento.
Het touw moet zich bevinden tussen het venster en het rolluik.
Regelmatig de staat van het touw en zijn beweging controleren.
A corda deve estar entre a janela e a persiana.
Controlar periodicamente em que estado está a corda e o seu deslizamento.
RACCOMANDAZIONI
RECOMMENDATIONS
RECOMMANDATIONS
EMPFEHLUNGEN
3
Nota: Per evitare lo sfregamento della fune contro una parte tagliente della
tapparella, si può incollare una squadretta (non fornita).
La squadretta NON deve avere sogoli taglienti.
CONSEJOS
AANBEVELINGEN
RECOMENDAÇÕES
Installazione: Posizionare il contatto a fune di preferenza al centro del cassonetto e fissarlo. Quindi fissare l’estremità della fune alla tapparella con una vite.
Installation:
Den Seil-Kontakt möglichst in der Mitte des Kastens positionieren und befestigen. Danach das Seilende mit einer Schraube an den Rollladen befestigen.
Installation: Positionner le contact à câble de préférence au centre du coffrage et le fixer. Fixer ensuite l’extrémité du câble au volet à l’aide d’une vis.
Installation: Preferably position the rope contact at the centre of the window box and fasten it. Then fasten the end of the rope to the rolling shutter with a screw.
Instalación: Ponga el contacto del cable preferido, al centro de la caja y fíjelo. Luego fije con un tornillo el extremo del cable a la persiana
Installatie: Het contact met touw bij voorkeur in het centrum van de bak plaatsen en vasthechten. Vervolgens het uiteinde van het touw vasthechten aan het rolluik met
een schroef.
Instalação: Posicionar o contacto com a corda preferencialmente ao centro da caixa e fixá-lo. A seguir fixar a extremidade da corda com a persiana utilizando um parafuso.
N.B.: Um zu vermeiden dass das Seil gegen die Scharfe Rollladenkante rei-
bt, kann ein Winkelstück angeklebt werden (nicht mitgeliefert).
Das Winkelstück darf KEINE scharfen Kanten haben.
Note: pour éviter le frottement du câble contre une partie coupante du
volet, il est possible de coller une petite équerre (non fournie).
L’équerre NE doit PAS avoir d’angles coupants.
Note: To avoid the rope rubbing against a cutting part of the rolling shut-
ter, you can glue a bracket (not supplied).
The bracket must NOT have cutting edges.
Nota: Para evitar el roce del cable contra el lado cortante de la persiana, se
puede pegar una escuadra (no suministrada).
La escuadra NO debe tener cantos agudos.
Opmerking: Om het wrijven van het touw tegen een snijdend gedeelte
van het rolluik te voorkomen, kan men een winkelhaakje vastlijmen (niet
in dotatie).
Het winkelhaakje mag GEEN snijdende hoeken hebben.
Nota: Para evitar que a corda roce contra uma parte cortante da persiana,
pode-se colar um esquadro (não fornecido)
O esquadro NÃO deve ter os cantos cortantes.

4
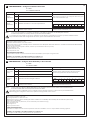
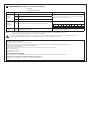
AUX 1 2 3 4 5 6 7 8 9
Tempo 1 min 2 min 3 min 4 min 5 min 15 min 30 sec 0,5 sec 2 sec
IT
Installabile su: MOD – Modo operativo
1
AUX – Funzioni non antintrusione
1
Sistema
Antintrusione
0
Non ritardato
Attiva la funzione ausiliaria solo ad impianto disinserito; speci-
fica il canale di attivazione (1-9).
2
Ritardato
2
9
Ausiliario su antintrusione
Sistema
Automazione
ON Modalità automazione: accensione temporizzata luci
Determina il tempo di accensione:
Entrambi i
sistemi
AUX Modalità sempre ausiliaria
Attiva la funzione ausiliaria;
specifica il canale di attivazione (1-9).
Z = ZONA
N = NUMERO DISPOSITIVO
CONFIGURAZIONE – Configurare a batteria disinserita
NOTE: 1 - Per i criteri di installazione e per abilitare ed utilizzare i canali AUX, fare riferimento alla “Guida My Home Antifurto”.
2 - Funzione disponibile con centrale prodotta a partire dalla settimana 08W06.
Se si sostituisce il sensore 3445 con uno nuovo, configurare in modo identico e memorizzarlo sul ricevitore per evitare malfunzionamenti.
Dopo l’eventuale modifica della configurazione del sensore, ripetere la memorizzazione sul ricevitore.
DATI TECNICI
Alimentazione: Batteria 3,6 V tipo ½ AA
Temperatura di funzionamento: 5 – 40 °C uso interno
Durata minima batteria: 3 anni in stand by (il numero di rilevazioni anche ad impianto disinserito diminuisce considerevolmente la durata della batteria).
Frequenza radio: 868,35 Mhz
Portata: 100 metri in aria libera (pareti in metallo, cemento e placche metalliche riducono la portata)
Tipo di modulazione: FSK
Lunghezza della fune: 3,2 m
Grado di protezione: IP 32
DICHIARAZIONE DI CONFORMITÀ
L’articolo 3445 è conforme ai requisiti essenziali della direttiva 1999/5/CE, in quanto rispetta le seguenti norme:
ETSI EN300 220-3 ETSI EN301 489-3 EN60950 EN50090-2-2 EN50090-2-3
Anno di approvazione della marcatura CE secondo la direttiva indicata: 2007
NOTES: 1 - Please refer to the “My Home Burglar Alarm Guide” for the installation references and to enable and use the AUX channels.
2 - Function available with control unit produced from week 08W06.
If you replace the sensor 3445 with a new one, configure it in the same way and store it on the receiver to prevent malfunctions.
After changing the configuration of the sensor, repeat the storing operation on the receiver.
EN
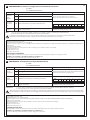
AUX 1 2 3 4 5 6 7 8 9
Time 1 min 2 min 3 min 4 min 5 min 15 min 30 sec 0,5 sec 2 sec
Can be installed on:
MOD – Operating mode
1
AUX – Non-burglar alarm functions
1
Burglar alarm
system
0
Not delayed
Activates only the auxiliary function when the system is
disconnected; specifies the activation channel (1-9).
2
Delayed
2
9
Auxiliary on burglar alarm
Automation
system
ON Automation mode: timed lights activation
Determines the activation time:
Both
systems
AUX Auxiliary mode at all times
Activates the auxiliary function;
specifies the activation channel (1-9).
Z = ZONE
N = DEVICE NUMBER
CONFIGURATION – Configure when the battery is disconnected
TECHNICAL DATA
Power source: 3,6 V battery - type ½ AA
Operating temperature: 5 – 40 °C indoor use
Minimum life of battery: 3 years in stand by (the number of detections considerably reduces battery life even when the system is off).
Radio frequency: 868.35 MHz
Range: 100 metres in free air (metal walls, concrete and metallic plates reduce the range)
Type of modulation: FSK
Rope length: 3.2 m
Degree of protection: IP 32
COMPLIANCE CERTIFICATION
Item 3445 is in compliance with the essential requirements of directive 1999/5/CE in so far as it complies with the following regulations:
ETSI EN300 220-3 ETSI EN301 489-3 EN60950 EN50090-2-2 EN50090-2-3
Year of Approval of CE marking according to the directive specified: 2007
La pagina si sta caricando...
La pagina si sta caricando...
La pagina si sta caricando...
-
 1
1
-
 2
2
-
 3
3
-
 4
4
-
 5
5
-
 6
6


in altre lingue
- English: Bticino 3445 Operating instructions
- français: Bticino 3445 Mode d'emploi
- español: Bticino 3445 Instrucciones de operación
- Deutsch: Bticino 3445 Bedienungsanleitung
- Nederlands: Bticino 3445 Handleiding
- português: Bticino 3445 Instruções de operação
Documenti correlati
-
Bticino 3444 Istruzioni per l'uso
-
-
-
-
-
-
-
-
-