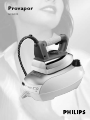
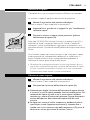
Philips GC6034 Manuale del proprietario
- Categoria
- Ferri da stiro
- Tipo
- Manuale del proprietario

Provapor
GC6034

2

3
K
E
L
D
C
B
A
F
G
I
H
J

4


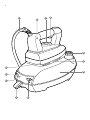
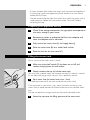
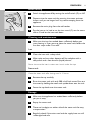
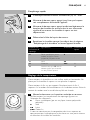
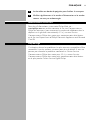
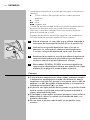
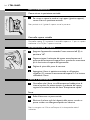
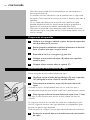
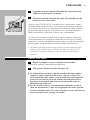
General description
A Cap of the steam tank
B Steam tank
C Iron stand
D On/off switch with built-in pilot light
E 'Steam tank heating up' pilot light.The pilot light goes out when the
appliance is ready for steam ironing
F Steam control.
q = moderate steam
R = maximum steam
G Temperature pilot light
H Steam activator button
I Temperature dial
J Supply hose
K Soleplate
L Mains cord
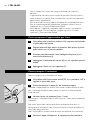
Important
For optimal safety, read these instructions carefully and look at the
illustrations before you start using the appliance.
- Do not put perfume, vinegar, descaling agents or other chemicals in
the steam tank.
- Never use the appliance if it is damaged in any way. Regularly check if
the mains cord and the supply hose are still undamaged and safe.
- If the mains cord of this appliance is damaged, it must always be
replaced by Philips or a service centre authorised by Philips, as
special tools and/or parts are required.
- Do not use any other cap on the steam tank than the cap that has
been supplied with the appliance, as this cap also functions as a safety
valve.
- Check if the voltage indicated on the bottom of the steam tank
corresponds to the mains voltage in your home before you connect
the appliance.
- Only connect the appliance to an earthed wall socket.
- Never immerse the iron or the steam tank in water.
- Never leave the iron unattended when it is connected to the mains.
- When you have finished ironing and even when you leave the iron
for a short while, unplug the iron and put it on the iron stand.
- Always place the steam tank on a stable, level and horizontal surface.
Do not put the steam tank on the soft part of the ironing board.
- Always place the iron on the iron stand or on its heel. Do not put
the hot iron on the supply hose or the mains cord.
- The iron stand and the soleplate of the iron can become extremely
hot and may cause burns if touched. If you want to move the steam
tank, do not touch the stand.
- Do not allow the cord to come into contact with the hot soleplate.
- Infirm persons should not be allowed to use the appliance without
supervision. Keep an eye on children to make sure that they do not
play with the appliance.
ENGLISH6

- If steam escapes from under the steam tank cap when the appliance
is heating up, switch the appliance off and contact a service centre
authorised by Philips.
- Do not remove the cap from the steam tank when the steam tank is
under pressure. Follow the instructions under 'Fast refill' before
removing the cap.
Preparing the appliance for use
1 Check if the voltage indicated on the type plate corresponds to
the mains voltage in your home.
2 Remove any sticker or protective foil from the soleplate and
clean the soleplate with a soft cloth.
3 Fully unwind the mains cord (L) and supply hose (J).
4 Place the steam tank (B) on a stable, level surface.
5 Place the iron on the iron stand (C).
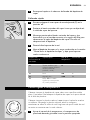
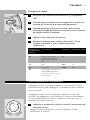
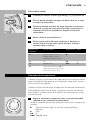
Filling the steam tank
Never immerse the steam tank in water.
1 Make sure the on/off switch (D) has been set to 'off' and
remove the plug from the wall socket.
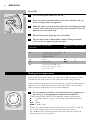
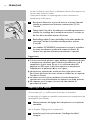
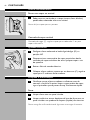
C
2 Slowly unscrew the cap (A) of the steam tank.
You may hear a sound when you remove the cap.This sound is caused
by the cold tank being under vacuum.This is perfectly normal.
3 Pour water into the steam tank (max. 1 litre).
Use cold tap water to fill the tank up to the maximum level.
If the tap water in your area is very hard, we advise you to mix tap
water with an equal portion of distilled water, or to use distilled water
only.
Do not use perfume, vinegar, starch or chemically descaled water.
4 Screw the cap onto the filling aperture of the steam tank.
ENGLISH 7

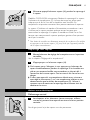
Fast refill
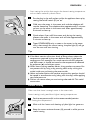
C
1 First set the on/off switch (D) to 'off'.
2 Press the steam activator button until you no longer hear any
steam escaping from the appliance.
3 Keep the steam activator button pressed in and slowly unscrew
the cap of the steam tank by turning it anti-clockwise.This will
depressurise the steam tank.
4 Remove the mains plug from the wall socket.
5 Fill the steam tank as described in section 'Filling the steam
tank' and let the appliance heat up again.
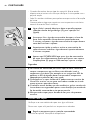
Setting the temperature
Always place the steam tank on a stable, level and horizontal surface
Do not put the steam tank on the soft part of the ironing board.
Always place the iron on the iron stand or on its heel. Do not put the
hot iron on the supply hose or the mains cord. Make sure the cord
does not come into contact with the hot soleplate.
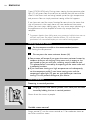
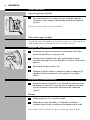
C
1 Set the temperature dial to the required ironing temperature
by turning it to the appropriate temperature indication.
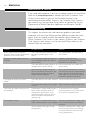
- Check the garment label for the required ironing temperature:
- 1 Synthetic fabrics (e.g. acrylic, viscose, polyamide, polyester)
- 1 Silk
- 2 Wool
- 3 Cotton, linen
- When you do not know what kind of fabric the article is made of,
try to iron a spot which will be invisible when you wear it.
- Silk, woollen and synthetic materials: iron the reverse side of the
fabric to prevent shiny patches.
ENGLISH8
H
I
L
O
A
I
G
O
D
O
N
L
A
N
A
A
L
G
O
D
O
N
H
I
L
O
M
A
X
O
/
O
F
F
L
I
N
E
N
C
O
T
T
O
N
W
O
O
L
S
I
L
K
N
Y
L
O
N
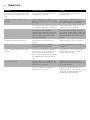
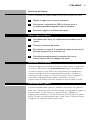
Steam control
-
q
R
Temperature
dial
1
2
3
Type of fabric
Synthetic fabrics, e.g. acetate,
acrylic, viscose, polyamide,
polyester, and silk
Wool
Cotton, linen
Please note that Z in the
table means that the article
cannot be ironed.
Label with ironing
instructions
B
C
D
Z

- Start ironing the articles that require the lowest ironing temperature,
such as those made of synthetic fibres.
C
2 Put the plug in the wall socket and let the appliance heat up by
setting the on/off switch (D) to 'on'.
3 Cold start: the water in the steam tank and the soleplate will
now be heated up.The soleplate takes approximately 2 minutes
to heat up, the water in the steam tank takes approximately
8 minutes to heat up.
4 Quick reheat: if you refill the steam tank during the ironing
process, the water in the steam tank will take approximately
6 minutes to heat up.
5 Types GC6024/6026 only: as soon as the water in the steam
tank is hot enough for steam ironing, the pilot light (E) will go
out.You can now start ironing.
Tips
◗ If the fabric consists of various kinds of fibres, always select the
temperature required by the most delicate fibre, i.e. the lowest
temperature. For example: if an article consists of 60% polyester
and 40% cotton, it should be ironed at the temperature indicated
for polyester (1) and without steam.
◗ When steam ironing woollen fabrics, shiny patches may occur.You
can prevent this by using a dry pressing cloth or by turning the
article inside out and ironing the reverse side.
◗ Velvet and other fabrics that tend to acquire shiny patches should
be ironed in one direction only (along with the nap) while applying
very little pressure.
◗ Do not use steam when you are ironing coloured silk.This could
cause stains.
Steam ironing
Make sure that there is enough water in the steam tank.
Steam ironing is only possible at higher ironing temperatures:
1 Set the temperature dial to the recommended position.
See 'Setting the temperature'.
2 Wait until the 'steam tank heating up' pilot light has gone out.
C
3 Keep the steam activator button (H) pressed in while you are
steam ironing.
ENGLISH 9

Types GC6024/6026 only: During steam ironing, the temperature pilot
light (G) will go on from time to time to indicate that the iron and the
water in the steam tank are being heated up to the right temperature
and pressure.You can simply continue ironing while this happens.
If you have not used the steam function for some time, the steam that
was still present in the supply hose will have condensed into water.
When you start steam ironing again, this may cause some spluttering in
the appliance and a few droplets of water may escape from the
soleplate.
B
To prevent droplets from falling onto your garments, hold the iron over an
old cloth and press the steam activator button (H) until the steam
production has normalised before you start steam ironing again.
Ironing without steam
1 Set the temperature dial to the recommended position.
See 'Setting the temperature'.
2 Do not press the steam activator button (H).
◗ Some steam will escape if you press the steam activator button by
accident while you are ironing. If the steam tank is empty or has
not heated up yet, you will hear a clicking sound inside the tank.
This phenomenon is caused by the opening of the steam valve and
is perfectly harmless.
◗ If you have been ironing at a high temperature and subsequently
set the temperature dial (I) to a lower setting, wait until the
temperature pilot light (G) goes on again before you continue
ironing.This will prevent damage to your fabrics.
Other features
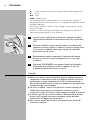
Steaming in vertical position.
C
1 Hanging curtains and clothes (jackets, suits, coats) can be steam
ironed by holding the iron in vertical position.
Never direct the steam at people.
Variable steam control
Steam control (F): set the steam control to q for moderate steam or
to R for maximum steam.
ENGLISH10

After ironing
C
1 Switch the appliance off by setting the on/off switch (D) to 'off'.
2 Depressurise the steam tank by pressing the steam activator
button until you no longer hear any steam escaping from the
appliance.
3 Remove the mains plug from the wall socket.
4 Put the iron on its heel or on the iron stand (C), set the steam
dial to O and let the iron cool down.
Cleaning and maintenance
1 Make sure the iron has cooled down sufficiently before you
start cleaning it. If you want to clean the steam tank, follow the
first four steps under 'Fast refill'.
Iron
1 Clean the iron with a damp cloth.
2 Wipe scale and any other deposits off the soleplate with a
damp cloth and a non-abrasive (liquid) cleaner.
Never immerse the iron in water nor rinse it under the tap.
Steam tank
Clean the steam tank after having used it 10 times.
1 Remove the cap carefully.
2 Rinse the steam tank with only 500 ml of fresh water. Pour out
the water by holding the steam tank upside down over the sink.
3 Screw the cap back onto the steam tank.
Storage
1 Make sure the appliance has cooled down sufficiently before
you put it away.
2 Empty the steam tank.
3 There are handgrips on either side of the steam tank for easy
transportation.
4 Regularly check if the mains cord and the supply hose are still
undamaged and safe.
ENGLISH 11

Information & service
If you need information or if you have a problem, please visit the Philips
Web site at www.philips.com or contact the Philips Customer Care
Centre in your country (you will find its phone number in the
worldwide guarantee leaflet). If there is no Customer Care Centre in
your country, turn to your local Philips dealer or contact the Service
Department of Philips Domestic Appliances and Personal Care BV.
Troubleshooting
This chapter summarises the most common problems you could
encounter with your iron. Please read the different sections for more
details. If you are unable to solve the problem, please contact the
Philips Customer Care Centre in your country. If there is no Customer
Care Centre in your country, turn to your local Philips dealer or the
nearest Philips service centre.
ENGLISH12
Solution
This phenomenon will cease after a
short while.
Select the required ironing
temperature as indicated in these
instructions and the table.
Put the steam tank on a stable and
even surface.
This is normal. Hold the iron over an
old cloth and press the steam activator
button (H).The cloth will absorb the
drops.After a few seconds the steam
production will have normalised.
Set the on/off switch (D) to 'on'.
Wait until the pilot light has gone out.
To check if the iron is actually
producing steam, hold a (cold) mirror
in front of the soleplate vents.
Clean the soleplate with a damp cloth
and, if necessary, with some washing-
up liquid.
Clean the soleplate with a damp cloth
and, if necessary, with some washing-
up liquid. Select the recommended
ironing temperature.
Possible cause(s)
This is normal. Some parts of the iron
have been greased lightly in the
factory.
The temperature dial (I) has been set
to a temperature that is too low for
steam ironing.
The steam tank has been placed on an
unstable and/or uneven surface.
When you start steam ironing, the
hose is cold. Steam condenses in the
hose, causing droplets of water to
escape from the soleplate.
The steam tank has not been switched
on.
The 'steam tank heating up' pilot light
is still on.
Superheated (i.e. high-quality) steam is
hardly visible, especially when the
temperature dial has been set to
maximum position and even less so
when the ambient temperature is
relatively high.
Impurities or chemicals present in the
water have deposited on the soleplate.
You have been ironing at too high
temperatures.
Problem
Some smoke comes out of the
appliance after you have switched the
appliance on for the first time.
Droplets of water escape from the
soleplate
The appliance does not produce
steam.
I don't see any steam coming out of
the soleplate.
The soleplate is dirty.

Description générale
A Bouchon de chaudière
A Chaudière à vapeur
A Support du fer
A Bouton marche/arrêt avec témoin lumineux incorporé
A Témoin "chauffage chaudière". Le témoin s'éteint lorsque l'appareil
est prêt pour le repassage à la vapeur.
A Commande de vapeur
q = débit vapeur modérée
R = débit vapeur maximum
A Indicateur température
A Bouton vapeur
A Thermostat
A Cordon secteur
A Semelle
A Cordon d'alimentation
Important
Avant d'utiliser l'appareil, lisez soigneusement ces instructions et
regardez les images pour une sécurité optimale.
- Ne mettez pas de parfum, de vinaigre, détartrants ou d'autres agents
chimiques dans la chaudière.
- N'utilisez jamais le fer à repasser s'il est endommagé d'une façon
quelconque.Vérifiez toujours le cordon d'alimentation et le cordon
secteur pour vous assurer qu'ils ne sont pas endommagés.
- Si le cordon d'alimentation est endommagé, il doit être remplacé par
Philips ou un Centre Service Agréé car des outils et/ou composants
spéciaux sont nécessaires.
- N'utilisez pas d'autre bouchon pour la chaudière que celui fourni
avec l'appareil, car ce bouchon fonctionne également comme
soupape de sûreté.
- Vérifiez que la tension indiquée sur le fond de la chaudière
correspond bien à la tension de votre secteur avant de brancher
l'appareil.
- Branchez la fiche dans la prise de courant.
- Ne plongez jamais le fer ou la chaudière dans l'eau.
- Ne laissez jamais le fer à repasser sans surveillance pendant qu'il est
branché.
- Lorsque vous avez fini de repasser ou même si vous laissez le fer
pour un bref instant, débranchez-le et placez-le sur son support.
- Placez toujours la chaudière sur une surface stable et horizontale.
Ne placez pas la chaudière à vapeur sur une planche à repasser.
- Placez toujours le fer sur son support ou sur le talon. Ne placez
jamais le fer chaud sur le cordon d'alimentation ou sur le cordon
secteur.
- Le support du fer et la semelle peuvent devenir très chauds et donc
peuvent causer des brûlures si vous les touchez. Si vous voulez
déplacer la chaudière, ne touchez pas le support.
FRANÇAIS 13

14
- Evitez le contact du cordon d'alimentation avec la semelle lorsqu'elle
est chaude.
- Cet appareil ne doit pas être manipulé sans surveillance par des
personnes handicapées.Tenez l'appareil hors de la portée des
enfants.Assurez-vous qu'ils ne puissent pas jouer avec l'appareil.
- Si de la vapeur s'échappe par le bouchon de chaudière lorsque
l'appareil chauffe, arrêtez l'appareil et contactez un Centre Service
Agréé Philips.
- Ne dévissez pas le bouchon de la chaudière quand celle-ci est sous
pression.Avant de retirer le bouchon, suivez les instructions du
chapitre "Remplissage rapide".
Préparation à l'emploi
1 Vérifiez que la tension indiquée sous l'appareil correspond bien
à la tension de votre secteur.
2 Retirez toute étiquette ou feuille de protection et nettoyez la
semelle avec un chiffon doux.
3 Déroulez complètement le cordon d'alimentation (L) et le
cordon secteur (J).
4 Placez la chaudière (B) sur une surface stable et horizontale.
5 Placez le fer sur son support (C).
Remplissage de la chaudière
Ne plongez jamais la chaudière dans l'eau.
1 Assurez-vous que le bouton marche/arrêt (D) est positionné
sur "arrêt" et débranchez la fiche de la prise de courant.
C
2 Dévissez lentement le bouchon (A) de la chaudière.
Vous pouvez entendre un léger bruit lorsque vous dévissez le
bouchon. Ceci est tout à fait normal.
3 Versez de l'eau dans la chaudière (max. 1 litre).
Utilisez de l'eau du robinet pour remplir le réservoir jusqu'au niveau
maximum.
Si l'eau du robinet de votre région est très calcaire, il est conseillé de la
mélanger avec de l'eau déminéralisée ou d'utiliser seulement de l'eau
déminéralisée.
N'utilisez jamais de parfum, de vinaigre, d'amidon ou d'eau détartrée
chimiquement.
4 Vissez le bouchon sur l'orifice de remplissage de la chaudière.
FRANÇAIS

15
Remplissage rapide
C
1 D'abord positionnez le bouton marche/arrêt (D) sur "arrêt".
2 Maintenez le bouton vapeur appuyé jusqu'à ce que la vapeur
soit complètement éliminée de l'appareil.
3 Maintenez le bouton vapeur appuyé et dévissez légèrement le
bouchon de chaudière en tournant dans le sens inverse des
aiguilles d'une montre. La chaudière à vapeur est ainsi
dépressurisée.
4 Débranchez la fiche de la prise de courant.
5 Remplissez la chaudière comme il est décrit dans le chapitre
"Remplissage de la chaudière" et laissez l'appareil chauffer.
Réglage de la température
Placez toujours la chaudière sur une surface stable et horizontale. Ne
placez pas la chaudière à vapeur sur une planche à repasser.
Placez toujours le fer sur son support. Ne placez jamais le fer à
repasser sur le cordon d'alimentation ou sur le cordon secteur. Evitez le
contact du cordon avec la semelle lorsqu'elle est chaude.
C
1 Mettez le thermostat sur la position souhaitée en tournant.
- Vérifiez toujours les températures de repassage figurant sur
l'étiquette des vêtements:
- 1 Fibres synthétiques (par ex. acrylique, viscose, polyamide,
polyester)
- 1 Soie
- 2 Laine
- 3 Coton, lin
- Si vous ne connaissez pas la composition des tissus, repassez en
commençant par la température la plus basse sur une partie interne
du vêtement et invisible de l'extérieur.
FRANÇAIS
H
I
L
O
A
I
G
O
D
O
N
L
A
N
A
A
L
G
O
D
O
N
H
I
L
O
M
A
X
O
/
O
F
F
L
I
N
E
N
C
O
T
T
O
N
W
O
O
L
S
I
L
K
N
Y
L
O
N
Commande de
vapeur
-
q
R
Thermostat
1
2
3
Type de tissu
Fibres synthétiques, par ex.
acétate, acrylique, viscose,
polyamide, polyester et soie
Laine
Coton, lin
Veuillez noter que Z dans le
tableau signifie que cet article
ne doit pas être repassé.
Etiquette avec
instructions de
repassage
B
C
D
Z

16
- La soie, la laine et autres fibres synthétiques doivent être repassés sur
l'envers pour éviter les taches.
- Commencez toujours le repassage des articles nécessitant la
température la plus basse .
C
2 Branchez la fiche dans la prise de courant et laissez l'appareil
chauffer en positionnant le bouton marche/arrêt (D) sur
"marche".
3 Début froid: L'eau de la chaudière et la semelle commencent à
chauffer. Le chauffage de la semelle dure environ 2 minutes et
de l'eau de la chaudière environ 8 minutes.
4 Réchauffage rapide: Si vous réchauffez la chaudière pendant le
repassage, l'eau de la chaudière chauffe pendant environ
6 minutes.
5 Les modèles GC6024/6026 uniquement: Lorsque la chaudière
est assez chaude pour produire de vapeur, le témoin (E)
s'éteint.Vous pouvez maintenant commencer à repasser.
Suggestions
◗ Si le tissu est fait de plusieurs types de fibres, sélectionnez toujours
la température nécessaire pour la fibre la plus délicate, c.-à-d. la
température la plus basse. Par ex. si un article contient 60%
polyester et 40% coton, il doit être repassé à la température
indiquée pour le polyester (1) et sans vapeur.
◗ Lorsque vous repassez des articles en laine, le fer peut lustrer.
Pour éviter de lustrer les tissus, utilisez un chiffon sec ou repassez
l'article sur l'envers.
◗ Le velours et tissus qui ont tendence à lustrer, doivent être
repassés dans une seule direction en exerçant une faible pression.
◗ Ne repassez pas à la vapeur les tissus de soie colorée. Ils
pourraient se lustrer.
Repassage à la vapeur
Assurez-vous qu'il y a suffisamment d'eau dans la chaudière.
Le repassage à la vapeur est possible uniquement aux températures de
repassage les plus élevées.
1 Mettez le bouton de réglage de la température sur la position
conseillée.
Voir le chapitre "Réglage de la température".
2 Attendez jusqu'à ce que le témoin "chauffage chaudière"
s'éteigne.
FRANÇAIS

17
C
3 Maintenez appuyé le bouton vapeur (H) pendant le repassage à
la vapeur.
Modèles GC6024/6026 uniquement: Pendant le repassage à la vapeur,
l'indicateur de température (G) s'allume de temps en temps pour
indiquer que le fer et l'eau de la chaudière sont chauffés à la
température et pression correctes.Vous pouvez continuer à repasser.
La vapeur à l'intérieur du cordon d'alimentation se condense si vous
n'utilisez pas la vapeur pendant quelque temps. Lorsque vous
commencez le repassage à la vapeur, le cordon est froid. De ce fait,
lorsque vous commencez à repasser quelques gouttes d'eau peuvent
sortir par la semelle.
B
Pour éviter de mouiller vos vêtements, tenez le fer au-dessus d'un chiffon
et appuyez sur le bouton vapeur (H) jusqu'à ce que l'appareil produise
de la vapeur normalement.
Repassage sans vapeur
1 Mettez le bouton de réglage de la température sur la position
conseillée.
Voir le chapitre "Réglage de la température".
2 N'appuyez pas sur le bouton vapeur (H).
◗ De la vapeur peut s'échapper si vous appuyez sur le bouton de
vapeur accidentellement pendant le repassage. Si la chaudière est
vide ou pas encore chauffée, vous entendrez un cliquetis dû à
l'ouverture de la vanne vapeur. Ceci est tout à fait normal et sans
danger.
◗ Si vous avez repassé à une température élevée et en suite vous
avez réglé le thermostat (I) sur une température inférieure, vous
devez attendre que le témoin de température (G) s'allume à
nouveau avant de continuer le repassage.Vous éviterez ainsi de
détériorer les tissus.
Autres caractéristiques
Défroissage vertical
C
1 Les draperies et les vêtements (vestes, costumes, tailleurs,
manteaux) peuvent être repassés en tenant le fer en position
verticale.
Ne dirigez jamais le jet de vapeur vers des personnes.
FRANÇAIS

18
Commande de vapeur réglable
Commande de vapeur (F): réglez le bouton de vapeur sur q pour
débit vapeur modéré ou sur R pour débit vapeur maximum.
Après le repassage
C
1 Arrêtez l'appareil en positionnant le bouton marche/arrêt (D)
sur "arrêt".
2 Dépressurisez la chaudière en maintenant le bouton vapeur
appuyé jusqu'à ce que la vapeur soit éliminée.
3 Débranchez la fiche de la prise de courant.
4 Placez le fer sur son support (C), réglez le thermostat sur O et
laissez le fer refroidir avant de le ranger.
Nettoyage et entretien
1 Avant de commencer à nettoyer le fer, laissez-le refroidir
suffisamment. Si vous voulez nettoyer la chaudière, suivez les
quatre premières étapes de la procédure "Remplissage rapide".
Fer à repasser
1 Nettoyez le fer avec un chiffon humide.
2 Nettoyez la semelle avec un chiffon humide et un peu de
détergent (liquide) non-abrasif pour enlever les tâches de
calcaire.
Ne plongez jamais le fer dans l'eau et ne le rincez pas non plus.
Chaudière à vapeur
Rincez la chaudière après avoir utilisé l'appareil 10 fois environ.
1 Dévissez le bouchon lentement, puis retirez-le.
2 Pour rincer la chaudière utilisez un demi litre d'eau. Puis versez
l'eau en tenant la chaudière à l'envers au-dessus de l'évier.
3 Revissez le bouchon sur la chaudière.
Rangement
1 Laissez le fer refroidir avant de le ranger.
2 Videz la chaudière.
FRANÇAIS

19
3 La chaudière est dotée de poignées pour faciliter le transport.
4 Vérifiez régulièrement si le cordon d'alimentation et le cordon
secteur ne sont pas endommagés.
Informations et service
Pour plus d'informations, visitez notre Philips Web site :
www.philips.com ou veuillez contacter le Service Consommateurs
Philips de votre pays (vous trouverez le numéro de téléphone dans le
dépliant sur la garantie internationale). S'il n'y a aucun Service
Consommateurs Philips dans votre pays, contactez votre distributeur
ou le Service Department of Philips Domestic Appliances and Personal
Care BV.
Dépannage
Ce chapitre résume les problèmes les plus courants susceptibles d'être
rencontrés. Lisez les sections suivantes pour plus de détails. Si vous ne
pouvez pas résoudre le problème, contactez un Centre Service
Consommateurs Philips dans votre pays. S'il n'y a aucun Service
Consommateurs Philips dans votre pays, contactez votre distributeur
ou le plus proche Centre Service Agréé Philips.
FRANÇAIS

20
Solution
Ce phénomène s'arrêtera après
quelque temps.
Sélectionnez la température de
repassage selon les instructions dans
ce mode d'emploi et du tableau.
Placez la chaudière à vapeur sur une
surface stable et/ou régulière.
C'est normal.Tenez le fer au-dessus
d'un chiffon et appuyez sur le bouton
vapeur (H). Après quelques secondes,
l'appareil produira à nouveau de la
vapeur.
Réglez le bouton (D) sur "marche".
Attendez que le témoin lumineux
s'éteigne.
Pour vérifier si le fer produit de la
vapeur, placez un miroir devant les
orifices de la semelle.
Nettoyez la semelle à l'aide d'un
chiffon humide et, si nécessaire, un peu
de liquide vaisselle.
Nettoyez la semelle à l'aide d'un
chiffon humide et, si nécessaire, un peu
de liquide vaisselle. Sélectionnez la
température recommandée.
Cause(s) possible(s)
C'est normal. Certaines parties ont
été légèrement graissées.
Le thermostat (I) a été réglé sur une
position trop basse pour le repassage
à la vapeur.
La chaudière à vapeur a été placée sur
une surface instable et/ou irrégulière.
Lorsque vous commencez le
repassage à la vapeur, le cordon est
froid. La vapeur se condense dans le
cordon laissant des gouttes d'eau
sortir pas la semelle.
La chaudière n'a pas été mise en
marche.
Le témoin lumineux "chauffage
chaudière" est encore allumé.
La vapeur surchauffée est difficile à
voir, surtout si le thermostat a été
réglé sur la position maximale et
surtout si la température ambiantale
est relativement élevée (en été par
ex.).
Les impuretés ou des particules de
calcaire présentes dans l'eau se sont
déposées sur la semelle.
Vous avez repassé l'article à une
température trop élevée.
Problème
De la fumée sort du fer après avoir
mis en marche l'appareil la première
fois.
Des gouttes d'eau sortent par la
semelle
L'appareil ne fait pas de vapeur.
Je ne vois pas la vapeur sortir par la
semelle.
La semelle est sale.
FRANÇAIS
La pagina si sta caricando...
La pagina si sta caricando...
La pagina si sta caricando...
La pagina si sta caricando...
La pagina si sta caricando...
La pagina si sta caricando...
La pagina si sta caricando...
La pagina si sta caricando...
La pagina si sta caricando...
La pagina si sta caricando...
La pagina si sta caricando...
La pagina si sta caricando...
La pagina si sta caricando...
La pagina si sta caricando...
La pagina si sta caricando...
La pagina si sta caricando...
La pagina si sta caricando...
La pagina si sta caricando...
La pagina si sta caricando...
La pagina si sta caricando...
La pagina si sta caricando...
La pagina si sta caricando...
La pagina si sta caricando...
La pagina si sta caricando...
La pagina si sta caricando...
La pagina si sta caricando...
-
 1
1
-
 2
2
-
 3
3
-
 4
4
-
 5
5
-
 6
6
-
 7
7
-
 8
8
-
 9
9
-
 10
10
-
 11
11
-
 12
12
-
 13
13
-
 14
14
-
 15
15
-
 16
16
-
 17
17
-
 18
18
-
 19
19
-
 20
20
-
 21
21
-
 22
22
-
 23
23
-
 24
24
-
 25
25
-
 26
26
-
 27
27
-
 28
28
-
 29
29
-
 30
30
-
 31
31
-
 32
32
-
 33
33
-
 34
34
-
 35
35
-
 36
36
-
 37
37
-
 38
38
-
 39
39
-
 40
40
-
 41
41
-
 42
42
-
 43
43
-
 44
44
-
 45
45
-
 46
46


Philips GC6034 Manuale del proprietario
- Categoria
- Ferri da stiro
- Tipo
- Manuale del proprietario
in altre lingue
- English: Philips GC6034 Owner's manual
- français: Philips GC6034 Le manuel du propriétaire
- español: Philips GC6034 El manual del propietario
- português: Philips GC6034 Manual do proprietário
Documenti correlati
-
Philips GC6022/03 Manuale utente
-
-
-
Philips GC6315/01 Manuale utente
-
-
Philips gc6065 Manuale utente
-
-
-
Philips GC6107 Manuale utente
-
Philips GC8080/28 Manuale utente