
FRAMTID
DOV8/2
GB
DE
FR
IT


ENGLISH 4
DEUTSCH 19
FRANÇAIS 35
ITALIANO 57

Contents
Safety information 4
Product description 6
Before first use 7
Daily use 7
Cooking tables 10
Care and cleaning 11
What to do if… 13
Technical data 14
Installation 15
Electrical connection 15
Environment concerns 16
IKEA GUARANTEE 16
Subject to change without notice
Safety information
For your safety and correct operation of
the appliance, read this manual careful-
ly before installation and use. Always keep
these instructions with the appliance even if
you move or sell it. Users must fully know the
operation and safety features of the appli-
ance.
Correct use
• Do not leave the appliance unattended
during operation.
• The appliance is designed exclusively for
domestic use.
• The appliance must not be used as a work
surface or as a storage surface.
• Do not place or store flammable liquids,
highly inflammable materials or fusible ob-
jects (e.g. plastic film, plastic, aluminium) in
or near the appliance.
• Watch out when connecting electric appli-
ances to sockets nearby. Do not allow con-
necting leads to come into contact with or
to catch beneath the hot oven door.
• Do not keep moist dishes and food in the
oven after finishing the cooking as the
moist can damage the enamel or get into
the units.
• Do not do repairs yourself to prevent injury
and damage to the appliance. Always
contact your local Service Centre.
• Do not use harsh abrasive or sharp metal
scrappers to clean the oven door glass
since they can scratch the surface, which
may result in shattering of the glass.
Note on enamel coating
Changes in the colour of the oven enam-
el coating as a result of use do not affect the
appliance suitability for normal and correct
use. They therefore do not constitute a defect
in the sense of the warranty law.
Child safety
• Only adults can use this appliance. Chil-
dren must get supervision to make sure
that they do not play with the appliance.
• Keep all packaging away from children.
There is a risk of suffocation.
• Keep children away from the appliance
when the door is open.
General safety
• This appliance is not intended for use by
persons (including children) with reduced
physical, sensory or mental capabilities, or
lack of experience and knowledge, unless
they have been given supervision or in-
struction concerning use of the appliance
by a person responsible for their safety.
• Risk of burns! The interior of the oven be-
comes hot during use.
• Always stand back from the appliance
when opening the oven door during cook-
ing or at the end of it to allow any build up
of steam or heat to release.
Installation
• Make sure that the appliance is not dam-
aged because of transport. Do not connect
a damaged appliance. If necessary, con-
tact the supplier.
ENGLISH 4

• Only an authorised service engineer can
repair this appliance. Use only original
spare parts.
• Built-in appliances can only be used after
they are built-in to suitable built-in units
and work surfaces that meet standards.
• Do not change the specifications or modify
this product. Risk of injury and damage to
the appliance.
Warning! Carefully obey the instructions
for electrical connections.
Oven lamp
• Bulb lamps used in this appliance are spe-
cial lamps selected for household applian-
ces use only. They cannot be used for the
full or partial illumination of a household
room.
• If it becomes necessary to replace the
lamp use one of the same power and spe-
cifically designed for household appliances
only.
Information on acrylamides
Important! According to the latest scientific
knowledge, intensive browning of food,
especially in products containing starch, can
constitute a health risk due to acrylamides.
Therefore, we recommend cooking at the
lowest possible temperatures and not
browning foods too much.
ENGLISH 5

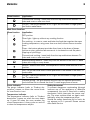
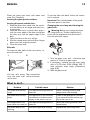
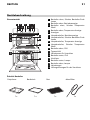
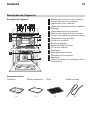
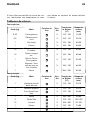
Product description
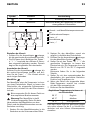
General overview
1 3
5
10
11
12
13
14
15
16
17
18
7
2 4 6
9
8
1 Top oven control knob for oven functions
2 Top oven power indicator
3 Top oven temperature control knob
4 Top oven temperature indicator
5 Display
6 Main oven power indicator
7 Main oven control knob for oven func-
tions
8 Main oven temperature indicator
9 Main oven temperature control knob
10 Top oven grill
11 Rating plate
12 Bottom heating element
13 Bottom oven grill
14 Fan
15 Bottom oven lamp
16 Top oven lamp
17 Heating element
18 Air vents for cooling fan
Oven accessories
Dripping pan
1x
Baking tray
1x
Grid
1x
Meat probe
1x
ENGLISH 6

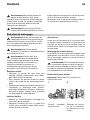
Push-pull control knobs The oven is provided with push-pull control
knobs. You can sunk the push-pull control
knobs inside the control panel when the oven
is off.
Turn the push-pull control knobs clockwise to
set the temperature and the oven function.
Before first use
Remove all packaging, both inside and
outside the oven, before using the appli-
ance. Do not remove the rating plate.
When you connect the appliance to the elec-
trical supply or in case of a power cut, the
Time function indicator flashes automatically.
To set the current time use "+" or "-" button.
After approx. 5 seconds the flashing stops
and the clock displays the time of the day set.
If the time of the day is not set the appliance
does not work.
Initial cleaning
Clean the appliance before first use. Clean
the accessories and the oven interior with a
soft cloth with warm water and soap.
After that preheat the oven up without food.
Preheating
Turn the oven function control knob to
and
run the oven for 45 minutes at maximum tem-
perature, to burn off any residue from the
cavity surface. Accessories can become hot-
ter than in normal use. During this period an
odour can be emitted. This is normal. Make
sure the room is well ventilated.
Daily use
Switching the appliance on
Set the oven function and the temperature.
Setting the oven function
Turn the control knob for oven functions (refer
to "Product description") clockwise .
Setting the temperature
Turn the temperature control knob (refer to
"Product description") clockwise. You can set
the temperature between 50 °C and 275 °C.
Switching the appliance off
Turn the temperature and oven functions
control knobs to the off position.
Top Oven functions
Oven function Application
OFF position
Oven light - lights up without any cooking function.
ENGLISH 7

Oven function Application
Conventional cooking - heats both from the top and bottom element. To
bake and roast on one oven level.
Full grill - the full grill element is on. To grill flat food items in large quanti-
ties and to make toasts.
Main Oven functions
Oven function Application
OFF position
Oven light - lights up without any cooking function.
Fan cooking - to roast or roast and bake the food that requires the same
cooking temperature, using more than one shelf, without flavour transfer-
ence.
Pizza - the bottom element provides direct heat to the base of pizzas,
quiches or pies, while the fan ensures air is circulated to cook the pizza
toppings or pie fillings.
Conventional cooking - heats both from the top and bottom element. To
bake and roast on one oven level.
Bottom heating element - heats only from the bottom of the oven. To bake
cakes with crispy or crusty bases.
Defrost - thaws frozen food. The temperature control knob must be on off
position.
Grill - to grill flat food items in small quantities in the middle of the shelf. To
make toasts.
Full grill - the full grill element is on. To grill flat food items in large quanti-
ties. To make toasts.
Thermal grilling - the grill element and the oven fan operate alternately
and circulate hot air around the food. To cook large pieces of meat.
Power indicator
The power indicator (refer to "Product de-
scription") comes on when the control knob
for oven function is set.
Temperature indicator
The temperature indicator (refer to "Product
description") comes on when the oven heats
up. It goes off when the oven reaches the
correct temperature. It then cycles on and off
to show the temperature adjusts.
Safety thermostat
To prevent dangerous overheating (through
incorrect use of the appliance or defective
components), the oven is fitted with a safety
thermostat, which interrupts the power sup-
ply. The oven switches back on again auto-
matically, when the temperature drops.
Should the safety thermostat fail to work, do
not attempt to fix it yourself. Please contact
After Sales Service.
ENGLISH 8

The cooling fan
The cooling fan (not visible) keeps the front
panel, the knobs and the oven door handle
cool. When the oven is on the fan switches on
automatically. Warm air blows out through
the air vents near the oven door handle. To
keep the controls cool, the cooling fan can
still run after the oven is off.
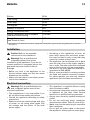
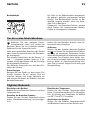
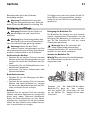
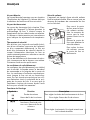
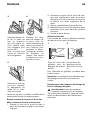
Mechanical child lock
The appliance is delivered with fixed and ac-
tivated child lock. It is situated just below the
oven control panel on the right side.
To open the oven
door with the child
lock inserted, pull
the child lock handle
up as shown in the
picture.
Close the oven door
without pulling the
child lock.
To remove the child
lock open the oven
door and unscrew it.
Clock functions
Symbol Function Description
Cooking duration To set how long the oven is to be in use
End of cooking To set when the oven is to switch off
Cooking duration and End of
cooking combined
To set delayed start of the appliance
Minute minder To set a countdown. A signal sounds when the
time elapses
Clock To set the time of the day
Meat probe Measures the core temperature while roasting
larger pieces of meat
ENGLISH 9

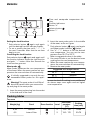
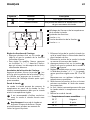
1
45 3
2
1 Time and meatprobe temperature dis-
play
2 Function indicators
3 Button "+"
4
Selector button
5 Button "-"
Setting the clock functions
•
Push selector button
again and again
until the desired function indicator flashes.
• To set or modify the time use"+ " / " -" in
the next 5 seconds. After that the set time
begins to run.
Cancelling the clock function
Push selector button
again and again until
the function indicator shows the right function
and push " - " button. After few seconds the
clock function goes out.
Meat probe
Meat probe measures the core temperature
of the meat. When the meat reaches set tem-
perature the oven switches off automatically.
It is kindly suggested to use only the rec-
ommended meat probe for this appli-
ance.
Warning! The meat probe is hot! Risk of
burns! Be careful when you remove the
tip and plug of the meat probe.
1. Insert the meat probe plug into the socket
in the side wall of the oven.
2. Insert the meat probe point in the middle
of the meat, as far as it goes.
3.
Push selector button
again and again
until Meat probe indicator
flashes.
4. Use "+" / "-" buttons to set the desired
core temperature. You can set the tem-
perature from 30 °C to 99 °C.
Refer to suggested values in the table.
5. Use control knobs to set the desired oven
cooking function and temperature.
6. When the meat reaches set core temper-
ature, the oven switches off automatically.
7. Remove the meat probe.
Suggested core temperatures
50 °C Rare
60 °C Medium
70 °C Well done
In case the level of cooking is not satisfactory
do above steps once again and set higher
core temperature.
Cooking tables
Top oven
Weight (kg) Food Oven function Level
Oven tem-
perature
(°C)
Cooking
time (min)
0,25 Biscuits
2 170 - 190 10-20
0,5 Instant Cake
2 150 - 170 50-70
ENGLISH 10

Weight (kg) Food Oven function Level
Oven tem-
perature
(°C)
Cooking
time (min)
1White Bread
2 170 - 180 40-50
1Fish
2 160 - 180 20-30
1,5
Fruit Pies, Crum-
bles
2 170 - 190 30-50
1,5
Pasta Lasagne
etc.
2 160 - 180 40-60
1
Quiche, Tarts,
Flans
2 170 - 190 25-50
1
Vegetables:
Baked Jacket/
Roast Potatoes
2 180 - 190 66-90
1Pizza
1 200 - 230 20-30
Main oven
Weight (kg) Food Oven function Level Oven tem-
perature
(°C)
Cooking
time (min)
1 Beef/Beef boned
3 170 - 190 50-70
1 Mutton/Lamb
3 170 - 190 50-70
1Pork/Veal/Ham
3 170 - 190 50-90
1Chicken
3 180 - 200 50-60
3Turkey/Goose
1 170 - 190 120-150
1,5 Duck
2 180 - 200 70-100
1 Pheasant
3 170 - 190 70-80
1,5 Rabbit
3 170 - 190 50-70
Warning! Do not line the oven with
aluminium foil and do not place a
dripping pan or baking tray on the floor.
Build-up heat can damage the oven enamel.
Warning! Always cook with the oven
door closed. Be careful when opening
the drop down oven door. Do not allow it to
fall open - support the door using the door
handle, until it is fully open.
Care and cleaning
Warning! Switch the appliance off and
let it cool down before you clean it.
ENGLISH 11

Warning! For safety reasons, do not
clean the appliance with steam blasters
or high-pressure cleaners.
Warning! Keep the appliance clean at
all times. A build-up of fats or other
foodstuffs can cause a fire, especially in the
dripping pan.
Outside of the appliance
• Clean the front of the appliance with a soft
cloth and warm water with soap.
• For metal fronts, use normal cleaning
agents.
• Do not use scouring agents and abrasive
sponges.
Oven interior
• Turn the oven lamp on before cleaning.
• Clean the oven with a soft cloth with warm
water and soap and leave it to dry .
Accessories
Clean all slide-in units with a soft cloth with
warm water and soap (shelf, baking tray,
shelf support rails etc.) after each use and
dry well. Soak briefly to make them easier to
clean.
Cleaning the oven door
The oven door consists of two panels of glass
mounted one behind the other. To make the
cleaning easier remove the oven door and
the internal panel.
Warning! The oven door can close if you
try to remove the internal panel of glass
when the door is still assembled.
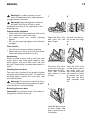
Removing the oven door
Important! Pay attention what is the order of
the glasses and how they are
1
90°
Open the door fully
and hold the two
door hinges .
2
A
A
Lift and turn the lev-
ers on the two hing-
es.
3
45°
Close the oven door
to the first open po-
sition (approx. 45°).
Then pull forward
and remove it from
its seat.
4
Hold the door strip
on the upper side of
the oven door on
both sides and press
this inwards in order
to loosen the seal.
Then pull the door
strip upwards and
off.
5
Hold the glass panel
on their upper side
and it up and out of
its retainer.
ENGLISH 12

Clean the glass oven door with water and
soap. Dry it carefully.
Inserting the glass panels and door
Inserting the panel and the door:
1. Slide the glass door panel into the retain-
er from above at an angle and then low-
er the panel.
2. Hold the door strip on both sides, align it
with the inner edge of the door and press
the door strip into the upper edge of the
door.
3. Open the door as far as it will go.
4. Fold the clamp levers on both door hinges
down into their original position.
5. Close the oven door.
Side rails
To clean the side walls of the oven cavity, re-
move the side rails.
1
Pull the rails away
from the oven wall
at the front.
2
2
1
Then unhook the
rails at the back.
To put the side rails back, follow the instruc-
tion in reverse.
Important! The rounded ends of the guide
bars must point to the front.
Changing the oven lamp and cleaning the
glass cover
Warning! Before you change the oven
lamp (refer to "Product description"),
switch off the appliance and disconnect it
from the electrical supply.
1. Turn the glass cover anti - clockwise and
remove it. Clean the glass cover.
2. If necessary, replace the old oven lamp
with a 15/25 watt, 230V (50Hz), 300 °C
heat resistant oven lamp (Connection
type: E14).
3. Refit the glass cover.
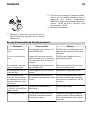
What to do if…
Problem Possible cause Solution
The oven does not op-
erate
The required setting have not
been set
check if cooking function and
temperature are selected
The oven does not op-
erate
The appliance is not correctly
connected or/and the mains
supply to the oven is not on
Check if the appliance is correct-
ly connected and the mains sup-
ply to the oven is on
The temperature indi-
cator does not come on
The required setting have not
been set
Select the cooking function and
temperature
The oven lamp is not
working
The oven lamp bulb is faulty Replace the oven lamp bulb
ENGLISH 13

Problem Possible cause Solution
Steam and condensa-
tion settle on the food
and in the oven cavity
Dishes have been left in the
oven for too long
Do not leave the dishes standing
in the oven for longer than 15-20
minutes after the cooking process
ends
“12.00” appears on the
display and the clock
LED is flashing
Interruption of the power sup-
ply.
Reset the time
F11 appears on the
display
The plug of the meat probe is
not firmly in position in the
socket
Insert the meat probe plug into
the socket in the side wall of the
oven as far as it can go
If there is a fault, first try to find a solution to
the problem yourself. If you cannot find a sol-
ution to the problem yourself, contact your
dealer or the After Sales Service.
If you operated the appliance wrongly,
or the installation was not carried out by
a registered engineer, the visit from the After
Sales Service technician or dealer may not
take place free of charge, even during the
warranty period.
Technical data
Dimensions (internal) Width
Height
Depth
594
888
548
Usable volumes Top oven: 37 l
Main oven: 55 l
Area of largest baking sheet (net sur-
face)
1130 cm2
Bottom heating element Top oven: 1000 W
Main oven: 1000 W
Top heating element Top oven: 1100 W
Main oven: 900W
Grill element Top oven: 1000 W
Main oven: 1750 W
Conventional cooking Top oven: 2200 W
Main oven: 2000 W
Bottom heat 1100 W
Grill 1850 W
Full grill Top oven: 2200 W
Main oven: 2750 W
Fan cooking 2000 W
Thermal Grilling 2750 W
Pizza 3000 W
ENGLISH 14

Defrost 50 W
Total rating
1)
5100 W
Oven lamp 25 W
Cooling fan 22 W
Number of functions 8+2
Energy consumption static 0,79 kWh
Energy Consumption with a standard
load and bottom heating
0,79 kWh
Energy Consumption with a standard
load forced air oven
0,79 kWh
1) Information on the electrical connection, voltage and overall power is given on the rating plate (refer to "Product
description").
Installation
Caution! Refer to the assembly
instructions for the installation.
Warning! Only a qualified and
competent person must do the
installation of the appliance. If you do not
contact qualified or competent person, the
guarantee becomes invalid if there is
damage.
• Before you built in the appliance to the
kitchen cabinet make sure that the recess
dimensions are suitable.
• Make sure that there is anti-shock protec-
tion for the installation.
• According to the regulations of force, all
parts which ensure the anti-shock protec-
tion must be fixed in such a way that they
cannot be undone without tools.
• The appliance can be placed with its back
and one side close to the higher applian-
ces or walls. The other side must be placed
close to the furniture with the same height.
• The built-in unit must meet the stability re-
quirements of DIN 68930.
• Built-in ovens and built-in cooking surfaces
are fitted with special connection systems.
For safety reasons, you must only combine
appliances from the same manufacturer.
Electrical connection
Warning! Only a qualified electrician
and competent person must do the
electrical installation.
• The manufacturer is not responsible if you
do not follow these safety precautions.
• Ground the appliance according to safety
precautions.
• Make sure that the rated voltage and type
of power on the rating plate agree with
the voltage and the power of the local
power supply.
• This appliance is supplied without a plug
and a connection cable.
• Any electrical component must be installed
or replaced by the After Sales Service
technician or qualified service personnel.
• Always use a correctly installed shockproof
socket.
•Do not use multi-way plugs, connectors
and extension cables. There is a risk of fire.
• Make sure that the mains plug is accessible
after installation.
• Do not pull the mains cable to disconnect
the appliance. Always pull the mains plug.
ENGLISH 15

• Connect the appliance to the mains using a
device that allows to disconnect the appli-
ance from the mains at all poles with a
contact opening width of at least 3 mm, eg.
automatic line protecting cut-out, earth
leakage trips or fuse.
This appliance complies with the E.E.C. Direc-
tives.
Environment concerns
The symbol on the product or on its
packaging indicates that this product may
not be treated as household waste. Instead it
should be taken to the appropriate collection
point for the recycling of electrical and
electronic equipment. By ensuring this
product is disposed of correctly, you will help
prevent potential negative consequences for
the environment and human health, which
could otherwise be caused by inappropriate
waste handling of this product. For more
detailed information about recycling of this
product, please contact your local council,
your household waste disposal service or the
shop where you purchased the product.
Packaging materials
The materials with the symbol
are recy-
clable. Dispose the packaging in a suitable
collection containers to recycle it.
Before disposal of appliance
Warning! Do these steps to dispose the
appliance:
• Pull the mains plug out of the mains socket.
• Cut off the mains cable and discard it.
• Discard the door catch. This prevents the
children to close themselves inside the ap-
pliance. Risk of suffocation.
IKEA GUARANTEE
How long is the IKEA guarantee valid?
This guarantee is valid for five (5) years from
the original date of purchase of Your appli-
ance at IKEA, unless the appliance is named
LAGAN in which case two (2) years of guar-
antee apply. The original sales receipt is re-
quired as proof of purchase. If service work is
carried out under guarantee, this will not ex-
tend the guarantee period for the appliance,
Which appliances are not covered by the
IKEA five (5) years guarantee?
The range of appliances named LAGAN and
all appliances purchased in IKEA before 1st
of August 2007
Who will execute the service?
IKEA service provider will provide the service
through its own service operations or author-
ized service partner network.
What does this guarantee cover?
The guarantee covers faults of the appliance,
which have been caused by faulty construc-
tion or material faults from the date of pur-
chase from IKEA. This guarantee applies to
domestic use only. The exceptions are speci-
fied under the headline “What is not covered
under this guarantee?” Within the guarantee
period, the costs to remedy the fault e.g. re-
pairs, parts, labour and travel will be cov-
ered, provided that the appliance is accessi-
ble for repair without special expenditure.
On these conditions the EU guidelines (Nr.
99/44/EG) and the respective local regula-
tions are applicable. Replaced parts become
the property of IKEA.
ENGLISH 16

What will IKEA do to correct the problem?
IKEA appointed service provider will exam-
ine the product and decide, at its sole discre-
tion, if it is covered under this guarantee. If
considered covered, IKEA service provider or
its authorized service partner through its own
service operations, will then, at its sole dis-
cretion, either repair the defective product or
replace it with the same or a comparable
product.
What is not covered under this guarantee?
• Normal wear and tear.
• Deliberate or negligent damage, damage
caused by failure to observe operating in-
structions, incorrect installation or by con-
nection to the wrong voltage, damage
caused by chemical or electro-chemical re-
action, rust, corrosion or water damage in-
cluding but not limited to damage caused
by excessive lime in the water supply,
damage caused by abnormal environmen-
tal conditions.
• Consumable parts including batteries and
lamps.
• Non-functional and decorative parts which
do not affect normal use of the appliance,
including any scratches and possible color
differences.
• Accidental damage caused by foreign ob-
jects or substances and cleaning or un-
blocking of filters, drainage systems or
soap drawers.
• Damage to the following parts: ceramic
glass, accessories, crockery and cutlery
baskets, feed and drainage pipes, seals,
lamps and lamp covers, screens, knobs,
casings and parts of casings. Unless such
damages can be proved to have been
caused by production faults.
• Cases where no fault could be found dur-
ing a technician’s visit.
• Repairs not carried out by our appointed
service providers and/or an authorized
service contractual partner or where non-
original parts have been used.
• Repairs caused by installation which is
faulty or not according to specification.
• The use of the appliance in a non-domestic
environment i.e. professional use.
• Transportation damages. If a customer
transports the product to their home or
other address, IKEA is not liable for any
damage that may occur during transport.
However, if IKEA delivers the product to
the customer's delivery address, then dam-
age to the product that occurs during this
delivery will be covered by this guarantee.
• Cost for carrying out the initial installation
of the IKEA appliance. However, if an IKEA
service provider or its authorized service
partner repairs or replaces the appliance
under the terms of this guarantee, the serv-
ice provider or its authorized service part-
ner will re-install the repaired appliance or
install the replacement, if necessary.
This restriction do not apply to fault-free
work carried out by a qualified specialist us-
ing our original parts in order to adapt the
appliance to the technical safety specifica-
tions of another EU country.
How country law applies
The IKEA guarantee gives You specific legal
rights, which covers or exceed local de-
mands. However these conditions do not limit
in any way consumer rights described in the
local legislation
Area of validity
For appliances which are purchased in one
EU country and taken to another EU country,
the services will be provided in the frame-
work of the guarantee conditions normal in
the new country. An obligation to carry out
services in the framework of the guarantee
exists only if the appliance complies and is
installed in accordance with:
• the technical specifications of the country in
which the guarantee claim is made;
• the Assembly Instructions and User Manual
Safety Information;
The dedicated After Sales Service for IKEA
appliances:
Please do not hesitate to contact IKEA After
Sales Service to:
1. make a service request under this guar-
antee;
ENGLISH 17

2. ask for clarification on installation of the
IKEA appliance in the dedicated IKEA
kitchen furniture. The service won’t pro-
vide clarifications related to:
– the overall IKEA kitchen installation;
– connections to electricity (if machine
comes without plug and cable), to wa-
ter and to gas since they have to be
executed by an authorized service en-
gineer.
3. ask for clarification on user manual con-
tents and specifications of the IKEA appli-
ance.
To ensure that we provide you with the best
assistance, please read carefully the Assem-
bly Instructions and/or the User Manual sec-
tion of this booklet before contacting us.
How to reach us if You need our service
Please refer to the last page of this manual
for the full list of IKEA appointed contacts
and relative national phone numbers.
Important! In order to provide You with a
quicker service, we recommend that You use
the specific phone numbers listed at the end
of this manual. Always refer to the numbers
listed in the booklet of the specific appliance
You need an assistance for. Before calling us,
assure that You have to hand the IKEA article
number (8 digit code) for the appliance of
which you need our assistance.
Important! SAVE THE SALES RECEIPT! It is
Your proof of purchase and required for the
guarantee to apply. Note that the receipt
reports also the IKEA article name and
number (8 digit code) for each of the
appliances you have purchased.
Do You need extra help?
For any additional questions not related to
After Sales of your appliances, please con-
tact our nearest IKEA store call centre. We
recommend you read the appliance docu-
mentation carefully before contacting us.
ENGLISH 18

Inhalt
Sicherheitshinweise 19
Gerätebeschreibung 21
Vor der ersten Inbetriebnahme 22
Täglicher Gebrauch 22
Kochtabellen 26
Reinigung und Pflege 27
Was tun, wenn … 29
Technische Daten 30
Montage 31
Elektrischer Anschluss 31
Umwelttipps 31
IKEA GARANTIE 32
Änderungen vorbehalten
Sicherheitshinweise
Lesen Sie diese Bedienungsanleitung
bitte sorgfältig durch, bevor Sie das Ge-
rät anschließen und benutzen, um Gefahren
zu vermeiden und einen korrekten Betrieb
des Geräts zu gewährleisten. Bewahren Sie
diese Bedienungsanleitung in der Nähe des
Geräts auf, auch wenn Sie dieses anderswo
aufstellen oder verkaufen. Jeder, der dieses
Gerät benutzt, muss mit der Bedienung und
den Sicherheitsmerkmalen gut vertraut sein.
Bestimmungsgemäße Verwendung
• Lassen Sie das Gerät bei Betrieb nicht un-
beaufsichtigt.
• Das Gerät ist ausschließlich zur Verwen-
dung im Haushalt bestimmt.
• Das Gerät darf nicht als Arbeits- oder Ab-
stellfläche verwendet werden.
• Brennbare Flüssigkeiten, leicht entzündli-
che Materialien oder schmelzbare Materi-
alien (z.B. Folien, Kunststoff, Aluminium)
dürfen nicht auf dem Gerät oder in dessen
Nähe abgestellt oder gelagert werden.
• Vorsicht bei Anschluss von Elektrogeräten
an Steckdosen in Gerätenähe. Die An-
schlussleitungen dürfen nicht unter der hei-
ßen Backofen-Tür eingeklemmt werden
oder damit in Berührung kommen.
• Lassen Sie nach dem Abschalten des Ge-
räts keine feuchten Gefäße oder Speisen
im Backofeninnenraum stehen. Die Feuch-
tigkeit könnte das Email schädigen oder
sich im Gerät niederschlagen.
• Versuchen Sie nicht, selbst Reparaturen
auszuführen. Andernfalls besteht Unfallge-
fahr und das Gerät könnte beschädigt
werden. Wenden Sie sich in jedem Fall an
den Kundendienst vor Ort.
• Benutzen Sie keine Scheuermittel oder Me-
tallschwämmchen zum Reinigen der Ofen-
glastür; sie können die Glasfläche verkrat-
zen und zum Zersplittern der Scheibe füh-
ren.
Hinweis zur Email-Beschichtung
Farbliche Veränderungen an der Email-
Beschichtung des Backofens als Folge des
Gebrauchs beeinträchtigen nicht die Eignung
des Gerätes zur gewöhnlichen bzw. vertrags-
gemäßen Verwendung. Sie stellen daher kei-
nen Mangel im Sinne des Gewährleistungs-
rechtes dar.
Sicherheit für Kinder
• Nur Erwachsene dürfen dieses Gerät be-
dienen. Kinder müssen beaufsichtigt wer-
den, so dass sie nicht mit dem Gerät spie-
len können.
• Halten Sie das Verpackungsmaterial von
Kindern fern. Andernfalls besteht Ersti-
ckungsgefahr.
• Halten Sie Kinder vom geöffneten Gerät
fern.
DEUTSCH 19

Allgemeine Sicherheit
• Personen (einschließlich Kinder), die auf-
grund ihrer physischen, sensorischen oder
geistigen Fähigkeiten oder ihrer Unerfah-
renheit oder Unkenntnis nicht in der Lage
sind, das Gerät sicher zu bedienen, sollten
dieses Gerät nicht ohne Aufsicht oder An-
weisung durch eine verantwortliche Person
benutzen.
• Verbrennungsgefahr! Bei Betrieb wird der
Backofeninnenraum heiß.
• Stellen Sie sich daher nicht direkt vor den
Backofen, wenn Sie die Tür während des
Betriebs oder danach öffnen, damit Hitze
und Dampf gegebenenfalls gefahrlos ab-
ziehen können.
Installation
• Vergewissern Sie sich, dass das Gerät
beim Transport nicht beschädigt wurde.
Schließen Sie ein beschädigtes Gerät nicht
an. Wenden Sie sich bei Bedarf an den
Hersteller.
• Das Gerät darf nur von einem Servicetech-
niker einer autorisierten Kundendienststelle
repariert werden. Dabei dürfen ausschließ-
lich Originalersatzteile verwendet werden.
• Einbaugeräte dürfen nur nach dem Einbau
in normgerechte, passende Einbauschrän-
ke und Arbeitsplatten betrieben werden.
• Nehmen Sie weder technische noch ander-
weitige Modifikationen am Gerät vor. An-
dernfalls besteht Unfallgefahr und das Ge-
rät könnte beschädigt werden.
Warnung! Beachten Sie genau
sämtliche Anweisungen zu den
elektrischen Anschlüssen.
Backofenlampe
• Die Leuchtmittel in diesem Gerät sind Spe-
ziallampen, die nur für Haushaltsgeräte
geeignet sind! Sie können nicht zur voll-
ständigen oder teilweisen Beleuchtung ei-
nes Zimmers verwendet werden.
• Falls das Leuchtmittel ausgewechselt wer-
den muss, setzen Sie eine Lampe mit der-
selben Leistung ein, die speziell für Haus-
haltsgeräte vorgesehen ist.
Hinweis zu Acrylamid
Wichtig! Nach neuesten wissenschaftlichen
Erkenntnissen kann eine intensive Bräunung
von Lebensmitteln, speziell bei stärkehaltigen
Produkten, eine gesundheitliche Gefährdung
durch Acrylamid verursachen. Daher
empfehlen wir, möglichst bei niedrigen
Temperaturen zu garen und die Speisen nicht
zu stark zu bräunen.
DEUTSCH 20
La pagina si sta caricando...
La pagina si sta caricando...
La pagina si sta caricando...
La pagina si sta caricando...
La pagina si sta caricando...
La pagina si sta caricando...
La pagina si sta caricando...
La pagina si sta caricando...
La pagina si sta caricando...
La pagina si sta caricando...
La pagina si sta caricando...
La pagina si sta caricando...
La pagina si sta caricando...
La pagina si sta caricando...
La pagina si sta caricando...
La pagina si sta caricando...
La pagina si sta caricando...
La pagina si sta caricando...
La pagina si sta caricando...
La pagina si sta caricando...
La pagina si sta caricando...
La pagina si sta caricando...
La pagina si sta caricando...
La pagina si sta caricando...
La pagina si sta caricando...
La pagina si sta caricando...
La pagina si sta caricando...
La pagina si sta caricando...
La pagina si sta caricando...
La pagina si sta caricando...
La pagina si sta caricando...
La pagina si sta caricando...
La pagina si sta caricando...
La pagina si sta caricando...
La pagina si sta caricando...
La pagina si sta caricando...
La pagina si sta caricando...
La pagina si sta caricando...
La pagina si sta caricando...
La pagina si sta caricando...
La pagina si sta caricando...
La pagina si sta caricando...
La pagina si sta caricando...
La pagina si sta caricando...
La pagina si sta caricando...
La pagina si sta caricando...
La pagina si sta caricando...
La pagina si sta caricando...
La pagina si sta caricando...
La pagina si sta caricando...
La pagina si sta caricando...
La pagina si sta caricando...
La pagina si sta caricando...
La pagina si sta caricando...
La pagina si sta caricando...
La pagina si sta caricando...
-
 1
1
-
 2
2
-
 3
3
-
 4
4
-
 5
5
-
 6
6
-
 7
7
-
 8
8
-
 9
9
-
 10
10
-
 11
11
-
 12
12
-
 13
13
-
 14
14
-
 15
15
-
 16
16
-
 17
17
-
 18
18
-
 19
19
-
 20
20
-
 21
21
-
 22
22
-
 23
23
-
 24
24
-
 25
25
-
 26
26
-
 27
27
-
 28
28
-
 29
29
-
 30
30
-
 31
31
-
 32
32
-
 33
33
-
 34
34
-
 35
35
-
 36
36
-
 37
37
-
 38
38
-
 39
39
-
 40
40
-
 41
41
-
 42
42
-
 43
43
-
 44
44
-
 45
45
-
 46
46
-
 47
47
-
 48
48
-
 49
49
-
 50
50
-
 51
51
-
 52
52
-
 53
53
-
 54
54
-
 55
55
-
 56
56
-
 57
57
-
 58
58
-
 59
59
-
 60
60
-
 61
61
-
 62
62
-
 63
63
-
 64
64
-
 65
65
-
 66
66
-
 67
67
-
 68
68
-
 69
69
-
 70
70
-
 71
71
-
 72
72
-
 73
73
-
 74
74
-
 75
75
-
 76
76


in altre lingue
- English: IKEA FDOV8/2 User manual
- français: IKEA FDOV8/2 Manuel utilisateur
- Deutsch: IKEA FDOV8/2 Benutzerhandbuch