
Multipic 2.5
IT
LT
FR
HR
PL
ES
EN
NL
DE
UK
Instrukcja obsługi / User Manual /
Bedienungsanleitung / Manuale d’uso /
Manuel de l’Utilisateur / Manual de usuario /
Handleiding / Посібник користувача /
Vartotojo vadovas / Korisnički priručnik

1

4
2 3
X X ✔

5
6
7

PL
Wprowadzenie
Drogi Kliencie!
Dziękujemy za obdarzenie nas zaufaniem iwybranie marki Overmax.
Dzięki wykorzystaniu wysokiej jakości materiałów inowoczesnych rozwiązań
technologicznych oddajemy wTwoje ręce produkt idealny do codziennego
użytkowania. Jesteśmy pewni, że dzięki ogromnej staranności wykonania
spełni on Twoje wymagania. Przed użyciem produktu zapoznaj się dokładnie
zponiższą instrukcją obsługi.
Jeśli masz jakiekolwiek uwagi lub pytania do zakupionego produktu, skontaktuj
się znami:
Ważne informacje:
Przed rozpoczęciem korzystania zprojektora należy przeczytać, anastępnie
postępować zgodnie zzaleceniami zawartymi wniniejszej instrukcji obsługi.
Niepoprawna obsługa urządzenia może doprowadzić do porażenia prądem
oraz zwiększyć ryzyko pożaru. Podczas używania oraz konserwacji projektora
należy stosować się do poniższych instrukcji.
Uwaga:
Instalacja
•
Aby uzyskać lepszą jakość obrazu, używaj projektora wpomieszczeniach
zzasłoniętymi zasłonami lub wciemnych pokojach.
•
Używaj projektora ostrożnie. Upuszczenie lub awaria mogą uszkodzić
części lub spowodować rozmycie obrazu inieprawidłowe wyświetlanie.
• Trzymaj urządzenie zdala od materiałów łatwopalnych.
Włączanie
•
Uważaj podczas użytkowania kabla zasilającego, unikaj nadmiernego
zginania kabla; uszkodzenie kabla zasilającego może spowodować
porażenie prądem lub pożar.
Czyszczenie
• Przed czyszczeniem urządzenia odłącz kabel zasilający.
• Regularnie czyść obudowę wilgotną szmatką.

PL
• Do czyszczenia soczewki projektora, używaj chusteczki do okularów lub
miękkiej tkaniny aby uniknąć zarysowań.
•
Regularnie czyść otwory wentylacyjne igłośniki projektora za pomocą
miękkiej szczotki, wprzeciwnym razie wentylacja może się zablokować.
Wysoka temperatura
•
Gdy projektor jest włączony, należy uważać, by otwory wentylacyjne
urządzenia nie były zasłonięte. Dlatego też nie należy umieszczać go
na miękkich powierzchniach, ani przykrywać materiałami.
• Nie należy spoglądać wobiektyw podczas jego pracy.
Dodatkowe informacje
• Nie stawiaj żadnych płynów ani ciężkich przedmiotów na projektorze.
• Nie należy samodzielnie demontować projektora.
•
Nie trzymaj projektora wwilgotnych imokrych miejscach – ryzyko
porażenia prądem.
• Zalecamy wyłączenie projektora po 6 h nieprzerwanej pracy.
• Produkt przeznaczony jest do użytku wewnętrznego.
Aby zapewnić stabilność rozpraszania ciepła, przed rozpoczęciem pracy
projektora należy wyregulować wysokość projektora wdolnej części, przy
pomocy pokrętła regulacji podstawy.
Produkt zgodny zwymaganiami dyrektyw Unii Europejskiej.
Zgodnie zDyrektywą 2012/19/UE, niniejszy produkt podlega zbiórce selektywnej.
Produktu nie należy wyrzucać wraz zodpadami komunalnymi, gdyż może
stanowić on zagrożenie dla środowiska izdrowia ludzi. Zużyty produkt należy
oddać do punktu recyklingu urządzeń elektrycznych ielektronicznych.
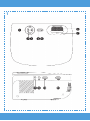
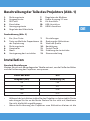
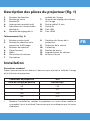
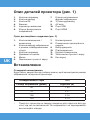
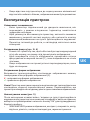
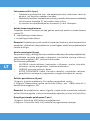
Opis części projektora (rys. 1)
1. Przyciski kierunku
2. Przycisk wyjścia
3. Przycisk OK
4. Włącznik
5. Wskaźnik zasilania
6. Pokrętło ostrości obrazu
7.
Pokrętło regulacji kształtu obrazu
8. Wyjście audio 3.5 mm
9. Wejście AV
10. Port USB
11. Port HDMI

PL
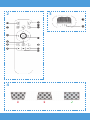
Pilot (rys. 2)
1.
Przycisk włączenia / wyłączenia
2. Przycisk wyboru proporcji
wyświetlania
3. Przyciski kierunku
4. Strona główna
5. Menu
6.
Zmniejszenie głośności dźwięku
7. Ustawienia
8. Obrócenie ekranu projekcji
9. Wybór źródła
10. Potwierdzenie
11. Przycisk powrotu
12. Zwiększenie głośności dźwięku
13. Wyciszenie
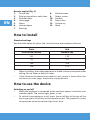
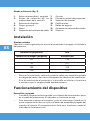
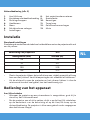
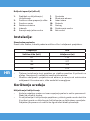
Instalacja
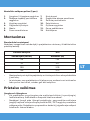
Ustawienia standardowe
Zapoznaj się zponiższą tabelą, aby dostosować rozmiar obrazu iodległość
projektora.
Współczynnik proporcji 16:9
Rozmiar obrazu (cale) Odległość (m)
50 1.55
70 2.17
100 3.10
120 3.72
•
Podczas instalacji umieść projektor na stabilnej powierzchni lub podwieś
do sufitu. Nie zakrywaj, ani nie blokuj otworów wentylacyjnych.
• Jeżeli odległość rzutnika od ekranu będzie mniejsza niż minimalna lub
będzie znacznie większa, obraz może być rozmyty.
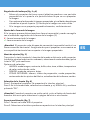
Obsługa urządzenia
Włączanie iwyłączanie
•
Gdy projektor jest podłączony do źródła zasilania, przechodzi wtryb
gotowości. Kontrolka zaświeci się na czerwono.
• Aby włączyć lub wyłączyć projektor, wciśnij włącznik na górze obudowy
lub naciśnij przycisk włączenia/wyłączenia na pilocie. Projektor gotowy
do pracy zasygnalizuje kontrolka świecąca się na niebiesko.

PL
Regulacja ostrości (rys. 3 i4)
•
Umieść projektor tak, aby obiektyw pozostał wpozycji prostopadłej
względem ściany lub ekranu, na którym ma być wyświetlany obraz.
•
Aby poprawić ostrość wyświetlanego obrazu, kręć pokrętłem ostrości
znajdującym się na górnym panelu (1), aż obraz się wyostrzy.
•
Jeżeli obraz nie jest wyświetlany prostopadle, będzie on zniekształcony.
Regulacja kształtu obrazu
Obraz zniekształcony wkształcie trapezu, można poprawić za pomocą pokrętła
do regulacji kształtu obrazu (2).
X - niepoprawny kształt obrazu
✔- poprawny kształt obrazu
Uwaga! Projektor posiada tylko korekcję trapezową wkierunku pionowym,
nie ma korekcji poziomej. Upewnij się, że projektor znajduje się na poziomej
powierzchni względem wyświetlanego obrazu.
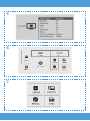
Ustawienia menu (rys. 5)
Po naciśnięciu klawisza lewo / prawo na pilocie lub projektorze, na głównym
interfejsie wyświetli się podmenu, wybierz żądany tryb inaciśnij przycisk
„OK”, aby potwierdzić.
Opcje wyboru:
•
OBRAZ: tryb obrazu, kontrast, jasność, kolor, odcień, ostrość, temperatura
koloru, redukcja szumów.
• DŹWIĘK: tryb głośności, bas.
• INNE OPCJE: język, współczynnik proporcji, tryb projekcji, przywrócenie
ustawień fabrycznych, aktualizacja oprogramowania, wersja.
Wybór źródła (rys. 6)
Krok 1: Włącz projektor. Wyświetli się główny interfejs.
Krok 2: Zwyświetlonej listy wybierz źródło np. HDMI lub AV ipotwierdź
przyciskiem „OK”.
Uwaga! Kiedy projektor nie ma sygnału, naciśnij przycisk źródła na pilocie,
aby wybrać stronę główną lub inne źródło.
Obsługa multimediów (rys. 7)
Krok 1: Podłącz kabel USB do projektora.
Krok 2: Wybierz plik do odtworzenia na głównym interfejsie.

PL
Obsługiwane formaty
Formaty wideo: MP4/MKV/MOV/WMV/RMVB/RM/AVI/FLV/TRP/VOB/3GP/
DIVX/TP/TS/MPG/M2TS/F4V/DAT
Formaty audio: MP3/AAC/FLAC/WAV/WMA/M4A
Formaty obrazu: BMP/JPG/PNG/JPEG
Formaty plików: TXT
Uwaga: to urządzenie nie obsługuje dźwięku kodowanego wsystemie Dolby
zpowodu ochrony praw autorskich.
Zdjęcia mają charakter poglądowy, rzeczywisty wygląd produktów może różnić
się od prezentowanego na zdjęciach.

EN
Introduction
Dear customer!
Thank you for placing trust in us and choosing Overmax.
Thanks to the use of high-quality materials and modern solutions, we provide
you with aproduct perfect for everyday use. We are convinced that the product
will satisfy your requirements as it has been manufactured with utmost care.
Before you use the product, please read this operating manual carefully.
Should you have any remarks or questions concerning the product, please do
not hesitate to contact us:
Important:
Before you start using the projector, please read and then follow guidelines
presented in this operating manual. Wrong use of the device may lead to
electric shock and raise fire risk. When using and maintaining the projector,
please adhere to the instructions below.
Note:
How to install
•
To assure better quality of image, use the projector in rooms with drawn
curtains or in dark rooms.
•
Be careful while using the projector. Dropping or failure may lead to
damage to parts or may cause the picture to be blurred and improperly
displayed.
• Keep the device away from inflammable items.
How to switch on
•
Be careful when using the power cable, do not excessively bend the cable;
damage to power cable may lead to electric shock or fire.
How to clean
• Before you start cleaning the device, unplug the power cable.
• Clean the housing with awet cloth on aregular basis.
•
To clean the projector lens, use aglasses tissue or soft fabric to avoid
scratching.

EN
• Regularly clean air holes and projector loudspeakers with asoft brush,
otherwise ventilation may get blocked.
High temperature
•
When the projector is on, make sure air holes of the device are not covered.
This is why you should not place it on soft surfaces or cover with materials.
• Do not look into the lens while it is operating.
Additional information
• Do not place any liquids or heavy items on the projector.
• Do not disassemble the projector on your own.
• Do not keep the projector in humid and wet places – electric shock risk.
•
It is advisable to turn the projector o after 6 hours of continuous
operation.
• The product is intended for indoor use only.
To assure stability of heat dissipation, before you activate the projector, please
adjust its height in the lower part with the use of abase adjustment knob.
The product complies with requirements of EU directives.
Pursuant to the Directive 2012/19/EU, this product is subject to selective
collection. The product must not be disposed of along with domestic waste
as it may pose athreat to the environment and human health. The worn-out
product must be handed over to the electrics and electronics recycling center.
Description of projector parts (fig. 1)
1. Direction keys
2. Exit key
3. OK key
4. On/o switch
5. Power indicator
6. Image sharpness knob
7. Image shape adjustment knob
8. Audio output 3.5 mm
9. AV input
10. USB port
11. HDMI port

EN
Remote control (fig. 2)
1. On/o key
2. Display proportions select key
3. Direction keys
4. Homepage
5. Menu
6. Volume down
7. Settings
8. Rotate screen
9. Select source
10. Confirm
11. Return key
12. Volume up
13. Mute
How to install
Standard settings
See the table below to adjust the size of picture and projector distance.
Ratio 16:9
Picture size (inches) Distance (m)
50 1.55
70 2.17
100 3.10
120 3.72
•
When installing, place the projector on astable surface or suspend under
ceiling. Do not cover or block air holes.
•
If the distance between the projector and screen is lower than the
minimum or is too large, the picture may be blurred.
How to use the device
Switching on and o
• When the projector is connected to the source of power, it switches into
standby mode. The control light glows in red.
• To switch the projector or or o, press the on/o key at the top of the
housing or press on/o key on the remote control. The projector is ready
for operation when the control light turns blue.

EN
Sharpness adjustment (fig. 3 and 4)
• Place the projector in away that the lens is perpendicular to the wall or
screen the image is to be displayed on.
•
To correct sharpness of the image, rotate the sharpness knob on the top
panel (1) until the picture gets clear.
• If the image is not displayed perpendicularly, it will be distorted.
Picture shape adjustment
Distorted picture in the shape of trapezoid can be corrected with the use of
apicture shape adjustment knob (2).
X - wrong shape
✔- correct shape
Note! The projector features avertical trapezoid correction only. There is no
horizontal correction. Make sure the projector is positioned on ahorizontal
surface in relation to the picture.
Menu settings (fig. 5)
When you press the left/right key on the remote control or projector, the
submenu will displayed in the main interface, select the desired mode and
press „OK” to confirm.
Options to choose:
•
PICTURE: picture mode, contrast, brightness, color, tint, sharpness, color
temperature, noise reduction.
• SOUND: volume mode, bass.
•
OTHER OPTIONS: language, ratio, projection mode, restore factory
settings, update software, version.
Select source (fig. 6)
Step 1: Switch the projector on. Main interface will be displayed.
Step 2: Select asource from the list displayed, e.g. HDMI or AV, and confirm
with „OK” key.
Note! When there is no signal, press source key on the remote control to choose
homepage or other source.
Multimedia support (fig. 7)
Step 1: Connect aUSB cable to projector.
Step 2: Select file to be played in the main interface.

EN
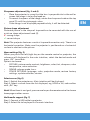
Supported formats
Video formats: MP4/MKV/MOV/WMV/RMVB/RM/AVI/FLV/TRP/VOB/3GP/
DIVX/TP/TS/MPG/M2TS/F4V/DAT
Audio formats: MP3/AAC/FLAC/WAV/WMA/M4A
Image formats: BMP/JPG/PNG/JPEG
File formats: TXT
Note: this device does not support sound coded in Dolby due to copyrights
protection.
The pictures are for reference only. The real design of the product may dier
from the pictures presented.

DE
Einführung
Sehr geehrter Kunde!
Wir möchten uns bei Ihnen bedanken, dass Sie uns vertraut und die Marke
Zeegma gewählt haben.
Wir übergeben Ihnen ein Produkt, das sich dank hochqualitativer Materialien
und moderner technologischer Lösungen perfekt für den täglichen Gebrauch
eignet. Wir sind sicher, dass die sorgfältige Ausführung Ihre Anforderungen
erfüllt. Vor der Benutzung des Produkts machen Sie sich mit der vorliegenden
Bedienungsanleitung vertraut.
Falls Sie Fragen oder Anmerkungen zu dem eingekauften Produkt haben,
setzen Sie sich mit uns in Verbindung:
Wichtige Informationen:
Vor der Benutzung des Projektors soll man die vorliegende Bedienungsanleitung
lesen und gemäß den Anweisungen handeln. Eine ordnungswidrige Bedienung
des Geräts kann zum Stromstoß führen und die Brandgefahr erhöhen. Während
der Benutzung und Instandhaltung des Projektors soll man gemäß unten
beschriebenen Schritten handeln.
Achtung:
Installation
• Für den besseren Eekt benutzen Sie den Projektor in den Räumen mit
den zugemachten Vorhängen oder in dunklen Räumlichkeiten
•
Benutzen Sie den Projektor vorsichtig, das Herunterfallen oder die Störung
kann die Teile beschädigen und das Bild verschwommen machen.
• Bewahren Sie das Gerät fern von leicht entzündlichen Materialien auf.
Einschalten
• Seien Sie vorsichtig während der Benutzung des Netzkabels, biegen Sie
das Kabel nicht; die Beschädigung des Kabels kann den Stromstoß und
Brandausbruch zur Folge haben.

DE
Reinigung
• Vor der Reinigung des Geräts trennen Sie es vom Versorgungskabel.
•
Reinigen Sie das Gehäuse des Projektors regelmäßig mit einem feuchten
Lappen.
•
Zur Reinigung des Objektivs des Projektors benutzen Sie ein Brillentuch
oder einen weichen Sto, um es nicht zu zerkratzen.
•
Reinigen Sie regelmäßig die Belüftungsönungen und Lautsprecher mit
einer Bürste, ansonsten kann die Belüftung blockiert werden.
Hohe Temperatur
• Wenn der Projektor eingeschaltet ist, soll man darauf achten, dass die
Belüftungsönungen des Geräts nicht blockiert werden. Deswegen soll
man ihn weder auf weiche Flächen stellen noch ihn mit Stoen aufdecken.
•
Während das Gerät im Betrieb ist, soll man nicht in das Objektiv schauen.
Zusätzliche Informationen
•
Stellen Sie keine Flüssigkeiten und keine schweren Sachen auf den
Projektor.
• Man soll den Projektor nicht selbstständig demontieren.
•
Bewahren Sie de Projektor nicht in feuchten und nassen Plätzen auf – es
besteht ein Risiko des Stromschlags.
•
Es ist empfohlen, den Projektor nach 6 Stunden ununterbrochener Arbeit
auszuschalten.
• Das Produkt ist zum äußeren Gebrauch geeignet.
Um eine stabile Wärmeverbreitung zu sichern, soll man vor dem Arbeitsbeginn
die Höhe des Projektors in dem unteren Teil mit dem Regulator richtig einstellen.
Das Produkt stimmt mit den Richtlinien der Europäischen Union.
Gemäß der Richtlinie 2012/19/UE unterliegt das Produkt einer getrennten
Sammlung. Das Produkt darf man nicht zusammen mit kommunalen Abfällen
entsorgen, weil das die Gefahr für die Umwelt und die Gesundheit der Menschen
bilden kann. Das verbrauchte Produkt soll man in einem entsprechenden
Rücknahmepunkt für Elektro- und Elektronik-Altgeräte zurückgeben.

DE
Beschreibung der Teile des Projektors (Abb. 1)
1. Richtungstaste
2. Ausgangstaste
3. OK-Taste
4. Einschalter
5. Versorgungstaste
6. Regulator der Bildschärfe
7. Regulator der Bildform
8. Audio-Ausgang 3.5 mm
9. AV-Anschluss
10. USB-Anschluss
11. HDMI-Anschluss
Fernbedienung (Abb. 2)
1. Ein-/Aus-Taste
2.
Taste zur Wahl der Proportionen
der Projizierung
3. Richtungstaste
4. Hauptseite
5. Menü
6. Verringerung der Lautstärke
7. Einstellungen
8. Drehung des Bildschirms
9. Wahl der Quelle
10. Bestätigung
11. Zurück-Taste
12. Erhöhung der Lautstärke
13. Stummschaltung
Installation
Standard-Einstellungen
Machen Sie sich mit der vorliegenden Tabelle vertraut, um die Größe des Bildes
und die Entfernung des Projektors anzupassen
Faktor des Bilds 16:9
Bildgröße (Zoll) Entfernung (m)
50 1.55
70 2.17
100 3.10
120 3.72
•
Während der Installation stellen Sie den Projektor auf eine stabile Fläche
oder hängen Sie ihn an die Decke. Decken Sie ihn nicht auf, blockieren
Sie nicht die Belüftungsönungen.
•
Wenn die Entfernung des Projektors vom Bildschirm kleiner als die

DE
minimale Entfernung oder wesentlich größer wird, kann das Bild
verschwommen sein.
Bedienung des Geräts
Einschalten und Ausschalten
•
Wenn der Projektor am Strom angeschlossen ist, übergeht er in die
Betriebsbereitschaft. Die Anzeige leuchtet rot.
• Um den Projektor ein- oder auszuschalten, drücken Sie den Einschalter
am Gehäuse oder drücken Sie die Ein-/Aus-Taste auf der Fernbedienung.
Eine blau leuchtende Anzeige signalisiert, dass der Projekt zum Betrieb
fertig ist.
Regulierung der Bildschärfe (Abb. 3 und 4)
•
Stellen Sie den Projektor so, dass das Objektiv sich senkrecht gegenüber
der Wand oder der Tafel befindet, auf der das Bild angezeigt werden soll.
•
Um die Bildschärfe zu verbessern, drehen Sie am Regler der Bildschärfe,
der sich auf der oberen Schalttafel befindet, bis das Bild schärfer wird.
• Wenn das Bild nicht senkrecht angezeigt wird, wird es verzerrt sein.
Regulierung der Bildform
Das Bild, das in Trapezform verzerrt wird, kann man mit dem Regler zur
Regulierung der Bildform verbessern (2).
X - falsche Bildform
✔- richtige Bildform
Achtung! Der Projektor hat nur die Trapezkorrektur in senkrechter Richtung, er
hat keine horizontale Korrektur. Stellen Sie sicher, dass der Projektor sich auf
einer horizontalen Fläche gegenüber dem projizierten Bild befindet.
Menü-Einstellungen (Abb. 5)
Nach dem Drücken der Taste links/rechts auf der Fernbedienung oder auf dem
Projektor, wird auf dem Haupt-Interface ein Submenü angezeigt, wählen Sie
den gewünschten Modus und drücken Sie die OK-Taste, um zu bestätigen.
Wahloptionen:
•
BILD: Bild-Modus, Kontrast, Helligkeit, Farbe, Farbton, Schärfe,
Farbtemperatur, Rauschreduzierung.
• TON: Lautstärke-Modus, Bass.
•
ANDERE OPTIONEN: Sprache, Faktor der Proportionen,
Projizierungsmodus, Zurücksetzen der Werkeinstellungen, Aktualisierung
der Software, Version.

DE
Wahl der Quelle (Abb. 6)
Schritt 1: Schalten Sie den Projektor ein. Es wird das Haupt-Interface angezeigt.
Schritt 2: Auf der angezeigten Liste wählen Sie die Quelle, z.B. HDMI oder AV
und bestätigen Sie die Wahl mit der OK-Taste.
Achtung! Wenn der Projektor kein Signal hat, drücken Sie die Taste der Quelle
auf der Fernbedienung, um die Hauptseite oder eine andere Quelle zu wählen.
Bedienung von Multimedia (Abb. 7)
Schritt 1: Schließen Sie das USB-Kabel an den Projektor an.
Schritt 2: Wählen Sie die Datei zur Wiedergabe auf dem Haupt-Interface.
Bediente Formate
Video-Formate: MP4/MKV/MOV/WMV/RMVB/RM/AVI/FLV/TRP/VOB/3GP/
DIVX/TP/TS/MPG/M2TS/F4V/DAT
Audio-Formate: MP3/AAC/FLAC/WAV/WMA/M4A
Bild-Formate: BMP/JPG/PNG/JPEG
Datei-Formate: TXT
Achtung: Wegen Urheberrechte bedient dieses Gerät nicht den Ton, der im
System Dolby kodiert wird.
Die Abbildungen sind anschaulich, das wirkliche Aussehen der Produkte kann
von den Abbildungen abweichen.

IT
Introduzione
Gentile Cliente!
Grazie per aver riposto in noi la vostra fiducia e aver scelto prodotto di un
marchio Overmax.
Vi oriamo un prodotto ideale per l'uso quotidiano grazie all'impiego di materiali
di alta qualità e asoluzioni tecniche moderne. Siamo sicuri che la grande cura
di esecuzione lo renderà conforme alle vostre esigenze. Prima di utilizzare il
prodotto, leggere attentamente la seguente istruzione d'uso.
Se avete commenti odomande su un prodotto acquistato,non esitate
acontattarci:
Informazioni importanti:
Prima di usare il proiettore, leggere e seguire le istruzioni di questo manuale.
L'uso improprio può provocare scosse elettriche e aumentare il rischio di
incendio. Seguire le istruzioni qui sotto quando si usa e si mantiene il proiettore.
Nota:
Installazione
• Per una migliore qualità dell'immagine, utilizzare il proiettore in stanze
con tende tirate oin stanze buie.
• Usare il proiettore con cura. La caduta oil malfunzionamento possono
danneggiare le parti ocausare un'immagine sfocata e una visualizzazione
errata.
• Tenere l'unità lontano da materiali infiammabili.
Accensione
•
Fare attenzione quando si usa il cavo di alimentazione, evitare di piegare
eccessivamente il cavo; un danno al cavo di alimentazione può causare
scosse elettriche oincendi.
Pulizia
• Scollegare il cavo di alimentazione prima di pulire il dispositivo.
• Pulire regolarmente l'alloggiamento con un panno umido.
•
Per pulire la lente del proiettore, utilizzare il tessuto per occhiali oun
panno morbido per evitare gra.
La pagina si sta caricando...
La pagina si sta caricando...
La pagina si sta caricando...
La pagina si sta caricando...
La pagina si sta caricando...
La pagina si sta caricando...
La pagina si sta caricando...
La pagina si sta caricando...
La pagina si sta caricando...
La pagina si sta caricando...
La pagina si sta caricando...
La pagina si sta caricando...
La pagina si sta caricando...
La pagina si sta caricando...
La pagina si sta caricando...
La pagina si sta caricando...
La pagina si sta caricando...
La pagina si sta caricando...
La pagina si sta caricando...
La pagina si sta caricando...
La pagina si sta caricando...
La pagina si sta caricando...
La pagina si sta caricando...
La pagina si sta caricando...
La pagina si sta caricando...
La pagina si sta caricando...
La pagina si sta caricando...
La pagina si sta caricando...
La pagina si sta caricando...
La pagina si sta caricando...
La pagina si sta caricando...
La pagina si sta caricando...
La pagina si sta caricando...
La pagina si sta caricando...
La pagina si sta caricando...
La pagina si sta caricando...
-
 1
1
-
 2
2
-
 3
3
-
 4
4
-
 5
5
-
 6
6
-
 7
7
-
 8
8
-
 9
9
-
 10
10
-
 11
11
-
 12
12
-
 13
13
-
 14
14
-
 15
15
-
 16
16
-
 17
17
-
 18
18
-
 19
19
-
 20
20
-
 21
21
-
 22
22
-
 23
23
-
 24
24
-
 25
25
-
 26
26
-
 27
27
-
 28
28
-
 29
29
-
 30
30
-
 31
31
-
 32
32
-
 33
33
-
 34
34
-
 35
35
-
 36
36
-
 37
37
-
 38
38
-
 39
39
-
 40
40
-
 41
41
-
 42
42
-
 43
43
-
 44
44
-
 45
45
-
 46
46
-
 47
47
-
 48
48
-
 49
49
-
 50
50
-
 51
51
-
 52
52
-
 53
53
-
 54
54
-
 55
55
-
 56
56


in altre lingue
- français: Overmax Multipic 2.5 Manuel utilisateur
- español: Overmax Multipic 2.5 Manual de usuario
- Deutsch: Overmax Multipic 2.5 Benutzerhandbuch
- polski: Overmax Multipic 2.5 Instrukcja obsługi