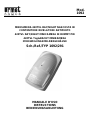
urmet domus 1092/291 Instructions Manual
- Tipo
- Instructions Manual

DS1092-112A
MINICAMERA 420TVL DAY/NIGHT NASCOSTA IN
CONTENITORE RIVELATORE ANTIFURTO
420TVL DAY/NIGHT MINICAMERA IN DUMMY PIR
420TVL Tag&NACHT MINIKAMERA
IM BEWEGUNGSMELDERGEHÄUSE
Sch./Ref./TYP 1092/291
MANUALE D’USO
INSTRUCTIONS
BEDIENUNGSANLEITUNG
Mod.
1092

2 DS1092-112A
PRECAUZIONI D’USO
Assicurarsi dell’integrità dell’apparecchio dopo averlo tolto dall’imballo.
Prima di effettuare qualsiasi operazione di pulizia o di manutenzione disinserire l’apparecchio dalla
rete di alimentazione elettrica. Non usare prodotti spray per la pulizia dell’apparecchio.
Controllare che la temperatura d’esercizio sia nei limiti indicati e che l’ambiente non sia
particolarmente umido.
In caso di guasto e/o cattivo funzionamento togliere l’alimentazione tramite l’interruttore generale.
Il dispositivo deve essere aperto soltanto da personale tecnico qualificato.
Per le riparazioni rivolgersi solo ad un centro di assistenza autorizzato.
Non esporre il dispositivo a pioggia o umidità, né impiegarla in zone umide. L’umidità può
danneggiare l’unità e creare il rischio di scosse elettriche.
CARATTERISTICHE TECNICHE
Tipo di sensore:.............................................................................................1/3” Sony CCD - DAY & NIGHT
Elemento sensibile: ................................................................512 pixel (orizzontale) x 582 pixel (verticale)
Ottica:...............................................................................................................................Pinhole f 4,3mm/F2
Standard video: ......................................................................................................................................... PAL
Risoluzione orizzontale:.................................................................................................................... 420 linee
Sincronizzazione: ..................................................................................................................................Interna
Controllo shutter: ...............................................................................................1/50 ~ 1/100.000 sec (AUTO)
Luminosità minima:................................................................................................................................0,5Lux
Commutazione B&N / colore:.................................................................................................................
AUTO
Uscita video:..............................................................................................
Uscita composita 1 Vpp, 75 Ohm
Rapporto S/R:........................................................................................................................................>48 dB
Alimentazione:......................................................................................................................... 12 VDC (10%)
Consumo:.............................................................................................................................................100 mA
Temperatura di utilizzo:.........................................................................................................................0
50°c
Dimensioni (HxLxP):..........................................................................................................124x70x54 ± 2mm
Peso: ........................................................................................................................................................ 137g
Nota Bene
Le caratteristiche tecniche possono essere soggette a variazione senza alcun preavviso.
ACCESSORI A CORREDO
Snodo Sch. 1033/139
Manuale d’uso.
Nota Bene
La composizione degli accessori a corredo può essere variata senza alcun preavviso.
NORME D’INSTALLAZIONE
Evitare di puntare direttamente l’obiettivo contro il sole o contro luci intense; il soggetto da riprendere
non deve essere in controluce.
Evitare di puntare la l’obiettivo verso oggetti riflettenti.
La presenza di alcuni tipi di luce (ad esempio fluorescente colorata) può falsare i colori.
E' opportuno prevedere a monte degli apparecchi un idoneo interruttore di sezionamento e di
protezione.
ITALIANO

DS1092-112A 3
INSTALLAZIONE
1. Prima d’iniziare l’installazione, assicurarsi che tutte le unità da collegare non siano alimentate.
2. Posizionare il dispositivo nel punto più idoneo per riprendere le immagini prescelte (la telecamera è
posizionata all’interno del dispositivo e le immagini vengono riprese per mezzo del piccolo foro
presente sulla parte frontale) .
Nota Bene
Per agevolare le operazioni di installazione, è possibile collegare un monitor LCD da polso
Sch.1092/400 nelle immediate vicinanze del dispositivo, inserendo il cavetto fornito in dotazione al
monitor stesso, nel connettore video (BNC) della telecamera.
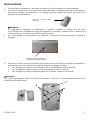
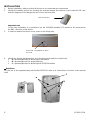
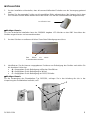
3. Una volta stabilito il posizionamento, per rimuovere il coperchio del sensore premere sul dente di
fissaggio.
4. Utilizzare le incisioni presenti sulla parte interna dell’involucro per fissare il dispositivo, eseguendo su
ognuna di esse un foro di dimensioni adeguate al tipo di ancoraggio utilizzato.
Per il fissaggio su superficie piana eseguire i fori in corrispondenza delle incisioni
A
.
Per il fissaggio ad angolo eseguire i fori in corrispondenza delle incisioni B.
Per il fissaggio con utilizzo di apposita staffa non a corredo, utilizzare l’incisione
C
.
Nota Bene
Per l’utilizzo dell’apposita staffa Sch.1033/139 consultare il manuale a corredo prodotto presente nella
confezione della staffa stessa.
Fare leva con un cacciavite
a taglio per facilitare l’apertura
C
A
B
Foro per la ripresa delle
immagini

4 DS1092-112A
5. Una volta fissato saldamente il dispositivo alla superficie d’appoggio, riunire le due parti ponendo
attenzione a far scattare il perno precedentemente utilizzato per l’apertura.
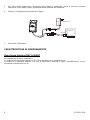
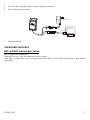
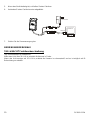
6. Eseguire i collegamenti come indicato in figura.
7. Alimentare il dispositivo.
CARATTERISTICHE DI FUNZIONAMENTO
Descrizione funzione DAY & NIGHT
La modalità day & night è automatica.
In condizioni di luminosità superiore a 10 LUX la telecamera è in modalità colore.
In condizioni di luminosità inferiore a 10 LUX la telecamera commuta in night in modalità bianco e nero,
diventando sensibile alla luce IR.
VIDEO IN
A
LIMENTATORE
MONITOR

DS1092-112A 5
PRECAUTIONS
Make sure that the device is intact after removing it from the package.
Disconnect the device from the mains before cleaning or maintenance. Do not use spray products to
clean the device.
Check that the working temperature is within the indicated range and that the environment is not
particularly humid.
Disconnect power by means of the circuit breaker in the event of a failure and/or bad operation.
The device can only be opened by qualified technical personnel.
Keep the device away from rain and humidity to prevent risk of fire and electrocution. Do not
introduce material (solid or liquid) inside
Exclusively contact an authorised service centre for repairs.
TECHNICAL SPECIFICATIONS
Sensor type: ............................................................................................... 1/3” SONY CCD – DAY & NIGHT
Sensitive elements: ........................................................................................................512(H)x582(V) pixels
Lens:..................................................................................................................................Pinhole f4,3mm/F2
Video standard: ......................................................................................................................................... PAL
Resolution:...........................................................................................................................................420 TVL
Synchronization:...................................................................................................................................
Internal
Shutter control:................................................................................................................1/50 ~ 1/100.000 sec
Sensitivity : ...........................................................................................................................................0.5 Lux
Day/Night switch:…...……………………………………………………………………………………………..Auto
Video output: .............................................................................................................................1Vpp, 75 Ohm
S/N ratio:.................................................................................................................................................>48dB
Nominal power supply:..........................................................................................................................12 Vcc
Max. current consumption:....................................................................................................................100mA
Operating temperature range:.......................................................................................................... 0 ÷ +50°C
Dimensions ( x D):...........................................................................................................124x70x54 ± 2mm
Weight: .................................................................................................................................................... 137 g
Important note:
Product specifications may be subject to change without prior notice.
ACCESSORIES PROVIDED
Bracket Ref. 1033/139
User manual.
Important note:
Accessories may be changed without prior notice.
INSTALLATION SPECIFICATIONS
Avoid pointing the lens directly towards the sun or intense sources of light also when the camera is
off. The subject must not be backlit.
Avoid pointing the lens directly towards reflecting objects.
Some lighting systems (e.g. coloured fluorescent lights) may false the colours.
Arrange a suitable circuit breaker and fuse upstream of the devices.
ENGLISH

6 DS1092-112A
INSTALLATION
1. Before installation, make sure that all devices to be connected are not powered
2. Identify the suitable position for shooting the selected images (the camera is put inside the PIR case
and the images are shot though the tiny hole on the front part) .
Important note
For an easy installation, it is possible to use the 1092/400 portable LCD monitor to be connected to
the BNC connector of the device.
3. In order to remove the sensor cover, press on the fixing snap.
4. Identify the internal predispositions to fix the device and make the correct hole.
A = prearrangements for fastening on flat surface
B = prearrangements for angle fastening
C
= prearrangements for fastening with 1033/139 bracket
Nota Bene
For the use of the supplementary bracket Ref.1033/139, refer to its instructions in the box of the bracket
itself.
Press with a screwdriver to open
the cover
C
A
B
Hole for the lens

DS1092-112A 7
5. Once the device is fixed, put the cover on the base and lock it.
6. Connect the device as below.
7. Power the device.
OPERATING FEATURES
DAY & NIGHT function description
Day & night mode is automatic.
If the light is over 10 LUX, the camera will work in colour.
If the light is less than 10 LUX, the camera will work in black & white and it will be able to work with IR
illumination.
VIDEO IN
A
LIMENTATORE
MONITOR

8 DS1092-112A
VORSICHTSMASSNAHMEN
Nach dem Auspacken des Gerätes muss sichergestellt werden, dass es sich in einwandfreiem
Zustand befindet.
Vor dem Ausführen jeglicher Reinigungs- oder Wartungsarbeiten, das Gerät vom
Stromversorgungsnetz trennen. Für die Reinigung des Geräts keine Sprays verwenden.
Stellen Sie sicher, dass sich die Umgebungstemperatur in dem angegebenen Bereich befindet und
die Umgebung nicht besonders feucht ist.
Bei Defekten und/oder mangelnder Funktionstüchtigkeit, die Versorgung über den Hauptschalter
abschalten.
Das Gerät darf nur von qualifiziertem technischem Personal geöffnet werden.
Halten Sie das Gerät von Regen und Feuchtigkeit fern um das Risiko von Feuer und einem
elektrischen Schlag zu verhindern. Achten Sie darauf, dass keine Materialien eindringen (feste oder
flüssige).
Für Reparaturen wenden Sie sich bitte nur an ein autorisiertes Zentrum des technischen
Kundendiensts.
TECHNISCHE EIGENSCHAFTEN
Sensorart:..................................................................................................1/3” SONY CCD – TAG & NACHT
Auflösung:........................................................................................................................
512(H)x582(V) Pixel
Optik:.................................................................................................................................Pinhole f4,3mm/F2
Video Standart:.......................................................................................................................................... PAL
Auflösung:............................................................................................................................................420 TVL
Synchronisation:......................................................................................................................................Intern
Verschlusszeit: ..............................................................................................................1/50 ~ 1/100.000 Sek.
Empfindlichkeit: ....................................................................................................................................0.5 Lux
Tag/Nacht schalten:…..…………………………………………………………………………………………..Auto
Videoausgang:...........................................................................................................................1Vpp, 75 Ohm
S/R Verhältnis:........................................................................................................................................>48dB
Stromversorgung:.................................................................................................................................12 VCC
Verbrauch:.............................................................................................................................................100mA
Betriebstemperatur:.......................................................................................................................... 0 ÷ +50°C
Abmessungen ( x H):.......................................................................................................124x70x54 ± 2mm
Gewicht:................................................................................................................................................... 137 g
Wichtiger Hinweis:
Produkteigenschaften können ohne vorherige Ankündigung geändert werden.
IN DER LIEFERUNG ENTHALTENES ZUBEHÖR
Halter Typ 1033/139
Gebrauchsanleitung.
Wichtiger Hinweis:
Zubehör kann ohne vorherige Ankündigung geändert werden.
INSTALLATIONSBESTIMMUNGEN
Vermeiden Sie es, das Objektiv direkt gegen die Sonne oder intensive Lichteinstrahlung zu richten,
auch bei ausgeschalteter Kamera. Der aufzunehmende Gegenstand darf sich nicht im Gegenlicht
befinden.
Vermeiden Sie es, das Objektiv direkt gegen reflektierende Objekte zu richten.
Einige Lichtarten (z. B. fluoreszierendes farbiges Licht) können Farben verfälschen.
Es ist von Vorteil dem Gerät ein geeigneten Trenn- und Schutzschalter vorzuschalten.
DEUTSCH

DS1092-112A 9
INSTALLATION
1. Vor der Installation sicherstellen, dass alle anzuschließenden Einheiten von der Versorgung getrennt
sind.
2. Suchen Sie die passende Position um die gewählten Bilder aufzuzeichnen (die Kamera sitzt in dem
PIR Gehäuse und die Bilder werden durch das kleine Loch auf der Gerätevorderseite aufgezeichnet).
Wichtiger Hinweis:
Für eine vereinfachte Installation kann der 1092/400 tragbare LCD Monitor an den BNC Anschluss des
Gerätes angeschlossen und verwendet werden.
3. Um das Gehäuse zu entfernen drücken Sie auf den Befestigungsverschluss.
4. Identifizieren Sie die internen vorgegebenen Positionen zur Befestigung des Gerätes und stellen Sie
die korrekten Löcher her.
A = Vorgegeben für die Befestigung auf flachen Oberflächen
B = Vorgegeben für die Befestigung im Winkel
C = Vorgegeben für die Befestigung mit 1033/139 Halter
Wichtiger Hinweis
Für die Verwendung des Zusatzhalters Typ 1033/139, schlagen Sie in der Anleitung die sich in der
Verpackung des Zusatzhalters befindet, nach.
Zum Öffnen mit einem
Schraubendreher drücken
C
A
B
Loch für die Linse

10 DS1092-112A
5. Wenn das Gerät befestigt ist, schließen Sie das Gehäuse.
6. Verbinden Sie das Gerät wie unten abgebildet.
7. Stellen Sie die Stromversorgung her.
BEDIENUNGSMERKMALE
TAG & NACHT Funktionsbeschreibung
Tag & Nachtmodus ist automatisch.
Wenn das Licht über 10 LUX ist, arbeitet die Kamera in Farbe.
Wenn das Licht weniger als 10 LUX ist, arbeitet die Kamera in schwarz/weiß und es ist möglich mit IR
Beleuchtung zu arbeiten.
VIDEO IN
NETZGERÄT
MONITOR

DS1092-112A 11

12 DS1092-112A
Prodotto in Cina su specifica URMET Domus
Made in China to URMET Domus specification
DS1092-112A
SEDE
URMET DOMUS S.p.A.
10154 TORINO (ITALY)
VIA BOLOGNA 188/C
Telef. +39 011.24.00.000 (RIC.AUT.)
Fax +39 011.24.00.300 - 323
A
rea Tecnica
Servizio Clienti +39 011.23.39.810
http://www.urmetdomus.com
e-mail: info@urmetdomus.it
FILIALI
20151 MILANO – V.Gallarate 218
Tel. 02.380.111.75 - Fax 02.380.111.80
00043 CIAMPINO (ROMA) V.L.Einaudi 17/19A
Tel. 06.791.07.30 - Fax 06.791.48.97
80013
CASALNUOVO (NA)
V.Nazionale delle Puglie 3
Tel. 081.193.661.20 - Fax 081.193.661.04
30030 VIGONOVO (VE) – V.del Lavoro 71
Tel. 049.738.63.00 r.a. - Fax 049.738.63.11
66020 S.GIOVANNI TEATINO (CH) – V.Nenni 17
loc. Sambuceto Tel. 085.44.64.851
Tel. 085.44.64.033 - Fax 085.44.61.862
-
 1
1
-
 2
2
-
 3
3
-
 4
4
-
 5
5
-
 6
6
-
 7
7
-
 8
8
-
 9
9
-
 10
10
-
 11
11
-
 12
12


urmet domus 1092/291 Instructions Manual
- Tipo
- Instructions Manual
in altre lingue
- English: urmet domus 1092/291
- Deutsch: urmet domus 1092/291
Documenti correlati

Altri documenti
-
Yamaha DG80 Manuale del proprietario
-
Samsung SCC-B9270P Manuale utente
-
Fbt J MaxX 114A Manuale utente
-
Videotec ULISSE Manuale utente
-
-
-
-
DOMUS LINE X-driver Manuale utente
-
DOMUS LINE LED Power X-Driver TW Manuale utente