Hoover AB HDV70X SY Manuale utente
- Categoria
- Asciugatrici
- Tipo
- Manuale utente

®
English 2-11
Português 12-22
Dansk 23-33
Italiano 34-44
HDV 70X
40000494English.fm Page 1 Thursday, August 28, 2003 3:27 PM

05651276SWE.qxd 18-07-02 14:00 Page 4

05651276SWE.qxd 18-07-02 14:00 Page 4

ENGLISH
2
Safety reminders
WARNING Check that the product has no
visible signs of damage before use. If damaged
do not use and please contact GIAS Service.
WARNING Do not use the product if the fluff
filter is not in position or is damaged; fluff
could be ignited.
WARNING Foam rubber materials can, under
certain circumstances, when heated become
ignited by spontaneous combustion. Foam
plastic, foam rubber and rubber-like material
are not suitable for tumble drying. Articles
made from these materials MUST NOT be
placed in the dryer.
Always refer to the laundry care labels for
directions on suitability for drying.
WARNING Misuse of a tumble dryer may
create a fire hazard.
WARNING Where the hot surface symbol
is located the temperature rise during operation
of the tumble dryer may be in excess of 60° C.
User's manual. This machine should only be
used for its intended purpose as described in
this manual. Ensure that it is fully understood
before operating.
Installation. This machine should not be
installed in a bathroom or shower room.
Never install the dryer against curtains and be
sure to prevent items from falling or collecting
behind the dryer.
Ventilation. Adequate ventilation must be
provided in the room where the tumble dryer is
located to prevent gases from appliances burning
other fuels, including open fires, being drawn into
the room during operation of the tumble dryer.
Exhaust air must not be discharged into a flue
which is used for exhausting fumes from
appliances burning gas or other fuels.
Check regularly that the air flowing through the
dryer is not restricted:
Check the fluff filter after use, and clean, if
necessary.
The venting hose or duct should be checked
periodically and any accumulation of fluff
removed.
The inlet and outlets should be kept free from
obstructions.
If the dryer is used frequently the period
between checks should be reduced accordingly.
Dryness. Clothes should be spin dried or
thoroughly wrung before they are put into the
tumble dryer. Clothes that are dripping wet
should NOT be put into the dryer.
Lighters and matches must not be left in
pockets and NEVER use flammable liquids
near the machine.
Glass fibre curtains should never be put in this
machine. Skin irritation may occur if other
garments are contaminated with the glass fibres.
Garments treated or contaminated with
flammable cleaning sprays or liquids such as
petrol, cooking oil or aerosol sprays must not be
put in this machine.
Lint or fluff must not be allowed to collect on
the floor around the outside of the machine.
Cool down period. The drum inside may be
very hot. Always allow the dryer to complete
the cool down period before removing the
laundry.
Faults. Do not continue to use this machine if it
appears to be faulty.
After use. Remove the plug from the electricity
supply. Always remove the plug before cleaning
the appliance.
Supply cord. If the supply cord on this
appliance is damaged, it must be replaced by a
special cord which is only available from GIAS
Service or an authorised dealer.
GIAS Service. To ensure the continued safe and
efficient operation of this appliance we
recommend that any servicing or repairs are only
carried out by an authorised service engineer.
40000494English.fm Page 2 Thursday, August 28, 2003 3:27 PM

ENGLISH
3
Safety reminders 2 Opening the door 6
Electrical requirements 3 Filter 6
Ventilation requirements 4 Drying guide 7
Preparing the load 5 Controls & indicators 8
Clothes preparation 5 Operation 9
Maximum drying weight 5 Cleaning the dryer 10
Sorting the load 5 Technical specification 10
Do not tumble dry 5 Trouble shooting 11
Energy saving 5
PLEASE READ THESE INSTRUCTIONS THOROUGHLY
This appliance must be operated in accordance with the instructions given in this manual.
It is for domestic use only in drying household textiles and garments where a water solution
has been used in the cleaning process. It MUST NOT be used with dry cleaning fluids. For
your safety, this dryer must be correctly installed.
If there is any doubt about installation, call GIAS Service for advice.
Before using the tumble dryer for the
first time:
● please read this instruction book
thoroughly.
● remove all items packed inside drum.
● wipe the inside of the drum and door
with a damp cloth to remove any dust
which may have settled in transit.
IMPORTANT: This dryer must only be
used for drying household textiles and
garments where a water solution has
been used for the cleaning process.
DO NOT tumble dry fabrics treated with
dry cleaning fluids.
Electrical requirements
This appliance is fitted with a moulded-on
non-rewireable plug.
The plug should be accessible for
disconnection after the appliance has been
installed.
IMPORTANT: The wires in the mains
lead are coloured in accordance with the
following code:
Blue - NEUTRAL
Brown - LIVE
Green-and-yellow - EARTH
If the supply cord on this appliance is
damaged, it must be replaced by a
special cord which is only available from
GIAS Service or an authorised GIAS
Dealer.
WARNING!
ELECTRICITY CAN BE
EXTREMELY DANGEROUS.
THIS APPLIANCE MUST BE
EARTHED.
40000494English.fm Page 3 Thursday, August 28, 2003 3:27 PM

ENGLISH
4
Installation and
Ventilation requirements
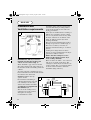
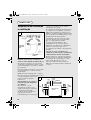
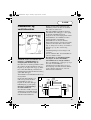
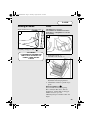
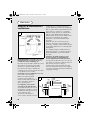
IMPORTANT: This dryer must be
installed such that the air inlets and
outlets are not restricted (fig. 1).
There should be a gap of at least 12 mm
(0.5 inches) between the sides and rear of
the machine and the surrounding walls and
cabinets.
To ensure adequate ventilation the space
between the bottom of the machine and the
floor must not be obstructed.
NEVER install the dryer up
against curtains.
Prevent items from falling or
collecting between the sides and
rear of the dryer as these may
obstruct the air inlet and outlets.
A venting hose is supplied with
this tumble dryer.
The use of the venting hose to
exhaust hot air to the external
atmosphere is strongly
recommended to ensure
maximum drying efficiency. Protect the
external outlet from prevailing winds to
ensure back-draughts do not reduce the
drying performance.
If the dryer is installed under a worktop or
built-in, it is essential to use the venting
hose to carry the hot moist air away from
the dryer otherwise re-circulation of the
moist air will prevent the dryer from
working efficiently.
The hose may be fitted through a wall or
through an open door or window (fig. 2).
The hose is 95 mm (3.75 inches) in
diameter and will extend up to 1.8 metres
(6 feet).
Venting hoses longer than 1.8 metres
(6 feet) are not recommended as the dryer
performance will be reduced.
Ensure that the venting hose is not
kinked as this will prevent the dryer
from working efficiently.
There are three air outlets – one at the rear
and one on each side of the dryer. The
venting hose must only be attached to one
of these outlets. The covers must be fitted
to the two unused outlets to maintain
maximum drying efficiency.
1
SUPPLY CORD
HOT AIR
OUTLET
AIR INLET
VENTS
2
WALL
WALL
WALL
DRYER
40000494English.fm Page 4 Thursday, August 28, 2003 3:27 PM

ENGLISH
5
Preparing the load
Before using the dryer for the first time
wipe the inside of the drum and door with a
damp cloth.
Make sure that the laundry you are going to
dry is suitable for drying in a tumble dryer,
as shown by the care symbols on each item.
Clothes preparation
Check that all fastenings are closed and that
pockets are empty. Turn the articles inside
out. Place clothes loosely in the drum to
make sure that they don’t get tangled.
Do not overload the drum, particularly
when drying large items, otherwise, the
laundry may stick to the drum and not dry
evenly.
Maximum drying weight
● Cottons Max. 7 kg
● Synthetics Max. 3 kg
Sort the load as follows:
A) By care symbols
On the collar or inside seam:
Suitable for tumble drying.
Tumble drying at high temperature.
Tumble drying at low temperature only.
DO NOT tumble dry.
B) By amount and thickness
Whenever the load is bigger than the
dryer capacity, separate clothes
according to thickness (e.g. towels
from thin underwear).
C) By type of fabric
Cottons/linen: Towels, cotton jersey,
bed and table linen.
Synthetics: Blouses, shirts, overalls,
etc. made of polyester or polyamid, as
well as for cotton/synthetic mixes.
D) By drying level
● Sort into: iron dry, cupboard dry, etc.
● For delicate articles press the
‘DELICATES’ button ( ) to select low
drying temperature.
Do not tumble dry:
Woollens, silk, delicate fabrics, nylon
stockings, delicate embroidery, fabrics
with metallic decorations, garments with
PVC or leather trimmings, training shoes,
bulky items such as sleeping bags, etc.
IMPORTANT: Do not dry articles
which have been treated with a dry
cleaning fluid or rubber clothes (danger
of fire or explosion).
Energy saving
Only put into the tumble dryer laundry
which has been thoroughly wrung or spin-
dried. The drier the laundry the shorter the
drying time thus saving electricity.
ALWAYS try to dry the maximum weight
of laundry, this will save time and
electricity.
NEVER exceed the maximum weight, this
will waste time and electricity.
ALWAYS check that the filter is clean
before every drying cycle.
NEVER put dripping wet items into the
tumble dryer, this may damage the
appliance.
40000494English.fm Page 5 Thursday, August 28, 2003 3:27 PM

ENGLISH
6
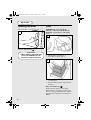
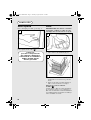
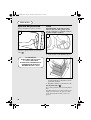
Opening the door
Pull on handle to open the door (fig. 3).
To restart the dryer, close the door and
press the ‘ON’ button
().
Filter
IMPORTANT: To maintain the
efficiency of the dryer check that the
fluff filter is clean before each drying
cycle.
1. Pull the filter upwards (fig. 4).
2. Open filter as shown (fig. 5).
3. Gently remove lint using a soft brush or
your fingertips.
4. Snap the filter together and push back
into place.
Filter Care Indicator ( )
Lights when the filter needs cleaning.
If the laundry is not drying check that the
filter is not clogged. The indicator will also
light when the venting hose is blocked or
kinked.
3
WARNING!
WHEN THE TUMBLE DRYER
IS IN USE THE DRUM AND
DOOR MAY BE VERY HOT.
4
5
40000494English.fm Page 6 Thursday, August 28, 2003 3:27 PM

ENGLISH
7
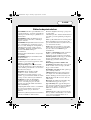
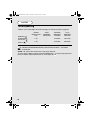
Drying guide
The table shows approximate drying times, depending on the type of fabric and
dampness of the clothes.
PRE-IRON PROGRAM: RELAXES CREASES – EASIER TO IRON
REMEMBER: During the last 10 minutes the load is always tumbled in cool air.
For delicate fabrics select the ‘DELICATES’ button ( ) for all Drying Programmes.
This reduces the drying temperature to protect your garments.
HEAT SETTING HEAVY LOAD MEDIUM LOAD LIGHT LOAD
COTTON ( )
HIGH 140-165 Min 70-80 Min 50-65 Min
SYNTHETICS ( )
LOW - 70-80 Min 40-55 Min
ACRYLICS ( )
LOW - 50-65 Min 30-40 Min
40000494English.fm Page 7 Thursday, August 28, 2003 3:27 PM

ENGLISH
8
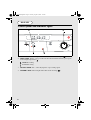
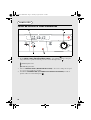
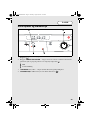
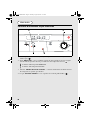
Control panel and indicator lights
1. ‘ON’ button and indicator – press to switch on, the indicator will light ( ).
2. ‘DELICATES’ button – press to reduce the heat level for delicate items, press again
to select high temperature (
).
3. ‘DRYING TIME’ dial – selects drying time or pre-ironing option.
4. ‘FILTER CARE’ indicator lights when filter needs cleaning ( ).
4
1
2
3
HIGH Heat setting
LOW Heat setting
40000494English.fm Page 8 Thursday, August 28, 2003 3:27 PM

ENGLISH
9
Operation
1. Open the door and load the drum with
laundry. Ensure that garments do not
hinder closure of the door.
2. If drying delicate items press the
‘DELICATES’ button to reduce the
heat level. Press again on completion,
to select high temperature.
HIGH Heat setting
LOWLOW Heat setting
3. Turn ‘DRYING TIME’ dial to select
the required drying time.
The PRE-IRONING setting shown by
the symbol on the ‘DRYING
TIME’ dial provides a conditioning and
anti-crease function. The dryer will
heat the load for 8 minutes followed by
a 2 minute cool down period and is
especially good for garments which
may have been left for some time prior
to ironing, in a linen basket for
example. Garments may also become
stiffened when dried outside on a
washing line or inside on radiators. The
PRE-IRONING process relaxes the
creases in the fabric making ironing
quicker and easier.
4. Gently close the door pushing it slowly
until you hear the door ‘click’ shut.
5. Press the ‘ON’ button. The indicator
will light and the drying cycle begins.
6. The load is dried by tumbling in
thermostatically controlled warm air.
Cool air is used for the last 10 minutes
to reduce creasing and cool the load
ready for handling.
7. When the program is fully completed
the drum will stop rotating and the
mark on the dial will be at the top.
Open the door and remove the load.
8. Clean the filter after every drying cycle
to ensure maximum dryer efficiency.
(See ‘Filter’ section.)
WARNING!
THE DRUM, DOOR AND LOAD
MAY BE VERY HOT.
40000494English.fm Page 9 Thursday, August 28, 2003 3:27 PM

ENGLISH
10
Cleaning the dryer
IMPORTANT: Always switch off and
remove the plug from the electricity
supply before cleaning this appliance.
Clean the filter after every drying cycle.
After each period of use, wipe the inside of
the drum and leave the door open for a
while to allow circulation of air to dry it.
Wipe the outside of the machine and the
door with a soft cloth.
DO NOT use abrasive pads or cleaning
agents.
To prevent the door sticking, periodically
clean the door gasket with a ‘non-scratch
cream cleaner.’
Technical specifications
Drum capacity 115 litres
Maximum load 7 kg
Height 85 cm
Width 60 cm
Depth 60 cm
Energy Label Band C
Note: For electrical data refer to the rating
label on the front of the dryer cabinet (with
the door open).
40000494English.fm Page 10 Thursday, August 28, 2003 3:27 PM

ENGLISH
11
Trouble shooting
Should your dryer operate incorrectly,
check the following points before calling
for a service engineer.
Drying time is too long/clothes are not
dry enough:
● Have you selected the correct drying
time/program? Go to page 7.
● Were the clothes too wet? Were the
clothes thoroughly wrung or spin-
dried?
● Does the filter need cleaning? Go to
page 6.
● Is the dryer overloaded? Go to page 5.
● Is the venting hose kinked or blocked?
Go to page 4.
● Is the load too small? Go to page 9.
● Has the ‘DELICATES’ option been
selected from a previous cycle? Go to
page 8.
The dryer does not operate:
● Is there a working electricity supply to
the dryer? Check using another
appliance such as a table lamp.
● Is the plug properly connected to the
mains supply?
● Is there a power failure?
● Has the fuse blown?
● Is the door fully closed? Go to
page 9.
● Is the dryer switched on, both at the
mains supply and at the machine? Go to
page 8.
● Has the drying time or the program
been selected? Go to page 8.
● Has the ‘ON’ button been pressed after
opening the door? Go to page 6.
Filter Care Indicator on
● Does the filter need cleaning? Go to
page 6.
● Is the venting hose kinked or blocked?
Go to page 4.
If the supply cord on this appliance is
damaged, it must be replaced by a special
cord which is only available from GIAS
Service or an authorised GIAS Dealer.
Should there still be a problem with your
dryer after completing all the
recommended checks, please call GIAS
Service for advice. They may be able to
assist you over the telephone or arrange for
a suitable appointment for an engineer to
call under the terms of your guarantee.
However, a charge may be made if any of
the following applies to your machine:
● Is found to be in working order.
● Has not been installed in accordance
with the installation instructions.
● Has been used incorrectly.
40000494English.fm Page 11 Thursday, August 28, 2003 3:27 PM

PORTUGUÊS
12
Segurança
ATENÇÃO Verifique se o produto não tem
quaisquer sinais visíveis de danos antes da
utilização. Se estiver danificado, não o utilize e
contacte o Serviço de Assistência Técnica GIAS.
ATENÇÃO Não utilize o produto se o filtro de
cotão não estiver bem posicionado ou se estiver
danificado; o cotão é inflamável.
ATENÇÃO Os materiais de borracha esponjosa
podem, em certas circunstâncias, ser inflamáveis
por combustão espontânea quando aquecidos.
Plástico esponjoso, borracha esponjosa e materiais
à base de borracha, não são apropriados para
secagem em máquina. Os artigos em cuja
composição entrem estes materiais NÃO PODEM
ser colocados na máquina.
Consulte sempre as indicações das etiquetas de
lavagem e secagem.
ATENÇÃO A má utilização de uma máquina de
secar pode criar risco de incêndio.
ATENÇÃO O aumento de temperatura durante o
funcionamento da máquina de secar pode exceder
os 60 graus C, onde exista o símbolo de superfície
quente .
Manual do utilizador. Esta máquina deve apenas
ser utilizada para os fins para os quais foi
concebida, conforme descrito neste manual.
Assegure-se de que o compreendeu bem antes de
começar a utilizá-la.
Instalação. Esta máquina não deve ser instalada
numa casa de banho.
Nunca instale a máquina junto a cortinas e tenha o
cuidado de evitar a queda ou acumulação de
objectos atrás da máquina.
Ventilação. A sala onde está localizada a máquina
de secar deve possuir uma ventilação adequada
para evitar que os gases provenientes dos
electrodomésticos que queimem outros
combustíveis, incluindo chamas vivas, sejam
atraídos à sala durante o funcionamento da
máquina de secar.
O ar de exaustão não pode ser eliminado pelo tubo
de chaminé que é utilizado para os fumos de
exaustão de electrodomésticos que queimem gás
ou outros combustíveis.
Verifique regularmente se nada está a limitar o
fluxo de ar na máquina:
Verifique a eventual presença de cotão após a
utilização e limpe, se necessário.
Verifique periodicamente a mangueira ou tubo de
ventilação e retire o cotão acumulado.
As entradas e saídas devem manter-se livres de
quaisquer obstruções.
Se a máquina de secar for utilizada
frequentemente, o período entre verificações deve
ser reduzido em conformidade.
Secagem. A roupa deve ser centrifugada ou bem
torcida antes de ser colocada na máquina de secar.
NÃO deve pôr na máquina roupa ensopada e a
pingar.
Não deixe isqueiros e fósforos nos bolsos e
NUNCA utilize líquidos inflamáveis perto da
máquina.
Nunca deverá utilizar esta máquina para secar
cortinas de fibra de vidro. Se outras roupas
forem contaminadas com estas fibras, podem
provocar irritações na pele.
As peças tratadas ou contaminadas com
aerossóis ou líquidos de limpeza inflamáveis,
tais como gasolina, óleo de cozinha ou aerossóis
não podem ser colocadas nesta máquina.
Fibra de algodão ou cotão não pode ser
acumulado no chão que rodeia o exterior da
máquina.
Período de arrefecimento. O interior do tambor
pode estar muito quente. Antes de retirar a roupa,
deixe sempre a máquina de secar completar o
período de arrefecimento.
Ava rias. Não insista em utilizar a máquina, se lhe
parecer que existe qualquer avaria.
Após a utilização. Retire a ficha da tomada de
corrente eléctrica. Faça o mesmo antes de limpar a
máquina.
Cabo de alimentação. Se o cabo de alimentação
desta máquina estiver danificado, deve ser
substituído por um cabo especial que se encontra
somente disponível no Serviço de Assistência
Técnica GIAS ou Agente Autorizado.
Serviço de Assistência Técnica GIAS. Para
assegurar o funcionamento seguro, eficiente e
continuado desta máquina, recomendamos que as
reparações e os serviços de manutenção sejam
apenas executados por um técnico autorizado.
Portuguese 40000494.fm Page 12 Thursday, August 28, 2003 3:56 PM

PORTUGUÊS
13
Segurança 12 Abrir a porta 16
Requisitos eléctricos 13 Filtro 16
Requisitos de ventilação 14 Guia de secagem 17
Preparação da carga 15 Comandos e indicadores 18
Preparação da roupa 15 Funcionamento 19
Peso máximo de secagem 15 Limpeza da máquina 20
Separação da carga 15 Especificações técnicas 20
Não pôr na máquina de secar 15 Resolução de problemas 21
Economia de energia 15 Termos de garantia 22
LEIA, POR FAVOR, ESTAS INSTRUÇÕES COM ATENÇÃO
Esta máquina deve ser posta a funcionar de acordo com as instruções deste manual.
Destina-se apenas a uso doméstico no que se refere à secagem de têxteis e vestuário,
utilizando uma solução de água no processo de limpeza. NÃO DEVE utilizar-se
com produtos de limpeza a seco. Para sua segurança, a máquina deve ser correctamente
instalada.
Se tiver alguma dúvida sobre a instalação, aconselhe-se com o Serviço de Assistência
Técnica GIAS.
Antes de utilizar a máquina de secar roupa
pela primeira vez:
● leia com atenção este livro de instruções.
● retire tudo o que estiver no tambor.
● limpe o interior do tambor e a porta com
um pano húmido para remover o pó que
possa ter-se instalado durante o
transporte.
IMPORTANTE: Esta máquina de secar
roupa deve apenas utilizar-se para têxteis e
vestuário, utilizando uma solução de água
no processo de limpeza.
NÃO pôr na máquina de secar roupa
tecidos tratados com produtos de limpeza a
seco.
Requisitos eléctricos
Esta máquina está apetrechada com uma ficha
vulcanizada.
A ficha deve ficar acessível para se poder
desligar a máquina após a sua instalação.
IMPORTANTE: Os fios do cabo de
alimentação têm cores diferentes, de
acordo com o seguinte código:
Azul - NEUTRO
Castanho - FASE
Verde e amarelo - TERRA
Se o cabo de alimentação desta máquina
estiver danificado, deve ser substituído por
um cabo especial que se encontra somente
disponível no Serviço de Assistência
Técnica GIAS ou Agente Autorizado.
ATENÇÃO!
A ELECTRICIDADE PODE SER
EXTREMAMENTE PERIGOSA.
ESTE ELECTRODOMÉSTICO
DEVE SER LIGADO À TERRA.
Portuguese 40000494.fm Page 13 Thursday, August 28, 2003 3:56 PM

PORTUGUÊS
14
Requisitos de instalação
e ventilação
IMPORTANTE: Esta máquina deve ser
instalada de modo a que as entradas e as
saídas de ar não fiquem obstruídas (fig. 1).
Deve deixar-se um espaço de, pelo menos,
12 mm (0,5 polegadas) entre os lados e a parte
posterior da máquina e as paredes e armários
que a rodeiam.
Para uma ventilação adequada, o espaço entre
a base da máquina e o chão deverá estar
desobstruído.
NUNCA instale a máquina junto a cortinas.
Evite que caiam e se acumulem objectos atrás
e ao lado da máquina, uma vez que
podem obstruir as entradas e
saídas de ar.
Esta máquina de secar roupa é
fornecida com uma mangueira
de ventilação.
Recomenda-se o uso da
mangueira de ventilação para
expelir ar quente para a atmosfera,
e assim assegurar máxima
eficiência de secagem. Proteja a
saída externa dos ventos
predominantes para assegurar que
o retorno da corrente de ar não reduza o
desempenho da secagem.
Se a máquina for instalada sob uma bancada
de cozinha ou se for embutida, é essencial
utilizar uma mangueira de ventilação para
eliminar o ar quente e húmido, evitando assim
que a recirculação de ar húmido impeça que a
máquina funcione eficientemente.
A mangueira pode passar através de uma
parede ou de uma porta ou janela abertas
(fig. 2). A mangueira tem 95 mm
(3,75 polegadas) de diâmetro e um
comprimento de até 1,8 metros (6 pés).
Mangueiras de ventilação de comprimento
superior a 1,8 metros (6 pés), não se
recomendam pois reduzem o desempenho da
máquina.
Assegure-se de que a mangueira de
ventilação não está torcida, o que impedirá
o funcionamento eficiente da máquina.
Há três saídas de ar - uma na parte traseira e
uma de cada lado da máquina. A mangueira
de ventilação deve apenas ligar-se a uma
destas saídas. Devem colocar-se as
respectivas tampas nas duas saídas não
utilizadas para manter eficiência máxima de
secagem.
1
CABO DE
ALIMENTAÇÃO
SAIDA DE AR
QUENTE
ABERTURAS
DE ENTRADA
DE AR
2
PAREDE
PAREDE
PAREDE
MÁQUINA DE
SECAR
Portuguese 40000494.fm Page 14 Thursday, August 28, 2003 3:56 PM

PORTUGUÊS
15
Preparação da carga
Antes de usar a máquina de secar pela
primeira vez, limpe o interior do tambor e da
porta com um pano húmido.
Certifique-se de que a roupa que vai secar é
apropriada para secagem por máquina de
secar, conforme indicado nos símbolos das
etiquetas, representativos dos cuidados a ter
com cada um dos artigos.
Preparação da roupa
Certifique-se de que todos os fechos estão
fechados e os bolsos vazios. Vire os artigos
do avesso. Coloque a roupa livremente no
tambor de modo a não se emaranhar.
Não sobrecarregue o tambor, particularmente
ao secar artigos volumosos, senão, a roupa
pode ficar presa ao tambor e não secar
uniformemente.
Peso máximo de
secagem
● Algodões Máx.de 7 kg
● Sintéticos Máx.de 3 kg
Separe a carga como se
segue:
A) Por símbolos de cuidados de secagem
Na gola ou no interior da bainha:
Pode ser seco em máquina de secar.
Secagem a alta temperatura.
Secagem apenas a baixa temperatura.
NÃO pôr na máquina de secar roupa.
B) Por quantidade e volume
Sempre que a carga for superior à
capacidade da máquina, separe a roupa
de acordo com o volume (por exemplo,
toalhas e roupa interior).
C) Por tipo de tecido
Algodões/Linho: Toalhas, camisolas de
algodão, lençóis e toalhas de mesa.
Sintéticos: Blusas, camisas, fatos-
macacos, etc. em cuja composição
entrem poliésteres ou poliamidas, bem
como misturas de algodão/fibras
sintéticas.
D) Por grau de secagem
● Separe por: Secagem para engomar,
secagem para guardar, etc.
● Para artigos delicados, prima a tecla
‘DELICATES’ (TECIDOS
DELICADOS) ( ) para seleccionar uma
temperatura de secagem baixa.
Não pôr na máquina de
secar:
Lãs, sedas, tecidos delicados, meias de nylon,
bordados delicados, tecidos com decoração
metálica, vestuário com guarnições de PVC
ou couro, ténis, artigos volumosos, tais como
sacos-cama, etc.
IMPORTANTE: Não seque artigos
tratados com um produto de limpeza a seco
ou vestuário de borracha (perigo de
incêndio ou de explosão).
Economia de energia
Ponha somente na máquina de secar roupa as
peças que tenham sido bem torcidas ou
centrifugadas. Quanto mais seca estiver a
roupa, menor será o tempo de secagem,
resultando numa economia de electricidade.
Tente SEMPRE secar o peso máximo de
roupa, o que origina economia de tempo e de
electricidade.
NUNCA exceda o peso máximo
recomendado, o que provocará desperdício de
tempo e de electricidade.
Verifique SEMPRE se o filtro está limpo
antes de cada ciclo de secagem.
NUNCA ponha na máquina artigos
ensopados e a pingar, o que pode danificar a
máquina.
Portuguese 40000494.fm Page 15 Thursday, August 28, 2003 3:56 PM

PORTUGUÊS
16
Abrir a porta
Puxe o manípulo para abrir a porta (fig. 3).
Para reiniciar o programa de secagem, feche a
porta e prima a tecla ‘ON’ ().
Filtro
IMPORTANTE: Para manter a eficiência
da máquina, verifique se o filtro do cotão
está limpo antes de cada ciclo de secagem.
1. Puxe o filtro para cima (fig. 4).
2. Abra o filtro como ilustrado (fig. 5).
3. Retire com cuidado os resíduos de tecido,
usando uma escova macia ou a ponta dos
dedos.
4. Junte e feche entre si as duas metades do
filtro e volte a montá-lo no seu lugar.
Indicador de Controlo do Estado
do Filtro ( )
Acende quando o filtro necessitar de limpeza.
Se a roupa não estiver a secar, verifique se o
filtro não está obstruído. O indicador iluminar-
se-á também quando a mangueira de ventilação
estiver obstruída ou torcida.
3
ATENÇÃO!
QUANDO A MÁQUINA DE
SECAR ROUPA ESTIVER A
UTILIZAR-SE, O TAMBOR E A
PORTA PODEM ESTAR
MUITO QUENTES.
4
5
Portuguese 40000494.fm Page 16 Thursday, August 28, 2003 3:56 PM

PORTUGUÊS
17
Guia de secagem
A tabela mostra os tempos aproximados de secagem, dependendo do tipo de
tecido e do grau de humidade da roupa.
PROGRAMA PRÉ-FERRO DE PASSAR: SUAVIZA OS VINCOS –
FACILITA A ACÇÃO DE PASSAR A FERRO
LEMBRE-SE: Durante os últimos 10 minutos, utiliza-se sempre ar frio para secar
a roupa.
Para tecidos delicados seleccione a tecla ‘DELICATES’ (TECIDOS DELICADOS)
( ) para todos os Programas de Secagem. Isto reduz a temperatura de secagem
para proteger as roupas.
REGULAR O
CALOR
CARGA
PESADA
CARGA
MÉDIA
CARGA
LEVE
ALGODÃO ( )
ALTO 140-165 Min 70-80 Min 50-65 Min
TECIDOS DE FIBRAS
SINTÉTICAS ( )
BAIXO - 70-80 Min 40-55 Min
TECIDOS DE FIBRAS
ACRÍLICAS ( )
BAIXO - 50-65 Min 30-40 Min
Portuguese 40000494.fm Page 17 Thursday, August 28, 2003 3:56 PM

PORTUGUÊS
18
Painel de controlo e luzes indicadoras
1. Indicador e tecla ‘ON’ – prima para ligar, o indicador iluminar-se-á ( ).
2. Tecla
‘DELICATES’ (TECIDOS DELICADOS) – para reduzir o grau de calor para
artigos delicados, e prima novamente para seleccionar alta temperatura ( ).
ALTO Regular Calor
BAIXO Regular Calor
3. Selector ‘DRYING TIME’ (TEMPO DE SECAGEM) – selecciona o tempo de secagem
ou a opção de secagem para engomar.
4. O indicador ‘FILTER CARE’ (CONTROLO DO ESTADO DO FILTRO) acende-se
quando o filtro necessitar de limpeza ( ).
4
1
2
3
Portuguese 40000494.fm Page 18 Thursday, August 28, 2003 3:56 PM
La pagina si sta caricando...
La pagina si sta caricando...
La pagina si sta caricando...
La pagina si sta caricando...
La pagina si sta caricando...
La pagina si sta caricando...
La pagina si sta caricando...
La pagina si sta caricando...
La pagina si sta caricando...
La pagina si sta caricando...
La pagina si sta caricando...
La pagina si sta caricando...
La pagina si sta caricando...
La pagina si sta caricando...
La pagina si sta caricando...
La pagina si sta caricando...
La pagina si sta caricando...
La pagina si sta caricando...
La pagina si sta caricando...
La pagina si sta caricando...
La pagina si sta caricando...
La pagina si sta caricando...
La pagina si sta caricando...
La pagina si sta caricando...
La pagina si sta caricando...
La pagina si sta caricando...
La pagina si sta caricando...
La pagina si sta caricando...
-
 1
1
-
 2
2
-
 3
3
-
 4
4
-
 5
5
-
 6
6
-
 7
7
-
 8
8
-
 9
9
-
 10
10
-
 11
11
-
 12
12
-
 13
13
-
 14
14
-
 15
15
-
 16
16
-
 17
17
-
 18
18
-
 19
19
-
 20
20
-
 21
21
-
 22
22
-
 23
23
-
 24
24
-
 25
25
-
 26
26
-
 27
27
-
 28
28
-
 29
29
-
 30
30
-
 31
31
-
 32
32
-
 33
33
-
 34
34
-
 35
35
-
 36
36
-
 37
37
-
 38
38
-
 39
39
-
 40
40
-
 41
41
-
 42
42
-
 43
43
-
 44
44
-
 45
45
-
 46
46
-
 47
47
-
 48
48


