
Getting Started
Useful Information
Troubleshooting
Appendix
OPERATING INSTRUCTIONS
Personal Computer
Model No. UT-MA6 series
Please print and use pages
containing important descriptions
for software installation, etc.
Please read these instructions carefully before using this product, and save this manual for future use.
Contents
Getting Started
Introduction ......................................................
2
Description of Parts .........................................
4
First-time Operation .........................................
6
Turning On / Turning Off ..................................
9
Useful Information
Handling and Maintenance ............................
10
Reinstalling Software .....................................
15
Troubleshooting
Troubleshooting (Basic) .................................
20
Appendix
LIMITED USE LICENSE AGREEMENT ........
25
Specifications ................................................
27
Standard Limited Warranty ............................
30

2
Getting Started
Introduction
Thank you for purchasing this Panasonic product. For optimum performance and safety, please read
these instructions carefully.
■ Terms and illustrations in these instructions
CAUTION
:
Conditions that may result in minor or moderate injury.
NOTE
:
Useful and helpful information.
è :
Page in these Operating Instructions or in the Reference Manual.
:
Reference to the on-screen manuals.
Open the charms : Swipe in from the right edge of the screen.
Touch
: Touch (Settings) in the charms.
<Only if the external keyboard is connected>
F12
:
Press F12 key.
●
Some illustrations are simplified to help your understanding and may look different from the actual
unit.
●
If you do not sign in as an administrator, you cannot use some functions or cannot display some
screens.
●
Refer for the latest information about optional products to the catalogs, etc.
●
In these instructions, the names and terms are referred as follows.
•
“Windows
®
8.1 Pro Update 64-bit” as “Windows” or “Windows 8.1”
•
DVD MULTI drive as “DVD drive”
●
Screen messages are explained in [English (United States)].
(Depending on the language preference, some screen messages in these instructions are
different from the actual screen messages. For example, [Flight mode] may be displayed instead
of [Airplane mode] in some language preference)
■ Disclaimer
Computer specifications and manuals are subject to change without notice. Panasonic Corporation
assumes no liability for damage incurred directly or indirectly from errors, omissions or discrepancies
between the computer and the manuals.
■ Trademarks
Microsoft
®
, Windows
®
, and the Windows logo are registered trademarks of Microsoft Corporation of
the United States and/or other countries.
Intel, Core, Centrino and PROSet are either registered trademarks or trademarks of Intel
Corporation.
SDXC Logo is a trademark of SD-3C, LLC.
Bluetooth
®
is a registered trademark owned by Bluetooth SIG, Inc., U.S.A. and licensed to Panasonic
Corporation.
NVIDIA, the NVIDIA logo and QUADRO are trademarks and/or registered trademarks of NVIDIA
Corporation in the U.S. and/or other countries.
DisplayPort is a trademark owned by the Video Electronics Standards Association in the United
States and other countries.
Names of products, brands, etc., appearing in this manual are trademarks or registered trademarks
of their respective own companies.

3
Getting Started
■ On-screen Manual
For further information about the computer, you can refer to the on-screen manual.
●
Reference Manual
The Reference Manual contains the practical information to help you fully enjoy the computer’s
performance.
●
Important Battery Tips
The Important Battery Tips will provide you with the battery information so that you can use the
built-in battery in the optimum condition to obtain longer operation time.
To access the on-screen manuals, follow the steps below.
On the Start screen, touch the [Manual Selector] tile, and select the on-screen manual.

4
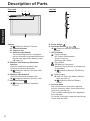
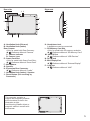
Getting Started
Description of Parts
Front side Left side
B
A C
F
D
E
G
H
I
J
Camera
è
Reference Manual “Camera”
A: Camera Indicator
B: Camera Lens
C: Ambient Light Sensor
The ambient light sensor is equipped
with an automatic brightness adjustment
function that adjusts the display screen.
(è page 11)
D: Wireless LAN Antenna / Bluetooth
Antenna
<Only for model with wireless LAN>
<Only for model with Bluetooth>
è
Reference Manual “Wireless LAN”
“Bluetooth”
E: Wireless LAN Antenna
<Only for model with wireless LAN>
è
Reference Manual “Wireless LAN”
F: Windows Button
è Reference Manual “Hardware
Buttons”
G: Power Switch
H: Hardware Buttons /
è Reference Manual “Hardware
Buttons”
I: LED Indicator
: Power Indicator
Off: Power off/Hibernation
Green: Power on
Blinking green: Sleep
: Drive status
: SD Memory Card status
(Blinking: During access or a password
is requested)
è Reference Manual “SD Memory
Card”
: Battery status
è page 10 “When the battery indicator
does not light on”
è Reference Manual “Battery
Power”
J: Security Hook
Pull out the security hook when passing
through a security cable. Store the security
hook during normal use.
(The insulation coating has been applied to
the metal part.)
For further information, read the manual that
comes with the cable.

5
Getting Started
Rear side Right side
A
B
I H
J
E
F
G
C D
K
M
N
O
P
L
A: Ventilation Hole (Exhaust)
B: Ventilation Hole (Intake)
Rear Camera
<Only for model with Rear Camera>
è
Reference Manual “Camera”
C: Camera Indicator
D: Camera Lens
E: Smart Card Slot
<Only for model with Smart Card Slot>
è
Reference Manual “Smart Card”
F: Microphone
G: Speaker
H: Expansion Bus Connector
è
Reference Manual “Cradle”
I: Ventilation Hole (Intake) / Speaker
J: Reset Button (For servicing by
Panasonic)
K: Headphone Jack
A headphone can be connected.
L: SD Memory Card Slot
<Only for model with SD memory card slot>
è
Reference Manual “SD Memory Card”
M: USB3.0 Port
è
Reference Manual “USB Devices”
N: DC-IN jack
O: Mini DisplayPort
è
Reference Manual “External Display”
P: LAN port
è
Reference Manual “LAN”
This computer contains a
magnet and magnetic products
at the locations circled in the
illustration at right.
Avoid leaving metallic object or
magnetic media in contact with
these areas.

6
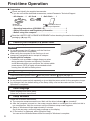
Getting Started
First-time Operation
■ Preparation
Check and identify the supplied accessories.
If you do not find the described accessories, contact Panasonic Technical Support.
•
AC Adaptor . . .
1
Model No:
CF-AA5713A
• AC Cord . . . . 1 • Soft Cloth . . . 1
è Reference Manual
“Screen Input Operation”
• Operating Instructions (CD-ROM / -R) . . . . . . . . . . . . . . . . . . . . . . 1
• Safety Precautions and Regulatory Information . . . . . . . . . . . . . 1
• Before using this computer . . . . . . . . . . . . . . . . . . . . . . . . . . . . . . 1
Read the LIMITED USE LICENSE AGREEMENT before breaking the seal on the computer’s
packaging (è page 25).
1 Connect your computer to a power outlet
The battery charging starts automatically.
CAUTION
●
Do not disconnect the AC adaptor until the first-time
operation procedure is completed.
●
When using the computer for the first time, do not
connect any peripheral device except AC adaptor.
●
Handling the AC adaptor
•
Problems such as sudden voltage drops may arise
during periods of thunder and lightning. Since this
could adversely affect your computer, an uninterruptible
power source (UPS) is highly recommended unless
running from the built-in battery alone.
2 Turn on the computer
Press and hold the power switch until the power indicator lights (è page 4).
CAUTION
●
Do not press the power switch repeatedly or do not hold the power switch for four seconds or longer.
●
Any changes from the default setting of the Setup Utility must not be made until the First-time
Operation is completed.
3 Select language
Select language and touch [Next].
Follow the on-screen instructions.
4 Setup Windows
Follow the on-screen instructions.
●
The computer restarts several times. Wait until the drive indicator has turned off.
●
After the computer is turned on, the screen remains black or unchanged for a while, but this is
not a malfunction. Wait for a moment until the Windows setup screen appears.
●
Setup of Windows will take approximately 5 minutes.
Go to the next step, confirming each message on the display.
●
If "Get online" is displayed, select [Skip this step].
You can set the Wireless Network after the setup of Windows is complete.

7
Getting Started
CAUTION
●
You can change the user name, password, image and security setting after setup of Windows.
●
Remember your password. If you forget the password, you cannot use Windows. Creating a
password reset disk beforehand is recommended.
●
Do not use the following words for user name: CON, PRN, AUX, CLOCK$, NUL, COM1 to COM9,
LPT1 to LPT9, @, &, space. In particular, if you create a user name (account name) that includes
the “@” mark, a password will be requested at the sign-in screen, even if no password has been
set. If you try to sign in without entering a password, “The user name or password is incorrect.”
may be displayed and you will not be able to sign in (è page 22).
5 Create the recovery disc
A recovery disc allows you to install OS and restore its factory default condition, in case, for
example, the recovery partition of the flash memory is damaged. We recommend creating a
recovery disc before you begin using the computer.
Refer to è Reference Manual “Recovery Disc Creation Utility” about creating the disc.
NOTE
●
PC Information Viewer
This computer periodically records the management information of the flash memory, etc. The
maximum data volume for each record is 1024 bytes.
This information is only used for estimating the cause when the flash memory goes down by any
possibility. They are never sent to outside via network nor used for any other purpose except for
the purpose described the above.
To disable the function, add the check mark for [Disable the automatic save function for
management information history] in [Hard Disk Status] of PC Information Viewer, and touch [OK].
(è
Reference Manual “Troubleshooting (Advanced)” - “Checking the Computer’s Usage
Status”)
●
In the default settings, a shortcut icon for Korean language is on the desktop screen. You may
delete the icon if not necessary.
■ Battery duration
Note that the computer consumes electricity even when the computer power is off. If the built-in
battery is fully charged, the battery will fully discharge in the following period of time:
Status Discharge period
In sleep Approx. 4 days
(Approx. 3 days with Wake Up from wired LAN function activated)
In hibernation Approx. 49 days
(Approx. 7 days with Wake Up from wired LAN function activated)
When power is off Approx. 49 days
(Approx. 7 days with Power On by LAN function activated)
The above table shows the battery duration while the USB port continuous charging function is not
used.
The battery duration will slightly be longer if a LAN cable is not connected to the computer, even
when Wake Up from wired LAN function is activated.

8
Getting Started
■ Before using wireless function
Open the charms, and touch - [Change PC settings] - [Network] - [Airplane mode
*1
].
Set "Airplane mode
*1
" to [Off], and then;
set "Wi-Fi" to [On] (for wireless LAN).
set "Bluetooth" to [On] (for Bluetooth).
*1
: Screen messages are explained in [English (United States)].
(Depending on the language preference, some screen messages in these instructions are
different from the actual screen messages. For example, [Flight mode] may be displayed
instead of [Airplane mode] in some language preference.)
■ To change the partition structure
You can shrink a part of an existing partition to create unallocated disk space, from which you can
create a new partition. In the default setting, you can use a single partition.
Perform the following procedure.
●
Long touch at the bottom left corner of the desktop screen.
Touch [Disk Management].
Long touch the partition for Windows (“c” drive in the default setting), and touch [Shrink
Volume…].
●
The partition size depends on the computer specifications.
Input the size in "Enter the amount of space to shrink in MB" and touch [Shrink].
●
You cannot input a larger number than the displayed size.
●
To select [Reinstall to the OS related partitions.] in installing OS (è page 17),
70 GB or more is necessary for "Total size after shrink in MB".
Long touch [Unallocated] (the shrunk space in the step ) and touch [New Simple Volume…].
Follow the on-screen instructions to make the settings, and touch [Finish].
Wait until formatting is completed.
NOTE
●
You can create an additional partition using remaining unallocated space or newly creating
unallocated space.
●
To delete a partition, long touch the partition and touch [Delete Volume…] in the step .
■ To select language
To select a language other than the one you have selected during the first-time operation, follow the
steps below.
Perform either of the following procedures.
●
Long touch at the bottom left corner of the desktop screen.
●
Slide up from the middle of the Start screen with a finger.
Touch [Control Panel].
Touch [Clock, Language, and Region] - [Language] - [Add a language].
Select a language, and then touch [Add].
Depending on the region, two or more languages are selectable. Touch [Open] and select the
desired language, and then touch [Add].
Touch [Options] for the language you want to use.
Touch [Make this the primary language].
Touch [Log off now].
Sign in to Windows.
First-time Operation

9
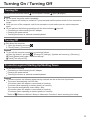
Getting Started
Turning On
Press and hold the power switch until the power indicator lights (è page 4).
NOTE
●
Do not press the power switch repeatedly.
●
The computer will forcibly be turned off if you press and hold the power switch for four seconds or
longer.
●
Once you turn off the computer, wait for ten seconds or more before you turn on the computer
again.
●
Do not perform the following operation until the drive indicator turns off.
•
Connecting or disconnecting the AC adaptor
•
Pressing the power switch
•
Touching the screen or external mouse/keyboard
Turning Off
Shut down the computer.
1. Open the charms, and touch .
2. Touch [Power] - [Shut down].
NOTE
●
To turn off the computer completely, proceed as follows.
Open the charms, and touch - [Change PC settings] - [Update and recovery] - [Recovery].
Touch [Restart now] under "Advanced startup".
Touch [Turn off your PC].
Precaution against Starting Up/Shutting Down
●
Do not do the following
•
Connecting or disconnecting the AC adaptor
•
Pressing the power switch
•
Touching the screen or external mouse/keyboard
NOTE
●
To conserve power, the following power saving methods are set at the time of purchase.
•
The screen automatically turns off after:
10 minutes (when AC adaptor is connected) of inactivity
5 minutes (when operating on battery power) of inactivity
•
The computer automatically enters sleep
*1
after:
20 minutes (when AC adaptor is connected) of inactivity
15 minutes (when operating on battery power) of inactivity
*1
Refer to Reference Manual “Sleep or Hibernation Functions” about resuming from sleep.
Turning On / Turning Off

10
Useful Information
Handling and Maintenance
Operation environment
●
Place the computer on a flat stable surface not subject to shock, vibration, and danger of
dropping. Do not place the computer upright or turn it over. If the computer is exposed to an
extremely strong impact, it may become damaged.
●
Operating environment
Temperature: Operation : 5 °C to 35 °C
Storage : -20 °C to 60 °C
Humidity: Operation : 30% to 80% RH (No condensation)
Storage : 30% to 90% RH (No condensation)
Even within the above temperature/humidity ranges, operation for a long time in extreme
environments, smoking nearby, or operation in places where oil is used or where there is a lot of
dust will result in the product deterioration and will shorten the product life.
●
Do not place the computer in the following areas, otherwise the computer may be damaged.
•
Near electronic equipment. Image distortion or noise may occur.
•
In extremely high or low temperature.
●
As the computer can become hot during operation, keep it away from items that are sensitive to
heat.
Handling cautions
This computer is designed to minimize shock to parts such as the LCD and the flash memory
drive, but no warranty is provided against any trouble caused by shock. Be extremely careful when
handling the computer.
●
When carrying the computer:
•
Turn off the computer.
•
Remove all external devices, cables, Smart Cards and other protruding objects.
•
Do not drop or hit the computer against solid objects.
•
Do not grip the display part.
●
When you board an airplane, take the computer with you and never put it in your checked
luggage. When using the computer on airplane, follow the airline’s instructions.
•
To use airplane mode
*1
:
Open the charms, and touch - [Change PC settings] - [Network] - [Airplane mode
*1
].
Set "Airplane mode
*1
" to [On].
Confirm that all wireless devices are set to [Off].
*1
: Screen messages are explained in [English (United States)].
(Depending on the language preference, some screen messages in these instructions are
different from the actual screen messages. For example, [Flight mode] may be displayed
instead of [Airplane mode] in some language preference.)
●
Use only your fingers or the dedicated electronic touch pen (optional) to touch the screen. Do not
place any object on its surface and do not press down strongly with sharp-pointed or hard objects
that may leave marks (e.g., nails, pencils and ball point pens).
●
Avoid any harmful substances such as oil from getting into the touchscreen. The pointer may not
work correctly.
●
Be careful not to get injured by dropping or getting hit when carrying the computer.
■ When the battery indicator does not light on
The battery indicator may not light on even if the AC adaptor is correctly connected to the computer,
due to the following reasons.
●
The AC adaptor’s protection function may be working. In this case, pull out the AC cord and wait
for more than 1 minute before reconnecting the AC cord.

11
Useful Information
■ When using peripheral devices
Follow these instructions and the Reference Manual to avoid any damage to the devices. Carefully
read the instruction manuals of the peripheral devices.
●
Use the peripheral devices conforming to the computer’s specifications.
●
Connect to the connectors in the correct direction.
●
If it is hard to insert, do not try forcibly but check the connector’s shape, direction, alignment of
pins, etc.
●
If screws are included, fasten them securely.
●
Remove the cables when you carry the computer. Do not pull the cables forcibly.
■ Preventing your computer from unauthorized use via wireless LAN/Bluetooth
<Only for model with wireless LAN/Bluetooth>
●
Before using wireless LAN/Bluetooth, make the appropriate security settings such as data
encryption.
■ Battery Recalibration
●
The battery recalibration may take a long time due to the large battery capacity. This is not a
malfunction.
<When performing “Battery Recalibration” after shutting down Windows>
•
Full charge: Approximately 2.5 hours
•
Complete discharge: Approximately 2 hours
When performing “Battery Recalibration” without shutting down Windows, it may take more time to
charge/discharge.
■ Sensors
This computer is equipped with four sensors (acceleration sensor, gyro sensor, magnetic sensor,
ambient light sensor), and you can use these sensors with any software that is compatible.
As the accuracy of each sensor output is dependent on the operating environment and other
conditions, the results should only be used as a reference.
The acceleration sensor, gyro sensor, and magnetic sensor are located at the bottom left of the LCD.
The detection results of each sensor may vary depending on how you are holding the computer, the
application software you are using, and other factors.
●
Automatic brightness adjustment
The computer is equipped with an automatic brightness adjustment function that adjusts the
display screen based on the ambient light sensor. You can configure the automatic adjustment
function as follows.
Open the charms, and touch - [Change PC settings] - [PC and devices] - [Power and sleep].
Set "Adjust my screen brightness automatically" to [On].
The ambient light sensor is located at the top of LCD.
The ambient light cannot be detected properly if this area is obstructed or dirty.

12
Useful Information
Handling and Maintenance
●
Magnetic sensor
The magnetic sensor on the computer operates by detecting geomagnetism. Therefore, the
magnetic sensor may not function properly and it readings may be inaccurate, especially in the
following environments.
•
Inside or near steel structures such as buildings or bridges
•
Inside or near automobiles, or near train power lines
•
Near metallic furniture or appliances
•
When the AC adaptor or other peripheral devices are brought closer to the computer
•
Near magnets, speakers, or other objects with strong magnetic fields
The magnetic directions indicated by the magnetic sensor may not be accurate immediately after
purchase or in environments with poor magnetic fields.
In such cases, turn on the computer and move it as follows.
Hold the computer so that its screen side is facing upward and level.
While keeping the computer level, rotate it 90 degrees or more clockwise.
Return the computer to position , and rotate it 90 degrees or more counterclockwise.
Return the computer to position .
Tilt the computer 90 degrees or more to the left so that the left side of the computer tilts down.
Return the computer to position , and tilt it 90 degrees or more to the right so that the right
side of the computer tilts down.
CAUTION
●
Hold the computer firmly when moving it. Strong shocks from dropping the computer may
result in damage.
Maintenance
If drops of water or other stains get on the surface of the LCD panel, wipe them off immediately.
Failure to do so may result in staining.
To clean the LCD panel
Use the soft cloth included with the computer. (For further information, refer to “Suggestions About
Cleaning the LCD Surface” è Reference Manual “Screen Input Operation”.)
To clean areas other than the LCD panel
Wipe with a soft dry cloth such as gauze. When using detergent, dip a soft cloth in water-diluted
detergent and wring it thoroughly.
CAUTION
●
Do not use benzene, thinner, or rubbing alcohol since it may adversely affect the surface causing
discoloration, etc. Do not use commercially-available household cleaners and cosmetics, as they
may contain components harmful to the surface.
●
Do not apply water or detergent directly to the computer, since liquid may enter inside of the
computer and cause malfunction or damage.

13
Useful Information
Dispose of Computer
<For Europe and U.S.A./Canada>
Attention Customers
Don't remove the battery by yourself. The battery must be removed by qualified professionals.
When disposing of this product, be sure to contact qualified professionals to remove the battery.
Attention Qualified professionals to remove the battery
Dispose of this product correctly in accordance with the local regulations after removing the battery
as shown in the following procedure.
■ Preparation
●
Remove all peripherals (SD memory card, etc.).
●
Erase the stored data. (è Reference Manual “Erasing Flash Memory Data”)
CAUTION
●
Never disassemble the computer except before disposal.
●
Refer to “Safety Precautions and Regulatory Information” for precautions when disposing of the
computer.
1. Turn off the computer completely. (è page 9)
●
Do not use sleep/hibernation.
2. While connecting the AC adaptor, press both volume buttons ( and ) at the same time
for more than five seconds.
The built-in battery’s power output stops.
●
Disconnect the AC adaptor, and press the power button for 1 second or longer and confirm
the computer does not start up.
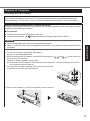
3. Turn over the computer, and peel off the seal (A) on the side
of Interface cover with a thin pointed tool.
A
4. Remove the screws (3), and lift up Interface cover to remove.

14
Useful Information
Handling and Maintenance
5. Remove the silver screw.
6. Remove the screws (10).
7. Unhook the claws on the upper part of the cover ( ), and
open the cover from the right side ( ).
●
The left side of the cover is connected to the computer
with the cord. Do not pull the cord.
8. Disconnect the connector (B).
Insulate the connectors on the built-in battery by covering
them with plastic tape, for example.
B
9. Remove the screws (7) that secures the built-in battery
(C), and remove the built-in battery.
C

15
Useful Information
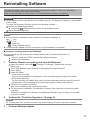
Reinstalling Software
Reinstalling software will return the computer to the default condition. When you reinstall the
software, the flash memory data will be erased.
Back up important data to other media or an external hard disk before reinstallation.
CAUTION
●
Do not delete the Recovery Partition on the flash memory. The Recovery Partition is not available
to store data.
To check the Recovery Partition, perform the following methods.
Perform the following procedure.
●
Long touch at the bottom left corner of the desktop screen.
Touch [Disk Management].
NOTE
●
You can use the following buttons instead of the keyboard (è page 4).
: ↓ key
: ↑ key
: Enter key
: F2 key (Default setting)
●
Connect the AC adaptor and do not remove it until reinstallation is complete.
■ Remove everything and reinstall Windows
You can reinstall the OS that was pre-installed at the time of purchase (Windows 8.1).
Preparation
●
<Only for model with TPM> Connect the external keyboard.
●
Remove all peripherals.
1 Perform “Remove everything and reinstall Windows”.
Open the charms, and touch - [Change PC settings] - [Update and recovery] -
[Recovery].
Touch [Get Started] under "Remove everything and reinstall Windows".
Touch [Next].
Select the option.
•
[Just remove my files]
Perform the reinstallation of Windows in a few moments (Approximately 20 minutes).
•
[Fully clean the drive]
By fully cleaning, the deleted files can not be recovered easily and the security level will
be increased. The processing time will be longer (Approximately 140 minutes).
Follow the on-screen instructions.
After the reinstallation, the computer will restart.
●
Do not interrupt installation, for example by turning off the computer or performing other
operation.
Otherwise installation may become unavailable as Windows may not start up or the data
may be corrupted.
2 Perform the “First-time Operation” (è page 6).
NOTE
●
The date and time, and the time zone may not be correct. Be sure to set them correctly.
3 Perform Windows Update.

16
Useful Information
4 <Only for model with TPM> Clear TPM.
Perform either of the following procedures.
●
Long touch at the bottom left corner of the desktop screen.
●
Slide up from the middle of the Start screen with a finger.
Touch [Run], then input "tpm.msc" and touch [OK].
Touch [Clear TPM ...] under "Actions" on the right of the "TPM Manager on Local Computer"
screen.
Touch [Restart] of the "Clear the TPM security hardware" screen.
The computer will restart.
When "TPM configuration change was requested to ..." is displayed, press
F12
.
Touch the Desktop tile, and when "TPM is ready" appears, touch [Close].
■ Flash memory Recovery
If the problem persists after performing “Remove everything and reinstall Windows”, follow the
instructions below.
Preparation
●
<Only for model with TPM> Connect the external keyboard.
●
Remove all peripherals.
1 Start the Setup Utility.
Open the charms, and touch - [Change PC settings] - [Update and recovery] -
[Recovery].
Touch [Restart now] under "Advanced startup".
Touch [Troubleshoot] - [Advanced options] - [UEFI Firmware Settings] - [Restart].
●
If the password is requested, enter the Supervisor Password.
2 Write down all of the contents of the Setup Utility and touch [Exit] and
double-touch [Load Default Values].
At the confirmation message, touch [Yes].
3 Check the [UEFI Boot] setting of the Setup Utility.
When reinstalling Windows 8.1: [Enabled]
4 Touch [Exit] and double-touch [Save Values and Reboot].
At the confirmation message, touch [Yes].
Computer will restart.
5 Press (Rotation lock) button while "Panasonic" boot screen is
displayed.
The Setup Utility starts up.
●
If the password is requested, enter the Supervisor Password.
6 Touch [Exit] and double-touch [Recovery Partition].
7 Touch [Next].
8 Touch [YES].
9 At the License Agreement screen, touch [Yes, I agree to the provisions
above and wish to continue!] and touch [Next].
Reinstalling Software

17
Useful Information
10 Touch [Next].
If the option is displayed, select the setting and touch [Next].
●
[Reinstall Windows to the System Disk to factory default.]
Select this option when you want to install Windows to the factory default. After installation,
you can create a new partition. For how to create a new partition, refer to “To change the
partition structure” (è page 8).
●
[Reinstall to the OS related partitions.]
*1
Select this option when the flash memory has already been divided into several partitions.
For how to create a new partition, refer to “To change the partition structure” (è page 8).
You can keep the partition structure.
*1
This does not appear if Windows cannot be installed to the recovery partition and the area usable
by Windows.
11 At the confirmation message, touch [YES].
Installation starts according to the instructions on the screen. (It will take approximately
20 minutes.)
●
Do not interrupt installation, for example by turning off the computer or other operation.
Otherwise installation may become unavailable as Windows may not start up or the data
may be corrupted.
12 When Ending process screen is displayed, touch [OK] to turn off the
computer.
13 Perform the “First-time Operation” (è page 6).
NOTE
●
The date and time, and the time zone may not be correct. Be sure to set them correctly.
●
If the password is requested, enter the Supervisor Password.
14 Start the Setup Utility and change the settings as necessary.
15 Perform Windows Update.
16 <Only for model with TPM> Clear TPM (è page 16).

18
Useful Information
Reinstalling Software
■ Using Recovery Disc
Use the Recovery Disc in the following conditions.
•
You have forgotten the administrator password.
•
Installation is not complete. The recovery partition in the flash memory may be broken.
Preparation
●
Prepare the following items:
•
Recovery Disc (è Reference Manual “Recovery Disc Creation Utility”)
•
USB DVD drive (optional) (refer to recent catalogs and other sources for information
about the products available)
•
<Only for model with TPM> External keyboard
●
Remove all peripherals (except for the USB DVD drive).
1 Connect the DVD drive to the USB port.
2 Start the Setup Utility.
Open the charms, and touch - [Change PC settings] - [Update and recovery] -
[Recovery].
Touch [Restart now] under "Advanced startup".
Touch [Troubleshoot] - [Advanced options] - [UEFI Firmware Settings] - [Restart].
●
If the password is requested, enter the Supervisor Password.
3 Write down all of the contents of the Setup Utility and touch [Exit] and
double-touch [Load Default Values].
At the confirmation message, touch [Yes].
4 Check the [UEFI Boot] setting of the Setup Utility.
When installing Windows 8.1: [Enabled]
5 Set the Recovery Disc into the DVD drive.
6 Touch [Exit] and double-touch [Save Values and Reboot].
At the confirmation message, touch [Yes].
The computer will restart.
7 Press (Rotation lock) button while "Panasonic" boot screen is
displayed.
The Setup Utility starts up.
●
If the password is requested, enter the Supervisor Password.
8 Touch [Exit], then double-touch your DVD drive in [Boot Override].
The computer will restart.
9 Touch [Reinstall Windows.] and touch [Next].
10 Touch [YES].
11 At the License Agreement screen, touch [Yes, I agree to the provisions
above and wish to continue!] and touch [Next].

19
Useful Information
12 Touch [Next].
If the option is displayed, select the setting and touch [Next].
●
[Reinstall Windows to the System Disk to factory default.]
Select this option when you want to install Windows to the factory default. After installation,
you can create a new partition. For how to create a new partition, refer to “To change the
partition structure” (è page 8).
●
[Reinstall to the OS related partitions.]
*1
Select this option when the flash memory has already been divided into several partitions.
For how to create a new partition, refer to “To change the partition structure” (è page 8).
You can keep the partition structure.
*1
This does not appear if Windows cannot be installed to the recovery partition and the area usable
by Windows.
13 At the confirmation message, touch [YES].
Installation starts according to the instructions on the screen. (It will take approximately
30 - 45 minutes.)
●
Do not interrupt installation, for example by turning off the computer.
Otherwise installation may become unavailable as Windows may not start up or the data
may be corrupted.
14 When the "Insert No.2 Media into optical drive." message is displayed,
replace with the other disc and then touch [OK].
15 When Ending process screen is displayed, remove the Recovery Disc
and DVD Drive and then touch [OK].
Follow the on-screen instructions.
Some models may take approximately 40 minutes.
16 Perform the “First-time Operation” (è page 6).
NOTE
●
The date and time, and the time zone may not be correct. Be sure to set them correctly.
17 Start the Setup Utility and change the settings as necessary.
18 Perform Windows Update.
19 <Only for model with TPM> Clear TPM (è page 16).
Connect the external keyboard.

20
Troubleshooting
Troubleshooting (Basic)
Follow the instructions below when a problem has occurred. There is also an advanced
troubleshooting guide in the “Reference Manual”. For a software problem, refer to the software’s
instruction manual. If the problem persists, contact Panasonic Technical Support. You can also check
the computer’s status in the PC Information Viewer
(è Reference Manual “Troubleshooting (Advanced)”).
■ Starting Up
Cannot start up.
The power indicator or
battery indicator is not
lit.
●
Connect the AC adaptor.
●
Remove the AC adaptor, and then connect it again.
●
If a device is connected to the USB port, disconnect the device, or set
[USB Port] or [Legacy USB Support] to [Disabled] in the [Advanced]
menu of the Setup Utility.
●
Check the [UEFI Boot] setting of the Setup Utility. [UEFI Boot] should
be set to [Enabled].
You have forgotten the
password.
●
Supervisor Password or User Password: Contact Panasonic Technical
Support.
●
Administrator password:
•
If you have a password reset disk, you can reset the administrator
password. Set the disk and enter any wrong password, then follow
the on-screen instructions and set a new password.
•
If you do not have a password reset disk, reinstall (è page 15) and set
up Windows, and then set a new password.
“Remove disks or other
media. Press any key
to restart” or a similar
message appears.
●
If a device is connected to the USB port, disconnect the device, or set
[USB Port] or [Legacy USB Support] to [Disabled] in the [Advanced]
menu of the Setup Utility.
●
If the problem persists after removing the disk, it may be a flash
memory failure. Contact Panasonic Technical Support.
Windows startup and
operation is slow.
●
Start the Setup Utility (è Reference Manual “Setup Utility”) to
return the Setup Utility settings (excluding the passwords) to the
default values. Start the Setup Utility and make the settings again.
(Note that the processing speed depends on the application software,
so this procedure may not make Windows faster.)
●
If you installed a resident software after purchase, turn off the
residence.
The date and time are
incorrect.
●
Make the correct settings.
Perform either of the following procedures.
●
Long touch at the bottom left corner of the desktop screen.
●
Slide up from the middle of the Start screen with a finger.
Touch [Control Panel].
Touch [Clock, Language, and Region] - [Date and Time].
●
If the problem persists, the internal clock battery may need to be
replaced. Contact Panasonic Technical Support.
●
When the computer is connected to LAN, check the date and time of
the server.
●
The 2100 A.D. or later year will not be correctly recognized on this
computer.
La pagina si sta caricando...
La pagina si sta caricando...
La pagina si sta caricando...
La pagina si sta caricando...
La pagina si sta caricando...
La pagina si sta caricando...
La pagina si sta caricando...
La pagina si sta caricando...
La pagina si sta caricando...
La pagina si sta caricando...
La pagina si sta caricando...
La pagina si sta caricando...
La pagina si sta caricando...
-
 1
1
-
 2
2
-
 3
3
-
 4
4
-
 5
5
-
 6
6
-
 7
7
-
 8
8
-
 9
9
-
 10
10
-
 11
11
-
 12
12
-
 13
13
-
 14
14
-
 15
15
-
 16
16
-
 17
17
-
 18
18
-
 19
19
-
 20
20
-
 21
21
-
 22
22
-
 23
23
-
 24
24
-
 25
25
-
 26
26
-
 27
27
-
 28
28
-
 29
29
-
 30
30
-
 31
31
-
 32
32
-
 33
33


Panasonic UT-MB5 Manuale del proprietario
- Tipo
- Manuale del proprietario
- Questo manuale è adatto anche per
in altre lingue
- English: Panasonic UT-MB5 Owner's manual
Documenti correlati
Altri documenti
-
EUROCOM Scorpius 3D2 Manuale utente
-
Gateway NE572 Manuale utente
-
Packard Bell EN TE69HW Manuale utente
-
-
Samsung NP940X3LI Manuale utente
-
Getac QYLEM7355T Manuale utente
-
-
-
-
HP COMPAQ PRESARIO X1010EA Manuale del proprietario