Getac QYLEM7355T Manuale utente
- Categoria
- I Quaderni
- Tipo
- Manuale utente
Questo manuale è adatto anche per

Rugged Mobile Computing Solutions
T800
USER MANUAL

February 2016
TRADEMARKS
TRADEMARKSTRADEMARKS
TRADEMARKS
All brand and product names are trademarks or registered trademarks of their
respective companies.

NOTE
NOTENOTE
NOTE
The information in this manual is subject to change without notice.
For the latest version of the manual, please visit the Getac website at www.getac.com.

i
Table of Contents
Table of ContentsTable of Contents
Table of Contents
Chapter 1
Chapter 1Chapter 1
Chapter 1 Getting Started
Getting StartedGetting Started
Getting Started
................................
................................................................
..................................................
....................................
..................
1
11
1
Getting the Tablet PC Running .......................................... 2
Unpacking .................................................................. 2
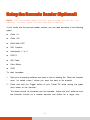
Installing the SIM Card (Optional) ................................. 3
Connecting to AC Power ............................................... 4
Using the Tether ......................................................... 5
Turning On and Off the Tablet PC ................................. 6
Taking a Look at the Tablet PC ........................................ 7
Front Components ........................................................ 7
Rear Components ....................................................... 10
Top Components ......................................................... 11
Bottom Components ..................................................... 12
Right-Side Components ................................................ 12
Chapter 2
Chapter 2Chapter 2
Chapter 2 Operating Your Tablet PC
Operating Your Tablet PCOperating Your Tablet PC
Operating Your Tablet PC
...............................
..............................................................
...............................
14
1414
14
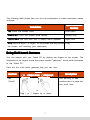
Navigating on the Screen................................................. 15
Using the Touchscreen ................................................. 15
Using the Dual Mode Display (Optional) ........................ 18
Using the Network Features ............................................. 19
Using the LAN (Optional) ........................................... 19
Using the WLAN ........................................................ 19
Using the BT Feature ..................................................... 21
Turning On/Off the BT Radio ....................................... 21
Connecting to another BT Device ................................... 21
Using the WWAN Feature (Optional) ............................... 23
Turning On/Off the WWAN Radio ................................. 23
Setting up a WWAN Connection ................................... 24

ii
Chapter 3
Chapter 3Chapter 3
Chapter 3 Managing Power
Managing PowerManaging Power
Managing Power
................................
................................................................
..............................................
............................
..............
25
2525
25
AC Adapter .................................................................. 26
Battery Pack ................................................................ 28
Charging the Battery Pack ........................................... 28
Initializing the Battery Pack .......................................... 29
Checking the Battery Level .......................................... 29
Battery Low Signals and Actions ................................... 30
Replacing the Battery Pack ........................................... 31
Second Battery Pack (Optional) .................................. 33
Power-Saving Tips ........................................................ 34
Chapter 4
Chapter 4Chapter 4
Chapter 4 Expanding Your Tablet PC
Expanding Your Tablet PCExpanding Your Tablet PC
Expanding Your Tablet PC
..............................
............................................................
..............................
35
3535
35
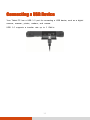
Connecting a USB Device ............................................... 36
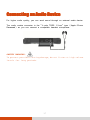
Connecting an Audio Device ............................................ 37
Connecting an HDMI Display Monitor ................................ 38
Connecting a Serial Device (Optional) ............................. 39
Using MicroSD Cards (Optional) ..................................... 40
Chapter 5
Chapter 5Chapter 5
Chapter 5 Using BIOS Setup
Using BIOS SetupUsing BIOS Setup
Using BIOS Setup
................................
................................................................
.............................................
..........................
.............
41
4141
41
When and How to Use .................................................. 42
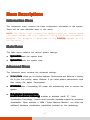
Menu Descriptions ......................................................... 43
Information Menu ....................................................... 43
Main Menu ............................................................... 43
Advanced Menu ......................................................... 43
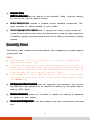
Security Menu ........................................................... 44
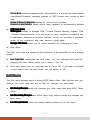
Exit Menu ................................................................ 45
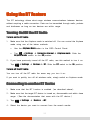
Chapter 6
Chapter 6Chapter 6
Chapter 6 Using Getac Software
Using Getac SoftwareUsing Getac Software
Using Getac Software
................................
................................................................
......................................
............
......
47
4747
47
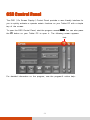
OSD Control Panel ........................................................ 48
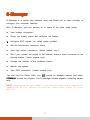
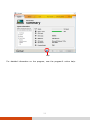
G-Manager .................................................................. 49
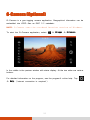
G-Camera (Optional) .................................................... 51
Using the Barcode Reader (Optional) .............................. 53
Chapter 7
Chapter 7Chapter 7
Chapter 7 Care and Maintenance
Care and MaintenanceCare and Maintenance
Care and Maintenance
................................
................................................................
....................................
........
....
55
5555
55
Taking Care of the Tablet PC ......................................... 56
Location Guidelines ..................................................... 56

iii
General Guidelines ..................................................... 57
Cleaning Guidelines .................................................... 57
Battery Pack Guidelines .............................................. 58
Touchscreen Guidelines ............................................... 59
When Traveling .............................................................. 61
Chapter 8
Chapter 8Chapter 8
Chapter 8 Troubleshooting
TroubleshootingTroubleshooting
Troubleshooting
................................
................................................................
..............................................
............................
..............
62
6262
62
Preliminary Checklist ....................................................... 63
Solving Common Problems .............................................. 64
Battery Problems ........................................................ 64
BT Wireless Transmission Problems ............................... 64
Display Problems ....................................................... 65
Hardware Device Problems .......................................... 65
Power Management Problems ....................................... 66
Sensor Problems ........................................................ 67
Software Problems ..................................................... 68
Sound Problems ........................................................ 68
Startup Problems ....................................................... 68
WAN Problems .......................................................... 69
Other Problems ......................................................... 70
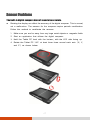
Resetting the Tablet PC .................................................. 71
System Recovery ........................................................... 72
Using the Driver Disc (Optional) ..................................... 73
Appendix A
Appendix AAppendix A
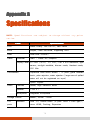
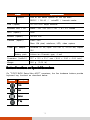
Appendix A ............................................................... Specifications
SpecificationsSpecifications
Specifications
74
7474
74
Appendix B
Appendix BAppendix B
Appendix B ........................................... Regulatory Information
Regulatory InformationRegulatory Information
Regulatory Information
77
7777
77
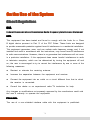
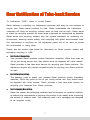
On the Use of the System ............................................. 78
Class B Regulations ................................................... 78
ANSI Warning ........................................................... 79
Safety Notices ........................................................... 80
On the Use of the RF Device ........................................ 83
USA and Canada Safety Requirements and Notices.......... 83
European Union CE Marking and Compliance Notices ....... 85

iv
User Notification of Take-back Service .............................. 87
ENERGY STAR 6.1 ....................................................... 89

1
Chapter 1
Chapter 1Chapter 1
Chapter 1
Getting Started
Getting StartedGetting Started
Getting Started
Congratulations on purchasing this rugged Tablet PC.
This chapter first tells you step by step how to get the Tablet PC up and running.
Then, you will find a section briefly introducing the external components of the Tablet
PC.

2
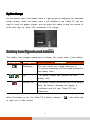
Getting the
Getting the Getting the
Getting the Tablet PC
Tablet PCTablet PC
Tablet PC
Running
RunningRunning
Running
Unpacking
UnpackingUnpacking
Unpacking
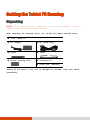
NOTE: This packing list applies to standard models. Select
models may have different items.
After unpacking the shipping carton, you should find these standard items:
T800 Tablet PC
AC adapter
AC power cord
Stylus
Tether
Screen cleaning cloth
Document(s)
Driver disc (optional)
Inspect all the items. If any item is damaged or missing, notify your dealer
immediately.

3
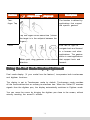
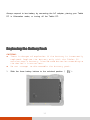
Ins
InsIns
Installing the
talling the talling the
talling the SIM Card (Optional)
SIM Card (Optional)SIM Card (Optional)
SIM Card (Optional)
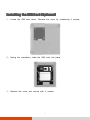
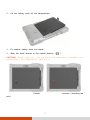
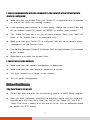
1. Locate the SIM card cover. Remove the cover by unfastening 4 screws.
2. Noting the orientation, slide the SIM card into place.
3. Replace the cover and secure with 4 screws.

4
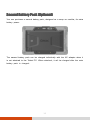
Connecting to AC Power
Connecting to AC PowerConnecting to AC Power
Connecting to AC Power
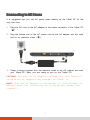
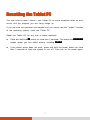
It is suggested that you use AC power when starting up the Tablet PC for the
very first time.
1. Plug the DC cord of the AC adapter to the power connector of the Tablet PC
(
).
2. Plug the female end of the AC power cord to the AC adapter and the male
end to an electrical outlet (
).
3. Power is being supplied from the electrical outlet to the AC adapter and onto
your Tablet PC. Now, you are ready to turn on the Tablet PC.
CAUTION: Use only the AC adapter included with your Tablet PC.
Using other AC adapters may damage the Tablet PC.
NOTE: When the AC adapter is connected, it also charges the
battery pack. For information on using battery power, see
Chapter 3.

5
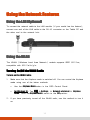
Using the Tether
Using the TetherUsing the Tether
Using the Tether
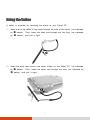
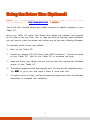
A tether is provided for attaching the stylus to your Tablet PC.
1. Insert one of the tether’s loop ends through the hole of the stylus (as indicated
by
below). Then, insert the other end through the first loop (as indicated
by
below) and pull it tight.
2. Insert the other loop end to the tether holder on the Tablet PC (as indicated
by
below). Then, insert the stylus end through the loop (as indicated by
below) and pull it tight.

6
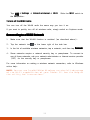
Turning On and Off the
Turning On and Off the Turning On and Off the
Turning On and Off the Tablet PC
Tablet PCTablet PC
Tablet PC
Turning On
Turning OnTurning On
Turning On
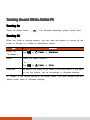
Press the power button (
). The Windows operating system should start.
Turning Off
Turning OffTurning Off
Turning Off
When you finish a working session, you can stop the system by turning off the
power or leaving it in Sleep or Hibernation mode:
To...
To...To...
To...
Do this...
Do this...Do this...
Do this...
Power off
(Shutdown)
Tap Power Shut down.
Sleep Press the power button.*
-or-
Tap Power Sleep.
Hibernate By default, this option is not shown
in the Start menu. If you want
to use the feature, set up accordingly in Windows settings.
* “Sleep” is the default setting of the power button. You may change what the
power button does in Windows settings.

7
Taking a Look at the
Taking a Look at the Taking a Look at the
Taking a Look at the Tablet PC
Tablet PCTablet PC
Tablet PC
NOTE: Depending on the model you purchased, the appearance of
your Tablet PC may not be exactly the same as those shown in
this manual.
CAUTION: You need to open the protective covers to access the
connectors or devices inside. When not accessing a connector
or device, make sure to close the cover completely for water-,
dust-, and fire-proof integrity of your Tablet PC. (Engage the
locking mechanism if existing.)
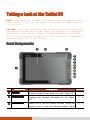
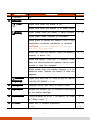
Front Components
Front ComponentsFront Components
Front Components
Ref
RefRef
Ref
Component
ComponentComponent
Component
Description
DescriptionDescription
Description
See Also
See AlsoSee Also
See Also
Speaker
SpeakerSpeaker
Speaker
Sends out sound and voice from your Tablet PC.
Touchscreen
TouchscreenTouchscreen
Touchscreen
Displays and receives information for the
Tablet
PC.
P. 15
Camera Lens
Camera Lens Camera Lens
Camera Lens
Allows you to use the camera function. When the
camera lens is in use, the indicator
beside it lights
P. 51

8
Ref
RefRef
Ref
Component
ComponentComponent
Component
Description
DescriptionDescription
Description
See Also
See AlsoSee Also
See Also
(optional)
up.
Indicators
IndicatorsIndicators
Indicators
Power
Lights blue when the power is on.
Blinks blue when the system is in Sleep mode.
Battery
BatteryBattery
Battery
Lights amber when the battery is being charged.
P. 28
Lights green when charging is completed.
Blinks green to indicate the battery’s built-
in high
temperature protection mechanism is activated.
CAUTION: Do not remove the battery
during this period.
Blinks red (once per second) when the battery’
s
capacity is below 10%.
P. 30
Blinks red rapidly (once per 0.5 second) when
there is a thermal protection problem.
Ask for repair
service in case this happens.
Blinks amber when the battery charging is in an
abnormal state. Replace the battery in case this
happens.
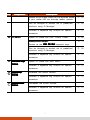
RF (Radio
RF (Radio RF (Radio
RF (Radio
Frequency)
Frequency)Frequency)
Frequency)
Lights blue when the RF radio of any RF feature
(WLAN/BT/WWAN) is on.
Microphone
MicrophoneMicrophone
Microphone
Receives sound and voice to record voice.
Light Sensor
Light SensorLight Sensor
Light Sensor
Senses the ambient light
for automatic adjustments
of the display backlight.
Power Button
Power ButtonPower Button
Power Button
Turns the power on or off. (The default “off”
state
is “Sleep mode.”)
P. 6
P1 Button
Starts the G-Camera application.
– or –
P. 51
– or –

9
Ref
RefRef
Ref
Component
ComponentComponent
Component
Description
DescriptionDescription
Description
See Also
See AlsoSee Also
See Also
Serves as the trigger button for the barcode reader
if your model has the barcode reader module.
P. 53
Can be changed to another set of predefined
functions using G-Manager.
P. 49
Provides a keyboard key function for specific
occasions.
P. 75
P2 Button
Opens or closes the OSD Control Panel. P. 48
When pressed longer:
Serves as the Ctrl
CtrlCtrl
Ctrl+Alt
AltAlt
Alt+Del
DelDel
Del keyboard keys.
P. 71
Can be changed to another set of predefined
functions using G-Manager.
P. 49
Provides a keyboard key function for specific
occasions.
P. 75
Windows Logo
Windows Logo Windows Logo
Windows Logo
Button
ButtonButton
Button
Opens or closes the Start menu.
Provides a keyboard key function for specific
occasions.
P. 75
Volume Up
Volume Up Volume Up
Volume Up
Button
ButtonButton
Button
Increases the sound volume.
Provides a keyboard key function for specific
occasions.
P. 75
Volume Down
Volume Down Volume Down
Volume Down
Button
ButtonButton
Button
Decreases the sound volume.
Provides a keyboard key function for specific
occasions.
P. 75

10
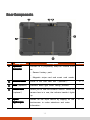
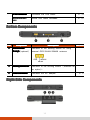
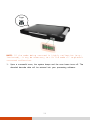
Rear Components
Rear ComponentsRear Components
Rear Components
Ref
RefRef
Ref
Component
ComponentComponent
Component
Description
DescriptionDescription
Description
See Also
See AlsoSee Also
See Also
Ex
ExEx
Expansion
pansion pansion
pansion
Connector
ConnectorConnector
Connector
Connect to a proprietary snap-
on module such
as:
- Second battery pack
-
- Magnetic stripe card and smart card reader
SIM Card Cover
SIM Card CoverSIM Card Cover
SIM Card Cover
Inside is the SIM card slot (optional). P. 3
Flash
Flash Flash
Flash (optional)
Provides extra light when taking pictures.
Camera Lens
Camera LensCamera Lens
Camera Lens
(optional)
Allows you to use the camera function. When the
camera lens is in use, the indicator beside it lights
up.
P. 51
Stylus/
Stylus/Stylus/
Stylus/
Digitizer pen
Digitizer penDigitizer pen
Digitizer pen
Serves as the input device by tapping
on the
touchscreen to make selections and enter
information.
P. 15

11
Battery Pack
Battery PackBattery Pack
Battery Pack
Supplies power to your Tablet PC
when external
power is not connected.
P. 28
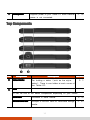
Top
TopTop
Top
Components
ComponentsComponents
Components
Ref
RefRef
Ref
Component
ComponentComponent
Component
Description
DescriptionDescription
Description
See Also
See AlsoSee Also
See Also
Tether Holder
Tether HolderTether Holder
Tether Holder
For holding a tether (such as the stylus
tether). There is one holder at each corner of
the Tablet PC.
P. 5
None
NoneNone
None
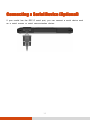
Or can be one of the below components depending on your model:
Serial Port
Serial PortSerial Port
Serial Port
Connects a serial device. P. 39
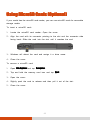
MicroSD Card Slot
MicroSD Card SlotMicroSD Card Slot
MicroSD Card Slot
Accepts a microSD
card for removable storage
media.
P. 40

12
RJ
RJRJ
RJ-
--
-45
4545
45
Connector
ConnectorConnector
Connector
Connects the LAN cable. P. 19
Barcode Reader
Lens
Scans and reads barcodes. P. 53
Bottom
BottomBottom
Bottom
Components
ComponentsComponents
Components
Ref
RefRef
Ref
Component
ComponentComponent
Component
Description
DescriptionDescription
Description
See Also
See AlsoSee Also
See Also
Antenna
AntennaAntenna
Antenna
P
PP
Pass
assass
ass-
--
-
through
throughthrough
through
(optional)
Connects to the docking station for using
external GPS/WLAN/WWAN antenna.
Docking Connector
Docking ConnectorDocking Connector
Docking Connector
Connects to the docking s
tation (available as
an option).
Power Connector
Power ConnectorPower Connector
Power Connector
Connects the AC adapter. P. 4
Righ
RighRigh
Right
tt
t-
--
-Side Components
Side ComponentsSide Components
Side Components
WWAN
WLAN
GPS

13
Ref
RefRef
Ref
Component
ComponentComponent
Component
Description
DescriptionDescription
Description
See Also
See AlsoSee Also
See Also
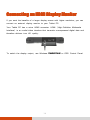
Micro HDMI
Micro HDMI Micro HDMI
Micro HDMI
Connector
ConnectorConnector
Connector
Connects a HDMI monitor or TV set. P. 38
USB
USB USB
USB 3.0
3.0 3.0
3.0 Port
PortPort
Port
Connects a USB device. P. 36
Combo Audio
Combo AudioCombo Audio
Combo Audio
Connector
ConnectorConnector
Connector
Connects a set of headphones or external speakers
with amplifier.
P. 37
Supports a headset microphone with 4-
pole TRRS
3.5mm jack.
La pagina si sta caricando...
La pagina si sta caricando...
La pagina si sta caricando...
La pagina si sta caricando...
La pagina si sta caricando...
La pagina si sta caricando...
La pagina si sta caricando...
La pagina si sta caricando...
La pagina si sta caricando...
La pagina si sta caricando...
La pagina si sta caricando...
La pagina si sta caricando...
La pagina si sta caricando...
La pagina si sta caricando...
La pagina si sta caricando...
La pagina si sta caricando...
La pagina si sta caricando...
La pagina si sta caricando...
La pagina si sta caricando...
La pagina si sta caricando...
La pagina si sta caricando...
La pagina si sta caricando...
La pagina si sta caricando...
La pagina si sta caricando...
La pagina si sta caricando...
La pagina si sta caricando...
La pagina si sta caricando...
La pagina si sta caricando...
La pagina si sta caricando...
La pagina si sta caricando...
La pagina si sta caricando...
La pagina si sta caricando...
La pagina si sta caricando...
La pagina si sta caricando...
La pagina si sta caricando...
La pagina si sta caricando...
La pagina si sta caricando...
La pagina si sta caricando...
La pagina si sta caricando...
La pagina si sta caricando...
La pagina si sta caricando...
La pagina si sta caricando...
La pagina si sta caricando...
La pagina si sta caricando...
La pagina si sta caricando...
La pagina si sta caricando...
La pagina si sta caricando...
La pagina si sta caricando...
La pagina si sta caricando...
La pagina si sta caricando...
La pagina si sta caricando...
La pagina si sta caricando...
La pagina si sta caricando...
La pagina si sta caricando...
La pagina si sta caricando...
La pagina si sta caricando...
La pagina si sta caricando...
La pagina si sta caricando...
La pagina si sta caricando...
La pagina si sta caricando...
La pagina si sta caricando...
La pagina si sta caricando...
La pagina si sta caricando...
La pagina si sta caricando...
La pagina si sta caricando...
La pagina si sta caricando...
La pagina si sta caricando...
La pagina si sta caricando...
La pagina si sta caricando...
La pagina si sta caricando...
La pagina si sta caricando...
La pagina si sta caricando...
La pagina si sta caricando...
La pagina si sta caricando...
La pagina si sta caricando...
La pagina si sta caricando...
La pagina si sta caricando...
-
 1
1
-
 2
2
-
 3
3
-
 4
4
-
 5
5
-
 6
6
-
 7
7
-
 8
8
-
 9
9
-
 10
10
-
 11
11
-
 12
12
-
 13
13
-
 14
14
-
 15
15
-
 16
16
-
 17
17
-
 18
18
-
 19
19
-
 20
20
-
 21
21
-
 22
22
-
 23
23
-
 24
24
-
 25
25
-
 26
26
-
 27
27
-
 28
28
-
 29
29
-
 30
30
-
 31
31
-
 32
32
-
 33
33
-
 34
34
-
 35
35
-
 36
36
-
 37
37
-
 38
38
-
 39
39
-
 40
40
-
 41
41
-
 42
42
-
 43
43
-
 44
44
-
 45
45
-
 46
46
-
 47
47
-
 48
48
-
 49
49
-
 50
50
-
 51
51
-
 52
52
-
 53
53
-
 54
54
-
 55
55
-
 56
56
-
 57
57
-
 58
58
-
 59
59
-
 60
60
-
 61
61
-
 62
62
-
 63
63
-
 64
64
-
 65
65
-
 66
66
-
 67
67
-
 68
68
-
 69
69
-
 70
70
-
 71
71
-
 72
72
-
 73
73
-
 74
74
-
 75
75
-
 76
76
-
 77
77
-
 78
78
-
 79
79
-
 80
80
-
 81
81
-
 82
82
-
 83
83
-
 84
84
-
 85
85
-
 86
86
-
 87
87
-
 88
88
-
 89
89
-
 90
90
-
 91
91
-
 92
92
-
 93
93
-
 94
94
-
 95
95
-
 96
96
-
 97
97


Getac QYLEM7355T Manuale utente
- Categoria
- I Quaderni
- Tipo
- Manuale utente
- Questo manuale è adatto anche per
in altre lingue
- English: Getac QYLEM7355T User manual
Documenti correlati
-
Getac T800 Android(52621222XXXX) Manuale utente
-
-
-
-
-
-
-
-
-
Altri documenti
-
Acer W700P Manuale utente
-
Panasonic FZ-G1 Windows 7 Istruzioni per l'uso
-
Panasonic FZ-B2 Manuale del proprietario
-
Panasonic UT-MB5 Manuale del proprietario
-
Datalogic Memor 10 Manuale utente
-
Gigabyte TouchNote T1028 Manuale utente
-
Hamlet ZELIG PAD 412W Restore Procedure
-
LG LMQ710EM Manuale utente
-
-
Philips SBCRU980/00 Manuale utente