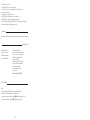
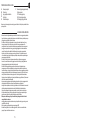
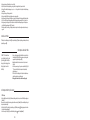
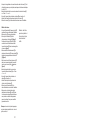
Tefal BL1111AD Manuale utente
- Categoria
- Frullatori
- Tipo
- Manuale utente
Questo manuale è adatto anche per

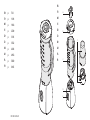
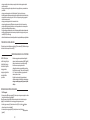
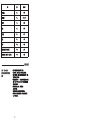
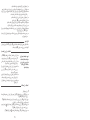
A
F3
F
F2
B
C
D
E
F1
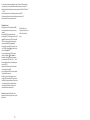
Réf. NC00022804-03
EN
TH
MS
VI
ZH
ID
KO
AR
FA
FR
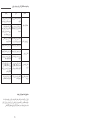
p. 7-12
p. 13-18
p. 19-24
p. 25-30
p. 31-36
p. 37-42
p. 43-48
p. 49-54
p. 55-60
p. 61-66
EN
TH
MS
VI
ZH
ID
KO
AR
FA
FR

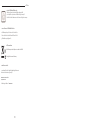
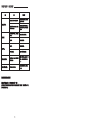
2
1
1
2
4
3
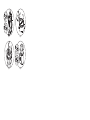
fig.1
fig.2
fig.3 fig.4
1
2
1
2
2
1

7
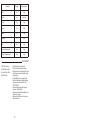
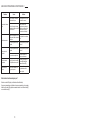
A
B
C
D
E
Measuring cup
Lid
Graduated mixer jug
Motor unit
Speed selector
F
Accessory (depending on model)
:
Universal mill
- f1 Sealing gasket
- f2 Mill blade unit
- f3 Universal mill bowl
DESCRIPTION OF THE APPLIANCE
The accessories contained in the model you have bought are represented on the label on the
top of the packaging.
SAFETY INSTRUCTIONS
•
Read the instructions for use carefully before using your appliance for the first time: the
manufacturer shall accept no liability in the event of any use that does not comply with the
instructions.
•
This appliance is not designed to be used by persons (including children) with reduced
physical, sensory or mental capacities, or lack of experience and knowledge, unless they have
been given supervision or instructions concerning use of the appliance by a person
responsible for their safety. Children should not be allowed to play with the appliance.
•
It is designed to work with alternating current only. Please check that the supply voltage
indicated on the name plate of the appliance corresponds to your electrical installation.
•
This product has been designed for domestic use only. Any commercial use, inappropriate
use or failure to comply with the instructions, the manufacturer accepts no responsibility and
the guarantee will not apply.
•
Be sure to unplug the appliance if you must leave it unattended, before inserting or
removing accessories or before cleaning it. Never pull on the power cord to unplug the
appliance.
•
Do not use your appliance if it does not operate correctly, if it has been damaged or if the
power cord or plug is damaged. To maintain safety, these parts must be replaced by an
approved service centre (see list in the service booklet).
•
Any maintenance other than routine cleaning and upkeep by customers must be carried out
by an approved service centre.
•
Do not immerse the appliance, cord or plug in liquid. The power cord must be kept out of the
reach of children and must not be placed near or come into contact with the hot parts of the
appliance, sources of heat or sharp corners.
•
For your safety, only use accessories and spare parts that correspond to your appliance, sold
by an approved service centre.
•
The blades are very sharp: handle them with caution to avoid injury.
•
Never use the blender or its accessories without ingredients and never pour boiling liquids
into the jug.
•
Always use the blender jug with its lid (B).
•
Always pour the liquid ingredients into the jug first, before adding the solid ingredients,
without exceeding the maximum level.
•
Never place your fingers or any other object in the blender when the appliance is running.
•
Do not use the bowls as containers for freezing, cooking or sterilisation.
EN

8
•
Do not use the blender for more than 3 minutes continuously.
•
Place the blender on a flat, stable, heat-resistant, clean and dry worktop.
•
Do not let long hair, scarves, ties, etc. hang over the blender jug or accessories when in
operation.
•
Do not use the blender outside in the open air.
•
Do not remove the lid (B) before the blades have stopped completely.
•
Never use this appliance for blending or mixing items other than food ingredients.
•
Wait for the appliance to cool down to room temperature after each batch you process.
•
Never use the blender or its accessories without ingredients and never pour boiling liquids
(80C) into the jug.
•
If the supply cord is damaged, it must be replaced by an approved service centre.
SAFETY LOCKING
USING FOR THE FIRST TIME
USING YOUR APPLIANCE
The appliance can run only when the jug (C) or accessory (F) are correctly positioned and
locked on the motor unit (D).
• Before using your appliance for the first time, clean
all the accessories (A, B, C and F) in warm soapy
water, except for the motor unit (D).
• Make sure all the packaging has been removed before
operating the appliance.
• Important note: Turn the speed selector (E) to “0”
before placing the blender jug or accessories on the
motor unit.
• The appliance starts only if the jug or accessory is
correctly positioned and locked on its body.
• Do not operate the blender if the lid is not in place.
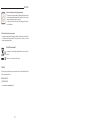
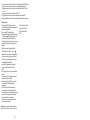
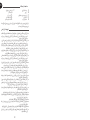
1. Mixer JUG:
• Fit the lid (B) to the mixer jug (C) and lock it by positioning it on the holes opposite the spout
(figure 1).
Introduce the measuring cup (A) into the lid and press into place (figure 1). You are advised to
hold the lid during operation.
• Place the mixer jug (C) on the body of the motor unit (D). The lock (open) is aligned in the
slot on the motor unit (figure 1).
• Then rotate the mixer jug (C) through a turn the lock (closed) appears (figure 1).
CAUTION: The blades are
extremely sharp; handle
them with caution when
using, emptying or
cleaning the appliance.

9
• Dice all the ingredients before putting them into the mixer jug (C). It is best to start with
liquids, without going over the maximum level shown on the jug (1.5L).
• Connect the appliance and start up by turning speed selector (E) to "Pulse," "1," or "2".
• To stop the appliance, bring the speed selector (E) to "0".
• Wait for the appliance back to a complete stop before removing the mixer jug (C).
• Remove the mixer jug (C) by unlocking it in opposite direction to installation.
2. Universal Mill:
• This universal mill (F) is equipped with a bowl (f3) that
prevents access to the blades during use.
• Rotate the bowl (F) and pour the ingredients.
• Position the sealing gasket (f1) in its recess on the mill
blade unit (f2) (figure 2). Position the mill blade unit
(f2) on the bowl (f3), and lock the universal mill by
rotating the blade unit (f2) through a turn in the
clockwise direction (figure 3).
• Rotate the assembled universal mill (F) and position it
on the motor unit (D). The lock (open) is aligned
in the slot on the motor unit (D) (figure 4).
• Rotate the assembled universal mill (F) though a turn
anticlockwise until the lock (closed) appears (figure 4).
• Connect the appliance and start up by turning speed
selector (E) to "Pulse," "1," or "2".
• To stop the appliance, bring the speed selector (E) to "0".
• Wait for the appliance back to a complete stop before
removing the universal mill (C).
• Remove the universal mill (F) by unlocking it in opposite
direction to installation.
• Turn it over on the worktop before unlocking the mill
blade unit (f2) from the bowl (f3) in the reverse order
of the assembly. The blades are very sharp: handle
them with caution to avoid injury. You can then collect
the preparation in the bowl.
Remark: The colour of the bowl may change after
blending certain very hard ingredients: cloves, cinnamon,
etc…
Caution: leaks can occur
if the accessory is not
locked correctly.

10
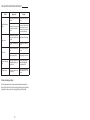
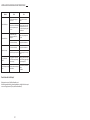
Ingredients Quantities Operating time
Dried red chilli 30g 33s
Black pepper 30g 1min30s
Dried shrimp 25g 30s
Roasted rice 40g 16s
Black sesame 30g 21s
Peanuts 50g 4s
Onions 100g 13s
Pork (cut into a small pieces) 140g 20s
Pormesan cheese (cut into a small pieces) 100g 13s
CLEANING YOUR APPLIANCE
• Unplug the appliance and remove the accessories
• Remove the jug and rinse it and its lid under running
water.
• For easy cleaning, be sure to wash the removable parts
in water and a little washing-up liquid immediately
after use.
• The mixer jug
(A, B, C)
and universal mill
(F)
can be
cleaned in the dishwasher in the top basket with the
“ECO” or “LIGHTLY SOILED” programme.
• To clean the motor unit
(D)
, use a moist cloth. Dry it
carefully.
• Never put the motor unit
(D)
under water or under
running water.
• Empty the mixer jug
(C)
or universal mill bowl
(f3)
before clean.
CAUTION: Handle them
with caution: the blades
of the blender jug and
accessories are sharp.

11
Problems Causes Solutions
Product does not work.
The plug is not fitted correctly into
the socket .
Plug the appliance into a socket and
switch on.
The jug or accessory is not correctly
positioned or locked on the motor
unit.
Check that the jug or accessories are
correctly positioned and locked onto
the motor unit as shown in the
figure in the manual.
Excessive vibrations.
The product is not placed on a flat,
stable, heat-resistant surface.
Place the product on a flat surface.
Volume of ingredients is too high.
Reduce the quantity of ingredients
processed.
Leak from the lid.
Volume of ingredients is too high.
Reduce the quantity of ingredients
processed.
The lid is not correctly positioned.
Lock the lid correctly on the blender
jug.
Leak from the base of the
accessories.
The gasket on the blade unit (f1) or
(f2) is not positioned correctly or is
missing.
Reposition the gasket on the blade
unit (f1) or (f2) and lock it correctly
onto the bowl (F3).
The blade does not turn
easily.
Pieces of food too large or too hard.
Reduce the size or quantity of
ingredients processed.
Add liquid
WHAT TO DO IF YOUR APPLIANCE DOES NOT WORK ?
Contact an approved service centre (see list in service booklet).
You can customise your blender and obtain the following accessories from your usual dealer
or from an approved service centre: Universal mill (F), or an additional blender jug (C).
Your blender still does not work?

12
RECYCLING
• Disposal of the appliance and its packaging materials.
The packaging is comprised exclusively of materials that present no danger
for the environment and which may therefore be disposed of in accordance
with the recycling measures in force in your area.
For disposing of the device itself, please contact the appropriate service of
your local authority.
• End of life electrical and electronic products:
Your appliance is expected to last for many years. However, when the time comes to replace it,
do not throw it into the bin, but take it to the recycling centre in your town (or to a waste
reception centre where applicable).
Think of the environment!
Your appliance contains valuable materials which can be recovered or
recycled.
Leave it at a local civic waste collection point.
HELPLINE:
If you have any product problems or queries, please contact our Customer Relations Team
first for expert help and advice:
0845 602 1454 – UK
(01) 677 4003 – ROI
or consult our website – www.tefal.co.uk

13
A
B
C
D
E
ฝาตวงส่วนผสม
ฝาปิด
โถปั่นแบบมีขีดบอกระดับ
ชุดมอเตอร์
ปุ่มปรับระดับความเร็ว
F
อุปกรณ์เสริม (จะแตกต่างกันไปในแต่ละรุ่น) :
เครื่องบดเอนกประสงค์
-f1 ซีลยางกันรั่วซึม
-f2 ชุดใบมีดบดสับ
-f3 โถบดเอนกประสงค์
รายละเอียดของเครื่องใช้ไฟฟ้า
รายการอุปกรณ์เสริมต่าง ๆ ที่มีอยู่ในแต่ละรุ่นที่คุณซื้อจะแสดงอยู่บนป้ายที่ติดอยู่ตรงด้านบนของบรรจุภัณฑ์
คู่มือการใช้งานเพื่อความปลอดภัย
• อ่านคู่มือการใช้งานอย่างละเอียดก่อนที่จะใช้งานเครื่องใช้ไฟฟ้าของคุณในครั้งแรก: ผู้ผลิตจะไม่ รับผิดชอบต่อเหตุการณ์ใด ๆ
ก็ตามที่เกิดจากการใช้งานที่ไม่ได้ปฏิบัติตามคู่มือการใช้งานฉบับนี้
• เครื่องใช้ไฟฟ้านี้ไม่ได้ออกแบบมาสำหรับการใช้งานโดยบุคคล (รวมถึงเด็ก) ที่มีความบกพร่อง ทางร่างกาย
ด้อยประสิทธิภาพด้านการรับรู้หรือด้านจิตใจ หรือโดยบุคคลที่ขาดประสบการณ์และความรู้เกี่ยวกับเครื่องใช้ไฟฟ้าดังกล่าว
เว้นแต่พวกเขาจะอยู่ใน การควบคุมดูแลหรือได้รับคำแนะนำในการใช้งานโดยผู้ใหญ่ที่รับผิดชอบในด้านความปลอดภัยของพวกเขา
ไม่ควรอนุญาตให้เด็กเล่นเครื่องใช้ไฟฟ้านี้
• เครื่องปั่นนี้ได้รับการออกแบบมาให้ทำงานด้วยไฟฟ้ากระแสสลับเท่านั้น โปรดตรวจสอบว่า
แรงดันไฟฟ้าขาเข้าที่ระบุอยู่บนแผ่นป้ายชื่อของเครื่องใช้ไฟฟ้าตรงกับแรงดันไฟฟ้าที่คุณติดตั้งใช้งาน
• ผลิตภัณฑ์นี้ได้รับการออกแบบมาสำหรับการใช้งานภายในครัวเรือนเท่านั้น ผู้ผลิตไม่รับผิดชอบใด ๆ ทั้งสิ้น และการรับประกันจะเป็นโมฆะ
หากมีการใช้งานเพื่อการค้า การใช้งานที่ไม่เหมาะสม หรือไม่ปฏิบัติตาม คู่มือการใช้งาน
• ตรวจสอบให้แน่ใจว่าคุณได้ถอดปลั๊กเครื่องใช้ไฟฟ้าแล้ว เมื่อไม่ได้ใช้งาน และก่อนที่จะใส่หรือถอด อุปกรณ์เสริมออก
หรือก่อนที่จะทำความสะอาด ห้ามดึงบริเวณสายไฟเพื่อถอดปลั๊กเครื่องใช้ไฟฟ้านี้
• ห้ามใช้เครื่องใช้ไฟฟ้าของคุณ หากเครื่องทำงานผิดปรกติ หรือหากตัวเครื่อง ปลั๊กไฟ หรือสายไฟ ชำรุดเสียหาย
เพื่อความปลอดภัยของผู้ใช้งาน การเปลี่ยนแทนชิ้นส่วนดังกล่าวนี้ต้องดำเนินการโดยศูนย์บริการที่ได้รับอนุญาตเท่านั้น
(โปรดดูรายชื่อศูนย์บริการได้จากคู่มือการบริการ)
• การบำรุงรักษาอื่นใดนอกเหนือจากการทำความสะอาดและการดูแลรักษาตามปกติ ต้องดำเนินการโดย ศูนย์บริการที่ได้รับอนุญาตเท่านั้น
• ห้ามจุ่มเครื่องใช้ไฟฟ้า สายไฟ หรือปลั๊กลงในของเหลว เก็บสายไฟให้พ้นมือเด็ก และต้องไม่วางสายไฟ
ไว้ใกล้หรือสัมผัสโดนชิ้นส่วนที่ร้อนของเครื่องใช้ไฟฟ้า แหล่งความร้อน หรือมุมที่แหลมคม
• เพื่อความปลอดภัยของตัวคุณเอง ให้ใช้อุปกรณ์เสริมและอะไหล่ที่ตรงกับเครื่องใช้ไฟฟ้าของคุณ
ซึ่งจัดจำหน่ายโดยศูนย์บริการที่ได้รับอนุญาตเท่านั้น
• ใบมีดของเครื่องปั่นมีความคมมาก:ให้ใช้งานด้วยความระมัดระวังเพื่อหลีกเลี่ยงการบาดเจ็บ
• ห้ามใช้งานเครื่องปั่นหรืออุปกรณ์เสริมของเครื่องปั่นโดยไม่ได้ใส่ส่วนผสม และไม่เทน้ำที่กำลังเดือด ลงในโถปั่นเด็ดขาด
• ใช้โถปั่นพร้อมฝาปิด (B) ทุกครั้ง
• เทส่วนผสมชนิดน้ำลงในโถปั่นก่อนที่จะเติมส่วนผสมแบบแข็งอื่น ๆ ทุกครั้ง และต้องไม่ใส่ในปริมาณเกินระดับสูงสุดที่กำหนด
• ห้ามยื่นนิ้วของคุณหรือวัตถุใด ๆ เข้าไปในเครื่องปั่นขณะที่เครื่องกำลังทำงานอยู่
• ห้ามใช้โถเป็นภาชนะสำหรับการแช่แข็ง การทำอาหาร หรือการฆ่าเชื้อโรค
TH

14
• ห้ามใช้เครื่องปั่นต่อเนื่องกันนานเกิน 3 นาที
• วางเครื่องปั่นไว้บนพื้นผิวเรียบที่มั่นคง ทนความร้อนสะอาด และแห้งสะอาด
• ห้ามปล่อยให้ผมยาว ผ้าพันคอ เน็คไท ฯลฯ ห้อยอยู่เหนือโถปั่นหรืออุปกรณ์เสริม ขณะที่เครื่อง กำลังทำงานอยู่
• ห้ามใช้งานเครื่องปั่นนอกบ้านในที่เปิดโล่ง
• ห้ามถอดฝาปิด (B) ออกจนกว่าใบมีดหยุดหมุนจนนิ่งสนิทแล้ว
• ห้ามใช้เครื่องใช้ไฟฟ้านี้สำหรับการปั่นหรือผสมสิ่งอื่น ๆ นอกเหนือจากส่วนผสมจำพวกอาหาร
• รอให้เครื่องใช้ไฟฟ้าเย็นลงเท่ากับอุณหภูมิห้อง หลังจากที่ปั่นหรือบดสับส่วนผสมแต่ละชุดแล้ว
• ห้ามใช้งานเครื่องปั่นหรืออุปกรณ์เสริมของเครื่องปั่นโดยไม่ได้ใส่ส่วนผสม และห้ามเทน้ำที่กำลังเดือด (80C) ลงในโถปั่นอย่างเด็ดขาด
• หากสายไฟชำรุด โปรดติดต่อให้ศูนย์บริการที่ได้รับอนุญาตเปลี่ยนแทนสายไฟให้
ระบบล็อคนิรภัย
ก่อนการใช้งานครั้งแรก
การใช้งานเครื่องปั่น
เครื่องปั่นจะสามารถทำงานได้เมื่อประกอบและล็อคโถปั่น (C) หรืออุปกรณ์เสริม (F) เข้าที่อย่างถูกต้องและล็อคบนชุดมอเตอร์ (D) แล้วเท่านั้น
• ก่อนที่จะใช้งานเครื่องใช้ไฟฟ้าเป็นครั้งแรก
คุณควรทำความสะอาดอุปกรณ์เสริมทุกชิ้น (A,B,CและF)
ด้วยน้ำยาล้างจานในน้ำอุ่น ยกเว้นสำหรับชุดมอเตอร์ (D)
• ตรวจดูให้แน่ใจว่าได้แกะบรรจุภัณฑ์ทุกชิ้นออกแล้ว
ก่อนที่จะเปิดทำงานเครื่องใช้ไฟฟ้า
• สิ่งสำคัญที่ต้องจำ: หมุนปุ่มปรับระดับความเร็ว (E) ไปที่ “0”
ก่อนที่จะประกอบโถปั่นหรืออุปกรณ์เสริมบนชุดมอเตอร์
• เครื่องใช้ไฟฟ้าจะเริ่มทำงานก็ต่อเมื่อคุณ
ประกอบและล็อคโถปั่นหรืออุปกรณ์เสริมเข้าที่
อย่างถูกต้องแล้วเท่านั้น
• ห้ามเปิดทำงานเครื่องปั่นหากยังปิดฝาไม่เข้าที่
1.โถปั่น:
•
ปิดฝาปิด (B) บนโถปั่น (C) แล้วล็อคให้เข้าที่โดยหมุนให้ช่องอยู่ในทิศตรงข้ามกับพวยสําหรับริน (รูปที่1)
ใส่จุกปิด (A) ลงบนฝาปิดแล้วกดให้เข้าที่ (รูปที่1) คุณควรเอามือกดฝาปิดไว้ขณะที่เครื่องทำงาน
•
วางชุดประกอบโถปั่น (C) บนฐานชุดมอเตอร์ (D) ตัวล็อค (รูปกุญแจเปิด) จะอยู่ตรงกันกับขีดที่อยู่บนชุดมอเตอร์ (รูปที่ 1)
•
จากนั้น ให้หมุนโถปั่น (C) จนกระทั่งตัวล็อค (รูปกุญแจปิด) อยู่ตรงกันกับขีดที่อยู่บน ชุดมอเตอร์ (รูปที่1)
คำเตือน:ใบมีดมีความคมมาก
ให้ใช้งานด้วยความระมัดระวัง
เมื่อใช้งานเทส่วนผสมออกหรือ
ทำความสะอาดเเครื่องใช้ไฟฟ้า

15
•
หั่นส่วนผสมทั้งหมดเป็นชิ้นเล็ก ๆ ก่อนที่จะใส่ในโถปั่น (C) วิธีที่ดีที่สุดคือให้เทส่วนผสมชนิดน้ำ ลงในโถปั่นก่อน
และต้องไม่ใส่ในปริมาณเกินขีดระดับสูงสุดที่แสดงอยู่บนโถปั่น (1.5 ล.)
•
เสียบปลั๊กไฟของเครื่องใช้ไฟฟ้าแล้วเปิดเครื่องโดยหมุนปุ่มปรับระดับความเร็ว (E) ไปที่ "Pulse" หรือ "1" หรือ "2"
•
หากต้องการหยุดเครื่องใช้ไฟฟ้า ให้หมุนปุ่มปรับระดับความเร็ว (E) กลับมาที่ "0"
•
รอจนกระทั่งเครื่องหยุดหมุนจนนิ่งสนิทดีแล้ว ก่อนที่จะถอดโถปั่น (C) ออก
•
ถอดโถปั่น (C) โดยหมุนเพื่อปลดล็อคในทิศทางตรงกันข้ามกับตอนประกอบ
2.เครื่องบดเอนกประสงค์:
• ชุดเครื่องบดเอนกประสงค์ (F) นี้ประกอบด้วยโถบด (f3)
ซึ่งทำหน้าที่เป็นฝาครอบที่ช่วยป้องกันไม่ให้ใบมีดบาดผู้ใช้ในระหว่างการใช้งาน
• หมุนโถบด (F) ออกแล้วเทส่วนผสมลงไป
• ใส่ซีลยางกันรั่วซึม (f1) ให้เข้าที่กับขอบของชุดใบมีดบดสับ (f2)(รูปที่2)
ประกอบชุดใบมีดบดสับ (f2) เข้ากับโถบด (f3) แล้วล็อคเครื่องบดเอนกประสงค์
โดยหมุนชุดใบมีดบดสับ (f2) ไปในทิศทางตามเข็มนาฬิกา (รูปที่3)
• หมุนเครื่องบดเอนกประสงค์ (F) ที่ประกอบแล้วให้เข้าที่บนชุดมอเตอร์ (D) ตัวล็อค
(รูปกุญแจเปิด) จะอยู่ตรงกันกับขีดที่อยู่บนชุดมอเตอร์ (D)(รูปที่4)
• หมุนเครื่องบดเอนกประสงค์ (F) ที่ประกอบแล้วไปในทิศทางทวนเข็มนาฬิกา
จนกระทั่งตัวล็อค (รูปกุญแจปิด) อยู่ตรงกันกับขีดที่อยู่บนชุดมอเตอร์ (รูปที่4)
• เสียบปลั๊กไฟของเครื่องใช้ไฟฟ้าแล้วเปิดเครื่องโดยหมุนปุ่มปรับระดับความเร็ว (E)
ไปที่ "Pulse" หรือ "1" หรือ "2"
• หากต้องการหยุดเครื่องใช้ไฟฟ้า ให้หมุนปุ่มปรับระดับความเร็ว (E) กลับมาที่ "0"
• รอจนกระทั่งเครื่องหยุดหมุนจนนิ่งสนิทดีแล้ว ก่อนที่จะถอดเครื่องบดเอนกประสงค์ (F)
ออก
• ถอดเครื่องบดเอนกประสงค์ (F) ออก
โดยหมุนในทิศทางตรงกันข้ามกับตอนประกอบเพื่อปลดล็อค
• วางชุดเครื่องบดเอนกประสงค์หงายขึ้นบนพื้นเรียบก่อนที่จะปลดล็อคชุดใบมีดบดสับ
(f2) ออกจากโถบด (f3) โดยหมุนไปในทิศทางตรงกันข้ามกับตอนประกอบ
ใบมีดของเครื่องมีความคมมาก:
ให้ใช้งานด้วยความระมัดระวังเพื่อหลีกเลี่ยงการบาดเจ็บ
คุณสามารถเก็บส่วนผสมที่เตรียมไว้ในโถบดนั้นได้
หมายเหตุ: โถบดอาจเปลี่ยนสีได้หากใช้บดส่วนผสมที่เป็นเนื้อแข็งบางอย่าง เช่น
กานพลูหรืออบเชย เป็นต้น
คำเตือน:ส่วนผสมอาจรั่วซึม
ได้หากคุณไม่ได้ล็อคอุปกรณ์
เสริมให้เข้าที่อย่างถูกต้อง

16
ส่วนผสม ปริมาณ ระยะเวลาทำงาน
พริกแห้ง 30 กรัม 33 วินาที
พริกไทดำ 30 กรัม 1 นาที 30 วินาที
กุ้งแห้ง 25 กรัม 30 วินาที
ข้าวคั่ว 40 กรัม 16 วินาที
งาดำ 30 กรัม 21 วินาที
ถั่วลิสง 50 กรัม 4 วินาที
หอมหัวใหญ่ 100 กรัม 13 วินาที
เนื้อหมู (ปรับลดลงมาเป็นชิ้นเล็กชิ้นน้อยขนาดเล็ก) 140 กรัม 20 วินาที
พาเมซานชีส (ปรับลดลงมาเป็นชิ้นเล็กชิ้นน้อยขนาดเล็ก) 100 กรัม 13 วินาที
การทำความสะอาดเครื่องใช้ไฟฟ้า
• ถอดปลั๊กเครื่องใช้ไฟฟ้าและถอดอุปกรณ์เสริมออก
• ถอดโถปั่นออก แล้วล้างโถปั่นและฝาปิดใต้ก๊อกน้ำที่กำลังไหล
• เพื่อให้สามารถทำความสะอาดได้ง่าย ให้ทำความสะอาดชิ้นส่วนที่ถอดออก
ด้วยน้ำและน้ำยาล้างจานทันทีหลังการใช้งาน
• คุณสามารถทำความสะอาดชุดโถปั่น (A,B,C) และเครื่องบดเอนกประสงค์ (F)
ด้วยเครื่องล้างจานได้ โดยวางไว้ที่ตระกร้าบนสุด และใช้โปรแกรม “ECO” หรือ
“LIGHTLY SOILED”
• วิธีการทำความสะอาดชุดมอเตอร์ (D) คือให้ใช้ผ้าชุดน้ำบิดพอหมาดเช็ด
แล้วเช็ดให้แห้ง ด้วยความระมัดระวัง
• ห้ามจุ่มชุดมอเตอร์ (D) ในน้ำ หรือรองใต้น้ำก๊อกที่กำลังไหลโดยเด็ดขาด
• ถอดโถปั่น (C) หรือโถบดเอนกประสงค์ (f3) ออกก่อนที่จะทำความสะอาด
คำเตือน: หยิบจับด้วยความ
ระมัดระวัง: ใบมีดของโถปั่นและ
อุปกรณ์เสริมมีความคมมาก

17
ปัญหา สาเหตุ วิธีแก้ไข
เครื่องใช้ไฟฟ้าไม่ทำงาน
ไม่ได้เสียบปลั๊กเข้ากับ
เต้ารับอย่างถูกต้อง
เสียบปลั๊กเครื่องใช้ไฟฟ้าเข้ากับเต้ารับ
แล้วเปิดสวิตช์
ประกอบหรือล็อคโถปั่น
หรืออุปกรณ์เสริมไม่เข้าที่
บนชุดมอเตอร์
ตรวจสอบว่าได้ประกอบหรือล็อคโถปั่นหรือ
อุปกรณ์เสริมให้เข้าที่อย่างถูกต้องบนชุด
มอเตอร์ ตามรูปประกอบที่แสดงอยู่ในคู่มือ
เครื่องสั่นสะเทือน
มากเกินไป
ไม่ได้วางเครื่องใช้ไฟฟ้าบนพื้นผิวเรียบที่มั่นคง
และทนความร้อน
ให้วางเครื่องใช้ไฟฟ้าบนพื้นผิวที่เรียบ
ใส่ส่วนผสมในปริมาณมากเกินไป ลดปริมาณส่วนผสมที่จะปั่นหรือบดให้น้อยลง
มีส่วนผสมรั่วซึม
ออกมาจากฝาปิด
.
ใส่ส่วนผสมในปริมาณมากเกินไป ลดปริมาณส่วนผสมที่จะปั่นหรือบดให้น้อยลง
ปิดฝาปิดไม่เข้าที่ ล็อคฝาปิดให้ถูกต้องบนโถปั่น
มีส่วนผสมรั่วซึม
ออกมาจากฐาน
ของอุปกรณ์เสริม
ใส่ซีลยางกันรั่วซึมบนชุดใบมีด (f1) หรือ (f2)
ไม่ถูกต้อง หรือไม่ได้ใส่ซีลยางกันรั่วซึม
ใส่ซีลยางกันรั่วซึมบนชุดใบมีด (f1) หรือ (f2)
ใหม่ให้เข้าที่ และล็อคบนฝาปิด (F3) ให้ถูกต้อง
ใบมีดติดขัด
ใส่อาหารชิ้นใหญ่เกินไป
หรือแข็งเกินไป
ลดปริมาณหรือขนาดของส่วนผสมที่จะปั่น
หรือบดให้น้อยลง เติมของเหลวให้มากขึ้น
วิธีการแก้ปัญหาเมื่อเครื่องใช้ไฟฟ้าไม่ทำงาน
โปรดติดต่อศูนย์บริการที่ได้รับอนุญาต (ดูรายชื่อศูนย์บริการได้จากคู่มือการบริการ)
คุณสามารถปรับเปลี่ยนเครื่องปั่นของคุณ และซื้ออุปกรณ์เสริมต่อไปนี้ได้จากดีลเลอร์เจ้าประจำของคุณ หรือจากศูนย์บริการที่ได้รับอนุญาต:
เครื่องบดเอนกประสงค์ (F) หรือโถปั่น (C) เพิ่มอีกหนึ่งอัน
เครื่องปั่นของคุณยังคงไม่ทำงานหรือทำงานผิดปกติอยู่หรือ?

18
การรีไซเคิล
• การกำจัดเครื่องใช้ไฟฟ้าและวัสดุที่ใช้ทำบรรจุภัณฑ์
วัสดุที่ใช้ทำบรรจุภัณฑ์ของเราผลิตจากวัสดุเฉพาะที่ไม่เป็นอันตรายต่อสิ่งแวดล้อม ดังนั้น
คุณอาจกำจัดวัสดุที่ใช้ทำบรรจุภัณฑ์ตามมาตรการรีไซเคิลที่มีผลบังคับใช้ในภูมิภาคของคุณก็ได้
สำหรับวิธีการกำจัดตัวเครื่อง โปรดติดต่อสอบถามจากเจ้าหน้าที่ของหน่วยงานที่กำกับดูแล ในประเทศของคุณ
• ระยะเวลาการใช้งานของเครื่องใช้ไฟฟ้าหรือสินค้าอิเล็กทรอนิก:
เครื่องใช้ไฟฟ้าของคุณน่าจะมีอายุการใช้งานได้นานหลายปี อย่างไรก็ตาม เมื่อถึงเวลา
ที่ต้องทำการเปลี่ยนเครื่องใหม่ ห้ามโยนทิ้งลงในถังขยะหรือในที่ทิ้งขยะ แต่ให้นำไปยัง
ศูนย์รีไซเคิลในเมืองของคุณ (หรือศูนย์รับขยะ ถ้ามี)
คำนึงถึงสภาพแวดล้อม!
เครื่องใช้ไฟฟ้าของคุณประกอบด้วยวัสดุที่สามารถแปรสภาพหรือนำกลับมาใช้ใหม่ได้
ให้นำส่งที่ศูนย์จัดเก็บขยะเทศบาลในท้องถิ่นของคุณ
สายด่วนเพื่อขอความช่วยเหลือ:
หากคุณพบปัญหาหรือมีคำถามเกี่ยวกับผลิตภัณฑ์ โปรดติดต่อทีมลูกค้าสัมพันธ์ของเราก่อน
เพื่อขอความช่วยเหลือและคำแนะนำจากผู้เชี่ยวชาญ ได้ที่
08456021454–สหราชอาณาจักร
(01)6774003–ROI
หรือศึกษาข้อมูลจากเว็บไซต์ของเรา ที่ www.tefal.co.uk

19
A
B
C
D
E
Cawan penyukat
Penudung
Jag pengadun bertanda
Unit motor
Pemilih kelajuan
F
Aksesori (bergantung pada model) :
Giling universal
- f1 Gasket pengedap
- f2 Unit mata pisau giling
- f3 Mangkuk giling universal
PENERANGAN PERALATAN
Aksesori yang terkandung dalam model yang anda telah beli ditunjukkan pada label di atas
pembungkusan.
ARAHAN KESELAMATAN
• Baca arahan untuk digunakan dengan berhati-hati sebelum menggunakan peralatan
bagi kali pertama: pengilang tidak akan menerima liabiliti sekiranya berlaku apa-apa
penggunaan yang tidak mematuhi arahan.
• Peralatan ini bukan untuk digunakan oleh orang (termasuk kanak-kanak) yang
kurang keupayaan fizikal, deria atau mental, atau kurang pengalaman dan
pengetahuan, kecuali mereka telah diberikan pengawasan atau arahan mengenai
penggunaan peralatan oleh orang yang bertanggungjawab ke atas keselamatan
mereka. Kanak-kanak hendaklah tidak dibenarkan bermain dengan peralatan.
• Ia direka untuk berfungsi dengan arus ulang alik sahaja. Sila periksa sama ada
voltan bekalan kuasa yang ditunjukkan pada plat nama peralatan sepadan dengan
pemasangan elektrik anda.
• Produk ini telah direka untuk kegunaan domestik saja. Apa-apa penggunaan
komersil, secara tidak sesuai atau gagal mematuhi arahan, pengilang tidak akan
bertanggungjawab dan jaminan tidak akan terpakai.
• Pastikan untuk tanggalkan plag peralatan jika anda mesti tinggalkan tanpa
pengawasan, sebelum memasukkan atau mengeluarkan aksesori atau sebelum
membersihkannya. Jangan tarik kord bekalan kuasa untuk menanggalkan peralatan.
• Jangan gunakan alat anda jika ia tidak beroperasi dengan betul, jika ia telah rosak
atau jika kord bekalan kuasa atau plag rosak. Untuk mengekalkan keselamatan,
bahagian ini mesti digantikan oleh pusat perkhidmatan yang diluluskan (lihat senarai
dalam buku panduan perkhidmatan).
• Apa-apa penyelenggaraan selain daripada pembersihan rutin dan senggaraan oleh
pelanggan mesti dijalankan oleh pusat perkhidmatan yang diluluskan.
• Jangan rendam peralatan, kord atau plag di dalam cecair. Kord bekalan kuasa mesti
dijauhkan daripada kanak-kanak dan mesti tidak diletakkan berdekatan atau
bersentuhan dengan bahagian panas peralatan, sumber haba atau bucu tajam.
• Untuk keselamatan anda, hanya gunakan dan alat ganti yang sepadan dengan
peralatan anda, dijual oleh pusat perkhidmatan yang diluluskan.
• Mata pisau adalah sangat tajam: kendalikannya dengan berhati-hati untuk
mengelakkan kecederaan.
• Jangan gunakan pengadun atau aksesorinya tanpa bahan dan jangan tuang cecair
mendidih ke dalam jag.
• Selalu gunakan jag pengadun dengan penutupnya (B).
• Sentiasa tuang bahan cecair ke dalam jag dahulu, sebelum menambah bahan
pepejal, tanpa melebihi aras maksimum.
MS

20
• Jangan masukkan jari anda atau apa-apa objek lain ke dalam pengadun apabila
peralatan berjalan.
• Jangan gunakan mangkuk sebagai bekas untuk penyejukbekuan, pemasakan atau
pensterilan.
• Jangan gunakan pengadun untuk lebih daripada 3 minit secara berterusan.
• Letakkan pengadun di atas permukaan kerja rata, stabil dan kalis haba, bersih dan kering.
• Jangan biarkan rambut panjang, skarf, tali leher, dll tergantung atas jag pengadun
aksesori semasa operasi.
• Jangan gunakan pengadun di luar kawasan terbuka.
• Jangan tanggalkan penutup (B) sebelum mata pisau telah berhenti sepenuhnya.
• Jangan sekali-kali gunakan peralatan ini untuk mengadunkan atau mencampurkan
barangan selain daripada bahan makanan.
• Tunggu sehingga peralatan sejuk ke suhu bilik selepas setiap kelompok anda proseskan.
• Jangan gunakan pengadun atau aksesorinya tanpa bahan dan jangan tuang cecair
mendidih (80C) ke dalam jag.
• Jika kord bekalan kuasa rosak, ia mesti digantikan oleh pusat perkhidmatan yang diluluskan.
PENGUNCIAN KESELAMATAN
MENGGUNAKAN BAGI KALI PERTAMA
MENGGUNAKAN PERALATAN ANDA
Peralatan hanya boleh dijalankan apabila jag (C) atau aksesori (F) diletakkan dengan
betul dan dikuncikan pada unit motor (D).
• Sebelum menggunakan peralatan anda bagi kali
pertama, bersihkan semua aksesori (A, B, C dan F)
dalam air suam bersabun, kecuali unit motor (D).
• Pastikan semua pembungkusan telah
ditanggalkan sebelum mengendalikan peralatan.
• Pemberitahuan penting: Putar pemilih kelajuan (E)
ke “0” sebelum meletakkan jag pengadun atau
aksesori pada unit motor.
• Peralatan hanya bermula jika jag atau aksesori
diletakkan dengan betul dan dikunci pada badannya.
• Jangan memakai pengadun jika penutup tidak
ditutup.
1. JAG Pengadun:
•
Pasang penutup (B) ke jag pengadun (C) dan kuncinya dengan menempatnya ke dalam
lubang bertentangan muncung (rajah 1).
Masukkan cawan penyukat (A) ke dalam penudung dan tekan ke dalam tempatnya
(rajah 1). Anda dinasihatkan untuk memegang penudung semasa operasi.
•
Letakkan jag pencampur (C) atas badan unit motor (D). Kunci (buka) dijajarkan
dalam slot pada unit motor (rajah 1).
•
Kemudian putarkan jag pengadun (C) melalui putaran kunci (tertutup)
dipaparkan
(rajah 1).
AWAS: Mata pisau
adalah sangat tajam,
kendalikan dengan
berhati-hati apabila
menggunakan,
mengosongkan atau
membersihkan
peralatan.

21
•
Potong semua bahan sebelum meletakkannya ke dalam jag pengadun (C). Memulakan
dengan cecair, tanpa sampai tahap maksimum yang ditunjukkan pada jag (1.5L).
•
Sambungkan peralatan dan bermula dengan memutar pemilih kelajuan (E) ke "Pulse,"
"1," atau "2".
•
Untuk menghentikan alat, bawa pemilih kelajuan (E) ke "0".
•
Tunggu peralatan berhenti sepenuhnya sebelum mengeluarkan jag pengadun (C).
•
Keluarkan jag (C) dengan membuka kunci dalam arahan bertentangan dengan pemasangan.
2. Giling universal:
• Giling universal ini (F) dilengkapkan dengan
mangkuk (f3) yang menghalang akses kepada mata
pisau semasa penggunaan.
• Putar mangkuk (F) dan tuangkan bahan.
• Letakkan gasket pengedap (f1) pada rehatnya pada
unit mata pisau giling (f2) (rajah 2). Letakkan unit
mata pisau giling (f2) atas mangkuk (f3), dan
kuncikan giling universal dengan memutar unit mata
pisau (f2) melalui putaran dalam arahan ikut jam
(rajah 3).
• Putar giling universal yang dipasang (F) dan
letaknya pada unit motor (D). Kunci (buka)
dijajarkan dalam slot pada unit motor (D) (rajah 4).
• Putar giling universal yang dipasang (F) melalui
putaran lawan arah jam sehingga jam mengunci
(ditutup)
dipaparkan (rajah 4).
• Sambungkan peralatan dan bermula dengan
memutar pemilih kelajuan (E) ke "Pulse," "1,"
atau "2".
• Untuk menghentikan alat, pusing pemilih kelajuan
(E) ke "0".
• Tunggu peralatan berhenti sepenuhnya sebelum
mengeluarkan giling universal (F).
• Keluarkan giling universal (F) dengan membuka
kunci dalam arahan bertentangan dengan
pemasangan.
• Terbalikkan di atas permukaan atas sebelum
membuka kunci unit mata pisau giling (f2) dari
mangkuk (f3) dalam urutan songsang pemasangan.
Mata pisau adalah sangat tajam: kendalikannya
dengan berhati-hati untuk mengelakkan
kecederaan. Kemudian anda boleh mengambil
penyediaan dalam mangkuk.
Catatan: Warna mangkuk boleh berubah selepas
mengadun bahan tertentu: cengkih, kayu manis, dll...
Awas: kebocoran boleh
berlaku jika aksesori
tidak dikunci dengan
betul.

22
Bahan Kuantiti Masa pengendalian
Cili merah kering 30g 33s
Lada hitam 30g 1min30s
Udang kering 25g 30s
Nasi panggang 40g 16s
Bijian hitam 30g 21s
Kacang 50g 4s
Bawang 100g 13s
Daging (potong sehingga ketulan kecil) 140g 20s
Keju Parmesan (potong sehingga ketulan
kecil)
100g 13s
MEMBERSIHKAN PERALATAN ANDA
• Tanggalkan plag peralatan dan keluarkan
aksesori.
• Keluarkan jag dan penudungnya dan bilas di
bawah air.
• Untuk pembersihan mudah, pastikan bahagian
yang boleh ditanggalkan dicuci dengan sabun
pencuci mangkuk dalam air dan sedikit cecair
mencuci.
• Jag pengadun (A, B, C) dan giling universal (F)
boleh dibersihkan dalam mesin basuh pinggan
mangkuk atas program “ECO” atau “LIGHTLY
SOILED”.
• Untuk bersihkan unit motor (D) dengan gunakan
kain lembap. Keringkan dengan berhati-hati.
• Jangan letakkan unit motor (D) di dalam air.
• Kosongkan jag pengadun (C) atau mangkuk giling
universal (f3) sebelum membersih.
AWAS: Kendalikannya
dengan berhati-hati.
Mata pisau jag
pengadun dan aksesori
adalah tajam.

23
Masalah Penyebab Penyelesaian
Produk tidak berfungsi
Plag tidak dipasang dengan betul
ke dalam soket.
Plag peralatan ke dalam soket
dan hidupkan.
Jag atau aksesori tidak
ditempatkan dengan betul atau
dikunci pada unit motor.
Periksa sama ada jag atau
aksesori diletakkan dengan betul
dan dikunci atas unit motor
seperti ditunjukkan dalam rajah
dalam buku panduan.
Getaran berlebihan.
Produk tidak diletakkan di atas
permukaan rata, stabil dan kalis
haba.
Letakkan produk di atas
permukaan rata.
Isipadu bahan terlalu tinggi.
Kurangkan kuantiti bahan
diproses
Kebocoran dari penudung.
Isipadu bahan terlalu tinggi.
Kurangkan kuantiti bahan
diproses
Penudung tidak ditempatkan
dengan betul.
Kuncikan penudung dengan betul
atas jag pengadun.
Kebocoran dari tapak
aksesori.
Gasket pada unit mata pisau (f1)
atau (f2) tidak diletakkan dengan
betul atau hilang.
Reposisi gasket pada unit mata
pisau (f1) atau (f2) dan kuncinya
dengan betul ke dalam mangkuk
(F3).
Pisau tidak diputar dengan
senang.
Potongan makanan terlalu besar
atau terlalu keras.
Kurangkan saiz atau kuantiti
bahan yang diproses.
Tambah cecair.
APA HENDAK DILAKUKAN JIKA PERALATAN TIDAK BERFUNGSI?
Hubungi pusat perkhidmatan yang diluluskan (lihat senarai dalam buku panduan
perkhidmatan).
Anda boleh sesuaikan pengadun anda dan mendapatkan aksesori yang berikut daripada
peniaga biasa anda atau daripada pusat perkhidmatan yang diluluskan: Giling universal
(F), atau jag pengadun tambahan (C).
Pengadun anda masih tidak berfungsi?

24
PENGITARAN SEMULA
• Pelupusan peralatan dan bahan pembungkusannya.
Pembungkusan terdiri daripada bahan yang tidak menyebabkan
bahaya untuk alam sekitar dan boleh dilupuskan mengikut langkah-
langkah pengitaran semula berkuat kuasa di tempat anda.
Untuk pelupusan peralatan itu sendiri, sila hubungi perkhidmatan pihak
berkuasa tempatan anda yang sesuai.
• Akhir hayat produk elektrik dan elektronik:
Peralatan anda dijangka boleh tahan untuk beberapa tahun. Walau bagaimanapun,
apabila tiba masanya untuk menggantikannya, jangan buang ke dalam tong sampah tetapi
bawanya ke pusat pengitaran semula di bandar anda (atau ke pusat penerimaan buangan
di mana berkenaan).
Fikirkan alam sekitar!
Peralatan anda mengandungi bahan berharga yang boleh didapati
semula atau dikitarkan semula.
Tinggalkannya di tempat pengumpulan sampah sivik tempatan.
TALIAN BANTUAN:
Jika anda mempunyai apa-apa masalah atau pertanyaan produk, sila hubungi Pasukan
Perhubungan Pelanggan kami dahulu untuk bantuan dan nasihat pakar:
603-7957 6020 – TMT Service Center Malaysia
Atau rujuk tapak web kami – www.tefal.com
La pagina si sta caricando...
La pagina si sta caricando...
La pagina si sta caricando...
La pagina si sta caricando...
La pagina si sta caricando...
La pagina si sta caricando...
La pagina si sta caricando...
La pagina si sta caricando...
La pagina si sta caricando...
La pagina si sta caricando...
La pagina si sta caricando...
La pagina si sta caricando...
La pagina si sta caricando...
La pagina si sta caricando...
La pagina si sta caricando...
La pagina si sta caricando...
La pagina si sta caricando...
La pagina si sta caricando...
La pagina si sta caricando...
La pagina si sta caricando...
La pagina si sta caricando...
La pagina si sta caricando...
La pagina si sta caricando...
La pagina si sta caricando...
La pagina si sta caricando...
La pagina si sta caricando...
La pagina si sta caricando...
La pagina si sta caricando...
La pagina si sta caricando...
La pagina si sta caricando...
La pagina si sta caricando...
La pagina si sta caricando...
La pagina si sta caricando...
La pagina si sta caricando...
La pagina si sta caricando...
La pagina si sta caricando...
La pagina si sta caricando...
La pagina si sta caricando...
La pagina si sta caricando...
La pagina si sta caricando...
La pagina si sta caricando...
La pagina si sta caricando...
-
 1
1
-
 2
2
-
 3
3
-
 4
4
-
 5
5
-
 6
6
-
 7
7
-
 8
8
-
 9
9
-
 10
10
-
 11
11
-
 12
12
-
 13
13
-
 14
14
-
 15
15
-
 16
16
-
 17
17
-
 18
18
-
 19
19
-
 20
20
-
 21
21
-
 22
22
-
 23
23
-
 24
24
-
 25
25
-
 26
26
-
 27
27
-
 28
28
-
 29
29
-
 30
30
-
 31
31
-
 32
32
-
 33
33
-
 34
34
-
 35
35
-
 36
36
-
 37
37
-
 38
38
-
 39
39
-
 40
40
-
 41
41
-
 42
42
-
 43
43
-
 44
44
-
 45
45
-
 46
46
-
 47
47
-
 48
48
-
 49
49
-
 50
50
-
 51
51
-
 52
52
-
 53
53
-
 54
54
-
 55
55
-
 56
56
-
 57
57
-
 58
58
-
 59
59
-
 60
60
-
 61
61
-
 62
62


Tefal BL1111AD Manuale utente
- Categoria
- Frullatori
- Tipo
- Manuale utente
- Questo manuale è adatto anche per
in altre lingue
- français: Tefal BL1111AD Manuel utilisateur