La pagina si sta caricando...

2
I
GB
F
D
AVVERTENZE
1. L’apparecchio può essere utilizzato da bambini di età non inferiore a 8 anni e da persone con ridotte
capacitàsiche,sensorialiomentali,oprivediesperienzaodellanecessariaconoscenza,purchésotto
sorveglianzaoppuredopochelestesseabbianoricevutoistruzionirelativeall’usosicurodell’apparecchio
e alla comprensione dei pericoli ad esso inerenti.
2.Ibambininondevonogiocareconl’apparecchio.
3.Lapuliziaelamanutenzionedestinataadessereeffettuatadall’utilizzatorenondeveessereeffettuata
dabambinisenzasorveglianza.
4.Seilcavodialimentazioneèdanneggiato,essodeveesseresostituitodalcostruttoreodalsuo
servizioassistenzatecnicaocomunquedaunapersonaconqualicasimilare,inmododaprevenire
ognirischio.
5.L’installazione,ilprimoavviamentoelesuccessivefasidimanutenzione,eccettolapuliziaoil
lavaggiodelltrodell’ariaambiente,devonoessereeseguiteesclusivamentedapersonaleautorizzato
equalicato.
6. Perprevenireognirischiodifolgorazioneèindispensabilestaccarel’interruttoregeneraleprimadi
effettuarecollegamentielettriciedognioperazionedimanutenzionesugliapparecchi.
7.L’installazioneel’allacciamentoelettricodell’apparecchiodevonoessereeseguitedapersonale
specializzatoinpossessodeirequisitiprevistidallalegge.
Le istruzioni per l’installazione sono contenute nell’apposito manuale.
8.Nessunoggettoodostacolostrutturale(arredi,tende,piante,fogliame,tapparelleecc.)dovrà
maiostruireilnormaledeussodell’ariasiadallegriglieinternechedaquelleesterne.
9.Nonappoggiarsiopeggiosedersimaisullascoccadelclimatizzatoreperevitaregravidannialle
parti esterne.
10.Nelcasovifosseroperdited’acquadall’apparecchioènecessariospegnerloimmediatamentee
toglierel’alimentazioneelettrica.
Chiamarequindiilcentroassistenzapiùvicino.
11.L’apparecchionondeveessereinstallatoinlocalidovesisviluppanogasesplosiviodove
visonocondizionidiumiditàetemperaturafuoridailimitimassimidenitisulmanualedi
installazione.
12.Pulireregolarmenteilltrodell’ariacomedescrittonell’appositoparagrafo.
I
GB
WARNINGS
1. The appliance may be used by children over 8 years of age and by persons with reduced physical,
sensorial or mental capacities, or without the required experience or knowledge, provided they
are supervised or have been instructed in the safe use of the appliance and understand the hazards
involved.
2. Children must not play with the equipment.
3. Children must not be allowed to clean the appliance or perform user maintenance without proper
supervision.
4. If the power cable is damaged, it must be replaced by the manufacturer or by its technical support
serviceorbysimilarlyqualiedpersonnel,topreventanyrisktotheuser.
5. Installation,initialstart-upandsubsequentmaintenance,withtheexceptionoftheambientairlter
cleaningandwashing,mustbecarriedoutsolelybyauthorizedandqualiedpersonnel.
6. To prevent the risk of an electric shock it is mandatory to switch off the main switch before performing
the electrical connections or any maintenance operation to the appliances.
7. Installation and connection of the air conditioner should be carried out by specialized personnel
inpossessionofthequalicationsspeciedinLaw.
Theinstructionsforinstallationareprovidedinthespecicmanual.
8. No structural object (furniture, curtains, plants, leaves, blinds, etc.) should ever obstruct the
normalowofairfromeithertheinternalorexternalgratings.
9. Never lean or, worse yet, sit on the casing of the air conditioner as this could cause serious
damage to the external parts.
10. If the unit leaks water, switch it off immediately and disconnect it from the power mains.
Call the nearest service centre.
11
. The air conditioner must not be installed in rooms where explosive gasses develop or where
there are conditions of heat and humidity beyond the maximum limits indicated in the installation manual.
12. Cleantheairlterperiodically,asdescribedinthespecicparagraph.
La pagina si sta caricando...
La pagina si sta caricando...
La pagina si sta caricando...

6
I
GB
F
D
1 GENERALITÁ
1.1 INFORMAZIONI
GENERALI
1.2 SIMBOLOGIA
1.2.1Pittogrammiredazionali
1.2.2Pittogrammirelativialla
sicurezza
1.3 USOPREVISTO
1.4 ELENCOCOMPONENTI
A CORREDO
1.4.1Immagazzinamento
1.4.2Ricevimentoedisimballo
2 INSTALLAZIONE
2.1 MODALITÀDI
INSTALLAZIONE
2.1.1 Dimensioni e caratteristiche
dellocaledoveinstallareil
climatizzatore
2.1.2Sceltadellaposizionedove
installare il climatizzatore
2.2 MONTAGGIO
DELL’UNITÀ
2.2.1 Foratura della parete
2.2.2 Predisposizione dello scarico
condensa per le macchine in
pompa di calore
2.2.3Montaggiodeicondotti
dell’ariaedellegriglieesterne
2.2.4 Allacciamento elettrico
2.2.5 Inserimento dell’apparecchio
sulla staffa
2.3 MANUTENZIONE
PERIODICA
3 USO E MANUTENZIONE
(parte utente)
3.2 DENOMINAZIONEDELLE
PARTI
3.2.1 Elementi unità
3.2.2 Pannello comandi
3.3 RIMOZIONEDEL
TELECOMANDO
3.4 ACCENSIONE GENERALE
EGESTIONEDEL
FUNZIONAMENTO
3.5 INSERIMENTODELLE
BATTERIE
3.6 TELECOMANDO
3.7
ACCENSIONE/SPEGNIMENTO
DELL’APPARECCHIO
(pulsanteT1)
3.8 TASTOBENESSERE
(AUTOMATICO)
(pulsanteT2)
3.9 FUNZIONAMENTOIN
RAFFREDDAMENTO
(pulsanteT4)
3.10 FUNZIONAMENTOINSOLA
DEUMIDIFICAZIONE
3.11 FUNZIONAMENTOINSOLA
VENTILAZIONE
10
10
16
16
16
18
18
20
20
22
22
22
24
24
24
28
30
34
36
38
40
40
40
40
42
42
46
48
50
50
52
52
54
1 GENERAL INFORMATION
1.1 GENERAL
INFORMATION
1.2 SYMBOLS
1.2.1 Editorial pictograms
1.2.2 Safety pictograms
1.3 PROPER USE
1.4 LISTOFACCESSORIES
SUPPLIED
1.4.1 Storage
1.4.2 Receipt and unpacking
2 INSTALLATION
2.1 INSTRUCTIONS FOR
INSTALLATION
2.1.1 Dimensions and features of
site where air conditioner is
installed
2.1.2 Choice of best position for
installing the air conditioner
2.2 INSTALLATIONOFTHE
UNIT
2.2.1 Drilling the wall
2.2.2 Provision for draining
condensate for machines
with heat pump
2.2.3 Installation of air pipes and
external gratings
2.2.4 Power supply connection
2.2.5 Fitting the unit on bracket
2.3 PERIODICAL
MAINTENANCE
3 USE AND MAINTENANCE
(for the user)
3.2 NAMES OF PARTS
3.2.1ListofUnits
3.2.2 Control panel
3.3 REMOVING THE REMOTE
CONTROL
3.4 SWITCHING ON THE
APPLIANCEAND
FUNCTION MANAGEMENT
3.5 INSTALLINGTHE
BATTERIES
3.6 REMOTECONTROL
3.7 SWITCHING THE UNIT ON
AND OFF (button T1)
3.8 WELLBEINGMODE
(AUTOMATIC) (button T2)
3.9 COOLINGFUNCTION
(button T4)
3.10 DEHUMIDIFIERONLY
3.11 FANONLY
1 GENERALITES
1.1 INFORMATIONS
GENERALES
1.2 SYMBOLOGIE
1.2.1Pictogrammesrédactionnels
1.2.2Pictogrammesconcernantla
sécurité
1.3 UTILISATIONPRÉVUE
1.4 LISTEDESCOMPOSANTS
NECESSAIRESFOURNIS
1.4.1Stockage
1.4.2Réceptionetdéballage
2 INSTALLATION
2.1 MODED’INSTALLATION
2.1.1 Dimensions et
caractéristiquesdelapièce
oùleclimatiseurdoitêtre
installé
2.1.2Choixdelapositionoù
installer le climatiseur
2.2 MONTAGEDEL’UNITÉ
2.2.1Perçagedumur
2.2.2Préparationd’unsystème
d’évacuationducondensat
pourlesmachinesavec
pompe à chaleur
2.2.3Montagedesconduitsd’air
etdesgrillesextérieures
2.2.4Branchementélectrique
2.2.5Fixationdel’appareilsurla
bride
2.3 ENTRETIENPÉRIODIQUE
3 MODE D’EMPLI ET
ENTRETIEN (partie
utilisateur)
3.2 DÉNOMINATION
DESCOMPOSANTS
3.2.1Listeunités
3.2.2Tableaudecommande
3.3 EXTRACTIONDELA
TÉLÉCOMMANDE
3.4 MISEENMARCHE
GÉNÉRALEETGESTION
DUFONCTIONNEMENT
3.5 INTRODUCTIONDES
PILES
3.6 TÉLÉCOMMANDE
3.7 ACTIVATION/
DÉSACTIVATIONDE
L’APPAREIL(toucheT1)
3.8 TOUCHECONFORT
(AUTOMATIQUE)(toucheT2)
3.9 FONCTIONNEMENTEN
MODEREFROIDISSEMENT
(toucheT4)
3.10 FONCTIONNEMENTEN
MODEDÉSHUMIDIFICATION
SEULEMENT
3.11 FONCTIONNEMENTEN
MODEVENTILATION
SEULEMENT
1 ALLGEMEINES
1.1 ALLGEMEINE
INFORMATIONEN
1.2 BILDSYMBOLE
1.2.1 Bildsymbole
1.2.2 Bildsymbole zur Sicherheit
1.3 VORGESEHENER
GEBRAUCH
1.4 LISTEDER
AUSSTATTUNGSELEMENTE
1.4.1Lagerung
1.4.2 Annahme und Auspacken
2 INSTALLATION
2.1
INSTALLATIONSBESTIMMUNGEN
2.1.1 Abmessungen und
Eigenschaften des Raums, in
dem dem das Klimagerät
installiert wird
2.1.2 Wahl der Stelle, an der das
Klimagerät installiert werden
soll
2.2 MONTAGE DER EINHEIT
2.2.1 Durchführung der Bohrungen
2.2.2 Vorbereitung der
Kondenswasserablaueitung
für Geräte mit Wärmepumpe
2.2.3 Montage der Abluftkanäle
und der externen Gitter
2.2.4 Elektrischer Anschluss
2.2.5 Montage des Gerätes auf
dem Befestigungsbügel
2.3 WARTUNG
3 GEBRAUCH UND
INSTANDHALTUNG
(Benutzer-Teil)
3.2 BENENNUNG
DER KOMPONENTEN
3.2.1 Bestandteile der Einheiten
3.2.2 Bedienteil
3.3 ENTFERNEN DER
FERNBEDIENUNG
3.4 EINSCHALTENUND
BETRIEBSSTEUERUNG
3.5 DAS EINSETZEN DER
BATTERIEN
3.6 DIE FERNBEDIENUNG
3.7 EINSCHALTEN/
AUSSCHALTENDES
GERÄTES (Drucktaste T1)
3.8 (AUTOMATISCHE)
WOHLSEINTASTE
(Drucktaste T2)
3.9 KÜHLFUNKTION
(Drucktaste T4)
3.10 NUR
ENTFEUCHTUNGSFUNKTION
3.11 NURLÜFTUNGSFUNKTION
La pagina si sta caricando...
La pagina si sta caricando...
La pagina si sta caricando...

10
I
GB
F
D
1
1.1
GENERALITA’
INFORMAZIONI GENERALI
Desideriamoinnanzituttoringraziar-
Vidiaveredecisodiaccordarela
vostrapreferenzaaduncondiziona-
tore di nostra produzione.
ComepotreterenderVicontoavete
effettuato una scelta vincente in
quantoaveteacquistatounprodotto
che rappresenta lo stato dell’Arte
nellatecnologiadellaclimatizzazio-
ne domestica.
Questomanualeèstatoconcepito
con l’obbiettivo di fornirVi tutte le
spiegazioniperessereingradodi
gestirealmeglioilVostrosistemadi
climatizzazione.
Vi invitiamo quindi a leggerlo
attentamente prima di mettere in
funzione l’apparecchio.
Mettendoinattoisuggerimentiche
sonocontenutiinquestomanuale,
grazie alclimatizzatore cheavete
acquistato, potrete fruire senza
problemi di condizioni ambientali
ottimaliconilminorinvestimentoin
terminienergetici.
ATTENZIONE
Ilmanualeèsuddivisoin3sezioni
ocapitoli:
CAP. 1 GENERALITÀ
Si rivolge all’installatorespecializ-
zatoeall’utentenale.
Contiene informazioni, dati tecnici
e avvertenze importanti che de-
vono essere conosciute prima di
installare e utilizzare il climatiz-
zatore.
CAP. 2 INSTALLAZIONE
Sirivolgesolo ed esclusivamente
ad un’installatore specializzato.
Contiene tutte le informazioni
necessarie al posizionamento e
montaggio del climatizzatore nel
luogoincuivainstallato.
L’installazione del climatizzatore da
parte di personale non specializzato
fadecaderelecondizionidigaranzia.
CAP. 3 USO E MANUTENZIO-
NE
(parte utente)
Contiene le informazioni utili per
comprendere l’uso e la program-
mazione del climatizzatore e gli
interventi di manutenzione più
comuni.
GENERAL INFORMATION
GENERAL INFORMATION
We wish to thank you, rst of all,
for purchasing an air-conditioner
produced by our company.
We are sure you will be happy with
it because it represents the state of
the art in the technology of home air
conditioning.
This manual serves to provide you
with the instructions and explana-
tions you need to make the best
possible use of your air-conditioner.
We suggest that you read it carefully
before starting to use the appliance.
By following the instructions and
suggestions provided in the manual,
your air-conditioner will give you ye-
ars of smooth operation and comfort
at the lowest cost in terms of power
consumption.
ATTENTION
The manual is divided into 3 sections
or chapters:
CHAP. 1 GENERAL INFOR-
MATION
Contains information for the specia-
lized installer and end user.
The information, technical data and
important warnings must be known
before installing and using the
air-conditioner.
CHAP. 2 INSTALLATION
Contains information exclusively
intended for the specialized installer.
The information contained in this
chapter is necessary for installation
of the air conditioner.
If the air-conditioner is installed by
personnel lacking the necessary
qualicationsandspecializationthis
invalidates the warranty.
CHAP. 3 USE AND MAINTE-
NANCE (by user)
Contains all information and in-
structions for proper use and
programming of the air-conditioner,
as well as instructions for simple
maintenance.
GENERALITES
INFORMATIONS GENERALES
Nous désirons avant tout vous
remercier pour avoir accordé la
préférenceàunclimatiseurdenotre
production.
Commevouspourrezleconstater,
vousavezeffectuéunchoixgagnant
enachetantunproduitquireprés-
entecequ’ilyadeplusavancédans
la technologie de la climatisation
domestique.
Cemanuelaétéconçuandevous
fournir toutes les explications qui
vouspermettronsdegéreraumieux
votresystèmedeclimatisation.
Nous vous invitons donc à le lire
attentivementavantdemettrevotre
appareil en marche.
Ensuivantlesinstructionsquisont
contenues dans ce manuel, vous
pourrezproterpendantdesannées
etsansproblèmes,grâceauclima-
tiseur que vous venez d’acheter,
de conditions ambiantes optimales
avecunminimumd’investissement
entermesénergétiques.
ATTENTION
Lemanuelestdiviséen3sections
ouchapitres:
CHAP. 1 GENERALITES
Ils’adresseà l’installateurqualié
etàl’utilisateurnal.
Il contient des informations, des
données techniques et des in-
structions importantes qui doivent
être connues avant d’installer et
d’utiliser le climatiseur.
CHAP. 2 INSTALLATION
Il s’adresse uniquement et exclu-
sivement à l’installateur qualié.
Il contient toutes les informations
nécessairesàl’emplacementetau
montageduclimatiseuràl’endroit
oùildoitêtreinstallé.L’installation
du climatiseur par un personnel non
qualiéentraînelaperted’effetdes
conditionsdegarantie.
CHAP. 3 MODE D’EMPLOI ET
ENTRETIEN (partie utilisa-
teur)
Il contient les informations utiles pour
comprendre le mode d’emploi et la
programmationduclimatiseurainsi
quelesinterventionsd’entretienles
plus courantes.
ALLGEMEINES
ALLGEMEINE INFORMA-
TIONEN
Zunächst möchten wir Ihnen danken,
dass Sie sich für eine Klimaanlage
aus unserer Produktion entschieden
haben.
Sie werden sich davon überzeugen
können, mit dem Kauf dieses Pro-
duktes eine gute Wahl getroffen
zu haben, denn es bendet sich
im Bereich der Klimatisierung von
Wohnhäusern auf dem neuesten
Stand der Technik.
Ziel dieses Benutzerhandbuchs
ist es, Ihnen alle notwendigen
Informationen zu liefern, damit Sie
Ihre Klimaanlage optimal einsetzen
können.
Wir empfehlen Ihnen daher, vor der
Inbetriebnahme des Geräts dieses
Benutzerhandbuch aufmerksam
zu lesen.
Wenn Sie sich an die hier gegebe-
nen Empfehlungen halten, können
Sie mit Hilfe dieser Klimaanlage für
optimale Raumbedingungen sorgen
und sie auch im energetischen Sinne
optimal nutzen.
ACHTUNG
Das Benutzerhandbuch ist in 3
Abschnitte oder Kapitel unterteilt:
KAP.1 ALLGEMEINES
Richtet sich an den Fachinstallateur
oder den Endbenutzer.
Enthält Informationen, technische
Angaben und wichtige Warnhinwei-
se, die bekannt sein müssen, bevor
die Klimaanlage installiert und
benutzt wird.
KAP. 2 INSTALLATION
Richtet sich ausschließlich an den
Fachinstallateur.
Enthält alle Informationen, die für
die Positionierung und Montage der
Anlage an dem dafür vorgesehenen
Ort notwendig sind.
Die Installation der Klimaanlage dur-
chnichtentsprechendqualiziertes
Fachpersonal führt zum Verfall der
Garantie.
KAP. 3 GEBRAUCH UND
INSTANDHALTUNG (Benut-
zer-Teil)
Enthält Informationen über den
Gebrauch und die Programmie-
rung der Klimaanlage sowie über
die gebräuchlichsten Instandhaltun-
gsarbeiten.
1
La pagina si sta caricando...

12
I
GB
F
D
Documento riservato aitermini di
legge con divietodi riproduzione
o di trasmissione a terzi senza
esplicita autorizzazione della ditta
OLIMPIA SPLENDID.
Lemacchine possonosubire ag-
giornamentie quindipresentare
particolari diversi daquellirafgu-
rati,senza perquesto costituire
pregiudizio per itesti contenutiin
questomanuale.
Leggere attentamente il presente
manuale prima di procedere con
qualsiasi operazione (installazio-
ne, manutenzione, uso) ed atte-
nersi scrupolosamente a quanto
descritto nei singoli capitoli.
LA DITTA COSTRUTTRICE
NON SI ASSUME RESPONSA-
BILITÀ PER DANNI A PERSO-
NE O COSE DERIVANTI DAL-
LA MANCATA OSSERVANZA
DELLE NORME CONTENUTE
NEL PRESENTE LIBRETTO.
La ditta costruttrice si riserva il
diritto di apportare modiche in
qualsiasi momento ai pro-
pri modelli, fermo re-
stando le caratteristiche
essenziali descritte nel presente
manuale.
L’installazione e la manuten-
zione di apparecchiature per
la climatizzazione come la pre-
sente potrebbero risultare pe-
ricolose in quanto all’interno di
questi apparecchi è presente un
gas refrigerante sotto pressione e
componenti elettrici sotto ten-
sione.
Pertanto l’installazione, il primo
avviamento e le successive fasi di
manutenzione devono essere ese-
guite esclusivamente da personale
autorizzato e qualicato.
Installazioni eseguite al di fuori
delleavvertenzefornitedalpresente
manuale e l’utilizzo al di fuori dei
limiti di temperatura prescritti fanno
decaderelagaranzia.
L’ordinaria manutenzionedei ltri,
lapuliziageneraleesternapossono
essereeseguiteanchedall’utente,
inquantononcomportanooperazio-
nidifcoltoseopericolose.
Durante il montaggio,e adogni
operazione di manutenzione,è
necessarioosservareleprecauzioni
citatenelpresentemanuale,esulle
etichette apposte all’interno degli
apparecchi,nonché adottareogni
precauzionesuggeritadalcomune
buonsenso e dalleNormativedi
Sicurezzavigenti nelluogo d’instal-
lazione.
1
This document is restricted in use to
the terms of the law and may not be
copied or transferred to third parties
without the express authorization
of the manufacturer, OLIMPIA
SPLENDID.
Our machines are subject to change
and some parts may appear dif-
ferent from the ones shown here,
without this affecting the text of the
manual in any way.
Read this manual carefully before
performing any operation (instal-
lation, maintenance, use) and
follow the instructions contained
in each chapter.
THE MANUFACTURER IS
NOT RESPONSIBLE FOR
DAMAGES TO PERSONS
OR PROPERTY CAUSED BY
FAILURE TO FOLLOW THE
INSTRUCTIONS IN THIS MA-
NUAL.
The manufacturer reserves the ri-
ght to make any changes it deems
advisable to its models, although
the essential features described
in this manual remain the same.
The installation and maintenance of
air-conditioners like this one may
be hazardous as they contain a
cooling gas under pressure as
well as powered parts.
Therefore, the installation, rst
startup and subsequent main-
tenance should be carried out
exclusively by authorized, quali-
ed personnel.
Failing to comply with the in-
structions contained in this manual,
and using the unit with tempera-
tures exceeding the permissible
temperature range will invalidate
the warranty.
Routinemaintenanceof thelters
and general external cleaning can
be done by the user as these opera-
tionsarenotdifcultordangerous.
During installation and maintenan-
ce, respect the precautions indica-
ted in the manual, and on the labels
applied inside the units, as well
as all the precautions suggested
by good sense and by the safety
regulations in effect in your country.
Documentréservéauxtermesdela
loiavecinterdictiondereproduction
ou de transmission à tiers sans
l’autorisationexpressedelasociété
OLIMPIA SPLENDID.
Les machines peuventsubir des
mises à jouret parconséquent
présenterdes élémentsdifférents
deceuxquisontreprésentés,sans
quecelaconstituepour autantun
préjudicepourlestextescontenus
dans ce manuel.
Lire attentivement le présent
manuel avant de procéder à toute
opération (installation, entretien,
utilisation) et suivre scrupuleu-
sement ce qui est décrit dans
chacun des chapitres.
LE FABRICANT DECLINE
TOUTE RESPONSABILITE
EN CAS DE DOMMAGES AUX
PERSONNES OU AUX BIENS
DERIVANT DU NON-RESPECT
DES NORMES CONTENUES
DANS LE PRESENT LIVRET.
Le fabricant se réserve le droit
d’apporter à tout moment des
modications à ces modèles, tout
en conservant les caractéristiq-
ues essentielles décrites dans le
présent manuel.
L’installation et l’entre-
tien d’appareils pour la cli-
matisation comme celui
qui est décrit dans ce manuel
pourraient être dangereux étant
donné qu’il se trouve à l’in-
térieur de ces appareils un gaz
frigorigène sous pression ainsi
que des composants électriques
sous tension.
Par conséquent l’installation, la
première mise en route et les
phases successives d’entretien
doivent être effectuées exclusi-
vement par un personnel agréé
et qualié.
Les installations effectuéesen
dehors des instructions fournies par
leprésentmanueletl’utilisationen
dehorsdeslimitesdetempérature
prescritesannulentlagarantie.
L’entretien courantdes ltres, le
nettoyagegénéralextérieurpeuvent
êtreeffectuésmêmeparl’utilisateur,
étantdonnéquecesopérationsne
comportentpasdedifcultéoude
danger.
Lors du montage,et àchaque
opérationd’entretien,ilfautobser-
verlesprécautions citées dansle
présentmanueletsurlesétiquettes
misesà l’intérieurdes appareils,
ainsiqu’adoptertoutelesprécaut-
ionssuggérées parle bonsens
commun et par les Normes de
Sécurité en vigueursur lelieu de
l’installation.
LautGesetzistdieseinvertrauliches
Dokument, daher gilt das Verbot
der Vervielfältigung oder Übermittl-
ung an Dritte ohne ausdrückliche
Genehmigung der Firma OLIMPIA
SPLENDID.
An den Geräten können techni-
sche Neuerungen vorgenommen
werden, d.h. Einzelteile können
u.U. anders aussehen als auf den
Abbildungen, was jedoch die Gült-
igkeit der Anweisungen in diesem
Benutzerhandbuch in keiner Weise
beeinträchtigt.
Bevor Sie mit einer Tätigkeit
beginnen (Installation, Instan-
dhaltung, Gebrauch), lesen Sie
aufmerksam das vorliegende
Benutzerhandbuch und halten
Sie sich strengstens an die in den
einzelnen Kapiteln dargelegten
Anweisungen.
DIE HERSTELLERFIRMA ÜB-
ERNIMMT KEINERLEI VERAN-
TWORTUNG FÜR SCHÄDEN
AN PERSONEN ODER SA-
CHEN, DIE DURCH NICHT-
BEACHTUNG DER IM VOR-
LIEGENDEN BENUTZERHAN-
DBUCH ENTHALTENEN SI-
CHERHEITSVORSCHRIFTEN
ENTSTEHEN.
Die Herstellerrma behält sich
das Recht vor, an ihren Modellen
jederzeit Veränderungen vorzu-
nehmen, wobei die wesentlichen
im vorliegenden Benutzerhan-
dbuch beschriebenen Geräteeig-
enschaften unverändert bleiben.
Die Installation und Instandhal-
tung von Klimaanlagen wie der
hier beschriebenen können
gefährlich sein, da sich im Inne-
ren der Anlagen ein unter Druck
stehendes Kühlgas bendet und
sie zudem elektrische Bauteile
enthalten, die unter Spannung
stehen.
Daher dürfen die Installation, die
erste Inbetriebsetzung und die
nachfolgenden Instandhaltun-
gsarbeiten ausschließlich von
autorisiertem und qualiziertem
Personal durchgeführt werden.
Installationen die nicht entsprechend
den im vorliegenden Handbuch enthal-
tenen Anweisungen sowie der Einsatz
unter Nichtbeachtung der vorgeschrie-
benen Temperaturgrenzen, geben
keinerlei Anspruch auf Garantie.
Die gewöhnliche Instandhaltung der
Filter und die allgemeine äußerliche
Reinigung können auch durch den
Benutzer durchgeführt werden, da
sie keine schwierigen oder gefährl-
ichen Tätigkeiten erfordern.
Während der Montage und bei
sämtlichen Instandhaltungstätig-
keiten müssen die Vorsichtsmaßn-
ahmen eingehalten werden, die in
diesem Benutzerhandbuch und auf
den Schildern im Innern der Geräte
angeführt sind; außerdem müssen
sämtliche Vorsichtsmaßnahmen
ergriffen werden, die der gesunde
Menschenverstand gebietet und
die durch die am Installationsort
geltenden Sicherheitsbestimmun-
gen vorgeschrieben sind.
La pagina si sta caricando...

14
I
GB
F
D
Always wear gloves and protecti-
ve goggles when performing any
operations on the refrigerating
side of the units.
Air conditioners MUST NOT
be installed in places con-
taining inammable gasses,
explosive gasses, or in very
humid environments (lau-
ndries, greenhouses, etc.),
or in places where there are
machines that generate very
great heat.
In case of replacement of par-
ts, use only original OLIMPIA
SPLENDID parts.
IMPORTANT!
To prevent any risk of electro-
cution, always disconnect the
main circuit breaker before ma-
king electric connections or
performing any maintenance on
the units.
The following instructions must
be made known to all personnel
involved in the machine’s tran-
sport and installation.
Do not pump in R410A into atmo-
sphere: R410A is a uorinated gre-
enhouse gas, covered by Kyoto
Protocol, with a Global Warming
Potential (GWP) = 2088
DISPOSAL
This symbol on the product or its
packaging indicates that the ap-
pliance cannot be treated as normal
domestic trash, but must be handed
in at a collection point for recycling
electric and electronic appliances.
Your contribution to the correct
disposal of this product protects
the environment and the health of
your fellow men. Health and the
environment are endangered by
incorrect disposal.
Further information about the
recycling of this product can be
obtained from your local town hall,
your refuse collection service, or
in the store at which you bought
the product.
This regulation is valid only in EU
member states.
Il faut toujours mettre des gants
et chausser des lunettes de
protection pour effectuer les in-
terventions sur le côté réfrigérant
des appareils.
Les climatiseurs NE DOIVENT
PAS être installés dans des
pièces où il y a présence de
gaz inammables, gaz explo-
sifs, dans des endroits très
humides (buanderies, serres,
etc.), ou dans des locaux où
se trouvent d’autres machines
produisant une importante
source de chaleur.
En cas de remplacement de
composants, utiliser exclu-
sivement des pièces de re-
change originales OLIMPIA
SPLENDID.
IMPORTANT!
An de prévenir tout risque d’él-
ectrocution, il est indispensable
de couper le courant au disjon-
cteur principal avant d’effectuer
des branchements électriques et
toute opération d’entretien sur
les appareils.
Communiquer ces instructions
à tout le personnel concerné par
le transport et l’installation de la
machine.
Ne pas émettre de R-410A dans
l’atmosphère: le R-410A est un gaz
à effet de serre uoré, cité dans
le Protocole de Kyoto, avec un
Pouvoir de Réchauffement Global
(GWP) égal à 2088
ELIMINATION
Cesymboleapposésurleproduit
ouson emballageindique quece
produitnedoitpasêtrejetéautitre
desorduresménagèresnormales,
mais doit être remis à un centre de
collectepourlerecyclagedesap-
pareilsélectriquesetélectroniques.
Encontribuant àune éliminat-
ion correcte dece produit,vous
protégezl’environnement etla
santéd’autrui. L’environnementet
lasantésontmisendangerparune
éliminationincorrecteduproduit.
Pourtoutesinformationscomplém-
entairesconcernantlerecyclagede
ceproduit, adressez-vousà votre
municipalité,votreservice desor-
duresouaumagasinoùvousavez
achetéleproduit.
Cetteconsigne n’estvalable que
pourlesétatsmembresdel’UE.
Bei Eingriffen an der Kühls-
eite der Geräte sind stets
Schutzhandschuhe und Schutz-
brille zu tragen.
Die Klimaanlagen DÜRFEN
NICHT in Räumen installiert
werden, in denen sich en-
tflammbare oder explosive
Gase benden oder in denen
hohe Feuchtigkeit herrscht
(Wäschereien, Gewächs-
häuser usw.) oder in Räumen,
in denen sich andere Geräte
befinden, die viel Wärme
freisetzen.
Bei der Auswechslung
von Einzelteilen bitte aus-
schließlich original OLIM-
PIA SPLENDID-Ersatzteile
verwenden.
WICHTIG!
Um dem Risiko eines Stromschla-
gs vorzubeugen, muss unbedingt
der Hauptschalter ausgeschal-
tet werden, bevor elektrische
Anschlüsse hergestellt oder
Instandhaltungsarbeiten an den
Geräten vorgenommen werden.
Das für den Transport und für die
Maschineninstallation zuständige
Personal ist von diesen Anwei-
sungen in Kenntnis zu setzen.
R-410A nicht in die Atmosphäre
auslassen: R-410A ist ein im
Kyoto-Protokoll verzeichnetes
Fluorgasmit mit einem globalem
Treibhauspotential (GWP) = 2088
ENTSORGUNG
Dieses Symbol auf dem Produkt
oder seiner Verpackung weist da-
rauf hin, dass dieses Produkt nicht
als normaler Haushaltsabfall zu
behandeln ist, sondern an einem
Sammelpunkt für das Recycling
von elektrischen und elektronischen
Geräten abgegeben werden muss.
Durch Ihren Beitrag zum korrekten
Entsorgen dieses Produktes schütz-
en Sie die Umwelt und die Gesun-
dheit Ihrer Mitmenschen. Umwelt
und Gesundheit werden durch
falsches Entsorgen gefährdet.
Weitere Informationen über das
Recycling dieses Produktes erhal-
ten Sie von Ihrem Rathaus, Ihrer
Müllabfuhr oder dem Geschäft, in
dem Sie das Produkt gekauft haben.
Diese Vorschrift ist nur gültig für
Mitgliedstaaten der EU.
1
E’ necessario indossare sempre
guanti ed occhiali protettivi per
eseguire interventi sul lato refri-
gerante degli apparecchi.
I climatizzatori NON DEVO-
NO essere installati in am-
bienti con presenza di gas
infiammabili, gas esplosi-
vi, in ambienti molto umidi
(lavanderie, serre, ecc.),
o in locali dove sono
presenti altri macchinari che
generano una forte fonte di
calore.
In caso di sostituzione di
componenti utilizzare
esclusivamente ricambi
originali OLIMPIA SPLENDID.
IMPORTANTE!
Per prevenire ogni rischio di
folgorazione è indispensabile
staccare l’interruttore generale
prima di effettuare collegamenti
elettrici ed ogni operazione di
manutenzione sugli apparecchi.
Rendere note a tutto il perso-
nale interessato al trasporto ed
all’installazione della macchina le
presenti istruzioni.
Non immettere R-410A nell’at-
mosfera: l’R-410A è un gas
serra uorurato, richiamato nel
Protocollo di Kyoto, con un Po-
tenziale di Riscaldamento Globale
(GWP)= 2088
SMALTIMENTO
Il simbolo sul prodotto o sulla
confezione indica che il prodotto
nondeveessereconsideratocome
un normale riuto domestico, ma
deveessere portatonel puntodi
raccoltaappropriatoperilriciclaggio
di apparecchiature elettriche ed
elettroniche.
Provvedendoa smaltirequesto
prodottoin modoappropriato, si
contribuisce a evitare potenziali
conseguenze negative perl’am-
bienteeperlasalute,chepotreb-
beroderivaredaunosmaltimento
inadeguatodelprodotto.
Perinformazioni piùdettagliate
sulriciclaggio diquesto prodotto,
contattare l’ufficio comunale,il
serviziolocaledismaltimentoriuti
oilnegozioincuièstatoacquistato
il prodotto.
Questa disposizione è valida
solamente negliStati membri
dell’UE.
La pagina si sta caricando...

16
I
GB
F
D
SYMBOLS
The pictograms in the next chapter
provide the necessary information
for correct, safe use of the machi-
ne in a rapid, unmistakable way.
Editorial pictograms
Service
- Refers to situations in which
you should inform the SERVICE
department in the company:
CUSTOMER TECHNICAL
SERVICE.
Index
- Paragraphs marked with this
symbol contain very important in-
formation and recommendations,
particularly as regards safety.
Failure to comply with them may
result in:
- danger of injury to the operators
- loss of the warranty
- refusal of liability by the manu-
facturer.
Raised hand
- Refers to actions that absolutely
must not be performed.
Safety pictograms
Danger of high voltage
- Signals to the personnel that the
operation described could cause
electrocution if not performed
according to the safety rules.
Generic danger
- Signals to the personnel that the
operation described could cause
physical injury if not performed
according to the safety rules.
Danger due to heat
- Signals to the personnel that the
operation described could cause
burns if not performed according
to the safety rules.
SYMBOLOGIE
Lespictogrammesreportésauchapitre
suivantpermettentdefournirrapidement
etdemanièreunivoquelesinformations
nécessairespouruneutilisationcorrecte
de la machine dans des conditions de
sécurité.
Pictogrammes rédactionnels
Service
- Indiquedes situationsoù ilfaut
informer le SERVICEinterne dela
société:
SERVICE APRES-VENTE CLIENTS.
Index
- Les paragraphes précédés par
ce symbole contiennentdes infor-
mationset desprescriptions très
importantes,notammentpourcequi
concernelasécurité.
Lenon-respectpeutcomporter:
- dangerpourlasécuritédesopérat-
eurs.
- pertedelagarantieducontrat.
- dégagementdelaresponsabilitédu
fabricant.
Main levée
- Indiquelesactionsqu’ilnefautabso-
lument pas accomplir.
Pictogrammes concernant la
sécurité
Tension électrique dange-
reuse
- Signaleaupersonnelconcernéque
l’opération décrite présente, si elle
n’est pas effectuéeconformément
auxnormesdesécurité,lerisquede
provoquerunedéchargeélectrique.
Danger général
- Signaleaupersonnelconcernéque
l’opération décrite présente, si elle
n’est pas effectuéeconformément
auxnormesdesécurité,lerisquede
provoquerdesdommagesphysiques.
Danger de température élevée
- Signaleaupersonnelconcernéque
l’opération décrite présente, si elle
n’est pas effectuéeconformément
auxnormesdesécurité,lerisquede
provoquerdesbrûlurespar contact
avecdescomposantsàtempérature
élevée.
BILDSYMBOLE
Die im folgenden Kapitel aufgeführt-
en Bildsymbole liefern schnell
und eindeutig Informationen zum
korrekten und sicheren Gebrauch
des Gerätes.
Bildsymbole
Kundendienst
- Kennzeichnet Situationen, in de-
nen der interne KUNDENDIENST
der Firma zu benachrichtigen ist:
KUNDENDIENST
Inhaltsverzeichnis
- Die Paragrafen, denen dieses
Symbol vorausgeht, enthalten sehr
wichtige Informationen und Vor-
schriften, insbesondere bezüglich
der Sicherheit.
Die Nichtbeachtung dieser Informa-
tionen und Vorschriften kann dazu
führen, dass:
- die Unversehrtheit des Personals
an den Geräten gefährdet ist
- die vertragliche Garantie verfällt
- die Herstellerfirma jede
Verantwortung ablehnt.
Erhobene Hand
- Kennzeichnet Handlungen, die
absolut verboten sind.
Bildsymbole zur Sicherheit
Gefährliche elektrische Span-
nung
- Zeigt dem betreffenden Personal
an, dass bei der beschriebenen
Tätigkeit die Gefahr eines elektri-
schen Schlags besteht, wenn
diese nicht unter Beachtung der Si-
cherheitsvorschriften durchgeführt
wird.
Allgemeine Gefahr
- Zeigt dem betreffenden Personal
an, dass bei der beschriebenen
Tätigkeit Verletzungsgefahr be-
steht, wenn diese nicht unter
Beachtung der Sicherheitsvor-
schriften durchgeführt wird.
Gefahr durch starke Hitze
- Zeigt dem betreffenden Personal
an, dass bei der beschriebenen
Tätigkeit Verbrennungsgefahr
durch Berührung heißer Gerätet-
eile besteht, wenn diese nicht
unter Beachtung der Sicherhei-
tsvorschriften durchgeführt wird.
1
SIMBOLOGIA
Ipittogrammiriportatinelseguen-
te capitoloconsentono di fornire
rapidamente ed in modo univoco
informazioni necessarie alla corretta
utilizzazione della macchina in
condizioni di sicurezza.
Pittogrammi redazionali
Service
- Contrassegna situazioninelle
qualisideveinformareilSERVI-
CEaziendaleinterno:
SERVIZIO ASSISTENZA
TECNICA CLIENTI.
Indice
- Iparagrapreceduti daquesto
simbolocontengonoinformazioni
e prescrizioni molto importan-
ti,particolarmente perquanto
riguardalasicurezza.
Ilmancatorispettopuòcomportare:
- pericolo perl’incolumità degli
operatori
- perditadellagaranziacontrattua-
le
- declinazionediresponsabilitàda
parte della ditta costruttrice.
Mano alzata
- Contrassegnaazionichenonsi
devonoassolutamentefare.
Pittogrammi relativi alla
sicurezza
Tensione elettrica pericolosa
- Segnalaal personale interes-
sato che l’operazione descritta
presenta,se noneffettuatanel
rispetto delle normative di si-
curezza,ilrischiodisubireuno
shock elettrico.
Pericolo generico
- che l’operazionedescritta pre-
senta,senoneffettuatanelrispet-
todellenormativedisicurezza,il
rischiodisubiredannisici.
Pericolo di forte calore
- dellenormativedi sicurezza,
il rischio di subire bruciature per
contatto con componenti con
elevatatemperatura.
1.2
1.2.1
1.2.2
La pagina si sta caricando...

18
I
GB
F
D
1.3
1.4
1
USO PREVISTO
Ilclimatizzatoredeveessereutiliz-
zato esclusivamente per produrre
ariacaldaofredda(ascelta)conil
soloscopodirendereconfortevole
la temperatura nell’ambiente.
Unusoimpropriodell’apparecchia-
turaconeventualidannicausatia
persone, cose o animali esulano
l’OLIMPIA SPLENDID da ogni
responsabilità.
ELENCO COMPONENTI A
CORREDO
Leunitàchecompongonoilsistema
diclimatizzazionevengono confe-
zionatesingolarmenteinimballodi
cartone.
Gli imballi possono essere traspor-
tati,persingoleunità,amanoda
due addetti, oppure caricate su
carrello trasportatore anche acca-
tastate per un numero massimo di
tre confezioni.
La fornitura comprende
le parti precisate nella se-
guente tabella. Prima di pas-
sare al montaggio è bene
accertarsi di averle tutte a
portata di mano.
A- Staffaperancoraggioaparete
B - Griglie esterneperl’entratae
l’uscitadell’aria(n.2)comprensi-
vedicatenelle
C - Fogliopertubiparete
D- Flangiainternadissaggiotubi
(n.2)
E- Kitvitietasselli
F- Librettiusoemanutenzione+
garanzia
G- Dimadicartaperl’esecuzione
deifori(Fig.1)
H-Zoccolo(n.2)
I - Tubodrenaggio
L- Chiave bloccaggio
telecomando
PROPER USE
The air-conditioner should be used
for the exclusive purpose of pro-
ducing hot or cool air (on demand)
for the sole purpose of obtaining a
comfortable temperature in the room.
Improper use of the machine (outside
and inside units) causing damage to
persons, property or animals relieve
OLIMPIASPLENDIDofanyliability.
LIST OF ACCESSORIES SUP-
PLIED
The two units that make up the
air-conditioner are packed separa-
tely in cartons.
Packaging may be transported
per single units, by hand by two
authorized persons, or loaded on a
trolley, even piling up to a maximum
of three packs.
The supply includes the parts
listed in the table below. Befo-
re beginning to assemble the
unit, make sure all the parts
are within easy reach.
A - Wall fastening bracket 1
B- Externalairintake/outletgrids
(2) complete with chains
C - Sheet for wall pipes
D- Pipefasteninginnerange2
E - Kit of screws and anchor bolts
F - Manual of instructions for use
and maintenance, and warranty
G - Paper template to make holes
(Fig. 1)
H - Shoe (n.2)
I - Drain pipe
L - Remote control locking key
UTILISATION PRÉVUE
Leclimatiseurdoitêtreutiliséexclu-
sivementpourproduiredel’airchaud
oufroid(auchoix)dansleseulbut
derendreagréablelatempérature
ambiante.
Un usage impropre des appareils
(extérieur et intérieur) avec d’év-
entuels dommages causés aux
personnes,aux biensouaux ani-
maux dégage lasociété OLIMPIA
SPLENDIDdetouteresponsabilité.
LISTE DES COMPOSANTS
NECESSAIRES FOURNIS
Lesunitésquicomposentlesystème
de climatisation sont emballées
individuellement dans une caisse
en carton.
Lesemballagespeuventêtretran-
sportées par unités individuelles
àla mainpar deuxpersonnes ou
chargéessurunchariottransporteur,
même empilés à raison de trois
emballagesaumaximum.
La forniture comprend les
pièces précisées dans la
tableau suivant. Avant de
procéder au montage, il est
conseillé de s’assurer de les
avoir toutes à portée de main.
A- Bridepourancrageaumur
B - Grillesextérieurespourl’entrée
etlasortiedel’air(2)comprenant
les chaînes.
C - Feuillepourtubesmuraux
D- Flasque intérieure de xation
destuyaux(n.2)
E- Kitvisetchevilles
F- Manuel d’instruction mode
d’emploi,montageetgarantie
G- Gabaritenpapierpourl’exécution
destrous(Fig.1)
H-Plinthe(2)
I - Tuyaudedrainage
L - Clefdeblocagetélécommande
VORGESEHENER GEBRAU-
CH
Die Klimaanlage darf ausschließlich
dafür verwendet werden, warme
oder kalte Luft (nach Wahl) zu
produzieren; ihr einziger Verwen-
dungszweck ist der, die Raumtem-
peratur angenehm zu temperieren.
OLIMPIA SPLENDID übernimmt
keinerlei Verantwortung für Schäd-
en, die durch zweckentfremdeten
Gebrauch der Anlage an Personen,
Sachen oder Tieren entstehen.
LISTE DER AUSSTATTUNG-
SELEMENTE
Die Einheiten, aus denen die Klima-
anlage besteht, werden einzeln in
Kartons verpackt.
Die Verpackungen können einzeln von
zwei Angestellten von Hand oder auf
einem Transportwagen zu maximal
drei Einheiten aufeinandergestapelt
transportiert werden.
Die Lieferung umfasst die in
nachfolgender Tabelle auf-
geführten Teile. Bevor man
mit der Montage beginnt,
sollte man sich davon überz-
eugen, dass man alle Teile zur
Hand hat.
A - Bügel zur Verankerung in der
Wand
B - Außengitter für das Ein- und
Ausströmen der Luft (2)
einschließlich Kette.
C - Rohrhalbschalen für Wand-
schläuche
D- InnenanschzurBefestigungder
Rohre (2 Stück)
E - Satz Schrauben und Dübel
F - Instandhaltungs-und Garantie
Handbücher
G - Papierschablone zur
Durchführung der Bohrungen
(Abb. 1)
H - Sockel (Anz. 2)
I - Ablaufrohr
L -
Fernbedienungssicherungsschlüssel
A B
F
D
E
C
H
L
I
0
La pagina si sta caricando...

20
I
GB
F
D
1.4.1
1.4.2
Immagazzinamento
Immagazzinare le confezioni in
ambiente chiuso e protetto dagli
agentiatmosferici,isolatedalsuolo
tramitetraversineopallet.
NON CAPOVOLGERE
L’IMBALLO.
Ricevimento e disimballo
L’imballo è costituito da materiale
adeguatoedeseguitodapersonale
esperto.
Le unità sono tutte controllate e
collaudate e vengonoconsegnate
completeedinperfettecondizioni,
tuttaviaperilcontrollodellaqualità
deiserviziditrasportoattenersialle
seguentiavvertenze:
- al ricevimento degli imballi ve-
ricare se la confezione risulta
danneggiata, in caso positivo
ritirare la merce con riserva,
producendo prove fotograche
edeventualidanniapparenti.
- disimballare verificando la
presenzadeisingolicomponenti
conglielenchid’imballo
- controllarechetuttiicomponenti
non abbiano subito danni durante
il trasporto; nel caso noticare
entro3giornidalricevimentogli
eventualidanniallospedizionie-
re a mezzo raccomandata r.r.
presentando documentazione
fotograca.
Analoga informazione inviarla
tramite fax anche a OLIMPIA
SPLENDID.
Nessuna informazion concer-
nente danni subiti potrà essere
presainesamedopo3giornidalla
consegna.
Nota importante:
Conservarel’imballoalmenopertut-
taladuratadelperiododigaranzia,
pereventualispedizionialcentrodi
assistenza in caso di riparazione.
Smaltire i componenti dell’imballo
secondolenormativevigentisullo
smaltimentodeiriuti.
Storage
Store the cartons in a closed environ-
ment protected against atmospheric
agentsand raisedoff the oorby
planks or a pallet.
TO NOT TURN THE CARTON
UPSIDE DOWN.
Receipt and unpacking
The packing is made of suitable
material and is done by expert
personnel.
The units are delivered complete
and in perfect condition, however
we suggest that you perform the
following controls of the quality of
the shipping service:
- on receipt of the cartons check
them for any damage and, if any
is found, accept the goods with
reservation, and keep
photographic evidence of any
damage found.
- unpack and check the contents
against the packing list.
- make sure none of the parts have
been damaged during shipment;
in case of damage you must report
it to the shipping
company within 3 days of receipt,
by registered letter with return
receipt,
presenting photographic docu-
mentation.
Copy of notice should also be sent
by fax to OLIMPIA SPLENDID.
No notice of damage will be ac-
cepted after 3 days from delivery.
Important note:
Keep the packing at least through
the warranty period, in case you
need to ship the air-conditioner to
the service centre for repair.
Dispose of the packing materials in
compliance with the rules in effect
for waste disposal.
Stockage
Stocker les caisses dans un local
ferméetprotégédesagentsatmo-
sphériques,isoléesdusolpardes
traversesoudespalettes.
NE PAS RENVERSER L’EM-
BALLAGE.
Réception et déballage
L’emballage est constitué de ma-
tériau adéquat et effectué par un
personnelexpert.
Les unitéssont livrées complètes
et en parfaites conditions; suivre
cependantlesinstructionssuivantes
pour lecontrôle dela qualitédes
servicesdetransport:
- à la réception des emballages
vérier sile carton est endom-
magé, si c’est le cas retirer la
marchandise sous réserve, en
produisant des preuves photo-
graphiquesdeséventuelsdégâts
apparents.
- déballerenvériantlaprésence
dechacundescomposantsavec
leslistesd’emballage.
- contrôler qu’aucun composant
n’asubidedommagespendant
letransport;danslecascontraire,
notierleséventuelsdommages
autransporteurdansledélaide3
joursàpartirdelaréceptionpar
lettrerecommandéeavecaccusé
de réception en présentant la
documentationphotographique.
Envoyer aussi par fax cette
même information à OLIMPIA
SPLENDID.
Aucune information concernant
lesdommagessubisnepourra
être prise enconsidération au-
delàde3joursaprèslalivraison.
Note importante:
Conserver l’emballage au moins
pendanttouteladuréedelapériode
de garantie, pour d’éventuelles
expéditions au centre du service
après-venteencasderéparation.
Pour la mise au rebut des composan-
tsdel’emballage,suivrelesnormes
localesrelativesàl’éliminationdes
déchetsenvigueur.
Lagerung
Die Verpackungen in geschlosse-
ner und vor Witterungseinüssen
geschützter Umgebung lagern;
sie müssen durch Schwellen oder
Paletten vom Boden getrennt sein.
DIE VERPACKUNG NICHT AUF
DEN KOPF STELLEN.
Annahme und Auspacken
Die Verpackung besteht aus geei-
gnetem Material; die Geräte werden
vonqualiziertemPersonalverpackt.
Die Einheiten sind alle kontrolliert
und geprüft und werden vollständig
und in einwandfreiem Zustand ge-
liefert; dennoch sollte man zur Qua-
litätskontrolle des Transportdienstes
folgende Hinweise beachten:
- Kontrollieren Sie bei Erhalt der
Verpackungen,obdieLieferung
beschädigt ist. Sollte dies der
Fall sein, nehmen Sie die Ware
unter Vorbehalt an und fertigen
SieFotograenalsBeweismittel
offensichtlicher Schäden an.
- Überprüfen Sie beim Auspacken
das Vorhandensein der einzel-
nen Komponenten anhand der
Verpackungslisten.
- Prüfen Sie nach, dass keines der
Bestandteile beim Transport be-
schädigt wurde; sollte dies jedoch
der Fall sein, teilen Sie die even-
tuellen Schäden innerhalb von 3
Tagen nach Erhalt der Ware dem
Spediteur mittels Einschreiben mit
Rückschein mit und legen Sie die
FotograenalsBeweismittelbei.
Schicken Sie dieselben Informa-
tionen per Fax auch an OLIMPIA
SPLENDID.
Später als 3 Tage nach Eingang
derLieferungkönnenSchaden-
smeldungen nicht mehr berücks-
ichtigt werden.
Wichtiger Hinweis:
Bewahren Sie die Verpackung min-
destens über die gesamte Dauer der
Garantiezeit auf; falls etwas repariert
werden muss, kann sie zum Einsen-
den von Teilen an den Kundendienst
benutzt werden.
Entsorgen Sie die Verpackungsteile
gemäß den geltenden Abfallbeseiti-
gungs-Vorschriften.
11
La pagina si sta caricando...

22
I
GB
F
D
MODALITÀ
D’INSTALLAZIONE
Per ottenere una buona riuscita
dell’installazione e prestazioni di
funzionamento ottimali, seguire
attentamente quanto indicato nel
presente manuale. La mancata
applicazionedellenormeindicate,
che può causare mal funzionamento
delleapparecchiature,sollevanola
dittaOLIMPIASPLENDIDdaognifor-
madigaranziaedaeventualidanni
causatiapersone,animaliocose.
E’ importante che l’impianto
elettrico sia a norma, rispetto
ai dati riportati nella scheda
tecnica e sia provvisto di una
buona messa a terra.
Dimensioni e caratteristiche
del locale dove installare il
climatizzatore
L’apparecchio deve essere instal-
lato rispettando i regolamenti na-
zionali previsti per le connessioni
elettriche.
Prima di installare il climatizzatore
èindispensabile procederead un
calcolodeicarichitermiciestivi.
Piùquestocomputoècorrettoepiù
ilprodottoassolveràpienamentela
sua funzione.
Perl’esecuzionedeicalcolidovete
riferirvidirettamenteallenormative
invigore(UNIrif.Legge10/91)oa
tabelle,siastampatecheinformati-
che,estrapolatedallestessenorme.
Per applicazioni particolarmente
importantiViconsigliamodirivolger-
Viastuditermotecnicispecializzati.
Perquanto possibilecomunque
bisognacercaredilimitareicarichi
temicimaggiori coni seguenti
accorgimenti:Su ampievetrate
esposteal soleè opportunoche
vi siano tendeinterne omeglio
mascheratureesterne(veneziane,
verande,pellicolerifrangentiecc.)
Illocalecondizionatodeverimanere
per il maggior tempopossibile
chiuso.
Evitare l’accensione di fari ditipo
alogenoconalticonsumiodialtre
apparecchiature elettriche che
assorbanotanta energia(fornetti,
ferridastiroavapore,piastreper
cotturaecc).
2.1
2.1.1
INSTRUCTIONS FOR IN-
STALLATION
To obtain the best results and
optimum performance, follow the
instructions for correct installation
provided in this manual. Failure to
follow the instructions and apply
the rules indicated may cause
malfunction of the appliance and
relievesthemanufacturer,OLIMPIA
SPLENDIDofanyformofguarantee
and liability for damages to persons,
animals or property.
The electrical system must
comply with the regulations
and rating data in the technical
sheet, with good grounding.
Dimensions and features of
site where air conditioner is
installed
The appliance shall be instal-
led in accordance with natio-
nal wiring regulations.
Before installing the air conditioner,
it is essential to make an accurate
calculation of the heat load in
summer.
The more accurate this calculation
is made the better the air conditioner
will be able to do its job.
To make these calculations, refer
directly to the regulations in effect
(UNIref.Law10/91)ortothetables,
both printed and computerized,
based on those regulations.
Forparticularlysignicantapplica-
tions, we recommend contacting
expert heating engineers.
As far as possible, in any case, it is
important to try and reduce major
thermal loads by the following
means:
Largeglass panesexposed to
sunlight should be provided with
curtains on the inside or shades on
the outside (Venetian blinds, veran-
das,refractinglms,etc.)
The air-conditioned room should
be closed as much of the time as
possible.
Halogen spotlights or other electri-
cal equipment with high power
consumption should not be used in
the room (toasters, steam irons, hot
plates for cooking, etc.).
MODE D’INSTALLATION
Pourunebonneréussitedel’instal-
lationetpourquelesprestationsde
fonctionnement soient optimales,
suivreattentivementlesinstructions
dansleprésentmanuel.Lenon-re-
spect de l‘application des normes
indiquées, qui peut entraîner un
mauvaisfonctionnementdesappa-
reillages,dégagelasociétéOLIMPIA
SPLENDIDdetouteformedega-
rantieetdeséventuelsdommages
causésàdespersonnes,animaux
ou biens.
S’assurer que l’installation
électrique correspond aux
normes, respecte les données
reportées sur la che techni-
que et qu’elle dispose d’une
mise à la terre adéquate.
Dimensions et caractéris-
tiques de la pièce où le cli
matiseur doit être installé
L’équipement doit être installé
dans le respect des règlements
nationaux en vigueur pour les
connexions électriques.
Avantl’installation duclimatiseur,
ilestindispensabledeprocéderà
uncalcul des chargesthermiques
d’étérelativesàlapièceconcernée.
Pluscecalculestcorrectetplusvo-
tre climatiseur remplira sa fonction.
Pourl’exécutiondescalculs,vous
devrezvousréférerdirectementaux
règlementationsenvigueur(UNIréf.
Loi 10/91) ouaux tableaux,aussi
bienimprimés qu’informatiques,
extrapolésdecesmêmesnormes.
Pour des applications particu-
lièrement importantes, nous vous
conseillonsdevousadresseràdes
bureaux d’études thermo-techni-
quesspécialisés.
Dans la mesuredu possible,il faut
essayer de limiter,de toutefaçon,
lescharges thermiquesmajeures en
suivantcesprécautions.
Surdegrandesbaiesvitréesexposées
ausoleil,ilestopportunqu’ilyaitdes
rideauxàl’intérieuroumieuxencore,
desprotections extérieures(stores
vénitiens,vérandas,pelliculesréfractiv-
es,etc...)
Lapièceclimatiséedoitresterleplus
detempspossiblefermée.
Evitez d’allumer des lampes de type
halogène à grande consomation ou
d’autresappareillagesélectriquesqui
absorbent une quantité importante
d’énergie(petitsfours,fersàrepasser
àlavapeur,plaquesdecuisson,etc...).
INSTALLATIONSBESTIMMUNGEN
Befolgen Sie genauestens die
Anweisungen des vorliegenden
Benutzerhandbuchs, um die Instal-
lation problemlos durchführen und
optimale Betriebsleistungen erzielen
zu können. Die Nichtbeachtung
der angeführten Vorschriften kann
zu Funktionsstörungen der Anlage
führenundenthebtdieFirmaOLIM-
PIASPLENDIDvonjederPichtzur
Garantieleistung und von der Ve-
rantwortung für eventuelle Schäden
an Personen, Tieren oder Sachen.
Die elektrische Anlage muss
genormt sein, die in der
technischen Beschreibung
aufgeführten Daten einhalten
und mit einer guten Erdleitung
ausgestattet sein.
Abmessungen und Eigen-
schaften des Raums, in dem
dem das Klimagerät installiert
wird
Das Gerät ist unter Einhaltung
der für elektrische Anschlüsse
vorgesehenen nationalen Veror-
dnungen zu installieren.
Vor der Installation des Klima-
gerätes ist eine Berechnung der
benötigten Kühlleistung für den
Sommer bezüglich des betreffen-
den Raums durchzuführen.
Je genauer diese Berechnung ist,
destoefzienteristdieArbeitsweise
des Gerätes. Für die Durchführung
der Berechnungen hat man sich
auf die Vorschriften der gelten-
den Richtlinien (UNI Gesetz Nr.
10/91) oder aufdie Tabellen (auf
Ausdrucken oder Datenträgern),
die ebenfalls in den Richtlinien
enthalten sind, zu beziehen.
Im Falle von besonders komplexen
Installationen ist es empfehlenswert,
sich an kompetente Fachkräfte
(Wärmetechniker) zu wenden.
Nach Möglichkeit sollten höhere
Wärmeleistungen vermieden werden,
wobei Folgendes zu beachten ist: Bei
großächigenFenstern,dieeinerstar-
ken Sonneneinstrahlung ausgesetzt
sind, sollten im Raum Vorhänge oder
auf der Außenseite des Gebäudes
Sonnenschutzvorrichtungen (Stores,
Veranden, lichtbrechende Folien,
usw.) angebracht werden.
Der klimatisierte Raum sollte möglichst
lange geschlossen bleiben.
Es sollten keine Halogenlampen mit
hohem Energieverbrauch oder andere
elektrische stromaufnehmende Geräte
(Öfen, Dampfbügeleisen, Kochfelder,
usw.) eingeschaltet werden.
12
La pagina si sta caricando...

24
I
GB
F
D
Scelta della posizione dove
installare il climatizzatore
La posizione di installazione deve
essere scelta a ridosso di
una parete comunicante con
l’esterno.
Avvertenza: Una volta in-
dividuata, secondo i crite-
ri precedentemente espo-
sti, la corretta posizione per
l’installazione occorre vericare
che nei punti dove avete inten-
zione di praticare i fori non vi
siano strutture od impianti (travi ,
pilastri, tubazioni idrauliche, cavi
elettrici ecc.) che impediscano
l’esecuzione dei fori necessari
all’installazione.
Controllate ancora una volta che
non sussistano ostacoli alla libera
circolazione dell’aria attraverso i
fori che andrete a praticare (pian-
te e relativo fogliame, doghe di
rivestimento, persiane, grate o
griglie troppo tte ecc.).
MONTAGGIO DELL’UNITÀ
Foratura della parete
Questa operazione deve essere
eseguita utilizzando un’attrezzatu-
raappropriata cheagevoli ilvostro
lavoro e cheeviti dannio disturbi
eccessivi al Vostro cliente. Imigliori
strumentiper eseguirefori digran-
dediametro sullepareti sonodegli
specialitrapani (chiamati“carotatri-
ci”)con elevatacoppia torcente e
convelocità dirotazione regolabile a
secondo del diametro del foro da
praticare.
Perevitare ladiffusione dielevate
quantitàdipolvereedetritiinambiente
le “carotatrici” si possono accoppiare
a sistemi di aspirazione composti
essenzialmente da unaspirapolvere
da collegare adun’accessorio (tipo
ventosa)dametterearidossodella
punta di perforazione.
2.1.2
2.2
2.2.1
Choice of best position for
installing the air conditioner
The air conditioner must be
installed on a wall that commu-
nicates with the outside.
Caution: After determining the
best place for installation as
described above, check to make
sure that the wall can be drilled in
that point without interfering with
other structures or installations
(beams, piers, pipes, wires, etc.).
Check again to make sure there
are no obstacles to air circulation
through the holes to be drilled
due to plants and their leaves,
slats or panelling, blinds, gratings
or grids too dense, etc.).
INSTALLATION OF THE UNIT
Drilling the wall
This operation should be carried out
using the proper tools to facilitate
your work and prevent excess da-
mage or disturbance to your client.
The best tools for drilling large holes
in walls are special drills called core
borers with very high twisting tor-
que and adjustable rotation speed
depending on the diameter of the
hole to be drilled.
To prevent the creation of large
amounts of dust and rubble due to
drilling,thecoreborercanbetted
with a vacuum system applied by
means of suction cups to the dril-
ling zone.
Choix de la position où instal-
ler le climatiseur
La position de l’installation doit
être choisie sur un mur commu-
niquant avec l’extérieur.
AVERTISSEMENT: Une fois lo-
calisée la position correcte pour
l’installation, selon les critères
précédemment exposés, il vaut
vérifier qu’à l’endroit où vous
avez l’intention de percer des
trous, il n’y ait pas de structures
ou d’installations (poutres, pi-
liers, tuyauteries hydrauliques,
câbles électriques, etc ...) qui
empêchent l’exécution des trous
nécessaires à l’installation.
Contrôler encore une fois qu’il
n’y ait pas d’obstacles à la libre
circulation de l’air à travers les
trous que vous allez pratiquer
(arbres et leur feuillage, lambris,
persiennes, grillages ou grilles
trop serrés, etc...).
MONTAGE DE L’UNITÉ
Perçage du mur
Cetteopérationdoitêtreexécutée
enutilisantunoutillageapproprié
quifacilitevotretravailetquivous
évitedesdommagesetdesdérang-
ementsexcessifs enversvotre
client. Les meilleurs instruments
pourexécuterdestrousd’ungrand
diamètre dans lesmurs sontdes
perceusesspécialisées dotées
d’unescie-trépanàcoupledetor-
sionélevé etcaractérisé parune
vitessederotationréglableselonle
diamètredutrouàpratiquer.
Pouréviterladiffusiond’unegrande
quantitédepoussièreetdedétritus
danslapièce,lesperceusesàscie-
trépanpeuvent êtrereliées à des
systèmes d’aspiration composés
essentiellementd’unaspirateurdoté
d’unaccessoire (typeventouse)
qu’ilfautplaceraudessusduforet
de perforation.
Wahl der Stelle, an der das Kli-
magerät installiert werden soll
Das Gerät ist an einer zur Au-
ßenseite des Gebäudes ge-
richteten Wand zu installieren.
Hinweis: Nachdem unter
Berücksichtigung der zuvor
erläuterten Kriterien die Stelle,
an der das Klimagerät installiert
werden soll, gewählt wurde,
ist zu überprüfen, ob sich an
der zu bohrenden Stelle in
der Wand Stahlträger, Was-
serrohre, Abwasserleitungen,
elektr. Kabel o.ä. benden, die
eine Bohrung verhindern.
Nach der Erstellung der beiden
Bohrungen ist zu überprüfen,
ob der Außenluftansaug und
die Rückführung der Luft nach
außen nicht durch blattreiche
Panzen, Fassadenverkleidun-
gen, Fensterläden o.ä. behindert
wird.
MONTAGE DER EINHEIT
Durchführung der Bohrungen
Die Bohrungen sind mit einem geei-
gneten Bohrer durchzuführen, durch
den die Arbeit erleichtert und ein
übermäßigstörenderLärmverhindert
wird oder zu große Beschädigungen
an der Wand vermieden werden.
Die besten Ergebnisse für dei Erstel-
lung von Bohrlöchern mit großem
Durchmesser erzielt man mit speziel-
len Betonbohrern, die ein erhöhtes
Drehmoment und eine einstellbare
Drehzahl, je nach durchzuführend-
emLochdurchmesser,aufweisen.
Zur Vermeidung einer übermäßigen
Bildung von Staub und Bohrgut
kann der Bohrkopf mit einer Absau-
gvorrichtung versehen werden, die
an einen Staubsauger angeschlos-
sen werden kann.
12
La pagina si sta caricando...

26
I
GB
F
D
1
To drill the holes, proceed as follows:
Fasten the drilling template to the
wall leaving the necessary space
fromtheceiling,oorandsidewalls
as shown on the template. Use
adhesive tape to fasten it in place.
Use a small drill or punch to mark,
with extreme care, the exact centre
of each of the holes to be drilled.
Using a core boring head measuring
at least 162 mm to drill the two holes
for entry and exit of the air.
The maximum length allowed for
pipes is 1 m. The pipes must be
smooth on the inside, and with a
diameter of 160 mm. Pipes cannot
be curved or bent.
It is necessary to use the grilles
provided, or grilles which keep the
same features.
Note: The holes should have a
slight outward inclination to pre-
vent any backow of water from
the pipes .
Most of the removed material is
expelled outwards, therefore make
sure that it does not hit any person
or object when it falls out.
In order to avoid as much as pos-
sible outer plaster breaking, it is
necessary to proceed carefully
with the last part of hole execution,
decreasing pressure on core borers.
Make two 6 mm diameter holes in
correspondence with the anchor
points of the wall-fixing bracket
using the template provided.
Pourexécuterleperçage,procéderde
lafaçonsuivante:
Placezle gabaritdu perçagefourni
contre le mur en respectant les di-
stances minimums: parrapport au
plafond,ausoletauxmurslatéraux,
indiquéssurcegabarit.Celui-cipeut
être maintenu dans la bonne position
avecdurubanadhésif.
A l’aide d’une petite perceuse ou d’un
pointeur,tracez avecgrandsoin les
centresdesdifférentstrousàeffectuer
avantleurréalisation.
Effectuez avec unforet scie-trépan
d’un diamètre minimumégal à162
mm,lesdeuxtrouspourl’entréeetla
sortie de l’air.
Lalongueurmaximaleadmisepour
lestuyaux est de1m,les tuyaux
doiventêtrelissesàl’intérieur,d’un
diamètreégalà160mmetaucun
coudenepeutêtreréalisé.
Il faut utiliser les grilles fournies
avec la machine, ou bien des
grilles qui possèdent les mêmes
caractéristiques.
Avertissement: Ces trous doivent
être exécutés avec une légère
inclinaison vers l’extérieur pour
empêcher d’éventuelles rentrées
d’eau par les conduits.
Laplusgrandepartiedelamatière
enlevée est expulséevers l’ex-
térieur;ilfautdoncveilleràcequ’en
tombant,ellen’aillepasheurterles
personnesoulesobjetssetrouvant
dessous.
Pouréviter leplus possible la
rupturedel’enduitextérieur,ilfaut
procéder avec beaucoup de soin
pourl’exécutiondelapartienale
du trou en diminuant un peu la
pressionexercée surla perceuse
àscie-trépan.
Percerdeux oricesde 6mm de
diamètredestinésàrecevoirlesup-
portdexationmurale,enutilisant
legabaritfourni.
Für die Durchführung der Bohrungen
ist wie folgt vorzugehen:
Die mitgelieferte Bohrschablone an
der Wand positionieren, wobei die
auf der Schablone angegebenen
Mindestabstände zur Decke, zum
Fußboden und zu den seitlichen
Wänden zu berücksichtigen sind. Die
Bohrschablone kann durch Anbringen
von Klebeband gegen ein Verrutschen
geschützt werden. Mit einem kleinen
Bohrer oder einem Treiber die Mitte
der zu bohrendenLöcher sorgfältig
anreißen.
Mit einem Bohrkopf AD 162 mm,
diezweiLöcherfürdenLuftein-und
-austritt bohren.
Die maximal zulässige Länge der
Rohrleitungen beträgt 1m; die
Rohrleitungen müssen innen glatt
sein, einen Durchmesser von 160
mm aufweisen und müssen ohne
Kurven verlegt werden.
Es müssen die mitgelieferten Gitter
oder andere Gitter die diesel-
ben Eigenschaften gewährleisten,
verwendet werden.
Hinweis: Diese Bohrungen sind
mit einer leichten Neigung zur
Außenseite des Gebäudes hin
durchzuführen, damit keine
Feuchtigkeit (Regen) von außen
eintreten kann.
Das meiste abgetragene Material
wird nach außen hin ausgestoßen,
es ist daher dafür zu sorgen, dass
es beim Herunterfallen keine Perso-
nen oder Gegenstände trifft.
Damit der Außenputz möglichst
nicht beschädigt wird, ist der letzte
BereichdesLochsmitgroßerSor-
gfalt durchzuführen, indem man den
auf den Betonbohrer auszuübenden
Druck verringert.
Führen Sie die beiden
6-mm-Bohrungen für die Veranke-
rung des Wandbefestigungsbügels
unter Verwendung der Bohrschablo-
ne aus.
Pereseguirelaforaturaprocedere
comesegue:
Collocare la dima di foratura indota-
zione contro la parete rispettando
ledistanzeminime:dalsoftto,dal
pavimentoe dallepareti laterali
indicate sulla dima stessa che può
essere tenuta nella corretta posizio-
necondelnastroadesivo.
Tramiteun piccolotrapano odun
punteruolo tracciate con estrema
curailcentrodeivariforidapraticare
prima della loro realizzazione.
Praticare,tramiteunapuntacarota-
trice di diametro minimo pari a 162
mm i due fori per l’entrata e l’uscita
dell’aria.
Lalunghezzamassimaconsentita
peritubièdi1m,itubidevonoessere
internamentelisci,didiametropari
a 160 mm e non possono essere
eseguitecurve.
E’ necessario utilizzare le griglie
fornite in dotazione, oppure delle
grigliechemantenganolemedesime
caratteristiche.
Avvertenze: Questi fori devono
essere eseguiti con una leggera
inclinazione verso l’esterno per
impedire eventuali rientri di ac-
qua dai condotti.
La maggior partedel materiale
asportatoviene espulsoverso
l’esterno, pertanto occorrecau-
telarsi che cadendo non colpisca
personeeoggettisottostanti.
Perevitareilpiùpossibilelarottura
dell’intonaco esterno occorre
procedere con molta cautela
all’esecuzionedellapartenaledel
foro allentando un po’ la pressione
esercitata sulla carotatrice.
Eseguireidueforididiametro6mm
relativi all’ancoraggio dellastaffa
dissaggioapareteutilizzandola
dima di foratura.
12
La pagina si sta caricando...

28
I
GB
F
D
12
Predisposizione dello scarico
condensa per le macchine in
pompa di calore
Durante il funzionamento in
riscaldamento gli apparecchipro-
duconocondensachedeveessere
smaltita con un apposita linea di
scarico in assenzadel qualela
macchina non può funzionare.
Il drenaggio avviene per gravità.
Perquestomotivoèindispensabile
che la linea di scarico abbia una
pendenzaminimainognipuntodi
almenoil3%.Togliereiltapposulla
macchinaquindi collegareil tubo
fornitoacorredocomeingura2.
Nel caso che la linea sfoci in un
sistemafognario,occorreeseguire
una sifonatura prima dell’immissio-
ne del tubo nello scarico principale.
Questosifonedovràtrovarsialmeno
300 mm sotto l’imbocco dall’appa-
recchio.
AVVERTENZA: fate at-
tenzione in questo caso
che l’acqua espulsa non
determini danni o inconve-
nienti alle cose o alle persone.
Durante il periodo invernale
quest’acqua può provocare
formazioni di lastre di ghiac-
cio all’esterno.
Tuttele macchinein pompadi
calorehannobisognodelloscarico
di condensa anche se la macchina
funzionerà solo in raffreddamento.
Quandosiraccordaloscaricodella
condensa prestare molta attenzione
anonschiacciareiltuboingomma.
2.2.2
Provision for draining con-
densate for machines with
heat pump
When the machine is heating, it
produces condensate that has to be
eliminatedthroughaspecicdrain
line, otherwise the machine will not
work. Drainage occurs by gravity.
For this reason, it is essential for
the drain line to have a minimum
inclination of at least 3% throughout
its length. Remove the cap on the
machine then connect the supplied
pipeasshowningure2.
If the line drains into a sewer sy-
stem, it should be provided with a
trap ahead of the main outlet.
The trap should be at least 300 mm
lower than the inlet opening on the
air conditioner.
CAUTION: make sure, in this
case, that the water expelled
outward does not damage or
disturb persons or property.
During the winter this type of
drainage may cause sheets of
ice to form.
All the machines with heat pump
require condensate drainage even
if they work in cooling mode.
When the condensate drainage is
fitted, pay much attention not to
compress the rubber hose.
Préparation d’un système
d’évacuation du condensat
pour les machines avec pom-
pe à chaleur
Pendant le fonctionnement en
mode chauffage, lesappareils
produisentdelacondensationqu’il
fautévacuer paruntuyau spécial
d’écoulement, sans lequella ma-
chine ne pourrait pas fonctionner.
Ledrainages’effectuepargravité.
C’estpourquoiilestindispensable
quele tuyaud’évacuation ait une
pente minimum sur toute sa lon-
gueurd’aumoins3%.
Enleverlebouchonsurlamachine,
puis brancher le tube fourni de la
façonindiquéeàlagure2.
Aucas oùle tuyaudéboucher-
ait dans untout-à-l’égout, ilfaut
effectuerun système desyphon
avantl’introductiondu tuyau dans
l’écoulementprincipal.
Cesiphon devrase trouverau
moins 300 mm en dessous de
l’entréedel’appareil.
AVERTISSEMENT: Faites at-
tention dans ce cas que l’eau
ne cause ni dommages ni
inconvénients aux choses ou
aux personnes. Pendant l’hi-
ver, cette eau peut provoquer
des formations de plaques
de verglas à l’extérieur.
Touteslesmachinesavecpompeà
chaleurontbesoind’untuyaupour
l’évacuationducondensatmêmesi
la machine fonctionne seulement en
mode de refroidissement.
Lorsque l’on effectuele branche-
mentpourl’évacuationduconden-
sat,faire trèsattention àne pas
écraserletuyauencaoutchouc.
Vorbereitung der Konden-
swasserablaueitung für
Geräte mit Wärmepumpe
Im Modus “Heizung” erzeugt das
Gerät Kondenswasser, das über
einedazuvorgeseheneAblaueitung
abgeleitet werden muss; ohne diese
AblaueitungkanndasGerät nicht
in Betrieb genommen werden. Die
Ableitung des Kondenswassers
erfolgt durch Schwerkraft. Aus
diesem Grund ist es unbedingt
erforderlich,dass dieAblaueitung
eine Neigung von mindestens 3%
aufihrer ganzenLänge aufweist.
Entfernen Sie den auf der Maschine
bendlichenStopfenundschließen
Sie den mitgelieferten Schlauch wie
in Abbildung 2 gezeigt an.
Führt die Ablaueitungin dieKa-
nalisation, ist sie mit einem Siphon
auszustatten, bevor sie in die Haup-
tablaueitungeingeführtwird.
Dieser Siphon muss sich mindestens
300 mm unterhalb der Tülle des
Gerätesbenden.
HINWEIS: In diesem Fall ist
darauf zu achten, dass das
ausströmende Wasser keine
Schäden an Gegenständen
verursacht oder zu Körperv-
erletzungen führt. Während
der Wintermonate kann dieses
Wasser auf der Außenseite
des Gebäudes zu einer Eis-
schicht gefrieren.
Alle Geräte mit Wärmepumpe
benötigen eine Konden-
swasserablaufleitung auch wenn
das Gerät nur zur Kühlung verwen-
det wird.
Wenndie Kondenswasserablauei-
tung angeschlossen wird, darauf
achten dass der Schlauch nicht
zerdrückt wird.
2
La pagina si sta caricando...

30
I
GB
F
D
3
Montage des conduits d’air et
des grilles extérieures
Une fois lestrous effectués,
il faut yintroduire lafeuille
enplastique fournieavec le
climatiseur.
La longueur desfeuilles doit
êtreégaleàl'épaisseurdela
paroi.
Enroulerlafeuilleetl'introduire
dansletrou(g.3),enveillant
àlalignedejonction(g.3réf.
A)quidoittoujoursêtreplacée
versle haut.Pour couperle
tube,ilsuftd'utiliseruncutter
ordinaire(g.3).
Pour le positionnement des
grilles extérieures agirde la
façonsuivante:
- fixerles deuxbrides au
moyen de deux fiches
de diamètre 6avec les
deuxoricesdexationen
positionverticale;
- introduirelepetitoeilletdu
ressort, celui munid'une
longuetige, surl'axe du
bouchon (sur les deux
composants)(g.4);
- introduirelesdeuxbouchons
(avecressort), parla face
avantdelagrilleextérieure,
surlesdeuxlogementsde
celle-ci,entirantjusqu'àce
qu'ilyaitundéclic(g.5)et
accrocherlesdeuxchaînes
augrandoeilletduressort;
- prendred'unemainlesdeux
chaînesreliéesàlagrille;
Montage der Abluftkanäle und
der externen Gitter
Nach Ausführung der
Öffnungen ist im Innern
derselben der zum Klimagerät
mitgelieferte Kunststoffbogen
einzuführen.
DieLänge derBögen muss
gleich der Wandstärke sein.
Stecken Sie die Rohrhalbschalen
zusammen und führen Sie sie in
die Öffnung (Abb. 3). Achten Sie
dabei auf die Nahtstelle, welche
stets nach oben gerichtet sein
muss. Die Rohre können mit
einer Säge abgelängt werden
(Abb. 32).
Die Außenluftgitter sind wie folgt
beschrieben zu positionieren:
- Befestigen Sie die beiden
inneren Flansche unter
Verwendung zweier Dübel
von 6 mm Durchmesser
mit den beiden
Befestigungsbohrungen in
vertikaler Richtung.
- Die kleine mit langem Schaft
versehene Öse der Feder
auf den Stift des Stöpsels
schieben (bei beiden
Komponenten) (Abb. 4);
- Die zwei (mit Feder
versehenen) Endstücke
durch die Vorderseite des
Außenluftgitters hindurch
in die dafür vorgesehenen
Aussparungen einführen,
einrasten lassen (Abb.
5) und die zwei Ketten in
die große Öse der Feder
einhängen.
- Mit einer Hand die zwei am
Außenluftgitter befestigten
Ketten umfassen.
2.2.3
Montaggio dei condotti
dell’aria e delle griglie esterne
Una volta eseguiti i fori,
dentroaglistessi,deveessere
introdottoilfoglioinplasticain
dotazione con il climatizzatore.
Lalunghezza deifogli deve
essere uguale allospessore
della parete.
Arrotolareil foglioe introdurlo
nel foro (fig.3), prestando
attenzioneallalineadigiunzione
(g.3 rif.A)chedeve sempre
essereposizionataversol'alto.
Pertagliareiltuboèsufciente
utilizzareunnormaletaglierino
(g.3).
Per il posizionamento delle
griglie esterneagite come
segue:
- ssareledueangeinterne
mediante 2 tasselli diametro
6conidueforidissaggio
inposizioneverticale;
- inlare l'occhiello piccolo,
con gambo lungo, della
molla sul perno del tappo
(suambedueicomponenti)
(g.4);
- infilarei duetappi (con
molla),dallaparteanteriore
dellagriglia esterna,sulle
due sedi della stessa,
tirando fino allo scatto
(fig. 5) e attaccare le
duecatenelle all'occhiello
grandedellamolla;
- impugnateconunamanole
duecatenellecollegatealla
griglia;
Installation of air pipes and
external gratings
After having drilled the holes,
insert the plastic sheet supplied
with the conditioner into them.
The length of the sheets must
be equal to the thickness of
the wall.
Roll the sheet and insert it
into the hole (fig. 3), paying
attentiontothesplicingline(g.
3 ref. A), which must always face
upwards.
Use an ordinary cutter for the
foregoingoperation(g.3).
To position the external grids,
proceed as follows:
- fix the two inner flanges
using 2 plugs having a
diameter of 6 with the two
xingholesvertical;
- Fit the small eyelet of the
spring, with the long stem,
on the cap pin (on both
components)(g.4).
- Insert the two caps (with
spring), on the front part
of the external grid, on its
two housings, pulling until
itclicks(g.5)andcouple
the two chains to the large
eyelet of the spring.
- Using one hand, grip the two
chains connected to the grid.
12
A
La pagina si sta caricando...

32
I
GB
F
D
- ripiegate su se stesse
le griglie esterne
impugnandole con la
mano libera nella parte di
ripiegaturaeintroducendo
le dita all'interno delle
singolealette(g.6);
- introdurreil braccionel
tubo sino afar sporgere
completamente la griglia
all'esterno;
- lasciate riaprirela griglia
facendo attenzione a
trattenereleditaall'interno
delle alette.
- ruotatela grigliasino a
quando le alette sono
ben orizzontali e con
l'inclinazionerivoltaversoil
basso.
- tirare la catenella,
tensionando la molla,ed
agganciarel'anello della
catenella al perno della
flangia interna passaggio
tubi(g.7).
- tagliare conun tronchese
lemagliedellecatenellein
eccesso(g.8).
AVVERTENZA:
usare esclusivamente le
griglie in dotazione, oppure
delle griglie che mantengano
le medesime caratteristiche.
7
- Bend the external grids
back, gripping them with
your free hand where they
bend,andinsertyourngers
insidethesinglens(g.6).
- Insert your arm into the
pipe until the grid protrudes
completely outwards.
- Reopen the grid, being
carefultokeepyourngers
insidethens.
- Turn thegrid untilthe ns
are fully horizontal and tilted
downwards.
- Pull the chain, tensioning
the spring, and couple the
chain ring to the pin of the
inner ange through which
thepipespass(g.7).
- Use hand shears to cut
off any excess chain links
(g.8).
WARNING:
use exclusively the supplied
grids, or grids with like
characteristics.
- replierlesgrillesextérieures
sur elles-mêmes enles
prenant avec lamain libre
du côté durepliement et
enintroduisantlesdoigtsà
l'intérieur de chacunedes
ailettes(g.6);
- introduire lebras dans le
tuyaujusqu'à ceque la
grillesortecomplètementà
l'extérieur;
- laisserlagrilleserouvriren
veillantàgarderlesdoigtsà
l'intérieurdesailettes;
- tournerla grillejusqu'à
ce que lesailettes soient
bien horizontales et avec
l'inclinaisontournéeversle
bas.
- tirerlachaînette,entendant
le ressort, etaccrocher
l'anneau de lachaînette à
l'axedelabrideinternede
passagedestubes(g.7).
- couper au moyen d'un
sécateur les maillesen
excédent des chaînettes
(g.8).
AVERTISSEMENT: utiliser
exclusivement les grilles
fournies ou bien des grilles
présentant les mêmes
caractéristiques.
- Mit der freien Hand die
Außenroste an der
Knicklinie umbiegen und
dabei die Finger zwischen
die einzelnen Rippen
einführen (Abb. 6);
- Den Arm in das Rohr
einführen, bis sich das
Außenluftgitter vollkommen
imFreienbendet.
- Das Gitter erneut öffnen,
wobei darauf zu achten
ist, dass die Finger nicht
aus den Rippen gezogen
werden.
- Das Gitter so drehen,
dass die Rippen horizontal
ausgerichtet und nach unten
geneigt sind.
- Spannen Sie die Feder durch
Ziehen der Kette an und
hängen Sie den Ring der
Kette am Zapfen des inneren
Rohrdurchgangsanschesein
(Abb. 7).
- Schneiden Sie die
überschüssigen
Kettenglieder mit einer
Schneidzange ab (Abb. 8).
WARNHINWEIS: Es dürfen
nur die mitgelieferten
Roste beziehungsweise
Roste, welche dieselben
Eigenschaften gewährleisten,
verwendet werden
12
La pagina si sta caricando...

34
I
GB
F
D
2.2.4
Power supply connection
The air conditioner is equipped
with a power supply cable and plug
(Y-type connection).
If it is installed near an outlet, you
need only plug it in.
WARNING: The replacement
of the power supply cable,
if needed, must be made by
Olimpia Splendid technical
service only, or by personnel
with similar qualications and
expertise.
In this case, it is important to
make sure the outlet to which
you are plugged in is effecti-
vely grounded and connected
to the mains by wiring of
adequate size (minimum 1.5
sq.mm. cross section).
WARNING: In compliance with
the installation prescriptions,
the external power line must
be tted with an omnipolar
connection device with rated
capacity compatible with the
unit’s maximum absorbed
power, and with an opening
of the contacts which allows
a complete disconnection
from the power mains under
the conditions specified in
overvoltage category III.
Make all connections in com-
pliance with the laws in effect.
Branchement électrique
Leclimatiseur estéquipé d’un
câble d’alimentation avecune -
che(connexiondetypeY).Encas
d’utilisation d’une prise de courant
à proximité del’appareil, ilsuft
seulementd’introduirelache.
AVERTISSEMENT: En cas de
remplacement du câble d’a-
limentation, cette opération
doit être effectuée seulement
par un technicien du service
après-vente Olimpia Splendid
ou par une personne com-
pétente.
Même dans ce cas, il est de
toute façon préférable de
vérier que la prise à laquelle
vous vous branchez est dotée
d’une mise à la terre efcace
et d’un dimensionnement
adapté des câbles d’alimen-
tation (section minimum de
1,5 mm²).
AVERTISSEMENT: Confor-
mément aux règles d’instal-
lation, la ligne d’alimentation
externe doit être dotée d’un
dispositif de connexion om-
nipolaire ayant une portée
nominale compatible avec
l’absorption maximale de
l’appareil et avec une ouver-
ture des contacts permettant
une déconnexion totale du
réseau selon les conditions
prévues par la catégorie de
surtension III.
Exécutez la connexion selon
les normes en vigueur.
Elektrischer Anschluss
Das Klimagerät ist mit einem
Netzkabel mit Stecker ausgestattet
(Anschluss des Typs Y).
Ist in der Nähe des Gerätes eine
Steckdose installiert, braucht nur
der Stecker in diese gesteckt zu
werden.
HINWEIS: Falls das Netzkabel
ersetzt werden soll, darf dies
nur vom technischen Kunden-
dienst Olimpia Splendid oder
von qualifiziertem Fachper-
sonal vorgenommen werden.
Auch in diesem Fall ist es ra-
tsam zu überprüfen, dass die
Steckdose mit einem efzien-
ten Erder und entsprechend
dimensionierten Speiseka-
beln (Mindestquerschnitt 1.5
mm
2
) ausgestattet ist.
HINWEIS: Die äußere Strom-
leitung muss gemäß den
Installationsvorschriften, mit
einer allpoligen Anschlus-
svorrichtung ausgestattet
werden, deren Nennleistung
mit der maximalen Stromauf-
nahme des Geräts kompatibel
ist und deren Kontaktöffnung
ein vollständiges Ausschalten
des gesamten Netzes unter
den für die Überspannung-
skategorie III vorgesehenen
Bedingungen gestattet.
Den Anschluss laut den gel-
tenden Richtlinien vorneh-
men.
2
Allacciamento elettrico
Ilclimatizzatoreèdotatodiuncavo
dialimentazioneconspina(collega-
mentoditipoY).
Nel caso di utilizzo di una presa di
corrente in prossimità dell’appa-
recchio non occorre fare altro che
introdurre la spina.
AVVERTENZA: L’eventua-
le sostituzione del cavo di
alimentazione deve esse-
re effettuata solamente
dal servizio di assistenza
tecnica Olimpia Splendid o
da personale con qualifica
similare.
E’ comunque opportuno veri-
care che la presa alla quale
vi collegate sia dotata di un’ef-
cace messa a terra e di un
adeguato dimensionamento
dei cavi di alimentazione (se-
zione minima di 1,5 mm²).
AVVERTENZA: La linea di
alimentazione esterna, con-
formemente alle regole di
installazione, deve essere
provvista di un dispositivo di
disconnessione onnipolare
avente una portata nominale
compatibile con l’assorbimen-
to massimo dell’apparecchio
e con un’apertura dei contatti
tale da consentire una discon-
nessione completa dalla rete
nelle condizioni previste dalla
categoria di sovratensione III.
Eseguite la connessione se-
condo le norme vigenti.
La pagina si sta caricando...

36
I
GB
F
D
Inserimento dell’apparecchio
sulla staffa
Prima di agganciare la macchina
allastaffadissaggio,applicareallo
schienaleletreguarnizionifornitea
corredoindicateing.9.
Controllarechelastaffadissag-
gioaparetesiastataposizionata
correttamenteeagganciareilclima-
tizzatore.Sollevarlo leggermente
prendendolo ai lati della base
inferiore e appoggiarlocontro il
muro. Vericarecheil climatizza-
toresisiaagganciatoallastaffae
appoggiarlosulpavimento(g.10).
Prestaremoltaattenzioneinquanto
la staffa nondevesopportare il
peso del climatizzatore, ma deve
solamenteimpedireeventualispo-
stamenti accidentali che potrebbero
comprometterne il corretto allinea-
mentoconiforieseguitinelmuro.
Se necessario regolarein altezza
laposizione delclimatizzatore ,
utilizzandoipiediniregolabilidicuiè
dotata.
Allane dellavoro vericatecon
curache nonrimangano fessure
dietro lo schienale dell’apparec-
chio(la guarnizioneisolantedeve
aderirebene allaparete) soprat-
tutto nella zona dei condotti di
entrata ed uscita dell’aria.
Unavoltacompletatal’operazione
di installazione del climatizzatore
posizionate i due zoccoli estetici
infilandoli ad incastro sui piedi
inferiori(vedigura11).
2.2.5
Fitting the unit on bracket
Beforeattaching themachine to
thebracket,applytothebackthe
threegasketsprovided,asindicated
ing.9.
Check that thewall-xing bracket
has been correctly positioned and
hookuptheconditioner.Liftitsli-
ghtly, holding it by the sides of the
lower base and rest it against the
wall. Check that the conditioner is
hooked onto the bracket and rest
itontheoor(g.10).Takegreat
care because the bracket must
not support the weight of the air
conditioner but only prevent any
accidental movements that could
affect the correct aligning with the
holes made in the wall. If necessary,
adjust the height of the conditioner
using its adjustable feet.
When you havenished, inspect
carefully to make sure there are no
ssuresatthebackoftheaircon-
ditioner (the insulating gasket must
trmlyagainstthewall)particularly
in the zone where air enters and
leaves the machine.
Once the installation of the air
conditioner has been completed,
place the two aesthetic shoes by
sliding them on to the lower feet
(seegure11).
Fixation de l’appareil sur la
bride
Avantd’accrocher la machineà
l’étrierdexation,appliqueraudos-
sierlestroisjointsfournisindiqués
danslag.9.
S’assurerquelesupportdexation
muraleestplacécorrectement,puis
mettrelesystèmedeclimatisation
enplace.Lesouleverlégèrementen
leprenantparlescôtésdelabase
inférieureetleposercontrelemur.
S’assurerquelesystèmedeclima-
tisationestbienaccrochéàl’étrier
etleposerausol(g.10).Veillerà
cequelesupportnesupportepasle
poidsdusystèmedeclimatisation:
il doit seulement empêcher tout
déplacementaccidentelpouvanten
compromettrel’alignementcorrect
par rapport auxorifices percés
danslemur.Sibesoinest,régleren
hauteurlapositiondusystèmede
climatisation,enutilisantlespieds
réglablesdontilestdoté.
Aprèsavoirterminéletravail,vérif-
iezavecsoinqu’ilnerestepasde
fentes derrière l’appareil (le joint
étanchedoitbienadhéreraumur)
surtout dans la zone des conduits
d’entréeetdesortiedel’air.
Unefoisterminéel’opérationd’in-
stallationdu systèmede climati-
sation, placer lesdeux plinthes
enjoliveusesenlesencastrantsur
lespiedsinférieurs(voirgure11).
Montage des Gerätes auf dem
Befestigungsbügel
BringenSievordemEinhängender
Maschine am Befestigungsbügel
diemitgeliefertenDichtungenwiein
Abb.9anderRückwandan.
Stellen Sie sicher, dass der Wan-
dbefestigungsbügel korrekt posi-
tioniert wurde und hängen Sie die
Klimaanlage ein. Heben Sie die
Klimaanlage leicht an, indem Sie
diese an den Seiten des unteren
Sockels ergreifen und stützen Sie
die Anlage gegen die Wand (Abb.
10). Stellen Sie sicher, dass die Kli-
maanlage am Bügel eingehängt ist
und setzen sie auf den Fußboden.
Beachten Sie unbedingt, dass der
Bügel nicht das Gewicht der Klima-
anlage aufnehmen darf, sondern
nur eventuelle, unbeabsichtigte
Verschiebungen verhindern soll,
welche die korrekte Zentrierung
mit den an der Wand ausgeführten
Bohrungen beeinträchtigen könnte.
Regulieren Sie die Klimaanlage mit
Hilfe der verstellbaren Stützfüße
gegebenenfalls in der Höhe.
Nach Beenden dieser Arbeit-
sgänge ist zu überprüfen, dass
sich hinter der Rückwand des
Gerätes, vor allem im Bereich der
Luftein-und -austrittsleitungen,
keine Schlitze gebildet haben (die
als Isolierung dienende Dichtung
muss gut an der Wand anliegen).
Positionieren Sie nach Abschluss
der Klimaanlageninstallation die
beiden Ziersockel zum Einspan-
nen an den unteren Füßen (siehe
Abbildung 11).
12
10
9
La pagina si sta caricando...

38
I
GB
F
D
PERIODICAL MAINTENANCE
Air conditioners of this type do not
require any particular routine main-
tenance except:
- Cleaning or washing the room air
lterwhenthegreenledlightsup
(see user manual).
- Cleaning of “external air” battery,
to be done as needed, depending
on the amount of dirt in the exter-
nal air, once or twice a year.
- Cleaning can be done using a
vacuum cleaner or soft brush, ta-
king particular care not to dama-
ge the aluminium heat exchanger
baffles. It may be necessary
to use water and detergents to
remove heavily encrusted dirt.
Before you leave the site of installa-
tion you should gather up all packing
material and use a damp cloth to
remove any traces of dust that may
have deposited on the machine
during assembly .
These operations, though certainly
not essential, have a beneficial
effect as they enhance the profes-
sional image of the installer in the
eyes of the client.
To prevent unnecessary calls by the
user, before you leave the site of
installation it is also a good idea to:
- Explain the contents of the In-
struction Manual to the user.
- Showhimhowtocleanthelter.
- Explain when and how he should
contact the Service Department
2.3
MANUTENZIONE PERIODICA
I climatizzatori diquesto tiponon
hannobisognodiparticolariopera-
zionidimanutenzionesenon:
- Lapuliziaoillavaggiodelltro
dell’ariaambienteogniqualvolta
siillumina ilrelativo led dise-
gnalazionedicoloreverde(vedi
manualeuso).
- Lapulizia dellabatteria “aria
esterna”daeffettuare,aseconda
dellaquantitàdisporcopresente
nell’ariaesterna,unaoduevolte
all’anno.
- Lapuliziapuò essereeseguita
conun’aspirapolvereoconuna
spazzola morbida facendo molta
attenzioneanonrovinarelealet-
te in alluminio di scambio termi-
co.Persporcomoltoincrostatoé
necessarioprovvedere adun
lavaggioconacquaedetergenti.
Primadilasciareilcantiereèbene
raccogliere gli imballaggi ed eli-
minare con unpanno umidoogni
traccia della sporciziache siè
depositata sull’apparecchio durante
ilmontaggio.
Queste operazioni, chea rigor
dilogica nonsono strettamente
indispensabili,permettono tuttavia
diaumentareagliocchidell’Utente
l’immagineprofessionaledichiha
installato l’apparecchio.
Perevitareinutilichiamatedaparte
dell’Utente,primadilasciareilcan-
tiereèinoltrebene:
- IllustrargliicontenutidelManuale
d’Istruzioniperl’Utente,
- Illustrarglilemodalitàconlequali
deveessere eseguitalapulizia
delltro.
- Chiarirgliquando e comedeve
interpellare il Serviziod’Assi-
stenza.
ENTRETIEN PÉRIODIQUE
Les climatiseurs dece typen’ont
pasbesoind’opérationsd’entretien
particulières,àpart:
- lenettoyageetlelavagedultre
del’airambiant,chaquefoisque
s’allumelevoyantdesignalisa-
tion correspondant de couleur
vert(voirmanueld’utilisation).
- le nettoyagede la batterie“air
extérieur” à effectuer,selon la
quantité d’impuretés présentes
dansl’airextérieur,uneoudeux
fois par an.
Lenettoyagepeutêtreexécutéà
l’aided’unaspirateurouavecune
grossebrossesoupleenfaisant
trèsattentionànepasabîmerles
lamellesenaluminiumd’échange
thermique. Pour dela saleté
trèsincrustée, ilfaut procéder
àunlavageàl’eauetavecdes
détergents.
Avantdequitterlechantier,ilvaut
mieuxramasserlesemballageset
élimineravecunchiffonhumidetou-
tetracedesaletéquis’estdéposée
surl’appareilpendantlemontage.
Cesopérations,quiàlarigueurde
sontpasvraimentindispensables,
permettent toutefois d’augmenter,
auxyeux del’utilisateur, l’image
professionnelledeceluiquiainstal-
lél’appareil.
And’éviterdesappelsinutilesdela
partdel’utilisateur,avantdequitter
lechantier,ilvautmieuxenoutre:
- luiillustrerlecontenuduManuel
d’Instructionspourl’Utilisateur,
- luiillustrer lesmodalité avec
lesquellesil fautexécuter le
nettoyagedultre,
- luiexpliquerquandetcomment
ildoitappelerleServiceAprès-
Vente.
WARTUNG
Raumklimageräte dieses Typs sind
weitgehend wartungsfrei. Dennoch
ist Folgendes zu beachten:
- BeiAueuchten dergrün LED
(siehe Bedienungsanleitung) ist
der Raumluftfilter zu reinigen
oder auszuspülen.
- Der Außenluftwärmetauscher
ist je nach Verschmutzung der
Außenluft ein oder zwei Mal pro
Jahr zu reinigen.
- Die Reinigung kann mit einem
Staubsauger oder einer weichen
Bürste vorgenommen werden,
wobei vor allem darauf zu achten
ist, dass die Aluminiumrippen
des Wärmeaustauschers nicht
beschädigt werden. Bei stark
verkrustetem Schmutz ist der
Wärmetauscher mit Wasser und
Reinigungsmitteln zu reinigen.
Nach erfolgter Installation ist die
Verpackung aufzusammeln und
das Gerät mit einem feuchten Tuch
zur Entfernung der Schmutzspuren
zu reinigen.
Diese Arbeitsgänge sind zwar
nicht unbedingt erforderlich, doch
hinterlassen sie beim Kunden den
Eindruck, dass ein professioneller
Installateur am Werk war.
Zur Vermeidung von unnötigen
Telefonaten seitens des Benutzers
sollte/ndiesem:
- der Inhalt der Bedienungsanlei-
tung erläutert werden,
- die für die Reinigung des Gerätes
erforderlichen Vorgänge erklärt
werden,
- erklärt werden, in welchen Fällen
der Kundendienst zu verständig-
en ist.
12
La pagina si sta caricando...

40
I
GB
F
D
DENOMINAZIONE DELLE
PARTI
Elementi unità(g.12)
1)Aperturauscitaaria.
2)Telecomandoasportabile
3)Pernodibloccaggiotelecomando
4)Consolledivisualizzazionedella
funzioneedegliallarmi.
5)Grigliadiaspirazionearia.
6)Impugnatureperl’estrazionedel
ltroaria.
Descrizione della consolle
di segnalazione (g.13)
1)Areatrasparentediricezionedel
segnaledaltelecomando.
2)Ledverdedisegnalazionedella
macchinainfunzione(quandola
macchinaèinstandbyèspento).
3) Ledarancio di segnalazione
dell’inserimento della
programmazionediaccensione
e/ospegnimento.
4) Ledverde disegnalazione
dell’accensione del compressore
frigorifero.
5)Ledrossodisegnalazionedella
necessità di effettuare la pulizia
delltrodell’aria.
6)Microtastodiservizio(RESET).
3.2
3.2.1
3.2.2
12
NAMES OF PARTS
List of Units(g.12)
1) Air outlet opening.
2) Removable remote control
3) Remote control locking pin
4) Alarm display console.
5) Air intake grating.
6)Gripsforremovalofairlter.
Description of signal console
(g.13)
1) Transparent zone of receipt of
remote control signal.
2) Green led indicating machine is
running (When the machine is on
stand-by this light is off).
3) Orangeled indicateson/off
programming is in use.
4) Green led indicates cooling
compressor is on.
5)Redledindicatesairlterclogged.
6) Service microkey (RESET)
DÉNOMINATION
DES COMPOSANTS
Liste unités (g.12)
1)Ouverturesortied’air.
2)Télécommandeamovible
3)Pivot de blocage de la
télécommande
4)Consolede visualisation dela
fonction et des alarmes.
5)Grilled’aspirationd’air.
6)Tirettepourl’extractiondultreà
air.
Description de la console de
signalisation (g.13)
1)Zonetransparentederéception
dusignaldelatélécommande.
2) Voyant vert designalisation
machineen fonction (Quand la
machine est enstand-by ilest
éteint).
3) Voyantorangede signalisation
del’insertiondelaprogrammation
de marche et/ou arrêt.
4)Voyantvert designalisationde
mise en marche du compresseur
frigorique.
5)Voyantrougedesignalisationde
la nécessité d’effectuer le
nettoyagedultreàair.
6)Micro touche de sécurité
(RESET).
BENENNUNG
DER KOMPONENTEN
Bestandteile der Einheiten
(abb. 12)
1)ÖffnungLuftausgang.
2) Abnehmbare Fernbedienung
3)
Fernbedienungssicherungsbolzen
4) Display für die Anzeige der
Funktion und von Störmeldungen.
5)Luft
ansauggitter.
6) Griffe für das Herausziehen des
Luftlters.
Beschreibung des Displays
(abb. 13)
1) Transparenter Bereich für den
Empfang des von der
Fernbedienung gesendeten
Signals.
2)GrüneLed“GerätinBetrieb”(im
Modus Stand-by leuchtet diese
nicht).
3) Orange Led “Eingabe der
Programme Einschaltenu./o.
Ausschalten”.
4)GrüneLED“VerdichterEIN”.
5)RoteLed“Luftlterreinigen”.
6) Mikrodruktaste (RESET).
13
6 1 4 2 3 6 5
La pagina si sta caricando...

42
I
GB
F
D
RIMOZIONE DEL
TELECOMANDO
Per rimuovere il telecomando
dal climatizzatore ènecessario
utilizzare l’apposita chiavefornita
acorredo. Inserire lachiavenella
sede posta sul pannello comandi e
ruotarla in senso antiorario di circa
90°(g.14).Estrarreiltelecomando
dalla sede afferrandolo per la parte
posterioreefacendololeggermente
ruotare su se stesso. Per
riposizionare il telecomando nella
suasede eseguirel’operazione
inversa.Nonènecessariobloccare
nuovamenteiltelecomandoconla
chiavesenonloritenetenecessario.
ACCENSIONE GENERALE
E GESTIONE DEL
FUNZIONAMENTO
Perpoter gestirel’apparecchio
tramite il telecomando occorre
introdurre la spina di alimentazione
dell’apparecchio
nella presa dell’impianto. Per
trasmettere i comandi occorre
rivolgerela parteanteriore del
telecomandoversolaconsolledel
climatizzatore.
La ricezione del comando emesso
vieneconfermatadall’emissionedi
una nota da parte del cicalino.
Ladistanzamassimaallaqualepuò
avvenire la ricezionedei comandi
corrisponde ad 8 metri circa.
3.3
3.4
REMOVING THE REMOTE
CONTROL
To remove the remote control from
the conditioner, use the special key
provided. Insert the key in the seat
located on the control panel and turn
itanticlockwiseabout90°(g.14).
Grasp the rear part of the remote
control and, turning it slightly, extract
it from its seat. To replace the
remote control in its seat, repeat the
same operation in reverse order. It
is not essential to lock the remote
control with the key again unless
this is deemed necessary.
SWITCHING ON THE
APPLIANCE AND FUNCTION
MANAGEMENT
To manage the appliance using the
remote control, insert the plug on
the appliance to the mains power
supply outlet.
To transmit signals from the remote
control to the appliance, point the
front part of the remote handset
towards the control panel on the air
conditioner.
Receptionofthesignalisconrmed
by a beep.
The maximum signal transmission
distance is about 8 metres.
EXTRACTION DE LA
TÉLÉCOMMANDE
Pourenleverlatélécommandedu
systèmedeclimatisation,ilconvient
d’utiliserla clefprévue à ceteffet
fournie avec l’appareil. Insérer la
clef dans lelogement situésur le
panneau de commande et le tourner
danslesensinversedecelui des
aiguillesd’unemontred’environ90°
(g.14).Enleverlatélécommande
de son logementen lasaisissant
par l’arrière et en la faisant
légèrementtournersurelle-même.
Pourremettrelatélécommandeen
placedanssonlogement,effectuer
l’opération inverse. Il n’estpas
nécessairedebloquerànouveaula
télécommandeaveclaclef.
MISE EN MARCHE
GÉNÉRALE ET GESTION DU
FONCTIONNEMENT
Il est nécessaire, pour gérer
l’appareil au moyen de la
télécommande, d’introduirela
fiche d’alimentation de l’appareil
dans la prise de l’installation.
Pourtransmettre lescommandes,
diriger la partieantérieure dela
télécommandevers laconsole
duclimatiseur.La réceptionde
lacommande estconfirmée par
l’émissiond’unenotedelapartdu
vibreursonore.
La distance maximalepermettant
la réception des commandes
correspondàenviron8mètres.
ENTFERNEN DER
FERNBEDIENUNG
Zur Entfernung der Fernsteuerung
von der Klimaanlage ist der
eigens mitgelieferte Schlüssel
zu verwenden. Stecken Se den
Schlüssel in den Sitz auf der
Bedientafel und drehen ihn um zirka
90° im Gegenuhrzeigersinn (Abb.
14). Ziehen Sie die Fernsteuerung
aus ihrem Sitz, indem Sie diese am
hinteren Teil ergreifen und leicht um
sich selbst drehen lassen. Führen
Sie zur Wiederpositionierung
der Fernbedienung in ihrem Sitz
den Vorgang in umgekehrter
Reihenfolge aus. Es ist nicht
notwendig, die Fernbedienung
erneut mit dem Schlüssel zu
blockieren, wenn Sie dies nicht für
notwendigbenden.
EINSCHALTEN UND
BETRIEBSSTEUERUNG
Um das Gerät über die
Fernbedienung steuern zu
können, muss zunächst der
Gerätenetzstecker in die Steckdose
eingeführt werden.
Zur Übersendung der Befehle
richten Sie die Frontseite der
Fernbedienung auf die Konsole des
Klimagerätes. Ein Summton zeigt
an, dass der Befehl empfangen
wurde.
Der Höchstabstand, bei dem die
Befehle empfangen werden, beträgt
ca. 8 m.
13
14
La pagina si sta caricando...

44
I
GB
F
D
13
AVVERTENZE
Il telecomando fornito a corredo
dell’apparecchio èstato studiato
inmododaconferirglilamassima
robustezza ed un’eccezionale
funzionalità,comunqueessodeve
esseremaneggiato conalcune
cautele.
Evitare di:
- lasciarlo esposto alla
pioggia, versare liquidi
sulla sua tastiera o farlo
cadere in acqua;
- fargli subire forti urti o
lasciarlo cadere su
superci dure,
- lasciarlo esposto ai raggi
solari,
- frapporre ostacoli tra il
telecomando e
l’apparecchio mentre si
usa il telecomando stesso.
Inoltre:
- nel casoin cuinellostesso
ambiente vengano usati altri
apparecchi dotati di
telecomando (TV, radio,
gruppi stereo, etc.), si
potrebberoverificare alcune
interferenze;
- le lampade elettroniche e
fluorescenti possono
interferire nelle
comunicazioni tra il
telecomandoel’apparecchio,
- estrarrelebatterie incaso di
prolungato inutilizzo del
telecomando.
WARNINGS
Although the remote control handset
supplied with the appliance is
designed to be as robust and
practical to use as possible, please
handle with the due care and
attention.
Do not:
- expose to rain, spill any
liquids on the keypad or drop
in water,
- subject to violent knocks or
drop on hard surfaces,
- expose to sunlight,
- introduce obstacles between
the remote control and the
appliance while using the
remote control.
Furthermore:
- any other appliances in the
same room controlled by a
remote control (TV, radio,
stereo, etc.), may cause
interferences;
- electronic and fluorescent
lamps may interfere with the
signal transmission between
the remote control and the
appliance;
- remove the batteries if the
remote control is not used for
long periods.
INSTRUCTIONS
La télécommande fournie avec
l’appareil a étéconçue pourêtre
dotéed’uneextrêmerobustesseet
d’unefonctionnalitéexceptionnelle.
Il faut cependant la manipuler en
adoptantquelquesprécautions.
Éviter :
- de la laisser sous la pluie, de
verser du liquide sur son
clavier ou de la faire tomber
dans l’eau,
- qu’elle ne subisse de gros
chocs ou qu’elle ne tombe
sur des surfaces dures,
- de l’exposer aux rayons du
soleil,
- d’interposer des obstacles
entre la télécommande et
l’appareil lors de l’utilisation
de la télécommande
ellemême.
Enoutre:
- desinterférencespourraientse
produire en casd’utilisation,
dans lamême pièce,d’autres
appareils dotés de
télécommande (TV, radio,
chaînesstéréo,etc.);
- les lampes électroniqueset
uorescentespeuventinterférer
dans les communications entre
latélécommandeetl’appareil;
- extraire lespiles encas de
nonutilisation prolongéede la
télécommande.
HINWEISE
Die Fernbedienung des Gerätes ist
so ausgelegt, dass eine maximale
Stabilität und optimale Funktionalität
gewährleistet werden kann; bei ihrer
Benutzung müssen jedoch einige
Vorsichtsmaßnahmen beachtet
werden.
So sollte man vermeiden:
- sie Regen auszusetzen,
Flüssigkeiten auf die Tastatur
zu gießen oder sie ins Wasser
fallen zu lassen;
- starke Stöße oder das
Herunterfallen auf harte
Oberächen,
- Sonneneinstrahlung,
- Hindernisse zwischen dem
Gerät und der Fernsteuerung
während der Benutzung der
Fernsteuerung.
Beachten Sie außerdem:
- werden in demselben Raum
noch andere ferngesteuerte
Geräte benutzt (Fernsehgeräte,
Radio, Stereoanlagen usw.),
kann es zu gegenseitigen
Beeinträchtigungen kommen;
- elektronische und
Leuchtstofflampen können die
Kommunikation zwischen der
Fernbedienung und dem Gerät
beeinträchtigen;
- wird die Fernbedienung über
einen längeren Zeitraum nicht
benutzt, nehmen Sie die
Batterien heraus.
La pagina si sta caricando...
La pagina si sta caricando...
La pagina si sta caricando...
La pagina si sta caricando...
La pagina si sta caricando...
La pagina si sta caricando...
La pagina si sta caricando...
La pagina si sta caricando...
La pagina si sta caricando...
La pagina si sta caricando...
La pagina si sta caricando...
La pagina si sta caricando...
La pagina si sta caricando...
La pagina si sta caricando...
La pagina si sta caricando...
La pagina si sta caricando...
La pagina si sta caricando...
La pagina si sta caricando...
La pagina si sta caricando...
La pagina si sta caricando...
La pagina si sta caricando...
La pagina si sta caricando...
La pagina si sta caricando...
La pagina si sta caricando...
La pagina si sta caricando...
La pagina si sta caricando...
La pagina si sta caricando...
La pagina si sta caricando...
La pagina si sta caricando...
La pagina si sta caricando...
La pagina si sta caricando...
La pagina si sta caricando...
La pagina si sta caricando...
La pagina si sta caricando...
La pagina si sta caricando...
La pagina si sta caricando...
La pagina si sta caricando...
La pagina si sta caricando...
La pagina si sta caricando...
La pagina si sta caricando...
-
 1
1
-
 2
2
-
 3
3
-
 4
4
-
 5
5
-
 6
6
-
 7
7
-
 8
8
-
 9
9
-
 10
10
-
 11
11
-
 12
12
-
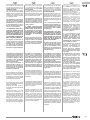 13
13
-
 14
14
-
 15
15
-
 16
16
-
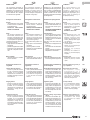 17
17
-
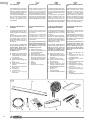 18
18
-
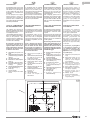 19
19
-
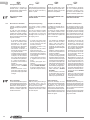 20
20
-
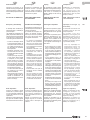 21
21
-
 22
22
-
 23
23
-
 24
24
-
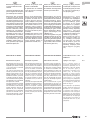 25
25
-
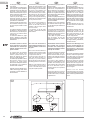 26
26
-
 27
27
-
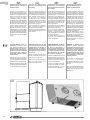 28
28
-
 29
29
-
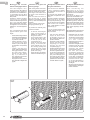 30
30
-
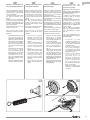 31
31
-
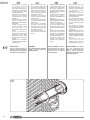 32
32
-
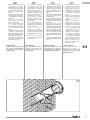 33
33
-
 34
34
-
 35
35
-
 36
36
-
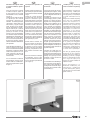 37
37
-
 38
38
-
 39
39
-
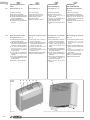 40
40
-
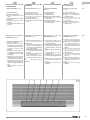 41
41
-
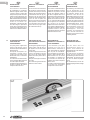 42
42
-
 43
43
-
 44
44
-
 45
45
-
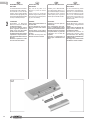 46
46
-
 47
47
-
 48
48
-
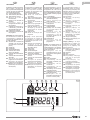 49
49
-
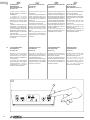 50
50
-
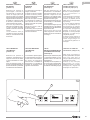 51
51
-
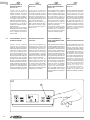 52
52
-
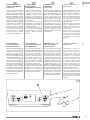 53
53
-
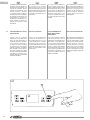 54
54
-
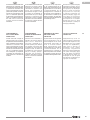 55
55
-
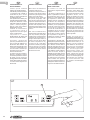 56
56
-
 57
57
-
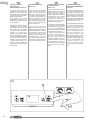 58
58
-
 59
59
-
 60
60
-
 61
61
-
 62
62
-
 63
63
-
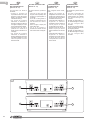 64
64
-
 65
65
-
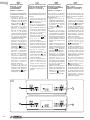 66
66
-
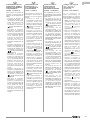 67
67
-
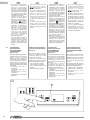 68
68
-
 69
69
-
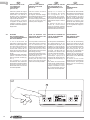 70
70
-
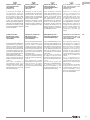 71
71
-
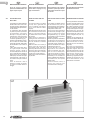 72
72
-
 73
73
-
 74
74
-
 75
75
-
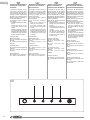 76
76
-
 77
77
-
 78
78
-
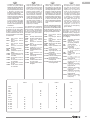 79
79
-
 80
80
-
 81
81
-
 82
82
-
 83
83
-
 84
84


Olimpia Splendid UNICO EASY Manuale utente
- Tipo
- Manuale utente
- Questo manuale è adatto anche per
in altre lingue
- English: Olimpia Splendid UNICO EASY User manual
- français: Olimpia Splendid UNICO EASY Manuel utilisateur
- español: Olimpia Splendid UNICO EASY Manual de usuario
- Deutsch: Olimpia Splendid UNICO EASY Benutzerhandbuch
- Nederlands: Olimpia Splendid UNICO EASY Handleiding
- português: Olimpia Splendid UNICO EASY Manual do usuário
Documenti correlati
-
 Olimpia Splendid UNICO EASY Manuale del proprietario
-
 Olimpia Splendid UNICO EASY Manuale utente
-
 Olimpia Splendid UNICO EASY Manuale utente
-
 Olimpia Splendid Issimo 2 12 Manuale utente
-
 Olimpia Splendid Aquaria 16 Thermo Manuale utente
-
DOLCECLIMA 2150 Manuale utente
-
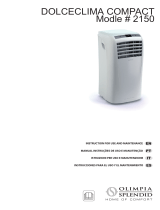 Olimpia Splendid Compact 2150 Manuale del proprietario
-
 Olimpia Splendid Dolceclima Nano Manuale utente
-
 Olimpia Splendid DOLCECLIMA nano silent Manuale utente
-
Olimpia Splendid Ellisse HP Manuale utente


