KWC AVA 11.192.034.000 Istruzioni per l'uso
- Tipo
- Istruzioni per l'uso

802016-01 01/18
802016
Z.536.828
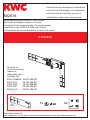
Montageanleitung Schiene 2-Loch Wand
Notice de montage rail paroi à 2 trous
Istruzioni di montaggio guida, 2 fori per parete
Installation instructions, 2-hole rail to wall
Instrucciones de montaje pletina 2 oricios a pared
Passend zu:
A combiner avec:
Adatto a:
Adecuado para:
Suitable for:
2x
1x 4x
KWC ADRENA 39.321.400.931
KWC AVA 39.193.400.931
KWC ONO 39.151.400.931
KWC ZOE 39.193.400.931
KWC ELLA 39.001.400.931
Montage- und Serviceanleitung
Instructions de montage et d‘entretien
Istruzioni di montaggio e di assistenza
Instrucciones de montaje y servicio
Installation and service instructions
Franke Water Systems AG
KWC | Hauptstrasse 57 | P.O. Box 179 | CH-5726 Unterkulm | Phone +41 62 768 68 68 | www.kwc.com
La pagina si sta caricando...

3
802016-01 01/18
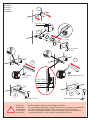
Montage / Montage / Montagio / Montaje / Installation
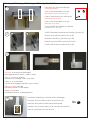
Zum einstellen der Einbautiefe an den 4 Messingmuttern drehen.
Pour régler la profondeur de montage, agir sur les 4 écrous en
laiton.
Regolare la profondità di montaggio ruotando i 4 dadi in ottone.
Regular la profundidad de montaje girando las 4 tuercas de latón.
Turn the 4 brass nuts to adjust the installation depth.
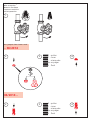
Achtung: Einbautiefe bachten
(Gelber Kleber min. – max.)
Kontrolle: Transparente Bauschutzkappe satt aufstecken.
Attention: veiller à la profondeur de montage.
(autocollant jaune min. – max.)
Contrôle: le couvercle transparent doit être bien mis en place.
Importante: rispettare la profondità di montaggio
(adesivo giallo min.-max.)
Controllo: calotta protettiva trasparente inserita a lo.
Atención: comprobar la profundidad de montaje
(Pegatina amarilla: mín. - máx.)
Control: introducir el capuchón protector transparente hasta el tope.
Caution: Pay attention to the installation depth
(yellow sticker indicates min./max.).
To check, t the transparent cover sleeve on fully.
½“ Rohr (Länge: min. 200 mm bauseits) in den Anschluss des Auslaufes
eindrehen.
Visser le tuyau ½“ (longueur: min. 200 mm à procurer sur les lieux)
dans l‘évacuation.
Inserire nella bocca il tubo da ½“ (lunghezza min. 200 mm sul cantiere).
Atornillar el tubo de ½“ (long.: mín. 200 mm en la obra ) en la salida
del caño.
Screw the ½“ pipe (length: at least 200 mm on the site) into the outlet
for the spout.
6
8
9
Montageschiene mit UP-Einheit A+B verschrauben.
Fixer par vis le rail de montage avec A+B l‘unité encastrable en bas.
Avvitare la guida di montaggio A+B all’unità sotto muro nella
parte inferiore.
Atornillar la pletina de montaje A+B por la parte de abajo a la
unidad de empotrar.
Screw the mounting rail to the concealed A+B unit at the bottom.
5
A
B
0-13 mm
47–72 mm
32–57 mm
7
200 mm

4
802016-01 01/18
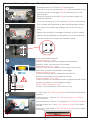
Schwarzer Kunststoffring (A) auf ½“ Rohr aufbringen.
Transparente Bauschutzkappe (B) entfernen.
Adapter l‘anneau de plastique noir (A) sur le tuyau ½“.
Enlever le couvercle transparent.
Applicare l’anello nero in plastica (A) alla base del tubo da ½“.
Rimuovere la calotta protettiva trasparente (B).
Colocar el anillo de plástico negro (A) en el tubo de ½“.
Retirar el capuchón protector transparente (B).
Fit the black plastic ring (A) to the ½“ pipe.
Remove the transparent cover sleeve (B).
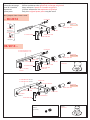
Montage / Montage / Montagio / Montaje / Installation
Ausrichtung UP-Einheit:
Zur Kontrolle Wasserwaage über den schwarzen
Kunststoffring und verchromter Hülse legen. Zum
nivilieren an den Messingmuttern drehen, oder die
Montageschiene neu ausrichten.
Ajustage de l‘unité encastrable:
Pour vérier, placer le niveau à bulle par-dessus
l‘anneau de plastique noir et la douille chromée.
Pour la mise à niveau, agir sur les écrous de laiton
ou réajuster le rail de montage.
Verica allineamento unità sotto muro:
posizionare la livella ad acqua sull’anello nero in
plastica e sul manicotto cromato.Per livellare, ruotare
i dadi in ottone oppure riposizionare la guida di
montaggio.
Enderezar la unidad de empotrar:
Comprobar colocando el nivel de burbuja sobre el
anillo de plástico y la funda cromada. Para nivelar,
girar las tuercas de latón, o volver a colocar la pletina
de montage.
Alignment of the concealed unit: To check, place a
spirit level over the black plastic ring and chrome pla-
ted sleeve. To level up, turn the brass nuts or re-align
the mounting rail.
Ausrichtung Auslauf:
Zur Kontrolle Wasserwaage auf ½“ Rohr legen.
Zum Ausrichten an den Messingmuttern drehen.
Ajustage de le bec:
Pour vérier, placer le niveau à bulle sur le tuyau ½“.
Pour ajuster, agir sur les écrous de laiton.
Verica allineamento bocca:
posizionare la livella ad acqua sul tubo da ½“.
Per allineare, ruotare i dadi in ottone.
Enderezar el caño de salida:
Para comprobar, colocar el nivel de burbuja sobre
el tubo de ½“.
Girar las tuercas de latón para enderezar.
Alignment of the spout:
To check, place a spirit level on the ½“ pipe.
To adjust the alignment, turn the brass nuts.
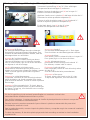
Für die Druckprüfung ist der weisse Kunststoffzapfen zu montieren und nach den
nationalen/lokalen Installationsvorschriften zu prüfen.
Pour vérier la pression, il convient de monter la cheville de plastique blanche et de tenir compte des
prescriptions d‘installation nationales/locales.
Eseguire la prova in pressione montando il perno bianco in plastica e attenendosi alle prescrizioni
d‘installazione nazionali o locali.
Para la prueba de presión, montar el tapón de plástico blanco y comprobar según las normas de instalación
nacionales/locales.
To check the pressure, t the white plastic spigot and check according to national or local installation
regulations.les.
10
11 12
A
B

802374-02 10/18
Franke Water Systems AG
KWC | Hauptstrasse 57 | P.O. Box 179 | CH-5726 Unterkulm | Phone +41 62 768 68 68 | www.kwc.com
802374
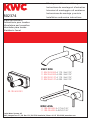
Waschtischarmatur
Robinetterie pour lavabos
Miscelatore per lavandino
Mezclador para lavabo
Washbasin faucet
KWC AVA
11.192.033.000 A 175 6 7/8"
11.192.034.000 A 225 9 7/8"
39.193.400.931
KWC ZOE
11.202.033.000 A 175 / A6 7/8"
11.202.034.000 A 225 / A8 7/8"
11.202.033.127 A 175 / A6 7/8"
11.202.034.127 A 225 / A8 7/8"
Montage- und Serviceanleitung
Instructions de montage et d’entretien
Istruzioni di montaggio e di assistenza
Instrucciones de montaje y servicio
Installation and service instructions

2
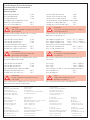
Achtung:
Vor Montage die Leitungen gründlich
durchspülen!
Idealer Betriebsdruck : 3 bar
Max. Betriebsdruck
: 5 bar
Min. Betriebsdruck
: 1 bar
Druckgleichheit empf
ehlenswert.
Ideale W
assertemperatur : 60°C
Max. W
assertemperatur : 70°C
W
eitere Informationen finden Sie in unseren
detaillierten V
erkaufsunterlagen.
Attenzione:
Risciacquare bene le tubazioni
prima del montaggio!
Pr
essione di servizio ideale : 3 bar
Pr
essione di servizio mass. : 5 bar
Pr
essione di servizio min. : 1 bar
Si r
accomanda pressioni uguali.
T
emperatura acqua calda ideale : 60°C
T
emperatura acqua calda mass. : 70°C
Ulteriori inf
ormazioni le troverete nelle nostre
dettagliate documentazioni.
Atención:
¡Enjuagar escrupulosamente las tuberías
antes del montaje!
Presión ideal de servicio : 3 bar
Presión máxima de servicio : 5 bar
Presión mínima de servicio : 1 bar
Se recomienda la igualdad de las presiones.
Temperatura ideal del agua : 60°C
Temperatura máxima del agua : 70°C
Información más detallada en nuestra
documentación de ventas.
Attention:
Rincer à fond la tuyauterie avant le
montage!
Pr
ession de service idéale : 3 bar
Pr
ession de service max. : 5 bar
Pr
ession de service min. : 1 bar
Egalité de pr
ession recommandée.
T
empérature idéale de l’eau : 60°C
T
empérature max. de l’eau : 70°C
P
our informations supplémentaires voir nos
documentations de vente détaillées.
Attention:
Flush pipes thoroughly before
installation!
Ideal operating pressure : 3 bar / 45 PSI / 300 kPa
Max. operating pressure : 5 bar / 70 PSI / 500 kPa
Min. operating pressure : 1 bar / 14.5 PSI / 100 kPa
Equal pressures are recommended.
Ideal water temperature : 60°C (140°F)
Max. water temperature : 70°C (158°F)
For further information refer to our detailed sales
literature.
O.B.S.
Spola rören ordentligt innan
blandare installeras!
Driftstryck : 3 bar / 300 kPa
Max. tryck : 5 bar / 500 kPa
Min. tryck : 1 bar / 100 kPa
Lika tryck på kall- och varmvatten rekommenderas.
Driftstemperatur : 60°C
Max temperatur : 70°C
För ytteligare information se produktblad.
KWC VG
KWC Deutschland GmbH
Junghansring 70
DE-72108 Rottenburg
+49 (0) 7457 948 56
0
+49 (0) 7457 948 56 30
Franke WS/KS
Franke Consumer Products
Luxury Products Group
800 Aviation Parkway
Smyrna, TN 37167 USA
+1 800-626-5771
Franke WS/KS
Franke S.p.A.
Via Pignolini 2
IT – 37019 Peschiera del Garda
+39 (045) 644 931 1
Fr
anke KS
Fr
anke GmbH
Mumpf
erfährstrasse 70
DE-79713 Bad Säckingen
+49 (0) 7761 52
0
+49 (0) 7761 52 294
Fr
anke WS
Fr
anke GmbH
Ober
er Achdamm 52
AT
-6971 Hard
+43 (0) 557 467 350
+43 (0) 557 462 411
Franke WS
Franke Water Systems
Ring-Oost 10
BE-9400 Ninove
+32 (0) 54 31 01 30
+32 (0) 54 31 01 35
Franke KS
Franke NV
Ring 10
BE-9400 Ninove
+32 (0) 54 31 01 11
+32 (0) 54 32 36 88
Franke KS
Franke Nederland B.V.
Lagedijk 13
NL-5705 Bx Helmond
+31 492 585 111
+31 492 585 200
Franke KS
Franke France S.A.S.
Avenue Aristide Briand BP 13
FR-60230 Chambly
+331 30 28 94 00
+331 30 28 94 30
Franke WS/KS
Franke L.L.C.
RAK Industrial Zone, P.O. Box 14511
AE-Ras Al Khaimah, UAE
+971 7 203 47 00
+971 7 203 47 60
Franke KS
Franke UK Limited
West Park, MIOC, Styal Road
GB-Manchester M22 5WB
+44 161 436 62 80
+44 161 437 13 79
Betriebsdaten
Caractéristiques de fonctionnement
Caratteristiche di funzionamento
Datos de servicio
Operating data

3
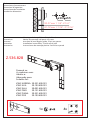
Einbaumasse
Dimensions d’encastrement
Dimensioni d’ingombro
Dimensiones de instalación
Installation dimension
47–72 mm 1 7/16"- 2 13/16"
32–57 mm 1 1/4"- 2 1/4"
ø30ø55
Z.536.828
Montageanleitung Schiene 2-Loch Wand
Notice de montage rail paroi à 2 trous
Istruzioni di montaggio guida, 2 fori per parete
Installation instructions, 2-hole rail to wall
Instrucciones de montaje pletina 2 oricios a pared
Passend zu:
A combiner avec:
Adatto a:
Adecuado para:
Suitable for:
KWC ADRENA 39.321.400.931
KWC AVA 39.193.400.931
KWC ELLA 39.001.400.931
KWC ONO 39.151.400.931
KWC PIANA 39.321.400.931
KWC ZOE 39.193.400.931
2x
1x 4x
Zubehör
Accessoires
Accessori
Accesorios
Accessories
La pagina si sta caricando...
La pagina si sta caricando...

6
Inbetriebsetzung
Mise en service
Messa in funzione
Puesta en servicion
Initial operation
1
D spülen
F rincer
I sciacquate
Sp enjuagar
E flush
D spülen
F rincer
I sciacquate
Sp enjuagar
E flush
4
4
3
3
2
2
bis / jusqu‘à / no / hasta / until
– 06/2014
06/2014 –

7
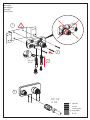
Ersatzteile
Pièces de rechange
Pezzi di ricambio
Repuestos
Spare parts
Z.536.237.000
Z.536.548.000
Z.536.597.000
–2011
2012 –06.14
Z.636.255
M18,5x1
Z.634.953
M18,5x1
Z.635.632
Z.635.700
Z.536.235.000 A 225
Z.536.234.000 A 175
Z.536.237.000
Z.536.548.000
Z.536.271
Z.536.597.000
Z.601.958.700
Z.600.703
Z.635.632
Z.635.700
Z.537.122.000
M20x1
Z.536.032
Z.635.924.000
8 Nm +/- 1 Nm
Z.536.032
Z.635.924.000
8 Nm +/- 1 Nm
Z.536.333
20mm
(optional)
Es dürfen ausschliesslich original Ersatzteile verwendet werden!
Utiliser seulement des pièces de rechange originaux!
Usare soltanto i pezzi di ricambio originali!
¡Utilizar solamente los repuestos originales!
Only the original spare parts may be used!
bis / jusqu‘à / no / hasta / until
– 06/2014
06/2014 –
M20x1
Z.638.338
M24x1
Z.635.231
Z.536.032
Z.635.924.000
8 Nm +/- 1 Nm
Z.536.985.000 A 175
Z.536.983.000 A 225
Z.537.159.000
Z.536.548.000
Z.536.975.000
Z.535.954
M24x1
Z.635.700
Z.635.632
Z.600.703
Z.601.958.700
La pagina si sta caricando...
-
 1
1
-
 2
2
-
 3
3
-
 4
4
-
 5
5
-
 6
6
-
 7
7
-
 8
8
-
 9
9
-
 10
10
-
 11
11
-
 12
12


