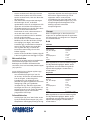
Princess 152006152007 Manuale del proprietario
- Categoria
- Macchine per il pane
- Tipo
- Manuale del proprietario
Questo manuale è adatto anche per

152006 Princess
Breadmaker Wake Up
Nederlands 4
English 13
Français 22
Deutsch 31
Español 41
Italiano 50
Svenska 60
Dansk 69
Norsk 78
Suomi 86
Português 95
105
123

2
1
2
4
3
6
7
9
11
5
8
10a 10b
A

3
22
12
15
13
14
21
23
20
19
18
17
16
B
5
8
24
6
C

4
NL
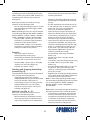
Gefeliciteerd!
U heeft een product van Princess aangeschaft.
Ons doel is om kwaliteitsproducten met een
smaakvol ontwerp en tegen een betaalbare
prijs te bieden. We hopen dat u gedurende
vele jaren plezier zult hebben van dit product.
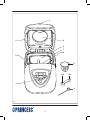
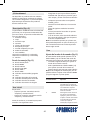
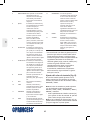
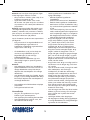
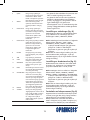
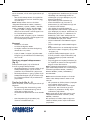
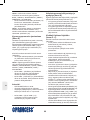
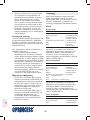
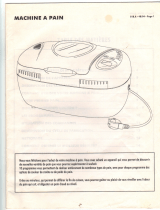
Beschrijving (fig. A)
Uw 152006 Princess broodbakmachine is
ontworpen voor het maken van brood.
Het apparaat is uitsluitend geschikt voor
gebruik binnenshuis. Het apparaat is uitsluitend
geschikt voor huishoudelijk gebruik.
1. Bedieningspaneel
2. Deksel
3. Dekselhandgreep
4. Kijkvenster
5. Bakcompartiment
6. Broodblik
7. Broodblikhandgreep
8. Kneedhaak
9. Maatbeker
10a. Maatlepel (1 el.)
10b. Maatlepel (1 tl.)
11. Haak
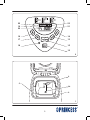
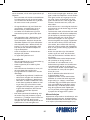
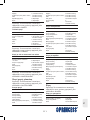
Bedieningspaneel (fig. B)
12. START/STOP-knop
13. MENU-knop
14. COLOR-knop
15. LOAF SIZE-knop
16. TIME + knop
17. TIME - knop
18. Aan/uit-indicator
19. Display
20. Bakmodusindicator
21. Baktijdindicator
22. Korstkleurindicator
23. Broodafmetingsindicator
Eerste gebruik
Voorbereiding:
- Reinig het apparaat. Zie het gedeelte
"Reiniging en onderhoud".
- Reinig de accessoires. Zie het gedeelte
"Reiniging en onderhoud".
Voordat u verdergaat, vragen wij graag uw
aandacht voor de volgende punten:
- Zorg ervoor dat er voldoende ruimte
rondom het apparaat is voor het
ontsnappen van de warmte en voor
voldoende ventilatie.
Plaats het apparaat op een stabiel en vlak •
oppervlak.
Plaats de netstekker in het stopcontact.•
Selecteer de volgende bakmodus: BASIC.•
Start het bakproces. Het apparaat begint •
met opwarmen.
Verwijder na 10 minuten de netstekker uit •
het stopcontact en laat het apparaat
volledig afkoelen.
Let op: Indien u het apparaat voor de eerste
keer inschakelt, kan gedurende korte tijd een
lichte rookontwikkeling onstaan en een
karakteristieke geur vrijkomen. Dit is normaal.
Gebruik
Instellen van de bakmodus (fig. B)
De bakmodus kan worden ingesteld met
behulp van de MENU-knop (13). De bakmodus-
indicator (20) geeft de bakmodus aan.
Zie onderstaande tabel voor het instellen •
van de juiste bakmodus.
Druk herhaaldelijk op de MENU-knop (13) •
om de bakmodus in te stellen. Het apparaat
zal piepen bij iedere druk op de knop.
Let op: Na het bereiken van de laatste
instelling kan de instelling nog steeds worden
aangepast. Druk op de MENU-knop (13) om
terug te gaan naar de eerste instelling.
Bak-
modus Naam Toepassing
1 BASIC Witte en gemengde broden
voor namelijk gemaakt van
tarwe meel of roggemeel. Het
brood heeft een compacte
consistentie. Gebruik normale gist
voor de bakmodus.
2 FRENCH Lichte broden gemaakt van fijn
meel. Het brood is doorgaans
luchtig en heeft een krokante
korst.

5
NL
De bakmodus is niet geschikt
voor bakrecepten met boter,
margarine of melk.
3 WHOLE WHEAT Zware broden met zware
meelsoorten die een langere
deeg-en-rijsfase vereisen. Het
brood heeft een compacte
consistentie.
4 QUICK Kneden, rijzen en bakken van
brood in minder tijd dan bij
gebruik van de bakmodus
"BASIC". Het brood is doorgaans
klein en heeft een dichte textuur.
Gebruik bakpoeder in plaats van
bakgist.
5 SWEET Broden met zoete toevoegingen
(suiker, chocolade, droge
vruchten of vruchtensappen). Het
brood heeft een luchtige
consistentie en een lichte textuur.
6 ULTRA FAST-I Kneden, rijzen en bakken van een
brood (1.5LB) in korte tijd. Het
brood is doorgaans kleiner en
grover dan bij gebruik van de
bakmodus "QUICK". Gebruik
snelrijsgist voor de bakmodus.
7 ULTRA FAST-II Kneden, rijzen en bakken van een
brood (2.0LB) in korte tijd. Het
brood is doorgaans kleiner en
grover dan bij gebruik van de
bakmodus "QUICK". Gebruik
snelrijsgist voor de bakmodus.
8 DOUGH Kneden en rijzen, zonder bakken.
Maken van broodjes, pizza's,
gestoomd brood, etc.
9 JAM Maken van jam en marmelade.
10 CAKE Kneden, rijzen en bakken van
cakes. Gebruik bakpoeder in
plaats van bakgist.
11 SANDWICH Kneden, rijzen en bakken van
sandwiches. Het brood heeft een
lichte textuur en een dunne korst.
12 BAKE Extra bakken van te lichte of
niet-doorbakken broden, zonder
kneden of rijzen.
13 GLUTEN FREE * Glutenvrij deeg is doorgaans
natter dan normaal deeg.
Glutenvrij deeg niet te lang
mengen of kneden. Glutenvrij
deeg mag slechts één keer rijzen
en vereist een langere baktijd dan
normaal deeg.
Voeg extra ingrediënten aan het
begin van het bakproces toe aan
de basisingrediënten.
14 KNEAD Kneden, zonder rijzen en bakken.
15 YOGURT Rijzen, zonder kneden en bakken.
Beschikbare tijden: 6 uur of 8 uur.
Druk op de TIME + knop (16) of
de TIME - knop (17) om de tijd te
selecteren. Druk op de START/
STOP-knop (12) om de tijd in te
stellen.
* Een glutenvrij dieet wordt aanbevolen voor
personen die lijden aan coeliakie
(glutenenteropathie) en tarweallergie. Het
glutenvrije dieet bevat helemaal geen
ingrediënten afkomstig van graanproducten
die gluten bevatten (tarwe, rogge, gerst, etc.).
Het glutenvrije dieet bevat ook helemaal
geen gluten als voedseltoevoeging in de
vorm van bloem or bindmiddel. Bovendien,
sommige glutenvrije dieeten sluiten haver uit.
Instellen van de korstkleur (fig. B)
De korstkleur kan worden ingesteld met
behulp van de COLOR-knop (14). De
korstkleurindicator (22) toont de bakkleur:
LIGHT / MEDIUM / DARK.
Let op: De korstkleur kan niet worden
ingesteld in de volgende bakmodi: DOUGH /
JAM / CAKE / SANDWICH / BAKE / KNEAD /
YOGURT.
Druk herhaaldelijk op de COLOR-knop (14) •
om de korstkleur in te stellen. Het apparaat
zal piepen bij iedere druk op de knop.
Let op: Na het bereiken van de laatste
instelling kan de instelling nog steeds worden
aangepast. Druk op de COLOR-knop (14) om
terug te gaan naar de eerste instelling.
Instellen van de broodafmeting
(fig. B)
De broodafmeting kan worden ingesteld met
behulp van de LOAF SIZE-knop (15). De brood-
afmetingsindicator (23) toont de broodafmeting:
1.5LB / 2.0LB.

6
NL
Let op: De broodafmeting kan uitsluitend
worden ingesteld in de volgende bakmodi:
BASIC / FRENCH / WHOLE WHEAT / SWEET /
SANDWICH / GLUTEN FREE.
Druk herhaaldelijk op de LOAF SIZE-knop •
(15) om de broodafmeting in te stellen.
Het apparaat zal piepen bij iedere druk op
de knop.
Let op: Na het bereiken van de laatste
instelling kan de instelling nog steeds worden
aangepast. Druk op de LOAF SIZE-knop (15)
om terug te gaan naar de eerste instelling.
Uitstellen van het bakproces (fig. B)
Het apparaat heeft een uitgestelde
startfunctie (max. 13 uur) waarmee het tijdstip
van aanvang van het bakproces kan worden
geprogrammeerd. Het bakproces kan worden
uitgesteld met behulp van de TIME + knop (16)
en de TIME - knop (17). De baktijdindicator
(21) geeft de baktijd aan.
Voordat u verdergaat, vragen wij graag uw
aandacht voor de volgende punten:
- Stel het bakproces niet uit voor recepten
met ingrediënten die beperkt houdbaar
zijn (eieren, kaas, verse melk, etc.).
Let op: Het bakprocess kan uitsluitend worden
uitgesteld in de volgende bakmodi: BASIC /
FRENCH / WHOLE WHEAT / QUICK / SWEET /
DOUGH / CAKE / SANDWICH / BAKE /
GLUTEN FREE.
Druk op de TIME + knop (16) om de tijd •
met 10 minuten te verhogen. Houd de
knop ingedrukt om het proces te versnellen.
Druk op de TIME - knop (17) om de tijd •
met 10 minuten te verlagen. Houd de knop
ingedrukt om het proces te versnellen.
Voorbeeld:
- De huidige tijd is 19.30.
- De uitgestelde eindtijd is 8.00.
- Het verschil tussen de uitgestelde eindtijd
en de huidige tijd is 12,5 uur.
Druk op de TIME + knop (16) of de TIME - •
knop (17) totdat de baktijdindicator (21)
"12:30" toont.
Starten en stoppen van het
bakproces (fig. B)
De START/STOP-knop (12) moet worden
gebruikt om het bakproces te starten en te
stoppen.
Indien het bakproces is ingesteld, druk dan •
op de START/STOP-knop (12) om het proces
te starten. De aan/uit-indicator (18) gaat
branden.
Indien het bakproces loopt, druk dan op de •
START/STOP-knop (12) totdat een piep klinkt
om het proces te stoppen. De aan/uit-
indicator (18) gaat uit.
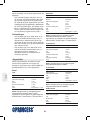
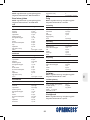
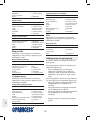
Aanwijzingen voor gebruik
(fig. A - C)
Voordat u verdergaat, vragen wij graag uw
aandacht voor de volgende punten:
- Verwijder voor montage of demontage de
netstekker uit het stopcontact en wacht
totdat het apparaat is afgekoeld.
- Laat het broodblik afkoelen alvorens het
brood te verwijderen.
Monteer de kneedhaak (8) op de spindel •
(24) in de bodem van het broodblik (6).
Doe de ingrediënten in de juiste volgorde •
in het broodblik (6). Gebruik indien nodig
de maatbeker (10) of de maatlepel (11)
om ingrediënten toe te voegen.
Open het deksel (2) met behulp van de •
dekselhandgreep (3).
Monteer het broodblik (6) in de bodem •
van het bakcompartiment (5). Vergrendel
het broodblik (6) door het rechtsom te
draaien.
Sluit het deksel (5) met behulp van de •
dekselhandgreep (3).
Plaats de netstekker in het stopcontact. •
Het apparaat piept. De display (19) gaat
branden. De bakmodusindicator (20) toont
"1" . De baktijdindicator (21) toont "3:00" .
De korstkleurindicator (22) geeft "MEDIUM"
aan. De broodafmetings indicator (23) geeft
"2.0LB" aan.
Stel de bakmodus in met behulp van de •
MENU-knop (13).
Stel de korstkleur in met behulp van de •
COLOR-knop (14).

7
NL
Stel indien nodig het bakproces uit met •
behulp van de TIME + knop (16) en de
TIME - knop (17).
Druk op de START/STOP-knop (12) om het •
proces te starten. De aan/uit-indicator (18)
gaat branden. De display (19) telt af tijdens
het proces.
Kijk regelmatig door het kijkvenster (4) om •
te controleren of het voedsel wordt
gebakken en ervoor te zorgen dat het niet
aanbrandt.
Let op: In de volgende bakmodi klinken piepen
tijdens het bakprocess om u erop te wijzen
ingrediënten toe te voegen: BASIC / FRENCH /
WHOLE WHEAT / CAKE / SANDWICH /
GLUTEN FREE.
Let op: Tijdens het bakproces kan stoom door
het deksel ontsnappen. Dit is normaal.
Indien het proces is voltooid, klinken tien •
piepen om het einde van het proces aan te
geven.
Het apparaat zal het voedsel warm houden •
gedurende een maximum van 60 minuten.
Er klinkt een piep om het einde van het
proces aan te geven. De aan/uit-indicator
(18) gaat uit.
Let op: Het apparaat zal het voedsel niet warm
houden in de volgende bakmodi: DOUGH /
JAM / KNEAD / YOGURT. Indien het proces is
voltooid, klinkt een piep om het einde van het
proces aan te geven. De aan/uit-indicator (18)
gaat uit.
Voordat u verdergaat, vragen wij graag uw
aandacht voor de volgende punten:
- Gebruik ovenhandschoenen om het
broodblik uit het bakcompartiment en het
brood uit het broodblik te verwijderen. Het
broodblik en het brood worden zeer heet
tijdens gebruik.
Ontgrendel het broodblik (6) door het •
linksom te draaien. Verwijder het broodblik
(6) uit het bakcompartiment (5) met
behulp van de broodblikhandgreep (7).
Verwijder het brood uit het broodblik (6). •
Gebruik indien nodig een rubberen of
plastic spatel.
Let op:
- Indien de kneedhaak in het broodblik
achterblijft, vul dan het broodblik met heet
water om de kneedhaak te verwijderen.
Gebruik geen scherpe metalen voorwerpen
om de kneedhaak te verwijderen.
- Indien de kneedhaak in het brood
achterblijft, gebruik dan de haak (11) om
de kneedhaak te verwijderen. Gebruik
geen scherpe metalen voorwerpen om de
kneedhaak te verwijderen.
Verwijder de netstekker uit het stopcontact. •
De display (19) gaat uit.
Laat het apparaat volledig afkoelen.•
Algemene tips
Zorg ervoor dat de ingrediënten van goede •
kwaliteit en op kamertemperatuur zijn.
Plaats het apparaat op een stabiel en vlak •
oppervlak.
Indien het bakcompartiment nog warm is, •
laat het dan voor gebruik volledig afkoelen.
Doe de ingrediënten in de juiste volgorde •
in het broodblik.
- Doe de vloeibare ingrediënten in het
broodblik.
- Doe een klein beetje meel in het
broodblik.
- Doe de vaste ingrediënten in het
broodblik.
- Doe de rest van het meel in het broodblik.
Zorg ervoor dat alle vaste ingrediënten
worden bedekt door het meel.
- Maak een kleine inkeping aan één zijde
van het meel. Giet de bakgist of het
bakpoeder in de inkeping. Zorg ervoor
dat de bakgist of het bakpoeder niet in
contact komt met zout of vloeibare
ingrediënten.
Gebruik bij voorkeur meel dat speciaal •
bedoeld is voor het bakken van brood.
Bij gebruik van zwaar meel (tarwemeel,
roggemeel, maïsmeel, etc.) zal het brood
minder rijzen dan bij gebruik van licht
meel. Gebruik de juiste hoeveelheid meel.
Gebruik indien nodig een keukenweeg schaal
om de hoeveelheid meel af te wegen.

8
NL
Gebruik de juiste hoeveelheid bakgist. •
Gebruik gedroogde actieve bakgist in plaats
van bakpoeder. Gebruik bij verse gist drie
keer zoveel gist als bij gedroogde gist en
los de gist op in een beetje lauwwarm water.
Zorg ervoor dat de bakgist niet in contact
komt met water, melk, zout of suiker.
Gebruik lauwwarm water. Gebruik indien •
mogelijk kraanwater. Indien u eieren
gebruikt, breek dan de eieren en voeg ze
toe aan het water.
Indien u melk gebruikt, gebruik dan verse •
melk of melkpoeder. Indien u melkpoeder
gebruikt, voeg dan de benodigde
hoeveelheid water toe aan de melkpoeder.
Indien u water aan de verse melk wilt
toevoegen, moet de totale hoeveelheid
melk en water gelijk zijn aan de voor het
recept benodigde hoeveelheid.
Indien u suiker gebruikt, gebruik dan bij •
voorkeur witte suiker, bruine suiker of
honing. Gebruik geen verfijnde suiker of
suikerklontjes.
Indien u zout gebruikt, zal het gist beter •
rijzen en het brood meer smaak krijgen.
Indien u boter of olie gebruikt, zal het •
brood zachter worden en meer smaak
krijgen. Indien u boter gebruikt, snijd dan
de boter in stukken of laat hem zacht
worden.
Houd het deksel gesloten tijdens het •
bakproces.
Gebruik na het einde van het bakproces •
ovenhandschoenen om het broodblik uit
het bakcompartiment en het brood uit het
broodblik te verwijderen.
Laat het brood afkoelen voordat u het in •
sneetjes snijdt. Indien u het brood wilt eten
wanneer het nog heet is, wordt aanbevolen
om het brood in sneetjes van 2,5 cm te
snijden.
Gebruik een getand mes of een elektrisch •
mes om het brood in sneetjes te snijden.
Bewaar het brood in een hermetisch •
afgesloten bak of trommel om het brood
zo lang mogelijk (ongeveer 2 dagen) vers
te houden. Indien het brood eieren bevat,
moet het brood op dezelfde dag worden
geconsumeerd.
Indien het brood geen boter of olie bevat,
moet het brood op dezelfde dag worden
geconsumeerd. Bewaar het brood niet in
de koelkast.
Indien u het brood in de vriezer wilt •
bewaren, doe het brood dan in een
diepvrieszak voordat u het in de vriezer doet.
Geheugenfunctie
Het apparaat is voorzien van een geheugen-
functie. Indien de stroomtoevoer is onderbroken,
wordt het bakproces na 10 minuten automatisch
voortgezet, zelfs zonder op de START/STOP-
knop (12) te drukken.
Voordat u verdergaat, vragen wij graag uw
aandacht voor de volgende punten:
- De geheugenfunctie werkt niet als de
stroomtoevoer langer dan 10 minuten
wordt onderbroken. Verwijder de oude
ingrediënten uit het broodblik (6). (Gebruik
de oude ingrediënten niet voor andere
kookdoeleinden!) Doe de nieuwe
ingrediënten in het broodblik (6). Herstart
het apparaat. Indien het deeg zich nog niet
in de rijsfase bevindt wanneer de stroom-
toevoer wordt onderbroken, kunt u op de
START/STOP-knop (12) drukken om het
programma vanaf het begin voort te zetten.
Foutmeldingen
Indien de display (19) "HHH" toont na het •
indrukken van de START/STOP-knop (12),
is de temperatuur in het bakcompartiment
(5) te hoog. Het apparaat kan niet worden
gebruikt totdat het is afgekoeld. Open het
deksel (2) en laat het apparaat 10-20
minuten afkoelen.
Indien de display (19) "EEE" toont na het •
indrukken van de START/STOP-knop (12),
is de temperatuursensor losgekoppeld.
Laat een erkend servicecentrum de
temperatuursensor controleren.
Recepten
Deze receptenlijst geeft een klein overzicht
van recepten die specifiek zijn bedoeld voor
het apparaat. Raadpleeg voor andere recepten
een receptenboek voor broodbakmachines.

9
NL
Brood
Witbrood
Ingrediënten Hoeveelheid
Meel (hoog glutengehalte) 2,25 koppen
Gedroogde actieve bakgist 1,25 tl.
Zout 1 tl.
Suiker 1,5 el.
Mager melkpoeder 1 el.
Olie 1 el.
Water 0,75 kop + 1 el.
Let op: De ingrediënten en hoeveelheden zijn
van toepassing op de volgende bakmodi:
BASIC. Andere ingrediënten en hoeveelheden
kunnen van toepassing zijn op de volgende
bakmodi: ULTRA FAST-I / ULTRA FAST-II.
Maïsbrood
Ingrediënten Hoeveelheid
Meel (hoog glutengehalte) 2 koppen
Maïsmeel 0,25 kop
Gedroogde actieve bakgist 1,5 tl.
Zout 1 tl.
Suiker 2 el.
Mager melkpoeder 0,75 kop
Olie 2 el.
Eieren 1
Water 0,75 kop + 1 el.
Let op: De ingrediënten en hoeveelheden zijn
van toepassing op de volgende bakmodi:
BASIC. Andere ingrediënten en hoeveelheden
kunnen van toepassing zijn op de volgende
bakmodi: ULTRA FAST-I / ULTRA FAST-II.
Walnotenbrood
Ingrediënten Hoeveelheid
Meel (hoog glutengehalte) 2 koppen
Gedroogde actieve bakgist 1,5 tl.
Zout 1 tl.
Suiker 1,5 el.
Mager melkpoeder 1 el.
Olie 1 el.
Walnoten (fijngehakt) 0,33 kop
Water 0,75 kop
Let op: De ingrediënten en hoeveelheden zijn
van toepassing op de volgende bakmodi:
SWEET.
Frans brood
Ingrediënten Hoeveelheid
Meel (hoog glutengehalte) 2,25 koppen
Gedroogde actieve bakgist 1,25 tl.
Zout 1 tl.
Suiker 1 el.
Olie 1 el.
Water 0,75 kop + 2 el.
Let op: De ingrediënten en hoeveelheden zijn
van toepassing op de volgende bakmodi:
FRENCH.
Volkorenbrood
Ingrediënten Hoeveelheid
Volkorenmeel 2,25 koppen
Gedroogde actieve bakgist 2,25 tl.
Zout 1 tl.
Bruine suiker 2 el.
Olie 2 el.
Water 0,75 kop
Let op: De ingrediënten en hoeveelheden zijn
van toepassing op de volgende bakmodi:
WHOLE WHEAT.
Glutenvrij brood
Let op: De ingrediënten en hoeveelheden zijn
van toepassing op de volgende bakmodi:
GLUTEN FREE.
Witbrood
Ingrediënten Hoeveelheid
Witte rijstbloem 1,5 koppen
Sojabloem 2 el.
Aardappelbloem 0,5 kop
Zetmeelbloem 3 el.
Xanthangom 1 tl.
Snelrijsgist 1,5 tl.
Zout 1 tl.
Suiker 2 el.
Mager melkpoeder 6 el.
Olie 2 el.
Ciderazijn 0,5 tl.
Eieren (XL) 2
Water 0,5 kop + 3 el.

10
NL
Maïsbrood
Ingrediënten Hoeveelheid
Witte rijstbloem 1,5 koppen
Zetmeelbloem 2 el.
Maïsmeel 0,75 kop
Xanthangom 1 tl.
Snelrijsgist 1,5 tl.
Zout 1 tl.
Bruine suiker 4 tl.
Mager melkpoeder 6 el.
Olie 2 el.
Ciderazijn 0,5 tl.
Eieren (XL) 2
Water 0,5 kop + 6 el.
Walnotenbrood
Ingrediënten Hoeveelheid
Witte rijstbloem 1,5 koppen
Aardappelbloem 0,5 kop
Zetmeelbloem 0,25 kop
Xanthangom 1 tl.
Snelrijsgist 1,5 tl.
Zout 1 tl.
Suiker 2 el.
Mager melkpoeder 0,5 el.
Olie 2 el.
Ciderazijn 0,5 tl.
Citroenrasp 1,5 tl.
Eieren (XL) 2
Water 0,75 kop + 2 el.
Deeg
Let op: De ingrediënten en hoeveelheden zijn
van toepassing op de volgende bakmodi:
DOUGH.
Pastadeeg
Ingrediënten Hoeveelheid
All-purpose bloem 1 kop
Griesmeelbloem 0,5 kop
Zout 0,5 tl.
Olijfolie 1 el.
Eieren (kapotgeslagen) 1
Water 0,25 kop
Pizzadeeg
Ingrediënten Hoeveelheid
Meel (hoog glutengehalte) 2,25 koppen
Gedroogde actieve bakgist 1 tl.
Zout 0,5 tl.
Suiker 1 el.
Olijfolie 1 el.
Water 0,75 kop
Bageldeeg
Ingrediënten Hoeveelheid
Meel (hoog glutengehalte) 2 koppen
Gedroogde actieve bakgist 2,25 tl.
Zout 1 tl.
Suiker 2 el.
Water 0,75 kop
Jam
Let op: De ingrediënten en hoeveelheden zijn
van toepassing op de volgende bakmodi: JAM.
Aardbeienjam
Ingrediënten Hoeveelheid
Bevroren aardbeien
(ontdooid, fijngemaakt) 225 g
Aardbeien (vers) 2 koppen
Droge pectine 0,5 pak
Suiker 0,75 kop
Citroensap 1,5 tl.
Snelbrood
Let op: De ingrediënten en hoeveelheden zijn
van toepassing op de volgende bakmodi:
QUICK.
Muffinsnelbrood
Ingrediënten Hoeveelheid
All-purpose bloem 1,25 koppen
Bakpoeder 2 tl.
Vanille-extract 0,5 tl.
Zout 0,25 tl.
Suiker 6 el.
Mager melkpoeder 2 el.
Boter (zacht) 0,5 kop
Eieren (XL) 2
Rozijnensnelbrood
Ingrediënten Hoeveelheid
All-purpose bloem 1,25 koppen
Bakpoeder 2 tl.
Vanille-extract 0,5 tl.
Zout 0,25 tl.
Suiker 6 el.
Melk 0,5 kop
Boter (zacht) 0,5 kop

11
NL
Eieren (XL) 2
Rozijnen 0,25 kop
Cake
Let op: De ingrediënten en hoeveelheden zijn
van toepassing op de volgende bakmodi:
CAKE.
Normale cake
Ingrediënten Hoeveelheid
Cakemix (elk bloem)
165 g
Plantaardige olie 0,33 kop
Eieren (XL) 3
Water 1,25 koppen
Reiniging en onderhoud
Het apparaat moet na ieder gebruik worden
gereinigd.
Voordat u verdergaat, vragen wij graag uw
aandacht voor de volgende punten:
- Verwijder voor reiniging en onderhoud de
netstekker uit het stopcontact en wacht
totdat het apparaat is afgekoeld.
- Dompel het apparaat niet onder in water
of andere vloeistoffen.
Voordat u verdergaat, willen wij graag dat u
uw aandacht vestigt op de volgende punten:
- Gebruik geen bijtende of schurende
reinigingsmiddelen om het apparaat te
reinigen.
- Gebruik geen scherpe voorwerpen om het
apparaat te reinigen.
- Gebruik geen ovenreinigers om de
binnenkant van het apparaat te reinigen.
Controleer het apparaat regelmatig op •
mogelijke schade.
Reinig de buitenkant van het apparaat met•
een zachte, vochtige doek. Droog de
buitenkant van het apparaat grondig met
een schone, droge doek.
Reinig het deksel en het bakcompartiment•
met een zachte, vochtige doek. Droog het
deksel en het bakcompartiment grondig
met een schone, droge doek.
Reinig het broodblik in sop. Droog het•
broodblik grondig met een schone, droge
doek.
Indien de kneedhaak is verstopt, reinig dan•
de kneedhaak met een houten of plastic
tandenstoker. Reinig de kneedhaak in sop.
Droog de kneedhaak grondig met een
schone, droge doek.
Doe het apparaat en de accessoires in de•
originele verpakking.
Berg het apparaat met de accessoires op•
op een droge plaats, buiten bereik van
kinderen.
Veiligheidsinstructies
Algemene veiligheid
Lees voor gebruik de gebruiksaanwijzing•
zorgvuldig door. Bewaar de gebruiks-
aanwijzing voor toekomstig gebruik.
Gebruik het apparaat en de accessoires•
uitsluitend voor hun beoogde doeleinden.
Gebruik het apparaat en de accessoires
niet voor andere doeleinden dan
beschreven in de gebruiksaanwijzing.
Houd altijd toezicht op kinderen om te•
voorkomen dat ze met het apparaat spelen.
Het apparaat is niet bedoeld om gebruikt•
te worden door personen (inclusief
kinderen) met een lichamelijke, zintuiglijke,
of geestelijke beperking, of zonder de
benodigde ervaring en kennis tenzij ze
onder toezicht staan of instructies hebben
gekregen over hoe het apparaat kan
worden gebruikt door een persoon die
verantwoordelijk is voor hun veiligheid.
Gebruik het apparaat niet als een•
onderdeel of een accessoire beschadigd of
defect is. Indien een onderdeel of een
accessoire beschadigd of defect is, moet
het door de fabrikant of een erkend
servicecentrum worden vervangen.
Gebruik het apparaat niet in de buurt van•
badkuipen, douches, wastafels of andere
voorzieningen die water bevatten.
Dompel het apparaat niet onder in water•
of andere vloeistoffen. Verwijder het
apparaat niet met uw handen indien het
apparaat is ondergedompeld in water of
andere vloeistoffen. Verwijder onmiddellijk
de netstekker uit het stopcontact.

12
NL
Gebruik het apparaat niet opnieuw indien
het apparaat is ondergedompeld in water
of andere vloeistoffen.
Dit apparaat is uitsluitend bedoeld voor •
gebruik binnenshuis en voor gelijksoortige
toepassingsgebieden zoals
werknemerskantines in winkels, kantoren
en andere werkomgevingen; boerderijen;
door gasten in hotels, motels, bed and
breakfasts en andere woonomgevingen.
Elektrische veiligheid
Controleer voor gebruik altijd of de •
netspanning overeenkomt met de spanning
op het typeplaatje van het apparaat.
Sluit het apparaat aan op een geaard •
stopcontact. Gebruik indien nodig een
geaarde verlengkabel met een geschikte
diameter (minimaal 3 x 1,5 mm
2
).
Installeer voor extra bescherming een •
aardlekschakelaar (RCD) met een nominale
reststroom van maximaal 30 mA.
Het apparaat mag niet worden bediend •
door middel van een externe timer of een
apart afstandsbedieningssysteem.
Zorg ervoor dat er geen water in de •
pluggen van het netsnoer en het
verlengsnoer kan komen.
Draai het netsnoer en het verlengsnoer •
altijd volledig uit.
Zorg ervoor dat het netsnoer niet over de •
rand van een werkblad hangt. Zorg ervoor
dat het netsnoer niet per ongeluk
verstrengeld raakt of de oorzaak van een
struikeling kan vormen.
Houd het netsnoer uit de buurt van •
warmtebronnen, olie en scherpe randen.
Controleer het netsnoer en de netstekker •
op tekenen van beschadiging. Gebruik het
apparaat niet als het netsnoer of de
netstekker beschadigd of defect is. Indien
het netsnoer of de netstekker beschadigd
of defect is, moet het door de fabrikant of
een erkend servicecentrum worden
vervangen.
Trek niet aan het netsnoer om de netstekker •
van de netvoeding te verwijderen.
Verwijder de netstekker van de netvoeding •
wanneer het apparaat niet in gebruik is,
voor montage- of demontage-
werkzaamheden en voor reinigings- en
onderhoudswerkzaamheden.
Veiligheidsinstructies voor
broodbakmachines
Gebruik het apparaat niet buitenshuis.•
Gebruik het apparaat niet in vochtige •
omgevingen.
Plaats het apparaat op een stabiel en vlak •
oppervlak.
Plaats het apparaat op een hittebestendig •
en spatvrij oppervlak.
Plaats het apparaat niet op een kookplaat.•
Zorg ervoor dat er voldoende ruimte •
rondom het apparaat is voor het
ontsnappen van de warmte en voor
voldoende ventilatie.
Bedek het apparaat niet. Plaats geen •
objecten boven op het apparaat.
Zorg ervoor dat het apparaat niet in •
contact komt met brandbaar materiaal.
Houd het apparaat uit de buurt van •
warmtebronnen.
Wees altijd voorzichtig wanneer u het •
apparaat aanraakt. Gebruik
ovenhandschoenen indien u het apparaat
tijdens of kort na gebruik moet aanraken.
De verwarmingselementen worden zeer •
heet tijdens gebruik. Raak de verwarmings-
elementen niet aan.
Raak de bewegende delen niet aan. Raak •
het broodblik niet aan of verwijder het
broodblik niet terwijl het apparaat is
ingeschakeld.
Verplaats het apparaat niet wanneer het is •
ingeschakeld of nog heet is. Verwijder de
netstekker uit het stopcontact en wacht
totdat het apparaat is afgekoeld.
Laat het apparaat niet onbeheerd achter •
tijdens gebruik.
Disclaimer
Wijzigingen voorbehouden; specificaties
kunnen zonder opgave van redenen worden
gewijzigd.

13
EN
Congratulations!
You have purchased a Princess product.
Our aim is to provide quality products with
a tasteful design and at an affordable price.
We hope that you will enjoy this product for
many years.
Description (fig. A)
Your 152006 Princess bread maker has been
designed for making bread. The appliance is
suitable for indoor use only. The appliance is
suitable for domestic use only.
1. Operation panel
2. Lid
3. Lid handle
4. Viewing window
5. Baking compartment
6. Bread pan
7. Bread pan handle
8. Kneading paddle
9. Measuring cup
10a. Measuring spoon (1 tbsp.)
10b. Measuring spoon (1 tsp.)
11. Hook
Operation panel (fig. B)
12. START/STOP button
13. MENU button
14. COLOR button
15. LOAF SIZE button
16. TIME + button
17. TIME - button
18. On/off indicator
19. Display
20. Baking mode indicator
21. Baking time indicator
22. Roast colour indicator
23. Loaf size indicator
Initial use
Preparation:
- Clean the appliance. Refer to the section
"Cleaning and maintenance".
- Clean the accessories. Refer to the section
"Cleaning and maintenance".
Before you proceed, we need you to pay
attention to the following notes:
- Make sure that there is sufficient space
around the appliance to allow heat to
escape and provide sufficient ventilation.
Place the appliance on a stable and flat •
surface.
Insert the mains plug into the wall socket.•
Set the following baking mode: BASIC.•
Start the baking process. The appliance •
starts heating.
After 10 minutes, remove the mains plug •
from the wall socket and allow the appliance
to cool down completely.
Note: If you switch on the appliance for the
first time, the appliance may emit a little
smoke and a characteristic smell for a short
period. This is normal operation.
Use
Setting the baking mode (fig. B)
The baking mode can be set using the MENU
button (13). The baking mode indicator (20)
shows the baking mode.
Refer to the table below to set the correct •
baking mode.
Repeatedly press the MENU button (13) to •
set the baking mode. The appliance will
beep each time you press the button.
Note: If the last setting has been reached, it is
still possible to adjust the setting. Press the
MENU button (13) to go back to the first setting.
Baking
mode Name Application
1 BASIC White and mixed breads mainly
made from wheat flour or rye
flour. The bread has a compact
consistency. Use normal yeast for
the baking mode.
2 FRENCH Light breads made from fine flour.
The bread is usually fluffy and has
a crispy crust. The baking mode is
not suitable for baking recipes
requiring butter, margarine or milk.
3 WHOLE WHEAT Heavy breads with heavy varieties
of flour requiring a longer phase
of kneading and rising. The bread
has a compact consistency.

14
EN
4 QUICK Kneading, rising and baking bread
in less time than when using the
baking mode "BASIC". The bread is
usually small and has a dense
texture. Use baking powder
instead of baking yeast.
5 SWEET Breads with sweet additives
(sugar, chocolate, dry fruits or
fruit juices). The bread has an airy
consistency and a light texture.
6 ULTRA FAST-I Kneading, rising and baking a loaf
of bread (1.5LB) in a shortest time.
The bread is usually smaller and
coarser than when using the baking
mode "QUICK". Use quick-rise
yeast for the baking mode.
7 ULTRA FAST-II Kneading, rising and baking a loaf
of bread (2.0LB) in a shortest time.
The bread is usually smaller and
coarser than when using the baking
mode "QUICK". Use quick-rise
yeast for the baking mode.
8 DOUGH Kneading and rising, without
baking. Making bread rolls, pizza,
steamed bread, etc.
9 JAM Making jam and marmalade.
10 CAKE Kneading, rising and baking cakes.
Use baking powder instead of
baking yeast.
11 SANDWICH Kneading, rising and baking
sandwiches. The bread has a light
texture and a thin crust.
12 BAKE Additional baking of breads that
are too light or not baked through,
without kneading or rising.
13 GLUTEN FREE * Gluten-free dough is usually
wetter than normal dough.
Do not over-mix or over-knead
gluten-free dough. Gluten-free
dough must rise only once and
requires a longer baking time than
normal dough. Add additional
ingredients to the basic ingredients
at the very beginning of the
baking process.
14 KNEAD Kneading, without rising and
baking.
15 YOGURT Rising, without kneading and
baking. Available times: 6 hours or
8 hours. Press the TIME + button
(16) or the TIME - button (17) to
select the time. Press the START/
STOP button (12) to set the time.
* A gluten-free diet is recommended for
persons suffering from celiac disease (gluten
enteropathy) and wheat allergy. The gluten-
free diet is completely free of ingredients
derived from gluten-containing cereals (wheat,
rye, barley, etc.). The gluten-free diet is also
completely free of gluten as a food additive
in the form of a flavoring, stabilising or
thickening agent. Additionally, some gluten-
free diets exclude oats.
Setting the roast colour (fig. B)
The roast colour can be set using the COLOR
button (14). The roast colour indicator (22)
shows the roast colour: LIGHT / MEDIUM /
DARK.
Note: The roast colour can not be set in the
following baking modes: DOUGH / JAM /
CAKE / SANDWICH / BAKE / KNEAD / YOGURT.
Repeatedly press the COLOR button (14) to •
set the roast colour. The appliance will
beep each time you press the button.
Note: If the last setting has been reached, it is
still possible to adjust the setting. Press the
COLOR button (14) to go back to the first setting.
Setting the loaf size (fig. B)
The loaf size can be set using the LOAF SIZE
button (15). The loaf size indicator (23) shows
the loaf size: 1.5LB / 2.0LB.
Note: The loaf size can only be set in the
following baking modes: BASIC / FRENCH /
WHOLE WHEAT / SWEET / SANDWICH /
GLUTEN FREE.
Repeatedly press the LOAF SIZE button •
(15) to set the loaf size. The appliance will
beep each time you press the button.
Note: If the last setting has been reached, it is
still possible to adjust the setting. Press the
LOAF SIZE button (15) to go back to the first
setting.
Delaying the baking process (fig. B)
The appliance has a delay start function (max.
13 hours) which makes it possible to program
the time for starting the baking process.

15
EN
The baking process can be delayed using the
TIME + button (16) and the TIME - button (17).
The baking time indicator (21) shows the
baking time.
Before you proceed, we need you to pay
attention to the following notes:
- Do not delay the baking process for recipes
with perishable ingredients (eggs, cheese,
fresh milk, etc.).
Note: The baking process can only be delayed
in the following baking modes: BASIC / FRENCH /
WHOLE WHEAT / QUICK / SWEET / DOUGH /
CAKE / SANDWICH / BAKE / GLUTEN FREE.
Press the TIME + button (16) to increase •
the time by 10 minutes. Keep the button
pressed to accelerate the process.
Press the TIME - button (17) to decrease•
the time by 10 minutes. Keep the button
pressed to accelerate the process.
Example:
- The current time is 7:30 p.m.
- The delayed finish time is 8 a.m.
- The difference between the delayed finish
time and the current time is 12.5 hours.
Press the TIME + button (16) or the TIME•
- button (17) until the baking time
indicator (21) shows "12:30".
Starting and stopping the baking
process (fig. B)
The START/STOP button (12) must be used to
start and stop the baking process.
If the baking process is set, press the•
START/STOP button (12) to start the process.
The on/off indicator (18) comes on.
If the baking process is running, press the•
START/STOP button (12) until a beep
sounds to stop the process. The on/off
indicator (18) goes off.
Hints for use (fig. A - C)
Before you proceed, we need you to pay
attention to the following notes:
- Before assembly or disassembly, remove
the mains plug from the wall socket and
wait until the appliance has cooled down.
- Allow the bread pan to cool down before
removing the bread.
Mount the kneading paddle (8) onto the•
spindle (24) into the bottom of the bread
pan (6).
Put the ingredients into the bread pan (6)•
in the required order. If necessary, use the
measuring cup (10) or the measuring
spoon (11) to add the ingredients.
Open the lid (2) using the lid handle (3).•
Mount the bread pan (6) into the bottom•
of the baking compartment (5). Lock the
bread pan (6) by turning it clockwise.
Close the lid (5) using the lid handle (3).•
Insert the mains plug into the wall socket.•
The appliance will beep. The display (19)
comes on. The baking mode indicator (20)
shows "1". The baking time indicator (21)
shows "3:00". The roast colour indicator
(22) indicates "MEDIUM". The loaf size
indicator (23) indicates "2.0LB".
Set the baking mode using the MENU•
button (13).
Set the roast colour using the COLOR•
button (14).
If necessary, delay the baking process using•
the TIME + button (16) and the TIME -
button (17).
Press the START/STOP button (12) to start•
the process. The on/off indicator (18)
comes on. The display (19) counts down
during the process.
Regularly look through the viewing window•
(4) to check whether the food is baked and
to make sure that it does not burn.
Note: In the following baking modes, beeps
will sound during the baking process to prompt
you to add ingredients: BASIC / FRENCH /
WHOLE WHEAT / CAKE / SANDWICH /
GLUTEN FREE.
Note: Steam can escape through the lid during
the baking process. This is normal operation.
If the process is completed, ten beeps will•
sound to indicate the end of the process.
The appliance will keep the food warm for•
a maximum of 60 minutes. A beep will
sound to indicate the end of the process.
The on/off indicator (18) goes off.

16
EN
Note: The appliance will not keep the food
warm in the following baking modes: DOUGH /
JAM / KNEAD / YOGURT. If the process is
completed, a beep will sound to indicate the
end of the process. The on/off indicator (18)
goes off.
Before you proceed, we need you to pay
attention to the following notes:
- Use oven gloves to remove the bread pan
from the baking compartment and the
bread from the bread pan. The bread pan
and the bread become very hot during use.
Unlock the bread pan (6) by turning it •
counterclockwise. Remove the bread pan
(6) from the baking compartment (5) using
the bread pan handle (7).
Remove the bread from the bread pan (6). •
If necessary, use a rubber or plastic spatula.
Note:
- If the kneading paddle remains in the bread
pan, fill the bread pan with hot water to
remove the kneading paddle. Do not use
sharp or metal objects to remove the
kneading paddle.
- If the kneading paddle remains in the bread,
use the hook (11) to remove the kneading
paddle. Do not use sharp or metal objects
to remove the kneading paddle.
Remove the mains plug from the wall •
socket. The display (19) goes off.
Allow the appliance to cool down •
completely.
General tips
Make sure that the ingredients are of good •
quality and at room temperature.
Place the appliance on a stable and flat •
surface.
If the baking compartment is still warm, •
allow it to cool down completely before
use.
Put the ingredients into the bread pan in •
the required order:
- Put the liquid ingredients into the bread
pan.
- Put a small amount of flour into the
bread pan.
- Put the solid ingredients into the bread
pan.
- Put the rest of the flour into the bread
pan. Make sure that all solid ingredients
are covered by the flour.
- Make a small indentation on one side of
the flour. Pour the baking yeast or the
baking powder into the indentation.
Make sure that the baking yeast or the
baking powder does not come into
contact with salt or liquid ingredients.
Preferably use bread-making flour. If you •
use heavy flour (wheat flour, rye flour, corn
flour, etc.), the bread will rise less than if
you use light flour. Use the correct amount
of flour. If necessary, use a kitchen scale to
measure the amount of flour.
Use the correct amount of baking yeast. •
Use dried active baking yeast instead of
baking powder. If you use fresh yeast, use
thrice more yeast than if you use dried
yeast and solve the yeast in a small amount
of lukewarm water. Make sure that the
baking yeast does not come into contact
with water, milk, salt, or sugar.
Use lukewarm water. If possible, use tap •
water. If you use eggs, break the eggs and
add them to the water.
If you use milk, use fresh milk or milk •
powder. If you use milk powder, add the
required amount of water to the milk
powder. If you want to add water to the
fresh milk, the total amount of milk and
water must be equal to the required
amount for the recipe.
If you use sugar, preferably use white •
sugar, brown sugar, or honey. Do not use
refined sugar or sugar cubes.
If you use salt, the yeast will rise better and •
the bread will have more taste.
If you use butter or oil, the bread will •
become softer and have more taste. If you
use butter, cut the butter into pieces or
allow it to become soft.
Keep the lid closed during the baking •
process.
If the baking process is completed, use •
oven gloves to remove the bread pan from
the baking compartment and the bread
from the bread pan.

17
EN
Allow the bread to cool down before •
cutting the bread into slices. If you want to
eat the bread when it is still warm, it is
recommended to cut the bread into slices
of 2.5 cm.
Use a serrated knife or an electric knife to•
cut the bread into slices.
Keep the bread in an hermetically sealed•
container to keep the bread fresh as long
as possible (approximately 2 days). If the
bread contains eggs, the bread must be
consumed the same day. If the bread
contains neither butter nor oil, the bread
must be consumed the same day. Do not
keep the bread in the refrigerator.
If you want to keep the bread in the•
freezer, put the bread into a freezing bag
before putting it into the freezer.
Memory function
The appliance is equipped with a memory
function. If the power supply is interrupted,
the baking process will be continued
automatically after 10 minutes, even without
pressing the START/STOP button (12).
Before you proceed, we need you to pay
attention to the following notes:
- If the power supply is interrupted for more
than 10 minutes, the memory function will
not work. Remove the old ingredients from
the bread pan (6). (Do not use the old
ingredients for other cooking purposes!)
Put new ingredients into the bread pan (6).
Restart the appliance. If the dough is not yet
in the rising phase when the power supply
is interrupted, you can press START/STOP
button (12) to continue the program from
the beginning.
Error messages
If the display (19) shows "HHH" after pressing•
the START/STOP button (12), the
temperature in the baking compartment (5)
is too high. The appliance will not operate
until it has cooled down. Open the lid (2)
and allow the appliance to cool down for
10-20 minutes.
If the display (19) shows "EEE" after pressing•
the START/STOP button (12), the temperature
sensor is disconnected. Have the temperature
sensor checked by an authorised repair agent.
Recipes
This recipe list provides a small overview of
recipes which are specifically created for the
appliance. For other recipes, please refer to
a recipe book for bread makers.
Bread
White bread
Ingredients Quantity
High-gluten flour 2.25 cups
Dried active baking yeast 1.25 tsp.
Salt 1 tsp.
Sugar 1.5 tbsp.
Skim milk powder 1 tbsp.
Oil 1 tbsp.
Water 0.75 cup + 1 tbsp.
Note: The ingredients and quantities are
applicable to the following baking modes:
BASIC. Other ingredients and quantities may
be applicable to the following baking modes:
ULTRA FAST-I / ULTRA FAST-II.
Corn bread
Ingredients Quantity
High-gluten flour 2 cups
Cornmeal 0.25 cup
Dried active baking yeast 1.5 tsp.
Salt 1 tsp.
Sugar 2 tbsp.
Skim milk powder 0.75 cup
Oil 2 tbsp.
Eggs 1
Water 0.75 cup + 1 tbsp.
Note: The ingredients and quantities are
applicable to the following baking modes:
BASIC. Other ingredients and quantities may
be applicable to the following baking modes:
ULTRA FAST-I / ULTRA FAST-II.

18
EN
Walnut bread
Ingredients Quantity
High-gluten flour 2 cups
Dried active baking yeast 1.5 tsp.
Salt 1 tsp.
Sugar 1.5 tbsp.
Skim milk powder 1 tbsp.
Oil 1 tbsp.
Walnuts (chopped) 0.33 cup
Water 0.75 cup
Note: The ingredients and quantities are
applicable to the following baking modes:
SWEET.
French bread
Ingredients Quantity
High-gluten flour 2.25 cups
Dried active baking yeast 1.25 tsp.
Salt 1 tsp.
Sugar 1 tbsp.
Oil 1 tbsp.
Water 0.75 cup + 2 tbsp.
Note: The ingredients and quantities are
applicable to the following baking modes:
FRENCH.
Whole-wheat bread
Ingredients Quantity
Whole-wheat flour 2.25 cups
Dried active baking yeast 2.25 tsp.
Salt 1 tsp.
Brown sugar 2 tbsp.
Oil 2 tbsp.
Water 0.75 cup
Note: The ingredients and quantities are
applicable to the following baking modes:
WHOLE WHEAT.
Gluten-free bread
Note: The ingredients and quantities are
applicable to the following baking modes:
GLUTEN FREE.
White bread
Ingredients Quantity
White rice flour 1.5 cups
Soy flour 2 tbsp.
Potato flour 0.5 cup
Tapioca flour 3 tbsp.
Xanthan gum 1 tsp.
Quick-rise yeast 1.5 tsp.
Salt 1 tsp.
Sugar 2 tbsp.
Skim milk powder 6 tbsp.
Oil 2 tbsp.
Cider vinegar 0.5 tsp.
Eggs (XL) 2
Water 0.5 cup + 3 tbsp.
Corn bread
Ingredients Quantity
White rice flour 1.5 cups
Tapioca flour 2 tbsp.
Cornmeal 0.75 cup
Xanthan gum 1 tsp.
Quick-rise yeast 1.5 tsp.
Salt 1 tsp.
Brown sugar 4 tsp.
Skim milk powder 6 tbsp.
Oil 2 tbsp.
Cider vinegar 0.5 tsp.
Eggs (XL) 2
Water 0.5 cup + 6 tbsp.
Walnut bread
Ingredients Quantity
White rice flour 1.5 cups
Potato flour 0.5 cup
Tapioca flour 0.25 cup
Xanthan gum 1 tsp.
Quick-rise yeast 1.5 tsp.
Salt 1 tsp.
Sugar 2 tbsp.
Skim milk powder 0.5 tbsp.
Oil 2 tbsp.
Cider vinegar 0.5 tsp.
Lemon zest 1.5 tsp.
Eggs (XL) 2
Water 0.75 cup + 2 tbsp.
Dough
Note: The ingredients and quantities are
applicable to the following baking modes:
DOUGH.
Pasta dough
Ingredients Quantity
All-purpose flour 1 cup
Semolina flour 0.5 cup
Salt 0.5 tsp.

19
EN
Olive oil 1 tbsp.
Eggs (beaten) 1
Water 0.25 cup
Pizza dough
Ingredients Quantity
High-gluten flour 2.25 cups
Dried active baking yeast 1 tsp.
Salt 0.5 tsp.
Sugar 1 tbsp.
Olive oil 1 tbsp.
Water 0.75 cup
Bagel dough
Ingredients Quantity
High-gluten flour 2 cups
Dried active baking yeast 2.25 tsp.
Salt 1 tsp.
Sugar 2 tbsp.
Water 0.75 cup
Jam
Note: The ingredients and quantities are
applicable to the following baking modes: JAM.
Strawberry jam
Ingredients Quantity
Frozen strawberries
(thawed, crushed) 225 g
Strawberries (fresh) 2 cups
Dry pectin 0.5 package
Sugar 0.75 cup
Lemon juice 1.5 tsp.
Quick bread
Note: The ingredients and quantities are
applicable to the following baking modes:
QUICK.
Muffin quick bread
Ingredients Quantity
All-purpose flour 1.25 cups
Baking powder 2 tsp.
Vanilla extract 0.5 tsp.
Salt 0.25 tsp.
Sugar 6 tbsp.
Skim milk powder 2 tbsp.
Butter (softened) 0.5 cup
Eggs (XL) 2
Raisin quick bread
Ingredients Quantity
All-purpose flour 1.25 cups
Baking powder 2 tsp.
Vanilla extract 0.5 tsp.
Salt 0.25 tsp.
Sugar 6 tbsp.
Milk 0.5 cup
Butter (softened) 0.5 cup
Eggs (XL) 2
Raisins 0.25 cup
Cake
Note: The ingredients and quantities are
applicable to the following baking modes:
CAKE.
Normal cake
Ingredients Quantity
Cake mix (any flavour) 65 g
Vegetable oil 0.33 cup
Eggs (XL) 3
Water 1.25 cups
Cleaning and maintenance
The appliance must be cleaned after each use.
Before you proceed, we need you to pay
attention to the following notes:
- Before cleaning or maintenance, remove
the mains plug from the wall socket and
wait until the appliance has cooled down.
- Do not immerse the appliance in water or
other liquids.
Before you proceed, we would like you to
focus your attention on the following notes:
- Do not use aggressive or abrasive cleaning
agents to clean the appliance.
- Do not use sharp objects to clean the
appliance.
- Do not use oven cleaners to clean the
inside of the appliance.
Regularly check the appliance for possible •
damage.
Clean the outside of the appliance with•
a soft, damp cloth. Thoroughly dry the
outside of the appliance with a clean, dry
cloth.

20
EN
Clean the lid and the baking compartment •
with a soft, damp cloth. Thoroughly dry
the lid and the baking compartment with
a clean, dry cloth.
Clean the bread pan in soapy water.•
Thoroughly dry the bread pan with a clean,
dry cloth.
If the kneading paddle is clogged, clean the•
kneading paddle with a wooden or plastic
toothpick. Clean the kneading paddle in
soapy water. Thoroughly dry the kneading
paddle with a clean, dry cloth.
Put the appliance and the accessories in•
the original packaging.
Store the appliance with the accessories in•
a dry place, out of the reach of children.
Safety instructions
General safety
Read the manual carefully before use. Keep•
the manual for future reference.
Only use the appliance and the accessories•
for their intended purposes. Do not use the
appliance and the accessories for other
purposes than described in the manual.
Children should be supervised to ensure•
that they do not play with the appliance.
The appliance is not intended for use by•
persons (including children) with reduced
physical, sensory or mental capabilities, or
lack of experience and knowledge, unless
they have been given supervision or
instruction concerning use of the appliance
by a person responsible for their safety.
Do not use the appliance if any part or any•
accessory is damaged or defective. If a part
or an accessory is damaged or defective,
it must be replaced by the manufacturer or
an authorised repair agent.
Do not use the appliance near bathtubs,•
showers, basins or other vessels containing
water.
Do not immerse the appliance in water or•
other liquids. If the appliance is immersed
in water or other liquids, do not remove
the appliance with your hands. Immediately
remove the mains plug from the wall socket.
If the appliance is immersed in water or
other liquids, do not use the appliance
again.
This appliance is intended to be used in•
indoor only and similar applications such as
staff kitchen areas in shops, offices and
other working environments; farm houses;
by clients in hotels, motels and other
residential type environments; bed-and-
breakfast type environments.
Electrical safety
Before use, always check that the mains•
voltage is the same as the voltage on the
rating plate of the appliance.
Connect the appliance to an earthed wall•
socket. If necessary, use an earthed
extension cable of a suitable diameter
(at least 3 x 1.5 mm
2
).
For additional protection, install a residual•
current device (RCD) with a rated residual
operating current that does not exceed
30 mA.
The appliance is not intended to be•
operated by means of an external timer or
separate remote-control system.
Make sure that water cannot enter the•
contact plugs of the mains cable and the
extension cable.
Always fully unwind the mains cable and•
the extension cable.
Make sure that the mains cable does not•
hang over the edge of a worktop and
cannot be caught accidentally or tripped
over.
Keep the mains cable away from heat, oil•
and sharp edges.
Regularly check the mains cable and the•
mains plug for signs of damage. Do not use
the appliance if the mains cable or the
mains plug is damaged or defective. If the
mains cable or the mains plug is damaged
or defective, it must be replaced by the
manufacturer or an authorised repair agent.
Do not pull the mains cable to disconnect•
the mains plug from the mains.
Disconnect the mains plug from the mains•
when the appliance is not in use, before
assembly or disassembly and before cleaning
and maintenance.
La pagina si sta caricando...
La pagina si sta caricando...
La pagina si sta caricando...
La pagina si sta caricando...
La pagina si sta caricando...
La pagina si sta caricando...
La pagina si sta caricando...
La pagina si sta caricando...
La pagina si sta caricando...
La pagina si sta caricando...
La pagina si sta caricando...
La pagina si sta caricando...
La pagina si sta caricando...
La pagina si sta caricando...
La pagina si sta caricando...
La pagina si sta caricando...
La pagina si sta caricando...
La pagina si sta caricando...
La pagina si sta caricando...
La pagina si sta caricando...
La pagina si sta caricando...
La pagina si sta caricando...
La pagina si sta caricando...
La pagina si sta caricando...
La pagina si sta caricando...
La pagina si sta caricando...
La pagina si sta caricando...
La pagina si sta caricando...
La pagina si sta caricando...
La pagina si sta caricando...
La pagina si sta caricando...
La pagina si sta caricando...
La pagina si sta caricando...
La pagina si sta caricando...
La pagina si sta caricando...
La pagina si sta caricando...
La pagina si sta caricando...
La pagina si sta caricando...
La pagina si sta caricando...
La pagina si sta caricando...
La pagina si sta caricando...
La pagina si sta caricando...
La pagina si sta caricando...
La pagina si sta caricando...
La pagina si sta caricando...
La pagina si sta caricando...
La pagina si sta caricando...
La pagina si sta caricando...
La pagina si sta caricando...
La pagina si sta caricando...
La pagina si sta caricando...
La pagina si sta caricando...
La pagina si sta caricando...
La pagina si sta caricando...
La pagina si sta caricando...
La pagina si sta caricando...
La pagina si sta caricando...
La pagina si sta caricando...
La pagina si sta caricando...
La pagina si sta caricando...
La pagina si sta caricando...
La pagina si sta caricando...
La pagina si sta caricando...
La pagina si sta caricando...
La pagina si sta caricando...
La pagina si sta caricando...
La pagina si sta caricando...
La pagina si sta caricando...
La pagina si sta caricando...
La pagina si sta caricando...
La pagina si sta caricando...
La pagina si sta caricando...
La pagina si sta caricando...
La pagina si sta caricando...
La pagina si sta caricando...
La pagina si sta caricando...
La pagina si sta caricando...
La pagina si sta caricando...
La pagina si sta caricando...
La pagina si sta caricando...
La pagina si sta caricando...
La pagina si sta caricando...
La pagina si sta caricando...
La pagina si sta caricando...
La pagina si sta caricando...
La pagina si sta caricando...
La pagina si sta caricando...
La pagina si sta caricando...
La pagina si sta caricando...
La pagina si sta caricando...
La pagina si sta caricando...
La pagina si sta caricando...
La pagina si sta caricando...
La pagina si sta caricando...
La pagina si sta caricando...
La pagina si sta caricando...
La pagina si sta caricando...
La pagina si sta caricando...
La pagina si sta caricando...
La pagina si sta caricando...
La pagina si sta caricando...
La pagina si sta caricando...
La pagina si sta caricando...
La pagina si sta caricando...
-
 1
1
-
 2
2
-
 3
3
-
 4
4
-
 5
5
-
 6
6
-
 7
7
-
 8
8
-
 9
9
-
 10
10
-
 11
11
-
 12
12
-
 13
13
-
 14
14
-
 15
15
-
 16
16
-
 17
17
-
 18
18
-
 19
19
-
 20
20
-
 21
21
-
 22
22
-
 23
23
-
 24
24
-
 25
25
-
 26
26
-
 27
27
-
 28
28
-
 29
29
-
 30
30
-
 31
31
-
 32
32
-
 33
33
-
 34
34
-
 35
35
-
 36
36
-
 37
37
-
 38
38
-
 39
39
-
 40
40
-
 41
41
-
 42
42
-
 43
43
-
 44
44
-
 45
45
-
 46
46
-
 47
47
-
 48
48
-
 49
49
-
 50
50
-
 51
51
-
 52
52
-
 53
53
-
 54
54
-
 55
55
-
 56
56
-
 57
57
-
 58
58
-
 59
59
-
 60
60
-
 61
61
-
 62
62
-
 63
63
-
 64
64
-
 65
65
-
 66
66
-
 67
67
-
 68
68
-
 69
69
-
 70
70
-
 71
71
-
 72
72
-
 73
73
-
 74
74
-
 75
75
-
 76
76
-
 77
77
-
 78
78
-
 79
79
-
 80
80
-
 81
81
-
 82
82
-
 83
83
-
 84
84
-
 85
85
-
 86
86
-
 87
87
-
 88
88
-
 89
89
-
 90
90
-
 91
91
-
 92
92
-
 93
93
-
 94
94
-
 95
95
-
 96
96
-
 97
97
-
 98
98
-
 99
99
-
 100
100
-
 101
101
-
 102
102
-
 103
103
-
 104
104
-
 105
105
-
 106
106
-
 107
107
-
 108
108
-
 109
109
-
 110
110
-
 111
111
-
 112
112
-
 113
113
-
 114
114
-
 115
115
-
 116
116
-
 117
117
-
 118
118
-
 119
119
-
 120
120
-
 121
121
-
 122
122
-
 123
123
-
 124
124


Princess 152006152007 Manuale del proprietario
- Categoria
- Macchine per il pane
- Tipo
- Manuale del proprietario
- Questo manuale è adatto anche per
in altre lingue
- français: Princess 152006152007 Le manuel du propriétaire
- Deutsch: Princess 152006152007 Bedienungsanleitung
- Nederlands: Princess 152006152007 de handleiding
- português: Princess 152006152007 Manual do proprietário
- dansk: Princess 152006152007 Brugervejledning
- svenska: Princess 152006152007 Bruksanvisning
Documenti correlati
Altri documenti
-
Moulinex OW240E30 PAIN ET DELICE Manuale del proprietario
-
Electrolux EBM8000 Manuale utente
-
 XBM EURECA 538 Manuale del proprietario
-
AmazonBasics BM1349DB-GS Manuale utente
-
Kenwood BM250 Manuale del proprietario
-
Kenwood BM350 Multilingual Manuale del proprietario
-
Kenwood BM210J Manuale utente
-
Kenwood BM450 Manuale del proprietario
-
-
Petra CM 20.00 Manuale del proprietario
