

ENGLISH
1
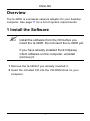
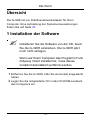
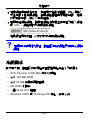
Overview
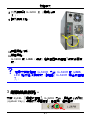
The G-320H is a wireless network adapter for your desktop
computer. See page 11 for a list of system requirements.
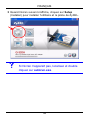
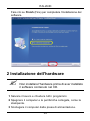
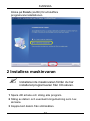
1 Install the Software
" Install the software from the CD before you
insert the G-320H. Do not insert the G-320H yet.
If you have already installed Funk Odyssey
Client software on the computer, uninstall
(remove) it.
1 Remove the G-320H if you already inserted it.
2 Insert the included CD into the CD-ROM drive on your
computer.

2
ENGLISH
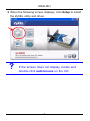
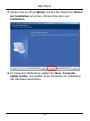
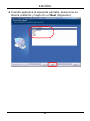
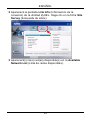
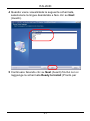
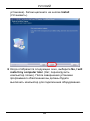
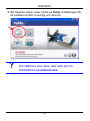
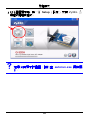
3 When the following screen displays, click Setup to install
the ZyXEL utility and driver.
V If the screen does not display, locate and
double-click autorun.exe on the CD.

ENGLISH
3
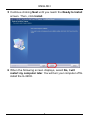
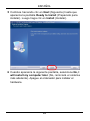
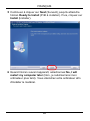
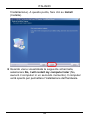
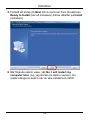
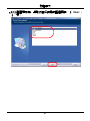
4 When the following screen displays, select your preferred
language and click Next.

4
ENGLISH
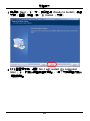
5 Continue clicking Next until you reach the Ready to Install
screen. Then, click Install.
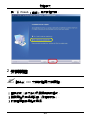
6 When the following screen displays, select No, I will
restart my computer later. You will turn your computer off to
install the G-320H.

ENGLISH
5
Click Finish to complete the software installation.
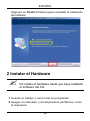
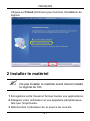
2 Install the Hardware
" Do not install the hardware until you have
installed the software from the CD.
1 Save your work and close all applications.
2 Turn off the computer and any peripheral device(s), such
as a printer.
3 Unplug the computer from the power source.

6
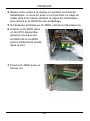
ENGLISH
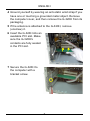
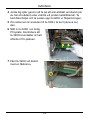
4 Ground yourself by wearing an anti-static wrist strap if you
have one or touching a grounded metal object. Remove
the computer cover, and then remove the G-320H from its
packaging.
5 If the antenna is attached to the G-320H, remove
(unscrew) it.
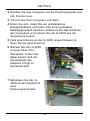
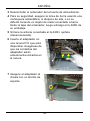
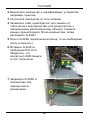
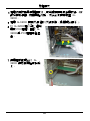
6 Insert the G-320H into an
available PCI slot. Make
sure the G-320H's
contacts are fully seated
in the PCI slot.
7 Secure the G-320H to
the computer with a
bracket screw.

ENGLISH
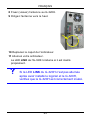
7
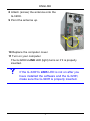
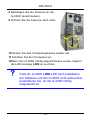
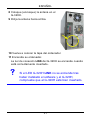
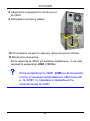
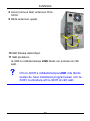
8 Attach (screw) the antenna onto the
G-320H.
9 Point the antenna up.
10 Replace the computer cover.
11 Turn on your computer.
The G-320H’s LINK LED (light) turns on if it is properly
inserted.
V If the G-320H’s LINK LED is not on after you
have installed the software and the G-320H,
make sure the G-320H is properly inserted.

8
ENGLISH
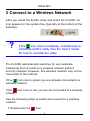
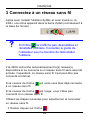
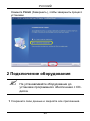
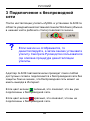
3 Connect to a Wireless Network
After you install the ZyXEL utility and insert the G-320H, an
icon appears in the system tray (typically at the bottom of the
desktop).
V If the icon does not display, uninstall and re-
install the ZyXEL utility. See the User’s Guide
for how to uninstall the utility.
The G-320H automatically searches for any available
network(s) and connects to a wireless network without
security enabled. However, this wireless network may not be
connected to the Internet.
If the icon color is green you are already connected to a
wireless network.
If the icon color is red, you are not connected to a wireless
network.
Use the following steps to select and connect to a wireless
network.
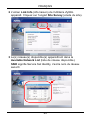
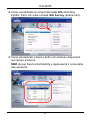
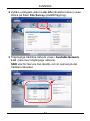
1 Double-click the icon.

ENGLISH
9
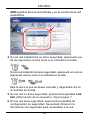
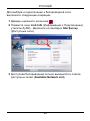
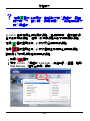
2 The ZyXEL utility Link Info screen displays. Click the Site
Survey tab.
3 The available wireless network(s) displays in the
Available Network List.
SSID means Service Set Identity and is the name of the
wireless network.

10
ENGLISH
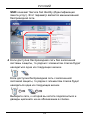
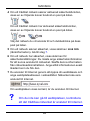
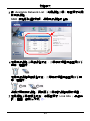
4 If a wireless network has no security, one of the following
icons appears next to its entry in the list.
If a wireless network has security, one of the following icons
appears next to its entry in the list.
Choose the network you want to connect to and double-click
its entry in the list.
5 If a network has no security, the Link Info screen displays.
Go to step 7.
6 If a network has security, the security settings screen
appears. You need to enter security information to connect
to the network. Get this information from the network
administrator. Be sure to enter the information exactly as it
was given to you.
7 To access the Internet, open your Internet browser and
enter the URL of a web site in the address bar. The
network should be connected to the Internet.
If the web site displays correctly, you are successfully
connected to the Internet.

ENGLISH
11
V If you are not able to access the web site, make
sure the wireless network is connected to the
Internet.
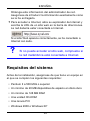
System Requirements
Before installation, make sure you have a computer with the
following:
• Pentium II 500 MHz or above
• A 32-bit (v2.2) PCI slot
• A minimum of 20 MB available hard disk space
• A minimum of 128 MB RAM
• A CD-ROM drive
• Windows 2000 or Windows XP
Important Information
Federal Communications Commission (FCC)
Interference Statement
The equipment complies with FCC RF radiation exposure
limits set forth for an uncontrolled environment, under 47 CFR
2.1093 paragraph (d) (2).

12
ENGLISH
This Transmitter must not be co-located or operating in
conjunction with any other antenna or transmitter.
Refer to the User's Guide for general FCC statements.
Procedure to View a Product's
Certification(s)
1 Go to www.zyxel.com
2 Select your product from the drop-down list box on the
ZyXEL home page to go to that product's page.
3 Select the certification you wish to view from this page.

DEUTSCH
13
Übersicht
Die G-320H ist ein Drahtlosnetzwerkadapter für Ihren
Computer. Eine Aufstellung der Systemvoraussetzungen
finden Sie auf Seite 23.
1 Installation der Software
" Installieren Sie die Software von der CD, bevor
Sie die G-320H einstecken. Die G-320H jetzt
noch nicht einlegen.
Wenn auf Ihrem Computer das Programm Funk
Odyssey Client installiert ist, muss dieses
zunächst deinstalliert (entfernt) werden.
1 Entfernen Sie die G-320H, falls Sie sie bereits eingesteckt
haben.
2 Legen Sie die mitgelieferte CD in das CD-ROM-Laufwerk
des Computers ein.

14
DEUTSCH
3 Klicken Sie im folgenden Bildschirm auf Setup, um das
ZyXEL-Utility und den Treiber zu installieren.
V Falls dieses Fenster nicht erscheinen sollte,
navigieren Sie auf der CD zur Datei
autorun.exe und klicken Sie doppelt darauf.

DEUTSCH
15
4 Wählen Sie in dem folgenden Bildschirm Ihre bevorzugte
Sprache und klicken Sie auf Weiter.

16
DEUTSCH
5 Klicken Sie so oft auf Weiter, bis Sie den Bildschirm Bereit
zur Installation erreichen. Klicken Sie dann auf
Installieren.
6 Im folgenden Bildschirm wählen Sie Nein, Computer
später starten. Sie werden Ihren Computer zur Installation
der Hardware abschalten.

DEUTSCH
17
Klicken Sie auf Fertig stellen, um die Installation der
Software abzuschließen.
2 Installation der Hardware
" Installieren Sie die Hardware erst nachdem Sie
die Software von der CD installiert haben.
1 Speichern Sie Ihre Arbeit und schließen Sie alle
Programme.

18
DEUTSCH
2 Schalten Sie den Computer und die Peripheriegeräte (wie
z.B. Drucker) aus.
3 Trennen Sie Ihren Computer vom Netz.
4 Erden Sie sich, indem Sie ein antistatisches
Handgelenkband umbinden oder einen geerdeten
Metallgegenstand berühren. Entfernen Sie das Gehäuse
des Computers und nehmen Sie die G-320H aus der
Verpackung heraus.
5 Falls eine Antenne an der G-320H angeschlossen ist,
lösen Sie sie (abschrauben).
6 Stecken Sie den G-320H
in einen freien PCI-
Steckplatz. Achten Sie
dabei darauf, daß die
Kontaktleiste des
Adapters richtig im
Steckplatz sitzt.
7 Befestigen Sie den G-
320H an dem Gestell mit
einer
Halterungsschraube.

DEUTSCH
19
8 Befestigen Sie die Antenne an der
G-320H (anschrauben).
9 Richten Sie die Antenne nach oben.
10 Setzen Sie das Computergehäuse wieder auf.
11 Schalten Sie den Computer ein.
12Wenn der G-320H richtig angeschlossen wurde, beginnt
die LED-Anzeige LINK zu leuchten.
V Falls die G-320H LINK-LED nach Installation
der Software und der G-320H nicht aufleuchtet,
kontrollieren Sie, ob die G-320H richtig
eingesteckt ist.
La pagina sta caricando ...
La pagina sta caricando ...
La pagina sta caricando ...
La pagina sta caricando ...
La pagina sta caricando ...
La pagina sta caricando ...
La pagina sta caricando ...
La pagina sta caricando ...
La pagina sta caricando ...
La pagina sta caricando ...
La pagina sta caricando ...
La pagina sta caricando ...
La pagina sta caricando ...
La pagina sta caricando ...
La pagina sta caricando ...
La pagina sta caricando ...
La pagina sta caricando ...
La pagina sta caricando ...
La pagina sta caricando ...
La pagina sta caricando ...
La pagina sta caricando ...
La pagina sta caricando ...
La pagina sta caricando ...
La pagina sta caricando ...
La pagina sta caricando ...
La pagina sta caricando ...
La pagina sta caricando ...
La pagina sta caricando ...
La pagina sta caricando ...
La pagina sta caricando ...
La pagina sta caricando ...
La pagina sta caricando ...
La pagina sta caricando ...
La pagina sta caricando ...
La pagina sta caricando ...
La pagina sta caricando ...
La pagina sta caricando ...
La pagina sta caricando ...
La pagina sta caricando ...
La pagina sta caricando ...
La pagina sta caricando ...
La pagina sta caricando ...
La pagina sta caricando ...
La pagina sta caricando ...
La pagina sta caricando ...
La pagina sta caricando ...
La pagina sta caricando ...
La pagina sta caricando ...
La pagina sta caricando ...
La pagina sta caricando ...
La pagina sta caricando ...
La pagina sta caricando ...
La pagina sta caricando ...
La pagina sta caricando ...
La pagina sta caricando ...
La pagina sta caricando ...
La pagina sta caricando ...
La pagina sta caricando ...
La pagina sta caricando ...
La pagina sta caricando ...
La pagina sta caricando ...
La pagina sta caricando ...
La pagina sta caricando ...
La pagina sta caricando ...
La pagina sta caricando ...
La pagina sta caricando ...
La pagina sta caricando ...
La pagina sta caricando ...
La pagina sta caricando ...
La pagina sta caricando ...
La pagina sta caricando ...
La pagina sta caricando ...
La pagina sta caricando ...
La pagina sta caricando ...
La pagina sta caricando ...
La pagina sta caricando ...
-
 1
1
-
 2
2
-
 3
3
-
 4
4
-
 5
5
-
 6
6
-
 7
7
-
 8
8
-
 9
9
-
 10
10
-
 11
11
-
 12
12
-
 13
13
-
 14
14
-
 15
15
-
 16
16
-
 17
17
-
 18
18
-
 19
19
-
 20
20
-
 21
21
-
 22
22
-
 23
23
-
 24
24
-
 25
25
-
 26
26
-
 27
27
-
 28
28
-
 29
29
-
 30
30
-
 31
31
-
 32
32
-
 33
33
-
 34
34
-
 35
35
-
 36
36
-
 37
37
-
 38
38
-
 39
39
-
 40
40
-
 41
41
-
 42
42
-
 43
43
-
 44
44
-
 45
45
-
 46
46
-
 47
47
-
 48
48
-
 49
49
-
 50
50
-
 51
51
-
 52
52
-
 53
53
-
 54
54
-
 55
55
-
 56
56
-
 57
57
-
 58
58
-
 59
59
-
 60
60
-
 61
61
-
 62
62
-
 63
63
-
 64
64
-
 65
65
-
 66
66
-
 67
67
-
 68
68
-
 69
69
-
 70
70
-
 71
71
-
 72
72
-
 73
73
-
 74
74
-
 75
75
-
 76
76
-
 77
77
-
 78
78
-
 79
79
-
 80
80
-
 81
81
-
 82
82
-
 83
83
-
 84
84
-
 85
85
-
 86
86
-
 87
87
-
 88
88
-
 89
89
-
 90
90
-
 91
91
-
 92
92
-
 93
93
-
 94
94
-
 95
95
-
 96
96


in altre lingue
- français: ZyXEL G-320H Guide de démarrage rapide
- Deutsch: ZyXEL G-320H Schnellstartanleitung
