Baumer O200.RR-GL1E.72NV/T003 Assembly Instruction
- Tipo
- Assembly Instruction

3
42
1
Connection Diagrams
- Disconnect power before connecting the sensor.
- Voltage supply according UL 1310, Class 2
or device shall be protected by an external R/C or listed fuse, rated max.
30 VAC/3A or 24 VDC/4A
Push-Pull &
Teach-In /
IO-Link*
PNP
Complementary
NPN
Complementary
O200.T,
Emitter
1 - Brown BN +Vs
2 - White WH Teach-In*
PNP
Inverted
NPN
Inverted
n.c.
3 - Blue BU 0 V
4 - Black BK
Push-Pull /
IO-Link*
PNP NPN Test
*Only for models with IO-Link or ext. Teach-In
BK (4)
output / IO-Link*
O200
0 V
BU (3)
BN (1)
+V
S
WH (2)
Teach-In* or output
Test: Connect Test to +Vs to deactivate the light emission (O200.T)
n.c.: Not connected
Photoelectric sensors
O200
Baumer Electric AG - CH-8501 Frauenfeld
Phone +41 (0)52 728 1122 - Fax +41 (0)63 739 1144
www.baumer.com
qTarget
®
qTeach
®
EN
DE
FR
IT
ES
CN
07.12.2018 / Version 1.1
Xpress Mode
Models with IO-Link
SSC1/4: Switching Signal Channels
MDC: Excess Gain, Intensity or Switch Counter
(selectable)
Quality: The quality bit signals a weak signal
Alarm: The alarm bit signals a problem with the
confi guration or the functionality of the sensor
Scale: Factor by power of ten, applicable to the value of
the Measurement Data Channel (MDC)
IO-Link Process Data Input
16 8 0
IntegerT(16) IntegerT(8) 8 bit
Measurement
Data Channel
(MDC)
Scale
Baumer specifi c
7 6 5 4 3 2 1 0
SSC4 Alarm Quality SSC1
Available Commands:
Teach-in commands, light emission on/off, Find Me (locating
sensor) and more
Available Parameters:
Switching point, output function, time fi lters, operation modes,
qTeach lock time, teach-mode, LED status indicators,
Teach-In method and more
Available Additional Data:
Switch counter, temperature
Related Models
O200 Models with Xpress Teach:
O200.G (Background suppression sensors)
O200.R (Retro-refl ective sensors)
O200.S (Smart Refl ect Light barriers)
O200.T/E (Through beam aensors (E: Receiver)(T: Emitter))
More Information related to these
products can be found on our website
(CAD, Beamcharts, CoC, Drawings, IODDs …)
www.baumer.com
Mounting Instructions
Background suppression sensors & SmartRefl ect Light barriers
The direct refl ection from glossy or refl ective objects
must not impinge on the receiver. This can be avoided
by slightly tilting the sensor.
It is recommended that the object to be detected
approaches the active area of the sensor from the
side, which avoids malfunctions caused by defl ection
of the light beam at edges.
Sensoren mit Hintergrundausblendung & SmartRelfect Lichtschranken
Bei glänzenden oder spiegelnden Objekten darf der
direkte Refl ex nicht auf den Empfänger fallen. Dies
kann vermieden werden, indem der Sensor leicht
abgekippt wird.
Es ist zu beachten, dass ein zu erfassendes Objekt
sich dem aktiven Bereich
des Sensors von der Seite nähern sollte, dadurch
werden Fehlschaltungen durch Ablenkungen des
Lichtstrahles an Kanten vermieden.
Détecteurs de suppression d’arrière-plan & barrières SmartRefl ect
La réfl exion directe d’une surface brillante ou d’objets
très réfl échissants ne doit pas parvenir au récepteur.
Ceci peut être évité en inclinant un peu le capteur.
Il est recommandé que l’objet à détecter adopte
une approche latérale, ce qui évite les dysfonctionne-
ments liés à la diffraction du faisceau sur les bords.
Fotocellule a soppressione di sfondo e SmartRefl ect
Su superfi ci lucide e rifl ettenti è consigliabile inclinare
leggermente il sensore per evitare refl essi diretti sul
ricettore.
Si raccomanda di installare il sensore in modo che
l’oggetto entri lateralmente nel fascio di luce.
Sensores con supresión de fondo y barreras SmartRefl ect
La refl exión directa sobre objetos brillantes o refl ec-
tantes no debe incidir en el receptor, Ésto se puede
evitar inclinanto ligeramente el sensor.
Se recomienda que el objeto se aproximelateralmente
al sensor, de éste modo se Evitan errores de detec-
ción causados por la refl exión del haz en los bordes.
带背景抑制漫发射和智能反射传感器
光泽或高反光物体的全反射不得反射到接收器. 通过稍
微倾斜传感器可以避免这种情况.
建议被测物从侧面接近传感器的有效区域, 这避免了光
束在边缘处偏转而引起的故障.
Teach-In OK
Teach-In NOK
8
8
X
2
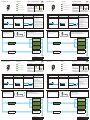
How to activate the Teach-In
- Place tool as shown right or connect
Teach-In wire to +Vs.
- Green LED fl ashes with 2 Hz if tool/Teach-In
is recognized properly.
General Information
- qTeach locks 5 min after power up.
- In teach mode the output changes to 0V.
- During operation the teach wire should be connected to 0V.
- For external Teach-In, connect teach wire to +Vs.
- External Teach-In is always possible (no locking).
1-Point Teach
O200.G:
Place object & activate
Teach-In for >2 sec
O200.R, O200.E:
Completely block the
beam & activate Teach-In
for >2 sec
Factory Reset
(only threshold)
Teach-In Instruction
O200.R, O200.S:
Align the sensor to the
refl ector / reference &
activate Teach-In
for >2 sec
O200.E/T:
Align the emitter to the
receiver & activate
Teach-In for >2 sec
1
2
8
1
8
Reference
Tolerance*
Sensing range, Sa
Teach-Position
Sensing direction
+10%*
Intensit
y
Signal
Threshold
LED Indicators Green Yellow
Power on
Short circuit
Output 1 active
Output 1 signal close
to threshold
Teach-In mode see Teach-In Instruction
LED Indication Legend Operating Mode
LED on
LED fl ashing 1 Hz
LED fl ashing 2 Hz
LED fl ashing 8 Hz
O200.G, Background suppression
sensors
O200.R, Retro-refl ective sensors
O200.T/E, Through beam sensors
O200.S, SmartRefl ect Light barriers Optional Teach-In methods*
Level 1
1-Point Teach 1-Point Teach 1-Point Teach
Confi gurable via IO-Link
Window mode (only O200.G)
Level 1 / 1-Point Teach:
Sets a window of +/- 10%* around the
position of the object
Dynamic Teach-In
(only O200.G, O200.R)
The data aquisition starts immediately
after activating Teach-In by qTeach or
wire and stops as soon as released.
Accepted duration of data aquisition:
2 … 15 sec
The switchpoint or window is defi ned by
the detected min & max value.
Sets the switchpoint at the position of
the object +10%*
Sets the threshold as close to the
measurement value
Teaches the position of the
reference (distance)
Teach-In Description Level 1
Englisch
EN
*This value is adjustable by IO-Link. Please check the IO-Link manual available on www.baumer.com
1
2
8
1
8
Reference
Tolerance*
Sensing range, Sa
Teach-Position
Sensing direction
+10%*
Intensit
y
Signal
Threshold
LED Indikatoren Grün Gelb
Betriebsanzeige
Kurzschluss
Ausgang 1 aktiv
Ausgang 1 Signal
nahe der Schwelle
Teach-In Modus siehe Teach-In Anweisung
LED Anzeige Legende Betriebsmodus
LED leuchtet
LED blinkt 1 Hz
LED blinkt 2 Hz
LED blinkt 8 Hz
O200.G, Hintergrundausblendung O200.R, Refl exions-Lichtschranken
O200.T/E, Einweg-Lichtschranken
O200.S, SmartRefl ect Lichtschranken Optionale Teach-In Modi
Level 1
1-Punkt Teach 1-Punkt Teach 1-Punkt Teach
Einstellbar per IO-Link
Fenster-Modus (O200.G)
Level 1/ 1-Punkt Teach:
Defi niert ein Fenster à +/- 10% um die
Position des Objektes
Dynamischer Teach-In (O200.G, O200.R)
Ebenfalls verfügbar für den Fenster-Modus.
Die Datenaufnahme startet unmittelbar
nach der Aktivierung des Teach-In und
stoppt, sobald das Teach-In freigegeben
wird.
Akzeptierte Dauer: 2 ... 15 Sek.
Der Schaltpunkt oder das Schaltfenster
wird auf Basis der min. & max. Werten
defi niert.
Setzt den Schaltpunkt an der Position
des Objektes +10%*
Setzt die Schaltschwelle so nah
ans eingelernte Refl ektorsignal wie
möglich.
Lernt die Position der Referenz ein
(Distanz)
Teach-In Beschreibung Level 1
DE
*Dieser Wert kann per IO-Link verändert werden. Weitere Details fi nden Sie im IO-Link Manual verfügbar auf www.baumer.com
Teach-In OK
Teach-In NOK
8
8
X
2
Allgemeine Informationen
- qTeach verriegelt 5 min nach dem Einschalten.
- Im Teachmodus wechselt der Ausgang auf 0V.
- Im Normalbetrieb muss die Teachleitung auf 0V gelegt werden.
- Für externes Teach-In, Teachleitung entsprechend mit +Vs verbinden.
- Externes Teach-In ist immer möglich (keine Verriegelung)
1-Punkt Teach
O200.R, O200.S:
Sensor zu Refl ektor /
Referenz ausrichten
& Teach-In >2 Sek.
aktivieren
O200.E/T:
Sender zu Empfänger
ausrichten &
Teach-In >2 Sek.
aktivieren
O200.R, O200.E:
Den Strahl komplett
blockieren &
Teach-In >2 sec aktivieren
Werkseinstellungen
(nur Schaltschwelle)
Aktivierung des Teach-In
- Platziere das Werkzeug wie rechts gezeigt
oder verbinde die Teachleitung mit +Vs
- Die grüne LED blinkt mit 2 Hz, wenn das
Werkzeug korrekt erkannt wird.
Teach-In Anleitung
O200.G:
Objekt platzieren &
Teach-In >2 Sek.
aktivieren

1
2
8
1
8
Reference
Tolerance*
Sensing range, Sa
Teach-Position
Sensing direction
+10%*
Intensit
y
Signal
Threshold
Französisch
Indicateurs LED Vert Jaune
Power On
Court-circuit
Sortie 1 activée
Sortie 1 signal proche
du seuil
Mode Teach-In Voir Instructions Teach-In
Indication LED Légende Mode de fonctionnement
LED ON
LED clignotante 1 Hz
LED clignotante 2 Hz
LED clignotante 8 Hz
O200.G, Suppression d’arrière-plan O200.R, Retro-réfl ex
O200.T/E, Barrière simple
O200.S, Barrière SmartRefl ect Méthodes de Teach-in optionnelles
Niveau 1
Teach 1-point Teach 1-point Teach 1-point
Confi gurable via IO-Link
Mode fenêtre (uniquement O200.G)
Niveau 1/ Teach 1-point:
Régler une fenêtre de +/- 10% autour de
la position de l’objet
Teach-In dynamique
(uniquement O200.G, O200.R)
Disponible uniquement pour le mode
fenêtre. L’acquisition des données aug-
mente immédiatement après activation
du Teach-in par le qTeach ou le fi l
Il s’arrête immédiatement au relâche-
ment. Durée d’acquisition de données
acceptée : 2… 15 sec.
Le point de commutation ou la fenêtre
est défi nie par la valeur Min & Max
détectée
Régler le point de commutation à la
position de l’objet +10%*
Apprendre le réfl ecteur et régler le seuil
le plus sensible possible
Apprendre la position de la référence
(distance)
Description Teach-In Niveau 1
FR
* Cette valeur est ajustable via IO-Link. Consultez le manuel IO-Link disponible sur www.baumer.com
Teach-In OK
Teach-In NOK
8
8
X
2
Information Générale
- qTeach se verrouille 5 min après la mise tension.
- En mode Teach la sortie est à 0V.
- En mode normal l‘entrée Teach est à 0V.
- Pour un Teach externe, connecteur l‘entrée Teach correspondant au
+Vs.
- Le Teach externe est toujours disponible (Pas de verrouillage).
Teach 1 Point
O200.R, O200.S:
Aligner le détecteur sur
le réfl ecteur/Référence &
activer Teach-In >2 sec
O200.T/E:
Aligner le détecteur sur le
réfl ecteur & activer
Teach-In >2 sec
Remise confi guration
usine
(point de commutation)
Información Teach-In
- Placer l‘outil comme indiqué ci-contre ou
connecter le fi l Teach-in au +Vs.
- La LED verte clignote à 2 Hz si l’outil/Teach-
in est reconnu correctement.
Instructions Teach-In
O200.R, O200.E :
Occulter complètement le
faisceau & activer
Teach-In >2 sec
O200.G:
Placer l’objet & activer
Teach-In >2 sec
1
2
8
1
8
Reference
Tolerance*
Sensing range, Sa
Teach-Position
Sensing direction
+10%*
Intensit
y
Signal
Threshold
Indicazioni LED Verde Giallo
Power On
Corto circuito
Uscita 1 attiva
Uscita 1 prossima alla
soglia
Modalità di Teach-In vedi istruzioni Teach-In
Indicazioni LED Legenda Modalità operativa
LED acceso
LED lampeggia a 1 Hz
LED lampeggia a 2 Hz
LED lampeggia a 8 Hz
O200.G, Sensori a soppressione di sfondo O200.R, Sensori a retro-rifl essione
O200.T/E, Fotocellula a barriera
O200.S, Sensori SmartRefl ect Confi gurazioni opzionali
Livello 1
Teach a 1 punto Teach a 1 punto Teach a 1 punto
Confi gurazioni tramite IO-Link
Funzionamento a fi nestra (solo O200.G)
Livello 1/Teach a 1 punto:
Viene impostata una fi nestra di +/-10%* rela-
tiva alla posizione dell’oggetto da rilevare
Modalità Teach-In dinamico
(solo O200.G, O200.R)
Disponibile anche nel funzionamento a
fi nestra. L’acquisizione dei dati inizia subito
dopo l’attivazione del Teach-In tramite qTeach
o tramite cavo remoto.
Si ferma appena rilasciato.
Durata dell’acquisizione: 2…15 sec.
Il punto di commutazione o la fi nestra
vengono defi niti in base al valore minimo e al
valore massimo acquisiti.
Impostazione del punto di commutazio-
ne alla posizione desiderata +10%*
Impostazione automatica della soglia
di commutazione in funzione dell’inten-
sistà restituita dal rifl ettore (massima
sensibilità)
Teach-In della posizione dello sfondo
Descrizione livello 1 di Teach-In
IT
*Questo valore è modifi cabile via IO-Link. Consultare il manuale IO-Link disponibile sul sito www.baumer.com
Teach-In OK
Teach-In NOK
8
8
X
2
Informazioni relative al Teach-in
- Posizionare un utensile metallico sul punto di
Teach come mostrato a destra o collegare il cavo
Teach-In a +Vs.
- Il LED verde lampeggia a 2 Hz se l‘utensile/Teach-In
viene riconosciuto correttamente.
Informazione generali
- La funzione di qTeach si disattiva dopo 5min dall‘accensione del sensore.
- in modalità Teach-In l‘output assume un valore pari a 0V.
- Durante il funzionamento normale del sensore il cavo Teach-In va messo a 0V.
- Per il Teach-In da remoto, connettere il cavo Teach-In a +Vs.
- Il Teach-In da remoto è sempre possibile (non si disattiva dopo 5 min).
Teach a punto 1
O200.G:
Posizionare oggetto
e attivare il Teach-In per >2 sec
O200.R, O200.S:
Allineare il sensore al rifl et-
tore / riferimento e attivare
il Teach-In per >2 sec
O200.E/T:
Allineare l’emettitore al
ricevitore e attivare il
Teach-In per >2 sec
O200.R, O200.E:
Interrompere completamen-
te il fascio luminoso e attiva-
re il Teach-In per >2sec
Reset della soglia di
commutazione
Istruzioni Teach-In
Teach-In OK
Teach-In NOK
8
8
X
2
Información general
- qTeach se bloquea 5 min después de la alimentación.
- En modo teach la salida cambia a 0V.
- En modo normal el cable deteach se pone a 0V.
- Para Teach-In externo, conectar el cable teach a +Vs
- El Teach-In externo está siempre disponible (no se bloquea)
1-Point Teach
O200.G:
Colocar objeto & activar
Teach-In durante >2 s
O200.R, O200.S:
Alinear el sensor con el
refl ector / la referencia &
activar Teach-In
durante >2 s
Oculta completamente la
viga & activar Teach-In
durante >2 s
Reset a valores fábrica
(umbral de
conmutación)
Información Teach-In
- Colocar herramienta como indica la imagen o
conectar el cable Teach-In A +Vs
- El LED verde parpadea a 2 Hz se la herramienta/
Teach-In se reconoce correctamente
Instrucciones Teach-In
O200.E/T:
Alinead el emisor y
receptor & activar
Teach-In durante >2 s
1
2
8
1
8
Reference
Tolerance*
Sensing range, Sa
Teach-Position
Sensing direction
+10%*
Intensit
y
Signal
Threshold
Información LED Verde Amarillo
Power On
Cortocircuito
Salida 1 activa
Salida 1 señal dentro
del intervalo
Modo Teach-In Ver instrucciones Teach-In
Información LED Leyenda Modo operativo
LED ON
LED parpadeo 1 Hz
LED parpadeo 2 Hz
LED parpadeo 8 Hz
O200,G, Sensores con supresión de fondo O200,R, Sensores Retrorrefl ectivos
O200.T/E, Barreras unidireccionales
O200,S, Barreras SmartRefl ect Métodos Teach-In opcionales
Nivel 1
1-Point Teach 1-Point Teach 1-Point Teach
Modo ventana (Sólo 0200.G)
Nivel 1 / 1-Point Teach:
Defi ne una ventana de +/- 10%* alrede-
dor de la posición del objeto.
Teach-In dinámico
( Sólo O200.G, O200.R)
Disponible también para modo ventana.
La adquisición de datos se inicia
inmediatamente después de activar
teach-in tanto por qTeach como por
cable. Se detiene tan pronto como se
desactiva. Duración de adquisición de
datos permitida: 2 a 15 s.
El punto de conmutación o ventana
se defi ne por los valores mínimos y
máximos detectados.
Defi ne el punto de conmutación en la
posición del objeto +10%*
Aprende el refl ector y defi ne el límite lo
más sensible posible.
Aprende la posición de la referencia
(Distancia)
Descripción Teach-In Nivel 1
ES
*Éste valor es ajustable vía IO-Link. Por favor consulte el manual IO-Link disponible en www.baumer.com
1
2
8
1
8
Reference
Tolerance*
Sensing range, Sa
Teach-Position
Sensing direction
+10%*
Intensit
y
Signal
Threshold
LED 指示灯 绿
黄
通电
短路
输出 1 激活
输出 1 信号接近阈值
Teach-In 模式 详见 Teach-In 说明
LED 指示灯 图例 操作模式
LED 亮
LED 闪烁 1 Hz
LED 闪烁 2 Hz
LED 闪烁 8 Hz
O200.G,带背景抑制漫反射 O200.R, 镜反射
O200.T/E, 对射式传感器
O200.S, 智能反射 可选的设定方式
1级
1点设定 1点设定 1点设定 通过IO-Link配置
窗口模式(仅 O200.G)
1级/1点设定
设定大约在被测物± 10%位置的窗口
动态模式(仅 O200.G, O200.R)
也适用于窗口模式.
在通过qTeach或设定线激活设定后,
数据采集立即开始.
它会在释放后立即停止.
接受的数据采集持续时间:2 ... 15秒.
开关点或窗口由检测到的最小值和
最大值定义.
将开关点设置在被测物位置后10% 设定反光板并将阈值设定得尽可
能灵敏
设定参考面的位置(距离)
Teach-In 说明 1 级
CN
*这个值是通过IO-Link来调整的。请在 www.baumer.com 上查询IOLink手册
Teach-In OK
Teach-In NOK
8
8
X
2
设定信息
- 如右图所示放置金属工具或连接设定线至
+Vs.
- 如果工具或设定被恰当地识别到, 绿色LED
以2 Hz闪烁.
总览:
- qTeach 开启5分钟后自行锁定.
- 在设定模式下输出变至 0V.
- 在通常情况西设定先接至 0V.
- 对于外部设定, 将设定线连接至 +Vs.
- 外部设定线永久有效 (无自锁).
1 点设定
O200.G:
放置被测物并设定激活
>2秒
O200.R, O200.S:
将传感器对准反光板
并设定激活>2秒
O200.R, O200.E:
完全遮挡住光束
并激活设定超过2秒
恢复出厂设置
设定说明
O200.E/T:
将发射器对准接收器
并设定激活>2秒
-
 1
1
-
 2
2


Baumer O200.RR-GL1E.72NV/T003 Assembly Instruction
- Tipo
- Assembly Instruction
in altre lingue
- English: Baumer O200.RR-GL1E.72NV/T003
- français: Baumer O200.RR-GL1E.72NV/T003