Nordmende CRT 14-15 Manuale del proprietario
- Categoria
- TV LCD
- Tipo
- Manuale del proprietario

COLOUR TELEVISION
TELEVISORE A COLORI
TELEVISEUR COULEURS
FARBFERNSEHER
TELEVISOR A COLOR
TV A CORES
USER’S MANUAL
MANUALE D’USO
MANUEL D’UTILISATION
GEBRAUCHSANWEISUNG
MANUAL DE USO
MANUAL DE USO


1
Thank you for purchasing this colour television.
To ensure your complete understanding, please read this manual thoroughly before operation.
Congratulazioni per l’acquisto del suo nuovo televisore a colori.
Prima di utilizzare il televisore, vi consigliamo di leggere e comprendere il presente manuale.
Merci d’avoir acheté ce téléviseur couleur.
Pour être certain de comprendre pleinement le fonctionnement de votre téléviseur, lisez attentivement ce manuel avant de
commencer.
Wir freuen uns, dass Sie sich für diesen Farbfernseher entschieden haben.
Bitte machen Sie sich mit Ihrem neuen Gerät vertraut, indem Sie dieses Handbuch vor der Inbetriebnahme des
Fernsehers gründlich durchlesen.
Gracias por adquirir este televisor en color.
Para garantizar una perfecta comprensión de su funcionamiento, lea este manual con detenimiento antes de utilizarlo.
Parabéns pela aquisição do seu novo televisor a cores.
Antes de utilizar o televisor, é importante que você leia e compreenda este manual.
SPECIFICATIONS – SPECIFICHE – SPECIFICATIONS - TECHNISCHE ANGABEN - ESPECIFICACIONES
ESPECIFICAÇÕES
Television RF system
Sistema RF televisore
Système RF du téléviseur
RF-System Fernseher
Sistema RF de televisión
Sistema RF televisor
I, BG, DK , LL’
Colour System
Sistema del colore
Système couleur
Farbsystem
Sistema de color
Sistema da cor
PAL, SECAM
NTSC 3.58, NTSC 4.43 (AV input only, solo ingresso AV,
entrée AV uniquement, nur AV-Eingang, sólo entrada AV,
somente entrada AV)
Channel and frequencies
Canale e frequenze
Chaîne et fréquences
Kanal und Frequenzen
Canales y frecuencias
Canal e frequências
VHF = 46.25÷ 463.25 MHz
UHF = 471.25 ÷ 863.25 MHz
Television channel
Canali televisivi
Chaînes télévisées
Fernsehkanal
Canal de televisión
Canais televisivos
256
Nominal input voltage
Tensione nominale in ingresso
Tension nominale en entrée
Eingangs-Nominalspannung
Tensión nominal de entrada
Tensão nominal em entrada
220 -240 V ~
50/60 Hz
Power consumption
Consumi
Consommation propre
Verbrauch
Consumo eléctrico
Consumos
14” = 40 W
15” = 40 W
Screen size
Dimensioni schermo
Dimensions de l’écran
Bildschirmgröße
Tamaño de pantalla
Dimensões do ecrâ
14” = 36 cm
15” = 38 cm
Audio output (Rated output)
Potenza audio (Potenza nominale)
Entrée audio (Puissance nominale)
Audio-Ausgang (Nennleistung)
Potencia de audio (Potencia nominal)
Potência Áudio (potência nominal)
14” = 1.5 W
15” = 1.5 W
Note: All specifications are subject to change without notice.
Nota: Tutte le specifiche sono soggette a modifica senza preavviso.
Remarque: Toutes les spécifications peuvent faire l’objet de modifications sans préavis.
Anmerkung: Alle technischen Angaben können ohne Vorankündigung geändert werden.
Nota: Las especificaciones están sujetas a cambio sin previo aviso.
Nota: Todas as especificações estão sujeitas a modificações sem aviso prévio.

2
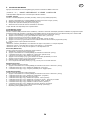
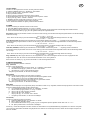
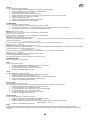
NAMES AND FUNCTIONS OF CONTROLS- Front / Back
NOMI E FUNZIONI DEI COMANDI
- Fronte / Retro
NOMS ET FONCTIONS DES COMMANDES-
Avant / Arriere
BEZEICHNUNGEN UND FUNKTIONEN DER BEDIENUNGSELEMENTE-
Vorderseite / Rückseite
NOMBRES Y FUNCIONES DE LOS MANDOS- Vista Frontal/ Vista Posterior
NOMES E FUNÇÕES DOS COMANDOS : Vista Frontal/ Vista Traseira
1 Main switch
Accensione/Spegnimento
Interrupteur principal
Ein-Aus-Schalter
Interruptor principal
Interruptor principal
2 Remote sensor
Sensore telecomando
Capteur télécommande
Fernbedienungssensor
Sensor mando a distancia
Sensor de controlo remoto
3 Led indicator
Spia Led
Voyant diode
Led-Anzeige
Piloto Led
Indicador luminoso LED
4 Channel UP(CH+)
Canali Avanti (CH+)
Chaîne avant (CH+)
Fernsehkanal vor (CH+)
Canales Avance (CH+)
Canais para a frente (CH+)
5 Channel (CH-) DOWN
Canali Indietro (CH-)
Chaîne arrière (CH-)
Fernsehkanal zurück (CH-)
Canales Retroceso (CH-)
Canais para trás (CH-)
6 Volume UP
Aumento volume
Hausse du son
Lautstärke lauter
Aumento volumen
Aumento volume
7
Volume DOWN
Diminuzione volume
Baisse du son
Lautstärke leiser
Disminución volumen
Diminuição volum
8
Menu
Menu
Menu
Menü
Menú
Menú
9 TV/AV If included
TV/AV Sui modelli equipaggiati
TV/AV Sur modèles équipés
TV/AV Bei entsprechend ausgestatteten
modellen
TV/AV En las modelas equipados
TV/AV Nas modelas equipados
10 RF input
Presa dell’antenna
Borne d’entrée de l’antenne
Antennen-Eingangsbuchse
Entrada antena
Tomada de entrada da antenna
11 SCART
Presa SCART
Borne d’entrée de SCART
SCART-Eingangsbuchse
Entrada SCART
Tomada entrada SCART
12
AC Power cord
Cavo di alimentazione
Câble d'alimentation
Wechselstrom-Anschlusskabel
Cable alimentación
Cabo de alimentação
13 Audio IN
Ingresso Audio
Borne d’entrée Audio
Audio-Eingang
Entrada Audio
Tomada entrada Áudio
14
Video IN
Ingresso Video
Borne d’entrée Video
Video-Eingang
Entrada Video
Tomada entrada Video
15
Head phone
Cuffie
Ecouteurs
Kopfhörer
Auriculares
Fone
16 Audio IN (R) -right-
Ingresso Audio (R) -destro-
Borne d’entrée Audio (R) - droite-
Audio-Eingang (R)
-rechts-
Entrada Audio (R) - derecha -
Tomada entrada Áudio (R) - direita -
17 Audio IN (L) -left-
Ingresso Audio (L) -sinistro-
Borne d’entrée Audio (L) -
gauche-
Audio-Eingang (L)- links -
Entrada Audio (L) – izquierda -
Tomada entrada Áudio (L) - esquerda -
18 Video IN
Ingresso Video
Borne d’entrée Video
Video-Eingang
Entrada Video
Tomada entrada Video
This figure is just for reference - Questa figura è solo per riferimento –
La figure est purement indicative - Das Bild dient nur als Beispiel –
Figura para referencia solamente - A presente figura é meramente indicativa
If included
Sui modelli equipaggiati
Sur modèles équipés
Bei entsprechend
ausgestatteten
modellen
En las modelas equipados
Nas modelas equipados
16
18
17
15 14 13
9 8 7 6 5 4 3 2 1
10
11
12

3
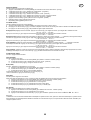
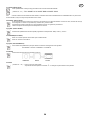
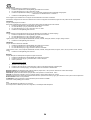
BATTERY INSTALLATION AND REPLACEMENT FOR REMOTE CONTROL UNIT
INSERIMENTO E SOSTITUZIONE BATTERIE TELECOMANDO
INSTALLATION ET REMPLACEMENT DES PILES DE LA TÉLÉCOMMANDE
EINSETZEN UND WECHSELN DER FERNBEDIENUNGS-BATTERIEN
INSTALACIÓN Y CAMBIO DE PILAS DEL MANDO A DISTANCIA
INSTALAÇÃO E SUBSTITUIÇÃO DA BATERIA DO CONTROLO REMOTO
The remote control uses two 1.5V batteries. For battery installation and replacement follow the procedure:
1. Turn the remote control unit upside down. Press down the grip of battery compartment and slide the cover in the
direction of the arrow.
2. Install two new batteries. Make sure that battery polarity matches with the "+", "-" marks inside the battery compartment
or else it could damage the unit.
Close the battery compartment cover.
Il telecomando è alimentato da due batterie 1.5V. Per l'inserimento e la sostituzione delle batterie, procedere nel
modo seguente:
1. Rovesciare il telecomando. Premere verso il basso la tacca dello scomparto portabatterie e far scivolare il
coperchio nella direzione indicata dalla freccia.
2. Inserire due batterie nuove. Assicurarsi che la polarità delle batterie coincida con i simboli "+", "-" riportati
all'interno dello scomparto portabatterie; errori di polarità potrebbero causare danni.
3. Chiudere il coperchio dello scomparto portabatterie.
La télécommande utilise deux piles de 1,5 V. Pour poser et remplacer les piles, procédez comme suit:
1. Retournez la télécommande. Appuyez sur la poignée du compartiment à piles et faites glisser le couvercle dans le sens
de la flèche.
2. Insérez deux nouvelles piles, en veillant à ce que la polarité corresponde aux repères “+”, “–” des piles. Sinon, vous
risquez d’endommager l’appareil.
3. Fermez le couvercle du compartiment à piles.
Die Fernbedienung wird durch zwei 1,5V. Zum Einsetzen und Wechseln der Batterien wie folgt vorgehen:
1. Die Fernbedienung umdrehen. Auf die Sperre des Batteriefachs drücken und den Deckel in Pfeilrichtung
schieben.
2. Zwei neue Batterien einsetzen. Sicherstellen, dass die Batteriepole mit den Symbolen "+", "-" im Batteriefach
übereinstimmen. Bei einem Vertauschen der Batteriepole kann die Fernbedienung beschädigt werden.
3. Den Deckel vom Batteriefach wieder schließen.
El mando a distancia necesita dos pilas de 1,5 V. Para su instalación y sustitución:
1. Girar el mando a distancia boca abajo. Presionar la muesca del compartimiento de las pilas y empujar la tapa en la
dirección que indica la flecha.
2. Colocar dos pilas nuevas y asegurarse de que su polaridad coincida con las marcas “+” y “-” del interior del
compartimiento. De lo contrario, podría dañarse la unidad.
3. Cerrar la tapa del compartimiento de las pilas.
O controlo remoto utiliza duas baterias de 1,5 V . Para a instalação e a substituição das baterias efectuar as
seguintes operações:
1. Dirigir o controlo remoto com a parte traseira para cima. Pressionar para baixo o apropriado espaço do
compartimento das baterias e deslizar a tampa na direcção da seta.
2. Instalar duas baterias novas e certificar-se de que a polaridade das baterias corresponda às marcas "+", "-"
no interior do compartimento; em caso contrário, pode danificar-se.
3. Fechar a tampa do compartimento de baterias.
1
2
3

4
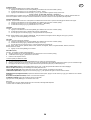
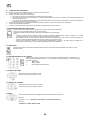
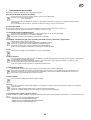
TELEVISION INSTALLATION - Connect antenna or video facility.
INSTALLAZIONE DEL TELEVISORE- Collegare l’antenna o l’attrezzatura video.
INSTALLATION DU TELEVISEUR - Raccordement d’une antenne ou d’un équipement vidéo
INSTALLATION DES FERNSEHGERÄTS - Anschluss einer Antenne oder eines Videogerätes.
INSTALACIÓN DEL TELEVISOR- Conexión de antena o equipo de vídeo.
INSTALAÇÃO DO TELEVISOR - Conectar a antena ou o equipamento vídeo.
1. - Use 75 Ohm coaxial cable plug or 300-75 Ohm impedance converter to plug in antenna input terminal on the
rear of the cabinet.
- Utilizzare una spina per cavo coassiale da 75 Ohm o un convertitore di impedenza da 300-75 Ohm per
inserire il terminale di ingresso dell'antenna sul retro dell'apparecchio televisivo.
- Utilisez une prise de câble coaxial de 75 Ohm ou un convertisseur d’impédance de 300-75 Ohm pour
raccorder la borne d’entrée d’antenne à l’arrière du boîtier.
- Zum Anschluss einer Antenne an der Rückseite des Gerätes einen 75 Ohm Koaxialkabelstecker oder
einen 300-75 Ohm Widerstandskonverter benutzen.
- Utilizar una ficha para cable coaxial de 75 Ohm o un convertidor de impedancia de 300-75 Ohm para
conectar el terminal de entrada de la antena en la parte posterior del aparato.
- Utilizar a tomada do cabo coaxial de 75 Ohm ou o conversor de impedância de 300-75 Ohm para
conectar o terminal de entrada da antena na parte traseira do televisor.
2. - In AV mode, connect the external signal cable of SCART according to the following figure
- In modalità AV, collegare il cavo del segnale esterno dello SCART come illustrato nella seguente
figura.
- En modalité AV, connectez le câble du signal externe du SCART, comme illustré sur la figure suivante.
- In AV-Modalität das externe SCART-Signalkabel wie nachstehend gezeigt anschließen.
- En modalidad AV, conectar el cable de la señal exterior del SCART como se ilustra en la siguiente figura.
- Na modalidade scart, conectar o cabo do sinal externo da SCART como ilustrado na figura abaixo.
3. - In AV mode, connect the external signal line to AV input terminal according to the following figure.
- Nella modalità AV, collegare la linea del segnale esterno al terminale di ingresso AV in base alla
seguente figura.
- En modalité AV, connectez la ligne du signal externe au terminal d'entrée AV en vous reportant au
schéma suivant.
- Im AV-Modus erfolgen Anschlüsse an den vorderen AV- (siehe Abbildung unten).
- En modo AV, conecte la línea de señal externa al terminal AV, según se muestra en la figura siguiente.
- No modo AV, conectar a linha do sinal externo ao terminal de entrada AV com base na seguinte
figura.
These figures are just for reference - Queste figure sono solo per riferimento - Ces figures sont seulement indicative -
Das Bild dient nur als Beispiel - Figuras para referencia solamente - Estas figuras são justas para a referência
2
If included - Sui modelli equipaggiati –
Sur modèles équipés – Bei entsprechend ausgestatteten modellen –
En las modelas equipados - Nas modelas equipados
3
Video / DVD
VIDEO AUDIO
VIDEO AUDIO
Video / DVD
1

GB
5
Thank you for purchasing this colour television.
To ensure your complete understanding, please read this manual thoroughly before operation.
CONTENTS
1. IMPORTANT SAFEGUARDS .................................................................................................................................... 5
2. CONTROL YOUR TV................................................................................................................................................. 6
3. MENU OPERATION...................................................................................................................................................8
4. TELETEXT OPERATION......................................................................................................................................... 11
5. TROUBLE SHOOTING ............................................................................................................................................ 12
6. CORRECT DISPOSAL OF THIS PRODUCT……………………………………………………………………………….53
7. WARRANTY CERTIFICATE………………………………………………………..…………………………………………54
1. IMPORTANT SAFEGUARDS
Warning: to prevent fire or shock hazard, do not expose this TV set to rain or moisture.
LOCATION
Place the TV set on a flat level surface and in a dry area, free from dust and moisture. Do not place the unit direct sunlight, or
were it would be affected by smoke, stream, vibrations or heat radiating appliances. To prevent excessive internal temperature
rise, place the unit so that there is at least 15 cm of space between it and the surrounding walls.
FIRE AND SHOCK PRECAUTIONS
Adequate ventilation must be provided to prevent heat build up inside unit. Keep the inside of unit free from foreign objects,
such as hairpins, nails, paper, etc. Do not the build the set into the bookcase or other enclosures in which it would be poorly
ventilated. Do not place it on carpet or a bad as low ventilation holes could become obstructed.
Do not set liquids, including flower vases filled with chemicals or water etc., on top of the unit as liquid could get inside the unit.
If a hazardous object falls inside the TV set, unplug it immediately and call a qualified technician for removal.
When placing or moving the TV set, take care to insure that the power cord is fitted into the allocated slot. To avoid damage to
the power cord, never allow heavy objects such as the TV set itself to be placed on the power cord. Keep cord away from heat
radiating appliances. Do not allow cord to become knotted or tangled. Do not lengthen the cord. When removing the power plug
from the socket, always hold onto the plug, never pull by the cord.
WARNING
Do not remove the back cover of the TV set. Accidental contact with high voltage components could result in electric shock.
When internal adjustment is necessary, please contact your distributor.
If your set produces sound but not picture, or it emits smoke or produces a strange sound or smell, continued operation is
dangerous. Immediately turn off power and remove the power plug from the socket and contact your distributor.
During vacation or other occasions when you will not be using the set for an extended period, remove the power plug from the
socket.
This appliance should not be operated by children or infirm persons, without adequate supervision.
CUSTOMER NOTICE
If a continual DISCOLOURATION or a COLOURED PATCH appears on your picture image, it may be caused by one of the
following:
External speakers placed near to the TV.
Vacuum cleaners switched ON or OFF near the TV.
Moving or rotating the position of the TV while it is turned on.
The TV has been left in the STANDBY mode for some period of time, without being turned OFF using the front panel power
button. If this happens, then:
Switch OFF the TV by using the FRONT PANEL POWER button.
Leave the TV switch OFF for at least 20 minutes.
Switch ON the TV using the FRONT PANEL POWER button.
Note: You may need to repeat steps 1, 2 and 3 for the best result.

GB
6
2. CONTROL YOUR TV
To use the TV, follow the instructions below.
1. Fit the batteries into the remote control.
2. Plug the TV into a power socket.
a. The plug for connection to the grid power socket will power your TV.
b. The TV can only be connected to 220-240V~ 50-60Hz alternate current. It must not be connected to a direct current grid.
c. If the plug comes loose from the power cord, do not connect it to a power socket: you might be electrocuted.
3. Connect the external aerial or the cable aerial to the socket on the back of the TV.
4. Press ON/OFF on the TV.
5. The light on the TV will turn on: the TV is in “Stand-By” mode.
2-1 MAIN POWER ON/OFF
When in “Stand-By” mode, press this button to switch on the TV. Press again to go back to “Stand-By” mode. To switch off
the TV, press ON/OFF on the TV.
Notes:
• When in “Stand-By” mode, the TV can also be switched ON by pressing the “channels Up/Down” buttons on the remote
control or on the TV.
• The TV is provided with an automatic switch-off feature (Automatic Power OFF). When in “No Signal” mode, the TV
automatically goes to “Stand-By” mode after a few minutes.
• Every time the TV is switched on, TV mode is automatically selected; if an input signal is received by the SCART plug,
SCART AV mode is automatically selected.
2-2 MUTE
By pressing this button, sound output will be muted.
Press [MUTE] again, or Volume Up [V+], and sound Volume will return.
2-3 DIRECT ACCESS TUNING
Using the numeric buttons on Remote Control Unit, channels can be selected directly.
Repeatedly press the [-/--] button, to select the desired mode, then press numeric buttons.
“-“ 1 digit mode
“—“ 2 digit mode
“—-“ 3 digit mode (Max Ch. 256)
2-4 PROGRAM UP/DOWN
Press [P+] button, to change Program Up.
Press [P-] button, to change Program Down.
2-5 VOLUME CONTROL
Press [V+] button, for Volume Up.
Press [V-] button, for Volume Down.
2-6 MENU
By repeatedly pressing MENU button will change as follows:
TV mode:
( 14” / 15” models ) PICTURE Æ TUNING Æ TIMER Æ SETUP Æ LANGUAGE
AV mode:
PICTURE Æ TIMER Æ SETUP

GB
7
2-7 TV/AV SELECTION
By repeatedly pressing the [TV/AV] button, you can select the desire input source as follows:
( 14” / 15” models )
TV Æ SCART AVÆ SCART RGBÆ SCART SVHS
Note: When SCART signal input, the TV automatically enters the SCART AV mode to receive SCART signal, even if TV/AV button isn’t
pressed.
2-8 STATUS (RED KEY)
The first time you press this button, a window appears on screen showing the details of: Channel number, the name of the
channel ( if previously assigned), Colour system, Sound system.
The second time you press this button, the time appears on screen.
2-9 SLEEP (GREEN KEY)
By repeatedly pressing this button sleep timer can be set to 0 to 120 min.
Selecting “0” switches the activated sleep timer off.
2-10 REVIEW (BLUE KEY)
TV Mode: program will quick back to the previous program being watched.
AV Mode: Back to TV program.
2-11 V-PP (YELLOW KEY)
By repeatedly pressing this button, picture effects will change as follows:
STANDARD ÆMILD Æ DYNAMICÆ FAVOURITE
2-12 ZOOM
Pressing this button, it will follow the following cycle:
2-13 A.PP
( 14” / 15” models )
Key not available.
By repeatedly pressing A.PP button, the symbol
; will appear on the screen.
Standard
Zoom
Wide

GB
8
3. MENU OPERATION
Press [MENU] button continuously, to scroll through the MENU selection, as follows:
( 14” / 15” models )
PICTURE Æ TUNING Æ TIMER Æ SETUP Æ LANGUAGE
MENU display disappears about 2 min. after last selection.
3-1 PICTURE MENU
Function: Brightness, Contrast, Colour, Sharpness setting
A. Press [MENU] button repeatedly to select “Picture”
B. Select each function using the [P+]/[P-] button.
C. Each value can be controlled by the [V+]/[V-] button.
D. Repeat any functions if required.
TINT option is available only in NTSC system
3-2 TUNING PROCEDURE
Auto Tune
Function: Automatic Search and Memory (ASM) is available for program installation from antenna input.
Using [MENU] button on the front or on the Remote for ASM.
A. Press [MENU] button repeatedly to select “Tuning”
B. Press [P+] or [P-] button, to select “AUTO TUNE”.
C. Press [V+] button, to visualize a new menu
D. Press [P+] or [P-] button to select ” Worldwide”, “ France” or “Both”
E. Press [V+] button, to start “ASM” and memorize into program list.
F. Wait until function has finished.
Note:
- Select “Worldwide” if in an area in which the L L’ system is not available
- Select “France” if in an area in which the L L’ system is available.
- Select “Both” if in an area in which information about the availability of the L L’ system is not available
Manual Tune
Function: Manual Tune for Antenna input.
Each channel can be given a number (0÷255), before starting manual tuning.
A. Select the program number which to make the search
B. Press [MENU] button repeatedly to select “TUNING”.
C. Press [P+] or [P-] button, to select “MANUAL TUNE”.
D. Press [V+] button, to visualize a new menu
E. Press [P+] or [P-] button to select ” Worldwide” or “ France”
F. Press [V+] or [V-] button to start search.
G. Wait until function has finished.
H. If it is not the desired channel, press [V+] or [V-] again for a new search.
Fine Tune
Function: fine Tuning for current setting.
A. Select the channel to be fine tuned.
B. Press [MENU] repeatedly to select “TUNING”.
C. Press [P+] or [P-] to select “FINE TUNING”
D. Press [V+] or [V-] for fine tuning.
E. Press [MENU] to end.
Organizer
Function: exchange of the channels
A. Press [MENU] button repeatedly to select “TUNING” .
B. Using [P+] or [P-] button, select “ORGANIZER”
C. Press [V+] to enter in the new menu
D. Using [P+] or [P-] button, select “Channel 1”.
E. Press numeric buttons or [V+] / [V-] button to select the channel to be change
F. Press [P-] button to select “Channel 2”
G. Press numeric buttons or [V+] / [V-] button to select the second channel
H. Using [P+] or [P-] button select “Exchange”.
I. Confirm operation pressing [V+] button.
J. Repeatedly pressing [MENU] button to exit.

GB
9
Delete
Function: to cancel the channels not desired
A. Press [MENU] button repeatedly to select “TUNING” .
B. Using [P+] or [P-] button, select “ORGANIZER”
C. Press [V+] to enter in the new menu
D. Using [P+] or [P-] button, select “Channel 1”.
E. Press numeric buttons or [V+] / [V-] button to select the channel to be delete
F. Using [P+] or [P-] button, select “Delete”
G. Confirm operation pressing [V+] button.
H. Waiting for some second until the operation is not finished
I. Repeatedly pressing [MENU] button to quit.
3-3 TIMER MENU
Function: Time and Timer setting
A. Press [MENU] button repeatedly to select “Timer”
B. By pressing the [P+]/ [P-] buttons, the highlight will move up or down.
C. By pressing the [V+]/[V-] buttons, selected item can be set
Clock: to setup the current time press [V-] button to hours, which will change as follows:
00 Æ 01 Æ 02 Æ… Æ 23 Æ00
Press [V+] button to tune minutes, which will change as follows:
00 Æ 01 Æ 02 Æ … Æ 59 Æ 00
On Timer: Setup auto start time of TV.
When it is shown as "- -:- -", auto start is effectiveness; press [V-] button, setup the hour of start time,
which will change as follows:
- - Æ 00 Æ 01 Æ 02 Æ … Æ 23 Æ - -
Press [V+] button, setup the minute of start time, which will change as follows:
00 Æ 01 Æ 02 Æ … Æ 59 Æ 00
Off Timer: setup auto off time of TV.
When it is shown as "- -:- -", auto off is effectiveness; press [V-] button, setup the hour of off time, which will change as follows:
- - Æ 00 Æ 01 Æ 02 Æ … Æ 23 Æ - -
Press [V+], setup the minute of off time, which will change as follows:
00 Æ 01 Æ 02 Æ …
Æ 59 Æ 00
Channel: This indicates the program number which will be selected when the TV is switched on after the set period of On Timer.
The programs could be selected in the range 0÷200 pressing [V+] / [V-] button.
3-4 SETUP
Function: other functions setup
Channel
Function: Channel selection
A. Press [MENU] button repeatedly to select “Setup”
B. Using the [P+]/[P-] button, select the “Channel”
C. Using the [V+]/[V-] button, channel will change.
D. Press [MENU] to confirm.
Label
Function: give a label to a channel.
A. Press [MENU] button repeatedly to select “Setup”.
B. Press P+]/[P-] to select “Label”.
C. Press V+]/[V-] to move within the string.
D. Press [P+]/[P-] to write a label.
E. Press [MENU] to confirm.
Skip
Function: Use to “SKIP” channels.
After setting to “YES”, the channel will not be selected by Channel Up/Down buttons.
A. Press [MENU] button repeatedly to select “Setup”.
B. Using [P+] or [P-] button, select “CHANNEL”.
C. Using [V+] or [V-] button, select channel number.
D. Using [P+] or [P-] button, select “SKIP”.
E. Using [V+] or [V-] button, select “ON” or “OFF”.
F. Press [MENU] to confirm.
Sound:
Function: select correct sound system.
A. Press [MENU] button repeatedly to select “Setup”.
B. Using [P+] or [P-] button, select “Sound”.
C. By repeatedly pressing [V+] or [V-] button to change as follows:
BG Æ DK Æ I Æ LL’
D. Press [MENU] to confirm.
Note:
The TV set has auto sound system identify function, this means after automatic search the sound system of programs will be automatic
identified and memorized. If the sound may be noisy, in such cases, you can use SOUND select correct sound system.

GB
10
Colour
Function: Select correct colour system.
A. Press [MENU] button repeatedly to select “Setup”.
B. Using [P+] or [P-] button, select “COLOUR”.
C. By repeatedly pressing [V+] or [V-] button to change as follows:
AUTO ÆPAL Æ SECAM ÆNTSC 4 ÆNTSC 3
D. Press [MENU] to confirm.
AUTO means the colour system will automatically be set according to the software.
Normally, it should be set to “AUTO”.
If the colour system is not appropriate selected, some colours may become missing.
Blue Back
Function: Setting Blue screen
When no signal is present one can select blue screen or plane raster using this option.
A. Press [MENU] button repeatedly to select “Setup”.
B. Using the [P+]/[P-] button, select the “Blue Back”.
C. Using the [V+]/[V-] button, select the “Yes ” or “No”.
D. Press [MENU] to confirm.
Language
Function: choose OSD language
A. Press [MENU] button repeatedly to select “Setup”.
B. Using the [P+]/[P-] button select “Language”
C. Using the [V+]/[V-] button language will change to:.
English, Polski, Čeština, Türkce, Espaňol, Nederlands, Franςais, Deutsch, Portuguĕs, Italiano, Magyar, Eλληντχά, PyccnИЙ.
D. Press the [MENU] button to confirm your choice.
TXT Lang
Function: choose teletextlanguage
A. Press [MENU] button repeatedly to select “Setup”.
B. Using the [P+]/[P-] button select “TXT Lang”
C. Using the [V+]/[V-] button language will change to:
English, Polish, Czech, Turkish, Spanish, Dutch, French, German, Portuguese, Italian, Hungarian/Swedian, Swidish, Serbian,
Russian,.Estonian, Greek.
D. Press the [MENU] button to confirm your choice.
Lock
Function: Lock or unlock television set
A. Press the [MENU] key repeatedly to select “Setup” menu
B. By pressing [P+]/[P-] button you can select “Lock”.
C. Input the correct password.
The password is “ 0000” by default.
D. The menu "Lock" will be visualized
E. Using the [P+]/[P-] button select the desired item.
F. By pressing the [V+]/[V-] keys, selected item that can be locked (ON) or unlocked (OFF)
Child Lock: When Child Lock is set to “On” then the Tuning Menu cannot be selected.
AV Lock: Euro AV can be locked or unlocked.
Vol limit sw: When this item is set to ON, the next item “Vol limit” will be active.
Vol limit: By pressing [V+]/[V-] keys, you can set the value of maximum volume limit.
Change Password: When this item is selected, pressing [V+]/[V-] keys, the Change Password menu will be appeared.
New Password: Input any new password you want.
Confirm: Input same number as in above item again. Press the [MENU] button to confirm your choice.
G. Press [MENU] to confirm.
Note:
OSD will disappear after 5 sec. without operation.
The LOCK menu does not appear in the AV Mode

GB
11
4. TELETEXT OPERATION
Select the channel which is broadcasting the TELETEXT program you want to watch.
4-1 SELECT TELETEXT MODE
Press [TV / TEXT] button on the remote control unit and enter to TELETEXT mode.
By this button, mode will be changed as:
TV ÅÆ Picture Teletext
The overview station page or the last page viewed (in case you already watched TELETEXT at this channel previously) appears.
If you need to return to TV mode, press again the [TV / TEXT] button on the remote control.
4-2 PAGE SELECTION
You can enter directly desired page number with the remote control 0 - 9 numeric buttons.
You can sequentially select page by pressing [P+] or [P-] button.
4-3 REVEAL
Some TELETEXT pages contain quiz or game questions with hidden answers.
Press the [REVEAL] button to see the answers.
Press the [REVEAL] button again to hide the answers.
4-4 SIZE (T/B/F Top/Bottom/Full)
To enable easier reading (larger display).
Press the [SIZE] button to display the TOP HALF of the page.
Press again to display the BOTTOM HALF of the page.
Press again to return to a FULL PAGE display.
Note: changing pages reverts to a FULL PAGE display.
4-5 MIX
Press the [MIX] button to turn on/off TELETEXT background.
4-6 CANCEL
When a page is selected in TELETEXT mode it may take some time before it becomes available, pressing the [CANCEL] button will
switch to the TV mode.
When the required page is found the page number will appear at the top of the TV picture, press the [CANCEL] button to return to the
selected TELETEXT page.
Note: You cannot change TV program while in this mode.
4-7 SUB CODE
Periodically revised NEWS FLASHES can be obtained from TELETEXT broadcasts.
Select the NEWS FLASH page in TELETEXT mode then press the [SUBCODE] button. You can now watch the TV program and every
time the News Flash page is updated it will be automatically displayed in the TV picture.
Press the [SUBCODE] button to cause the news flash to disappear.
4-8 INDEX
Press the [INDEX] button to return to index page.
4-9 STOP
Some TELETEXT information is contained on more than one page, the pages automatically changing after a given reading time.
Press [STOP] button to stop the page changing.
Press [STOP] button again to allow the page to change.
4-10 FAST TEXT (For possible future reference)
The RED, GREEN, YELLOW & BLUE buttons are used for quick access to colour coded pages transmitted by FAST TEXT broadcast.

GB
12
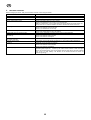
5. TROUBLE SHOOTING
Before arranging for service, firstly know the status and then check simply as follows:
Problems Check
No picture or sound. Check if the power supply is plugged in.
Check if the power switch is in “ON’” position.
Picture is OK, no sound. Check if the volume control is set to the minimum or mute position.
Remote control doesn’t work. Check if the power switch is in “ON” position.
Check if the batteries are out of use or not connected well.
Make sure that there is no strong light striking the sensor window of remote control unit.
Check there are no obstacles between the sensor window and remote control uni
No TV signal. Check if the TV/AV button is not set to TV status.
Check if the antenna is well connected.
Check if you installed the TV correctly.
No external video signal. Check if you installed the TV correctly.
Check if the TV/AV button is set to AV position.
Picture lacks colour or picture too dark. Check colour, brightness and contrast controls are correctly adjusted.
All channels lose colour
intermittently.
Check if the antenna is broken.
Check if the antenna is disconnected.
Check if the antenna is damaged.
Poor reception, loss of colour
with certain channels.
Check if channels are correctly tuned (see “Fine tuning”).
Diagonal stripes appear
on picture.
The receiver may be affected by interference (e.g. from nearby radio broadcasting
transmitter or from another TV receiver).
Picture has “snow”. Check if the antenna is broken.
Check if the antenna is disconnected.
Check if the antenna is damaged.
Ghost images appear. Check if the antenna direction has been changed by a storm or strong wind, etc.
(because ghost images are caused by the arrival at the antenna of both the signal
which has travelled directly from the transmitter and the signal which has been reflected
from a hill or a large building. The direction of the antenna should be chosen for
minimum ghosting).

I
13
Congratulazioni per l’acquisto del suo nuovo televisore a colori.
Prima di utilizzare il televisore, vi consigliamo di leggere e comprendere il presente manuale.
INDICE
1. IMPORTANTI MISURE PRECAUZIONALI .............................................................................................................. 13
2. COMANDI DEL TELEVISORE................................................................................................................................. 14
3. FUNZIONAMENTO DEI MENU................................................................................................................................ 16
4. FUNZIONAMENTO DI TELEVIDEO ........................................................................................................................ 19
5. RISOLUZIONE DEI PROBLEMI .............................................................................................................................. 20
6. CORRETTO SMALTIMENTO DEL PRODOTTO…………………………………………………………………………..53
7. CERTIFICATO DI GARANZIA…………………………………………………………………………..…………………....54
1. IMPORTANTI MISURE PRECAUZIONALI
Avvertenza: Per evitare incendi o il pericolo di scossa elettrica non esporre l’apparecchio alla pioggia o all’umidità.
COLLOCAMENTO
Posizionare il televisore su una superficie piana e in un locale secco e privo di polvere o umidità. Non esporre l’apparecchio alla
luce diretta del sole, o in una posizione sottoposta a fumi, vapori, vibrazioni o calore derivanti da apparecchi di riscaldamento a
irradiazione. Per impedire un eccessivo innalzamento della temperatura interna, posizionare l’apparecchio in modo da lasciare
almeno 15 cm di spazio dalle pareti circostanti.
PRECAUZIONI CONTRO GLI INCENDI E LE FOLGORAZIONI
Per evitare il surriscaldamento all’interno dell’apparecchio, garantire sempre un’adeguata ventilazione. Verificare che nessun
corpo estraneo sia stato inserito all’interno dell’apparecchio, come mollette per capelli, chiodi, carta ecc. Non collocare
l’apparecchio all’interno di una libreria o di un altro mobile che non ne consenta una corretta aerazione. Non collocare
l’apparecchio su un tappeto o su un letto, per non ostruire i fori di ventilazione inferiori.
Non posizionare liquidi, compresi vasi di fiori e altri contenitori con sostanze chimiche o acqua, sopra l’apparecchio, per evitare
che il liquido possa penetrare nell’apparecchio. Se un oggetto pericoloso dovesse entrare nell’apparecchio, staccare
immediatamente l’alimentazione e contattare un tecnico autorizzato.
Quando si posiziona o si sposta l’apparecchio, verificare che il cavo di alimentazione sia inserito nell’apposito alloggiamento.
Per non danneggiare il cavo, non schiacciarlo mai con oggetti pesanti, come il televisore stesso. Tenere il cavo lontano da
apparecchi che generano calore. Evitare di attorcigliare o piegare il cavo. Non allungare il cavo. Quando occorre staccare il
cavo di alimentazione dalla presa, tenere sempre la spina con una mano e non tirare mai direttamente dal cavo.
AVVERTENZA
Non togliere il coperchio posteriore dell’apparecchio. Il contatto accidentale di componenti sotto tensione può provocare scosse
elettriche. Qualora sia necessario un intervento sulle parti interne dell’apparecchio, contattare sempre il distributore locale.
Se l’apparecchio riproduce audio ma non immagini, oppure se emette fumo oppure rumori od odori inconsueti, interromperne il
funzionamento. Spegnere immediatamente l’apparecchio, staccare la spina dalla presa elettrica, quindi contattare il distributore
locale.
Se si prevede di non utilizzare il televisore per un lungo periodo, si suggerisce di scollegare il cavo di alimentazione dalla presa.
L’utilizzo di questo apparecchio è sconsigliato per i bambini e le persone inferme, senza un’adeguata supervisione.
AVVERTENZA PER I CLIENTI
Qualora dovessero comparire difetti quali DISCOLORAZIONE o una MACCHIA COLORATA sull’immagine, verificare le
seguenti possibili cause:
Diffusori esterni posti vicini al TV.
Aspirapolvere acceso o spento nelle vicinanze dell’apparecchio.
Spostamento o rotazione dell’apparecchio mentre è acceso.
L’apparecchio è rimasto in modalità STANDBY senza essere spento utilizzando il pulsante sul pannello anteriore. In tale caso:
Spegnere il televisore utilizzando il pulsante sul PANNELLO ANTERIORE.
Lasciare spento l’apparecchio per almeno 20 minuti.
Accendere quindi l’apparecchio utilizzando il pulsante sul PANNELLO ANTERIORE.
Nota: Per ottenere risultati migliori, può essere necessario ripetere i punti 1, 2 e 3.

I
14
2. COMANDI DEL TELEVISORE
Seguite le istruzioni di questa pagina per mettere in funzione il televisore.
1. Inserire le pile nel telecomando.
2. Collegare il televisore ad una presa della rete elettrica
a. La spina di collegamento alla rete di alimentazione elettrica permette di alimentare il vostro televisore.
b. L’apparecchio deve essere alimentato unicamente con una tensione alternata di 220-240V~ 50-60Hz. Non deve essere collegato
ad una rete che distribuisce corrente continua.
c. Se la spina è staccata dal cordone d’alimentazione, non collegatela in nessun caso ad una presa della rete elettrica: correreste il
rischio di restare fulminati.
3. Collegate l’antenna esterna o l’antenna della rete via cavo alla presa sul retro del televisore.
4. Premere il tasto ON/OFF del televisore.
5. La spia luminosa situata sul televisore si accenderà: l’apparecchio è in modalità di “Stand-By”.
2-1 ALIMENTAZIONE ON/OFF
In modalità “Stand-By”, premere questo tasto per accendere il televisore.
Premere ancora questo tasto per ritornare in modalità “Stand-By”.
Per spegnere premere il tasto ON/OFF sul televisore.
Note:
• In modalità “Stand-By” è possibile accendere il televisore anche premendo i pulsanti di selezione dei canali avanti/indietro
presenti sul telecomando e sul televisore.
• Il televisore ha una funzione di spegnimento automatico (Automatic Power OFF). Nella condizione “No Signal” (nessun
segnale) il televisore si porta automaticamente in modalità “Stand-By” dopo alcuni minuti.
• Ogni volta che si accende il televisore, si seleziona automaticamente la modalità TV; in caso di presenza di segnale di
ingresso ai terminali della presa SCART, si seleziona automaticamente la modalità SCART AV.
2-2 DISATTIVAZIONE AUDIO (MUTE)
Premendo questo tasto, si disattiva l'audio in uscita. Premere nuovamente il pulsante [MUTE] oppure il tasto Aumento Volume
per riattivare l'audio.
2-3 SINTONIZZAZIONE DIRETTA
Utilizzando i tasti numerici posti sul Telecomando, è possibile selezionare direttamente i canali.
In alternativa, premere ripetutamente il tasto [-/- -] per selezionare la modalità desiderata, poi premere i tasti
numerici.
“-“ modalità 1 cifra
“--“ modalità 2 cifre
“---“ modalità 3 cifre (max 256 canali)
2-4 PROGRAMMA AVANTI/INDIETRO
Premere il tasto [P+] per passare al programma successivo.
Premere il tasto [P-] per passare al programma precedente.
2-5 CONTROLLO DEL VOLUME
Premere il tasto [V+] per aumentare il volume.
Premere il tasto [V-] per abbassare il volume.
2-6 MENU
Premendo ripetutamente il tasto [MENU] è possibile scegliere il menù desiderato secondo la sequenza illustrata:
Modalità TV:
( Modellli 14” / 15”) PICTURE Æ TUNING Æ TIMER Æ SETUP Æ LANGUAGE
Modalità AV:
IMMAGINE ÆTIMER Æ INSTALLAZIONE
2-7 SELEZIONE TV/AV
Premendo ripetutamente il tasto [TV/AV], è possibile selezionare la sorgente di ingresso nel modo seguente:
( Modellli 14” / 15”) TV Æ SCART AVÆ SCART RGBÆ SCART SVHS
Nota: Quando si seleziona l’ingresso di segnale SCART, il televisore seleziona automaticamente la modalità SCART AV per
ricevere il segnale SCART, anche se non viene premuto il tasto TV/AV.

I
15
2-8 STATUS (TASTO ROSSO)
Premendo questo tasto una prima volta, apparirà una finestra sullo schermo che mostra i dettagli: numero di canale, nome del
canale (se precedentemente assegnato), sistema colore, sistema audio.
Premendolo una seconda volta, sarà visualizzato l’orario, se impostato in precedenza.
Premere ancora questo tasto per far scomparire quest’ ultima finestra.
2-9 SLEEP (TASTO VERDE)
Premendo ripetutamente questo tasto, il tempo di spegnimento automatico (“sleep timer”), può essere impostato da 0 a 120 min.
2-10 REVIEW (TASTO BLU)
Nella modalità TV: Il programma torna rapidamente al programma precedentemente visualizzato.
Nella modalità AV: si torna al programma TV.
2-11 V-PP (TASTO GIALLO)
Premendo ripetutamente questo tasto, gli effetti dell’immagine si modificano come segue:
STANDARDÆ SOFT Æ DINAMICO Æ PREFERITO
2-12 ZOOM
Premendo questo tasto si avrà il seguente ciclo:
2-13 A.PP
( Modellli 14”
/ 15”) Funzione non disponibile.
Premendo il tasto A-PP apparirà sullo schermo il simbolo
;.
Standard Zoom Wide

I
16
3. FUNZIONAMENTO DEI MENU
Tenere premuto il tasto [MENU] per fare scorrere la selezione dei MENU presenti, nel modo seguente:
( Modellli 14” / 15” ) PICTURE Æ TUNING ÆTIMER ÆSETUP Æ LANGUAGE
( Modelli 20” / 21” ) PICTURE ÆSOUND Æ TUNING ÆTIMER ÆSETUP Æ LANGUAGE
La visualizzazione dei MENU scompare dopo circa 10 secondi dopo l’ultima selezione.
3-1 MENU IMMAGINE (Picture)
Funzione: regolazione della Luminosità, Contrasto, Colore, Nitidezza (Brightness, Contrast, Color, Sharpness, Tint)
A. Premere ripetutamente il pulsante [MENU] per selezionare “immagine”
B. Selezionare ogni funzione utilizzando i tasti [P+]/[P-].
C. Ogni valore può essere controllato mediante i tasti [V+]/[V-].
D. Ripetere le funzioni, se necessario.
L’opzione TINTA è disponibile solamente con il sistema NTSC.
3-2 SINTONIZZAZIONE (Tuning )
Sintonia automatica (Auto Tune)
Funzione: la funzione di ricerca automatica e memoria “Automatic Search and Memory” (ASM) è disponibile per l’installazione dei programmi
dall’ingresso antenna.
Utilizzare il pulsante [MENU] nella parte anteriore dell’apparecchio o sul telecomando per attivare la funzione ASM.
A. Premere ripetutamente il pulsante [MENU] per selezionare “sinonia”
B. Premere il tasto [P+] o [P-] per selezionare “Sintonia Auto”
C. Premere il tasto [V+],per visualizzare il nuovo menu
D. Premere il tasto [P+] o [P-] per selezionare “Mondiale” , “Francia” o “Entrambe”.
E. Premere il tasto [V+],per avviare la ricerca e memorizzarla nell’elenco dei programmi (0÷255).
F. Attendere finché la funzione è stata completata.
Nota:
- selezionare " Mondiale" se nella zona non è disponibile il sistema LL’
- selezionare " Francia " se nella zona è disponibile il sistema LL’
- selezionare " Entrambe " se le informazioni sul sistema LL’ non sono disponibili
Sintonia manuale (Manual Tune)
Funzione: Ordinamento dei canali usando la sintonizzazione manuale
A. Selezionare il numero di programma sul quale effettuare la ricerca
B. Premere ripetutamente il pulsante [MENU] per selezionare “sintonia”.
C. Premere il tasto [P+] o [P-] per selezionare “sintonia man”.
D. Premere il tasto [V+],per visualizzare il nuovo menu
E. Premere il tasto [P+] o [P-] per selezionare “Mondiale” , “Francia”
F. Premere il tasto [V+] o [V-] per avviare la ricerca.
G. Attendere finché la funzione è stata completata.
H. Se il canale trovato non è quello desiderato , premere inuovamente l tasto [V+] o [V-] per avviare una nuova ricerca.
Sintonia fine (Fine Tune)
Funzione: consente di eseguire la sintonizzazione fine dell’impostazione corrente.
A. Selezionare il canale di cui si vuole regolare la sintonia
B. Premere ripetutamente il pulsante [MENU] per selezionare “sintonia”.
C. Mediante il tasto [P+] o [P-], selezionare “Sintoniia fine”
D. Eseguire la regolazione con il tasto [V+] o [V-] per ottenere la migliore sintonizzazione.
E. Premere il tasto [MENU] per uscire
Organizzatore
Funzione: Scambio dei canali
A. Premere ripetutamente il pulsante [MENU] per selezionare “sintonia”.
B. Premere il tasto [P+] o [P-] per selezionare “organizzatore”.
C. Premere il tasto [V+],per visualizzare il nuovo menu
D. Premere il tasto [P+] o [P-] per selezionare “canale 1”
E. Premere il tasto [V+] o [V-] o i tasti numerici per selezionare il canale da scambiare.
F. Premere il tasto [[P-] per selezionare “canale 2”
G. Premere il tasto [V+] o [V-] o i tasti numerici per selezionare canale con cui scambiare.
H. Premere il tasto [P+] o [P-] per selezionare “Conferma”
I. Premere il tasto [V+] per effettuare lo scambio
J. Premere ripetutamente il tasto [MENU] per uscire

I
17
Cancellare
Funzione: Cancellazione dei canali non desiderati.
A. Premere ripetutamente il pulsante [MENU] per selezionare “sintonia”.
B. Premere il tasto [P+] o [P-] per selezionare “organizzatore”.
C. Premere il tasto [V+],per visualizzare il nuovo menu.
D. Premere il tasto [P+] o [P-] per selezionare “canale 1”
E. Premere il tasto [V+] o [V-] o i tasti numerici per selezionare il canale da cancellare.
F. Premere il tasto [P+] o [P-] per selezionare “cancellare”.
G. Premere il tasto [V+] per effettuare la cancellazione.
H. Attendere alcuni secondi fino a quando l’operazione non è conclusa.
I. Premere ripetutamente il tasto [MENU] per uscire.
3-3 TIMER
Funzione: impostazione dell’orario e dei timer mer
A. Premere ripetutamente il tasto [MENU] per selezionare “TIMER”.
B. Premendo i tasti [P+]/[P-], il cursore si sposta verso l'alto e verso il basso per evidenziare le varie voci.
C. Premendo i tasti [V+]/[V-], è possibile regolare la voce selezionata.
Ora (Clock): Regolazione ora corrente. Premere il tasto [V-] per regolare le ore, che cambieranno nel modo seguente:
00 Æ 01 Æ 02 Æ… Æ 23 Æ00
Premere il tasto [V+] per regolare i minuti dell'orario di accensione, che cambieranno nel modo seguente:
00 Æ 01 Æ 02 Æ … Æ 59 Æ 00
Accendi (On Timer): Regolazione ora di accensione automatica della TV.
Quando sono visualizzati i seguenti simboli "- -:- -", l'accensione automatica è operativa. Premere il tasto [V-] per regolare l'ora di accensione,
che cambierà nel modo seguente:
- - Æ 00 Æ 01 Æ 02 Æ … Æ 23 Æ - -
Premere il tasto [V+] per regolare i minuti dell'orario di accensione, che cambieranno nel modo seguente:
00 Æ 01 Æ 02 Æ … Æ 59 Æ 00
Spegni (Off Timer): Regolazione ora di spegnimento automatico della TV. Quando sono visualizzati i seguenti simboli "- -:- -", lo spegnimento
automatico è operativo. Premere il tasto [V-] per regolare l'ora di spegnimento, che cambierà nel modo seguente:
- - Æ 00 Æ 01 Æ 02 Æ … Æ 23
Æ - -
Premere il tasto [V+] per regolare i minuti dell'orario di spegnimento, che cambieranno nel modo seguente:
00 Æ 01 Æ 02 Æ … Æ 59 Æ 00
Canale (Channel): indica il numero del programma che viene selezionato quando si accende la TV dopo il tempo prestabilito sul timer di
accensione automatica “Accendi”. Premendo i tasti [V+] / [V-] si possono selezionare i canali da 0 a 255.
3-4 INSTALLARE (Setup)
Funzione: impostazione di altre funzioni.
Canale (Channel)
Funzione: selezione di un canale
A. Premere ripetutamente il pulsante [MENU] per selezionare “Installare”
B. Mediante i tasti [P+]/[P-], selezionare “Canale”.
C. Mediante i tasti [V+]/[V-], cambiare il numero del canale.
D. Premere il tasto [MENU] per confermare
Nome (Label)
Per la commutazione premere il pulsante [V+]/[V-].
A. Premere il tasto [MENU] per selezionare “Installare” (Setup).
B. Premere i tasti [P+]/[P-] per selezionare “Nome “ (Label).
C. Premere I tasti [V+]/[V-] per muoversi all’interno della stringa.
D. Premere I tasti [P+]/[P-] per selezionare le lettere / cifre.
E. Premere il tasto [MENU] per confermare.
Salta (Skip)
Funzione: utilizzata per saltare i canali.
Se impostata su “Si”, il canale non sarà selezionato dai tasti Canali Avanti/Indietro.
A. Premere ripetutamente il pulsante [MENU] per selezionare “Installare”.
B. Mediante il pulsante [P+] o [P-], selezionare “canale”.
C. Mediante il pulsante [V+] o [V-], selezionare il canale che si vuole saltare.
D. Mediante il pulsante [P+] o [P-], selezionare “Salta”.
E. Mediante il pulsante [V+] o [V-], selezionare “Si” o “No”.
F. Premere il tasto [MENU] per confermare
Suono (Sound )
Funzione: consente di selezionare il sistema audio corretto.
A. Premere ripetutamente il pulsante [MENU] per selezionare “Installare”.
B. Mediante il tasto [P+] o [P-], selezionare “Suono”.
C. Premere ripetutamente il tasto [V+] o [V-] per passare successivamente alle seguenti impostazioni: BG Æ DK Æ I Æ LL’
D. Premere il tasto [MENU] per confermare
Nota: il televisore è dotato di una funzione di identificazione automatica del sistema audio che consente, dopo la ricerca, di identificare e
memorizzare automaticamente il sistema audio dei programmi. In presenza di disturbi dell’audio, la funzione “SUONO” consente di selezionare
il sistema audio corretto.

I
18
Colore (Colour)
Funzione: consente di selezionare il sistema di colore corretto.
A. Premere ripetutamente il pulsante [MENU] per selezionare “Installare”.
B. Mediante il tasto [P+] o [P-], selezionare “Colore”.
C. Premere ripetutamente il tasto [V+] o [V-] per passare alle impostazioni: AUTO ÆPAL Æ SECAM ÆNTSC 4 ÆNTSC 3
D. Premere il tasto [MENU] per confermare l’impostazione scelta
AUTO significa che il sistema del colore viene impostato automaticamente in base al software. Di solito, viene impostato su AUTO. Se il sistema
del colore non viene impostato correttamente, alcuni colori possono non venire riprodotti.
Pagina Blu (Blue Back)
Funzione: programmazione schermo blu
Questa opzione serve per impostare la visualizzazione dello sfondo blu dello schermo, in assenza di segnale ricevuto.
A. Premere ripetutamente il pulsante [MENU] per selezionare “Installare”.
B. Mediante il tasto [P+] o [P-], selezionare “Pagina Blu”.
C. Mediante il tasto [V+] o [V-], selezionare “Si ” o “No”
D. Premere il tasto [MENU] per confermare
Language
Funzione: scegliere la lingua per l’On Screen Display (visualizzazione su schermo)
A. Premere ripetutamente il tasto [MENU] per selezionare il menu “Installare”,
B. Usare i tasti [P+] o [P-] per selezionare il menu “Language”.
C. Mediante i tasti [P+]/[P-], la lingua passa successivamente a:
English, Polski, Čeština, Türkce, Espaňol, Nederlands, Franςais, Deutsch, Portuguĕs, Italiano, Magyar, Eλληντχά, PyccnИЙ.
D. Premere il tasto [MENU] per confermare la scelta effettuata.
TXT Lang
Funzione: scegliere la lingua per il teletext
A. Premere ripetutamente il tasto [MENU] per selezionare il menu “Installare”,
B. Usare i tasti [P+] o [P-] per selezionare il menu “TXT Lang”.
C. Mediante i tasti [P+]/[P-], la lingua passa successivamente a:
English, Polish, Czech, Turkish, Spanish, Dutch, French, German, Portuguese, Italian, Hungarian/Swedian, Serbian, Rumanian,
Russian,.Estonian, Greek.
D. Premere il tasto [MENU] per confermare la scelta effettuata.
Blocco (Lock)
Funzione: Blocco o sblocco televisione
A. Premere ripetutamente il tasto [MENU] per selezionare il menu “Installare”, per selezionare il menu “Blocco”.
B. Mediante i tasti [P+] /[P-] selezionare “Blocco” (Lock)
C. Inserire la password corretta;
La password iniziale é "0000".
D. la voce selezionata si porterà automaticamente su menu "Blocco" .
E. In seguito, premendo i tasti [P+]/[P-], il cursore si sposta ed è possibile selezionare la voce su cui si desidera lavorare.
F. Premendo i tasti [V+]/[V-], la voce selezionata può essere bloccata (Si) o sbloccata (No).
Blocco Per Bambini (Child Lock): Se il Blocco Visione Bambini è in posizione “Si”, non è possibile selezionare il Menu Sintonizzazione.
Blocco AV (AV Lock): blocco o sblocco di Euro AV.
Limit vol sw (Vol limit sw): quando questa voce è in posizione ON, la voce successiva "Vol limit" sarà attiva.
Limitaz volVol limit: premendo i tasti [V+]/[V-], è possibile regolare il valore del limite di volume massimo.
Cambio Password (Change Password ): dopo avere selezionato questa voce, premere i tasti [V+]/[V-] per visualizzare il menu Change
Password.
Nuova Password (New Password): Inserire una nuova password.
Confermare (Confirm): inserire nuovamente la stessa voce di cui sopra.
Nota:
Se la funzione non viene utilizzata per più di 5 secondi, la visualizzazione OSD scompare.
Il menu LOCK non è attivo in modalità AV.
La pagina si sta caricando...
La pagina si sta caricando...
La pagina si sta caricando...
La pagina si sta caricando...
La pagina si sta caricando...
La pagina si sta caricando...
La pagina si sta caricando...
La pagina si sta caricando...
La pagina si sta caricando...
La pagina si sta caricando...
La pagina si sta caricando...
La pagina si sta caricando...
La pagina si sta caricando...
La pagina si sta caricando...
La pagina si sta caricando...
La pagina si sta caricando...
La pagina si sta caricando...
La pagina si sta caricando...
La pagina si sta caricando...
La pagina si sta caricando...
La pagina si sta caricando...
La pagina si sta caricando...
La pagina si sta caricando...
La pagina si sta caricando...
La pagina si sta caricando...
La pagina si sta caricando...
La pagina si sta caricando...
La pagina si sta caricando...
La pagina si sta caricando...
La pagina si sta caricando...
La pagina si sta caricando...
La pagina si sta caricando...
La pagina si sta caricando...
La pagina si sta caricando...
La pagina si sta caricando...
La pagina si sta caricando...
La pagina si sta caricando...
La pagina si sta caricando...
La pagina si sta caricando...
La pagina si sta caricando...
-
 1
1
-
 2
2
-
 3
3
-
 4
4
-
 5
5
-
 6
6
-
 7
7
-
 8
8
-
 9
9
-
 10
10
-
 11
11
-
 12
12
-
 13
13
-
 14
14
-
 15
15
-
 16
16
-
 17
17
-
 18
18
-
 19
19
-
 20
20
-
 21
21
-
 22
22
-
 23
23
-
 24
24
-
 25
25
-
 26
26
-
 27
27
-
 28
28
-
 29
29
-
 30
30
-
 31
31
-
 32
32
-
 33
33
-
 34
34
-
 35
35
-
 36
36
-
 37
37
-
 38
38
-
 39
39
-
 40
40
-
 41
41
-
 42
42
-
 43
43
-
 44
44
-
 45
45
-
 46
46
-
 47
47
-
 48
48
-
 49
49
-
 50
50
-
 51
51
-
 52
52
-
 53
53
-
 54
54
-
 55
55
-
 56
56
-
 57
57
-
 58
58
-
 59
59
-
 60
60


Nordmende CRT 14-15 Manuale del proprietario
- Categoria
- TV LCD
- Tipo
- Manuale del proprietario
in altre lingue
- English: Nordmende CRT 14-15 Owner's manual
- français: Nordmende CRT 14-15 Le manuel du propriétaire
- español: Nordmende CRT 14-15 El manual del propietario
- Deutsch: Nordmende CRT 14-15 Bedienungsanleitung
- português: Nordmende CRT 14-15 Manual do proprietário
Documenti correlati
Altri documenti
-
Yamaha DVX-S301 Manuale utente
-
Philips HTS5000W/05 Manuale utente
-
AEG CTV 2206 Manuale del proprietario
-
-
DGM ETV-1969W Manuale utente
-
Panasonic NVSD230B Manuale del proprietario
-
Hyundai HLT-1711 Manuale del proprietario
-
Haier LT15R1CBW Manuale utente
-
Proline L3217HD LED Manuale utente
-
jWIN JV-DTV30 Manuale del proprietario