
HP Color LaserJet 3000/3600/3800 Series printers
Getting Started Guide
Guide de mise en route
Leitfaden zur Inbetriebnahme
Guida introduttiva
Guía de instalación inicial
Beknopte handleiding
Primers passos
Guia de primeiros passos
Lea esto primero
La pagina si sta caricando...

2
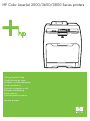
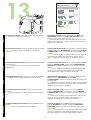
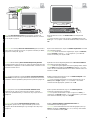
540 mm (21.25 in)
400 mm (15.75 in)
450 mm (17.7 in)
423 mm (16.65 in)
400 mm (15.75 in)
563 mm (22 in)
17° - 25°C
(62.6° - 77°F)
229 mm (9 in)
89 mm (3.5 in)
356 mm (14 in)
89 mm (3.5 in)
178 mm (7 in)
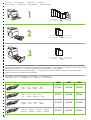
Select a sturdy, well-ventilated, dust-free area to
position the printer.
Choisissez une zone résistante, bien aérée et
exempte de poussière pour placer l'imprimante.
Stellen Sie den Drucker auf einer stabilen Fläche in
einem gut belüfteten, staubfreien Raum auf.
Posizionare la stampante su una superficie solida,
in un'area ventilata e priva di polvere
appositamente selezionata.
Coloque la impresora en una zona firme con
buena ventilación y sin polvo.
Plaats de printer op een stevig oppervlak in een
goed geventileerde, stofvrije omgeving.

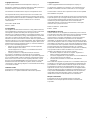
3
1
Ch
ec
k
th
e con
t
en
t
s o
f
th
e
b
ox. •
Vé
r
ifi
ez
l
e con
t
enu
d
u car
t
on
d’emballage. • Überprüfen Sie den Packungsinhalt. • Verificare il
contenuto della confezione. • Compruebe el contenido de la
caja. • Controleer de inhoud van de doos.
2
21.5 Kg.
47.4 lbs.
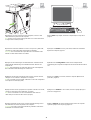
If
th
e pr
i
n
t
er came w
ith
a
t
ray
3
, p
l
ace
th
e pr
i
n
t
er on
t
op o
f
it
.
Si l’imprimante est livrée avec un bac d'alimentation 3, placez l’imprimante
sur ce bac.
Wenn der Drucker mit einem Fach 3 geliefert wurde, setzen Sie den
Drucker auf das Fach.
Se la stampante è dotata del vassoio 3, posizionarla sopra tale vassoio.
Si la impresora se suministra con una bandeja 3, coloque la impresora
encima de ésta.
Als de printer is geleverd met een lade 3, plaatst u de printer hier bovenop.
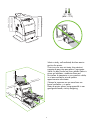
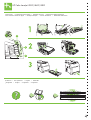
3
R
emove
th
e pr
i
n
t
car
t
r
id
ges. •
R
e
ti
rez
l
es car
t
ouc
h
es
d’i
mpress
i
on.
Entfernen Sie die Druckpatronen. • Estrarre le cartucce di stampa.
Quite los cartuchos de impresión. • Verwijder de printcartridges.
4
R
emove
th
e s
hi
pp
i
ng
t
ape. •
R
e
ti
rez
l
a
b
an
d
e a
dhé
s
i
ve.
Entfernen Sie die Transportversiegelung. • Rimuovere il nastro di
trasporto. • Quite la cinta adhesiva de embalaje.
Verwijder de verpakkingstape.

4
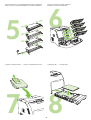
5
R
emove
th
e s
hi
pp
i
ng
l
oc
k
s an
d
t
ape
f
rom
th
e pr
i
n
t
car
t
r
id
ges.
Retirez le dispositif de sécurité d'expédition et la bande adhésive des
cartouches d’impression.
Entfernen Sie die Transportsicherung und die Klebestreifen von den
Druckpatronen.
Rimuovere i fermi e il nastro dalle cartucce di stampa.
Quite los bloqueos de embalaje y la cinta adhesiva de los cartuchos de
impresión.
Verwijder de verpakkingsvergrendelingen en de tape van de printcartridges.
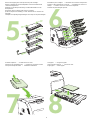
6
R
e
i
ns
t
a
ll
th
e pr
i
n
t
car
t
r
id
ges. •
Réi
ns
t
a
ll
ez
l
es car
t
ouc
h
es
d’i
mpress
i
on.
Setzen Sie die Druckpatronen erneut ein. • Reinstallare le cartucce di
stampa. • Vuelva a colocar los cartuchos de impresión.
Installeer de printcartridges opnieuw.
7
I
ns
t
a
ll
th
e ou
t
pu
t
bi
n. •
I
ns
t
a
ll
ez
l
e
b
ac
d
e sor
ti
e.
Setzen Sie das Ausgabefach ein. • Installare lo scomparto di uscita.
Coloque la bandeja de salida. • Installeer de uitvoerbak.
8
L
oa
d
paper. •
Ch
argez
d
u pap
i
er.
Legen Sie das Papier ein. • Caricare la carta.
Ponga papel. • Plaats papier.

EnglishFrançaisDeutschItalianoEspañolNederlands
5
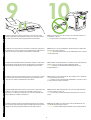
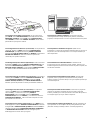
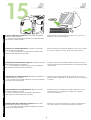
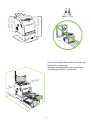
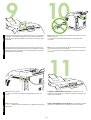
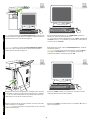
Install the control-panel overlay (if necessary). Press the ends of the
overlay straight down onto the printer and then move your hands toward
the center of the overlay until it completely adheres to the printer.
10.1 Plug in the power cord. Do not plug in the USB cable until you are
prompted to in step 14.
Note Plug the power cord directly into a wall outlet only.
Installez le cache du panneau de commande (si nécessaire). Appuyez sur
les extrémités du cache en le plaçant sur l’imprimante puis appuyez sur le
centre du cache pour qu’il adhère complètement à l'imprimante.
10.1 Branchez le cordon d’alimentation. Ne branchez pas le câble USB
avant d’y être invité à l’étape 14.
Remarque Branchez directement le cordon d’alimentation dans une prise
murale uniquement.
Installieren der Bedienfeldschablone (bei Bedarf). Drücken Sie die Enden
der Schablone gerade auf den Drucker, und drücken Sie die Schablone
mit den Händen in der Mitte an, bis sie vollständig am Drucker haftet.
10.1 Schließen Sie das Netzkabel an. Schließen Sie das USB-Kabel erst
dann an, wenn Sie in Schritt 14 dazu aufgefordert werden.
Hinweis Schließen Sie das Netzkabel unbedingt direkt an eine
Wandsteckdose an.
Installare la mascherina del pannello di controllo, se necessario. Premere
le estremità della mascherina sulla stampante, quindi spostarsi verso il
centro fino a far aderire completamente la mascherina.
10.1 Collegare il cavo di alimentazione. Non collegare il cavo USB finché
non viene richiesto al punto 14.
Nota Collegare il cavo di alimentazione direttamente a una presa a muro e
a nessun altro tipo di presa intermedia.
Instale la plantilla del panel de control (si es necesario). Presione de forma
rectilínea y hacia abajo los extremos de la plantilla en dirección a la
impresora y, a continuación, empuje hacia el centro de la plantilla hasta
que se adhiera por completo a la impresora.
10.1 Enchufe el cable de alimentación. No conecte el cable USB hasta
que se le solicite en el paso 14.
Nota Conecte sólo el cable de alimentación directamente a la toma de
pared.
Installeer zonodig de overlay van het bedieningspaneel. Druk de einden
van de overlay recht omlaag op de printer en beweeg uw handen naar het
midden van de overlay totdat deze helemaal recht op de printer zit.
10.1 Steek de stekker in het stopcontact. Sluit de USB-kabel niet aan
voordat dit wordt gevraagd in stap 14.
Opmerking Steek de stekker altijd rechtstreeks in een wandcontactdoos.
9
10

6
10.2 Turn on the printer.
Note Printer calibration and start-up noises are normal.
Set the language/date/time (if necessary). If prompted, select your
language and date/time. Follow the instructions on the control panel.
10.2 Mettez l’imprimante sous tension.
Remarque L’étalonnage de l’imprimante et les bruits à l’allumage sont
normaux.
Définition de la langue, de la date et de l'heure (si nécessaire). Si vous
y êtes invité, sélectionnez votre langue ainsi que la date et l’heure. Suivez
les instructions affichées sur le panneau de commande.
10.2 Schalten Sie den Drucker ein.
Hinweis Die Geräusche beim Kalibrieren und Einschalten des Druckers
sind normal.
Einstellen von Sprache/Datum/Zeit (bei Bedarf). Wählen Sie bei
entsprechender Aufforderung Ihre Sprache und Datum/Zeit aus. Folgen
Sie den Anweisungen auf dem Bedienfeld.
10.2 Accendere la stampante.
Nota I rumori percepibili durante la fase di avvio e di calibrazione della
stampante denotano il normale funzionamento della periferica.
Impostare lingua/data/ora (se necessario). Se richiesto, selezionare,
lingua, data e ora. Seguire le istruzioni visualizzate sul pannello di
controllo.
10.2 Encienda la impresora.
Nota Los ruidos de calibración e inicio de la impresora son normales.
Configure las opciones de idioma/fecha/hora (si es necesario). Si se
le solicita, seleccione su idioma y la fecha/hora. Siga las instrucciones que
aparecen en el panel de control.
10.2 Zet de printer aan.
Opmerking Printerkalibratie- en opstartgeluiden zijn normaal.
Stel zonodig de taal/datum/tijd in. Selecteer de juiste taal en datum/tijd
wanneer daarom wordt gevraagd. Volg de aanwijzingen op het
bedieningspaneel.
11

EnglishFrançaisDeutschItalianoEspañolNederlands
7
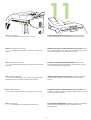
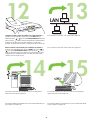
Set the media size and type for the input trays. At the printer control
panel, press MENU, use the or button to highlight PAPER
HANDLING, and then press . Use the control panel buttons to highlight
and select media sizes and types for each input tray. For more
information, see the online user guide.
To connect to a network, go to step 13 on page 9.
Définition du format et du type de support pour les différents bacs
d’alimentation. Sur le panneau de commande de l’imprimante, appuyez
sur MENU, puis utilisez les touches et pour mettre GESTION DU
PAPIER en surbrillance, puis appuyez sur . Utilisez les boutons du
panneau de commande pour mettre en surbrillance et sélectionner le
format et le type de support de chaque bac d’alimentation. Pour plus
d’informations, consultez le guide de l’utilisateur en ligne.
Pour vous connecter à un réseau, passez à l’étape 13, page 9.
Legen Sie das Medienformat und den Medientyp für die Zufuhrfächer
fest. Drücken Sie auf dem Bedienfeld des Druckers auf MENÜ.
Verwenden Sie die Taste oder , um PAPIERZUFUHR zu
markieren. Drücken Sie anschließend auf . Verwenden Sie die
Bedienfeldtasten, um das Medienformat und den Medientyp für die
einzelnen Zufuhrfächer zu markieren und auszuwählen. Weitere
Informationen finden Sie im Online-Benutzerhandbuch.
Wenn Sie den Drucker mit einem Netzwerk verbinden möchten, fahren Sie
mit Schritt 13 auf Seite 9 fort.
Impostare il formato e il tipo di supporto da utilizzare nei vassoi di
alimentazione. Sul pannello di controllo della stampante, premere MENU,
utilizzare il pulsante o per evidenziare GESTIONE CARTA,
quindi premere . Utilizzare i pulsanti del pannello di controllo per
evidenziare e selezionare i formati e i tipi di supporto da utilizzare in
ciascun vassoio di alimentazione. Per ulteriori informazioni, consultare la
guida dell'utente in linea.
Per collegarsi a una rete, andare al punto 13 a pagina 9.
Establezca el tamaño y el tipo de papel de las bandejas de entrada.
En el panel de control de la impresora, pulse MENÚ, utilice los botones
o para resaltar MANEJO DE PAPEL y, a continuación,
pulse . Utilice los botones del panel de control para resaltar y
seleccionar los tamaños y tipos de papel de cada bandeja de entrada.
Para obtener más información, consulte la guía del usuario en línea.
Para conectar la impresora a una red, vaya al paso 13 en la página 9.
Stel het formaat en de soort afdrukmateriaal in voor de invoerladen.
In het bedieningspaneel van de printer drukt u achtereenvolgens op
MENU, gebruikt u de knop of om PAPIERVERWERKING te
markeren en drukt u op . Gebruik de knoppen van het
bedieningspaneel om het formaat en de soort afdrukmateriaal te markeren
en te selecteren voor elke invoerlade. Voor meer informatie raadpleegt u
de online gebruikershandleiding.
Ga naar stap 13 op pagina 9 als u verbinding wilt maken met een netwerk.
12
LAN
13

8
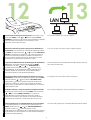
To install software for Windows® with a direct connection (USB), go to
step 14 on page 12.
To install software for Macintosh with a direct connection (USB), go to step
15 on page 15.
Pour installer un logiciel sous Windows® avec une connexion directe
(USB), passez à l'étape 14, page 12.
Pour installer un logiciel sous Macintosh avec une connexion directe
(USB), passez à l'étape 15, page 15.
Wenn Sie die Software für Windows® mit einer Direktverbindung (USB)
installieren möchten, fahren Sie mit Schritt 14 auf Seite 12 fort.
Wenn Sie die Software für Macintosh mit einer Direktverbindung (USB)
installieren möchten, fahren Sie mit Schritt 15 auf Seite 15 fort.
Per informazioni sull'installazione del software su sistemi Windows® con
connessione diretta (USB), andare al punto 14 a pagina 12.
Per informazioni sull'installazione del software su sistemi Macintosh con
connessione diretta (USB), andare al punto 15 a pagina 15.
Para instalar el software en Windows® mediante una conexión directa
(USB), vaya al paso 14 en la página 12.
Para instalar el software en Macintosh mediante una conexión directa
(USB), vaya al paso 15 en la página 15.
Ga naar stap 14 op pagina 12 als u software voor Windows® wilt
installeren met een rechtstreekse verbinding (USB).
Ga naar stap 15 op pagina 15 als u software voor Macintosh wilt
installeren met een rechtstreekse verbinding (USB).
14
15

EnglishFrançaisDeutschItalianoEspañolNederlands
9
13.1 Connect to a network. Connect the network cable to the printer.
Note Ensure that all cables are HP-compliant.
13.2 Find the IP address. On the control panel, press Menu. Select
INFORMATION, and then select PRINT CONFIGURATION. The IP
address is on the Jetdirect page, under “TCP/IP”.
Note You might need to assign an IP address depending on the type of
network that is installed. See “Configure an IP address (if necessary)” on
page 10 for more information.
13.1 Connexion à un réseau. Connectez le câble réseau à l’imprimante.
Remarque Assurez-vous que tous les câbles sont conformes aux
normes HP.
13.2 Recherche de l’adresse IP. Sur le panneau de commande, appuyez
sur Menu. Sélectionnez INFORMATIONS, puis sélectionnez IMPRIMER
CONFIGURATION. L'adresse IP se trouve sur la page Jetdirect, sous
«TCP/IP».
Remarque Vous devrez peut-être définir une adresse IP selon le type de
réseau installé. Pour obtenir plus d'informations, reportez-vous à la
section « Configuration d'une adresse IP (si nécessaire) », page 10.
13.1 Verbindung mit einem Netzwerk. Schließen Sie das Netzwerkkabel
an den Drucker an.
Hinweis Vergewissern Sie sich, dass alle verwendeten Kabel HP-
kompatibel sind.
13.2 Suchen der IP-Adresse. Drücken Sie auf dem Bedienfeld auf Menü.
Wählen Sie INFORMATIONEN und anschließend KONFIGURATION
DRUCKEN. Die IP-Adresse befindet sich auf der Jetdirect-Seite unter
„TCP/IP“.
Hinweis Je nach installiertem Netzwerktyp müssen Sie möglicherweise
eine IP-Adresse zuweisen. Weitere Informationen finden Sie unter
„Konfiguration einer IP-Adresse (bei Bedarf)“ auf Seite 10.
13.1 Collegamento a una rete. Collegare il cavo di rete alla stampante.
Nota Verificare che tutti i cavi siano compatibili con gli standard HP.
13.2 Rilevamento dell'indirizzo IP. Sul pannello di controllo, premere
Menu. Selezionare INFORMAZIONI, quindi STAMPA
CONFIGURAZIONE. L'indirizzo IP è riportato nella pagina Jetdirect, nella
sezione "TCP/IP".
Nota Potrebbe essere necessario assegnare un indirizzo IP a seconda del
tipo di rete installata. Per ulteriori informazioni, vedere "Configurazione di
un indirizzo IP (se necessario)" a pagina 10.
13.1 Conecte la impresora a una red. Conecte el cable de red a la
impresora.
Nota Asegúrese de que todos los cables cumplen las especificaciones
de HP.
13.2 Busque la dirección IP. En el panel de control, pulse Menú.
Seleccione INFORMACIÓN y, a continuación, seleccione IMPRIMIR
CONFIGURACIÓN. La dirección IP aparece en la página Jetdirect, bajo
“TCP/IP”.
Nota Puede que sea necesario asignar una dirección IP en función del
tipo de red instalada. Consulte “Configure una dirección IP (si es
necesario)” en la página 10 para obtener más información.
13.1 Maak verbinding met een netwerk. Sluit de netwerkkabel aan op
de printer.
Opmerking Zorg ervoor dat alle kabels HP-compatibel zijn.
13.2 Zoek het IP-adres. Druk op
Menu op het bedieningspaneel.
Selecteer INFORMATIE en selecteer vervolgens CONFIGURATIE
AFDRUKKEN. U kunt het IP-adres op de pagina van Jetdirect vinden
onder “TCP/IP”.
Opmerking Het is mogelijk dat u een IP-adres moet toekennen, afhankelijk
van het soort netwerk dat is geïnstalleerd. Raadpleeg voor meer
informatie “Configureer een IP-adres (indien nodig)” op pagina 10.
13

10
13.3 Configure an IP address (if necessary). On the control panel,
press MENU. Select CONFIGURE DEVICE, select I/O, and then select
EMBEDDED JETDIRECT. Select TCP/IP, select CONFIG METHOD,
select MANUAL, and then select MANUAL SETTINGS. Use the control-
panel buttons to specify the IP address.
13.4 Prepare for software installation. Quit all of the programs
(including terminate-and-stay resident [TSR], antivirus, and firewall
programs) on the print server or on each computer that will use the printer.
13.3 Configuration d'une adresse IP (si nécessaire). Sur le panneau de
commande, appuyez sur MENU. Sélectionnez CONFIGURATION
PÉRIPHÉRIQUE, puis E/S et sélectionnez JETDIRECT INTÉGRÉ.
Sélectionnez TCP/IP, MÉTHODE CONFIG, puis MANUEL et sélectionnez
PARAMÈTRES MANUELS. Utilisez les boutons du panneau de
commande pour spécifier l’adresse IP.
13.4 Préparation à l’installation du logiciel. Quittez tous les
programmes (y compris les programmes résidents [TSR], les anti-virus et
les pare-feu) sur le serveur d’impression ou sur chaque ordinateur qui
utilise l'imprimante.
13.3 Konfiguration einer IP-Adresse (bei Bedarf). Drücken Sie auf dem
Bedienfeld auf MENÜ. Wählen Sie GERÄT KONFIGURIEREN, E/A und
anschließend INTEGRIERTER JETDIRECT aus. Wählen Sie TCP/IP,
METHODE KONFIG., MANUELL und anschließend MANUELLE EINST.
aus. Geben Sie über die Bedienfeldtasten die IP-Adresse ein.
13.4 Vorbereiten der Softwareinstallation. Schließen Sie alle
Programme (auch TSR- (terminate-and-stay resident), Antivirus- und
Firewall-Programme) auf dem Druckserver bzw. auf jedem Computer, der
den Drucker verwendet.
13.3 Configurazione di un indirizzo IP (se necessario). Sul pannello di
controllo, premere MENU. Selezionare CONFIGURA PERIFERICA, I/O,
quindi PERIFERICA INTERNA JETDIRECT. Selezionare TCP/IP,
CONFIG. METODO, MANUALE, quindi IMPOSTAZIONI MANUALI.
Utilizzare i pulsanti del pannello di controllo per immettere l'indirizzo IP.
13.4 Preparazione dell'installazione del software. Chiudere tutti i
programmi, inclusi i programmi TSR (terminate-and-stay resident),
antivirus e firewall, sul server di stampa o su ogni computer impostato per
l'uso della stampante.
13.3 Configure una dirección IP (si es necesario). En el panel de
control, pulse MENÚ. Seleccione CONFIGURAR DISPOSITIVO,
seleccione E/S y, a continuación, seleccione JETDIRECT
INCORPORADO. Seleccione TCP/IP, seleccione MÉTODO DE
CONFIGURACIÓN, seleccione MANUAL y, a continuación, seleccione
CONFIGURACIÓN MANUAL . Utilice los botones del panel de control
para especificar la dirección IP.
13.4 Prepare la instalación del software. Cierre todos los programas
(incluidos los programas residentes en memoria [TSR], programas
antivirus y firewall) que se estén ejecutando en el servidor de impresión o
en cualquier equipo que vaya a utilizar la impresora.
13.3 Configureer een IP-adres (indien nodig). Druk op MENU op het
bedieningspaneel. Selecteer APPARAAT CONFIGUREREN en selecteer
vervolgens I/O en GEÏNTEGREERDE JETDIRECT. Selecteer TCP/IP en
selecteer achtereenvolgens CONFIGURATIEMETHODE, HANDMATIG
en HANDMATIGE INSTELLINGEN. Gebruik de knoppen op het
bedieningspaneel om het IP-adres op te geven.
13.4 Voordat u de software gaat installeren. Sluit alle programma’s af
op de printserver en alle computers die de printer gebruiken (ook TSR-
[Terminate-and-Stay Resident], antivirus- en firewall-programma’s).

EnglishFrançaisDeutschItalianoEspañolNederlands
11
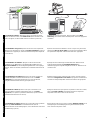
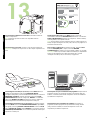
13.5 Install the software. 1) Insert the CD that came with the printer.
2) On the welcome screen, click Install Printer. (If the welcome screen
does not appear, run SETUP.EXE from the root directory of the CD.)
3) Follow the onscreen instructions. When prompted, select Wired
Networking. The installer shows available printers. Select the appropriate
IP address.
13.5 Installation du logiciel. 1) Insérez le CD fourni avec l’imprimante.
2) Sur l’écran de bienvenue, cliquez sur Installer l’imprimante. (Si l’écran
de bienvenue n’apparaît pas, exécutez SETUP.EXE à partir du répertoire
racine du CD.)
3) Suivez les instructions affichées à l’écran. Lorsque vous y êtes invité,
sélectionnez Mise en réseau câblée. Le programme d’installation affiche
les imprimantes disponibles. Sélectionnez l’adresse IP appropriée.
13.5 Installation der Software. 1) Legen Sie die mit dem Drucker
gelieferte CD ein. 2) Klicken Sie auf dem Begrüßungsbildschirm auf
Drucker installieren. (Sollte der Begrüßungsbildschirm nicht angezeigt
werden, führen Sie die Datei „SETUP.EXE“ im Stammverzeichnis der CD
aus.)
3) Folgen Sie den Anweisungen auf dem Bildschirm. Wählen Sie bei
entsprechender Aufforderung Verdrahtetes Netzwerk. Das
Installationsprogramm zeigt die verfügbaren Drucker an. Wählen Sie die
IP-Adresse aus.
13.5 Installazione del software. 1) Inserire il CD fornito assieme alla
stampante. 2) Nella schermata di benvenuto, fare clic su Installa
stampante (se la schermata di benvenuto non viene visualizzata,
eseguire SETUP.EXE dalla directory principale del CD).
3) Attenersi alle istruzioni visualizzate sullo schermo. Quando richiesto,
selezionare Collegamento in rete cablato. Il programma di installazione
visualizza le stampanti disponibili. Selezionare l'indirizzo IP appropriato.
13.5 Instale el software. 1) Inserte el CD que se suministró con la
impresora. 2) En la pantalla de bienvenida, haga clic en Instalar
impresora (si no aparece la pantalla de bienvenida, ejecute el archivo
SETUP.EXE del directorio raíz del CD).
3) Siga las instrucciones que aparecen en pantalla. Cuando se le solicite,
seleccione Redes cableadas. El instalador muestra las impresoras
disponibles. Seleccione la dirección IP adecuada.
13.5 Installeer de software. 1) Plaats de cd die bij de printer is geleverd.
2) Klik op Printer installeren in het welkomstvenster. (Als het
welkomstvenster niet wordt weergegeven, voert u SETUP.EXE uit vanaf de
hoofddirectory op de cd.)
3) Volg de instructies op het scherm. Selecteer Bekabeld netwerk als dit
wordt gevraagd. Het installatieprogramma geeft beschikbare printers
weer. Selecteer het juiste IP-adres.

12
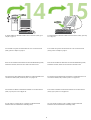
4) On the Installation Type screen select Full Installation to install the
most common drivers and software (recommended), select Basic
Installation to install the minimum set of drivers and software, or select
Custom Installation. 5) Allow the installation to finish. 6) Go to step 16 on
page 19.
Windows® with a direct connection (USB). 1) Install the software from
the CD before connecting the cable to the printer.
4) Sur l’écran Type d’installation, sélectionnez Installation complète
pour installer les pilotes et logiciels les plus répandus (recommandé),
sélectionnez Installation standard pour installer le jeu minimum de
pilotes et de logiciels, ou bien sélectionnez Installation personnalisée.
5) Attendez que l’installation se termine. 6) Passez à l’étape 16, page 19.
Windows® avec connexion directe (USB). 1) Installez le logiciel à partir
du CD avant de connecter le câble à l’imprimante.
4) Wählen Sie auf dem Bildschirm Installationstyp die Option
Vollständige Installation, wenn Sie die gängigsten Treiber und
Softwareprogramme installieren möchten (empfohlen). Wählen Sie
Minimale Installation, wenn nur ein Minimum an Treibern und Software
installiert werden soll, oder wählen Sie Benutzerdefinierte Installation.
5) Warten Sie, bis der Installationsvorgang abgeschlossen ist. 6) Fahren
Sie mit Schritt 16 auf Seite 19 fort.
Windows® mit Direktverbindung (USB). 1) Installieren Sie die Software
von der CD, bevor Sie das Kabel an den Drucker anschließen.
4) Nella schermata Tipo di installazione, selezionare Installazione
completa per installare i driver e il software più diffusi (consigliati),
Installazione standard per installare il numero minimo di driver e
componenti software oppure scegliere Installazione personalizzata.
5) Completare l'installazione. 6) Passare al punto 16 a pagina 19.
Sistemi Windows® con connessione diretta (USB). 1) Installare il
software dal CD prima di collegare il cavo alla stampante.
4) En la pantalla Tipo de instalación, seleccione Instalación completa
si desea instalar el software y los controladores más comunes (opción
recomendada), seleccione Instalación básica si sólo desea instalar el
conjunto de software y controladores básicos, o bien seleccione
Instalación personalizada. 5) Deje que finalice la instalación. 6) Vaya al
paso 16 en la página 19.
Windows® mediante una conexión directa (USB). 1) Instale el software
del CD antes de conectar el cable a la impresora.
4)
Selecteer Volledige installatie in het scherm Soort installatie als u
de meest gangbare drivers en software wilt installeren (aanbevolen).
Selecteer Normale installatie als u de minimale hoeveelheid drivers en
software wilt installeren of selecteer Aangepaste installatie. 5) Wacht tot
de installatie is voltooid. 6) Ga naar stap 16 op pagina 19.
Windows® met een rechtstreekse verbinding (USB). 1) Installeer de
software vanaf de cd voordat u de kabel aansluit op de printer.
14
Windows

EnglishFrançaisDeutschItalianoEspañolNederlands
13
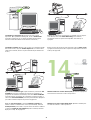
Note If the New Hardware Found message appears, insert the CD.
Follow the onscreen instructions, accept the default selections, and then
go to step 16 on page 19.
2) On the welcome screen, click Install Printer. The Setup Wizard
appears.
Note If the welcome screen does not appear, click Start, and then click
Run. Type X:SETUP, replace X with the CD-ROM drive letter, and then click
OK.
Remarque Si le message Nouveau matériel détecté apparaît, insérez le
CD. Suivez les instructions sur l’écran, acceptez les sélections par défaut,
puis passez à l’étape 16, page 19.
2) Sur l’écran de bienvenue, cliquez sur Installer l’imprimante. L’assistant
de configuration apparaît.
Remarque Si l’écran de bienvenue n’apparaît pas, cliquez sur Démarrer,
puis sur Exécuter. Saisissez X : SETUP, remplacez X par la lettre du
lecteur de CD-ROM, puis cliquez sur OK.
Hinweis Sollte die Meldung Neue Hardwarekomponente gefunden
angezeigt werden, legen Sie die CD ein. Folgen Sie den Anweisungen auf
dem Bildschirm, akzeptieren Sie die Standardauswahl, und fahren Sie mit
Schritt 16 auf Seite 19 fort.
2) Klicken Sie auf dem Begrüßungsbildschirm auf Drucker installieren.
Der Setup-Assistent wird aufgerufen.
Hinweis Sollte der Begrüßungsbildschirm nicht angezeigt werden, klicken
Sie auf Start und anschließend auf Ausführen. Geben Sie X:SETUP ein,
wobei X für den Laufwerkbuchstaben des CD-ROM-Laufwerks steht, und
klicken Sie auf OK.
Nota Se viene visualizzato il messaggio Nuovo componente hardware
individuato, inserire il CD. Seguire le istruzioni visualizzate sullo schermo,
accettare le selezioni predefinite, quindi passare al punto 16 a pagina 19.
2) Nella schermata di benvenuto, fare clic su Installa stampante. Viene
visualizzata l'installazione guidata.
Nota Se la schermata di benvenuto non viene visualizzata, fare clic su
Start, quindi su Esegui. Digitare X:SETUP, sostituire X con la lettera
dell'unità CD-ROM appropriata, quindi fare clic su
OK.
Nota Si aparece el mensaje Se ha encontrado hardware nuevo,
introduzca el CD. Siga las instrucciones de la pantalla, acepte las
selecciones predeterminadas y, a continuación, vaya al paso 16 en la
página 19.
2) En la pantalla de bienvenida, haga clic en Instalar impresora.
Aparecerá el Asistente para la instalación.
Nota Si la pantalla de bienvenida no aparece, haga clic en Inicio y, a
continuación, en Ejecutar. Escriba X:SETUP, sustituyendo la X por la letra
de la unidad de CD-ROM y haga clic en Aceptar.
Opmerking Als het bericht Nieuwe hardware gevonden wordt
weergegeven, plaatst u de cd. Volg de instructies op het scherm,
accepteer de standaardinstellingen en ga vervolgens naar stap 16 op
pagina 19.
2) Klik op Printer installeren in het welkomstvenster. De
installatiewizard wordt weergegeven.
Opmerking Als het welkomstvenster niet wordt weergegeven, klikt u op
Start en vervolgens op Uitvoeren. Typ X:SETUP, vervang X met de letter
van het cd-romstation en klik op OK.
Windows
Windows

14
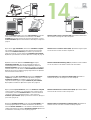
3) Follow the onscreen instructions. When prompted, connect a USB
cable between the printer and the computer.
Note HP does not recommend using USB hubs. Use a USB cable that is
no longer than 2 meters (6.5 feet).
4) Click Finish. If prompted, restart the computer. 5) Go to step 16 on
page 19.
3) Suivez les instructions affichées à l’écran. Lorsque vous y êtes invité,
connectez un câble USB reliant l’imprimante et l’ordinateur.
Remarque HP recommande de ne pas utiliser de concentrateurs USB.
Utilisez un câble USB de moins de 2 mètres.
4) Cliquez sur Terminer. Si vous y êtes invité, redémarrez l’ordinateur.
5) Passez à l’étape 16, page 19.
3) Folgen Sie den Anweisungen auf dem Bildschirm. Schließen Sie bei
entsprechender Aufforderung ein USB-Kabel zwischen Drucker und
Computer an.
Hinweis Die Verwendung von USB-Hubs wird von HP nicht empfohlen.
Das USB-Kabel sollte nicht länger als 2 Meter sein.
4) Klicken Sie auf Fertig stellen. Starten Sie bei entsprechender
Aufforderung den Computer neu. 5) Fahren Sie mit Schritt 16 auf Seite 19
fort.
3) Attenersi alle istruzioni visualizzate sullo schermo. Quando richiesto,
collegare un cavo USB tra la stampante e il computer.
NotaHP sconsiglia l'uso di hub USB. Utilizzare un cavo USB di lunghezza
non superiore a 2 metri (6,5 piedi).
4) Fare clic su Fine. Se richiesto, riavviare il computer. 5) Passare al
punto 16 a pagina 19.
3) Siga las instrucciones que aparecen en pantalla. Cuando se le solicite,
conecte un cable USB entre la impresora y el equipo.
Nota HP no recomienda el uso de concentradores USB. Utilice un
cable USB que no mida más de 2 metros (6,5 pies).
4) Haga clic en Finalizar. Si se le solicita, reinicie el equipo. 5) Vaya al
paso 16 en la página 19.
3) Volg de instructies op het scherm. Als hierom wordt gevraagd, sluit u
een USB-kabel aan tussen de printer en de computer.
Opmerking Wij raden u aan geen USB-hubs te gebruiken. Gebruik een
USB-kabel van maximaal 2 meter.
4) Klik op Voltooien. Als hierom wordt gevraagd, start u de computer
opnieuw op. 5) Ga naar stap 16 op pagina 19.
Windows Windows

EnglishFrançaisDeutschItalianoEspañolNederlands
15
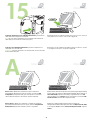
Connect to a Macintosh computer. 1) Connect a USB cable between
the printer and the computer.
Note HP does not recommend using USB hubs. Use a USB cable that is
not longer than 2 meters (6.5 feet).
2) Place the CD in the CD-ROM drive. For OS 9.1 to 9.2.x, go to A on
page 16. For OS X, go to B on page 17.
Connexion à un ordinateur Macintosh. 1) Connectez un câble USB
reliant l’imprimante et l’ordinateur.
Remarque HP recommande de ne pas utiliser de concentrateurs USB.
Utilisez un câble USB de moins de 2 mètres.
2) Placez le CD dans le lecteur de CD-ROM. Pour OS 9.1 à 9.2.x, passez
à la section A, page 16. Pour OS X, passez à la section B, page 17.
Verbindung mit einem Macintosh-Computer. 1) Schließen Sie ein USB-
Kabel zwischen Drucker und Computer an.
Hinweis Die Verwendung von USB-Hubs wird von HP nicht empfohlen.
Das USB-Kabel sollte nicht länger als 2 Meter sein.
2) Legen Sie die CD in das CD-ROM-Laufwerk ein. Bei OS 9.1 bis 9.2.x
fahren Sie mit Schritt A auf Seite 16 fort. Bei OS X fahren Sie mit Schritt B
auf Seite 17 fort.
Collegamento a un computer Macintosh. 1) Collegare la stampante e il
computer mediante un cavo USB.
NotaHP sconsiglia l'uso di hub USB. Utilizzare un cavo USB di lunghezza
non superiore ai 2 metri (6,5 piedi).
2) Inserire il CD nell'unità CD-ROM. Per le versioni da OS 9.1 a 9.2.x,
passare al punto A a pagina 16. Per la versione OS X, passare al punto B
a pagina 17.
Conecte la impresora a un equipo Macintosh. 1) Conecte un cable
USB entre la impresora y el equipo.
Nota HP no recomienda el uso de concentradores USB. Utilice un
cable USB que no mida más de 2 metros (6,5 pies).
2) Introduzca el CD en la unidad de CD-ROM. Si utiliza OS 9.1 a 9.2.x,
consulte la sección A en la página 16. Si utiliza OS X, consulte la
sección B en la página 17.
Verbinding maken met een Macintosh-computer. 1) Sluit een USB-
kabel aan tussen de printer en de computer.
Opmerking Wij raden u aan geen USB-hubs te gebruiken. Gebruik een
USB-kabel van maximaal 2 meter.
2) Plaats de cd in het cd-romstation. Ga naar stap A op pagina 16 voor
OS 9.1 tot en met 9.2.x. Ga naar stap B op pagina 17 voor OS X.
15
Macintosh
Macintosh

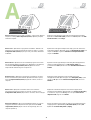
16
OS 9.1 to 9.2.x: 1) Run the Installer. Complete a custom install. 2) Select
all options, including USB Components (Classic). 3) When prompted,
restart the computer.
4) Run the Apple Desktop Printer Utility from HD/Applications/Utilities.
5) Double-click HP Printer (USB), and then click OK. 6) Next to the USB
Printer Selection, click Change.
OS 9.1 à 9.2.x : 1) Exécutez le programme d’installation. Effectuez une
installation personnalisée. 2) Sélectionnez toutes les options, y compris
Composants USB (Classic). 3) Lorsque vous y êtes invité, redémarrez
l’ordinateur.
4) Exécutez l’outil Apple Desktop Printer Utility à partir du dossier HD/
Applications/Utilitaires. 5) Double-cliquez sur Imprimante HP (USB), puis
cliquez sur OK. 6) En regard de Sélection d’une imprimante USB,
cliquez sur Modifier.
OS 9.1 bis 9.2.x: 1) Führen Sie das Installationsprogramm aus. Führen
Sie eine benutzerdefinierte Installation aus. 2) Wählen Sie alle Optionen,
einschließlich USB-Komponenten (Classic). 3) Starten Sie bei
entsprechender Aufforderung den Computer neu.
4) Führen Sie das Apple Desktop Printer Utility über HD/Applications/
Utilities aus. 5) Doppelklicken Sie auf HP Drucker (USB) und
anschließend auf OK. 6) Klicken Sie neben USB-Druckerauswahl auf
Ändern.
Da OS 9.1 a 9.2.x: 1) Eseguire il programma di installazione. Portare a
termine un'installazione personalizzata. 2) Selezionare tutte le opzioni,
inclusi i Componenti USB (Classic). 3)
Quando richiesto, riavviare il
computer.
4) Eseguire l'Utility Stampante scrivania Apple dal percorso
HD/Applicazioni/Utilità. 5) Fare doppio clic su Stampante (USB), quindi
fare clic su OK. 6) Accanto a Selezione stampante USB, fare clic su
Modifica.
OS 9.1 a 9.2.x: 1) Ejecute el instalador. Realice una instalación
personalizada. 2) Seleccione todas las opciones, incluida la opción
Componentes USB (Classic). 3) Cuando se le solicite, reinicie el equipo.
4) Ejecute la Utilidad de impresora de escritorio de Apple desde
HD/Aplicaciones/Utilidades. 5) Haga doble clic en Impresora HP (USB) y,
a continuación, haga clic en OK. 6) Junto a la opción Selección de
impresora USB, haga clic en Cambiar.
OS 9.1 tot en met 9.2.x: 1) Voer het installatieprogramma uit. Voer een
aangepaste installatie uit. 2) Selecteer alle opties, waaronder USB-
componenten (Classic). 3) Als u hierom wordt gevraagd, start u de
computer opnieuw op.
4) Voer de Desktop Printer Utility van Apple uit vanaf HD/Programma's/
Hulpprogramma's. 5) Dubbelklik op HP Printer (USB) en klik op OK.
6) Klik naast Selectie USB-printer op Wijzig.
A
Macintosh Macintosh

EnglishFrançaisDeutschItalianoEspañolNederlands
17
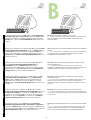
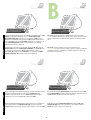
7) Select the printer, and then click OK. 8) Next to Postscript® Printer
Description (PPD) File, click Auto Setup, and then click Create. 9) Save
the printer setup. 10) On the desktop, highlight the printer. 11) Click the
Printing menu, and then click Set Default Printer. 12) Go to step 16 on
page 19.
OS X: 1) Run the Installer. Complete an easy install.
Note If OS X and OS 9.1 (Classic) to 9.2.x (Classic) are installed on the
same computer, the installer shows both the Classic and the OS X
installation options.
7) Sélectionnez l’imprimante, puis cliquez sur OK. 8) En regard de Fichier
PPD (PostScript® Printer Description), cliquez sur Réglage auto, puis
sur Créer. 9) Enregistrez la configuration de l’imprimante. 10) Sur le
bureau, mettez l’imprimante en surbrillance. 11) Cliquez sur le menu
Impression, puis sur Définir comme imprimante par défaut. 12) Passez
à l’étape 16, page 19.
OS X : 1) Exécutez le programme d’installation. Effectuez une installation
standard.
Remarque Si OS X et OS 9.1 (Classic) à 9.2.x (Classic) sont installés sur
le même ordinateur, le programme d’installation affiche les options
d’installation des systèmes Classic et OS X.
7) Wählen Sie den Drucker aus, und klicken Sie auf OK. 8) Klicken Sie
neben Postscript® Druckerbeschreibungsdatei (PPD) auf
Automatisch und dann auf Erstellen. 9) Speichern Sie die
Druckerkonfiguration. 10) Markieren Sie den Drucker auf dem Desktop.
11) Klicken Sie auf das Menü Drucken und dann auf Standarddrucker
festlegen. 12) Fahren Sie mit Schritt 16 auf Seite 19 fort.
OS X: 1) Führen Sie das Installationsprogramm aus. Führen Sie eine
einfache Installation aus.
Hinweis Wenn OS X und OS 9.1 (Classic) bis 9.2.x (Classic) auf
demselben Computer installiert sind, zeigt das Installationsprogramm die
Installationsoptionen der Classic- und der OS X-Version an.
7) Selezionare la stampante, quindi fare clic su OK. 8) Accanto a File
Postscript® Printer Description (PPD), fare clic su Impostazione
autom., quindi su Crea. 9) Salvare le impostazioni della stampante.
10) Evidenziare la stampante sulla Scrivania. 11) Fare clic sul menu
Stampa, quindi su Imposta stampante default. 12) Passare al punto 16
a pagina 19.
OS X: 1) Eseguire il programma di installazione. Portare a termine
un'installazione facile.
Nota Se su uno stesso computer sono installate le versioni OS X e una
versione da OS 9.1 (Classic) a 9.2.x (Classic), nel programma di
installazione vengono visualizzate sia le opzioni di installazione Classic
che OS X.
7) Seleccione la impresora y haga clic en OK. 8) Junto a la opción
Archivos de descripción de impresora Postscript® (PPD), haga clic en
Configuración automática y, a continuación en Crear. 9) Guarde la
configuración de la impresora. 10) En el escritorio, resalte la impresora.
11) Haga clic en el menú Impresión y, a continuación, en Establecer
impresora predeterminada. 12) Vaya al paso 16 en la página 19.
OS X: 1) Ejecute el instalador. Realice una instalación sencilla.
Nota Si OS X y OS 9.1 (Classic) a 9.2.x (Classic) están instalados en el
mismo equipo, el instalador mostrará ambas opciones de instalación para
Classic y OS X.
7) Selecteer de printer en klik op OK. 8) Klik naast PostScript®-
printerbeschrijvingsbestand (PPD) op Automatische configuratie en
vervolgens op Maak aan. 9) Sla de printerconfiguratie op. 10) Markeer de
printer op het bureaublad. 11) Klik op het menu Print en klik vervolgens op
Stel standaardprinter in. 12) Ga naar stap 16 op pagina 19.
OS X: 1) Voer het installatieprogramma uit. Voer een standaardinstallatie
uit.
Opmerking Als OS X en OS 9.1 (Classic) tot en met 9.2.x (Classic) op
dezelfde computer zijn geïnstalleerd, worden de installatie-opties voor
Classic en OS X beide weergegeven door het installatieprogramma.
Macintosh
B
Macintosh

18
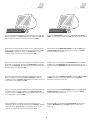
2) From HD/Applications/Utilities/Print Center, start the Print Center. 3) If
the printer appears in the Printer List, delete the printer. Click Add. 4) On
the next page, click the drop-down menu, and then select USB.
5) From the Printer Model drop-down list, select HP. 6) Under Model
Name, select the printer, and then click Add. 7) Go to step 16 on page 19.
2) Démarrez le Centre d’impression à partir du dossier HD/Applications/
Utilitaires/Centre d’impression. 3) Si l’imprimante apparaît dans la Liste
d’imprimantes, supprimez-la. Cliquez sur Ajouter. 4) Sur la page
suivante, cliquez sur le menu local, puis sélectionnez USB.
5) Dans la liste locale Modèle d’imprimante, sélectionnez HP. 6) Sous
Nom du modèle, sélectionnez l’imprimante, puis cliquez sur Ajouter.
7) Passez à l’étape 16, page 19.
2) Starten Sie das Print Center über HD/Applications/Utilities/Print Center.
3) Löschen Sie den Drucker, wenn er in der Druckerliste angezeigt wird.
Klicken Sie auf Hinzufügen. 4) Klicken Sie auf der nächsten Seite auf das
Dropdown-Menü, und wählen Sie USB.
5) Wählen Sie in der Dropdown-Liste Druckermodell den Eintrag HP aus.
6) Wählen Sie unter Modellname den gewünschten Drucker aus, und
klicken Sie dann auf Hinzufügen. 7) Fahren Sie mit Schritt 16 auf Seite 19
fort.
2) Avviare Centro Stampa da HD/Applicazioni/Utilità/Centro Stampa.
3) Se la stampante è visualizzata in Elenco Stampanti, eliminare la
stampante. Fare clic su Aggiungi. 4)
Nella pagina successiva, fare clic sul
menu a discesa, quindi selezionare USB.
5) Dall'elenco a discesa Modello stampante, selezionare HP. 6) In Nome
modello, selezionare la stampante, quindi fare clic su Aggiungi.
7) Passare al punto 16 a pagina 19.
2) Inicie el Centro de impresión desde HD/Aplicaciones/Utilidades/Centro
de impresión. 3) Si la impresora aparece en la Lista de impresoras,
elimínela. Haga clic en Añadir. 4) En la página siguiente, haga clic en el
menú desplegable y seleccione USB.
5) En la lista desplegable Modelo de impresora, seleccione HP. 6) Bajo
Nombre de modelo, seleccione la impresora y haga clic en Añadir.
7) Vaya al paso 16 en la página 19.
2) Start Afdrukbeheer vanuit HD/Programma's/Hulpprogramma's/
Afdrukbeheer. 3) Als de printer wordt weergegeven bij Printers, verwijdert
u de printer. Klik op Voeg toe. 4) Klik op de volgende pagina op het
bovenste vervolgkeuzemenu en selecteer vervolgens USB.
5) Selecteer HP in de vervolgkeuzelijst Printermodel. 6) Selecteer de
printer bij Modelnaam en klik op Voeg toe. 7) Ga naar stap 16 op
pagina 19.
Macintosh Macintosh

EnglishFrançaisDeutschItalianoEspañolNederlands
19
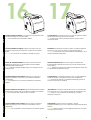
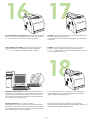
Test the software installation. Print a page from any program to make
sure that the software is correctly installed.
Note If the installation failed, reinstall the software.
Congratulations! The printer is ready to use. The user guide is located on
the CD and in the HP Easy Printer Care Software.
Note Save the boxes and the packing materials in case you need to
transport the printer.
Test de l’installation du logiciel. Imprimez une page à partir d’un
programme quelconque pour vérifier que le logiciel est correctement
installé.
Remarque En cas d’échec de l’installation, réinstallez le logiciel.
Félicitations ! L’imprimante est prête à l’emploi. Le guide de l'utilisateur
est situé sur le CD et dans le logiciel Assistant d'imprimantes HP.
Remarque Conservez les cartons et les matériaux d’emballage en cas de
transport éventuel de l’imprimante.
Prüfen der Softwareinstallation. Drucken Sie eine Seite über ein
beliebiges Programm aus, um sicherzustellen, dass die Software
ordnungsgemäß installiert wurde.
Hinweis Sollte die Installation fehlgeschlagen sein, installieren Sie die
Software erneut.
Herzlichen Glückwunsch! Der Drucker ist jetzt einsatzbereit. Das
Benutzerhandbuch befindet sich auf der CD und in der HP Easy Printer
Care-Software.
Hinweis Bewahren Sie die Kartons und das Verpackungsmaterial auf, falls
Sie den Drucker transportieren müssen.
Test dell'installazione del software. Stampare una pagina da un
programma qualsiasi per assicurarsi che il software sia installato
correttamente.
Nota Se l'installazione non è avvenuta correttamente, reinstallare il
software.
Congratulazioni. La stampante è pronta per l'uso. La guida dell'utente è
situata sul CD-ROM e nel software Gestione facile stampante HP.
Nota Conservare le confezioni e il materiale di imballaggio qualora sia
necessario trasportare la stampante.
Pruebe la instalación del software. Imprima una página desde cualquier
programa para asegurarse de que el software se instaló correctamente.
Nota Si la instalación falla, instale de nuevo el software.
¡Enhorabuena! La impresora está lista para su uso. La guía del usuario
se encuentra en el CD y en el software Cuidado fácil de impresoras HP.
Nota Guarde las cajas y el material de embalaje por si necesita
transportar la impresora.
Test de installatie van de software. Druk een pagina af vanuit een
willekeurig programma om te controleren of de software correct is
geïnstalleerd.
Opmerking Als de installatie is mislukt, installeert u de software opnieuw.
Gefeliciteerd! De printer is klaar voor gebruik. U vindt de
gebruikershandleiding op de cd en in de HP Eenvoudig printeronderhoud-
software.
Opmerking Bewaar de dozen en het verpakkingsmateriaal voor het geval
u de printer moet vervoeren.
16
17

20
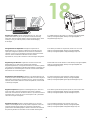
Register your printer. Register at www.register.hp.com. This is the
quickest and easiest way for you to register to receive the following
information: technical support updates, enhanced support options, ideas
and ways to use your new HP printer, and news about emerging
technologies.
For additional help for the printer, go to www.hp.com/support/clj3000,
www.hp.com/support/clj3600, www.hp.com/support/clj3800, or
http://instantsupport.hp.com.
Enregistrement de l’imprimante. Enregistrez l’imprimante sur
www.register.hp.com. Il s’agit de la méthode la plus simple et la plus
rapide pour enregistrer l’imprimante afin de recevoir les informations
suivantes : mises à jour de l’assistance technique, options d’assistance
avancées, idées et méthodes d’utilisation de votre nouvelle
imprimante HP, ainsi que des nouvelles sur les technologies émergentes.
Pour obtenir plus d’aide sur l’imprimante, rendez-vous sur le site
www.hp.com/support/clj3000, www.hp.com/support/clj3600,
www.hp.com/support/clj3800 ou http://instantsupport.hp.com.
Registrierung des Druckers. Registrieren Sie Ihren Drucker unter
www.register.hp.com. Dies ist die schnellste und einfachste
Registrierungsmethode, um folgende Informationen zu erhalten: Updates
zur technischen Unterstützung, erweiterte Unterstützung, Vorschläge und
Möglichkeiten zur Verwendung Ihres neuen HP Druckers sowie aktuelle
Informationen zu neuen Technologien.
Weitere Hilfe zum Drucker finden Sie unter www.hp.com/support/clj3000,
www.hp.com/support/clj3600, www.hp.com/support/clj3800 oder
http://instantsupport.hp.com.
Registrazione della stampante. Registrarsi al sito www.register.hp.com
è il modo più veloce e facile di registrare i propri dati e ricevere le seguenti
informazioni: aggiornamenti su assistenza tecnica, opzioni di assistenza
avanzate, idee e modi di utilizzare la nuova stampante HP, nonché novità
su tecnologie emergenti.
Per ulteriori informazioni sulla stampante, visitare le pagine
www.hp.com/support/clj3000, www.hp.com/support/clj3600,
www.hp.com/support/clj3800 oppure http://instantsupport.hp.com.
Registre la impresora. Regístrese en www.register.hp.com. Éste es el
modo más rápido y sencillo de registrarse para recibir la siguiente
información: actualizaciones de asistencia técnica, opciones de asistencia
mejoradas, ideas y modos de usar su nueva impresora HP y novedades
sobre las tecnologías emergentes.
Para obtener ayuda adicional para la impresora, visite los sitios Web
www.hp.com/support/clj3000, www.hp.com/support/clj3600,
www.hp.com/support/clj3800 o http://instantsupport.hp.com.
Registreer de printer. Registreer op www.register.hp.com. Dit is de
snelste en eenvoudigste manier om uw printer te registreren zodat u de
volgende informatie krijgt: updates voor technische ondersteuning,
geavanceerde ondersteuningsopties, ideeën en manieren om de nieuwe
HP-printer te gebruiken en informatie over de nieuwste technologieën.
Voor aanvullende informatie over de printer gaat u naar
www.hp.com/support/clj3000, www.hp.com/support/clj3600,
www.hp.com/support/clj3800 of http://instantsupport.hp.com.
18
La pagina si sta caricando...
La pagina si sta caricando...
La pagina si sta caricando...
La pagina si sta caricando...
La pagina si sta caricando...
La pagina si sta caricando...
La pagina si sta caricando...
La pagina si sta caricando...
La pagina si sta caricando...
La pagina si sta caricando...
La pagina si sta caricando...
La pagina si sta caricando...
La pagina si sta caricando...
La pagina si sta caricando...
La pagina si sta caricando...
-
 1
1
-
 2
2
-
 3
3
-
 4
4
-
 5
5
-
 6
6
-
 7
7
-
 8
8
-
 9
9
-
 10
10
-
 11
11
-
 12
12
-
 13
13
-
 14
14
-
 15
15
-
 16
16
-
 17
17
-
 18
18
-
 19
19
-
 20
20
-
 21
21
-
 22
22
-
 23
23
-
 24
24
-
 25
25
-
 26
26
-
 27
27
-
 28
28
-
 29
29
-
 30
30
-
 31
31
-
 32
32
-
 33
33
-
 34
34
-
 35
35
-
 36
36


in altre lingue
- English: HP 3000 User manual
- français: HP 3000 Manuel utilisateur
- español: HP 3000 Manual de usuario
- Deutsch: HP 3000 Benutzerhandbuch
- Nederlands: HP 3000 Handleiding
- português: HP 3000 Manual do usuário
Documenti correlati
-
HP Color LaserJet CP3505 Printer series Guida Rapida
-
HP LaserJet 5200 Printer series Guida Rapida
-
-
HP (Hewlett-Packard) P3005 Manuale utente
-
HP LaserJet M5025 Multifunction Printer series Guida Rapida
-
HP COLOR LASERJET 2600N PRINTER Manuale del proprietario
-
-
HP Deskjet D4100 Printer series Guida d'installazione
-
-