
Version 1.3r2
Published: December 12, 2019

CION v1.3r2 www.aja.com
2
Table of Contents
Notices . . . . . . . . . . . . . . . . . . . . . . . . . . . . . . . . . . . . . . . . . . . . . . . . . . . . . . . . 6
Trademarks . . . . . . . . . . . . . . . . . . . . . . . . . . . . . . . . . . . . . . . . . . . . . . . . . . . . . . . . . . . . . . . . . . . . . . . 6
Copyright . . . . . . . . . . . . . . . . . . . . . . . . . . . . . . . . . . . . . . . . . . . . . . . . . . . . . . . . . . . . . . . .
. . . . . . . . . 6
Contacting Support . . . . . . . . . . . . . . . . . . . . . . . . . . . . . . . . . . . . . . . . . . . . . . . . . . . . . . . . . . . . . . .
6
Chapter 1: Introduction . . . . . . . . . . . . . . . . . . . . . . . . . . . . . . . . . . . . . . . . 7
Overview. . . . . . . . . . . . . . . . . . . . . . . . . . . . . . . . . . . . . . . . . . . . . . . . . . . . . . . . . . . . . . . . . . . . . . . . . . 7
Physical Design . . . . . . . . . . . . . . . . . . . . . . . . . . . . . . . . . . . . . . . . . . . . . . . . . . . . . . . . . . . . . . .
7
Hardware Connectivity . . . . . . . . . . . . . . . . . . . . . . . . . . . . . . . . . . . . . . . . . . . . . . . . . . . . . . . . 8
Open Architecture . . . . . . . . . . . . . . . . . . . . . . . . . . . . . . . . . . . . . . . . . . . . . . . . . . . . . . . . . . . . 8
Functionality. . . . . . . . . . . . . . . . . . . . . . . . . . . . . . . . . . . . . . . . . . . . . . . . . . . . . . . . . . . . . . . . . . 9
Physical Layout. . . . . . . . . . . . . . . . . . . . . . . . . . . . . . . . . . . . . . . . . . . . . . . . . . . . . . . . . .
. . . . .
. . . . . 9
Front . . . . . . . . . . . . . . . . . . . . . . . . . . . . . . . . . . . . . . . . . . . . . . . . . . . . . . . . . . . . . . . . . . . .
. . . . . 9
Operator Side . . . . . . . . . . . . . . . . . . . . . . . . . . . . . . . . . . . . . . . . . . . . . . . . . . . . . . . . . . . . . . . . 10
User Interface Screen . . . . . . . . . . . . . . . . . . . . . . . . . . . . . . . . . . . . . . . . . . . . . . . . . . . . 11
Connector Side . . . . . . . . . . . . . . . . . . . . . . . . . . . . . . . . . . . . . . . . . . . . . . . . . . . . . . . . . . . . . . 12
Top . . . . . . . . . . . . . . . . . . . . . . . . . . . . . . . . . . . . . . . . . . . . . . . . . . . . . . . . . . . . . . . . . . . . . . . . . . 13
Bottom . . . . . . . . . . . . . . . . . . . . . . . . . . . . . . . . . . . . . . . . . . . . . . . . . . . . . . . . . . . . . . . . . . . . . . 14
Rear . . . . . . . . . . . . . . . . . . . . . . . . . . . . . . . . . . . . . . . . . . . . . . . . . . . . . . . . . . . . . . . . . . . . . . . . . 15
Chapter 2: Making Basic Connections. . . . . . . . . . . . . . . . . . . . . . . . . . .16
Overview. . . . . . . . . . . . . . . . . . . . . . . . . . . . . . . . . . . . . . . . . . . . . . . . . . . . . . . . . . . . . . . . . . . . . . . . . 16
Supplying Power to CION. . . . . . . . . . . . . . . . . . . . . . . . . . . . . . . . . . . . . . . . . . . . . . . . . . . . . . . . .
16
Connecting an AJA AC/DC Power Supply to CION . . . . . . . . . . . . . . . . . . . . . . . . . . . . . 16
Connectin
g a Battery Plate to CION . . . . . . . . . . . . . . . . . . . . . . . . . . . . . . . . . . . . . . . . . . . 16
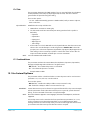
Power Up and Power Down of CION . . . . . . . . . . . . . . . . . . . . . . . . . . . . . . . . . . . . . . . . . . 17
Mounting a Lens to CION . . . . . . . . . . . . . . . . . . . . . . . . . . . . . . . . . . . . . . . . . . . . . . . . . . . . .
. . . .
18
Connecting a Monitoring Device to CION . . . . . . . . . . . . . . . . . . . . . . . . . . . . . . . . . . . . . . . . . 18
Front Monitor Outputs . . . . . . . . . . . . . . . . . . . . . . . . . . . . . . . . . . . . . . . . . . . . . . . . . . . . . . . 21
Rear
Monitor Outputs . . . . . . . . . . . . . . . . . . . . . . . . . . . . . . . . . . . . . . . . . . . . . . . . . . . . . . . . 21
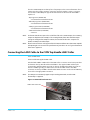
Connecting the LANC Cable to the CION Top Handle LANC Collar . . . . . . . . . . . . . . . . . . 23
Using Pak Media with CION . . . . . . . . . . . . . . . . . . . . . . . . . . . . . . . . . . . . . . . . . . . . . . . . . . . .
. . . 24
Insertin
g Pak media in CION . . . . . . . . . . . . . . . . . . . . . . . . . . . . . . . . . . . . . . . . . . . . . . . . . . 24
To re
move Pak media from CION . . . . . . . . . . . . . . . . . . . . . . . . . . . . . . . . . . . . . . . . . . . . . 24
Conn
ecting Audio Devices to CION . . . . . . . . . . . . . . . . . . . . . . . . . . . . . . . . . . . . . . . . . . . . . . . 25
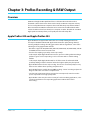
Chapter 3: ProRes Recording & RAW Output . . . . . . . . . . . . . . . . . . . .27
Overview. . . . . . . . . . . . . . . . . . . . . . . . . . . . . . . . . . . . . . . . . . . . . . . . . . . . . . . . . . . . . . . . . . . . . . . . . 27
Apple ProRes 422 and Apple ProRes 444 . . . . . . . . . . . . . . . . . . . . . . . . . . . . . . . . . . . . . . . . . . 27
AJA Raw . . . . . . . . . . . . . . . . . . . . . . . . . . . . . . . . . . . . . . . . . . . . . . . . . . . . . . . . . . . . . . . . . . . . .
. . . . 28
Chapter 4: Basic Operations . . . . . . . . . . . . . . . . . . . . . . . . . . . . . . . . . . .29
Making a Recording . . . . . . . . . . . . . . . . . . . . . . . . . . . . . . . . . . . . . . . . . . . . . . . . . . . . . . . . . . . . . . 29
Playing Back a Recording . . . . . . . . . . . . . . . . . . . . . . . . . . . . . . . . . . . . . . . . . . . . . . . . . . . . . . . . .
30
To playback recorded media . . . . . . . . . . . . . . . . . . . . . . . . . . . . . . . . . . . . . . . . . . . . . . . . . 31
Formatting Media and Deleting Clips . . . . . . . . . . . . . . . . . . . . . . . . . . . . . . . . . . . . . . . . . . . . . 31
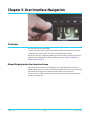
Chapter 5: User Interface Navigation . . . . . . . . . . . . . . . . . . . . . . . . . . .33
Overview. . . . . . . . . . . . . . . . . . . . . . . . . . . . . . . . . . . . . . . . . . . . . . . . . . . . . . . . . . . . . . . . . . . . . . . . . 33

CION v1.3r2 www.aja.com
3
Default Display for the User Interface Screen . . . . . . . . . . . . . . . . . . . . . . . . . . . . . . . . . . 33
Entering the Menu Structure . . . . . . . . . . . . . . . . . . . . . . . . . . . . . . . . . . . . . . . . . . . . . . . . . 34
To enter a specific menu . . . . . . . . . . . . . . . . . . . . . . . . . . . . . . . . . . . . . . . . . . . . . . . . . 34
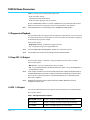
CONFIG Menu Parameters . . . . . . . . . . . . . . . . . . . . . . . . . . . . . . . . . . . . . . . . . . . . . . . . . . . . . . . . 36
1.3 Progressive Playback . . . . . . . . . . . . . . . . . . . . . . . . . . . . . . . . . . . . . . . . . . . . . . . . . . . . . 36
1.5
Crop SDI 1-4 Output . . . . . . . . . . . . . . . . . . . . . . . . . . . . . . . . . . . . . . . . . . . . . . . . . . . . . . 36
1.6 SDI 1-4 Output . . . . . . . . . . . . . . . . . . . . . . . . . . . . . . . . . . . . . . . . . . . . . . . . . . . . . . . . . . . 36
1.61 SDI 1-4 RGB Range. . . . . . . . . . . . . . . . . . . . . . . . . . . . . . . . . . . . . . . . . . . . . . . . . . . . . . . 37
1.62 SDI 12-bit/10-bit. . . . . . . . . . . . . . . . . . . . . . . . . . . . . . . . . . . . . . . . . . . . . . . . . . . . . . . . . 37
1.64 3G SDI Level. . . . . . . . . . . . . . . . . . . . . . . . . . . . . . . . . . . . . . . . . . . . . . . . . . . . . . . . . . . . . 37
1.66 Rear HDMI Out . . . . . . . . . . . . . . . . . . . . . . . . . . . . . . . . . . . . . . . . . . . . . . . . . . . . . . . . . . 38
1.68 Rear HDMI 10-bit/8-bit. . . . . . . . . . . . . . . . . . . . . . . . . . . . . . . . . . . . . . . . . . . . . . . . . . . 38
1.8 Crop SDI/HDMI Monitor Output . . . . . . . . . . . . . . . . . . . . . . . . . . . . . . . . . . . . . . . . . . . 38
1.85 SDI/HDMI Monitoring LUT . . . . . . . . . . . . . . . . . . . . . . . . . . . . . . . . . . . . . . . . . . . . . . . 39
1.9 Super Out . . . . . . . . . . . . . . . . . . . . . . . . . . . . . . . . . . . . . . . . . . . . . . . . . . . . . . . . . . . . . . . . 39
1.92 Super Displayed . . . . . . . . . . . . . . . . . . . . . . . . . . . . . . . . . . . . . . . . . . . . . . . . . . . . . . . . . 40
1.93 Super Area Opacity . . . . . . . . . . . . . . . . . . . . . . . . . . . . . . . . . . . . . . . . . . . . . . . . . . . . . . 40
1.94 Graticules . . . . . . . . . . . . . . . . . . . . . . . . . . . . . . . . . . . . . . . . . . . . . . . . . . . . . . . . . . . . . . . 41
1.95 Graticules Color . . . . . . . . . . . . . . . . . . . . . . . . . . . . . . . . . . . . . . . . . . . . . . . . . . . . . . . . . 42
1.97 Display VU Meters . . . . . . . . . . . . . . . . . . . . . . . . . . . . . . . . . . . . . . . . . . . . . . . . . . . . . . . 42
1.98 Histogram. . . . . . . . . . . . . . . . . . . . . . . . . . . . . . . . . . . . . . . . . . . . . . . . . . . . . . . . . . . . . . . 42
1.99 Histogram Mode . . . . . . . . . . . . . . . . . . . . . . . . . . . . . . . . . . . . . . . . . . . . . . . . . . . . . . . . 43
4.1 Analog Audio. . . . . . . . . . . . . . . . . . . . . . . . . . . . . . . . . . . . . . . . . . . . . . . . . . . . . . . . . . . . . 43
6.1 Genlock . . . . . . . . . . . . . . . . . . . . . . . . . . . . . . . . . . . . . . . . . . . . . . . . . . . . . . . . . . . . . . . . . . 43
8.0 TC Select . . . . . . . . . . . . . . . . . . . . . . . . . . . . . . . . . . . . . . . . . . . . . . . . . . . . . . . . . . . . . . . . . 43
8.1 TC Value. . . . . . . . . . . . . . . . . . . . . . . . . . . . . . . . . . . . . . . . . . . . . . . . . . . . . . . . . . . . . . . . . . 44
8.2 TC Type . . . . . . . . . . . . . . . . . . . . . . . . . . . . . . . . . . . . . . . . . . . . . . . . . . . . . . . . . . . . . . . . . . 44
9.0 Interval Record . . . . . . . . . . . . . . . . . . . . . . . . . . . . . . . . . . . . . . . . . . . . . . . . . . . . . . . . . . . 44
9.1 Interval Frames. . . . . . . . . . . . . . . . . . . . . . . . . . . . . . . . . . . . . . . . . . . . . . . . . . . . . . . 45
9.2 Interval Time . . . . . . . . . . . . . . . . . . . . . . . . . . . . . . . . . . . . . . . . . . . . . . . . . . . . . . . . . 45
41.2 Video SG . . . . . . . . . . . . . . . . . . . . . . . . . . . . . . . . . . . . . . . . . . . . . . . . . . . . . . . . . . . . . . . . 45
41.3 Audio SG. . . . . . . . . . . . . . . . . . . . . . . . . . . . . . . . . . . . . . . . . . . . . . . . . . . . . . . . . . . . . . . . 45
50.0 LAN Settings . . . . . . . . . . . . . . . . . . . . . . . . . . . . . . . . . . . . . . . . . . . . . . . . . . . . . . . . . . . . 46
50.1 IP Config. . . . . . . . . . . . . . . . . . . . . . . . . . . . . . . . . . . . . . . . . . . . . . . . . . . . . . . . . . . . 46
50.2 IP Address . . . . . . . . . . . . . . . . . . . . . . . . . . . . . . . . . . . . . . . . . . . . . . . . . . . . . . . . . . 46
50.3 Subnet Mask . . . . . . . . . . . . . . . . . . . . . . . . . . . . . . . . . . . . . . . . . . . . . . . . . . . . . . . . 46
50.4 Static Gateway . . . . . . . . . . . . . . . . . . . . . . . . . . . . . . . . . . . . . . . . . . . . . . . . . . . . . . 46
50.5 System Name . . . . . . . . . . . . . . . . . . . . . . . . . . . . . . . . . . . . . . . . . . . . . . . . . . . . . . . 47
50
.6 M
AC Address . . . . . . . . . . . . . . . . . . . . . . . . . . . . . . . . . . . . . . . . . . . . . . . . . . . . . . . 47
50.9 User Authentication. . . . . . . . . . . . . . . . . . . . . . . . . . . . . . . . . . . . . . . . . . . . . . . . . 47
55.4 Date Set. . . . . . . . . . . . . . . . . . . . . . . . . . . . . . . . . . . . . . . . . . . . . . . . . . . . . . . . . . . . . . . . . 48
55.6 Time Set . . . . . . . . . . . . . . . . . . . . . . . . . . . . . . . . . . . . . . . . . . . . . . . . . . . . . . . . . . . . . . . . 48
55.7 Time Zone . . . . . . . . . . . . . . . . . . . . . . . . . . . . . . . . . . . . . . . . . . . . . . . . . . . . . . . . . . . . . . 49
55.71 Daylight Savings . . . . . . . . . . . . . . . . . . . . . . . . . . . . . . . . . . . . . . . . . . . . . . . . . . . 49
70.1 Screen Saver . . . . . . . . . . . . . . . . . . . . . . . . . . . . . . . . . . . . . . . . . . . . . . . . . . . . . . . . . . . . 49
70.2 Display Intensity . . . . . . . . . . . . . . . . . . . . . . . . . . . . . . . . . . . . . . . . . . . . . . . . . . . . 49
70.3 Fan Speed . . . . . . . . . . . . . . . . . . . . . . . . . . . . . . . . . . . . . . . . . . . . . . . . . . . . . . . . . . 50
80.1 Serial Number . . . . . . . . . . . . . . . . . . . . . . . . . . . . . . . . . . . . . . . . . . . . . . . . . . . . . . . . . . . 50
80.2 SW Version. . . . . . . . . . . . . . . . . . . . . . . . . . . . . . . . . . . . . . . . . . . . . . . . . . . . . . . . . . 50
91.1 Recall Preset . . . . . . . . . . . . . . . . . . . . . . . . . . . . . . . . . . . . . . . . . . . . . . . . . . . . . . . . . . . . 50
92.1 Store Preset . . . . . . . . . . . . . . . . . . . . . . . . . . . . . . . . . . . . . . . . . . . . . . . . . . . . . . . . . . . . . 51
99.0 Factory Reset. . . . . . . . . . . . . . . . . . . . . . . . . . . . . . . . . . . . . . . . . . . . . . . . . . . . . . . . . . . . 51
MEDIA Menu Parameters . . . . . . . . . . . . . . . . . . . . . . . . . . . . . . . . . . . . . . . . . . . . . . . . . . . . .
. . . .
51
12.1 Media State . . . . . . . . . . . . . . . . . . . . . . . . . . . . . . . . . . . . . . . . . . . . . . . . . . . . . . . . . .
. . . 51

CION v1.3r2 www.aja.com
4
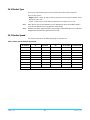
14.1 Encode Type . . . . . . . . . . . . . . . . . . . . . . . . . . . . . . . . . . . . . . . . . . . . . . . . . . . . . . . . . . . . 52
15.1 Play Media . . . . . . . . . . . . . . . . . . . . . . . . . . . . . . . . . . . . . . . . . . . . . . . . . . . . . . . . . . . . . . 52
15.2 Loop Play . . . . . . . . . . . . . . . . . . . . . . . . . . . . . . . . . . . . . . . . . . . . . . . . . . . . . . . . . . . 53
15.3 Playlist. . . . . . . . . . . . . . . . . . . . . . . . . . . . . . . . . . . . . . . . . . . . . . . . . . . . . . . . . . . . . . 53
15.4 Dropped Frames . . . . . . . . . . . . . . . . . . . . . . . . . . . . . . . . . . . . . . . . . . . . . . . . . . . . 53
16.1 Format Media . . . . . . . . . . . . . . . . . . . . . . . . . . . . . . . . . . . . . . . . . . . . . . . . . . . . . . . . . . . 53
16.2 Delete Clips . . . . . . . . . . . . . . . . . . . . . . . . . . . . . . . . . . . . . . . . . . . . . . . . . . . . . . . . . 53
16.25 Delete Clip: <Clip name appears here> . . . . . . . . . . . . . . . . . . . . . . . . . . . . . 54
17.0 Preset Reel Name. . . . . . . . . . . . . . . . . . . . . . . . . . . . . . . . . . . . . . . . . . . . . . . . . . . . . . . . 54
17.1 Camera Name. . . . . . . . . . . . . . . . . . . . . . . . . . . . . . . . . . . . . . . . . . . . . . . . . . . . . . . 54
17.2 Clip Name . . . . . . . . . . . . . . . . . . . . . . . . . . . . . . . . . . . . . . . . . . . . . . . . . . . . . . . . . . 55
17.3 Clip Number . . . . . . . . . . . . . . . . . . . . . . . . . . . . . . . . . . . . . . . . . . . . . . . . . . . . . . . . 55
17.4 Clip Append . . . . . . . . . . . . . . . . . . . . . . . . . . . . . . . . . . . . . . . . . . . . . . . . . . . . . . . . 55
17.5 Alpha Append . . . . . . . . . . . . . . . . . . . . . . . . . . . . . . . . . . . . . . . . . . . . . . . . . . . . . . 55
17.6 Take . . . . . . . . . . . . . . . . . . . . . . . . . . . . . . . . . . . . . . . . . . . . . . . . . . . . . . . . . . . . . . . . 56
17.7 Combined Name. . . . . . . . . . . . . . . . . . . . . . . . . . . . . . . . . . . . . . . . . . . . . . . . . . . . 56
19.1 Use Custom Clip Name . . . . . . . . . . . . . . . . . . . . . . . . . . . . . . . . . . . . . . . . . . . . . . . . . . 56
19.2 Custom Clip Name . . . . . . . . . . . . . . . . . . . . . . . . . . . . . . . . . . . . . . . . . . . . . . . . . . 57
19.4 Custom Take . . . . . . . . . . . . . . . . . . . . . . . . . . . . . . . . . . . . . . . . . . . . . . . . . . . . . . . . 57
22.1 Gang Clip Name . . . . . . . . . . . . . . . . . . . . . . . . . . . . . . . . . . . . . . . . . . . . . . . . . . . . . . . . . 57
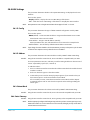
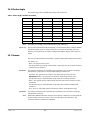
FPS Menu Parameters . . . . . . . . . . . . . . . . . . . . . . . . . . . . . . . . . . . . . . . . . . . . . . . . . . . . . . . . . . . . 57
23.1 Format. . . . . . . . . . . . . . . . . . . . . . . . . . . . . . . . . . . . . . . . . . . . . . . . . . . . . . . . . . . . . . .
. . . 57
23.2 Frame Rate. . . . . . . . . . . . . . . . . . . . . . . . . . . . . . . . . . . . . . . . . . . . . . . . . . . . . . . . . . . . . . 58
23.3 Slow Motion . . . . . . . . . . . . . . . . . . . . . . . . . . . . . . . . . . . . . . . . . . . . . . . . . . . . . . . . . . . . 58
Special Considerations for Format and Frame Rate Selections . . . . . . . . . . . . . 59
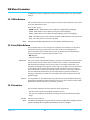
EI Menu Parameters . . . . . . . . . . . . . . . . . . . . . . . . . . . . . . . . . . . . . . . . . . . . . . . . . . . . . . . . . .
.
. . . 60
24.1 EI . . . . . . . . . . . . . . . . . . . . . . . . . . . . . . . . . . . . . . . . . . . . . . . . . . . . . . . . . . . . . . .
. . . . . . . . 60
24.2 Shutter Type . . . . . . . . . . . . . . . . . . . . . . . . . . . . . . . . . . . . . . . . . . . . . . . . . . . . . . . . . . . . 61
24.3 Shutter Speed . . . . . . . . . . . . . . . . . . . . . . . . . . . . . . . . . . . . . . . . . . . . . . . . . . . . . . . . . . . 61
24.3 Shutter Angle . . . . . . . . . . . . . . . . . . . . . . . . . . . . . . . . . . . . . . . . . . . . . . . . . . . . . . . . . . . 62
24.7 Gamma . . . . . . . . . . . . . . . . . . . . . . . . . . . . . . . . . . . . . . . . . . . . . . . . . . . . . . . . . . . . . . . . . 62
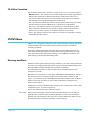
WB Menu Parameters. . . . . . . . . . . . . . . . . . . . . . . . . . . . . . . . . . . . . . . . . . . . . . . . . . . . . . . . .
.
. . . 63
25.1 White Balance . . . . . . . . . . . . . . . . . . . . . . . . . . . . . . . . . . . . . . . . . . . . . . . . . . . . . . . . . . .
63
25.2 Auto White Balance . . . . . . . . . . . . . . . . . . . . . . . . . . . . . . . . . . . . . . . . . . . . . . . . . . . . . 63
25.3 Saturation. . . . . . . . . . . . . . . . . . . . . . . . . . . . . . . . . . . . . . . . . . . . . . . . . . . . . . . . . . . . . . . 63
25.4 Color Correction. . . . . . . . . . . . . . . . . . . . . . . . . . . . . . . . . . . . . . . . . . . . . . . . . . . . . . . . . 64
STATUS Menu . . . . . . . . . . . . . . . . . . . . . . . . . . . . . . . . . . . . . . . . . . . . . . . . . . . . . . . . . . .
.
. . . . . . . . 64
Warnings and Alerts. . . . . . . . . . . . . . . . . . . . . . . . . . . . . . . . . . . . . . . . . . . . . . . . . . . . . . . . . . 64
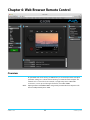
Chapter 6: Web Browser Remote Control . . . . . . . . . . . . . . . . . . . . . . .66
Overview. . . . . . . . . . . . . . . . . . . . . . . . . . . . . . . . . . . . . . . . . . . . . . . . . . . . . . . . . . . . . . . . . . . . . . . . . 66
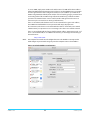
Operations Unique to the Web UI . . . . . . . . . . . . . . . . . . . . . . . . . . . . . . . . . . . . . . . . . . . . . . . . . 71
Up
dating Firmware . . . . . . . . . . . . . . . . . . . . . . . . . . . . . . . . . . . . . . . . . . . . . . . . . . . . . . . . . . 71
Prese
ts. . . . . . . . . . . . . . . . . . . . . . . . . . . . . . . . . . . . . . . . . . . . . . . . . . . . . . . . . . . . . . . . . . . . . . . 73
Gang Recording with Multiple CIONs . . . . . . . . . . . . . . . . . . . . . . . . . . . . . . . . . . . . . . . . . 74
Data Transfer via LAN . . . . . . . . . . . . . . . . . . . . . . . . . . . . . . . . . . . . . . . . . . . . . . . . . . . . . . . . 76
Playlists. . . . . . . . . . . . . . . . . . . . . . . . . . . . . . . . . . . . . . . . . . . . . . . . . . . . . . . . . . . . . . . . . . . . . . 78
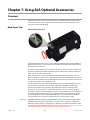
Chapter 7: Using AJA Optional Accessories . . . . . . . . . . . . . . . . . . . . .81
Overview. . . . . . . . . . . . . . . . . . . . . . . . . . . . . . . . . . . . . . . . . . . . . . . . . . . . . . . . . . . . . . . . . . . . . . . . . 81
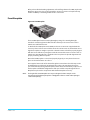
Back-Focus Tool. . . . . . . . . . . . . . . . . . . . . . . . . . . . . . . . . . . . . . . . . . . . . . . . . . . . . . . . . . .
. . . 81
Front Baseplate . . . . . . . . . . . . . . . . . . . . . . . . . . . . . . . . . . . . . . . . . . . . . . . . . . . . . . . . . . . . . . 82
Rear Baseplate . . . . . . . . . . . . . . . . . . . . . . . . . . . . . . . . . . . . . . . . . . . . . . . . . . . . . . . . . . . . . . . 83
Upper Rod Clamp . . . . . . . . . . . . . . . . . . . . . . . . . . . . . . . . . . . . . . . . . . . . . . . . . . . . . . . . . . . . 83

CION v1.3r2 www.aja.com
5
9” Extension Arm. . . . . . . . . . . . . . . . . . . . . . . . . . . . . . . . . . . . . . . . . . . . . . . . . . . . . . . . . . . . . 84
6” Extension Arm. . . . . . . . . . . . . . . . . . . . . . . . . . . . . . . . . . . . . . . . . . . . . . . . . . . . . . . . . . . . . 84
Rod-Rosette Mount . . . . . . . . . . . . . . . . . . . . . . . . . . . . . . . . . . . . . . . . . . . . . . . . . . . . . . . . . . 84
VCT-WEDGE. . . . . . . . . . . . . . . . . . . . . . . . . . . . . . . . . . . . . . . . . . . . . . . . . . . . . . . . . . . . . . . . . . 85
VCT-HEEL . . . . . . . . . . . . . . . . . . . . . . . . . . . . . . . . . . . . . . . . . . . . . . . . . . . . . . . . . . . . . . . . . . . . 85
VCT-HEEL-RBP . . . . . . . . . . . . . . . . . . . . . . . . . . . . . . . . . . . . . . . . . . . . . . . . . . . . . . . . . . . . . . . 85
Viewfinder Mount. . . . . . . . . . . . . . . . . . . . . . . . . . . . . . . . . . . . . . . . . . . . . . . . . . . . . . . . . . . . 86
LANC Collar . . . . . . . . . . . . . . . . . . . . . . . . . . . . . . . . . . . . . . . . . . . . . . . . . . . . . . . . . . . . . . . . . . 86
Coiled LANC Cable . . . . . . . . . . . . . . . . . . . . . . . . . . . . . . . . . . . . . . . . . . . . . . . . . . . . . . . . . . . 87
Short LANC Cable . . . . . . . . . . . . . . . . . . . . . . . . . . . . . . . . . . . . . . . . . . . . . . . . . . . . . . . . . . . . 87
7-inch 15mm Rod . . . . . . . . . . . . . . . . . . . . . . . . . . . . . . . . . . . . . . . . . . . . . . . . . . . . . . . . . . . . 87
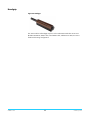
Handgrip . . . . . . . . . . . . . . . . . . . . . . . . . . . . . . . . . . . . . . . . . . . . . . . . . . . . . . . . . . . . . . . . . . . . 88
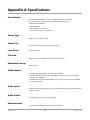
Appendix A: Specifications . . . . . . . . . . . . . . . . . . . . . . . . . . . . . . . . . . . .89
User Interface . . . . . . . . . . . . . . . . . . . . . . . . . . . . . . . . . . . . . . . . . . . . . . . . . . . . . . . . . . . . . . . . 89
Sensor Type. . . . . . . . . . . . . . . . . . . . . . . . . . . . . . . . . . . . . . . . . . . . . . . . . . . . . . . . . . . . . . . . . . 89
Sensor Size . . . . . . . . . . . . . . . . . . . . . . . . . . . . . . . . . . . . . . . . . . . . . . . . . . . . . . . . . . . . . . . . . . 89
Lens Mount . . . . . . . . . . . . . . . . . . . . . . . . . . . . . . . . . . . . . . . . . . . . . . . . . . . . . . . . . . . . . .
.
. . . 89
Filtration. . . . . . . . . . . . . . . . . . . . . . . . . . . . . . . . . . . . . . . . . . . . . . . . . . . . . . . . . . . . .
. . . . . . . . 89
Removable Storage . . . . . . . . . . . . . . . . . . . . . . . . . . . . . . . . . . . . . . . . . . . . . . . . . . . . . . . . . . 89
Video Outputs . . . . . . . . . . . . . . . . . . . . . . . . . . . . . . . . . . . . . . . . . . . . . . . . . . . . . . . . . . . . . . . 89
Audio Inputs . . . . . . . . . . . . . . . . . . . . . . . . . . . . . . . . . . . . . . . . . . . . . . . . . . . . . . . . . . . . . . . . . 89
Audio Output . . . . . . . . . . . . . . . . . . . . . . . . . . . . . . . . . . . . . . . . . . . . . . . . . . . . . . . . . . . . . . . . 89
Reference Input . . . . . . . . . . . . . . . . . . . . . . . . . . . . . . . . . . . . . . . . . . . . . . . . . . . . . . . . . . . . . . 89
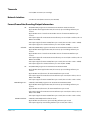
Timecode . . . . . . . . . . . . . . . . . . . . . . . . . . . . . . . . . . . . . . . . . . . . . . . . . . . . . . . . . . . . . . . . . . . . 90
Network Interface . . . . . . . . . . . . . . . . . . . . . . . . . . . . . . . . . . . . . . . . . . . . . . . . . . . . . . . . . . . . 90
Format/Frame Rate/Encoding/Output Information . . . . . . . . . . . . . . . . . . . . . . . . . . . . 90
Exposure Index . . . . . . . . . . . . . . . . . . . . . . . . . . . . . . . . . . . . . . . . . . . . . . . . . . . . . . . . . . . . . . 91
White Balance . . . . . . . . . . . . . . . . . . . . . . . . . . . . . . . . . . . . . . . . . . . . . . . . . . . . . . . . . . . . . . . 91
Weight . . . . . . . . . . . . . . . . . . . . . . . . . . . . . . . . . . . . . . . . . . . . . . . . . . . . . . . . . . . . . . . . . . . . . . 91
Power . . . . . . . . . . . . . . . . . . . . . . . . . . . . . . . . . . . . . . . . . . . . . . . . . . . . . . . . . . . . . . . . . . . . . . . 91
Temperature Range . . . . . . . . . . . . . . . . . . . . . . . . . . . . . . . . . . . . . . . . . . . . . . . . . . . . . . . . . . 91
Dimensions . . . . . . . . . . . . . . . . . . . . . . . . . . . . . . . . . . . . . . . . . . . . . . . . . . . . . . . . . . . . . . . . . . 92
Appendix B: Safety and Compliance . . . . . . . . . . . . . . . . . . . . . . . . . . . .97
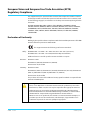
Federal Communications Commission (FCC) Compliance Notices . . . . . . . . . . . . . . . . . . 97
Class B Interference Statement . . . . . . . . . . . . . . . . . . . . . . . . . . . . . . . . . . . . . . . . . . . . . . . 97
FCC Cau
tion . . . . . . . . . . . . . . . . . . . . . . . . . . . . . . . . . . . . . . . . . . . . . . . . . . . . . . . . . . . . . . . . . 97
Canadian ICES Statement . . . . . . . . . . . . . . . . . . . . . . . . . . . . . . . . . . . . . . . . . . . . . . . . . . . . . .
. . . 97
European Union and European Free Trade Association (EFTA)
Regulatory Compliance. . . . . . . . . . . . . . . . . . . . . . . . . . . . . . . . . . . . . . . . . . . . . . . . . . . . . . . . . . . 98
Declaration of Conformity . . . . . . . . . . . . . . . . . . . . . . . . . . . . . . . . . . . . . . . . . . . . . . . . . . . . 98
Re
cycling Notice . . . . . . . . . . . . . . . . . . . . . . . . . . . . . . . . . . . . . . . . . . . . . . . . . . . . . . . . .
. . . . . . . . 99
Korea KCC Compliance Statement . . . . . . . . . . . . . . . . . . . . . . . . . . . . . . . . . . . . . . . . . . . . . . . . 99
Taiwan Compliance Statement . . . . . . . . . . . . . . . . . . . . . . . . . . . . . . . . . . . . . . . . . . . . . . . . . . . 99
Ja
panese Compliance Statement . . . . . . . . . . . . . . . . . . . . . . . . . . . . . . . . . . . . . . . . . . . . . . . . . 99
Tr
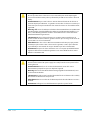
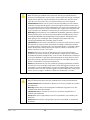
anslated Warning and Caution Messages. . . . . . . . . . . . . . . . . . . . . . . . . . . . . . . . . . . . . . . 100
Before Operation Please Read These Instructions . . . . . . . . . .
. . . . . . . . . . . . . . . . . . . . . . . 100
Warranty and Liability Information. . . . . . . . . . . . . . . . . . . . . . . . . . . 106
Limited Warranty. . . . . . . . . . . . . . . . . . . . . . . . . . . . . . . . . . . . . . . . . . . . . . . . . . . . . . . . . . . . . . . . 106
Limitation of Liability . . . . . . . . . . . . . . . . . . . . . . . . . . . . . . . . . . . . . . . . . . . . . . . . . . . . . . . . .
. . . 107
Index. . . . . . . . . . . . . . . . . . . . . . . . . . . . . . . . . . . . . . . . . . . . . . . . . . . . . . . 108

CION v1.3r2 www.aja.com
6
Notices
Trademarks
AJA® and Because it matters.® are registered trademarks of AJA Video Systems, Inc. for use with
most AJA products. AJA™ is a trademark of AJA Video Systems, Inc. for use with recorder, router,
software and camera products. Because it matters.™ is a trademark of AJA Video Systems, Inc. for
use with camera products.
CION®, Corvid Ultra®, lo®, Ki Pro®, KONA®, KUMO®, ROI® and T-Tap® are registered trademarks of AJA
Video
Systems, Inc.
AJA Control Room™, FiDO™, KiStor™, Science of the Beautiful™, TruScale™, TruZoom™, V2Analog™
and V2Digital™ are trademar
ks of AJA Video Systems, Inc.
AirPort, Apple, Apple logo, AppleShare, AppleTalk, FireWire, iPod, iPod touch, Mac, Macintosh and
ProRes, are registered trademarks of Apple Inc. Final Cut Pro, QuickTime and QuickTime logo are
trademarks of Apple Inc.
Avid, Avid DNxHD and Media Composer are registered trademarks of Avid Technology, Inc.
Adobe is a registered trademark of Adobe Systems Incorpor
ated in the United States and/or other
countries.
HDMI, the HDMI logo and High-Definition Multimedia Interface are trademarks or registered
trademarks of HDMI Licensing, LLC.
DVI is a registered trademark of DDWG.
TASCAM is a registered trademark of TEAC C
orporation.
Dolby and the double-D Dolby logo are registered trademarks of Dolb
y Laboratories Licensing
Corporation.
All other trademarks are the property of their respective holders.
Copyright
Copyright © 2016 AJA Video Systems, Inc. All rights reserved. All information in this
manual is subject to change without notice. No part of the document may be
reproduced or transmitted in any form, or by any means, electronic or mechanical,
including photocopying or recording, without the express written permission of AJA
Video Systems, Inc.
Contacting Support
When calling for support, have all information at hand prior to calling. To contact AJA for
sales or support, use any of the following methods:
Telephone: +1.530.271.3190
FAX: +1.530.271.3140
Web: http://www.aja.com
Support Email: suppor[email protected]
Sales Email: [email protected]

CION v1.3r2 www.aja.com
7
Chapter 1: Introduction
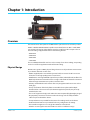
Overview
This manual covers the operation of CION and the optional accessories for the product.
CION is a 4K/Ultra HD/2K/1080 HD capable camera that features an APS-C sized CMOS
sensor w
ith an electronic global shutter. It may be used for live video output or the on-
board recording of Apple ProRes files to the following formats:
• 4096x2160
• 3840x2160
• 2048x1080
• 1920x1080
The recorded QuickTime files can be used in a variety of non-linear editing
, compositing
and color correction applications without file transcoding.
Physical Design
Attention was given to CION's physical design because not all production environments
or production demands are the same.
• CION is supplied with a removable PL (positive lock) le
ns mount. The PL lens mount
allows the use of high-quality prime or zoom lenses.
• CION features an integrated OLPF (optical low pass filter) and IR (infrared) cut filter. The
OLPF helps eliminate undesira
ble moire in images and the IR cut eliminates unwanted
infrared image contamination to produce accurate colors.
• Industry standard hirth-tooth rosettes allow easy integration with accessories such as
ha
nd grips.
• The top and bottom of the body feature removable c
heese plates with multiple
threaded holes so that accessories, like the AJA-supplied top handle, may be easily
attached to the unit.
• The use of magnesium body panels makes the unit ex
ceptionally lightweight yet rigid.
• No proprietary connectors have been used in the design so that readily-available
cables may be used with the device.
•
Transport buttons are provided for the review of recordings ma
de on the device.
• Dedicated menu buttons are provided for the easy
configuration of settings.
• User interface navigation is via a single User
Interface Control Knob.
• A built-in screen supplies menu information as we
ll as a confidence image.

CION v1.3r2 www.aja.com
8
Hardware Connectivity
An array of audio and video connectors make integrating CION with other products easy:
•4x 3G SDI/HD-SDI Outputs (4x BNC connectors)
•2
x 3G SDI/HD-SDI Monitor Outputs (1x front mounted BNC conne
ctor, 1x rear mounted
BNC connector
• 1x HDMI v1.4 Output (rear mounted HDMI v1.
4 Type A connector)
• 1x HDMI v1.3 Output (front mounted HDMI v1.3 Type A connector)
• 2
x Balanced Analog Audio Inputs ((2x 3-pin XLR connectors with line/mic/48v selection
switch per input)
• 1x Reference (BNC connector, analog color black)
• 1x LTC (BNC connector, 0.5 to 4.5Vpp)
• 1x USB (Type A connector, v2.0)
• 2x LANC (1x 2.5mm top connector and 1x 2.5mm side conn
ector)
• 1x 2-pin Power Output Connector (top front mounted, 10W recommended maximum)
• 1x 4-pin
XLR Power Input Connector (12-18Vdc, 5A max)
• 1x 2-pin Power Input Connector (12-18Vdc, 5A max)
• 1x LAN (RJ45 connector, 10/100/1000)
• 1x Thunderbolt (Mini Display Port con
nector, Thunderbolt v1)
• 1x Headphone Jack (3.5mm stereo mini TRS)
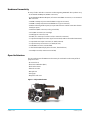
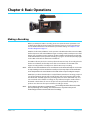
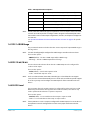
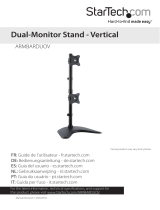
Open Architecture
The open architecture of CION means that it may be used with a wide variety of third-
party accessories:
•PL mount lenses
• Electronic viewfinders (EVFs)
• On-board monitors
• External recorders
• Microphones
•Hand grips
• Baseplates and more
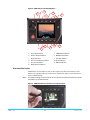
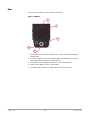
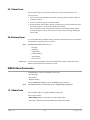
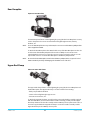
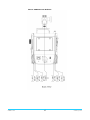
Figure 1.
Fully-outfitted CION

CION v1.3r2 www.aja.com
9
Functionality
The following is only a partial list of CION's capabilities:
• The global shutter means that footage is free from the unwanted effects of
rolling
shutter artifacts such as skewing or “jello”
• Records Apple ProRes files to removable Pak media
• R
ecords standard frame rates or may be configured to re
cord time-lapse or slow
motion
• Outputs baseband video or raw via SDI
• CION may be controlled from the front panel UI or remotely via
a web browser
interface
• Control the recordings of multiple CIONs simultaneously via the
web browser interface
• Upload or download files via the LAN connection and the web browser interface
• 20 system presets may be stored or recalled making insta
nt custom configuration easy
• User feedback, including alarms and alerts, is supplied on the User Inte
rface Screen
• Superimposed information, such as timecode, transport state, shutter setting, exposure
index
value, voltage, etc. may be displayed on the monitor outputs via a user selection
• Histogram information is provided as an aid
for proper exposure
• Physical VU meters as well as an option for superimposed VU meters on the video
output aids with setting proper audio levels
Physical Layout
The following section will help you familiarize yourself with the physical components of
CION referenced throughout the rest of this manual.
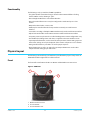
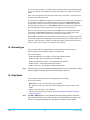
Front
The front of the unit features the PL Lens Mount and the Back Focus Access Door.
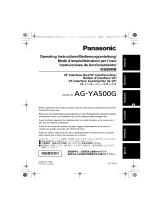
Figure 2. CION Front
2
3
1
1. Back Focus Access Door
2. PL Lens Mount
3. PL Lens Mount Cover

CION v1.3r2 www.aja.com
10
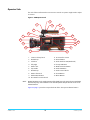
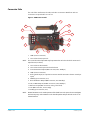
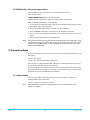
Operator Side
This side of the unit features the various menu controls an operator might need to adjust
or monitor.
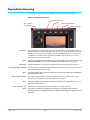
Figure 3. CION Operator Side
4
6
5
7
8
15
16
17
18
19
14
3
2
1
10
9
11
12
13
1. 15mm rod clamp knob
2. Rod End Cap
3. Cold Shoe
4. Tally Light
5. LANC Collar
6. Top Handle
7. Rod End Cap
8. LANC Collar Knob
9. STATUS Menu Button
10. User Interface Control Knob
11. User Interface Screen
12. Record Button
13. Hirth-Tooth Rosette (M6 thread)
14. Transport Buttons
15. Media Unmount Button
16. Audio VU Meters
17. Audio Control Knobs
18. Power Button
19. Menu Buttons
NOTE: Natural variations in the wooden portion of the handle are
to be expected since wood grain
and stain may vary. Color variations in the shoulder pad are also possible due to the use of
natural material.
Figure 4 on page 11 provides an expanded view of the Transport and Menu buttons.

CION v1.3r2 www.aja.com
11
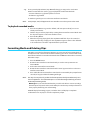
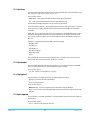
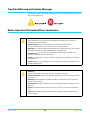
Figure 4. CION Transport and Menu Buttons
2
1
3
5
6
4
7
11
8
10
9
1. Status Menu Button
2. Reverse Playback Button
3. Playback Button
4. Fast Forward Playback Button
5. Stop (Pause) Button
6. Media Unmount Button
7. CONFIG Menu Button
8. MEDIA Menu Button
9. FPS Menu Button
10. EI Menu Button
11. WB Menu Button
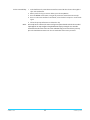
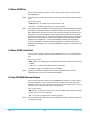
User Interface Screen
CION features a User Interface Screen on the operator side. This User Interface Screen
features not only information about the status of the device, but also menu information
and a confidence image.
NOTE: The confidence image is not intended to act as a substitute for a more
full-featured electronic
viewfinder or an on-board monitor.
Figure 5. CION Onboard User-Interface Screen and Controls

CION v1.3r2 www.aja.com
12
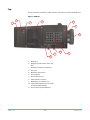
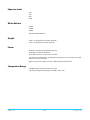
Connector Side
This side of the unit features the audio and video connections. Both front and rear
connections are provided for ease of use.
Figure 6. CION Connector Side
5
2
1
3
4
6
7
13
8
11
12
10
9
1. LANC (2.5mm connector)
2. Sensor Plane Post/Tape Hook
NOTE: The Sensor Plane Post/Tape Hook may be positioned on either the side of the unit or on the
top of t
he unit (as shown)
3. Sensor Plane Indicator Mark
4. Sensor Plane Post/Tape Hook Threaded Insert
5. Front SDI Monitor Output (BNC connector, 3G/1.485Gbps)
6. LANC (2.5mm connector)
7. Analog Audio Input (2x 3-pin XLR connectors with line/mic/48v selection switch per
input)
8. HDMI (Type A connector, v1.4)
9. Rear SDI Monitor Output (BNC connector, 3G/1.485Gbps)
10. SDI 1-4 Main Outputs (4x BNC connectors, 3G/1.485Gbps)
11. Reference Input (BNC connector, analog color black)
12. LTC (BNC connector, 0.5 to 4.5Vpp)
13. USB (Type A connector, v2.0)
NOTE: Natural variations in the wooden portion of the handle ar
e to be expected since wood grain
and stain may vary. Color variations in the shoulder pad are also possible due to the use of
natural material.

CION v1.3r2 www.aja.com
13
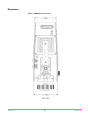
Top
The top side of the unit features audio and video connections as well as the Media Slot
Figure 7. CION Top
3
5
7
4
6
1
2
9
10
11
8
.
1. Media Slot
2. Headphone Jack (3.5mm stereo mini
TRS)
3. Headphone Volume Control Knob
4. Fan Cover
5. Back Focus Access Door
6. PL Lens Mount
7. PL Lens Mount Cover
8. LANC (2.5mm connector)
9. HDMI (Type A connector, v1.3)
10. 2-pin Power Output Connector (10W
rec
ommended maximum)
11. Cheese Plate Top Handle Mount

CION v1.3r2 www.aja.com
14
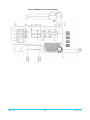
Bottom
The bottom of the unit features threaded holes for mounting the unit to baseplates or
tripods directly.
Figure 8. CION Bottom Mounts
3
2
1
4
1. Removable cheese plate with 1/4-20 and 3/8-16 threaded holes and guide pin holes
(The cheese plate is attached via 1/4-20 cap screws, 3/16 hex heads)
2. 1/4-20 threaded holes with 9mm center-to-center spacing
3. Removable shoulder pad (attached via 1/4-20
cap screws, 3/16 hex heads)
4. Rear heel 1/4-20 threaded inserts
NOTE: Color variations in the shoulder pad are possible du
e to the use of natural material.

CION v1.3r2 www.aja.com
15
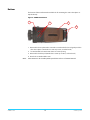
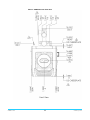
Rear
The rear of the unit features power and data connections:
Figure 9. CION Rear
1
2
3
4
5
1. Standard Rear Door (an Alternate Rear Door is used when attaching the Battery
Adapter Plate)
2. 2-pin Power Input Connector (housed behind the Standard Rear Door, used for
interf
acing with battery plates, 12-18Vdc, 5A max)
3. Thunderbolt Connector (Mini Display Port connector, Thunderbolt 1)
4. LAN connector (RJ45 connector, 10/100/1000)
5. 4-pin XLR Power Connector (12-18Vdc 4-pin XLR connector, 5A max)

CION v1.3r2 www.aja.com
16
Chapter 2: Making Basic Connections
Overview
Before you operate CION, familiarize yourself with all of the operational guidelines and
menu parameters presented in this manual. This section covers making basic
connections to CION prior to use.
Supplying Power to CION
CION may be powered by the AJA-supplied AC/DC power supply or a third-party battery
solution. Using the AC/DC power supply for CION may be appropriate for environments
where AC power is readily available, such as a studio setting. CION's operational voltage
range is 12 to 18 Vdc.
NOTE: Do not supply excess voltage to CION. To properly operate CION, be sure to supply voltage
within the specified 12 to 18 V
dc range.
Connecting an AJA AC/DC Power Supply to CION
Tools needed: None
Parts needed: AJA AC/DC power supply and line cord.
1. Connect the line cord to the AC/DC power supply and then plug the line cord into a
power
outlet. A green indicator light will illuminate on the power supply if it is
receiving power.
2. Connect the 4-pin XLR connector on the power supply to the 4-pin XLR connector on
the re
ar of CION
Connecting a Battery Plate to CION
Tools needed: Torx T10, Hex 3/32 and Phillips #2 (Note: These tools are not supplied with
the product.)
Parts needed: AJA-supplied Alternate Rear Door, 4x T10
Torx screws, 3x 4-40 cap screws,
Battery Adapter Plate and third-party battery plate. (Note: The third-party battery plate is
not supplied with the product.)
For non-studio use, you may wish to connect
a battery to CION. AJA supplies the
necessary screws to mount the AJA-supplied Battery Adapter Plate to CION. This Battery
Adapter Plate has threaded holes that allow a variety of third-party professional battery
plate solutions to be connected to it.
1. To connect the Battery Adapter Plate to CION, first re
move the Standard Rear Door of
the unit. Set aside the 4x Torx T10 screws from the Standard Rear Door as they will be
needed to attach the Alternate Rear Door.
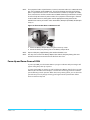
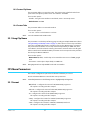
2. Attach the Alternate Rear Door using the 4x Torx T10 screws being sure to allow the
2-pin power lead to protrude through the opening as pictured in Figure 10 on page
17.

CION v1.3r2 www.aja.com
17
NOTE: The 2-pin power lead is a Tyco Electronics (172165-1) connector with two (1-7709870-0) crimp
pins. These crimp pins accept 20AWG wire. The expected mating connector on the battery
plates is a Tyco Electronics (172233-1) connector with two (170366-1) crimp pins (or similar).
These connectors are referred to as Mini Universal MATE-N-LOCK by Tyco Electronics, but may
be referred to by other names by other vendors. This 2-pin power connector type is common
to various ENG cameras so battery plates with the appropriate mating connector are
available from a variety of vendors such as Anton Bauer (Example: QR-DP800), IDX (Example:
P-V2), etc.
Figure 10. Alternate Rear Door & 2-Pin Power Lead
3. Attach the Battery Adapter Plate using the 3x 4-40 cap screws.
4. Attach the third-party battery plate to the Battery Adapter Plate.
NOTE: Requires third-party supplied battery plate and M3 thr
eaded screws.
NOTE: You may elect to connect the Battery Adapter Plate and the thir
d-party battery plate once
and then leave them connected to the unit for future ease of use.
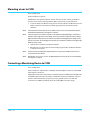
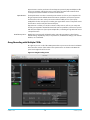
Power Up and Power Down of CION
To power up CION, press the Power Button. A progress indication with percentages will
appear during the power up sequence.
To power down CION, you must press and hold the Pow
er Button down for three seconds
while the User Interface Screen displays a count down. This design prevents accidental
power-off during normal operation. When the unit is powering down, you can abort the
power-down process by simply removing your finger from the power button before
three seconds have elapsed.

CION v1.3r2 www.aja.com
18
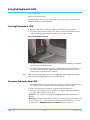
Mounting a Lens to CION
Tools needed: None
Parts needed: PL mount lens.
CION features a PL (positive lock) lens mount. This lens mount is robust, yet simple to
oper
ate. Lenses may be exchanged when CION is powered up or powered down.
1. To remove the PL Lens Mount Cover, place one hand on the PL Lens Mount Cover and
with th
e other hand, turn the outer locking ring of the PL Lens Mount counter
clockwise.
NOTE: Limit the amount of time that the PL Lens Mount Cov
er or a lens is not attached to CION to
avoid dust and other debris entering the lens mount.
NOTE: Some PL mount lenses will have a notch in each of their four pronged flanges, while others
will have onl
y a single notch in one flange. If your lens only has a single notch in one flange,
align this notch with the pin inside of the PL Lens Mount accordingly prior to sliding the lens
into the lens mount. The locating pin inside of the PL Lens Mount is located on the upper right
hand side of the mount.
2. Slide the lens into the PL Lens Mount carefully.
3. Once the lens is in place, turn the outer locking ring of the PL Lens Mount clockwise
to lock t
he lens in place.
NOTE: Do not remove your hand from supporting the lens until you are confident that the lens is
secured in the PL L
ens Mount.
NOTE: With heavier lenses (lenses in excess of approximately
5.5 lbs/2.5 kg), the use of a third-party
lens support is required.
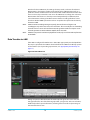
Connecting a Monitoring Device to CION
Tools needed: None
Parts needed: User supplied 3G or 1.485Gbps SDI cables (BN
C connectors) and/or HDMI
cables (type A connectors).
CION may be used with a wide variety of monitoring devices. CION features multiple SDI
and H
DMI output connectors that may be attached to electronic viewfinders, onboard
monitors, off-board monitors, projectors, etc. As a general rule, the use of the SDI
connections on CION are preferred due to the locking BNC connector design.

CION v1.3r2 www.aja.com
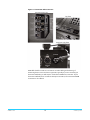
19
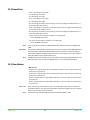
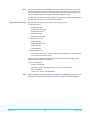
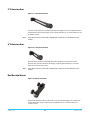
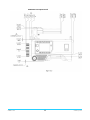
Figure 11. Front & Rear Video Connector
Connectors side, rear
Connectors side, front
Top, front
CION offers both front and rear connections to make cabling and balancing of
monitoring devices easier and more ergonomic. Typically, if you are connecting an
electronic viewfinder, you will want to use the front SDI Monitor connector. If your
electronic viewfinder does not offer an SDI input connection, a front mounted HDMI
connection is also offered.

CION v1.3r2 www.aja.com
20
NOTE: CION is capable of outputting a wide variety of formats and frame rates. Not all electronic
viewfinders or monitors support all of the possible formats and frame rates. Be sure to consult
the specifications for your electronic viewfinder or monitor.
If the electronic viewfinder has an external power input, you may find it useful to power
the electr
onic viewfinder from the CION 2-Pin Power Connector located near the front of
the device on the top of the unit. Many electronic viewfinders will come supplied with an
appropriate power cable to connect to CION as part of their standard accessory package.
NOTE: If you do elect to connect an electronic viewfinder power cable to the CION 2-Pin Power
Connector
, be sure to carefully note the orientation of CION's 2-Pin Power Connector and your
cable as well as any polarity markings prior to making a connection.
NOTE: Some power connector cables may have cabling layouts that makes the simultaneous use of
the front HDMI
port difficult or even impossible. If this is the case, you may alternately use the
rear HDMI connector on CION for an HDMI electronic viewfinder.
NOTE: If you do power your electronic viewfinder or monitor using the CION 2-Pin Power Connector,
be aware that
if you power down CION, power will still be provided via this connection so to
conserve battery life, be sure to power down the electronic viewfinder or monitor when CION
is powered down.
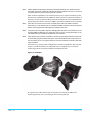
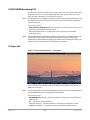
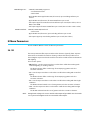
Since there are so many possible configurations of electronic viewfinders
and on-board
monitors, specific instructions for configuration are not supplied here. Consult your
monitoring product's manual for additional configuration details.
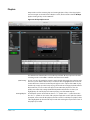
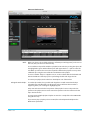
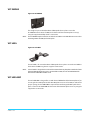
Figure 12. Viewfinders
As a general rule, make all of the power and video connections from CION to the
monitoring device(s) prior to powering up the monitoring device(s).
La pagina sta caricando ...
La pagina sta caricando ...
La pagina sta caricando ...
La pagina sta caricando ...
La pagina sta caricando ...
La pagina sta caricando ...
La pagina sta caricando ...
La pagina sta caricando ...
La pagina sta caricando ...
La pagina sta caricando ...
La pagina sta caricando ...
La pagina sta caricando ...
La pagina sta caricando ...
La pagina sta caricando ...
La pagina sta caricando ...
La pagina sta caricando ...
La pagina sta caricando ...
La pagina sta caricando ...
La pagina sta caricando ...
La pagina sta caricando ...
La pagina sta caricando ...
La pagina sta caricando ...
La pagina sta caricando ...
La pagina sta caricando ...
La pagina sta caricando ...
La pagina sta caricando ...
La pagina sta caricando ...
La pagina sta caricando ...
La pagina sta caricando ...
La pagina sta caricando ...
La pagina sta caricando ...
La pagina sta caricando ...
La pagina sta caricando ...
La pagina sta caricando ...
La pagina sta caricando ...
La pagina sta caricando ...
La pagina sta caricando ...
La pagina sta caricando ...
La pagina sta caricando ...
La pagina sta caricando ...
La pagina sta caricando ...
La pagina sta caricando ...
La pagina sta caricando ...
La pagina sta caricando ...
La pagina sta caricando ...
La pagina sta caricando ...
La pagina sta caricando ...
La pagina sta caricando ...
La pagina sta caricando ...
La pagina sta caricando ...
La pagina sta caricando ...
La pagina sta caricando ...
La pagina sta caricando ...
La pagina sta caricando ...
La pagina sta caricando ...
La pagina sta caricando ...
La pagina sta caricando ...
La pagina sta caricando ...
La pagina sta caricando ...
La pagina sta caricando ...
La pagina sta caricando ...
La pagina sta caricando ...
La pagina sta caricando ...
La pagina sta caricando ...
La pagina sta caricando ...
La pagina sta caricando ...
La pagina sta caricando ...
La pagina sta caricando ...
La pagina sta caricando ...
La pagina sta caricando ...
La pagina sta caricando ...
La pagina sta caricando ...
La pagina sta caricando ...
La pagina sta caricando ...
La pagina sta caricando ...
La pagina sta caricando ...
La pagina sta caricando ...
La pagina sta caricando ...
La pagina sta caricando ...
La pagina sta caricando ...
La pagina sta caricando ...
La pagina sta caricando ...
La pagina sta caricando ...
La pagina sta caricando ...
La pagina sta caricando ...
La pagina sta caricando ...
La pagina sta caricando ...
La pagina sta caricando ...
La pagina sta caricando ...
La pagina sta caricando ...
-
 1
1
-
 2
2
-
 3
3
-
 4
4
-
 5
5
-
 6
6
-
 7
7
-
 8
8
-
 9
9
-
 10
10
-
 11
11
-
 12
12
-
 13
13
-
 14
14
-
 15
15
-
 16
16
-
 17
17
-
 18
18
-
 19
19
-
 20
20
-
 21
21
-
 22
22
-
 23
23
-
 24
24
-
 25
25
-
 26
26
-
 27
27
-
 28
28
-
 29
29
-
 30
30
-
 31
31
-
 32
32
-
 33
33
-
 34
34
-
 35
35
-
 36
36
-
 37
37
-
 38
38
-
 39
39
-
 40
40
-
 41
41
-
 42
42
-
 43
43
-
 44
44
-
 45
45
-
 46
46
-
 47
47
-
 48
48
-
 49
49
-
 50
50
-
 51
51
-
 52
52
-
 53
53
-
 54
54
-
 55
55
-
 56
56
-
 57
57
-
 58
58
-
 59
59
-
 60
60
-
 61
61
-
 62
62
-
 63
63
-
 64
64
-
 65
65
-
 66
66
-
 67
67
-
 68
68
-
 69
69
-
 70
70
-
 71
71
-
 72
72
-
 73
73
-
 74
74
-
 75
75
-
 76
76
-
 77
77
-
 78
78
-
 79
79
-
 80
80
-
 81
81
-
 82
82
-
 83
83
-
 84
84
-
 85
85
-
 86
86
-
 87
87
-
 88
88
-
 89
89
-
 90
90
-
 91
91
-
 92
92
-
 93
93
-
 94
94
-
 95
95
-
 96
96
-
 97
97
-
 98
98
-
 99
99
-
 100
100
-
 101
101
-
 102
102
-
 103
103
-
 104
104
-
 105
105
-
 106
106
-
 107
107
-
 108
108
-
 109
109
-
 110
110


in altre lingue
- English: AJA CION™ Operating instructions
Documenti correlati
-
AJA CION™ Istruzioni per l'uso
-
-
-
-
-
-
AJA T-TAP® Manuale utente
-
-
-
AJA 3G-AMA Installation and Operation Guide
Altri documenti
-
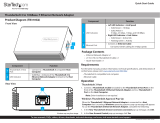 StarTech com TB310G2 Thunderbolt 3 to 10G Base-T Ethernet Network Adapter Guida utente
-
 StarTech.com ARMBARDUOV Manuale del proprietario
-
 Americana Appliances AGBS300 Istruzioni per l'uso
-
Rod Desyne DP063-Bay-4 Manuale utente
-
Tyco INTEVO-CMP-2TB Quick Setup Manual
-
Lanzar VECTOR VCT-2010 Manuale del proprietario
-
Bosch Appliances VMD01 M50 PAL Manuale utente


