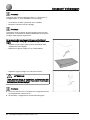
Volkswagen 6R0 017 221 Installation Instructions Manual
- Tipo
- Installation Instructions Manual

Einbauanleitung
Polo 2009 ➤
Trenngitter
6R0 017 221
Ausgabe 05.2009
Volkswagen Zubehör

Inhaltsverzeichnis
1 Allgemeines . . . . . . . . . . . . . . . . . . . . . . . . . . . . . . . . . . . . . . . . . . . . . . . . . . . . . . . . . . . . . . . . 1
1.1 Allgemeine Informationen zu dieser Einbauanleitung . . . . . . . . . . . . . . . . . . . . . . . . . . . . . . . . 1
2 Lieferumfang . . . . . . . . . . . . . . . . . . . . . . . . . . . . . . . . . . . . . . . . . . . . . . . . . . . . . . . . . . . . . . . . 3
2.1 Lieferumfang, Trenngitter 6R0 017 221 . . . . . . . . . . . . . . . . . . . . . . . . . . . . . . . . . . . . . . . . . . 3
3 Trenngitter 6R0 017 221 einbauen . . . . . . . . . . . . . . . . . . . . . . . . . . . . . . . . . . . . . . . . . . . . . . 4
Volkswagen Zubehör
Dieses Werk ist urheberrechtlich geschützt.
Jede Verwertung ist ohne Zustimmung des Urhebers unzulässig.
Copyright © 2009 Volkswagen Zubehör GmbH, Dreieich

1 Allgemeines
1.1 Allgemeine Informationen zu dieser
Einbauanleitung
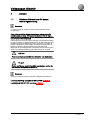
Hinweis
Wir empfehlen Ihnen, den Einbau von einem Fachbetrieb
durchführen zu lassen.
Dieses Heft enthält wichtige Informationen und Warnungen zum
Umgang mit dem Fahrzeug. Weitere Informationen, die Sie zur
eigenen Sicherheit und zur Sicherheit Ihrer Mitfahrer wissen
sollten, befinden sich in Ihrem Bordbuch.
Volkswagen Zubehör arbeitet ständig an der Weiterentwicklung
aller Produkte. Bitte haben Sie Verständnis dafür, dass deshalb
jederzeit Änderungen des Lieferumfangs in Form, Ausstattung
und Technik möglich sind. Die Angaben über Lieferumfang,
Aussehen und Funktionen der Produkte entsprechen dem
Informationsstand zum Zeitpunkt des Redaktionsschlusses. Aus
den Angaben, Abbildungen und Beschreibungen dieser
Anleitung können keine Ansprüche hergeleitet werden.
ACHTUNG!
Texte mit diesem Symbol weisen auf Unfall- und
Verletzungsgefahren hin.
Vorsicht!
Texte mit diesem Symbol enthalten Hinweise, wie Sie
mögliche Schäden an Ihrem Fahrzeug verhindern können.
Hinweis
Texte mit diesem Symbol enthalten zusätzliche Informationen.
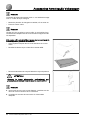
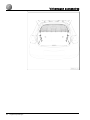
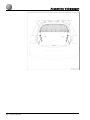
Lieferumfang Trenngitter 6R0 017 221 ⇒ Seite 3
Trenngitter 6R0 017 221 einbauen ⇒ Seite 4 .
Volkswagen Zubehör
1. Allgemeines 1

Volkswagen Zubehör
2 1. Allgemeines

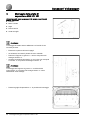
2 Lieferumfang
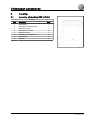
2.1 Lieferumfang, Trenngitter 6R0 017 221
Stückliste
Pos. Bezeichnung Stück
1 Trenngitter 1
2 Stützstrebe rechts 1
3 Haltestrebe rechts 1
4 Sterngriffschraube M8 10
5 Haltestrebe links 1
6 Stützstrebe links 1
7 Gummiauflage 2
8 Verzurröse 2
Volkswagen Zubehör
2. Lieferumfang 3

3 Trenngitter 6R0 017 221 einbauen
Benötigte Spezialwerkzeuge, Prüf- und Meßgeräte sowie
Hilfsmittel
♦ Messer
♦ Bandmaß
♦ Säge
♦ Lackstift
♦ Schleifpapier
Hinweis
Wir empfehlen Ihnen, den Einbau mit Hilfe einer zweiten Person
durchzuführen.
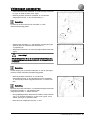
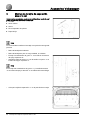
– Nehmen Sie die Gepäckraumabdeckung heraus.
– Bauen Sie den variablen Ladeboden, falls vorhanden, aus.
– Drücken Sie die Gummiauflage -7- in die Bohrung der linken
Stützstrebe -6-.
– Schrauben Sie die Verzurröse -8- mit der Sterngriffschraube
-4- an der linken Stützstrebe -6- fest.
Hinweis
Die Montage der Gummiauflage -7- und der Verzurröse -8- an der
rechten Stützstrebe -2- erfolgt sinngemäß.
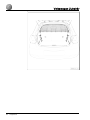
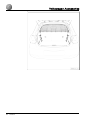
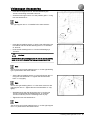
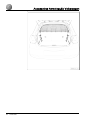
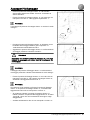
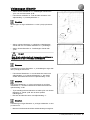
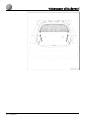
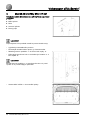
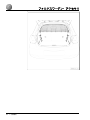
– Bringen Sie das Trenngitter -1- in Einbauposition.
Volkswagen Zubehör
4 3. Trenngitter 6R0 017 221 einbauen

– Setzen Sie die linke Stützstrebe -6- in die Verzurröse vorne
links ein -Pfeil A- und schwenken Sie sie nach vorn -Pfeil B-.
– Befestigen Sie die linke Stützstrebe -6- mit den zwei
Sterngriffschrauben -4- am Trenngitter -1-.
Hinweis
Der Einbau der rechten Stützstrebe -2- erfolgt sinngemäß.
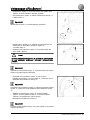
– Setzen Sie die linke Haltestrebe -5-, von unten, an die
Verzurröse hinten links und drehen Sie die linke Haltestrebe
-5- -in Pfeilrichtung A-.
– Haken Sie die linke Haltestrebe -5- in die Verzurröse hinten
links ein -Pfeil B-.
Vorsicht!
Haken Sie die Haltestreben -5- und -3- vorsichtig in die
Verzurrösen ein, um Beschädigungen an der
Gepäckraumverkleidung zu vermeiden.
Hinweis
Die Befestigung der rechten Haltestrebe -3- an der Verzurröse
hinten rechts erfolgt sinngemäß.
– Befestigen Sie die linke Haltestrebe -5- mit den zwei
Sterngriffschrauben -4- an der linken Stützstrebe -6-, ziehen
Sie dabei die zwei Sterngriffschrauben -4- nur leicht an.
Hinweis
Befestigen Sie die rechte Haltestrebe -3- sinngemäß an der
rechten Stützstrebe -2-, ziehen Sie dabei die zwei
Sterngriffschrauben -4- nur leicht an.
– Drücken Sie gleichzeitig die linke Stützstrebe -6- nach
hinten -Pfeil A- und die linke Haltestrebe -5- nach vorn
-Pfeil B-, bis sie spielfrei in den Aufnahmen sitzen.
– Drehen Sie die zwei Sterngriffschrauben -4- fest.
Hinweis
Die Befestigung der rechten Haltestrebe -3- an der rechten
Stützstrebe -2- erfolgt sinngemäß.
Volkswagen Zubehör
3. Trenngitter 6R0 017 221 einbauen 5

– Bauen Sie den variablen Ladeboden, falls vorhanden, ein.
– Bauen Sie die Gepäckraumabdeckung ein.
Hinweis
Prüfen Sie den Freigang der Gepäckraumabdeckung, ggf. muss
sie im Bereich der Stützstreben des Trenngitters angepasst
werden.
Klemmt die Gepäckraumabdeckung im Bereich der Stützstreben
des Trenngitters, gehen Sie wie folgt vor:
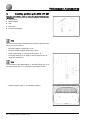
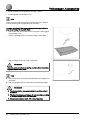
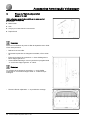
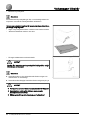
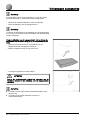
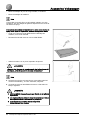
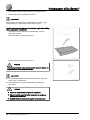
– Sägen Sie im vorderen Bereich der Gepäckraumabdeckung
den angezeigten Bereich heraus.
– Begradigen Sie die Schnittkante mit einem scharfen Messer.
– Versiegeln Sie die Schnittkanten mit einem Lackstift.
ACHTUNG!
Beachten Sie die Ablüftzeit gemäß der Herstellervorgabe,
bevor Sie die Gepäckraumabdeckung einbauen!
Hinweis
♦
Kontrollieren Sie nach kurzer Fahrstrecke alle
Verschraubungen und ziehen Sie sie ggf. nach.
♦
Kontrollieren Sie in angemessenen Abständen erneut die
Verschraubungen.
ACHTUNG!
♦ Der Transport von Personen hinter dem Trenngitter ist
verboten!
♦ Die Kopfstützen müssen immer auf die entsprechende
Kopfhöhe der Passagiere eingestellt werden.
♦ Besonders schweres Ladegut zusätzlich mit Spanngurten
sichern!
Volkswagen Zubehör
6 3. Trenngitter 6R0 017 221 einbauen

Installation instructions
Polo 2009 ➤
Partition grille
6R0 017 221
Edition 05.2009
Volkswagen Accessories

Contents
1 General . . . . . . . . . . . . . . . . . . . . . . . . . . . . . . . . . . . . . . . . . . . . . . . . . . . . . . . . . . . . . . . . . . . . 1
1.1 General information for these installation instructions . . . . . . . . . . . . . . . . . . . . . . . . . . . . . . . . 1
2 Scope of delivery . . . . . . . . . . . . . . . . . . . . . . . . . . . . . . . . . . . . . . . . . . . . . . . . . . . . . . . . . . . . 3
2.1 Scope of delivery for partition grille 6R0 017 221 . . . . . . . . . . . . . . . . . . . . . . . . . . . . . . . . . . . . 3
3 Installing partition grille 6R0 017 221 . . . . . . . . . . . . . . . . . . . . . . . . . . . . . . . . . . . . . . . . . . . . 4
Volkswagen Accessories
All rights reserved.
No reproduction without prior agreement from publisher.
Copyright © 2009 Volkswagen Zubehör GmbH, Dreieich

1 General
1.1 General information for these installa‐
tion instructions
Note
We recommend that the work be carried out by a specialist work‐
shop.
This booklet contains important information and warnings on us‐
ing your vehicle. Refer to your Owner's Manual for further infor‐
mation concerning your safety and the safety of your passengers.
Volkswagen Accessories are continually working on the further
development of all products. Please appreciate that we must
therefore reserve the right to alter any part of the vehicle and its
equipment or technical specifications at any time. The details
concerning scope of delivery, design and function of the product
refer to the information available at the time of publication. No
legal commitment can be derived from the information, illustra‐
tions or descriptions in this manual.
WARNING!
Texts with this symbol contains important information on safety
and how to reduce the risk of personal injury or death.
Caution!
Texts with this symbol indicate how you can prevent damage
to your vehicle.
Note
Texts with this symbol contain additional information.
Scope of delivery for partition grille 6R0 017 221 ⇒ page 3
Installing partition grille 6R0 017 221 ⇒ page 4 .
Volkswagen Accessories
1. General 1

Volkswagen Accessories
2 1. General

2 Scope of delivery
2.1 Scope of delivery for partition grille
6R0 017 221
Parts list
Item Description Qty.
1 Partition grille 1
2 Right support strut 1
3 Right retaining brace 1
4 M8 star head bolt 10
5 Left retaining brace 1
6 Left support strut 1
7 Rubber fittings 2
8 Lashing eye 2
Volkswagen Accessories
2. Scope of delivery 3

3 Installing partition grille 6R0 017 221
Required special tools, testers, measuring instruments and aux‐
iliary items
♦ Cutting blade
♦ Tape measure
♦ Saw
♦ Paint stick
♦ Abrasive cloth/paper
Note
We recommend that the installation be carried out with the assis‐
tance of a second person.
– Remove luggage compartment cover.
– Remove variable height load flooring, if fitted.
– Press rubber fitting -7- into hole of left support -6-.
– Screw the lashing eye -8- tightly to the left support strut -6-
using star head bolt -4-.
Note
The assembly of the rubber fittings -7- and the lashing eye -8- on
the right support strut -2- is performed in the same manner.
– Position partition grille -1- in installation position.
Volkswagen Accessories
4 3. Installing partition grille 6R0 017 221

– Insert the left support strut -6- into the left lashing eye
-arrow A- and swing it forwards -arrow B-
– Screw the left support strut -6- to the partition grille -1- using
two star head bolts -4-.
Note
The right support strut -2- is installed in the same manner.
– Insert the left retaining brace -5- into the rear left lashing eye
from below and turn the left retaining brace -5- in direction
of -arrow A-.
– Hook the left retaining brace -5- into the left lashing eye
-arrow B-.
Caution!
Carefully hook the retaining braces -5- and -3- into the lashing
eyes, so as not to damage the luggage compartment trim.
Note
The securing of the right retaining brace -3- on the right lashing
eye is performed in the same manner.
– Secure the left retaining brace -5- to the left support strut -6-
using two star head bolts -4-. Tighten the two star head
bolts -4- only lightly.
Note
Secure the right retaining brace -3- in the same manner to the
right support strut -2-. Tighten the two star head bolts -4- only
lightly.
– Simultaneously push the left support strut -6- to the rear
-arrow A- and pull the left retaining brace -5- forwards
-arrow B- until they sit in the mountings with no play.
– Tighten the two star head bolts -4-.
Note
The securing of the right retaining brace -3- on the right support
strut -2- is performed in the same manner.
Volkswagen Accessories
3. Installing partition grille 6R0 017 221 5

– Install variable load compartment flooring, if fitted.
– Install luggage compartment cover.
Note
Check free movement of luggage compartment cover, adapt in
area of partition grille support struts as necessary.
Proceed as follows if the luggage compartment cover sticks in
area of partition grille support struts:
– Saw off the area, as marked, on the front part of the luggage
compartment cover.
– Smooth off/straighten the cut section using a sharp knife.
– Seal the edges of the cut using a paint stick.
WARNING!
Observe paint manufactures drying period before reinstalling
luggage compartment cover.
Note
♦
After a short drive, check all screw fastenings and retighten as
necessary.
♦
After an adequate period, check all screw fastenings again.
WARNING!
♦ The transportation of people behind the partition grille is
forbidden!
♦ The head restraints must always be set correctly according
to the head height of the seat occupant.
♦ Always secure heavy loads with a securing strap.
Volkswagen Accessories
6 3. Installing partition grille 6R0 017 221

Instructions de pose
Polo 2009 ➤
Filet de séparation
6R0 017 221
Édition 05.2009
Accessoires homologués Volkswagen

Sommaire
1 Généralités . . . . . . . . . . . . . . . . . . . . . . . . . . . . . . . . . . . . . . . . . . . . . . . . . . . . . . . . . . . . . . . . 1
1.1 Informations générales relatives à ce document . . . . . . . . . . . . . . . . . . . . . . . . . . . . . . . . . . . . 1
2 Etendue de livraison . . . . . . . . . . . . . . . . . . . . . . . . . . . . . . . . . . . . . . . . . . . . . . . . . . . . . . . . . . 3
2.1 Etendue de livraison, Filet de séparation 6R0 017 221 . . . . . . . . . . . . . . . . . . . . . . . . . . . . . . . . 3
3 Pose du filet de séparation 6R0 017 221 . . . . . . . . . . . . . . . . . . . . . . . . . . . . . . . . . . . . . . . . . . 4
Accessoires homologués Volkswagen
Cet ouvrage est protégé par la législation sur les droits d’auteur.
Toute utilisation sans accord de l’auteur est interdite.
Copyright © 2009 Volkswagen Zubehör GmbH, Dreieich

1 Généralités
1.1 Informations générales relatives à ce
document
Remarque
Nous vous conseillons de confier la pose du filet de séparation à
un atelier spécialisé.
Cette brochure contient des informations et mises en garde
importantes sur l'utilisation de votre véhicule. Vous trouverez
aussi, dans votre Livre de Bord, d'autres informations à connaître
concernant votre propre sécurité et celle de vos passagers.
Volkswagen Zubehör œuvre en permanence au
perfectionnement de tous ses produits. Vous comprendrez que
nous nous réservons le droit d'apporter à tout moment des
modifications au matériel livré, qu'il s'agisse de sa forme, de son
équipement ou de sa technique. Les indications concernant
l'ensemble de livraison, l'aspect extérieur et les fonctions des
produits sont conformes aux informations disponibles au moment
de la clôture de la rédaction Vous ne sauriez de ce fait vous
prévaloir des indications, figures et descriptions figurant dans le
présent supplément de la Notice d'Utilisation.
ATTENTION !
Les textes accompagnés de ce symbole vous informent des
risques d'accidents et blessures.
Attention !
Les textes accompagnés de ce symbole vous informent
comment éviter des dommages éventuels sur votre véhicule.
Remarque
Les textes accompagnés de ce symbole comportent des
informations supplémentaires.
Etendue de livraison Filet de séparation 6R0 017 221 ⇒ Page
3
Pose du filet de séparation 6R0 017 221 ⇒ Page 4 .
Accessoires homologués Volkswagen
1. Généralités 1

Accessoires homologués Volkswagen
2 1. Généralités
La pagina si sta caricando...
La pagina si sta caricando...
La pagina si sta caricando...
La pagina si sta caricando...
La pagina si sta caricando...
La pagina si sta caricando...
La pagina si sta caricando...
La pagina si sta caricando...
La pagina si sta caricando...
La pagina si sta caricando...
La pagina si sta caricando...
La pagina si sta caricando...
La pagina si sta caricando...
La pagina si sta caricando...
La pagina si sta caricando...
La pagina si sta caricando...
La pagina si sta caricando...
La pagina si sta caricando...
La pagina si sta caricando...
La pagina si sta caricando...
La pagina si sta caricando...
La pagina si sta caricando...
La pagina si sta caricando...
La pagina si sta caricando...
La pagina si sta caricando...
La pagina si sta caricando...
La pagina si sta caricando...
La pagina si sta caricando...
La pagina si sta caricando...
La pagina si sta caricando...
La pagina si sta caricando...
La pagina si sta caricando...
La pagina si sta caricando...
La pagina si sta caricando...
La pagina si sta caricando...
La pagina si sta caricando...
La pagina si sta caricando...
La pagina si sta caricando...
La pagina si sta caricando...
La pagina si sta caricando...
La pagina si sta caricando...
La pagina si sta caricando...
La pagina si sta caricando...
La pagina si sta caricando...
La pagina si sta caricando...
La pagina si sta caricando...
La pagina si sta caricando...
La pagina si sta caricando...
La pagina si sta caricando...
La pagina si sta caricando...
La pagina si sta caricando...
La pagina si sta caricando...
La pagina si sta caricando...
La pagina si sta caricando...
La pagina si sta caricando...
La pagina si sta caricando...
La pagina si sta caricando...
La pagina si sta caricando...
La pagina si sta caricando...
-
 1
1
-
 2
2
-
 3
3
-
 4
4
-
 5
5
-
 6
6
-
 7
7
-
 8
8
-
 9
9
-
 10
10
-
 11
11
-
 12
12
-
 13
13
-
 14
14
-
 15
15
-
 16
16
-
 17
17
-
 18
18
-
 19
19
-
 20
20
-
 21
21
-
 22
22
-
 23
23
-
 24
24
-
 25
25
-
 26
26
-
 27
27
-
 28
28
-
 29
29
-
 30
30
-
 31
31
-
 32
32
-
 33
33
-
 34
34
-
 35
35
-
 36
36
-
 37
37
-
 38
38
-
 39
39
-
 40
40
-
 41
41
-
 42
42
-
 43
43
-
 44
44
-
 45
45
-
 46
46
-
 47
47
-
 48
48
-
 49
49
-
 50
50
-
 51
51
-
 52
52
-
 53
53
-
 54
54
-
 55
55
-
 56
56
-
 57
57
-
 58
58
-
 59
59
-
 60
60
-
 61
61
-
 62
62
-
 63
63
-
 64
64
-
 65
65
-
 66
66
-
 67
67
-
 68
68
-
 69
69
-
 70
70
-
 71
71
-
 72
72
-
 73
73
-
 74
74
-
 75
75
-
 76
76
-
 77
77
-
 78
78
-
 79
79


Volkswagen 6R0 017 221 Installation Instructions Manual
- Tipo
- Installation Instructions Manual
in altre lingue
- English: Volkswagen 6R0 017 221
- français: Volkswagen 6R0 017 221
- español: Volkswagen 6R0 017 221
- Deutsch: Volkswagen 6R0 017 221
- Nederlands: Volkswagen 6R0 017 221
- čeština: Volkswagen 6R0 017 221
- svenska: Volkswagen 6R0 017 221
- 日本語: Volkswagen 6R0 017 221
Documenti correlati
-
Volkswagen 5G9 061 197 A Guida d'installazione
-
-
-
-
-
-
-
-
-