Dell Latitude 7202 Rugged Manuale del proprietario
- Categoria
- I Quaderni
- Tipo
- Manuale del proprietario

Dell Latitude 12 Rugged Tablet – 7202
Getting Started Guide
Guide de mise en route
Handleiding Aan de slag
Handbuch zum Einstieg
Guida introduttiva
Regulatory Model: T03H
Regulatory Type: T03H001

Notes, cautions, and warnings
NOTE: A NOTE indicates important information that helps you make better use of your computer.
CAUTION: A CAUTION indicates either potential damage to hardware or loss of data and tells you
how to avoid the problem.
WARNING: A WARNING indicates a potential for property damage, personal injury, or death.
Copyright © 2015 Dell Inc. All rights reserved. This product is protected by U.S. and international copyright and
intellectual property laws. Dell
™
and the Dell logo are trademarks of Dell Inc. in the United States and/or other
jurisdictions. All other marks and names mentioned herein may be trademarks of their respective companies.
2015 - 06
Rev. A00

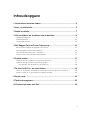
Contents
1 Finding Information and Resources.................................................................. 4
2 Front and Back View.............................................................................................5
3 Quick Setup............................................................................................................7
4 Removing and Installing Components.............................................................9
Removing the Battery............................................................................................................................9
Installing the Battery............................................................................................................................10
Installing the SIM Card........................................................................................................................ 10
5 Dell Rugged Control Center Application........................................................11
Using the Settings Option in Rugged Control Center....................................................................... 13
Installing the Dell Rugged Control Center......................................................................................... 14
Enabling or Disabling the Keyboard Backlight................................................................................... 15
Changing the Keyboard Backlight Colors ......................................................................................... 15
6 Stealth Mode........................................................................................................16
Turning Stealth Mode On/Off Using Optional Accessory Keyboard ................................................16
Turning Stealth Mode On/Off Using RCC.......................................................................................... 16
Modifying the Stealth Mode Settings............................................................................................ 17
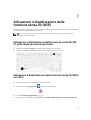
7 Enabling and Disabling Wireless (WiFi) Feature............................................ 18
Enabling or Disabling Wireless (WI-Fi) Feature Using Optional Keyboard Accessory...................... 18
Enabling and Disabling Wireless (WiFi) Feature Using RCC...............................................................18
8 Smart Cards......................................................................................................... 20
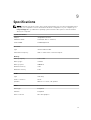
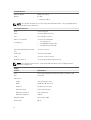
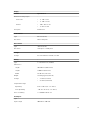
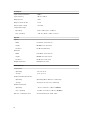
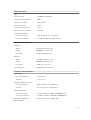
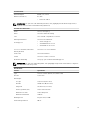
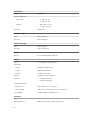
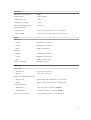
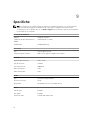
9 Specifications...................................................................................................... 21
10 Contacting Dell.................................................................................................25
3

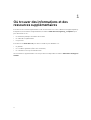
1
Finding Information and Resources
See the safety and regulatory documents that shipped with your computer and the regulatory
compliance website at www.dell.com/regulatory_compliance for more information on:
• Safety best practices
• Regulatory certification
• Ergonomics
See www.dell.com for additional information on:
• Warranty
• Terms and Conditions (U.S. only)
• End User License Agreement
Additional information on your product is available at www.dell.com/support/manuals
4

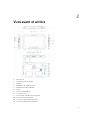
2
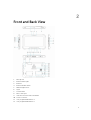
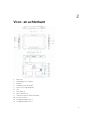
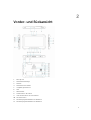
Front and Back View
1. Microphone
2. Camera status light
3. Camera
4. Camera shutter switch
5. Ambient light sensor
6. Stylus
7. Power button
8. Micro serial port
9. USB 3.0 connector with PowerShare
10. Power connector
11. User programmable button 3
12. User programmable button 2
5

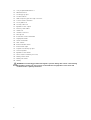
13. User programmable button 1
14. Windows button
15. Docking-pogo pins
16. Volume buttons
17. Radio frequency pass-through connector
18. Screen-rotate lock button
19. Dock-guide slots
20. Security-cable slot
21. QuadCool vent-output
22. Memory-card reader
23. HDMI Port
24. Headset connector
25. Microphone
26. Contactless smart card reader
27. Fingerprint reader
28. Smart card reader
29. Rear camera
30. Camera shutter switch
31. Camera flash light
32. Expansion module pogo pins
33. Service tag label
34. QuadCool vent-intake
35. SIM slot (remove battery to access)
36. Battery release latch
37. Battery life meters
38. Battery
WARNING: Your Dell Rugged Tablet is designed to prevent damage due to dust or dirt entering
the QuadCool intake vent. It is however recommended to keep QuadCool vents clean and
unobstructed for optimal performance.
6

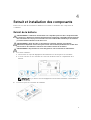
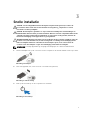
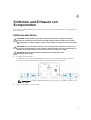
3
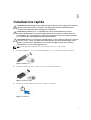
Quick Setup
WARNING: Before you begin any of the procedures in this section, read the safety information
that shipped with your computer. For additional best practices information, see www.dell.com/
regulatory_compliance
WARNING: The AC adapter works with electrical outlets worldwide. However, power connectors
and power strips vary among countries. Using an incompatible cable or improperly connecting
the cable to the power strip or electrical outlet may cause fire or equipment damage.
CAUTION: When you disconnect the AC adapter cable from the computer, grasp the connector,
not the cable itself, and pull firmly but gently to avoid damaging the cable. When you wrap the
AC adapter cable, ensure that you follow the angle of the connector on the AC adapter to avoid
damaging the cable.
NOTE: Some devices may not be included if you did not order them.
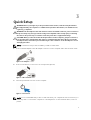
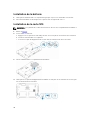
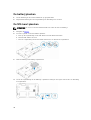
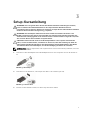
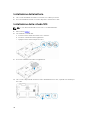
1. Connect the AC adapter to the AC adapter connector on the computer and to the electrical outlet.
Figure 1. AC Adapter
2. Connect USB devices, such as a mouse or keyboard (optional).
Figure 2. USB Connector
3. Press the power button to turn on the computer.
Figure 3. Power Button
NOTE: It is recommended that you turn on and shut down your computer at least once before you
install any cards or connect the computer to a docking device or other external device, such as a
printer.
7

8

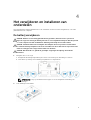
4
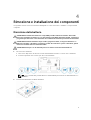
Removing and Installing Components
This section provides detailed information on how to remove or install the components from your
computer.
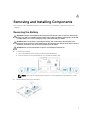
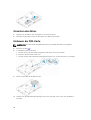
Removing the Battery
WARNING: Using an incompatible battery may increase the risk of fire or explosion. Replace the
battery only with a compatible battery purchased from Dell. The battery is designed to work with
your Dell tablet. Do not use a battery from any other tablet with your tablet.
WARNING: Before removing or replacing the battery, turn off the tablet, disconnect the AC
adapter from the electrical outlet and the tablet, disconnect the modem from the wall connector
and tablet, and remove any other external cables from the tablet.
WARNING: Not for use in hazardous locations. See installation instructions.
1. To remove the battery:
a. Unlock the battery release latch by sliding towards the battery.
b. Push the button in a downward direction to unlatch the battery bay.
NOTE: There are two battery release buttons for removing Battery 1 and Battery 2 on the
tablet .
2. Lift the batteries away from the tablet.
9

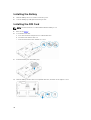
Installing the Battery
1. Slide the battery into its slot until it clicks into place.
2. Lock the battery by sliding the latch away from it.
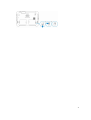
Installing the SIM Card
NOTE: The SIM card slot is located underneath the battery 2 slot.
1. Remove the battery.
2. To install the SIM card:
a. Press the SIM latch and pull it in an outward direction.
b. Insert the SIM card into the slot.
c. Push the SIM release latch inwards to lock it.
3. Install the battery into the battery bay.
4. Slide the battery release latch in an upwards direction, and then to the right to lock it.
10

5
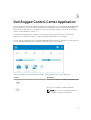
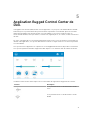
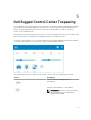
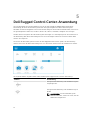
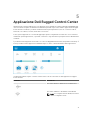
Dell Rugged Control Center Application
The Dell Rugged Control Center (RCC) is an application designed for your Dell Latitude 12 Rugged Tablet,
which enables you to perform several important tasks on the tablet. After you install the Dell Rugged
Control Center application on your tablet, you can view all the basic features, such as Wi-Fi, Bluetooth,
camera, volume, brightness, and so on.
In addition, this application also enables you to add a shortcut of any feature onto it. By using this
application, you can directly control or adjust all the important features on your tablet.
You can launch the application by clicking the Rugged Control Center icon, available on the desktop. You
can also start the RCC application from the bottom-right corner of the taskbar.
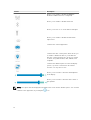
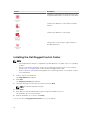
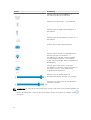
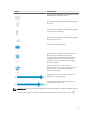
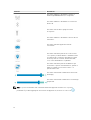
The following table shows the feature description of the Rugged Control Center Application:
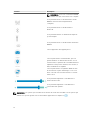
Feature Description
Allows you to enable or disable the airplane mode.
Allows you to enable or disable the WLAN.
NOTE: To connect to the WLAN, make sure
you have your network configured.
11

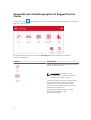
Feature Description
Allows you to enable or disable the WWAN /
Mobile broadband service (if configured).
Allows you to enable or disable Bluetooth.
Allows you to turn on or off the built-in flashlight.
Allows you to enable or disable the Automatic
Light Sensor.
Launches the camera application.
Launches the GPS control panel, which allows you
to enable or disable the GPS. If you enable the
GPS, the control panel will also show your current
location, along with the time, date, latitude, and
longitude.
Launches the Window panel to select the display
option, if you have connected to an external
monitor or to any other source.
Allows you to increase or decrease the brightness
in the display.
Allows you to increase or decrease the volume of
the speakers.
NOTE: The options that are displayed in the RCC home screen are the default options. You can add
a feature to the application, by clicking the
icon.
12

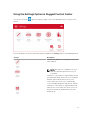
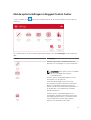
Using the Settings Option in Rugged Control Center
You can also touch the option from the top-right corner of the RCC application to explore more
options.
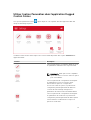
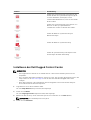
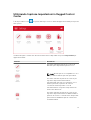
The following table shows the feature description available in the Settings option of the RCC Application:
Feature Description
Launches the Windows control panel for pen and
touch settings.
NOTE: This option is compatible only if you
have the optional keyboard accessory for
your tablet.
Launches a control panel to adjust settings for the
optional backlit keyboard accessory (if configured
with the optional keyboard accessory). The
control panel also allows you to set backlight
colors and adjust brightness and timeout settings.
Launches a control panel to adjust Stealth Mode
settings. The control panel also allows you to set
which functionality is disabled when you enter
Stealth Mode.
13

Feature Description
Launches a control panel to assign actions to the
3 programmable buttons on the front of the tablet.
Launches the Windows control panel for battery
settings.
Launches the Windows control panel.
Launches the control panel to adjust settings of
the RCC application.
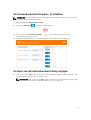
Installing the Dell Rugged Control Center
NOTE:
• Dell Rugged Control Center is compatible only with Windows 8 or higher versions of operating
systems.
• Before you install this application, make sure you that have the latest version of the setup file
from the Dell.com/support page for Dell Latitude 12 Rugged Tablet 7202.
• After you install or uninstall the Dell Rugged Control Center application on your tablet, a reboot
is recommended.
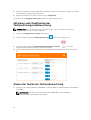
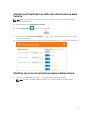
1. Double-click the executable file.
The Setup Wizard page appears.
2. Click Next.
The Language Selection page appears.
3. Select the language from the drop-down menu and click Next.
NOTE: The default language is English.
4. Click Install.
5. Click Yes to provide the administrator rights to begin the installation process.
The installation process will now begin.
6. After the installation is successful, click Finish.
You can now see the Rugged Control Center icon on your desktop.
14

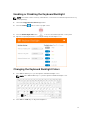
Enabling or Disabling the Keyboard Backlight
NOTE: This feature can be used only if the tablet is connected to an external keyboard accessory
(sold separately).
1. Launch the Rugged Control Center application.
2. Press the Settings button on the top-right corner.
3.
Press the Backlit Keyboard button to access the Backlit Keyboard control panel.
4. Adjust the required parameters for Backlight settings and Backlight colors.
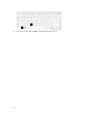
Changing the Keyboard Backlight Colors
1. Press <Fn> + < C> keys to cycle through the available backlight colors.
NOTE: Press <Fn> + < C> keys to cycle through the available backlight colors.
2. Press <Fn> + < F10> keys to adjust the brightness.
15

6
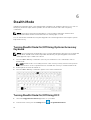
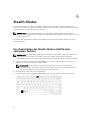
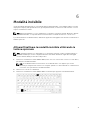
Stealth Mode
Latitude fully rugged products come equipped with a Stealth mode. Stealth mode allows you to turn off
the Display, all the LED lights, internal speakers, the fan and all wireless radios with a single key
combination.
NOTE: This mode is aimed at using the tablet in covert operations. When the stealth mode is
activated, the tablet remains functional but will not emit any light or sound.
You can activate the Stealth Mode, using the Rugged Control Center application and using the optional
keyboard accessory.
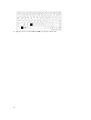
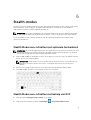
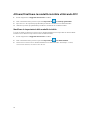
Turning Stealth Mode On/Off Using Optional Accessory
Keyboard
NOTE: The following steps are applicable only if you have attached the optional accessory keyboard
to your tablet. Stealth mode can be setup within the tablet by using the Rugged Control Center
(RCC) application pre-loaded on the device.
1. Press the <Fn> + <F7> key combination (<Fn> key not needed if Fn lock is activated) to turn on
stealth mode.
NOTE: Stealth mode is a secondary function of the <F7> key. The key can be used to perform
other functions on the computer when not used with the <Fn> key to activate stealth mode.
2. All the lights and sounds are turned off.
3. Press the <Fn> + <F7> key combination again to turn off the stealth mode.
Turning Stealth Mode On/Off Using RCC
1. Launch the Rugged Control Center application on your tablet.
2. From the main screen, press the Settings button > Programmable Buttons.
16

3. Set any 3 programmable buttons to enable or disable the Stealth Mode.
4. Use the selected programmable buttons to enable or disable the Stealth Mode.
Modifying the Stealth Mode Settings
You can also modify your desired features to disable in the stealth mode settings. To modify the stealth
mode settings:
1. Launch the Rugged Control Center application on your tablet.
2. From the main screen, press the Settings button > Stealth Mode.
3. Select the features that you want to disable in the stealth mode. For example: Volume, Wireless,
Display, and so on.
17

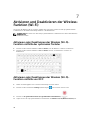
7
Enabling and Disabling Wireless (WiFi)
Feature
You can enable or disable the wireless (Wi-Fi) feature, using the optional keyboard accessory and using
the programmable buttons in RCC application.
NOTE: WiFi can also be enabled/disabled by using the user defined programmable buttons on the
tablet.
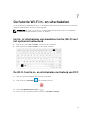
Enabling or Disabling Wireless (WI-Fi) Feature Using
Optional Keyboard Accessory
1. Press the <Fn> + <PrtScr> keys to enable wireless feature.
2. Press the<Fn> + < PrtScr> keys again to disable wireless feature.
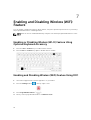
Enabling and Disabling Wireless (WiFi) Feature Using RCC
1. Launch the Rugged Control Center application on your tablet.
2. Press the Settings button on the top-right corner .
3. Press Programmable buttons .
4. Set any of the 3 programmable buttons to Wireless on/off.
18

5. Use the programmed button to Enable/Disable Wireless networks on the tablet.
19

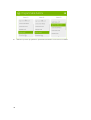
8
Smart Cards
There are two main types of Smart or Common Access Cards (CAC):
1. Enclosed Smart Cards — These cards have a contact area with many gold plated connection pads.
When inserted into a card reader, the information from the chip can be read and written
Insert the card into the smart card slot with the gold contact pad facing upward and pointing toward
the smart card slot. Slide the card into the slot until it is fully seated in its connector.
2. Contactless Smart Cards — These cards do not require any physical contact with the reader. The
chip communicates with the card reader through RFID induction technology.
These cards require only close proximity to an antenna of a card reader to complete transactions.
20
La pagina si sta caricando...
La pagina si sta caricando...
La pagina si sta caricando...
La pagina si sta caricando...
La pagina si sta caricando...
La pagina si sta caricando...
La pagina si sta caricando...
La pagina si sta caricando...
La pagina si sta caricando...
La pagina si sta caricando...
La pagina si sta caricando...
La pagina si sta caricando...
La pagina si sta caricando...
La pagina si sta caricando...
La pagina si sta caricando...
La pagina si sta caricando...
La pagina si sta caricando...
La pagina si sta caricando...
La pagina si sta caricando...
La pagina si sta caricando...
La pagina si sta caricando...
La pagina si sta caricando...
La pagina si sta caricando...
La pagina si sta caricando...
La pagina si sta caricando...
La pagina si sta caricando...
La pagina si sta caricando...
La pagina si sta caricando...
La pagina si sta caricando...
La pagina si sta caricando...
La pagina si sta caricando...
La pagina si sta caricando...
La pagina si sta caricando...
La pagina si sta caricando...
La pagina si sta caricando...
La pagina si sta caricando...
La pagina si sta caricando...
La pagina si sta caricando...
La pagina si sta caricando...
La pagina si sta caricando...
La pagina si sta caricando...
La pagina si sta caricando...
La pagina si sta caricando...
La pagina si sta caricando...
La pagina si sta caricando...
La pagina si sta caricando...
La pagina si sta caricando...
La pagina si sta caricando...
La pagina si sta caricando...
La pagina si sta caricando...
La pagina si sta caricando...
La pagina si sta caricando...
La pagina si sta caricando...
La pagina si sta caricando...
La pagina si sta caricando...
La pagina si sta caricando...
La pagina si sta caricando...
La pagina si sta caricando...
La pagina si sta caricando...
La pagina si sta caricando...
La pagina si sta caricando...
La pagina si sta caricando...
La pagina si sta caricando...
La pagina si sta caricando...
La pagina si sta caricando...
La pagina si sta caricando...
La pagina si sta caricando...
La pagina si sta caricando...
La pagina si sta caricando...
La pagina si sta caricando...
La pagina si sta caricando...
La pagina si sta caricando...
La pagina si sta caricando...
La pagina si sta caricando...
La pagina si sta caricando...
La pagina si sta caricando...
La pagina si sta caricando...
La pagina si sta caricando...
La pagina si sta caricando...
La pagina si sta caricando...
La pagina si sta caricando...
La pagina si sta caricando...
La pagina si sta caricando...
La pagina si sta caricando...
La pagina si sta caricando...
La pagina si sta caricando...
La pagina si sta caricando...
La pagina si sta caricando...
La pagina si sta caricando...
La pagina si sta caricando...
La pagina si sta caricando...
La pagina si sta caricando...
La pagina si sta caricando...
La pagina si sta caricando...
La pagina si sta caricando...
La pagina si sta caricando...
La pagina si sta caricando...
La pagina si sta caricando...
La pagina si sta caricando...
La pagina si sta caricando...
La pagina si sta caricando...
La pagina si sta caricando...
La pagina si sta caricando...
La pagina si sta caricando...
La pagina si sta caricando...
La pagina si sta caricando...
La pagina si sta caricando...
La pagina si sta caricando...
La pagina si sta caricando...
La pagina si sta caricando...
La pagina si sta caricando...
La pagina si sta caricando...
-
 1
1
-
 2
2
-
 3
3
-
 4
4
-
 5
5
-
 6
6
-
 7
7
-
 8
8
-
 9
9
-
 10
10
-
 11
11
-
 12
12
-
 13
13
-
 14
14
-
 15
15
-
 16
16
-
 17
17
-
 18
18
-
 19
19
-
 20
20
-
 21
21
-
 22
22
-
 23
23
-
 24
24
-
 25
25
-
 26
26
-
 27
27
-
 28
28
-
 29
29
-
 30
30
-
 31
31
-
 32
32
-
 33
33
-
 34
34
-
 35
35
-
 36
36
-
 37
37
-
 38
38
-
 39
39
-
 40
40
-
 41
41
-
 42
42
-
 43
43
-
 44
44
-
 45
45
-
 46
46
-
 47
47
-
 48
48
-
 49
49
-
 50
50
-
 51
51
-
 52
52
-
 53
53
-
 54
54
-
 55
55
-
 56
56
-
 57
57
-
 58
58
-
 59
59
-
 60
60
-
 61
61
-
 62
62
-
 63
63
-
 64
64
-
 65
65
-
 66
66
-
 67
67
-
 68
68
-
 69
69
-
 70
70
-
 71
71
-
 72
72
-
 73
73
-
 74
74
-
 75
75
-
 76
76
-
 77
77
-
 78
78
-
 79
79
-
 80
80
-
 81
81
-
 82
82
-
 83
83
-
 84
84
-
 85
85
-
 86
86
-
 87
87
-
 88
88
-
 89
89
-
 90
90
-
 91
91
-
 92
92
-
 93
93
-
 94
94
-
 95
95
-
 96
96
-
 97
97
-
 98
98
-
 99
99
-
 100
100
-
 101
101
-
 102
102
-
 103
103
-
 104
104
-
 105
105
-
 106
106
-
 107
107
-
 108
108
-
 109
109
-
 110
110
-
 111
111
-
 112
112
-
 113
113
-
 114
114
-
 115
115
-
 116
116
-
 117
117
-
 118
118
-
 119
119
-
 120
120
-
 121
121
-
 122
122
-
 123
123
-
 124
124
-
 125
125
-
 126
126
-
 127
127
-
 128
128
-
 129
129
-
 130
130
-
 131
131
-
 132
132


Dell Latitude 7202 Rugged Manuale del proprietario
- Categoria
- I Quaderni
- Tipo
- Manuale del proprietario
in altre lingue
Documenti correlati
-
Dell Latitude 7212 Rugged Extreme Guida Rapida
-
-
-
-
Dell Latitude 7214 Rugged Extreme Manuale del proprietario
-
-
-
-