

Legal Information
First English printing, October 2002
Information in this document has been carefully checked for accuracy; however, no guarantee is given to the correctness of the
contents. The information in this document is subject to change without notice. We are not liable for any injury or loss that
results from the use of this equipment.
Safety Instructions
Legal Information
First English printing, October 2002
Information in this document has been carefully checked for accuracy; however, no guarantee is given to the correctness
of the contents. The information in this document is subject to change without notice. We are not liable for any injury or
loss that results from the use of this equipment.
Safety Instructions
Please read all of these instructions carefully before you use the device. Save this manual for
future reference.
■ Unplug equipment before cleaning. Don’t use liquid or spray detergent; use a moist cloth.
■ Keep equipment away from excessive humidity and heat. Preferably, keep it in an air-conditioned environment with
temperatures not exceeding 40º Celsius (104º Fahrenheit).
■ When installing, place the equipment on a sturdy, level surface to prevent it from accidentally falling and causing
damage to other equipment or injury to persons nearby.
■ When the equipment is in an open position, do not cover, block or in any way obstruct the gap between it and the
power supply. Proper air convection is necessary to keep it from overheating.
■ Arrange the equipment’s power cord in such a way that others won’t trip or fall over it.
■ If you are using a power cord that didn’t ship with the equipment, ensure that it is rated for the voltage and current
labeled on the equipment’s electrical ratings label. The voltage rating on the cord should be higher than the one listed
on the equipment’s ratings label.
■ Observe all precautions and warnings attached to the equipment.
■ If you don’t intend on using the equipment for a long time, disconnect it from the power outlet to prevent being
damaged by transient over-voltage.
■ Keep all liquids away from the equipment to minimize the risk of accidental spillage. Liquid spilled on to the power
supply or on other hardware may cause damage, fi re or electrical shock.
■ Only qualifi ed service personnel should open the chassis. Opening it yourself could damage the equipment and
invalidate its warranty.
■ If any part of the equipment becomes damaged or stops functioning, have it checked by qualifi ed service personnel.
What the warranty does not cover
■ Any product, on which the serial number has been defaced, modifi ed or removed.
■ Damage, deterioration or malfunction resulting from:
□ Accident, misuse, neglect, fi re, water, lightning, or other acts of nature, unauthorized product modifi cation, or
failure to follow instructions supplied with the product.
□ Repair or attempted repair by anyone not authorized by us.
□ Any damage of the product due to shipment.
□ Removal or installation of the product.
□ Causes external to the product, such as electric power fl uctuation or failure.
□ Use of supplies or parts not meeting our specifi cations.
□ Normal wear and tear.
□ Any other causes which does not relate to a product defect.
■ Removal, installation, and set-up service charges.
Regulatory Notices Federal Communications Commission (FCC)
This equipment has been tested and found to comply with the limits for a Class B digital device, pursuant to Part 15 of
the FCC rules. These limits are designed to provide reasonable protection against harmful interference in a residential
installation.
Any changes or modifi cations made to this equipment may void the user’s authority to operate this equipment. This
equipment generates, uses, and can radiate radio frequency energy and, if not installed and used in accordance with the
instructions, may cause harmful interference to radio communications.
However, there is no guarantee that interference will not occur in a particular installation. If this equipment does cause
harmful interference to radio or television reception, which can be determined by turning the equipment off and on, the
user is encouraged to try to correct the interference by one or more of the following measures:
■ Re-position or relocate the receiving antenna.
■ Increase the separation between the equipment and receiver.
■ Connect the equipment into an outlet on a circuit different from that to which the receiver is connected.

Contents
< Part 1 > Matrix Cat6 KVM
MKCS1602 MKCS1603 MKCS1604
MKCS3202 MKCS3203 MKCS3204
1.1 Package contents
1.2 KVM port & Cat6 dongle connection
1.3 Remote & Local console connection
1.4 KVM Cascade
1.5 Specifications
< Part 2 > Usage
2.1 KVM Button
2.2 Password
2.3 KVM OSD
2.4 KVM Hotkey / Remote Console Hotkey
P.1 - 2
P.3
P.4 - 5
P.6
P.7
P.8
P.9
P.10
P.11

A
B
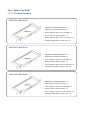
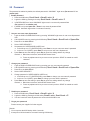
Figure 1.
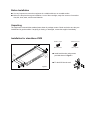
■ It is very important to mount the equipment in a suitable cabinet or on a stable surface.
■ Make sure the place has a good ventilation, is out of direct sunlight, away from sources of excessive
dust, dirt, heat, water, moisture and vibration.
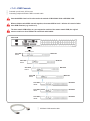
Unpacking
The equipment comes with the standard parts shown in package content. Check and make sure they are
included and in good condition. If anything is missing, or damaged, contact the supplier immediately.
Before Installation
Installation for standalone KVM
M3.2 x 4.5 mm M4 x 10 mm
■ Install each bracket using screws
provided shown in Figure 1.
■ Fix the KVM into the rack
Screw A: 2 pcs Screw B: 8 pcs

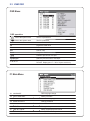
Part 1. Matrix Cat6 KVM
< 1.1 > Package Contents
MKCS1602 / MKCS3202
KVM unit
• MKCS1602 or MKCS 32 02 KVM unit x 1
• Mounting set w/ bracket & screws x 1
• Power adapter w/ power cord ( for KVM ) x 1
• Receiver box for remote console x 1
• Power adapter w/ power cord ( for receiver ) x 1
• 6ft Combo KVM cable for receiver box x 1
MKCS1603 / MKCS3203
KVM unit
• MKCS1603 or MKCS 32 03 KVM unit x 1
• Mounting set w/ bracket & screws x 1
• Power adapter w/ power cord ( for KVM ) x 1
• Receiver box for remote console x 2
• Power adapter w/ power cord ( for receiver ) x 2
• 6ft Combo KVM cable for receiver box x 2
MKCS1604 / MKCS3204
KVM unit
• MKCS1604 or MKCS 32 04 KVM unit x 1
• Mounting set w/ bracket & screws x 1
• Power adapter w/ power cord ( for KVM ) x 1
• Receiver box for remote console x 3
• Power adapter w/ power cord ( for receiver ) x 3
• 6ft Combo KVM cable for receiver box x 3


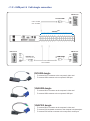
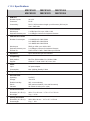
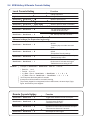
< 1.2 > KVM port & Cat6 dongle connection
USB Servers
CAT 5 / 6 cable
max. 40 meters
DG-100SD
DVI-USB dongle
USB
DVI-D
Cat6 KVM port
PS/2 Servers USB Servers
PS/2 DG-100
VGA-PS/2 dongle
DG-100S
VGA-USB dongle
USB
CAT 5 / 6 cable
VGA
max. 40 meters
VGA
DVI-USB dongle
¦ To connect DVI-D connector to the computer’s video card
¦ To connect USB connector to the computer’s USB port
VGA-USB dongle
¦ To connect DB-15 connector to the computer’s video card
¦ To connect USB connector to the computer’s USB port
VGA-PS/2 dongle
¦ To connect DB-15 connector to the computer’s video card
¦ To connect PS/2 keyboard connector to the computer’s keyboard port
¦ To connect PS/2 mouse connector to the computer’s mouse port


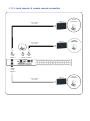
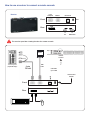
How to use a receiver to connect a remote console
Receiver
Front
Local
Computer Monitor Remote I/O
Power
Rear
USB
K/B Mouse
Local Remote
Button
to
PC
Button
to
KVM switch
The receiver provides a hotkey function for remote console.
Monitor
Remote
Console
Local computer
( Optional setup )
Combo
VGA
cable
KVM cable
Cat6 cable
up to 150m
12V DC Power
Adapter
Front
Rear

< 1.4 > KVM Cascade
¦ Cascade up to 8 levels, 256 servers
¦ Cascading multiple KVM with CMC-8 cascade cable.
Cascaded KVMs from level 2 to 8 must be the models of MKCS1602 /3202 or MKS802 /1602.
When multiple matrix KVMs cascade together, the master KVM at level 1 will take all control of other
slave KVM switches (e.g. level 2 to 8).
The slave matrix KVM will be as a port expansion module of the master matrix KVM, the original
remote console on slave KVM will be sacrificed and disabled.
Master KVM
out in
Cascade
Slave KVM
level 2
To cascade IN port
MKCS1602
Slave KVM
level 3
Slave KVM
level 4
Slave KVM
level 5
Slave KVM
level 6
Slave KVM
level 7
Slave KVM
level 8
MKCS1602
MKCS1602
MKCS1602
MKCS3202
MKCS3202
MKCS3202
CMC-8
¦ 8ft Matrix KVM cascade cable

< 1.5 > Specifications
MKCS1602 MKCS1603 MKCS1604
MKCS3202 MKCS3203 MKCS3204
¯ KVM Port
Number of ports: 16 or 32
Connector: RJ-45
Connectivity: DVI-D / VGA connector dongle up to 40 meters (132 feet) via
Cat6 / Cat5 cable
¯ Local Console
Monitor port: 1 x DB15-pin VGA, up to 1600 x 1200
Keyboard & mouse port: 2 x USB type connector for keyboard & mouse
¯ Cat6 Remote Console
Number of remote port: 1 for MKCS1602 / MKCS3202
2 for MKCS1603 / MKCS3203
3 for MKCS1604 / MKCS3204
Monitor port: DB15-pin VGA, up to 1600 x 1200
Keyboard & mouse port: 2 x USB type connector for keyboard & mouse
Remote I/O: RJ45 via Cat5 / Cat5e / Cat6 cable up to 500 feet
¯ Expansion: Up to 256 servers by 8-level cascade
¯ Compatibility
Multi-platform: Mix PCs, SUN and Mac G3 / G4 Mac / iMac
Support: Windows 7 / Vista / 2003 / XP, Linux, Unix
¯ Power
Input: AC power adapter
Consumption: Max. 48 Watt, Standby 5 Watt
¯ Regulatory Approval: cUL, FCC, CE
¯ Environmental
Operating: 0 to 50°C
Storage: -5 to 60°C
Relative humidity: 90%, non-condensing
Shock: 50G peak acceleration (11ms, half-sine wave)
Vibration: 58~100Hz / 0.98G (11ms / cycle)
¯ Product Information
Dimension (W x D x H): 443 x 171 x 43.6 mm / 17.4 x 6.7 x 1.72 inch
Net weight: 3 kg / 6.5 lb
¯ Packing Information
Dimension (W x D x H): 500 x 400 x 90 mm / 19.7 x 15.7 x 3.5 inch
Gross weight: 5 kg / 11 lb

Part 2. Usage
2.1 KVM Bu tton
P ower O N
¦ Tu rn o ff a ll serve rs a nd KVM switch e s
¦ M ake su re a ll ca ble s / con nectors are p ro pe rly co nn e cte d
¦ Re com m en d P o we r O N seque n ce is m on ito r, KVM switc h f in a lly co m p ut er
F ron t Pa nel - Port LED Indica tions
1 6 po r ts
Ban k no . P C po rt LE Ds Chan nel
b utton
B ank
b utto n
3 2 po r ts
B a nk no . 7 -S eg m e nt B AN K L E D in dica tion
P C p ort LE D s O nlin e : B lue L ED o n in dica ting a P C is conne cting t o the p ort
Ac tiv e : G re e n L E D o n in dica ting a se lect ed ch a nn e l
Re m ote : O ra ng e LED o n ind icatin g th e po rt is sele cting b y I P / re m o te conso le
C h an ne l bu tt on P re s s to se le ct chan n el fro m 0 1 to 32
B a nk bu tto n S e lect t he b an k fr om 1 to 8

2.2 Password
The password is enabled by default, the default password is “00000000” eight zeros (Do not use “0” on
number pad)
¦ Enable password
1. Press the KVM hotkey Scroll Lock + Scroll Lock + U
2. Logout the KVM by pressing the hotkey Scroll Lock + Scroll Lock + P
3. In SUPERVISOR level, enter “00000000” eight zeros in user name & password field
(Do not use “0” on number pad)
4. In USER level, press Space bar + Enter in user name & password field
Remark: Automatic logout after 10 minutes of inactivity
¦ Set your own user name & password
1. Login the KVM in SUPERVISOR level by pressing “00000000” eight zeros in user name & password
field
2. Call KVM OSD menu by pressing the KVM hotkey Scroll Lock + Scroll Lock + Space Bar
3. Press F1 to the MAIN MENU
4. Select “USER SECURITY”
5. Set password in SUPERVISOR & USER level
a. In the left-top row “S” (SUPERVISOR), press Enter to set your own user name & password
b. In the row 1 to 8 (USER), press Enter to set your own user name & password
6. Press Enter to save the setting or press Esc to cancel the editing without any change
Remark: a. Blank has underscore, while SPACE doesn’t have
b. Press any alphanumeric key to move to next input item. SPACE is treated as a valid
character
¦ Change your password
1. Login the KVM in SUPERVISOR level by pressing your own user name & password
2. Call KVM OSD menu by pressing the KVM hotkey Scroll Lock + Scroll Lock + Space Bar
3. Press F1 to the MAIN MENU
4. Select “USER SECURITY”
5. Change password in SUPERVISOR & USER level
a. In the left-top row “S” (SUPERVISOR), press Enter to change your user name & password
b. In the row 1 to 8 (USER), press Enter to change your user name & password
6. Press Enter to save the setting or press Esc to cancel the editing without any change
Remark: a. Blank has underscore, while SPACE doesn’t have
b. Press any alphanumeric key to move to next input item. SPACE is treated as a valid
character
¦ Disable your password
1. Press the KVM hotkey Scroll Lock + Scroll Lock + U
2. Logout the KVM by pressing the KVM hotkey Scroll Lock + Scroll Lock + P
3. You don’t need user name & password to access the KVM OSD menu
¦ Forget your password
Please contact your supplier for further support
Remark:
¦ You must press the KVM hotkey within 2 seconds
¦ A beep sound will be heard for successful entering KVM hotkey

2.3 KVM OSD
OSD Menu
OSD operation
next to the system name The PC is powered on
next to the system name The PC is selected
F1 Access F1 MAIN MENU
F2 Logout the OSD menu
F3 Previous menu
Esc Cancel / Quit
Enter Complete / Switch to selected port
Switch to previous or next port
PgUp/PgDn Switch to previous bank or next bank
Display port 01 ~ 08 / 09 ~ 16 / 17 ~ 24 / 25 ~ 32
1 / 2 / 3 / 4
Remark: Display port 17 ~ 32 for 32 port model only
F1 Main Menu
01
LANGUAGE
OSD language change
02
PORT NAME EDIT
Define port name
03
PORT SEARCH
Quick searching by port name
04
USER SECURITY
Change password
05
ACCESS LIST
Define user access authority
06
HOTKEY
Change hotkey
07
TIME SETTINGS
Modify scan display time interval
08
OSD MOUSE
Modify OSD mouse speed

Scroll Lock + Scroll Lock +
Space Bar
Calling OSD menu
Right-button mouse + Esc
Calling OSD menu
+
Port no.
Switch to specific port
Turn the buzzer ON and OFF
* Default the buzzer is ON
Logout the KVM if password security is
ON. Show up the status windows
Scroll Lock
+
Scroll Lock
+
S
Activate auto-scan mode for remote & local port
*The scan time interval is 5 seconds
Scroll Lock
+
Scroll Lock
+
A
Auto-adjust the video signal
2.4 KVM Hotkey & Remote Console Hotkey
Local Console Hotkey Function
Scroll Lock
+
Scroll Lock
+
Switch to previous port
Scroll Lock
+
Scroll Lock
+
Switch to next port
Scroll Lock
+
Scroll Lock
+
PgUp / PgDn
Switch to previous bank or next bank
Scroll Lock + Scroll Lock + Bank no.
Scroll Lock + Scroll Lock + B
Scroll Lock + Scroll Lock + P
Advance hotkeys (for Supervisor login only)
Scroll Lock + Scroll Lock + S
Scroll Lock + Scroll Lock + R
Activate auto-scan mode for connected
servers
*Press any key to exit the auto-scan
mode
Reset all the KVM settings to factory
default
*Except User Security settings
Scroll Lock + Scroll Lock + U
Disable and enable password security
*Default security is ON
To enable / disable the screen saving
Scroll Lock + Scroll Lock + L function and 10 minutes auto-logout
*Default the screen saving is OFF
Remarks: ¦ Example of “Scroll Lock + Scroll Lock + Bank no. + Port no.”
- Bank No. : 1 to 8
- Port No. : 01 to 16
- e.g. Bank 1 Port 4 : Scroll Lock + Scroll Lock + 1 + 0 + 4
- e.g. Bank 2 Port 16 : Scroll Lock + Scroll Lock + 2 + 1 + 6
¦ You must press the hotkey within 2 seconds
¦ A beep sound will be heard for successful entering
¦ The numeric keypad is not supported, while in OSD screen, the arrow keys, PgUp,
PgDn, and Enter keys are supports
Remote Console Hotkey Function
Scroll Lock
+
Scroll Lock
+
C
Toggle switch between remote & local port
Scroll Lock
+
Scroll Lock
+
Q
Turn the buzzer ON & OFF
*Default the buzzer is ON
-
 1
1
-
 2
2
-
 3
3
-
 4
4
-
 5
5
-
 6
6
-
 7
7
-
 8
8
-
 9
9
-
 10
10
-
 11
11
-
 12
12
-
 13
13
-
 14
14
-
 15
15


Acnodes MKCS1602 Manuale utente
- Categoria
- Switch KVM
- Tipo
- Manuale utente
in altre lingue
- English: Acnodes MKCS1602 User manual
Documenti correlati
Altri documenti
-
Lindy 32514 Manuale utente
-
Intellinet 507844 Manuale utente
-
-
Belkin OMNIVIEW SMB CAT5 KVM SWITCH Manuale del proprietario
-
-
-
ATEN CS62US Guida Rapida
-
ATEN CL6708MW Guida Rapida
-
 rackit Cat5 Reach Installation And Operation
-
Mitsubishi Electric TC-42MM-EU Scheda dati
