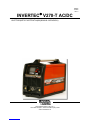
INVERTEC V270-T AC/DC Manuale utente
- Categoria
- Sistema di saldatura
- Tipo
- Manuale utente


II
Declaration of conformity
Dichiarazione di conformità
Konformitätserklärung
Declaración de conformidad
Déclaration de conformité
Samsvars erklæring
Verklaring van overeenstemming
Försäkran om överensstämmelse
Deklaracja zgodności
Vakuutus yhteensopivuudesta
Declaração de Conformidade
LINCOLN ELECTRIC ITALIA S.r.l.
Declares that the welding machine:
Dichiara che Il generatore per saldatura tipo:
Erklärt, daß die Bauart der Maschine:
Declara que el equipo de soldadura:
Déclare que le poste de soudage:
Bekrefter at denne sveisemaskin:
Verklaart dat de volgende lasmachine:
Försäkrar att svetsomriktaren:
Deklaruje, że spawalnicze źródło energii:
Vakuuttaa, että hitsauskone:
Declara que a máquina de soldar:
INVERTEC® V270-T AC/DC
conforms to the following directives:
è conforme alle seguenti direttive:
den folgenden Bestimmungen entspricht:
es conforme con las siguientes directivas:
est conforme aux directives suivantes:
er i samsvar med følgende direktiver:
overeenkomt conform de volgende richtlijnen:
överensstämmer med följande direktiv:
spełnia następujące wytyczne:
täyttää seuraavat direktiivit:
está em conformidade com as seguintes directivas:
2006/95/CEE, 2004/108/CEE
and has been designed in compliance with the following
standards:
ed è stato progettato in conformità alle seguenti norme:
und in Übereinstimmung mit den nachstehenden normen
hergestellt wurde:
y ha sido diseñado de acuerdo con las siguientes
normas:
et qu'il a été conçu en conformité avec les normes:
og er produsert og testet iht. følgende standarder:
en is ontworpen conform de volgende normen:
och att den konstruerats i överensstämmelse med
följande standarder:
i że zostało zaprojektowane zgodnie z wymaganiami
następujących norm:
ja on suunniteltu seuraavien standardien mukaan:
e foi concebida de acordo com as seguintes normas:
EN 60974-1, EN 60974-10
(2009)
Dario Gatti
European Engineering Director Machines
LINCOLN ELECTRIC ITALIA S.r.l., Via Fratelli Canepa 8, 16010 Serra Riccò (GE), Italia
12/05

III
07/06
English
Do not dispose of electrical equipment together with normal waste!
In observance of European Directive 2002/96/EC on Waste Electrical and Electronic Equipment (WEEE) and its
implementation in accordance with national law, electrical equipment that has reached the end of its life must be
collected separately and returned to an environmentally compatible recycling facility. As the owner of the equipment,
you should get information on approved collection systems from our local representative.
By applying this European Directive you will protect the environment and human health!
Italiano
Non gettare le apparecchiature elettriche tra i rifiuti domestici!
In ottemperanza alla Direttiva Europea 2002/96/CE sui Rifiuti di Apparechiature Elettriche ed Elettroniche (RAEE) e la
sua attuazione in conformità alle norme nazionali, le apparecchiature elettriche esauste devono essere raccolte
separatamente e restituite ad una organizzazione di riciclaggio ecocompatibile. Come proprietario dell’apparecchiatura,
Lei potrà ricevere informazioni circa il sistema approvato di raccolta, dal nostro rappresentante locale.
Applicando questa Direttiva Europea Lei contribuirà a migliorare l’ambiente e la salute!
Deutsch
Werfen Sie Elektrowerkzeuge nicht in den Hausmüll!
Gemäss Europäischer Richtlinie 2002/96/EG über Elektro- und Elektronik- Altgeräte (Waste Electrical and Electronic
Equipment, WEEE) und Umsetzung in nationales Recht müssen verbrauchte Elektrowerkzeuge getrennt gesammelt und
einer umweltgerechten Wiederverwertung zugeführt werden. Als Eigentümer diese Werkzeuges sollten sie sich
Informationen über ein lokales autorisiertes Sammel- bzw. Entsorgungssystem einholen.
Mit der Anwendung dieser EU Direktive tragen sie wesentlich zur Schonung der Umwelt und ihrer Gesundheit bei!
Español
No tirar nunca los aparatos eléctricos junto con los residuos en general!.
De conformidad a la Directiva Europea 2002/96/EC relativa a los Residuos de Equipos Eléctricos o Electrónicos (RAEE)
y al acuerdo de la legislación nacional, los equipos eléctricos deberán ser recogidos y reciclados respetando el
medioambiente. Como propietario del equipo, deberá informar de los sistemas y lugares apropiados para la recogida de
los mismos.
Aplicar esta Directiva Europea protegerá el medioambiente y su salud!
Français
Ne pas jeter les appareils électriques avec les déchets ordinaires!
Conformément à la Directive Européenne 2002/96/EC relative aux Déchets d' Équipements Électriques ou Électroniques
(DEEE), et à sa transposition dans la législation nationale, les appareils électriques doivent être collectés à part et être
soumis à un recyclage respectueux de l’environnement. En tant que propriétaire de l’équipement, vous devriez vous
informer sur les systèmes de collecte approuvés auprès nos représentants locaux.
Appliquer cette Directive Européenne améliorera l’environnement et la santé!
Norsk
Kast ikke elektriske artikler sammen med vanlig søppel.
I følge det europeiske direktivet for Elektronisk Søppel og Elektriske Artikler 2002/96/EC (Waste Electrical and Electronic
Equipment, WEEE) skal alt avfall kildesorteres og leveres på godkjente plasser i følge loven. Godkjente retur plasser gis
av lokale myndigheter.
Ved å følge det europeiske direktivet bidrar du til å bevare naturen og den menskelige helse.
Nederlandse
Gooi elektrische apparatuur nooit bij gewoon afval!
Met inachtneming van de Europese Richtlijn 2002/96/EC met betrekking tot Afval van Elektrische en Elektronische
Apparatuur (Waste Electrical and Electronic Equipment, WEEE) en de uitvoering daarvan in overeenstemming met
nationaal recht, moet elektrische apparatuur, waarvan de levensduur ten einde loopt, apart worden verzameld en worden
ingeleverd bij een recycling bedrijf, dat overeenkomstig de milieuwetgeving opereert. Als eigenaar van de apparatuur
moet u informatie inwinnen over goedgekeurde verzamelsystemen van onze vertegenwoordiger ter plaatse.
Door het toepassen van deze Europese Richtlijn beschermt u het milieu en ieders gezondheid!
Svenska
Släng inte uttjänt elektrisk utrustning tillsammans med annat avfall!
Enligt Europadirektiv 2002/96/EC ang. Uttjänt Elektrisk och Elektronisk Utrustning (Waste Electrical and Electronic
Equipment, WEEE) och dess implementering enligt nationella lagar, ska elektrisk utrustning som tjänat ut sorteras
separat och lämnas till en miljögodkänd återvinningsstation. Som ägare till utrustningen, bör du skaffa information om
godkända återvinningssystem från dina lokala myndigheter.
Genom att följa detta Europadirektiv bidrar du till att skydda miljö och hälsa!
Polski
Nie wyrzucać osprzętu elektrycznego razem z normalnymi odpadami!
Zgodnie z Dyrektywą Europejską 2002/96/EC dotyczącą Pozbywania się zużytego Sprzętu Elektrycznego i
Elektronicznego (Waste Electrical and Electronic Equipment, WEEE) i jej wprowadzeniem w życie zgodnie z
międzynarodowym prawem, zużyty sprzęt elektryczny musi być składowany oddzielnie i specjalnie utylizowany. Jako
właściciel urządzeń powinieneś otrzymać informacje o zatwierdzonym systemie składowania od naszego lokalnego
przedstawiciela.
Stosując te wytyczne bedziesz chronił środowisko i zdrowie człowieka!
Suomi
Älä hävitä sähkölaitteita sekajätteiden mukana!
Noudatettaessa Euroopan Unionin Direktiiviä 2002/96/EY Sähkölaite- ja Elektroniikkajätteestä ( WEEE ) ja
toteutettaessa sitä sopusoinnussa kansallisen lain kanssa, sähkölaite, joka on tullut elinkaarensa päähän pitää kerätä
erilleen ja toimittaa sähkö- ja elektroniikkaromujen keräyspisteeseen. Lisätietoja tämän tuotteen käsittelystä,
keräämisestä ja kierrätyksestä saa kunnan ympäristöviranomaisilta.
Noudattamalla tätä Euroopan Unionin direktiiviä, autat torjumaan kielteiset ynpäristö- ja terveysvaikutukset!
Português
Não deitar fora o equipamento eléctrico juntamente com o lixo normal!
Em conformidade com a directiva Europeia 2002/96/EC relativa a Resíduos Eléctricos e Equipamento Eléctricos (REEE)
e de acordo com a legislação nacional, os equipamentos deverão ser recolhidos separadamente e reciclados
respeitando o meio ambiente. Como proprietário do equipamento, deverá informar-se dos sistemas e lugares
apropriados para a recolha dos mesmos.
Ao aplicar esta Directiva Europeia protegerá o meio ambiente e a saúde humana!

IV
12/05
THANKS! For having choosen the QUALITY of the Lincoln Electric products.
• Please Examine Package and Equipment for Damage. Claims for material damaged in shipment must be notified immediately to
the dealer.
• For future reference record in the table below your equipment identification information. Model Name, Code & Serial Number
can be found on the machine rating plate.
GRAZIE! Per aver scelto la QUALITÀ dei prodotti Lincoln Electric.
• Esamini Imballo ed Equipaggiamento per rilevare eventuali danneggiamenti. Le richieste per materiali danneggiati dal trasporto
devono essere immediatamente notificate al rivenditore.
• Per ogni futuro riferimento, compilare la tabella sottostante con le informazioni di identificazione equipaggiamento. Modello,
Codice (Code) e Matricola (Serial Number) sono reperibili sulla targa dati della macchina.
VIELEN DANK! Dass Sie sich für ein QUALITÄTSPRODUKT von Lincoln Electric entschieden haben.
• Bitte überprüfen Sie die Verpackung und den Inhalt auf Beschädigungen. Transportschäden müssen sofort dem Händler
gemeldet werden.
• Damit Sie Ihre Gerätedaten im Bedarfsfall schnell zur Hand haben, tragen Sie diese in die untenstehende Tabelle ein.
Typenbezeichnung, Code- und Seriennummer finden Sie auf dem Typenschild Ihres Gerätes.
GRACIAS! Por haber escogido los productos de CALIDAD Lincoln Electric.
• Por favor, examine que el embalaje y el equipo no tengan daños. La reclamación del material dañado en el transporte debe ser
notificada inmediatamente al proveedor.
• Para un futuro, a continuación encontrará la información que identifica a su equipo. Modelo, Code y Número de Serie los cuales
pueden ser localizados en la placa de características de su equipo.
MERCI! Pour avoir choisi la QUALITÉ Lincoln Electric.
• Vérifiez que ni l’équipement ni son emballage ne sont endommagés. Toute réclamation pour matériel endommagé doit être
immédiatement notifiée à votre revendeur.
• Notez ci-dessous toutes les informations nécessaires à l’identification de votre équipement. Le nom du Modèle ainsi que les
numéros de Code et Série figurent sur la plaque signalétique de la machine.
TAKK! For at du har valgt et KVALITETSPRODUKT fra Lincoln Electric.
• Kontroller emballsjen og produktet for feil eller skader. Eventuelle feil eller transportskader må umiddelbart rapporteres dit du har
kjøpt din maskin.
• For fremtidig referanse og for garantier og service, fyll ut den tekniske informasjonen nedenfor i dette avsnittet. Modell navn,
Kode & Serie nummer finner du på den tekniske platen på maskinen.
BEDANKT! Dat u gekozen heeft voor de KWALITEITSPRODUCTEN van Lincoln Electric.
• Controleert u de verpakking en apparatuur op beschadiging. Claims over transportschade moeten direct aan de dealer of aan
Lincoln electric gemeld worden.
• Voor referentie in de toekomst is het verstandig hieronder u machinegegevens over te nemen. Model Naam, Code &
Serienummer staan op het typeplaatje van de machine.
TACK! För att ni har valt en KVALITETSPRODUKT från Lincoln Electric.
• Vänligen kontrollera förpackning och utrustning m.a.p. skador. Transportskador måste omedelbart anmälas till återförsäljaren
eller transportören.
• Notera informationen om er utrustnings identitet i tabellen nedan. Modellbeteckning, code- och serienummer hittar ni på
maskinens märkplåt.
DZIĘKUJEMY! Za docenienie JASKOŚCI produktów Lincoln Electric.
• Proszę sprawdzić czy opakownie i sprzęt nie są uszkodzone. Reklamacje uszkodzeń powstałych podczas transportu muszą być
natychmiast zgłoszone do dostawcy (dystrybutora).
• Dla ułatwienia prosimy o zapisanie na tej stronie danych identyfikacyjnych wyrobów. Nazwa modelu, Kod i Numer Seryjny, które
możecie Państwo znaleźć na tabliczce znamionowej wyrobu.
KIITOS! Kiitos, että olet valinnut Lincoln Electric LAATU tuotteita.
• Tarkista pakkaus ja tuotteet vaurioiden varalta. Vaateet mahdollisista kuljetusvaurioista on ilmoitettava välittömästi
jälleenmyyjälle.
• Tulevaisuutta varten täytä alla oleva lomake laitteen tunnistusta varten. Mallin, Koodin ja Sarjanumeron voit löytää konekilvestä.
OBRIGADO! Por ter escolhido os produtos de QUALIDADE da Lincoln Electric.
• Por favor, examine a embalagem e o equipamento para que não tenham danos. A reclamação de danos do material no
transporte deverá ser notificadas imediatamente ao revendedor.
• Para futura referência, registe abaixo a informação de identificação do equipamento. Modelo, Código e Número de Série podem
ser encontrados na chapa de características do equipamento.
Model Name, Modello, Typenbezeichnung, Modelo, Nom du modèle, Modell navn, Model Naam, Modellbeteckning, Nazwa modelu,
Mallinimi, Modelo:
………………...…………………………….…………………………………………………………………………………………..
Code & Serial number, Code (codice) e Matricola, Code- und Seriennummer, Code y Número de Serie, Numéros de Code et Série,
Kode & Serie nummer, Code en Serienummer, Code- och Serienummer, Kod i numer Seryjny, Koodi ja Sarjanumero, Código e
Número de Série:
………………….……………………………………………….. …………………………………………………….……………..
Date & Where Purchased, Data e Luogo d’acquisto, Kaufdatum und Händler, Fecha y Nombre del Proveedor, Lieu et Date
d’acquisition, Kjøps dato og Sted, Datum en Plaats eerste aankoop, Inköpsdatum och Inköpsställe, Data i Miejsce zakupu, Päiväys ja
Ostopaikka, Data e Local de Compra:
…………………………………………………………………... ……………………….…………………………………………..

V
ENGLISH INDEX
Safety ................................................................................................................................................................................................................ A-1
Installation and Operator Instructions................................................................................................................................................................ A-2
Electromagnetic Compatibility (EMC)................................................................................................................................................................ A-9
Technical Specifications.................................................................................................................................................................................. A-10
INDICE ITALIANO
Sicurezza........................................................................................................................................................................................................... B-1
Installazione e Istruzioni Operative.................................................................................................................................................................... B-2
Compatibilità Elettromagnetica (EMC) .............................................................................................................................................................. B-9
Specifiche Tecniche ........................................................................................................................................................................................ B-10
INHALTSVERZEICHNIS DEUTSCH
Sicherheitsmaßnahmen / Unfallschutz.............................................................................................................................................................. C-1
Installation und Bedienungshinweise ................................................................................................................................................................C-2
Elektromagnetische Verträglichkeit (EMC)......................................................................................................................................................C-10
Technische Daten ...........................................................................................................................................................................................C-11
INDICE ESPAÑOL
Seguridad..........................................................................................................................................................................................................D-1
Instalación e Instrucciones de Funcionamiento.................................................................................................................................................D-2
Compatibilidad Electromagnética (EMC)...........................................................................................................................................................D-9
Especificaciones Técnicas .............................................................................................................................................................................. D-10
INDEX FRANÇAIS
Sécurité ............................................................................................................................................................................................................. E-1
Installation et Instructions d'Utilisation............................................................................................................................................................... E-2
Compatibilité Electromagnétique (CEM) ........................................................................................................................................................... E-9
Caractéristiques Techniques........................................................................................................................................................................... E-10
NORSK INNHOLDSFORTEGNELSE
Sikkerhetsregler ................................................................................................................................................................................................ F-1
Installasjon og Brukerinstruksjon....................................................................................................................................................................... F-2
Elektromagnetisk Kompatibilitet (EMC) ............................................................................................................................................................. F-9
Tekniske Spesifikasjoner................................................................................................................................................................................. F-10
NEDERLANDSE INDEX
Veiligheid...........................................................................................................................................................................................................G-1
Installatie en Bediening .....................................................................................................................................................................................G-2
Elektromagnetische Compatibiliteit (EMC) ........................................................................................................................................................G-9
Technische Specificaties.................................................................................................................................................................................G-10
SVENSK INNEHÅLLSFÖRTECKNING
Säkerhetsanvisningar........................................................................................................................................................................................H-1
Instruktioner för Installation och Handhavande .................................................................................................................................................H-2
Elektromagnetisk Kompatibilitet (EMC) .............................................................................................................................................................H-9
Tekniska Specifikationer .................................................................................................................................................................................H-10
SKOROWIDZ POLSKI
Bezpieczeństwo Użytkowania .............................................................................................................................................................................I-1
Instrukcja Instalacji i Eksploatacji ........................................................................................................................................................................I-2
Kompatybilność Elektromagnetyczna (EMC) ......................................................................................................................................................I-9
Dane Techniczne ..............................................................................................................................................................................................I-10
SISÄLLYSLUETTELO
Turvallisuus ........................................................................................................................................................................................................J-1
Asennus ja Käyttöohjeet.....................................................................................................................................................................................J-2
Elektromagneettinen Yhteensopivuus (EMC).....................................................................................................................................................J-8
Tekniset Tiedot...................................................................................................................................................................................................J-9
INDÍCE PORTUGUÊS
Segurança......................................................................................................................................................................................................... K-1
Instalação e Instruções de Funcionamento....................................................................................................................................................... K-2
Compatibilidade Electromagnética (EMC)......................................................................................................................................................... K-9
Especificações Técnicas ................................................................................................................................................................................. K-10
Spare Parts, Parti di Ricambio, Ersatzteile, Lista de Piezas de Recambio, Pièces de Rechange, Deleliste, Reserve Onderdelen, Reservdelar,
Wykaz Części Zamiennych, Varaosaluettelo, Lista De Peças Sobressalentes.....................................................................................................1
Electrical Schematic, Schema Elettrico, Elektrische Schaltpläne, Esquema Eléctrico, Schéma Electrique, Elektrisk Skjema, Elektrisch Schema,
Elektriskt Kopplingsschema, Schemat Elektryczny, Sähkökaavio, Esquema Eléctrico.........................................................................................5
Accessories, Accessori, Zubehör, Accesorios, Accessoires, Tilleggsutstyr, Accessores, Tillbehör, Akcesoria, Varusteet, Accessórios ..............6

A
-1
Safety
11/04
WARNING
This equipment must be used by qualified personnel. Be sure that all installation, operation, maintenance and repair
procedures are performed only by qualified person. Read and understand this manual before operating this equipment.
Failure to follow the instructions in this manual could cause serious personal injury, loss of life, or damage to this
equipment. Read and understand the following explanations of the warning symbols. Lincoln Electric is not responsible
for damages caused by improper installation, improper care or abnormal operation.
WARNING: This symbol indicates that instructions must be followed to avoid serious personal injury,
loss of life, or damage to this equipment. Protect yourself and others from possible serious injury or
death.
READ AND UNDERSTAND INSTRUCTIONS: Read and understand this manual before operating
this equipment. Arc welding can be hazardous. Failure to follow the instructions in this manual could
cause serious personal injury, loss of life, or damage to this equipment.
ELECTRIC SHOCK CAN KILL: Welding equipment generates high voltages. Do not touch the
electrode, work clamp, or connected work pieces when this equipment is on. Insulate yourself from
the electrode, work clamp, and connected work pieces.
ELECTRICALLY POWERED EQUIPMENT: Turn off input power using the disconnect switch at the
fuse box before working on this equipment. Ground this equipment in accordance with local electrical
regulations.
ELECTRICALLY POWERED EQUIPMENT: Regularly inspect the input, electrode, and work clamp
cables. If any insulation damage exists replace the cable immediately. Do not place the electrode
holder directly on the welding table or any other surface in contact with the work clamp to avoid the
risk of accidental arc ignition.
ELECTRIC AND MAGNETIC FIELDS MAY BE DANGEROUS: Electric current flowing through any
conductor creates electric and magnetic fields (EMF). EMF fields may interfere with some
pacemakers, and welders having a pacemaker shall consult their physician before operating this
equipment.
CE COMPLIANCE: This equipment complies with the European Community Directives.
FUMES AND GASES CAN BE DANGEROUS: Welding may produce fumes and gases hazardous to
health. Avoid breathing these fumes and gases. To avoid these dangers the operator must use
enough ventilation or exhaust to keep fumes and gases away from the breathing zone.
ARC RAYS CAN BURN: Use a shield with the proper filter and cover plates to protect your eyes from
sparks and the rays of the arc when welding or observing. Use suitable clothing made from durable
flame-resistant material to protect you skin and that of your helpers. Protect other nearby personnel
with suitable, non-flammable screening and warn them not to watch the arc nor expose themselves to
the arc.
WELDING SPARKS CAN CAUSE FIRE OR EXPLOSION: Remove fire hazards from the welding
area and have a fire extinguisher readily available. Welding sparks and hot materials from the welding
process can easily go through small cracks and openings to adjacent areas. Do not weld on any
tanks, drums, containers, or material until the proper steps have been taken to insure that no
flammable or toxic vapors will be present. Never operate this equipment when flammable gases,
vapors or liquid combustibles are present.
WELDED MATERIALS CAN BURN: Welding generates a large amount of heat. Hot surfaces and
materials in work area can cause serious burns. Use gloves and pliers when touching or moving
materials in the work area.
SAFETY MARK: This equipment is suitable for supplying power for welding operations carried out in
an environment with increased hazard of electric shock.

A
-2
EQUIPMENT WEIGHT OVER 30kg: Move this equipment with care and with the help of another
person. Lifting may be dangerous for your physical health.
CYLINDER MAY EXPLODE IF DAMAGED: Use only compressed gas cylinders containing the
correct shielding gas for the process used and properly operating regulators designed for the gas and
pressure used. Always keep cylinders in an upright position securely chained to a fixed support. Do
not move or transport gas cylinders with the protection cap removed. Do not allow the electrode,
electrode holder, work clamp or any other electrically live part to touch a gas cylinder. Gas cylinders
must be located away from areas where they may be subjected to physical damage or the welding
process including sparks and heat sources.
HF CAUTION: The high frequency used for contact-free ignition with TIG (GTAW) welding, can interfere
with the operation of insufficiently shielded computer equipment, EDP centers and industrial robots,
even causing complete system breakdown. TIG (GTAW) welding may interfere with electronic
telephone networks and with radio and TV reception.
Installation and Operator Instructions
Read this entire section before installation or operation
of the machine.
Location and Environment
This machine will operate in harsh environments.
However, it is important that simple preventative
measures are followed to assure long life and reliable
operation.
• Do not place or operate this machine on a surface
with an incline greater than 15° from horizontal.
• Do not use this machine for pipe thawing.
• This machine must be located where there is free
circulation of clean air without restrictions for air
movement to and from the air vents. Do not cover
the machine with paper, cloth or rags when
switched on.
• Dirt and dust that can be drawn into the machine
should be kept to a minimum.
• This machine has a protection rating of IP23S.
Keep it dry when possible and do not place it on wet
ground or in puddles.
• Locate the machine away from radio controlled
machinery. Normal operation may adversely affect
the operation of nearby radio controlled machinery,
which may result in injury or equipment damage.
Read the section on electromagnetic compatibility in
this manual.
• Do not operate in areas with an ambient
temperature greater than 40°C.
Input Supply Connection
Check the input voltage, phase, and frequency supplied
to this machine before turning it on. The allowable input
voltage is indicated in the technical specification section
of this manual and on the rating plate of the machine.
Verify the connection of grounding wires from the
machine to the input source.
Make sure the amount of power available from the input
connection is adequate for normal operation of the
machine. The necessary fuse and cable sizes are
indicated in the technical specification section of this
manual.
The V270-T AC/DC is machine is designed to operate
on engine driven generators as long as the Vac auxiliary
can supply adequate power as indicated in the technical
specification section of this manual. The auxiliary supply
of the generator must also meet the following conditions.
• The AC waveform peak voltage is below 620V.
• The AC waveform frequency is between 50 and 60
Hz.
• The RMS voltage of the AC waveform is always
equal to 230/400Vac ±10%.
It is important to check these conditions because many
engine driven generators produce high voltage spikes.
Operation of this machine on engine driven generators
not conforming to these conditions is not recommended
and may damage the machine.
Output Connections
A quick disconnect system using Twist-Mate cable plugs
is used for the welding cable connections. Refer to the
following sections for more information on connecting
the machine for operation of stick welding (MMA) or TIG
welding (GTAW).
Stick Welding (MMA)
First determine the proper electrode polarity for the
electrode to be used. Consult the electrode data for this
information. Then connect the output cables to the
output terminals of the machine for the selected polarity.
For example, if DC(+) welding will be used then connect
the electrode cable to the (+) terminal of the machine
and the work clamp to the (-) terminal. Insert the
connector with the key lining up with the keyway and
rotate approximately ¼ turn clockwise. Do not over
tighten.
For DC(-) welding switch the cable connections at the
machine so that the electrode cable is connected to (-)
and the work clamp is connected to (+).
TIG Welding (GTAW)
This machine does not include a TIG torch necessary for
TIG welding, but one may be purchased separately.
Refer to the accessories section for more information.
Connect the torch cable to the (-) terminal of the
machine and the work clamp to the (+) terminal. Insert
the connector with the key lining up with the keyway and
rotate approximately ¼ turn clockwise. Do not over
tighten.

A
-3
Connect the gas hose from
the TIG torch to the gas
connector (B) on the front of
the machine. If necessary, an
extra gas connector for the
fitting on the front of the
machine is included in the
package. Next, connect the
fitting on the back of the machine to a gas regulator on
the cylinder of gas to be used. An input gas line and the
required fittings are also included in the package.
Connect the TIG torch trigger to the trigger connector (A)
on the front of the machine. Connect the water hoses to
the water connectors on the front of the Coolarc if the
machine is completed with a Coolarc water-cooler.
Remote Control Connection
Refer to the accessories section for a list of remote
controls. If a remote control is used, it will be connected
to the remote connector (C) on the front of the machine.
Optional COOL-ARC 34 Water Cooler
The optional Cool-Arc 34 water cooler is designed to
operate in communication with the V270-T AC/DC.
Refer to the Cool-Arc 34 operator manual for installation
instructions and a complete description of its operation.
When the V270-T AC/DC is powered ON the water
cooler Cool-Arc 34 will automatically power ON as well.
Rear Control Panel
WARNING
I1: Off/On switch turns on the electric power to the
welder. It has two positions, "O" off, and "I" on.
1. Supply cable.
2. Gas attachment.
3. Connector: SERVICE purposes only.
l1: Power Switch.
• With "l1" in the "I"(ON) position, the welding
machine is operational and there is voltage between
the positive (+) and negative (-) Terminals in stick
welding. In TIG, the welding process needs a
trigger closure command at the remote control
connection (Usually via an Arc Start Switch or Foot
Amptrol).
• The welder is connected to the supply even if the
"l1" (Power Switch) is in the "O" (Off) position, and
therefore there are electrically live parts inside the
power source. Carefully follow the instructions
given in this manual.
User Interface Overview and Operation
Figure B.3
The V270-T AC/DC User interface consists of the
following (Refer to Figure B.3):
1. Dynamic LCD Display
2. Status LED Lights
a) VRD On (Voltage Reduction Device) - If the
voltage reduction device is enabled from the
setup menu this green LED will illuminate when
the open circuit voltage is present at the output
terminals and held below the VRD threshold
limit. If the VRD is disabled or the unit is
welding, it will not illuminate.
b) General Alarm - Yellow LED which is lit when
faults exist with the power source or optional
cooler, such as over temperature, coolant
blockage, etc.
c) Output On (No VRD) - This status light will
illuminate red whenever the output in
electrically hot and the voltage level is above
the VRD threshold value.
3. 7-segment LED display (H)
4. Push button / Rotary Encoder
5. Mode Push buttons (A-D)
a) Weld Mode (A)
b) Trigger Mode (B)
c) TIG Pulse Mode (C)
d) Memory Location Select (D)
6. Push buttons (E, F)
e) Memory Save (E)
f) Memory Recall (F)
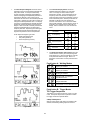
Dynamic LCD Display
The Dynamic display is divided into several sections
(Refer to Figure B.4):
Figure B.4
1. Weld Sequence Diagram
2. Parameter Display
3. Mode Push Button Indicators

A
-4
1. The Weld Sequence Diagram shows the various
parameters that can be selected and adjusted and
their preset values. As the push button/rotary
encoder is pressed a triangular shaped flashing
indicator will highlight the adjustable parameter on
the sequence diagram in bold. Each press of
theencoder will scroll to the next selected parameter
sequentially. Rotating the push button encoder will
change the selected parameter value. The display
is dynamic in that adjusting the selected parameter
dynamically changes the shape of the sequence
diagram. After 5 seconds of inactivity the selected
parameter will default back to the weld Output
Amperes parameter. Depressing the button again
will remember the last selected parameter and
begin the sequential scroll from that parameter.
Three Sequence Diagram types exist:
• STICK (See Figure B.4a)
• TIG (See Figure B.4b)
• Pulse TIG (See Figure B.4c)
Figure B.4a
Figure B.4b
Figure B.4c
2. The Parameter Display Section shows the
selected parameter its display icon and preset
value. To change the value, rotate the push
button/rotary encoder. Some parameters like AC
Frequency have an Enhanced Icon Display that
shows the effect of the varying parameter on the arc
and/or weld bead profile. As these parameters are
adjusted an indicator will move between the
minimum and maximum icon to show the relative
effect of that parameter. Pulse Frequency shown in
Figure B.4c is an example of the enhanced icon
display. Refer to Table B.1 for a list of Enhanced
Icons.
Symbol
Parameter Minimum Maximum
Ac Frequency
Ac Balance
Pulse Frequency
Hot Start
Arc Force
Table B.1
3. The Mode Push Buttons and Indicators show the
current selection made by the corresponding weld
push buttons (A-F). Refer to Table B.2 for a full list
of all parameters and their ranges. Below is a
description of the function of each push button and
display:
Push button A: Welding Modes
DC TIG - DC TIG welding with high
frequency arc initiation.
AC TIG - AC TIG welding with high
frequency arc initiation.
DC Touch Start TIG - DC TIG welding
with lift tig arc initiation.
Stick crisp mode - for Cellulosic
electrodes like Exx10.
Stick soft mode - for E7018 Low
Hydrogen electrodes.
AC Stick Mode - for AC Stick Electrodes.
Table B.2
Push button B: Trigger Modes
TIG Trigger Sequences
TIG welding can be done in either the 2-step or 4-step
mode. The specific sequences of operation for these
two trigger modes are explained below.
2-Step TIG Sequence
With the 2-step trigger mode and a TIG welding mode
selected, the following welding sequence will occur.

A
-5
1. Press and hold the TIG torch trigger to start the
sequence. The machine will open the gas valve to
start the flow of the shielding gas. After the preflow
time, to purge air from the torch hose, the output of
the machine is turned ON. At this time the arc is
started according to the selected welding mode.
After the arc is started the output current will be
increased at a controlled rate, or upslope time, until
the Welding current is reached.
2. Release the TIG torch trigger to stop welding. The
machine will now decrease the output current at a
controlled rate, or downslope time, until the Crater
current is reached and the output of the machine is
turned OFF.
After the arc is turned OFF, the gas valve will
remain open to continue the flow of the shielding
gas to the hot electrode and work piece.
As shown above, it is possible to press and hold the TIG
torch trigger a second time during downslope to end the
downslope function and maintain the output current at
the Crater current. When the TIG torch trigger is
released the output will turn OFF and the postflow time
will start. This operation, 2-step restart disabled, is the
default setting from the factory.
4-Step Sequence
With the 4-step trigger mode and a TIG welding mode
selected, the following welding sequence will occur.
1. Press and hold the TIG torch trigger to start the
sequence. The machine will open the gas valve to
start the flow of the shielding gas. After the preflow
time, to purge air from the torch hose, the output of
the machine is turned ON. At this time the arc is
started according to the selected welding mode.
After the arc is started the output current will be at
the Start current. This condition can be maintained
as long or as short as necessary.
If the Start current is not necessary, do not hold the
TIG torch trigger as described at the beginning of
this step. In this condition, the machine will pass
from Step 1 to Step 2 when the arc is started.
2. Releasing the TIG torch trigger starts the upslope
function. The output current will be increased at a
controlled rate, or upslope time, until the Welding
current is reached.
3. Press and hold the TIG torch trigger when the main
part of the weld is complete. The machine will now
decrease the output current at a controlled rate, or
downslope time, until the Crater current is reached.
This Crater current can be maintained as long or as
short as necessary.
This sequence has an automatic restart so welding
will continue after this step. This operation, 4-step
restart enabled, is the default setting from the
factory. If the weld is completely finished, use the
following sequence instead of step 3 described
above.
3A. Quickly press and release the TIG torch
trigger. The machine will now decrease the
output current at a controlled rate, or downslope
time, until the Crater current is reached and the
output of the machine is turned OFF. After the
arc is turned OFF the postflow time will start.
4. Release the TIG torch trigger. The output current
will again increase to the Welding current, like in
step 2, to continue welding. When the main part of
the weld is complete go to step 3.
As shown here, after
the TIG torch trigger is
quickly pressed and
released from step 3A,
it is possible to press
and hold the TIG torch
trigger another time to
end the downslope
time and maintain the
output current at the
Crater current. When
the TIG torch trigger is
released the output will
again increase to the
Welding current, like in step 4, to continue welding.
When the main part of the weld is complete go to step 3.

A
-6
As shown here, again
after the TIG torch trigger
is quickly pressed and
released from step 3A, it
is possible to quickly
press and release the
TIG torch trigger a
second time to end the
downslope time and stop
welding.
04/03
Bi-Level Current - (If Enabled from the
Setup Menu)
Depressing an arc start switch and releasing
will initiate the arc to current level A1.
Depressing and releasing the arc Start
switch again will toggle to current level A2.
Each depressing and releasing of the switch
will toggle between A1 and A2. Depressing
and holding the switch in will initiate the
down-slope to the finish current level and
finally releasing the trigger will extinguish the
arc.
Spot Timer -(If Enabled from theSetup
Menu)
Selecting this trigger mode will enable a spot
timer parameter setting to be displayed as a
welding parameter. Once the arc is
establish the machine will weld for the time
period set by the spot timer parameter
setting. The machine will follow the
functionality of two-step in that start current,
up-slope, down-slope and finish current can
all be adjusted.
Push button B: Trigger Modes
Stick Trigger Modes
Local
In this mode the machine ignores any remote
that is plugged. The machine will weld at the
preset value set at the panel of the machine.
Remote
Allows the amperage to be set with a remote
potentiometer.
Push button C: TIG Pulse Modes
Pulse On
Turns on pulse welding in TIG mode.
Changes the sequence diagram to Pulse TIG
and allows the adjustment of the following
added parameters:
• Pulse Frequency
• % Peak Time
• Background Current
Pulse Off
Turns off pulse welding inTIG.
Push button D, E & F: Memory
Operation
Pressing and releasing the memory location (D) button
will scroll through memory locations 1 through 10. When
a memory is recalled or saved the memory location
display will change to reversed text indicating that the
current memory parameters are active.
Normal Display
(Unselected)
Reversed Display
(Selected)
Saving to Memory
• Press and hold Memory Save Button (E) for 3
seconds to save to memory. The Memory location
display indicator (D) will change to a reverse text
indicating that the current parameters are the ones
in the actively selected memory.
Recalling from Memory
• Press and hold the memory recall button (F) for 3
seconds until the memory location display indicator
changes to reversed text indicating the stored
parameters are actively recalled.
• When memory parameters are actively selected, the
display indicator will remain reversed until a welding
parameter is changed with the encoder knob or until
the memory location button is pressed to scroll to a
different memory location.
Local/Remote Operation
The V270-T AC/DC, when in TIG mode, will
automatically sense when the machine has a remote
device plugged into the 6 pin MS-type connector-like a
remote pedant or a foot amptrol. If a remote device is
plugged in, the machine will automatically function in
remote mode. If no device is plugged in, the machine
will function in local mode.
In remote mode, the operation of the machine is slightly
different depending on whether the remote device is a
foot amptrol or a remote pendant. To let the machine
know what type of device is plugged in,the operator must
select the appropriate device from the trigger mode
button (See Trigger mode descriptions above for details
on the difference). In stick mode the second button on
the control panel selects local or remote operation
manually. This is required so that the user does not
need to detach a foot amptrol to use the machine in
STICK mode.

A
-7
Welding Parameters
The following parameters are adjustable on the V270-T
AC/DC. (See Table B.3)
Parameter Range
Parameter
Symbol
Parameter
Name Unit Min Max
Pre-Flow Sec 0 5
Start Current A Min Peak
Finish Current A Min Peak
Min. Current A Min Peak
Upslope Sec 0 10
Downslope Sec 0 10
Spot Time Sec Off 10
Max. Current A 5 270
Pulse
Frequency Hz 0.20 2500
Background
Current % A 5% 95%
% Peak Time % 5 95
Postflow Sec 0 60
AC Frequency Hz 20 200
AC Balance % EN 35 85
Hot Start % 0 500
Arc Force % 0 500
Table B.3
Users Menu Setup Parameters
Many additional parameters can be modified via the Set
Up Menu. To access the Set Up Menu press and hold
the rotary encoder knob for several seconds until the
following screen appears (See figure B.7):
Figure B.7
Rotating the encoder knob will scroll through the setup
parameters shown in Table B.4. Selected parameters
are changed in one of two ways:
For parameters like background current (shown in Figure
B.7a) the change is made by the mode push button. In
this example you can toggle between setting background
current as either a % or as absolute amperage. Other
parameters like selectable wave shape (shown in Figure
B.7b) are changed by depressing the encoder knob until
the parameter is flashing. Rotating the knob changes
the parameter and then the change is saved by pressing
the encoder knob again. Once all changes are made
you can exitand save by pressing the exit icon button or
you can exit the set up menu without saving your
changes by depressing the hooked arrow button.
Figure B.7a
Figure B.7b

A
-8
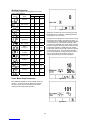
Setup Menu Parameters
Parameter Symbol Selection / * Default Value Parameter Number Description
See Figure B.7 0 Set Up menu Exit
• N.A. 1 Reset All Parameters
• % *
• A 3 Start Current Set Unit
• %
• A * 8Bi-Level Current 2
Set Unit
• % *
• A 10 Pulse Background
Current Units
• %
• A * 17 Finish Current Set
Unit
• 40 A * 307 DC TIG HF Strike
Current
• 60 A * 306 DC LIFT TIG Strike
Current
• 30 A * 307 AC TIG HF TIG Strike
Current
• Enabled *
• Disabled 214 2-Step trigger re-start
• Enabled
• Disabled * 215 4-Step trigger re-start
• Square *
• Sine
• Triangle
101 AC Waveform Shape
• Enabled
• Disabled * 998 Bi-Level Trigger
• Enabled
• Disabled * 999 Spot Timer Trigger
• Off *
• Enabled to 12 V
• Enabled to 20 V
• Enabled to 30 V
201 VRD Limit
• 500 Not Used
• 0 ÷ 10 10 * 552 Speaker Volume
• -20 ÷ 20 10 * 553 Display Contrast
• English *
• French
• Spanish
554 Display Language
• Display Off
• Display in 7-segment LED
• Display *
751 Output Current
Displayed
• Display Off *
• Display in 7-segment LED
• Display
752 Output Voltage
Displayed
• Display Off *
• Display in 7-segment LED
• Display
753 Input Phase
Displayed
• Display Off *
• Display in 7-segment LED
• Display
754 Input Voltage
Displayed
This function sets the initial start energy limit. Set this number to a higher setting than the factory default if
needed to improve starting of large diameter tungsten electrodes.
• 0.5 to 1.0 manual start energy setting.
• 1.2 to 5.0 = max. Incrementing limit (See Note). 104 AC TIG Start Power
(for AC TIG only)
Note: The machine will try to start the arc at a start power of 1. If the arc does not establish it will incrementally
increase the start power and try to restrike upto the set limit.
Table B.4

A
-9
Maintenance
WARNING
For any maintenance or repair operations it is recommended to contact the nearest technical service center or Lincoln
Electric. Maintenance or repairs performed by unauthorized service centers or personnel will null and void the
manufacturers warranty.
The frequency of the maintenance operations may vary in accordance with the working environment. Any noticeable
damage should be reported immediately.
WARNING
Input Filter Capacitor Discharge Procedure
The machine has internal capacitors which are charged to a high voltage during power-on conditions. This voltage is
dangerous and must be discharged before the machine can be serviced. Discharging is done automatically by the
machine each time the power is switched off. However, you must allow the machine to sit for at least 5 minutes to allow
time for the process to take place.
• Check cables and connections integrity. Replace, if necessary.
• Keep clean the machine. Use a soft dry cloth to clean the external case, especially the airflow inlet / outlet louvers.
• Always use gloves in compliance with the safety standards.
WARNING
Do not open this machine and do not introduce anything into its openings. Power supply must be disconnected from the
machine before each maintenance and service. After each repair, perform proper tests to ensure safety.
Electromagnetic Compatibility (EMC)
11/04
This machine has been designed in accordance with all relevant directives and standards. However, it may still generate
electromagnetic disturbances that can affect other systems like telecommunications (telephone, radio, and television) or
other safety systems. These disturbances can cause safety problems in the affected systems. Read and understand
this section to eliminate or reduce the amount of electromagnetic disturbance generated by this machine.
This machine has been designed to operate in an industrial area. To operate in a domestic area it is
necessary to observe particular precautions to eliminate possible electromagnetic disturbances. The
operator must install and operate this equipment as described in this manual. If any electromagnetic
disturbances are detected the operator must put in place corrective actions to eliminate these disturbances
with, if necessary, assistance from Lincoln Electric.
Before installing the machine, the operator must check the work area for any devices that may malfunction because of
electromagnetic disturbances. Consider the following.
• Input and output cables, control cables, and telephone cables that are in or adjacent to the work area and the
machine.
• Radio and/or television transmitters and receivers. Computers or computer controlled equipment.
• Safety and control equipment for industrial processes. Equipment for calibration and measurement.
• Personal medical devices like pacemakers and hearing aids.
• Check the electromagnetic immunity for equipment operating in or near the work area. The operator must be sure
that all equipment in the area is compatible. This may require additional protection measures.
• The dimensions of the work area to consider will depend on the construction of the area and other activities that are
taking place.
Consider the following guidelines to reduce electromagnetic emissions from the machine.
• Connect the machine to the input supply according to this manual. If disturbances occur if may be necessary to take
additional precautions such as filtering the input supply.
• The output cables should be kept as short as possible and should be positioned together. If possible connect the
work piece to ground in order to reduce the electromagnetic emissions. The operator must check that connecting
the work piece to ground does not cause problems or unsafe operating conditions for personnel and equipment.
• Shielding of cables in the work area can reduce electromagnetic emissions. This may be necessary for special
applications.

A
-10
Technical Specifications
V270-T AC/DC:
INPUT
Voltage
230/400 Vac
Phase
3 ph
Frequency
50-60 Hz
RATED INPUT and OUTPUT @ 40°C
Input
Phase Voltage
Rated Output Current / Voltage / Duty Cycle
(Duty Cycle: Based on a 10 min. period) Input Current @ Rated Output
TIG
210 A / 18.4 V / 100%
230 A / 19.2 V / 60%
270 A / 20.8 V / 35%
7.9 A
8.9 A
11.3 A
400 Vac
Stick
200A / 28.0 V / 100%
220A / 28.8 V / 60%
270A / 30.8 V / 30%
10.4 A
11.9 A
15.6 A
TIG
200 A / 18 V / 100%
220 A / 18.8 V / 60%
270 A / 20.8 V / 30%
12.8 A
14.7 A
20.0 A
3
230 Vac
Stick
200 A / 28.0 V / 100%
210 A / 28.4 V / 60%
270 A / 30.8 V / 25%
18.6 A
19.8 A
27.8 A
OUTPUT RANGE
Welding Current Range
5-270 A
Maximum Open Circuit Voltage
80 V
Type of Output
AC / DC
RECOMMENDED INPUT CABLE AND FUSE SIZES for MAXIMUM OUTPUT
Maximum Time-Delay Circuit Breaker or Super Lag Fuse Size
32 A
Input Power Cable
4 x 4 mm2
PHYSICAL DIMENSIONS
Height
432 mm
Width
280 mm
Length
622 mm
Weight
27.5 Kg
Operating Temperature
–20°C to +40°C
Storage Temperature
-25°C to +55°C

6
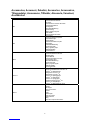
Accessories, Accessori, Zubehör, Accesorios, Accessoires,
Tilleggsutstyr, Accessores, Tillbehör, Akcesoria, Varusteet,
Accessórios
K857
Remote Output Control.
Controllo Remoto Manuale.
Fernregler.
Control Remoto Corriente de Salida.
Commande à distance.
Fjernregulator.
Hand afstandbediening.
Fjärranslutning.
Zdalna regulacja wyjścia.
Kaukosäädin.
Controlo Remoto de Saída.
K870
Foot Amptrol.
Comando a distanza a pedale.
Fußpedalfernregler.
Amptrol Pedal.
Commande à distance à pied.
Fotregulator.
Voet afstandbediening.
Fjärrkontroll pedal.
Nożny regulator prądu.
Jalkakaukosäädin.
Comando de Pé.
K963-3
Hand Amptrol.
Comando a distanza manuale.
Handfernregler.
Amptrol Manual.
Commande à distance à main.
Fjernregulator hånd.
Hand afstandbediening.
Fjärrkontroll hand.
Ręczny regulator prądu.
Käsikaukosäädin.
Comando de Mão.
K12047-1
Cool-Arc® 34 Water Cooler.
Gruppo di raffreddamento Cool-Arc® 34.
Cool-Arc® 34 Wasserkühler.
Refrigerador Cool-Arc® 34.
Refroidisseur Cool-Arc® 34.
Cool-Arc® 34 kjøleaggregat.
Cool-Arc® 34 waterkoeler.
Cool-Arc® 34 kylaggregat.
Chłodnica wodna Cool-Arc® 34.
Cool-Arc® 34 vesijäähdytin.
Cool-Arc® 34 Refrigerador de Água.
K2694-1
Inverter Cart.
Carrello.
Fahrwagen.
Carro para Inverter.
Chariot.
Tralle.
Onderwagen.
Vagn för Invertec.
Karta inwertora.
Kärry.
Carro de Transporte de Inverter.
-
 1
1
-
 2
2
-
 3
3
-
 4
4
-
 5
5
-
 6
6
-
 7
7
-
 8
8
-
 9
9
-
 10
10
-
 11
11
-
 12
12
-
 13
13
-
 14
14
-
 15
15
-
 16
16


INVERTEC V270-T AC/DC Manuale utente
- Categoria
- Sistema di saldatura
- Tipo
- Manuale utente
in altre lingue
- English: INVERTEC V270-T AC/DC User manual
- dansk: INVERTEC V270-T AC/DC Brugermanual
Documenti correlati

Altri documenti
-
Lincoln Electric Invertec 170S Manuale utente
-
-
-
-
-
-
-
Miller S-64 WIRE FEEDER Manuale del proprietario
-