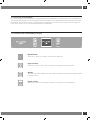
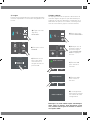
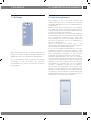
Fulgor F7IRC24O1-L Manuale utente
- Categoria
- Frigoriferi
- Tipo
- Manuale utente

USER MANUAL
MODE D’EMPLOI
MANUAL DEL USUARIO
EN
FR
ES
REFRIGERATOR
RÉFRIGÉRATEUR
REFRIGERADOR
F7IRC36O1
F7SRC36S1
F7IRC30O1
F7SRC30S1
F7IRC24O1
F7SRC24S1

2
EN

3
EN
INDEX
1
1.1
1.2
1.3
IMPORTANT DIRECTIONS OF SAFETY AND THE ENVIRONMENT
For your safety.................................................................................................................................................................
Important information when using the appliance................................................................................................
Caring for the environment..........................................................................................................................................
6
6
6
7
2
2.1
2.2
INSTALLATION
Installation.........................................................................................................................................................................
Connection to electrical power supply......................................................................................................................
7
7
7
3
3.1
3.2
3.3
3.4
3.5
BEFORE STARTING
Know your appliance......................................................................................................................................................
Model / serial identification.........................................................................................................................................
Main components............................................................................................................................................................
Electronic Control............................................................................................................................................................
Main control panel..........................................................................................................................................................
8
8
8
10
11
11
4
4.1
4.2
4.3
APPLIANCE SWITCHING ON AND OFF
Turning the appliance on and o................................................................................................................................
How to adjust the temperature for dierent requirements................................................................................
Messages and alarms....................................................................................................................................................
12
12
13
14
5
5.1
5.2
CUSTOMIZE FUNCTIONS AND SETTINGS
Functions...........................................................................................................................................................................
Settings..............................................................................................................................................................................
14
14
18
6
6.1
INTERNAL LAYOUT
Internal layout (positioning, adjustment, removal)...............................................................................................
24
24
7
7.1
LIGHTING
Lighting...............................................................................................................................................................................
25
25
8
8.1
8.2
FOOD STORAGE
General directions..........................................................................................................................................................
How to maintain good food quality............................................................................................................................
25
25
26
9
9.1
9.2
9.3
CARE AND CLEANING
Care and Cleaning...........................................................................................................................................................
Internal cleaning..............................................................................................................................................................
Cleaning of the toe kick cover and condenser.........................................................................................................
27
27
27
27
10
10.1
10.2
TROUBLESHOOTING GUIDE
Troubleshooting Guide...................................................................................................................................................
Error messages appearing on the display..............................................................................................................
29
29
30

4
EN SAFETY INSTRUCTIONS
WARNING
IMPORTANT SAFETY INSTRUCTIONS
This manual contains operational instructions for the users of the appliance.
Keep this manual in an easily accessible place for future reference.
Improper installation, adjustment, alteration, service or maintenance can
cause property damage, injury, or death.
Read the installation, operating, and maintenance instructions thoroughly
before installing or servicing this equipment.
To reduce risk of fire, electric shock, or injury to persons when using your
appliance, follow basic precautions, including the following:
> Children should be supervised to ensure that they do not play with the appliance.
> This appliance is not intended for use by persons (including children) with reduced
physical, sensory or lack of experience and knowledge unless they have been given
supervision or instruction concerning use of the appliance by a person responsible for
their safety.
>
This appliance is designed to refrigerate beverages and foods and is intended for domestic use.
> This appliance is intended to be used in household and similar applications such as: sta
kitchen areas in shops, oces, and other working environments; farm houses and by
clients in hotels, motels, and other residential-type environments; bed and breakfast-
type environments; and catering and similar non-retail applications.
> Do NOT use an extension cord or adapter.
> Plug into a grounded 3 prong outlet.
> Do not remove ground prong.
> A qualified installer / plumber must complete the water connection (if available).
> The appliance should be supplied only with drinkable water (if water connection is present).
WARNING
In the event of a power failure, do not attempt to operate this
appliance.
WARNING
Keep the appliance area free and clear from combustibles or
flammable materials and vapors.
WARNING
Keep ventilation openings, in the appliance enclosure or in the
built-in structure, clear of obstruction. Do not obstruct the air
intake or exhaust openings of the appliance.
WARNING
Do not store explosive substances such as aerosol cans with a
flammable propellant in this appliance.
WARNING
Do not use electrical appliances inside the food storage com-
partments of the appliance.
WARNING
This is the safety alert symbol. This symbol alerts you to potential hazards that can kill or
hurt you and others. All safety messages will follow the safety alert symbol and either the
word “DANGER” or “WARNING.” These words mean:
WARNING
You can be killed or seriously injured if you don’t follow instructions.
DANGER
You can be killed or seriously injured if you don't immediately follow
instructions.
All safety messages will tell you what the potential hazard is, tell you how to reduce the chance of
injury, and tell you what can happen if the instructions are not followed.
SAVE THESE INSTRUCTIONS!

5
EN
IMPORTANT SAFETY INSTRUCTIONS FOR MAINTENANCE
AND CARE
DANGER
Risk of fire or explosion due to puncture of refrigerant tubing; fol-
low handling instructions carefully. Flammable refrigerant used.
WARNING
To b
e repaired only by trained service personnel.
Use only manufacturer-authorized service parts. Do not use replacement parts that
have not been recommended by the manufacturer (e.g, parts made at home using a
3D printer). If power supply cord is damaged, it must be replaced by the manufac-
turer, its service agent, or a similarly qualified person in order to avoid a hazard.
Any repair equipment used must be designed for flammable refrigerants. Follow all
manufacturer repair instructions. Use nonflammable cleaner.
WARNING
Do not puncture refrigerant tubing, do not damage the refrige-
rant circuit.
WARNING
Do not use mechanical devices or other means to accelerate
the defrosting process, other than those recommended by the
manufacturer.
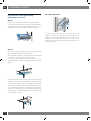
TIP OVER HAZARD
WARNING
Refrigerator is top heavy and tips easily when not completely
installed; to avoid a hazard due to instability of the appliance, it must be fixed in
accordance with the instructions (see installation manual provided).
Keep doors taped closed until refrigerator is completely installed.
Use two or more people to move and install refrigerator.
Failure to do so can result in death or serious injury.
IMPORTANT SAFETY INSTRUCTIONS FOR PROPER DISPOSAL
OF YOUR OLD REFRIGERATOR
WARNING
Suocation Hazard
Remove doors and / or drawers from your old appliance.
Failure to do so can result in death or brain damage.
WARNING
Risk of child entrapment.
Before you throw away your old refrigerator or freezer:
> Take o the doors and cut o the power cord.
> Leave the shelves in place so that children may not easily climb inside.
> IMPORTANT: Child entrapment and suocation are not problems of the past. Junked or
abandoned refrigerators are still dangerous, even if they will sit for "just a few days."
If you are getting rid of your old refrigerator, please follow these instructions to help
prevent accidents.
Important information to know about disposal of refrigerants:
Dispose of refrigerator in accordance with federal and local regulations. Refrigerants
must be evacuated by a licensed. EPA-certified refrigerant technician in accordance with
established procedures.

6
EN
considerable risk.
> Repairs may be performed by the manufacturer,
service company or a similarly qualified person
only.
> Plug into a grounded 3 prong outlet.
> Do not remove ground prong.
> Do not use an adapter.
> Do not use an extension cord.
> Disconnect power to all units before servicing.
> If the SUPPLY CORD is damaged, it must be
replaced by the manufacturer, its service agent or
similar qualified person in order to avoid a hazard.
> Children should be supervised to ensure that they
do not play with the appliance.
1.2 Important information when using
the appliance
> Never use electrical appliances inside the
appliance (e.g. heater, electric ice maker, etc.).
Explosion hazard!
> Never defrost or clean the appliance with a steam
cleaner! The steam may penetrate electrical parts
and cause a short-circuit. Risk of electric shock!
> Do not use pointed and sharp-edged implements
to remove frost or layers of ice. You could damage
the refrigerant tubes. Leaking refrigerant may
cause eye injuries or ignite.
> Do not store products which contain flammable
propellants (e.g. spray cans) or explosive substances
in the appliance.
Explosion hazard!
> Do not stand on or lean heavily against base of
appliance, drawers or doors, etc.
> Before cleaning the appliance, pull out the power
cord plug or switch o the breaker. Do not pull out
the power cord plug by tugging on the power cord.
> Keep plastic parts and the door seal free of oil
and grease. Otherwise, parts and door seal will
deteriorate.
> Never cover or block the ventilation openings for
the appliance.
1.1 For your safety
> If this appliance is replacing an existing appliance
which must be removed or disposed of, make
sure that it does not become a dangerous trap
for children by cutting its power supply cable and
rendering it impossible to close the door. Use the
same caution at the end of the lifespan of the new
appliance.
> This appliance is designed to refrigerate beverages
and foods and is intended for domestic use.
> The appliance must be installed by following the
instructions in the Installation Guide, particular
care should be taken not to obstruct the vent
openings of the appliance and of the built-in units.
> The appliance features a concentrated lighting
system with LED lamps. Do not stare into these
lamps when they are on to avoid possible eyesight
damage.
This warning is also contained on the label attached
to the inside of the refrigerator door.
> Do not use any type of electrical equipment inside
of the food conservation compartments.
> When positioning the shelves, do not place fingers
in the shelf slide guides.
> Do not position containers of flammable liquids
near the appliance.
> Completely switch o the appliance and
disconnect the appliance from power during
cleaning operations. If the plug is not easily reached,
it is a good idea to turn o the breaker or remove
the fuse that controls the socket that the appliance
is connected to.
> The packaging material can be dangerous for
children: do not allow children to play with the
plastic bags, plastic film or Styrofoam.
> Any repairs must be performed by a qualified
appliance technician.
> This appliance is not intended for use by persons
(including children) with reduced physical, sensory
or lack of experience and knowledge unless
they have been given supervision or instruction
concerning use of the appliance by a person
responsible for their safety. Children should be
supervised to ensure that they do not play with the
appliance.
> Do not damage the appliance refrigerant circuit
pipes.
> Do not store explosive substances such as aerosol
cans with a flammable propellant in this appliance.
> If the power cord of this appliance is damaged,
it must be replaced by the manufacturer, service
company or a similarly qualified person. Improper
installations and repairs may put the user at
1. IMPORTANT DIRECTIONS FOR SAFETY AND THE ENVIRONMENT

7
EN
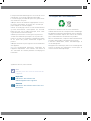
Symbols used in the Guide:
Note
Recommendations for correct use of the
appliance
Important
Directions for avoiding appliance damage
Warning
Indications for avoiding injury to people
1.3 Caring for the environment
> Pay special attention to correct disposal procedure
for all the packaging materials.
> The appliance must not be disposed of with urban
waste. Contact local waste disposal centers for on
how to dispose of recyclable waste.
> Prior to disposal, cut the power supply cord and
make it impossible to close the door.
> During disposal, avoid damage to the refrigeration
circuit.
> The appliance does not contain hazardous
substances for the atmospheric ozone layer, neither
in the refrigeration circuit nor in the insulation.
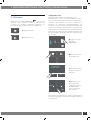
2.1 Installation
Make sure that installation is performed correctly,
adhering to all directions in the specific installation
manual provided with the appliance.
2.2 Connection to the electrical power
supply
The appliance operates at 115 V AC, 60 Hz and
is equipped with a power supply cord with a
3-prong grounded plug, which must be connected
to a corresponding 3-prong grounding-type wall
receptacle on a dedicated 15A circuit.
2. INSTALLATION 3. BEFORE STARTING
Do not use extension cords and/or
multiple adapters for the power supply
connection.
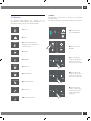
3.1 Know your appliance
This manual will answer most of your questions
about the product’s features. Should you require
further information, please check our website
> call us 1-855-4FULGOR (1-855-438-5467)
> visit fulgor-milano.com/us/en/assistance
Before calling, write down the model type
and serial number which are available
on the warranty certificate and on the
rating plate, and any messages which
may have appeared on the display. Built
In refrigerators come with 2 years parts &
labor warranty, and 5 year parts & labor for
sealed system only.
The rating plate is located into the appliance, on side
cabinet, close to the shelves.
Before calling, please make sure to have the following
information ready:
Model code, serial number and proof of purchase
(date and dealer).

8
EN
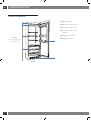
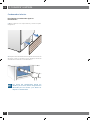
Position of the serial number
inside the compartment.
3.2 Model / serial identification
The model / serial identification tag shows the
technical data, the serial number and the model. The
product plate must never be removed.
3. BEFORE STARTING
The model / serial identification tag is
located on the interior side wall above
the separator glass shelf above the
crisper drawers opposite the door
hinges.

9
EN
S8990FR6U
F7SRC36S1
F20220101000006
3.0 oz MODEL
CODE
SER.NO./N° SERIE
3186660
ETL LISTED
CONFORMS TO
ANSI/UL STD 250
CERTIFIED TO CAN/CSA
STD C22.2 NO.63
oz
3 A
115 V
60 Hz
R600a
Fridge Gas Fill Charge
Quantité de Gaz Réfrigerateur
Freezer Gas Fill Charge
Quantité de Gaz Congélateur
Total Absorbed Current
Courant Absorbée Totale
Voltage
Tension
Frequency
Frequence
Refrigerant Gas Type
Type de Gaz Rèfrigerant
Defrost Heater
Chauage de Dégivrage
Made in Italy
W
Climate Classes
> SN (Subnormal) from +50°F to +90°F (+10°C to +32°C)
> N (Normal) from +61°F to +90°F (+16°C to +32°C)
> ST (Subtropical) from +64°F to +100°F (+18°C to +38°C)
> T (Tropical) from +64°F to +109°F (+18°C to +43°C)
Internal factory code
North American Model Number
Specifications
Serial Number

10
EN
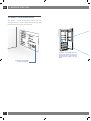
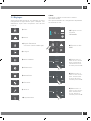
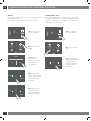
1
3
4
6
2
5
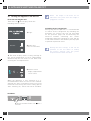
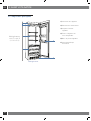
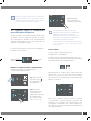
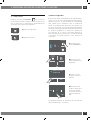
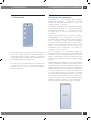
Fridge
1) Appliance body.
2) Interactive control panel.
3) Ajustable height shelf.
4) Stainless steel crisper
drawers.
5) Adjustable door bins.
6) Magnetic toe kick.
Fridge
+33°F / +44°F
(+1°C/+7°C)
3.3 Main components
3. BEFORE STARTING

11
EN
00
°C+
Impostazioni
Funzioni
00
°C+
00
°C-
Limite per graca parti retro-illuminate - la parte bianca è trasparente
Testo e graca
00
°C+
Impostazioni
Funzioni
00
°C+
00
°C-
Serigraa VETRO USER 599 LCD2.8 Colore AAAA
colore C71
Limite per graca parti retro-illuminate - la parte bianca è trasparente
Testo e graca
00
°C+
Impostazioni
Funzioni
00
°C+
00
°C-
Serigraa VETRO USER 599 LCD2.8 Colore AAAA
colore C71
Limite per graca parti retro-illuminate - la parte bianca è trasparente
Testo e graca
00
°C+
Impostazioni
Funzioni
00
°C+
00
°C-
Serigraa VETRO USER 599 LCD2.8 Colore AAAA
colore C71
Limite per graca parti retro-illuminate - la parte bianca è trasparente
Testo e graca
00
°C+
Impostazioni
Funzioni
00
°C+
00
°C-
Serigraa VETRO USER 599 LCD2.8 Colore AAAA
colore C71
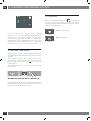
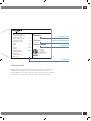
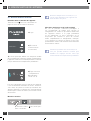
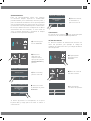
3.5 Main control panel
3.4 Electronic Control
The innovative electronic control system maintains constant temperature of the refrigeration compart-
ment shown on the control panel display. It also allows user interaction making it possible to personal-
ize settings of the various functions and to receive sound and/or visual messages should any malfunc-
tion occur in the appliance.
On / Off:
Touch the icon to turn the unit on or off.
Home
Touch the Home icon for going back to the main display screen.
Alarm
Touch the icon to view the alarm message and temporarily deactivate the audi-
ble alarm..
Back
Touch the arrow icon for going back to the previous display screen.

12
EN
SETTINGS
FUNCTIONS
INITIAL TEST
…
Limite per graca parti retro-illuminate - la parte bianca è trasparente
Testo e graca
00
°C+
Impostazioni
Funzioni
00
°C+
00
°C-
Serigraa VETRO USER 599 LCD2.8 Colore AAAA
colore C71
4.1 Turning the appliance on and o
First time starting the unit
Touch the icon . The display shows the
following launch screens:
4. APPLIANCE SWITCHING ON AND OFF
When the appliance is first switched on it is
recommended to wait at least 12 hours without
opening the doors and before placing any food
inside the unit.During the initial cooling period
after switching on, alarms will be be disabled.
4) Home screen.
- fridge compartment
+41°F (+5°C)
When the fridge is off there are no
indicators that prove that the fridge is
plugged to a socket.
1) Logo.
2) Initial test
(lasts 2-3 minutes).
3) The main display shows a rolling average of
the actual temperature of each compartment.
Automatically the unit starts to cool down until
reaching the set temperatures.
Shutdown.
1) Touch the Unit Power icon for 3
seconds.
Switching off for long periods
During long absence periods it is recommended
to switch off the refrigerator by following the
procedure for turning the unit off described
on the previous page and disconnecting the
electrical breaker controlling the socket.
Completely empty the refrigerator, clean and dry
it and leave the doors and drawers partially open
to prevent unpleasant odors.
During the first startup, it will not be
possible to use the Menu to modify
the factory settings until the preset
temperature has been reached.
SETTINGS
FUNCTIONS
5°C
+

13
EN
+ 2
°C
+ 4
+ 3
+ 1
+ 0
OK
OFF
+ 2
°C
+ 4
+ 3
+ 1
+ 0
OK
OFF
+ 2
°C
+ 4
+ 3
+ 1
+ 0
OK
OFF
SETTINGS
FUNCTIONS
5°C
+
SETTINGS
FUNCTIONS
5°C
+
Usually a grey padlock will show, in that case you
can scroll up or down with a finger on the display,
select the desired temperature and press OK to
confirm.
Whereas a white closed padlock will be seen if
the user has activated a function that overrides
the settings of the refrigerator and prevents
the user from changing the temperature
of the compartment until the overriding
function has completed or been canceled.
Each time the appliance is switched on it
goes through a self-diagnosis procedure
lasting up to three minutes before
completely starting up.
Preset
temperature
Fridge
Compartment
3) Touch the icon
ok to confirm
the desidered
temperature.
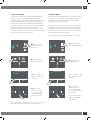
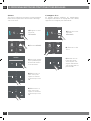
Modify the temperatures compartment
How to modify the Fridge compartment
temperature.
1) Home screen.
Touch the icon
SETTINGS
FUNCTIONS
5°C
+
of
fridge compartement.
2) Scoll up/down to
select the desired
temperature of the
fridge
from +33°F to +44°F
(from +1°C to +7°C)
4.2 How to adjust the temperature for
dierent requirements.
Each model has been carefully tested before leaving
the factory and is adjusted in such a way to ensure
high performance and ecient operation.
Usually, it is not necessary on modify the settings.
How it looks on the home screen:
The temperature shown can vary slightly
in respect to the set temperature following
frequent openings of the doors or insertion
of room temperature foods or large
quantities of foods.
6 to 12 hours are necessary to reach the
selected temperature in some cases.
Padlock icon.
The padlock icon shows up when the
temperatures are set up.
The padlock open/close shows that the
compartment's temperatures can or can not be
modified by the user.

14
EN
+ 2
°C
+ 4
+ 3
0
+ 1
OK
OFF
Limite per graca parti retro-illuminate - la parte bianca è trasparente
Testo e graca
00
°C+
Impostazioni
Funzioni
00
°C+
00
°C-
Serigraa VETRO USER 599 LCD2.8 Colore AAAA
colore C71
HOLIDAY
MAX COOL FRIDGE
HOLIDAY
MAX COOL FRIDGE
If the icon function is touched and a specific
function is set ( such as Holiday Mode, Max Cool
Fridge, etc...), the white padlock will be seen
closed and it won't be possible to change the
temperature of the compartments as long as the
function won't be completed or if it is manually
deactivated as long as the function is active.
4.3 Messages and alarms
An integrated control system will give information
through highlighted messages you will see on the
display.
The audible signal that goes along with
some of the alarm signals can be turned off
by touching the alarm icon on the main
control panel.
You can find the list of the alarms at the end of
this manual.
INFORMATION FOR THE USE OF THE DISPLAY.
It is possible to personalize the operation of your
Fulgor Milano unit in order to adapt it to the diffe-
rent ways you might want to use it.
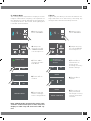
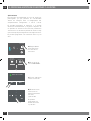
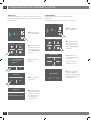
5.1 Functions.
After touching the Function icon
SETTINGS
FUNCTIONS
5°C
+
on the home
screen, the user you can access some or all of the
functions shown below depending on your model
and how it is equipped.
1) Max Cool Fridge.
2) Holiday Mode.
5. CUSTOMIZE FUNCTIONS AND SETTINGS

15
EN
MAX COOL FRIDGE
MODE
ON OFF
HOLIDAY
MAX COOL FRIDGE
9
HOUR
11
10
7
8
OK
SETTINGS
FUNCTIONS
5°C
+
9DAY
11
10
7
8
OK
HOLIDAY MODE
ON OFF
SETTINGS
FUNCTIONS
5°C
+
HOLIDAY
MAX COOL FRIDGE
It is possible to program the activation of this
function in advance between 1 and 24 hours.
C) Touch the icon
On to activate the
function.
B) Touch the icon
Max Cool Fridge.
D) Scroll up /
down to setting
the desired start
time delay and
then press OK.
A) Home screen.
Touch the icon
functions.
1) Max Cool Fridge
The function lowers the refrigerator temperature
to +36°F (+2°C) a factory default of 12 hours,
permitting more rapid cooling of food that has just
been placed in. Once the 12 hours have expired,
the function deactivates automatically, returning
to the previously set temperature. It is possible to
program a timed activation of the function.
If the power goes out during this function's opera-
tion the unit will resume operation in normal mode
and this function will be canceled.
2) Holiday Mode
This function (recommended in case of prolonged
absences since it allows considerable energy
savings) brings the refrigerator compartment
temperature to +57°F (+14°C).
It is possible to program the duration, or it can be
manually deactivated upon re-entry after a period
of absence. This function remains active even if
during the period of absence there is a prolonged
interruption of electrical power.
It is possible to program a period from 1 to 90 days.
C) Touch ON
to activate the
function.
B) Touch the icon
Holiday Mode.
D) Scroll up /
down to set the
desired duration
(in days) and then
press OK.
It is possible to pro-
gram a period from
1 to 90 days.
A) Home screen.
Touch FUNCTIONS.

16
EN
SABBATH MODE
DEMO MODERESET
SABBATH MODE
DEMO MODERESET
SABBATH MODE
DEMO MODERESET
MAINTENANCE SERVICE
INFORMATION
MAINTENANCE SERVICE
INFORMATION
TIMEDATE
LANGUAGE°C / °F
TIMEDATE
LANGUAGE°C / °F
TIMEDATE
LANGUAGE°C / °F
TIMEDATE
LANGUAGE°C / °F
MAINTENANCE
SERVICE
INFORMATION
It is possible to personalize the settings of your
Fulgor Milano fridge for adapting it to the diffe-
rent ways you might want to use it.
5.2 Settings.
1) Date.
2) Time.
3) Fahrenheit or Celsius (Display
units).
4) Language.
5) Sabbath Mode.
6) Reset.
7) Demo Mode.
8) Maintenance.
9) Service.
10) Info System.
5. CUSTOMIZE FUNCTIONS AND SETTINGS

17
EN
TIMEDATE
LANGUAGE°C / °F
9MONTH
11
10
7
8
OK
2021YEAR
2023
2022
2019
2020
OK
9DAY
11
10
7
8
OK
SETTINGS
FUNCTIONS
5°C
+
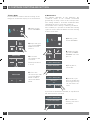
1) Date
The display will show the date in the format
(day:month:year).
By touching the display you can modify the settings.
C) Scroll up or
down until the
desired year
appears and press
OK.
D) Scroll up or
down until the
desired month
appears and
press OK.
B) Touch the DATE
icon.
A) Home screen.
Touch SETTINGS.
E) Scroll up or
down until the de-
sires date appears
and press OK.
CLOCK MODE?
12 24
37MIN
39
38
35
36
OK
TIMEDATE
LANGUAGE°C / °F
9HOUR
11
10
7
8
OK
SETTINGS
FUNCTIONS
5°C
+
C) Choose which
way you want to
see the time: 12
hour or 24 hours.
B) Touchthe TIME
icon.
2) Time
The display shows the hours and minutes in the
format hh:mm.
This function selects the display at 12 or 24 h.
A) Home screen.
Touch SETTINGS.
D) Scroll up /
down to set the
hour and press OK.
E) Scroll up / down
to set the minutes
and press OK.

18
EN
TIMEDATE
LANGUAGE°C / °F
TIMEDATE
LANGUAGE°C / °F
FRANÇAIS
FRANÇAIS
ESPAÑOL
DEUTSCH
ITALIANO
ENGLISH
OK
SETTINGS
FUNCTIONS
5°C
+SETTINGS
FUNCTIONS
5°C
+
OK
°C
°F
C) Scroll up /
down to select
either Fahrenheit
or Centigrade
degrees and
press OK.
B) Touch the °F/°C
icon.
3) Set °F/°C
This setting shows the temperatures displayed in
Fahrenheit or Centigrade degrees. By default, the
appliance is set for Fahrenheit.
A) Home screen.
Touch SETTINGS.
B) Touch the
LANGUAGE icon.
C) Scroll up /
down to select the
desired language
and press OK.
4) Language
To set the language of the display.
A) Home screen.
Touch SETTINGS.
5. CUSTOMIZE FUNCTIONS AND SETTINGS

19
EN
SABBATH MODE
DEMO MODERESET
SABBATH MODE
SABBATH MODE
ON OFF
YES NO
SABBATH MODE
SETTINGS
FUNCTIONS
5°C
+SETTINGS
FUNCTIONS
5°C
+
SABBATH MODE
DEMO MODERESET
RESETTING TO
FACTORY DEFAULT
SETTING
YES NO
RESET
YES NO
RESET
RESET COMPLETE
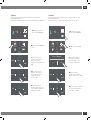
5) Sabbath Mode
This setting makes it possible to comply to certain
religious observances requiring the operation of
the appliance to not be aected by the opening or
closing of the doors. The control, inner lighting and
ice maker are deactivated.
A) Home screen.
Touch SETTINGS.
B) Swipe left
until you see the
SABBATH MODE
icon and press it.
C) Touch ON to
confirm the Sab-
bath Mode.
D) Touch YES to
confirm.
E) The fridge will
work accordingly
to this configuration.
6) Reset
It gives the possibility to restore the default set-
tings that were set in the factory, cancelling any
changes that have been made by the user.
C) Touch YES to
confirm the se-
lection of the
resetting of factory
default settings.
D) Touch YES to
confirm.
E) The reset has
been performed.
The fridge's factory
settings have been
restored.
A) Home screen.
Touch SETTINGS.
B) Swipe left until
you see the RESET
icon and press it.
Note: Sabbath mode automatically expires after
72 hours. To deactivate prior to this, touch the
display to wake it up and choose the 'OFF' op-
tion.

20
EN
SETTINGS
FUNCTIONS
5°C
+
SABBATH MODE
DEMO MODERESET
DEMO MODE
1
3
2
4
MAINTENANCE SERVICE
INFORMATION
YES NO
CLEAN CONDENSER
ENABLE REMINDER?
DEMO MODE
ON OFF
YES NO
CLEAN CONDENSER
DISABLE REMINDER?
OFF RESET
CLEAN CONDENSER
NEXT REMINDER
LEFT DAYS...
365
SETTINGS
FUNCTIONS
5°C
+
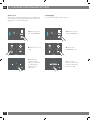
7) Demo Mode
It is possible to simulate the functioning of the
fridge, for showroom display or for tradeshows.
8) Maintenance
For ecient operation of the appliance, the
condenser needs to be cleaned (vacuumed)
periodically to keep it free of dust and pet hair.
This setting enables a 12 month countdown timer
reminding the user to clean the condenser.
The default of this setting is "Warning disabled".
Once enabled, it is possible to disable the warning
signal or see the time left before the next cleaning
that has to be done.
D) Insert the
password for the
activation.
Default password
1-2-3-4
E) Press the
desired choice: ON
to activate Demo
Mode or OFF to
deactivate Demo
Mode.
B) Swipe left until
you see the MAIN-
TENANCE icon and
press it.
C) To enable it,
touch YES.
A) Home screen.
Touch SETTINGS.
A) Home screen.
Touch SETTINGS.
B) Swipe left until
you see the DEMO
MODE icon and
press it.
E) To disable the
warning, touch the
Yes button
If you want to disable the reminder, at step D touch
O, then touch Yes as below.
D) Instead, if you
want to disable the
warning previously
set, touch the icon
reset.
5. CUSTOMIZE FUNCTIONS AND SETTINGS
La pagina si sta caricando...
La pagina si sta caricando...
La pagina si sta caricando...
La pagina si sta caricando...
La pagina si sta caricando...
La pagina si sta caricando...
La pagina si sta caricando...
La pagina si sta caricando...
La pagina si sta caricando...
La pagina si sta caricando...
La pagina si sta caricando...
La pagina si sta caricando...
La pagina si sta caricando...
La pagina si sta caricando...
La pagina si sta caricando...
La pagina si sta caricando...
La pagina si sta caricando...
La pagina si sta caricando...
La pagina si sta caricando...
La pagina si sta caricando...
La pagina si sta caricando...
La pagina si sta caricando...
La pagina si sta caricando...
La pagina si sta caricando...
La pagina si sta caricando...
La pagina si sta caricando...
La pagina si sta caricando...
La pagina si sta caricando...
La pagina si sta caricando...
La pagina si sta caricando...
La pagina si sta caricando...
La pagina si sta caricando...
La pagina si sta caricando...
La pagina si sta caricando...
La pagina si sta caricando...
La pagina si sta caricando...
La pagina si sta caricando...
La pagina si sta caricando...
La pagina si sta caricando...
La pagina si sta caricando...
La pagina si sta caricando...
La pagina si sta caricando...
La pagina si sta caricando...
La pagina si sta caricando...
La pagina si sta caricando...
La pagina si sta caricando...
La pagina si sta caricando...
La pagina si sta caricando...
La pagina si sta caricando...
La pagina si sta caricando...
La pagina si sta caricando...
La pagina si sta caricando...
La pagina si sta caricando...
La pagina si sta caricando...
La pagina si sta caricando...
La pagina si sta caricando...
La pagina si sta caricando...
La pagina si sta caricando...
La pagina si sta caricando...
La pagina si sta caricando...
La pagina si sta caricando...
La pagina si sta caricando...
La pagina si sta caricando...
La pagina si sta caricando...
La pagina si sta caricando...
La pagina si sta caricando...
La pagina si sta caricando...
La pagina si sta caricando...
-
 1
1
-
 2
2
-
 3
3
-
 4
4
-
 5
5
-
 6
6
-
 7
7
-
 8
8
-
 9
9
-
 10
10
-
 11
11
-
 12
12
-
 13
13
-
 14
14
-
 15
15
-
 16
16
-
 17
17
-
 18
18
-
 19
19
-
 20
20
-
 21
21
-
 22
22
-
 23
23
-
 24
24
-
 25
25
-
 26
26
-
 27
27
-
 28
28
-
 29
29
-
 30
30
-
 31
31
-
 32
32
-
 33
33
-
 34
34
-
 35
35
-
 36
36
-
 37
37
-
 38
38
-
 39
39
-
 40
40
-
 41
41
-
 42
42
-
 43
43
-
 44
44
-
 45
45
-
 46
46
-
 47
47
-
 48
48
-
 49
49
-
 50
50
-
 51
51
-
 52
52
-
 53
53
-
 54
54
-
 55
55
-
 56
56
-
 57
57
-
 58
58
-
 59
59
-
 60
60
-
 61
61
-
 62
62
-
 63
63
-
 64
64
-
 65
65
-
 66
66
-
 67
67
-
 68
68
-
 69
69
-
 70
70
-
 71
71
-
 72
72
-
 73
73
-
 74
74
-
 75
75
-
 76
76
-
 77
77
-
 78
78
-
 79
79
-
 80
80
-
 81
81
-
 82
82
-
 83
83
-
 84
84
-
 85
85
-
 86
86
-
 87
87
-
 88
88


Fulgor F7IRC24O1-L Manuale utente
- Categoria
- Frigoriferi
- Tipo
- Manuale utente
in altre lingue
- English: Fulgor F7IRC24O1-L User manual
- français: Fulgor F7IRC24O1-L Manuel utilisateur
- español: Fulgor F7IRC24O1-L Manual de usuario
Documenti correlati
Altri documenti
-
Fulgor Milano F7PBM36S1 Manuale utente
-
Bosch KGF56PI40/16 Istruzioni per l'uso
-
Bosch KGF56PI40/04 Istruzioni per l'uso
-
Siemens KG39FPI45/11 Manuale utente
-
Bosch Benchmark B36IT900NP Manuale utente
-
Siemens KG39FPI35/01 Manuale utente
-
Haier QHE16HYPFS Manuale del proprietario
-