Laney IRONHEART IRT-SLS Manuale utente
- Categoria
- Apparecchiature musicali supplementari
- Tipo
- Manuale utente
Questo manuale è adatto anche per

IRT-SLS

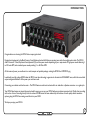
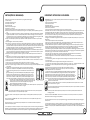
Loaded with two high voltage ECC83 tubes the IRT-SLS uses tube technology to generate its characteristic IRONHEART tones, whilst the mono block
output configuration delivers all the power you could ever need.
Your IRT-SLS also features an internal dummy load which means you can use your IRT-SLS without any cabinet connected at all. Totally silent recording
with no loss of tone. Recording directly from the on-board T-USB feature has been enhanced by the inclusion of studio quality cabinet emulation
options, giving the IRT-SLS an amazing sound direct into your DAW.
Designed and engineered in the Black Country, Great Britain and packed full of features, amazing tones and a thoroughly modern look. The IRT-SLS
offers 3 channels – Clean, Rhythm and Lead, separate EQ's, and two power modes depending on your requirements. A high-power mode delivering 3
to 300 watts RMS, and a standard power mode providing <1 to 60 Watts RMS.
We hope you enjoy your IRT-SLS.
Congratulations on choosing the IRT-SLS ultra-compact guitar head.
All the tone and power you could want in a small, compact and portable package making the IRT-SLS the ULTIMATE fly-rig.
Connecting your cabinet could not be easier – The IRT-SLS features combi twist sockets which can take either a Speakon connector or a regular jack.
2
INTRODUCTION

3
WELCOME
At the same time we believe we have not lost sight of the reason Laney was founded in the first place - a dedication to
building great sounding amplification for working musicians.
Laney products have a heritage which stretches back to 1967 when I first began building valve amplifiers in my parents’
garage.
Since then we have moved on from strength to strength developing an extensive range of guitar, bass, public address, multi
instrument and keyboard amplification products along with a list of Laney endorsees that includes some of the world’s
most famous and respected musicians.
Dear Player,
Thank you very much for purchasing your new Laney product and becoming part of the worldwide Laney family. Each and
every Laney unit is designed and built with the utmost attention to care and detail, so I trust yours will give you many years
of enjoyment.
Warm Regards,
Chairman and Founder.
Lyndon Laney

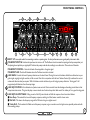
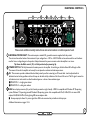
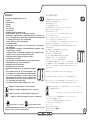
INPUT 1/4" mono jack socket for connecting an active or passive guitar. For best performance, use a good quality instrument cable.
PRE-BOOST SWITCH: Switches the input boost circuit on or off. The Pre-Boost circuit increases the input signal to the preamp tubes, just
like placing a boost pedal in your signal path. This drives the preamp tubes harder, resulting in more distortion. This works on all channels.
LEAD GAIN: Controls the level of preamp distortion on the Lead chanel. Turning this control clockwise will add more distortion to your
guitar signal, ranging from light overdrive, to full on metal. Use this in conjunction with the Lead Volume Control (6) to achieve the correct
volume and distortion level you require. With the Volume control set below 6, you will only get preamp distortion. Turning past 7 will
progressively add distortion from the output stage.
LEAD EQ CONTROLS: A traditional set of passive tone controls. Passive controls have the advantage of sounding musical due to their
unique interactive nature. This gives the player a more natural set of tools to shape their ideal sound. Set midway at 0 as a good starting point.
LEAD EQ PULL SWITCHES: Pulling on each of the EQ control knobs will shift the response of each control as follows:
■ Bass: Deep - This extends the low-end frequency response, resulting in a fuller, heavier sound for lower notes.
PRE-BOOST CONTROL: Controls the level of boost applied to the guitar signal.
■ Mid: Shift - This lowers the frequency range of the Mid control to give a tighter sound.
■ Treble: Shift - This broadens the Treble control frequency response, to give a rounder sound to higher notes, especially when used with
thin sounding pickups.
PRE-BOOST LED: The led will illuminate when the Pre-Boost control is activated.
5
13
14 15 16
12
9 10
11
8
2 3
4
5
6
13
7
FRONT PANEL CONTROLS
4

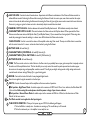
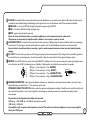
CLEAN/RHYTHM EQ CONTROLS: As Lead EQ Controls (4).
CLEAN VOLUME: Use this to control the volume of the amplifier when using Clean mode. The amp can still be driven to overdrive
with the control turned to 7 or more and can be driven harder by using the Pre-Boost.
LEAD VOLUME: Controls the Lead channel volume. Experiment with different combinations of the Drive and Volume controls to
achieve different sounds. Reducing the Drive while increasing the Volume will result in a warm, open, over-driven sound as the output
section is driven harder, while reducing the Volume and increasing the Drive will give a tighter, more modern sound with more distortion.
Once set, try using your guitar's volume controls to interactively adjust tone and distortion levels.
CLEAN/RHYTHM SWITCH & LED: This switch activates the Clean mode on the Rhythm channel. When operated, the Clean
Volume control becomes active, while Rhythm Gain (9) and Rhythm Volume (12) are removed from the signal path. When using clean
mode, the preamp gain is lowered, resulting in a cleaner tone. LED indicates that Clean mode is active.
RHYTHM GAIN: As Lead Gain (3).
CHANNEL SWITCH & LEDs: Switches between the Lead and Clean/Rhythm channels. LEDs indicate currently active channel.
1: The led will flash at a steady rate - the tubes warming up. This could take up to 30 seconds.are
The Watts control is not applied to Aux Input signals.
TUBE STATUS MONITOR: When you first power up your IRT-SLS, the following will happen:
2: The led is continuously on - the amplifier is now ready for use.
■Push position - Normal Power Mode: A variable output with a maximum of 60W into 4 Ohms, but the character and ‘Tube
Warmth’ of the tone remains.
Reverb is not applied to signal connected to the Aux Input.
CLEAN/RHYTHM EQ PULL SWITCHES: As Lead EQ Pull Switches (5).
TONE: This Tone control works in a similar fashion to the Tone control you probably have on your guitar except that it uniquely works at
the other end of the amplification chain. This has the ability to not only control the overall top end response but also reduce upper
harmonics on the output stage and preamplifier overdrive sounds. This will give you bright cutting sounds at high settings and smooth
rounded sounds at lower settings. Midway (0) is a good starting point.
WATTS: Controls the overall output of the amplifier and has two modes of operation.
RHYTHM VOLUME: As Lead Volume (6).
REVERB: Controls the level of the built in Laney-designed digital reverb.
■Pull position - High Power Mode: A variable output with a maximum of 300W into 4 Ohms. As an indicator, the Tube Status LED
(16) turns blue. Before using this mode please check the power ratings of your chosen cabinets.
10
11
14
15
12
13
16
5

REAR PANEL CONTROLS
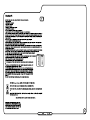
D.I: This connector provides a balanced line level feed, primarily used for connecting to a PA sound desk. Level is adjusted with its
dedicated control and any problems with earth loops can be dealt with by utilisation of the Ground Lift control. The D.I signal is routed via
an Emulation circuit and a switch to allow Emulation bypass or a choice of two emulation types.
■EMULATION 1 - a bright guitar cabinet.
■EMULATION 2 - a dark guitar cabinet.
Tip: Ensure the Watts control (15) is in Push position before powering Up.
POWER SWITCH: This fully disconnects the mains power to the amplifier. At switching on, the Valve Status LED will begin to flash.
The amount of time for the amplifier to be ready for use depends on ambient and tube temperatures.
USB: Record replay connector, (Dry on left channel, processed on right channel). USB2.0 is compatible with Windows XP ® operating
system, Windows 7 ® operating system & Windows 8 ® operating system. Also compatible with Mac ® & iPad ®1-3 via camera USB
adaptor, iPad ® 4 & iPad Mini ® via Lightning-USB camera adaptor cable.
UNIVERSAL POWER INLET: This socket accepts a standard IEC grounded connector supplied with the product.
The unit must be earthed under all circumstances! Input voltages from ~100V to ~240V 50-60Hz can be used around the world without
need for fuse or voltage changes to the product. Always disconnect the power connector when the amplifier is not in use.
■ Re-amp output jack allows Dry return signal from USB to be connected via jack cable to the Amp input.
Additional information on pages 13-16.
Please note additional safety instructions and serial number on bottom panel of unit.
USB I/O
RE-AMP
SEND
LEVEL LEVELLEVEL
4-8 OHM
(1*8Ω,
2*16Ω,
2*8Ω)
16 OHM
CABINET MATCH
RETURN
CLASS 2 WIRING REFER TO USER MANUAL FOR
SUGGESTED CONNECTIONS
-10dB
0dB
AUX IN
USB+AMP
BYPASS
SEND
4 WAY
(FS4-IRT)
EMULATION
AMP
USB
5
4
3
2
1
0
10
9
8
7
6
5
4
3
2
1
0
10
9
8
7
6
5
4
3
2
1
0
10
9
8
7
6
D.I.
USB
FX LOOP REMOTE
AUX IN
GROUND LINK
PHONES
DESIGNED AND ENGINEERED IN THE UK BY LANEY
POWER CONSUMPTION
75 WATTS 50/60Hz
SUPPLY VOLTAGE 100V-240V~
0
1
POWER
LOUDSPEAKER
CAUTION - RISK OF ELECTRIC SHOCK DO NOT OPEN
ATTENTION - RISQUE DE DÉCHARGE ÉLECTRIQUE, NE S'OUVRE PAS
1
ON
2
LIFT
OFF
1
TIP: LEAD/RHYTHM
RING: CLEAN/RHYTHM
2
1
/
4
”
J
A
C
K
-
C
O
M
B
O
6

Ensure the level is turned down before connecting a signal to avoid unexpected excessive volume levels and potential speaker
damage.
Ensure the level is turned down before connecting headphones to avoid unexpected excessive volume levels.
(DIN pin - Foot switch jack 2 -Tip - )1 REVERB
SPEAKER CONNECTOR: Use a high quality Speakon connector (or equivalent) to attach your favourite cabinet. If you don't have a
male Speakon plug, a standard mono ¼” jack connector can be used.
PHONES: A standard 6.35mm stereo jack socket for use with headphones or to provide a stereo feed to a PA system. A level control is
provided for comfortable listening/ level balancing and the signal source is set via the selector switch. Three options are available:
■USB - a mix of the USB Left and Right and signals only.
■AMP - signal running through the amp only.
FX LOOP: This is an insert type loop so all of the signal is passed to the external processor. The mixing of the dry and effect signal must
be controlled in your external processor. A switch is provided to allow two nominal levels of loop signal and a bypass option.
(DIN pin 3 - Foot switch jack 1 - Tip - LEAD/RHYTHM)
(DIN pin 5 - Foot switch jack 1- Ring - CLEAN/RHYTHM)
■USB+AMP - a mix of the USB Left and Right and signals running through the IRT-SLS.
When phones are connected, the amplifier output is disabled - this can take a couple of seconds.
REMOTE: A 5 pin DIN socket to connect the included FS4-IRT. In addition to this, there are two stereo jack sockets (providing the same
control functions as the DIN) and allowing for user flexibility. A midi switcher could utilise these connections for example.
(DIN pin 4 - Foot switch jack 2 - Ring - BOOST)
AUXILIARY INPUT: A standard 3.5mm jack socket for the connection of backing tracks etc. and level balanced with the accompanying
Level control. The Aux signal is inserted post Reverb and is present at the D.I and Headphone sockets, but not the Insert Send.
IMPEDANCE SELECTOR SWITCH: Used to select the optimum load impedance matching. It should be set to match the total load of
the connected loud speakers. Incorrect setting will not cause damage or reduced power, but your potential sound quality may be
compromised.
This amplifier is safe to operate without speakers connected. This enables use with only headphones or just as a pre-amplifier
within your DAW system.
4-8Ω setting: 1x4 Ω, 2x8Ω cab or 2x16Ω cabs (connected in parallel).
Pay attention to the impedance if multiple cabs are used.
16Ω setting: 1x16Ω cab.
TIP
RING
7

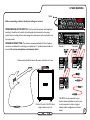
SPEAKER CONNECTORS: The minimum recommended load is 4 Ohms. Speakon
connectors are advised for connecting your cabinets but ¼” speaker jacks and cable can
be used. Do not use microphone or instrument cables.
IMPEDANCE SELECTOR SWITCH: Used to select the optimum load impedance
matching. It should be set to match the total speaker load connected to the output
socket. Incorrect setting will not cause damage, but output power and sound quality may
be compromised.
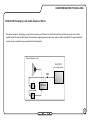
Before connecting a cabinet, check your settings are correct:
Guitar
UP AND RUNNING
IRT412IRT212
Example 1
Example 2
IRT212
Always switch off and disconnect the po
w
er cord when not in use.
The IRT-SLS can be connected to your
chosen cabinet via Speakon to jack, or jack
to jack connectors in either a single or
multiple cabinet configuration (as shown
above).
Check out the rest of the IRT cabinet
range at www.Laney.co.uk
8
POWER RATING: 160W RMS
Serial Number:
POWER RATING: 160W RMS
Serial Number:
POWER RATING: 320W RMS
Serial Number:

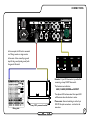
CONNECTIONS
Mixing desk.
Laney CXP - powered monitor.
Remote: A 5 pin DIN connector is provided for
connecting a Laney FS4-IRT foot-switch.
The functions controlled are:
LEAD, CLEAN, REVERB and BOOST.
The adjacent LED and associated front panel LED
will illuminate when the function is active.
Please note: External switching is via the 5 pin
DIN OR the jack connections - not both at the
same time.
LEAD
RHYTHM
CLEAN
REVERB
BOOST
In this example, the D.I feed is connected
to a Mixing console or stage monitor.
In the event of hum caused by a ground
loop lift the ground (audio ground) with
the ground Lift switch.
9

10
Mobile phone
Mp3 player
Ensure the level controls
are turned down before
using to avoid unexpected
or potentially damaging
volume levels!
PHONES and AUX:
REMOTE: The secondary jack remote
connections could be used to connect
your IRT-SLS to a suitable TRS
switchable pedal board.
Phones
Outboard FX unit
Pedal Board

USB INTERFACE FOR PC, MAC AND iPAD
During recording to your chosen DAW, the left channel carries an unprocessed guitar signal, with the right carrying the amplifier processed
signal. If you need to separate the clean and processed signals, simply copy the track in stereo with one track panned left and the other track
panned right, then both raw and processed signals are available independently.
■ Re-Amp guitar track with external stomp boxes as required.
To run into iPad or iPad mini connect via a Camera USB adaptor, PC/MAC connects via standard A-B USB cable, for use with the Garage Band
®, Audacity ®, MixPad Audio Mixer ®, Pro Tools and similar. It should be noted that the audio output of an iPad or iPad mini is disengaged and
returned via the USB. This can be picked up via a rear panel monitor switch on the amplifier headphones in stereo, or if required, routed into a
PA system/powered cabinets.
■ Record output of amplifier with or without a speaker load connected.
Re-Amp Facility
USB Interface options:
■ USB2.0 Bidirectional to PC/Mac/iPad etc.
■ Simultaneously record dry guitar signal for later processing or Re-Amping.
■ Re-Amp guitar track changing the settings as required.
Record out via USB
■ Add tube amplifier and/or power amplifier warmth to digital guitar tracks with or without speaker load.
This allows for the re-amplifying of a sound that may have been over processed initially. To re-amp via Garage Band on the iPad, solo the
original channel and record a new one with the 'link cable' in place. More information is available on the following pages.
TIP
The processed signal can be emulated or non-emulated dependant on the cabinet emulation switch selection.
11

USB INTERFACE FOR PC, MAC & iPAD
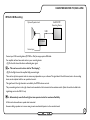
IRT-SLS USB Recording:
The signal level of the right channel is controlled by the IRT-SLS volume controls.
All this can be done without a speaker load connected.
However adding a speaker can in some cases give extra mechanical dynamics to the recorded sound.
(2) On the Right channel the amplified fully processed signal.
These can be split into separate tracks in various ways dependent on your software. The signal level of the left channel, sent to the recording
device, can be adjusted with the rear panel level control.
The processed signal sent to the right channel can be emulated or left untreated via the emulation switch. (Note this switch also affects the
signal being sent via the XLR D.I out).
This can be used at a later date for “Re-Amping”.
Alternatively record left and right as two separate tracks for maximum flexibiIity.
Connect your USB recording device (PC/MAC or iPad) via an appropriate USB cable.
Your amplifier will send two audio tracks to your recording device:
(1) On the Left channel the direct unaffected guitar signal.
Guitar Input
USB
Optional Speaker Load
iPad/MAC/PC
Recording Device
IRT-SLS
12

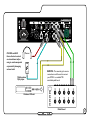
IRT-SLS USB “Re-Amping”:
Connect USB cable between the amplifier and recording device, then connect a good quality screened guitar cable from the rear panel “Re-Amp”
output jack and loop round the front panel to guitar input jack.
Start your record device. The monitored track will be sent to the amplifier input and the device will record the now processed signal from the
amplifier output. The controls on the amplifier can be adjusted to obtain the new sound you require.
You will now have the original track and the new re-processed version.
Output the original unprocessed guitar track by monitoring it on your record device.
Route lead in an anti-clockwise direction around the amplifier to avoid hum pick-up from the power transformer.
For lowest noise performance, adjust the Dry signal send control for the maximum undistorted record level on your DAW.
Make sure your monitor track output is being sent to the left channel output or both.
USB
Optional Speaker Load
iPad/MAC/PC
Recording Device
IRT-SLS
13
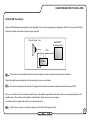
USB INTERFACE FOR PC, MAC & iPAD

Proceed as normal for “Re-Amping” except in this case insert your FX box/s into the Guitar lead from the Re-Amp out jack to the Guitar
amplifier input. The recorded Left channel will contain the original unprocessed signal now with your effects only added. The right channel will
contain the same sound but also processed via the Studio amplifier.
IRT-SLS USB “Re-Amping” with added Stomp box Effects:
USB
Optional Speaker Load
iPad/MAC/PC
Recording Device
IRT-SLS
FX
FX
14
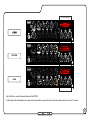
USB INTERFACE FOR PC, MAC & iPAD

Set to preference.
CLEAN
ROCK
RHYTHM
LEAD
METAL
RHYTHM
LEAD
DETUNED METAL
RHYTHM
LEAD
15
QUICK START SETTINGS

Set to preference.
CLEAN
RHYTHM
LEAD
In the Rhythm and Lead examples, the output section is pushed into output distortion when the volume controls are set at 7 or above.
Use the Watts to control the overall volume of the IRT-SLS.
16

TUBE TIPS
V1: ECC83 - part number - 005570
■ Allow the amplifier to warm up to room temperature before switching it on: the sudden thermal shock can crack a cold glass tube
enclosure, plus any moisture is bad news around high voltage electronics.
■ After playing, allow the amplifier to cool down before moving. Hot tubes are more fragile than cool ones.
Firstly switch off and unplug the amplifier from the mains supply. Remove the top cover. The tubes are protected with screen cans; to remove,
push down and twist the can anti clockwise and then pull up. The tube can now be gently pulled out. Take care when inserting the new tube to
make sure all pins are correctly aligned. Replace the top cover before connecting to the mains supply.
Important: ONLY fit the recommended tube types:
■ Take care when moving the amplifier. Tubes are fragile glass components, they can easily be damaged if thrown in and out of a van.
A tubes life expectancy is based upon a number of factors which include operating temperature, how hard and how often it is played, vibration
due to travel, etc. Tubes should be changed in your amplifier if you notice any deterioration in your amplifiers sound or performance. Otherwise,
they need not be changed at any regular interval.
V2: ECC83 - part number - 005550
DO NOT operate with the top cover removed.
Problematic tubes can cause crackling noises, hiss, excessive distortion, microphony and low output power.
Important: The user should not attempt to service this product!
Method for replacing tube V1 and V2 (by Qualified Service Engineers only).
The IRT-SLS uses specially selected and tested high voltage pre-amp tubes which should give you years of trouble free service. However like all
tube amps; it is important to treat it with a certain amount of care. Use the following steps as a guide for how to take care of your amplifier:
Failure to do so could result in malfunction/mis-opertaion of your IRT-SLS.
17

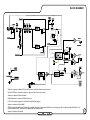
BLOCK DIAGRAM
(USB2.0 is compatible with Windows 10 ® operating system, Windows 8 ® operating system & Windows 7 ® operating system. Also compatible with Mac ® & iPad ® 1-3 via
camera USB adaptor, iPad ® & iPad Mini ® via Lightning-USB camera adaptor cable.)
Windows is a registered trademark of Microsoft Corporation in the United States and other countries.
Audacity is a trademark of Dominic Mazzoni.
MixPad Audio Mixer is a trademark of NCH Software, Inc.
Pro Tools is a trademark registered in the United States by Avid Technology, Inc.
Speakon is a trademark of Neutrik®AG.
Speakon is a trademark of Neutrik®.
Mac, Mac OS & iPad are trademarks of Apple Inc., registered in the U.S. and other countries.
18

SPECIFICATIONS
In the interest of continued development, Laney reserves the right to amend product specification without prior notification.
19
IRT-SLS
Operating Voltage Range: ~100V to ~240V 50-60Hz.
Average power consumption: 75W(Measured at 1/8th continuous output power)
Power Output (RMS): High power mode: 300W into 4Ù / 150W into 8Ù/ 75W into 16Ù
Standard power mode: 60W into 4Ù / 30W into 8Ù/ 15W into 16Ù
Load Impedance: Setting 1: 1x8Ù,2x16Ù, 2x8Ù
Setting 2: 1x16Ù
Input Impedance: 1MÙ & 47pF
FX Loop Sensitivity: 0dBu/-10dBu (Nominal dependant on control settings)
USB: 44.1kHz Standard Slave CODEC (PC/MAC/iPad compatible)
Unit Dimensions: H70mm, W318mm, D235mm
Carton Dimensions: H150mm, W442mm, D299mm
Weight: 4.5Kg (Unit) 5Kg (Packed)
Construction/ features: Sturdy steel chassis
Ergonomic and stylish handle design

SAFETY INFORMATION
La pagina sta caricando ...
La pagina sta caricando ...
La pagina sta caricando ...
La pagina sta caricando ...
La pagina sta caricando ...
La pagina sta caricando ...
La pagina sta caricando ...
-
 1
1
-
 2
2
-
 3
3
-
 4
4
-
 5
5
-
 6
6
-
 7
7
-
 8
8
-
 9
9
-
 10
10
-
 11
11
-
 12
12
-
 13
13
-
 14
14
-
 15
15
-
 16
16
-
 17
17
-
 18
18
-
 19
19
-
 20
20
-
 21
21
-
 22
22
-
 23
23
-
 24
24
-
 25
25
-
 26
26
-
 27
27


Laney IRONHEART IRT-SLS Manuale utente
- Categoria
- Apparecchiature musicali supplementari
- Tipo
- Manuale utente
- Questo manuale è adatto anche per
in altre lingue
- English: Laney IRONHEART IRT-SLS User manual
- français: Laney IRONHEART IRT-SLS Manuel utilisateur
- español: Laney IRONHEART IRT-SLS Manual de usuario
- Deutsch: Laney IRONHEART IRT-SLS Benutzerhandbuch
- português: Laney IRONHEART IRT-SLS Manual do usuário
- 日本語: Laney IRONHEART IRT-SLS ユーザーマニュアル
Documenti correlati
Altri documenti
-
 HH Electronics HPT-112 Manuale utente
-
HH Electronics HPT-110 Manuale utente
-
Yamaha T100 Manuale del proprietario
-
Peavey IPR 3000 Manuale utente
-
 Trace Elliot TRAMP Operating Instructions Manual
-
Yamaha THR10II Guida di riferimento
-
-
Silvercrest SLS 2200 C2 Operating Instructions Manual
-
-
Sherwood MICRO/CPU 100 Istruzioni per l'uso

