
1
INTRODUCTION
User manual MAESTRO 2060
English
MAESTRO 2060
Introduction
Belgacom thanks you for choosing the Maestro 2060, a telephone for both the home and
the office, which offers many advanced services such as :
- Incoming call numbers display and the storage of these numbers, times and dates of calls.
- SMS sending, receiving and storing
- SIM card content reading and storing into the Phonebook
EU Statement of Compliance
Industrie Dial Face S.p.A., based at 4 Via Canzo 20068 - Peschiera Borromeo (MI) Italy, declares under
its own responsibility that the Maestro 2060 telephone equipment complies with the following stan-dards:
EN 55024, EN 55022 – Electro-magnetic compatibility
EN 60950 – Electrical Safety
and meets the requirements of Directive 1999/5/CE of the European Parliament and Council dated 9
March 1999 in relation to radio equipment and telecommunication terminals and the recognition of
reciprocal compliance.
Compliance with these provisions is demonstrated by the mark
Use of the telephone
The telephone has been designed for connection to Belgacom analogue telephone network.
Important advice
Do not use the telephone in an environment which is excessively humid, dusty, gas saturated or with
risk of water contact. In addition, do not expose it to direct sunlight or other sources of heat. It is advised
not to place the device on slippery or delicate surfaces but to install it at a distance of at least one meter
from other devices that are the source of parasites such as cordless equipment, beepers, televisions and
industrial machinery, etc. Clean it by using a damp cloth or antistatic wipe. Do not use dry cloths or
corrosive cleaners.
Where the device remains unplugged from the network in order to preserve it, it is advisable
to remove the batteries from their housing to avoid any damage by contacts due to the leakage of
the liquid they contain.
Each of these conditions can affect the operating and appearance of the product over time.
For safety reasons, always unplug the network cable before removing the batteries,
when replacing them and also during telephone maintenance.
Keep this user manual safe and observe environmental standards when discarding the equipment.

2
User manual MAESTRO 2060
English
INTRODUCTION
SUMMARY
INTRODUCTION . . . . . . . . . . . . . . . . . . . . . . . . . . . . . . . . . . . . . . . . . . . . . . . . . . . . . . . . . . . . . . . . . . . . . . . . . . 1
EU Statement of Compliance . . . . . . . . . . . . . . . . . . . . . . . . . . . . . . . . . . . . . . . . . . . . . . . . . . . . . . . . . . . . . . . . 1
Use of the telephone . . . . . . . . . . . . . . . . . . . . . . . . . . . . . . . . . . . . . . . . . . . . . . . . . . . . . . . . . . . . . . . . . . . . . . . 1
Important Advice . . . . . . . . . . . . . . . . . . . . . . . . . . . . . . . . . . . . . . . . . . . . . . . . . . . . . . . . . . . . . . . . . . . . . . . . . . 1
SUMMARY . . . . . . . . . . . . . . . . . . . . . . . . . . . . . . . . . . . . . . . . . . . . . . . . . . . . . . . . . . . . . . . . . . . . . . . . . . . . . . . . 2
1 INSTALLATION AND START-UP
1.1 Description of the telephone . . . . . . . . . . . . . . . . . . . . . . . . . . . . . . . . . . . . . . . . . . . . . . . . . . . . . . . . . 4
1.2 Display symbols . . . . . . . . . . . . . . . . . . . . . . . . . . . . . . . . . . . . . . . . . . . . . . . . . . . . . . . . . . . . . . . . . . . . . 4
1.3 Content of the box . . . . . . . . . . . . . . . . . . . . . . . . . . . . . . . . . . . . . . . . . . . . . . . . . . . . . . . . . . . . . . . . . . 5
1.4 Installing the telephone . . . . . . . . . . . . . . . . . . . . . . . . . . . . . . . . . . . . . . . . . . . . . . . . . . . . . . . . . . . . . 6
1.5 Wall intallation . . . . . . . . . . . . . . . . . . . . . . . . . . . . . . . . . . . . . . . . . . . . . . . . . . . . . . . . . . . . . . . . . . . . . . 6
1.6 Telephone start-up . . . . . . . . . . . . . . . . . . . . . . . . . . . . . . . . . . . . . . . . . . . . . . . . . . . . . . . . . . . . . . . . . . 6
1.7 Replacing the batteries . . . . . . . . . . . . . . . . . . . . . . . . . . . . . . . . . . . . . . . . . . . . . . . . . . . . . . . . . . . . . . 7
1.8 Delivery configuration . . . . . . . . . . . . . . . . . . . . . . . . . . . . . . . . . . . . . . . . . . . . . . . . . . . . . . . . . . . . . . . 7
1.9 Technical and functional features . . . . . . . . . . . . . . . . . . . . . . . . . . . . . . . . . . . . . . . . . . . . . . . . . . . . 8
2 CUSTOMISATION / PROGRAMMING
Menu . . . . . . . . . . . . . . . . . . . . . . . . . . . . . . . . . . . . . . . . . . . . . . . . . . . . . . . . . . . . . . . . . . . . . . . . . . . . . 9
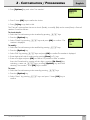
2.1 Setting the language . . . . . . . . . . . . . . . . . . . . . . . . . . . . . . . . . . . . . . . . . . . . . . . . . . . . . . . . . . . . . . . 10
2.2 Setting the light on the display . . . . . . . . . . . . . . . . . . . . . . . . . . . . . . . . . . . . . . . . . . . . . . . . . . . . . . 10
2.3 Serring time and date . . . . . . . . . . . . . . . . . . . . . . . . . . . . . . . . . . . . . . . . . . . . . . . . . . . . . . . . . . . . . . . 11
2.4 Setting the ringer . . . . . . . . . . . . . . . . . . . . . . . . . . . . . . . . . . . . . . . . . . . . . . . . . . . . . . . . . . . . . . . . . . . 11
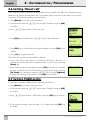
2.4.1 Setting the ringer melody . . . . . . . . . . . . . . . . . . . . . . . . . . . . . . . . . . . . . . . . . . . . . . . . . . . . . . . . . . . . . 11
2.4.2 Setting the ringer volum level . . . . . . . . . . . . . . . . . . . . . . . . . . . . . . . . . . . . . . . . . . . . . . . . . . . . . . . . . 12
2.4.3 Setting the ring mode . . . . . . . . . . . . . . . . . . . . . . . . . . . . . . . . . . . . . . . . . . . . . . . . . . . . . . . . . . . . . . . . 12
2.4.4 VIP filter . . . . . . . . . . . . . . . . . . . . . . . . . . . . . . . . . . . . . . . . . . . . . . . . . . . . . . . . . . . . . . . . . . . . . . . . . . . . 13
2.4.5 “No ringer anonymous“ filter . . . . . . . . . . . . . . . . . . . . . . . . . . . . . . . . . . . . . . . . . . . . . . . . . . . . . . . . . . 13
2.4.6 “Black list” filter . . . . . . . . . . . . . . . . . . . . . . . . . . . . . . . . . . . . . . . . . . . . . . . . . . . . . . . . . . . . . . . . . . . . . . 13
2.5 Setting the “Fast call” . . . . . . . . . . . . . . . . . . . . . . . . . . . . . . . . . . . . . . . . . . . . . . . . . . . . . . . . . . . . . . . 14
2.6 Setting “Direct call” . . . . . . . . . . . . . . . . . . . . . . . . . . . . . . . . . . . . . . . . . . . . . . . . . . . . . . . . . . . . . . . . . 16
2.7 Setting PABX prefix . . . . . . . . . . . . . . . . . . . . . . . . . . . . . . . . . . . . . . . . . . . . . . . . . . . . . . . . . . . . . . . . . 16
2.8 Setting PABX pause . . . . . . . . . . . . . . . . . . . . . . . . . . . . . . . . . . . . . . . . . . . . . . . . . . . . . . . . . . . . . . . . . 17
2.9 Setting Flash time . . . . . . . . . . . . . . . . . . . . . . . . . . . . . . . . . . . . . . . . . . . . . . . . . . . . . . . . . . . . . . . . . . 17
2.10 Setting CLI on CW . . . . . . . . . . . . . . . . . . . . . . . . . . . . . . . . . . . . . . . . . . . . . . . . . . . . . . . . . . . . . . . . . . 17
2.11 Setting the keypad lock PIN . . . . . . . . . . . . . . . . . . . . . . . . . . . . . . . . . . . . . . . . . . . . . . . . . . . . . . . . . 18
2.12 Reset code . . . . . . . . . . . . . . . . . . . . . . . . . . . . . . . . . . . . . . . . . . . . . . . . . . . . . . . . . . . . . . . . . . . . . . . . . 18
3 USE OF THE TELEPHONE
3.1 Connecting and disconnecting from the telephone network . . . . . . . . . . . . . . . . . . . . . . . . . . . 19
3.2 Hands-free mode . . . . . . . . . . . . . . . . . . . . . . . . . . . . . . . . . . . . . . . . . . . . . . . . . . . . . . . . . . . . . . . . . . . 19
3.3 Answering to an incoming call . . . . . . . . . . . . . . . . . . . . . . . . . . . . . . . . . . . . . . . . . . . . . . . . . . . . . . 19
3.4 Making a call . . . . . . . . . . . . . . . . . . . . . . . . . . . . . . . . . . . . . . . . . . . . . . . . . . . . . . . . . . . . . . . . . . . . . . . 20
3.4.1 Normal call . . . . . . . . . . . . . . . . . . . . . . . . . . . . . . . . . . . . . . . . . . . . . . . . . . . . . . . . . . . . . . . . . . . . . . . . . 20
3.4.2 Call with pre-selection . . . . . . . . . . . . . . . . . . . . . . . . . . . . . . . . . . . . . . . . . . . . . . . . . . . . . . . . . . . . . . . . 20
3.4.3 Calling a last number dialled . . . . . . . . . . . . . . . . . . . . . . . . . . . . . . . . . . . . . . . . . . . . . . . . . . . . . . . . . . 20
3.5 The Phonebook . . . . . . . . . . . . . . . . . . . . . . . . . . . . . . . . . . . . . . . . . . . . . . . . . . . . . . . . . . . . . . . . . . . . 21
3.5.1 Storing in the Phonebook . . . . . . . . . . . . . . . . . . . . . . . . . . . . . . . . . . . . . . . . . . . . . . . . . . . . . . . . . . . . . 22
3.5.2 Show numbers of the Phonebook . . . . . . . . . . . . . . . . . . . . . . . . . . . . . . . . . . . . . . . . . . . . . . . . . . . . . 22
3.5.3 Modify numbers of the Phonebook . . . . . . . . . . . . . . . . . . . . . . . . . . . . . . . . . . . . . . . . . . . . . . . . . . . . 23
3.5.4 Modify names of the Phonebook . . . . . . . . . . . . . . . . . . . . . . . . . . . . . . . . . . . . . . . . . . . . . . . . . . . . . . 25
3.5.5 Modify a Ring melody associated to a name of the Phonebook . . . . . . . . . . . . . . . . . . . . . . . . . . . . 25
3.5.6 Ring filter . . . . . . . . . . . . . . . . . . . . . . . . . . . . . . . . . . . . . . . . . . . . . . . . . . . . . . . . . . . . . . . . . . . . . . . . . . . 26
3.5.7 Erase a name of the Phonebook . . . . . . . . . . . . . . . . . . . . . . . . . . . . . . . . . . . . . . . . . . . . . . . . . . . . . . . 26
3.5.8 VIP list . . . . . . . . . . . . . . . . . . . . . . . . . . . . . . . . . . . . . . . . . . . . . . . . . . . . . . . . . . . . . . . . . . . . . . . . . . . . . . 27
3.5.9 Black list . . . . . . . . . . . . . . . . . . . . . . . . . . . . . . . . . . . . . . . . . . . . . . . . . . . . . . . . . . . . . . . . . . . . . . . . . . . . 27
3.5.10 Copy numbers of a SIM card . . . . . . . . . . . . . . . . . . . . . . . . . . . . . . . . . . . . . . . . . . . . . . . . . . . . . . . . . . 28
3.5.11 Free memory . . . . . . . . . . . . . . . . . . . . . . . . . . . . . . . . . . . . . . . . . . . . . . . . . . . . . . . . . . . . . . . . . . . . . . . . 29

3
User manual MAESTRO 2060
EnglishSUMMARY
3.5.12 Storing a number of the CLI list in the Phonebook . . . . . . . . . . . . . . . . . . . . . . . . . . . . . . . . . . . . . . . 29
3.5.13 Storing a number of the LN dialled list in the Phonebook . . . . . . . . . . . . . . . . . . . . . . . . . . . . . . . . . 30
3.6 Dialling numbers of the Phonebook / VIP / Fast call . . . . . . . . . . . . . . . . . . . . . . . . . . . . . . . . . . 31
3.7 Caller identification . . . . . . . . . . . . . . . . . . . . . . . . . . . . . . . . . . . . . . . . . . . . . . . . . . . . . . . . . . . . . . . . . 32
3.7.1 Call a number of the "Received" call list . . . . . . . . . . . . . . . . . . . . . . . . . . . . . . . . . . . . . . . . . . . . . . . . . 33
3.7.2 Erase numbers of the "Received" call list . . . . . . . . . . . . . . . . . . . . . . . . . . . . . . . . . . . . . . . . . . . . . . . . 33
3.8 2nd Call handling . . . . . . . . . . . . . . . . . . . . . . . . . . . . . . . . . . . . . . . . . . . . . . . . . . . . . . . . . . . . . . . . . . 34
3.9 Mute the Microphone . . . . . . . . . . . . . . . . . . . . . . . . . . . . . . . . . . . . . . . . . . . . . . . . . . . . . . . . . . . . . . 34
3.10 Loudspeaker volume adjusting . . . . . . . . . . . . . . . . . . . . . . . . . . . . . . . . . . . . . . . . . . . . . . . . . . . . . . 34
3.11 Group listening mode . . . . . . . . . . . . . . . . . . . . . . . . . . . . . . . . . . . . . . . . . . . . . . . . . . . . . . . . . . . . . . 35
3.12 Keyboard lock . . . . . . . . . . . . . . . . . . . . . . . . . . . . . . . . . . . . . . . . . . . . . . . . . . . . . . . . . . . . . . . . . . . . . 35
3.13 Reminders (alarms) . . . . . . . . . . . . . . . . . . . . . . . . . . . . . . . . . . . . . . . . . . . . . . . . . . . . . . . . . . . . . . . . . 35
3.14 Phone info . . . . . . . . . . . . . . . . . . . . . . . . . . . . . . . . . . . . . . . . . . . . . . . . . . . . . . . . . . . . . . . . . . . . . . . . 38
4 NETWORK SERVICES
4. Use of Network services . . . . . . . . . . . . . . . . . . . . . . . . . . . . . . . . . . . . . . . . . . . . . . . . . . . . . . . . . . . . 39
4.1 Call forwarding . . . . . . . . . . . . . . . . . . . . . . . . . . . . . . . . . . . . . . . . . . . . . . . . . . . . . . . . . . . . . . . . . . . . 39
4.1.1 Call forwarding unconditional . . . . . . . . . . . . . . . . . . . . . . . . . . . . . . . . . . . . . . . . . . . . . . . . . . . . . . . . 39
4.1.2 Call forwarding if not reply . . . . . . . . . . . . . . . . . . . . . . . . . . . . . . . . . . . . . . . . . . . . . . . . . . . . . . . . . . . 40
4.1.3 Call foewarding when busy . . . . . . . . . . . . . . . . . . . . . . . . . . . . . . . . . . . . . . . . . . . . . . . . . . . . . . . . . . 41
4.2 Fixed destination call . . . . . . . . . . . . . . . . . . . . . . . . . . . . . . . . . . . . . . . . . . . . . . . . . . . . . . . . . . . . . . . 43
4.3 Call waiting (2nd call) . . . . . . . . . . . . . . . . . . . . . . . . . . . . . . . . . . . . . . . . . . . . . . . . . . . . . . . . . . . . . . 44
4.4 Ring back . . . . . . . . . . . . . . . . . . . . . . . . . . . . . . . . . . . . . . . . . . . . . . . . . . . . . . . . . . . . . . . . . . . . . . . . . 45
4.5 PhoneMail and services . . . . . . . . . . . . . . . . . . . . . . . . . . . . . . . . . . . . . . . . . . . . . . . . . . . . . . . . . . . . . 45
5 ADDITIONAL OPTIONS
5.1 Options available in idle mode . . . . . . . . . . . . . . . . . . . . . . . . . . . . . . . . . . . . . . . . . . . . . . . . . . . . . . 47
5.1.1 Save a displayed number . . . . . . . . . . . . . . . . . . . . . . . . . . . . . . . . . . . . . . . . . . . . . . . . . . . . . . . . . . . . 47
5.1.2 Introducing a pause . . . . . . . . . . . . . . . . . . . . . . . . . . . . . . . . . . . . . . . . . . . . . . . . . . . . . . . . . . . . . . . . . 48
5.1.3 Make a call as visible . . . . . . . . . . . . . . . . . . . . . . . . . . . . . . . . . . . . . . . . . . . . . . . . . . . . . . . . . . . . . . . . . 48
5.1.4 Make a call as anonymous . . . . . . . . . . . . . . . . . . . . . . . . . . . . . . . . . . . . . . . . . . . . . . . . . . . . . . . . . . . 48
5.2 Options in conversation mode . . . . . . . . . . . . . . . . . . . . . . . . . . . . . . . . . . . . . . . . . . . . . . . . . . . . . . 49
5.2.1 Activate call-back . . . . . . . . . . . . . . . . . . . . . . . . . . . . . . . . . . . . . . . . . . . . . . . . . . . . . . . . . . . . . . . . . . . . 49
5.2.2 Start 2nd call . . . . . . . . . . . . . . . . . . . . . . . . . . . . . . . . . . . . . . . . . . . . . . . . . . . . . . . . . . . . . . . . . . . . . . . 49
5.2.3 Accept 2nd call . . . . . . . . . . . . . . . . . . . . . . . . . . . . . . . . . . . . . . . . . . . . . . . . . . . . . . . . . . . . . . . . . . . . . 49
5.2.4 Alternate . . . . . . . . . . . . . . . . . . . . . . . . . . . . . . . . . . . . . . . . . . . . . . . . . . . . . . . . . . . . . . . . . . . . . . . . . . 49
5.2.5 Conference call . . . . . . . . . . . . . . . . . . . . . . . . . . . . . . . . . . . . . . . . . . . . . . . . . . . . . . . . . . . . . . . . . . . . . 50
5.2.6 Call transfer . . . . . . . . . . . . . . . . . . . . . . . . . . . . . . . . . . . . . . . . . . . . . . . . . . . . . . . . . . . . . . . . . . . . . . . . 50
5.2.7 Reject 2nd call . . . . . . . . . . . . . . . . . . . . . . . . . . . . . . . . . . . . . . . . . . . . . . . . . . . . . . . . . . . . . . . . . . . . . . 50
5.2.8 Terminate call . . . . . . . . . . . . . . . . . . . . . . . . . . . . . . . . . . . . . . . . . . . . . . . . . . . . . . . . . . . . . . . . . . . . . . . 50
6 USE OF SMS SERVICE
6.1 Configuring the SMS service . . . . . . . . . . . . . . . . . . . . . . . . . . . . . . . . . . . . . . . . . . . . . . . . . . . . . . . . 51
6.1.1 Modify the SMS center numbers . . . . . . . . . . . . . . . . . . . . . . . . . . . . . . . . . . . . . . . . . . . . . . . . . . . . . . . 51
6.1.2 Assign a name to a SMS Box . . . . . . . . . . . . . . . . . . . . . . . . . . . . . . . . . . . . . . . . . . . . . . . . . . . . . . . . . . 52
6.1.3 Assign a number to a SMS Box . . . . . . . . . . . . . . . . . . . . . . . . . . . . . . . . . . . . . . . . . . . . . . . . . . . . . . . . 52
6.1.4 Assign a PIN code to a SMS Box . . . . . . . . . . . . . . . . . . . . . . . . . . . . . . . . . . . . . . . . . . . . . . . . . . . . . . . 53
6.1.5 Activate / Deactivate EATONI function . . . . . . . . . . . . . . . . . . . . . . . . . . . . . . . . . . . . . . . . . . . . . . . . . 53
6.1.6 Deactivate a SMS Box . . . . . . . . . . . . . . . . . . . . . . . . . . . . . . . . . . . . . . . . . . . . . . . . . . . . . . . . . . . . . . . . 53
6.1.7 Activate a SMS Box . . . . . . . . . . . . . . . . . . . . . . . . . . . . . . . . . . . . . . . . . . . . . . . . . . . . . . . . . . . . . . . . . . 54
6.2 SMS Sending . . . . . . . . . . . . . . . . . . . . . . . . . . . . . . . . . . . . . . . . . . . . . . . . . . . . . . . . . . . . . . . . . . . . . . . 54
6.2.1 Reading and Options of the SMS sent . . . . . . . . . . . . . . . . . . . . . . . . . . . . . . . . . . . . . . . . . . . . . . . . . . 55
6.3 SMS Receiving . . . . . . . . . . . . . . . . . . . . . . . . . . . . . . . . . . . . . . . . . . . . . . . . . . . . . . . . . . . . . . . . . . . . . 56
6.3.1 Reading received SMS . . . . . . . . . . . . . . . . . . . . . . . . . . . . . . . . . . . . . . . . . . . . . . . . . . . . . . . . . . . . . . 56
6.3.2 Options menu “Read received” . . . . . . . . . . . . . . . . . . . . . . . . . . . . . . . . . . . . . . . . . . . . . . . . . . . . . . . 57
6.4 EATONI (SMS only) . . . . . . . . . . . . . . . . . . . . . . . . . . . . . . . . . . . . . . . . . . . . . . . . . . . . . . . . . . . . . . . . . 57
Warranty . . . . . . . . . . . . . . . . . . . . . . . . . . . . . . . . . . . . . . . . . . . . . . . . . . . . . . . . . . . . . . . . . . . . . . . . . . . . . . . . . 59

4
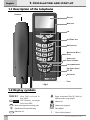
1- INSTALLATION AND START-UP
User manual MAESTRO 2060
English
1- INSTALLATION AND START-UP
DISPLAY
MENU KEYS
LED
UP /DOWN KEYS
MAIN KEYPAD
MICROPHONE MUTE /
ERASE
HANDS-FREE /
GROUP LISTENING
LAST NUMBER REDIAL
SWITCHING PARTIES /
R2 - R3
SERVICES KEY
FLASH
HANDSET
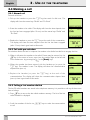
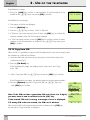
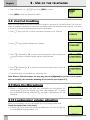
1.1 Description of the telephone
1.2 Display symbols
j
New SMS received in
box A/B/C
j
SMS Memory messages
full for box A/B/C
d
New not answered incoming calls
g Hands-free/Group-listening
Batteries off
i
Ringer deactivated, Filtre VIP, Black list,
hidden number, ring delayed
Alarm On
Alarm not stopped
b PhoneMail
i Direct call activated
8
Fig. 1
A/B/C
A/B/C

1- INSTALLATION AND START-UP
5
1- INSTALLATION AND START-UP
User manual MAESTRO 2060
English
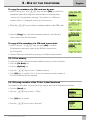
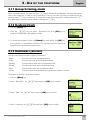
1.3 Content of the box
1 handset
1 spiral cord
1 line cord
1 base
1 line plug in
1 AC/DC supplier
1 user manual
(with guarantee card)
All the functions are available if the telephone is supplied via AC/DC supplier and/or via 3 batteries
1.5Vdc size AA. Batteries are not provided with the telephone.
Fig. 2
6
AC/DC supply
plug in
Line plug in
Batteries
cover (A)
Batteries
housing (B)
Handset
plug in (C)
Plastic screw (E)
SIM card housing

6
1- INSTALLATION AND START-UP
User manual MAESTRO 2060
English
1- INSTALLATION AND START-UP
1.4 Installing the telephone
Proceed as follows :
1)Put the shortest end of the spiral cable into the handset connector and put the other end into the
small socket (C) located at the bottom of the telephone base (identified by an handset (fig.2). Place
the flat part of the cord into the groove located at the bottom of the base.
2) Put one end of the line cord into the socket located at the bottom of the base (fig2). Place the flat
part of the cord into the groove located at the bottom of the base.
3) Insert the four-poles plug into the telephone socket.
4) Insert the AC/DC supplier plug into the connector located at the bottom of the base (supplier sym-
bol). Insert the 230Vac plug of the supplier into the 230Vac socket.
NB - To install the batteries (fig.2) remove the cover (A) located at the bottom of the base, insert the
batteries in accordance with the polarities indicated into the batteries housing (B) and close the cover.
N.B. Batteries or AC/DC supplier or both may be used.
Important: before to take the cover out, the ine cord MUST NOT be connected to the Maestro 2060.
After this operation, the Maestro 2060 installation is finished.
1.5 Wall installation
The Maestro 2060 can be fixed to the wall. Before fixing it, assembly the different parts and pro-
ceed as follows:
1) Drill two holes of 5mm diameter at a distance of 100 mm.
2) Insert the wall plugs into the holes and screw the screws until they are at 5 mm distance from the
wall.
3) Turn the plastic pivot pin (posit. E on the bottom of the base) 180° on the right side. Stick the tele-
phone to the wall so that the screw heads fully penetrate the large buttonhole. Then block the sub-
set by pulling it in a downward direction.
4) If not yet done, plug the four-pole plug into the telephone socket.
1.6 Telephone start-up
To start the telephone, after completing its installation in accordance with the instructions, check that
the telephone line is connected to the socket, lift the handset up, ensure there is a tone and then hang
up. This operation confirms the equipment has been correctly installed and it is then possible to pro-
ceed with the operations explained in the following paragraphs.

1- INSTALLATION AND START-UP
7
1- INSTALLATION AND START-UP
User manual MAESTRO 2060
English
1.7 Replacing the batteries
When the batteries are discharged or taken out and if the AC/DC supplier is not used, the telephone
provides all the basic functions. It is necessary to replace the batteries if the display shows
when
the handset is picked up.
To replace the batteries, refer to fig.2 and proceed as follows:
1) Unplug the line cord by removing the connector from its socket. In order to remove the connector
correctly, press the safety pin towards the cord and pull without forcing it.
2) Remove the battery cover
3) Replace the batteries, paying attention to the polarity
4) Close the cover
5) Plug the line back in by putting the connector fully back into its socket (until it clicks).
N.B. For safety reasons, follow the information set out in the paragraph entitled “Important Advice”.
Discharged batteries are not rechargeable and should be disposed of using containers provided for
this purpose in full compliance with current environmental standards.
WARNING : DO NOT CONNECT THE TELEPHONE TO THE TELEPHONE NETWORK WITHOUT
FIRST REPLACING THE BATTERY COVER.
1.8 Delivery configuration
Ringer volume . . . . . . . . . . . . . . . . . 3
Ringer melody . . . . . . . . . . . . . . . . . . 1
Loudspeaker volume . . . . . . . . . . . . level 4
Date and time . . . . . . . . . . . . . . . . . . 01 Jan 05 00:00
Alarm . . . . . . . . . . . . . . . . . . . . . . . . Deactivated
VIP filter . . . . . . . . . . . . . . . . . . . . . . Deactivated
1st Ring deactivation . . . . . . . . . . . . . Yes
No ring anonym. . . . . . . . . . . . . . . . Deactivated
Black Liste . . . . . . . . . . . . . . . . . . . . . Deactivated
Language . . . . . . . . . . . . . . . . . . . . . English
PIN Code box SMS . . . . . . . . . . . . . . . No
PABX Prefix . . . . . . . . . . . . . . . . . . . . No
Pause . . . . . . . . . . . . . . . . . . . . . . . . 1 second
Service center 1 (send). . . . . . . . . . . . 1717
Service center 2 (receive) . . . . . . . . . . 01717
SMS Function . . . . . . . . . . . . . . . . . . Activated
Dialling mode . . . . . . . . . . . . . . . . . . DTMF

8
1- INSTALLATION AND START-UP
User manual MAESTRO 2060
English
1.9 Technical and functional features
- 22 keys keyboard : 12 alphanumeric keys + 4 navigation menu keys + 6 function keys
-
Graphic LC display,102 x 64 pixels, 6 lines /16 alphanumeric characters each, backlight
- Pre-selection
- Flash : 125 +/- 5 ms
- Hands-free
- Group listening
- 4 levels loudspeaker volume adjusting
- 15 melodies (3 normal + 12 polyphonic )
- Adjustable ringer volume (3 levels + not activated)
- Led to indicate incoming calla and line engaged
- Mute microphone
Phonebook
-
250 name-number (20 characters by name - 26 characters by memory number)
- Classification (type) of the numbers (Internal / External / VIP / Black)
- Icones (Generic - Mobile - Home - Office) of the type of number
- Copy of a SIM card content
- Ringer activation for pre-defined numbers (VIP list, ring filter)
- Ringer melodies associated to a stored name - number
- Fast dialling (10 numbers max)
- Direct key to access a 30 last numbers dialled list (32 digits each number)
Caller number / name identification and presentation (CLIP/CNIP : if services available on the line)
- Display the callers name / number de l’appelant (also for a 2nd incaming call when in conversation)
- 50 elements CLIP/CNIP list ( name-number -date-hour)
- Dialling an element of the CLIP/CNIP list
Network Services
- "Network Services" handled via menu
- Dedicated key for the 2nd call function
- Reminders/Clock/Conversation elapsing time
- PABX prefix programmability (1 number,4 digits max.)
- Automatic pause insertion after PABX prefix dialling (1,2,3,4 secondes)
SMS sending and receiving
- SMS sending and receiving (160 characters max. each message)
- PIN Code for each Box SMS
- 3 Box SMS max. availability by program
- 80 messages per Box SMS max. / 20 messages of 160 characters per Box SMS
- SMS Centers numbers programmability
- Eatoni (predictive mode of writing SMS)
- 4 languages (FR/NL/D/UK)
- Wall mounting
- Supply via AC/DC (230Vac main) supplier or by 3 batteries 1,5 V / type AA (not included).

9
User manuali MAESTRO 2060
2
CUSTOMISATION
PROGRAMMING
Personalization can be done when the telephone is supplied via main or via batteries or both cases.
Menu
Menu
Main menu
Messages A: Box A Write new
Read received
Read written
Erase messages
Settings
Availanle memory
B: Box B
C: Box C
Service center Service center 1
Service center 2
Call list Received
Placed
Erase all Received
Placed
Network services Call forwarding All calls/ If not answered/ When busy
Fixed dest. call Activation / Deactivation
Call waiting Activation / Deactivation
Deact. ring back
Reminders List
New Single, Yearly, Monthly,
Weekly, Daily, Hourly
Erase all
Settings Display
Ring
Clock
Fast call
Direct call
PABX prefix
PABX pause
Flash
CLI on CW
Language
Lock PIN
Reset code
Keyboard lock - - -
Phone info SMS subaddresses
Ring settings
Direct call
SW release

10
2 - CUSTOMISATION / PROGRAMMING
User manual MAESTRO 2060
English
2.1 Setting the language
Four languages are available : English, Français, Nederlands, Deutsch. To select a language,proceed
as follows:
° Press [Menu] key to enter in the main menu .
° Scroll the menu items via Ωπ keys to select "Settings" and press [OK]
to confirm.
° Press Ωπ keys to select "Language" and press [OK] key to confirm.
° Select the desired language via Ωπ, then press [OK] to confirm.
° Press [∆] to exit the menu and to go back to idle.
2.2 Setting the light on the display
The user can choose between 3 lighting modes (Normal, Always off, Always on) and 12 levels of con-
trast. Proceed as follows:
° Press [Menu] key to enter in the main menu .
° Scroll the menu items via Ωπ keys to select "Settings" and press [OK]
to confirm.
° Press Ωπ keys to select "Display" and press [OK] key to confirm.
°
Select "Lighting" or “Contrast” via Ωπ keyes,
then press [OK] key to
confirm
° If
"Lighting"has been choosen
, select Normal/ Always off/
Always on via Ωπ keys and press [OK] to pour confirm.
Note: the option “Always on” cannot be activated if the Maestro 2060 is
supplied via AC/DC supplier.
° If "Contrast", select the desired level (de 1 à 12) via Ωπ keys and press
[OK] key to confirm.
° It is possible to get back by pressing [∆] key.

11
2 - CUSTOMISATION / PROGRAMMING
User Manual MAESTRO 2060
English
2.3 Setting time and date
Proceed as follows:
° Press [Menu] key to enter in the main menu .
° Scroll the menu items via Ωπ keys to select "Settings" and press [OK]
to confirm.
° Press Ωπ keys to select "Clock" and press [OK] key to confirm.
° Enter the day via numeric keys (01-31).
° Enter the month 01 - 12).
° Enter the year (00 - 99).
° Enter the hour (00 - 23).
° Enter the minutes (00-59).
° Press [OK] key to confirm.
The display will show time and date (jj -mm hh-mm) when the telephone is in idle.
The clock is updated at each incoming call (if CLI/CNIP service is available and
has been subscribed).
If the entered data are wrong, a message of error will be displaied after the
confirmation.
2.4 Setting the ringer
It is possible to choose the melody,the ringer level volume and how the ringer will react when a call
incomes.
2.4.1 Setting the ringer melody
It is possible to choose between 15 melodies (3 normal + 12 polyphonic) as follows:
° Press [Menu] key to enter in the main menu .
° Scroll the menu items via Ωπ keys to select "Settings" and press [OK]
to confirm.
° Press Ωπ keys to select "Ring" and press [OK] key to confirm.

12
2 - CUSTOMISATION / PROGRAMMING
User manual MAESTRO 2060
English
° Press Ωπ keys to select “Ring melody”. Then press [OK] key to
confirm.
° Press Ωπ keys pour to select the desired melody (de 1 à 15 ), then
press [OK] key to confirm.
2.4.2 Setting the ringer volume level
It is possible to choose the level of the ringer volume between 3 different levels: minimum (1), medium
(2), maximum (3). Proceed as follows:
° Press [Menu] key to enter in the main menu .
° Scroll the menu items via Ωπ keys to select "Settings" and press [OK]
to confirm.
° Press Ωπ keys to select "Ring" and press [OK] key to confirm.
° Press Ωπ keys to select “Ring volume”. Then press [OK] key to
confirm.
° Press Ωπ keys pour to select the desired volume level (from 1 to 3 ),
then press [OK] key to confirm.
2.4.3 Setting the ring mode
It is possible to set the mode the ringer will react when a call incomes, between the following modes:
Off: no ring (silence)
On.: immediately when the call incomes
2nd ring: start ringing at 2
nd
ring of the incoming call
At ring nr.: start ringing at a programmed number of rings
for that incoming call (3 - 9).
Proceed as follows:
° Press [Menu] key to enter in the main menu .
° Scroll the menu items via Ωπ keys to select "Settings" and press [OK]
to confirm.
° Press Ωπ keys to select "Ring" and press [OK] key to confirm.
° Press Ωπ keys to select “Ring mode”. Then press [OK] key to confirm.

13
2 - CUSTOMISATION / PROGRAMMING
User Manual MAESTRO 2060
English
° Press Ωπ keys to select the desired mode and
press [OK] key to confirm.
2.4.4 VIP filter
VIP filter allows to activate the ringer for Calling numbers stored in the Vip list only. To activate or
deactivate the VIP filter:
° Enter the menu item '"Ring" as described previously
° Select the "Ring VIP only" via Ωπ keys,then press [OK] key to confirm.
° Choose "Activate?" or "Deactivate?" via Ωπ keys and press [OK] to
confirm.
This function requires a subscription to the "CLIP/CNIP service".
2.4.5 "No ringer anonimous" filter
When this filter is active,the telephone will not ring in the event of anonimous incoming call.
To activate or deactivate the filter,proceed as follows:
° Enter the menu item '"Ring" as described previously
° Select the "No Ring anonim."item via Ωπ keys,then press [OK] key
to confirm.
° Choose "Activate?" or "Deactivate?" via Ωπ keys and press [OK] to
confirm.
This function requires a subscription to the "CLIP/CNIP service".
2.4.6 “Black list” filter
When this filter is active,the telephone will not ring for calls incoming from numbers stored in the
"Black list". To activate or deactivate the filter,proceed as follows:
° Enter the menu item '"Ring" as described previously
° Select the "Black list" item via Ωπ keys,then press [OK] key to
confirm.

14
2 - CUSTOMISATION / PROGRAMMING
User manual MAESTRO 2060
English
° Choose "Activate?" or "Deactivate?" via Ωπ keys and press [OK] to confirm.
This function requires a subscription to the "CLIP/CNIP service".
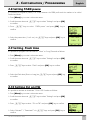
2.5 Setting the “Fast call”
The “Fast call” function allows to call all the numbers stored in the memories associated to (0 to 9) keys
by holding pressed these keys for 3 seconds. The line is automatically engaged via Hands-free and the
number is displayed and sent on to the line.
To associate a number to a (0 to 9)key, proceed as follows:
° Press [Menu] key to enter in the main menu .
° Scroll the menu items via Ωπ keys to select "Settings" and press [OK]
to confirm.
° Press Ωπ keys to select "Fast call" and press [OK] key to confirm.
° Press Ωπ key to select an empty memory ( 0 to 9) to be programmed.
° Press [Assign.] keyto confirm
° Enter the desired number,then press [OK] key to confirm
° Press [∆] key to go back to idle
To associate a Phonebook number to a (0 to 9) key proceed as follows:
° Repeat the above procedure to select an empty memory ( 0 to 9) to be
programmed
° Press [Assign.] key to access the "Main menu"
° Press [Ph. Book] key and select a Phonebook name/number via Ωπ
keys.

15
2 - CUSTOMISATION / PROGRAMMING
User Manual MAESTRO 2060
English
° Press [Options ] key and select "Use number".
° Press 2 times [OK] key to confirm the choice
° Press [∆] key to go back to idle
The "Fast call" options allow the user to check (Details), to modify (Edit) and to erase (Erase) a Fast call
number. Proceed as follows:
To check details:
° Select the Fast call memory to be visualized by pressing Ωπ keys
° Press the [Options] key
° Select "Details" by pressing Ωπ keys and press [OK] to confirm. The
number is displayed.
To modify:
° Select the Fast call memory to be modified by pressing Ωπ keys.
° Press the [Options] key
° Select "Edit" by pressing Ωπ keys and press [OK] to confirm.The number is displayed.
° Erase digits at left side of undersore by pressing [Erase] or ∂ keys
° Enter new digits and press [OK] to confirm. It is possible to enter a number
from the Phonebook by erasing all the digits, pressing [Ph. Book] key,
selecting a name via Ωπ keys, pressing [Options] key and then
selecting "Use number". Press [OK] key to confirm.
To erase:
° Select the Fast call memory to be erased by pressing Ωπ keys.
° Press the [Options] key
° Select "Erase" by pressing Ωπ keys and press 2 times [OK] key to
confirm.

16
2 - CUSTOMISATION / PROGRAMMING
User manual MAESTRO 2060
English
2.6 Setting “Direct call”
The "Direct call" function allows to call a pre-defined stored number (26 digits max.) by picking up the
handset or by pressing the Hands-free key. The number will be sent onto the line after a few seconds.
To program a "Direct call" number proceed as follows:
° Press [Menu] key to enter in the main menu .
° Scroll the menu items via Ωπ keys to select "Settings" and press [OK]
to confirm.
° Press Ωπ keys to select "Direct call" item.
° Press [OK] key to confirm. Press Ωπ keys to select "Activate?"
° Press [OK] key to confirm.Enter the desired number and press [OK] key to
confirm.
° Press [∆] key to get back to idle.
The "Direct call" number can be modified as follows:
° Access the "Direct call"submenu as described and press "Activate" to
visualize the number.Erase the complete number or part of it by pressing
[Erase] key.
° Enter a new number or new digits and press [OK] to confirm. It is possible
to enter a number from the Phonebook by erasing all the digits, pressing
[Ph. Book] key, selecting a name via Ωπ keys, pressing [Options]
key and then selecting "Use number". Press [OK] key to confirm.
2.7 Setting PABX prefix
It is possible to program a PABX prefix (4 digits max.) as follows:
° Press [Menu] key to enter in the main menu .
° Scroll the menu items via Ωπ keys to select "Settings" and press [OK]
to confirm.
° Press Ωπ keys to select "PABX prefix" and press [OK] key to confirm.
° If this memory is empty, enter the prefix (1 to 4 digits) and press [OK] key
to confirm.

17
2 - CUSTOMISATION / PROGRAMMING
User Manual MAESTRO 2060
English
2.8 Setting PABX pause
It is possible to program a pause (1 to 4 sec) between the PABX prefix and the number to be called.
Proceed as follows:
° Press [Menu] key to enter in the main menu .
° Scroll the menu items via Ωπ keys to select "Settings" and press [OK]
to confirm.
° Press Ωπ keys to select "PABX pause" and press [OK] key to
confirm.
° Select the pause time ( 1 to 4 sec.) via Ωπ keys and press [OK] key to
confirm.
2.9 Setting Flash time
It is possible to program the Flash time as "Short" or "Long".Proceed as follows:
° Press [Menu] key to enter in the main menu .
° Scroll the menu items via Ωπ keys to select "Settings" and press [OK]
to confirm.
° Press Ωπ keys to select "Flash" and press [OK] key to confirm.
° Select the Flash time (Short or Long) via Ωπ keys and press [OK] key
to confirm.
2.10 Setting CLI on CW
It is possible to activate or deactivate "CLI on CW" function as follows:
° Press [Menu] key to enter in the main menu .
° Scroll the menu items via Ωπ keys to select "Settings" and press [OK]
to confirm.
° Press Ωπ keys to select "CLI on CW" and press [OK] key to confirm.
° Select "Activate?" / "Deactivate?" via Ωπ keys and press [OK] key to
confirm.

18
2 - CUSTOMISATION / PROGRAMMING
User manual MAESTRO 2060
English
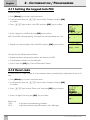
2.11 Setting the keypad lock PIN
Proceed as follows:
° Press [Menu] key to enter in the main menu .
° Scroll the menu items via Ωπ keys to select "Settings" and press [OK]
to confirm.
° Press Ωπ keys to select "Lock PIN" and press [OK] key to confirm.
° Enter 4 digits for Lock PIN and press [OK] key to confirm.
N.B. If a lock PIN is already existing, the telephone will immediately ask for it.
° Repeat the 4 entered digits of the Lock PIN and press [OK] key to confirm.
To erase the Lock PIN proceed as follows:
° Repeat the above mentioned procedure and insert a Lock PIN.
° The telephone will ask for a new PIN code.
° Press 2 times the [OK] key. The Lock PIN code is erased.
2.12 Reset code
The Reset code is a 4 digits number to set the telephone back to manufacturing configuration.Proceed as fol-
lows:
° Press [Menu] key to enter in the main menu .
° Scroll the menu items via Ωπ keys to select "Settings" and press [OK]
to confirm.
° Press Ωπ keys to select "Reset code" and press [OK] key to confirm.
° Enter a 4 digits Code and press [OK] key to confirm.
Reset Code
1234 . . . . . . . to go back to manufacturing condition
0710 . . . . . . . to go back without erasing Phonebook, Lists, Messages

19
User manuali MAESTRO 2060
3
USE OF THE TELEPHONE
3.1Connecting and disconnecting from the telephone
network
It is possible to obtain a line in two different ways:
1) By picking up the handset.
2) By pressing the ∑ key (the display will show the
g
icon). In both cases,
after 10 seconds, the display will shows the time elapsed since the line was
engaged.
The release of the line is possible as follows:
1) By hanging up the handset
2) By pressing the ∑ key again (the
g
icon will disappear from the display).
The telephone will return to idle mode and the display will show the current
time and date.
3.2 Hands-free mode
The Hands free mode enables the telephone to be used without the handset. In this case, it is possible
to hear via a loudspeaker located inside the telephone housing. To answer in Hands free mode, press
the ∑ key when a call incomes. The display will shows the
g
icon and the elapsing time.
3.3 Answering to an incoming call
When a call incomes, the telephone start ringing following the programmed melody.
° The writing “Call” is displayed on the top side of the display until the call is
answered.If the caller line identification servise is activated and available, the
number of the caller is displayed after the 1st ring. If the calling number is
stored in the Phonebook, the stored name is displayed.
° Pick up the handset or press the ∑ key.The display will show the time
elapsed since the line has been engaged (after 10 secs) and the menu
"Ph. Book".
° Release the line at the end of the conversation.

20
3 - USE OF THE TELEPHONE
User manual MAESTRO 2060
English
3.4 Making a call
3.4.1 Normal call
Proceed as follows :
° Pick up the handset or press the ∑ key,then wait for dial tone. The
display will show the menu keys “Redial” and “Ph. Book”.
° Enter the number to be called. The display will show the time elapsed since
the line has been engaged (after 10 secs) and the menu keys “Redial” and
“Ph. Book”.
° Replace the handset or press the ∑ key at the end of the conversation.
The display will show the time elapsed since the line has been engaged
(after 10 secs) then it goes back to idle mode.
3.4.2 Call with pre-selection
Pre-selection allows the user to compose the number to be dialled out before to engage the line.
° When in idle,enter the number to be called. Pauses may be entered via the
∏
key. In the event of errors, erase (one by one)the digits at the left side
of the underscore by pressing the
∂
or the [Erase] keys.
° When the number has been entered, pick the handset up (or press the
∑ key). The number is sent. The display will show the communication
elapsed time (mm: ss).
° Replace the handset (or press the ∑ key) at the end of the
communication. The display will show the communication elapsed time
(mm: ss) then it goes back to idle mode.
3.4.3 Calling a last number dialled
The last 30 called numbers are stored in the telephone memory. It is possible to call any of these num-
bers as follows:
° Press
∏
key to access the last called numbers memory. The list of the last
called numbers is displayed.
° Scroll the numbers of the list via Ωπ keys to select the name-number
to call.
La pagina si sta caricando...
La pagina si sta caricando...
La pagina si sta caricando...
La pagina si sta caricando...
La pagina si sta caricando...
La pagina si sta caricando...
La pagina si sta caricando...
La pagina si sta caricando...
La pagina si sta caricando...
La pagina si sta caricando...
La pagina si sta caricando...
La pagina si sta caricando...
La pagina si sta caricando...
La pagina si sta caricando...
La pagina si sta caricando...
La pagina si sta caricando...
La pagina si sta caricando...
La pagina si sta caricando...
La pagina si sta caricando...
La pagina si sta caricando...
La pagina si sta caricando...
La pagina si sta caricando...
La pagina si sta caricando...
La pagina si sta caricando...
La pagina si sta caricando...
La pagina si sta caricando...
La pagina si sta caricando...
La pagina si sta caricando...
La pagina si sta caricando...
La pagina si sta caricando...
La pagina si sta caricando...
La pagina si sta caricando...
La pagina si sta caricando...
La pagina si sta caricando...
La pagina si sta caricando...
La pagina si sta caricando...
La pagina si sta caricando...
La pagina si sta caricando...
La pagina si sta caricando...
La pagina si sta caricando...
-
 1
1
-
 2
2
-
 3
3
-
 4
4
-
 5
5
-
 6
6
-
 7
7
-
 8
8
-
 9
9
-
 10
10
-
 11
11
-
 12
12
-
 13
13
-
 14
14
-
 15
15
-
 16
16
-
 17
17
-
 18
18
-
 19
19
-
 20
20
-
 21
21
-
 22
22
-
 23
23
-
 24
24
-
 25
25
-
 26
26
-
 27
27
-
 28
28
-
 29
29
-
 30
30
-
 31
31
-
 32
32
-
 33
33
-
 34
34
-
 35
35
-
 36
36
-
 37
37
-
 38
38
-
 39
39
-
 40
40
-
 41
41
-
 42
42
-
 43
43
-
 44
44
-
 45
45
-
 46
46
-
 47
47
-
 48
48
-
 49
49
-
 50
50
-
 51
51
-
 52
52
-
 53
53
-
 54
54
-
 55
55
-
 56
56
-
 57
57
-
 58
58
-
 59
59
-
 60
60


in altre lingue
- English: Maestro 2060 User manual
Altri documenti
-
BELGACOM Maestro 2055 Manuale utente
-
Siemens GIGASET S685 Manuale utente
-
Philips DECT5251S/69 Manuale utente
-
-
Gigaset E630H Manuale utente
-
-
-
Topcom Telephone 520 Manuale utente
-
DETEWE OpenPhone 26 Manuale utente
-
Gigaset DA710 Guida utente