Printek 4000se Manuale utente
- Categoria
- Stampanti a matrice di punti
- Tipo
- Manuale utente
Questo manuale è adatto anche per

FormsPro 4000se Series
Operator’s Manual
©Printek, Inc. 2003
1517 Townline Road
Benton Harbor, MI 49022
(800) 368-4636
www.printek.com
Part Number 5593

ii
This equipment has been tested and found to comply with the limits for a Class A
Digital Device, pursuant to Part 15 of the FCC Rules. These limits are designed to
provide reasonable protection against harmful interference when the equipment is
operated in a commercial environment. This equipment generates, uses, and can
radiate radio frequency energy and, if not installed and used in accordance with the
instruction manual, may cause harmful interference in which case the user will be
required to correct the interference at his own expense.
The user is cautioned that any changes or modifications not expressly approved by
the party responsible for compliance could void the user's authority to operate the
equipment.
This digital apparatus does not exceed the Class A limits for radio noise emissions as
set out by the ICES-003 standard, of the Canadian Department of Communications.
Cet appareil numérique n’émet pas de bruits radioélectroiques depassant les limites
de Classe A prescrites dans la norme NMB-003 Édictée par le Ministre des
Communications du Canada.
Acknowledgments:
IBM and Proprinter are registered trademarks of International Business Machines
Co.; DEC is a registered trademark of Digital Equipment Corporation; Epson is a
registered trademark of Seiko Epson; QMS is a registered trademark of Quality Micro
Systems, Inc.; IGP is a registered trademark of Printronix Corp.; Printek is a registered
trademark of Printek, Inc.
Specifications are subject to change without notice.

iii
Read all setup and operating instructions before
proceeding with operation.
Operate printer only on a firm, solid surface.
Do not operate in an enclosure unless properly ventilated. Make sure no
ventilation openings are blocked or obstructed, which may result in the
printer overheating.
Do not operate near a heat source.
No user-serviceable parts inside. Refer service or
repairs to a qualified service professional.
Use of genuine Printek replacement parts is required to warrant proper,
safe operation.
Any alteration or modification of this device voids the user warranty and
may make the product unsafe to operate.
The printhead and motors get hot during use. Wait until they cool before
touching them.
Make certain the printer is disconnected from AC power before removing
any covers or performing any required cleaning or maintenance.
Connecting this printer to an ungrounded receptacle can result in electrical
shock.
Never place the printer near inflammable or explosive substances. Do not
operate near liquid or spill liquid into the printer at any time.

iv
Lesen Sie vor der Inbetriebnahme die Aufbau-
und Bedienungsanleitung.
Der Drucker muss zum Betrieb auf einer festen, soliden Oberfläche stehen.
Betreiben Sie den Drucker nicht in einem kleinen, geschlossenen Raum, es
sei denn dieser wird ordnungsgemäß belüftet. Achten Sie darauf, dass die
Lüftungen nicht blockiert oder versperrt sind, denn dies kann zum
Überhitzen des Druckers führen.
Nehmen Sie den Drucker nicht in der Nähe einer Wärmequelle in Betrieb.
Enthält keine Teile, die vom Bediener instandgesetzt
werden können. Bitte wenden Sie sich bei Instandsetzung oder Reparatur
an qualifiziertes Kundendienstpersonal.
Die Verwendung von echten Printek Ersatzteilen ist notwendig, um
ordnungsgemäßen, sicheren Betrieb zu gewährleisten.
Änderungen oder Modifikationen dieses Geräts machen die Garantie
ungültig und können den sicheren Betrieb des Produkts gefährden.
Während des Druckens werden Druckerkopf und Motoren heiß. Warten
Sie, bis sich die Teile abgekühlt haben, bevor Sie sie berühren.
Vergewissern Sie sich, dass der Drucker nicht mehr an die Stromquelle
angeschlossen ist, bevor Sie Abdeckungen abnehmen oder das Gerät
reinigen bzw. warten.
Schließen Sie diesen Drucker nicht an eine ungeerdete Steckdose an; dies
kann zum Elektroschock führen.
Setzen Sie den Drucker niemals in die Nähe von feuer- oder
explosionsgefährlichen Stoffen. Betreiben Sie den Drucker nicht in der

v
Nähe von Flüssigkeiten und lassen Sie keine Flüssigkeiten in den Drucker
gelangen.
TABLE OF CONTENTS
INTRODUCTION 1
Models and Options 1
Manual Contents 2
GETTING STARTED 5
Installation 5
Interface Set Up 6
RS-232C Serial Interface 7
Parallel Interface 8
Ethernet 10/100BaseT Print Server 9
Wireless Ethernet Print Server 9
Installing The Ribbon Cartridge 10
Why Use Only Printek
®
Brand Ribbons 10
Ribbon Installation 11
Loading Paper 14
FormsPro 4300se & 4500se Single Tractor Model 14
FormsPro 4503se Tri-Trak Model 16
Printer Self-Test 18
DAILY OPERATION 19
Introduction 19
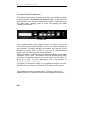
Control Panel Features 20
LCD Display and Indicators 21
Control Panel Buttons 22
Selecting And Loading Forms 25
Selecting a Form Already Loaded In the Tractors 25
Loading a New or Different Form In the Tractors 25
Ejecting And Tearing Off A Form 30
Installing A New Ribbon Cartridge 33
Removing the Old Ribbon Cartridge 33
Installing the New Ribbon Cartridge 34
Aligning Print 36

vi
Common Error Conditions 39
Check Paper 39
No Paper to Load 39
Too Much Paper to Unload 40
Selected Form is not Loaded 40
No Ribbon or Wrong Ribbon 40
Ribbon Lid Open 40
Change Ribbon 40
Other Errors 41
PRINTER CONFIGURATION 43
Introduction To Setup 43
Setup Buttons 43
Entering Setup 44
Using the SETUP Button 44
Using the FUNCTION and VALUE Buttons 44
Exiting Setup 45
Forms Menu 46
Forms Menu Items 46
Interface Menu 54
Entering the Interface Menu 54
RS-232C Serial Interface Items 55
Parallel/LAN Interface Items 59
Options Menu 63
ImagerPlus Graphic Card 68
Test Menu 73
FORM CONSTRUCTION 75
Form Construction 75
Form Layout Considerations 76
MAINTENANCE AND TROUBLESHOOTING 77
Error Messages 77
Preventive Maintenance 78
Obtaining Service 78
ADVANCED SETUP FEATURES 81
Security Menu 81
USING REMOTE SETUP 83
Remote Setup via Windows Application 83
Remote Setup via Generic Text File 83

vii
USING THE OPTIONAL SETUP MODULE 91
Introduction 91
Setup Module Installation 91
PRINTER RESET CONDITIONS 95
CONTROL CODE AND ESCAPE SEQUENCE
SUMMARIES 97
Genicom 3840 and 3410 Emulation 97
ANSI X3.64 Emulation 98
Epson Fx Emulation 99
IBM Proprinter Emulation 101
LA-120/210 Emulation 102
Simple TTY Emulation 103
Printek Emulation 104
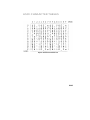
ASCII CHARACTER TABLES 105
SPECIFICATIONS 111
GLOSSARY OF TERMS 117


1
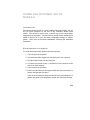
INTRODUCTION
Thank you for purchasing a Printek FormsPro 4000se Series Printer.
This printer has been designed to provide years of service handling your
most demanding printing requirements.
The FormsPro 4000se Series printers offer higher throughput than all other
printers in its class. In addition, an easy to use front panel combined with
the ability to store ten different form configurations makes handling multiple
forms as simple as a button press for the operator.
Models and Options
The FormsPro 4300se, 4500se and the FormsPro 4503se differ only in the
number of tractor paths available, one path or three.
Options available for both models include:
• Ethernet 10/100BaseT Print Server
• Wireless Ethernet Print Server
• Imager Bar Code Co-processor
• ImagerPlus Bar Code Co-processor
• Print Stand (required for reduced sound levels)
• External FormsCutter
• Setup Module
• Sound Enclosure

INTRODUCTION
2
Manual Contents
*Unless specifically noted, all instructions and information herein is
valid for all models in the 4000se series.
• GETTING STARTED provides instructions for installation, setting up
the computer interface, installing the ribbon cartridge, loading paper,
and performing a printer self-test.
• DAILY OPERATION provides more detailed descriptions of the
features that are used most frequently. These include the “every day”
buttons and indicators on the control panel, selecting or loading new
forms, ejecting forms, changing the ribbon cartridge, aligning print with
preprinted forms, and causes for common error conditions.
• PRINTER CONFIGURATION provides detailed information on how
to use Setup to permanently store parameters for each of the ten
forms, parameters for the standard and optional interfaces, and
parameters for other options.
• SPECIFYING FORMS provides tips for form construction and layout.
• MAINTENANCE AND TROUBLESHOOTING lists more serious
error messages than discussed in the Daily Operation section,
preventive maintenance, and how to obtain service.
• ADVANCED SETUP FEATURES provides information on how to set
menu security.
• USING REMOTE SETUP describes how to “set up” default
parameters from a host computer.
• USING THE SETUP MODULE describes how the optional Setup
Module can be used to copy Setup parameters from one printer to
another.
• PRINTER RESET CONDITIONS describes the state of the printer
after power up or reset.

INTRODUCTION
3
• CONTROL CODE AND ESCAPE SEQUENCE SUMMARIES lists
the commands supported for each printer emulation.
• ASCII CHARACTER TABLES show the characters for each
character set.
• SPECIFICATIONS list the operating ranges and ratings of the printer.
• GLOSSARY OF TERMS provides definitions for terms used in this
manual.


5
GETTING STARTED
This chapter will use the fewest possible steps to get the first time user up
and running quickly. You will be guided through the following steps:
• Finding a suitable location and installing the printer
• Setting up a host interface if necessary
• Installing the ribbon cartridge
• Loading paper
• Performing a printer self-test
Installation
Before installation, a suitable site must be chosen. Suitable sites include
offices, computer rooms, and most factory environments. The Printek
FormsPro 4000se printers have been designed to be rugged, heavy-duty
printers. As such, they will handle most harsh environments, but should not
be placed in direct sunlight or in areas that will exceed the rated
temperature, humidity, or power requirements. For details, refer to
“SPECIFICATIONS” on 111.
Once a site has been selected, the printer should be placed on a Printek
print stand. The Printek print stand is especially recommended for the
FormsPro 4503se and is required to meet the low noise rating of the
printer. Of course, another sturdy print stand or table with a slotted top for
feeding paper into the bottom of printer may be used.
The print stand should be located in an area large enough to provide easy
access to both the front of the printer and the rear for accessing printed
output. Unpack the printer as described in the “FormsPro 4000se series
Unpacking Instructions” and place the printer on the print stand.

GETTING STARTED
6
Note: Placing the printer on the print stand is best accomplished
with two people. Proper lifting technique should be observed.
Caution: Before connecting or turning on power, make sure that all
shipping materials have been removed. These materials include
a cable tie that secures the print head carriage (open ribbon lid
to access) and remove the cable tie securing the front panel to
the base. When unpacking a FormsPro 4503se, open the front
of the unit by releasing the latch panel of the printer. Remove
the two cable ties securing the tractor shuttle to the front of the
lower side plates, and the two ties located toward the rear of
the shuttle assembly.
Next, connect the power cord supplied with the printer to the printer and an
appropriate power outlet. Now connect the computer cable to the
appropriate interface on the rear panel of the printer.
Interface Set Up
Depending upon which interface is being used to connect the printer to the
host computer, some set up may or may not be required. This is true of the
standard parallel or serial ports The factory default settings for each
interface should work well for most installations. However, the following
paragraphs provide some basic information about each interface and also
refer to the page number in the Configuration chapter where all the details
for each interface are described. If you need to make changes to the
default settings, please refer to “Introduction to Setup” on page 43 for
instructions on how to access the printer’s Setup menus.
Once you are comfortable that the interface settings match those required
by your computer, proceed to the next section, “Installing the Ribbon
Cartridge” on page 10.

GETTING STARTED
7
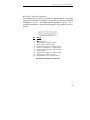
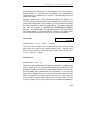
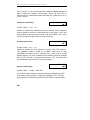
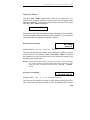
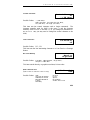
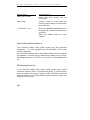
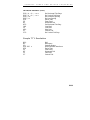
RS-232C Serial Interface
This interface uses a 25 pin “D” connector as described below. The default
settings are 9600 baud, 8 data bits, 1 stop bit, and no parity with hardware
handshake on pin 11. The default printer emulation is Epson. For a
complete description of all the default settings for this interface, refer to
page 55.
Pin Signal
1
2
3
4
5
6
7
8
11
20
Chassis ground.
Transmit data. (Printer output).
Receive data. (Printer input).
Request to send (set). (Printer output).
Clear to send (ignored). (Printer input).
Data set ready (ignored). (Printer input).
Signal ground.
Carrier detect (ignored). (Printer input).
Printer busy. (Printer output).
Data terminal ready. (Printer output).
RS-232C Serial Interface Connector.

GETTING STARTED
8
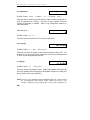
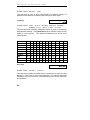
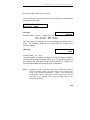
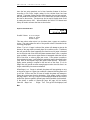
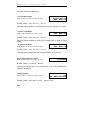
Parallel Interface
This interface uses the standard 36 pin parallel connector as shown below.
The default printer emulation is Epson.
Pin
Signal Pin
Signal
1
19
2
20
3
21
4
22
5
23
6
24
7
25
8
26
9
27
____________________
DATA STROBE
DATA STROBE RTN
DATA 1
DATA 1 RETURN
DATA 2
DATA 2 RETURN
DATA 3
DATA 3 RETURN
DATA 4
DATA 4 RETURN
DATA 5
DATA 5 RETURN
DATA 6
DATA 6 RETURN
DATA 7
DATA 7 RETURN
DATA 8
DATA 8 RETURN
10
28
11
29
12
13
14
16
17
18
31
30
32
35
36
_______________________
ACKNOWLEDGE
ACKNLG RETURN
BUSY
BUSY RETURN
PAPER ERROR
SELECT
________________
AUTO FEED
±0V
CHASSIS GROUND
+5V at 200mA Max.
______
INIT
INIT RTN
_________
FAULT
+5V LOGIC HIGH
______________
SELECT IN
Parallel Interface Connector

GETTING STARTED
9
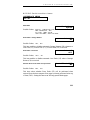
Ethernet 10/100BaseT Print Server
This interface uses a standard RJ-45 connector and the default printer
emulation is Epson. For a complete description of all the default settings for
this interface, refer to “Parallel/LAN Interface Items” on page 59. For
additional software installation and operational information, please refer to
the Troy XCD Quick Install Manual shipped with the unit.
Wireless Ethernet Print Server
This interface is intended for 802.11b wireless connectivity. It may also be
used with conventional CAT-5 twisted pair wiring, using the standard RJ-
45 connector. The interface automatically senses when a CAT-5 connection
is present and will disable the wireless capability.
For additional software installation and operational information, please refer
to the Printek Wireless Ethernet Print Server Manual shipped with the unit.

GETTING STARTED
10
Installing The Ribbon Cartridge
The Printek FormsPro printer has been designed to make installing Printek
brand ribbons a simple, clean process. Unlike other printers, there is no
need to touch the ribbon fabric or deal with difficult to position ribbon
guides. The following sections explain why the use of Printek brand ribbons
should be important to you and will guide you through installing the ribbon
cartridge.
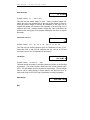
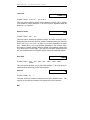
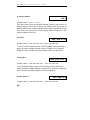
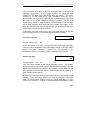
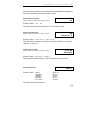
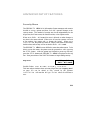
Why Use Only Printek
®
Brand Ribbons
Printek
®
Brand Ribbon Label
The above label on each ribbon can identify Printek brand ribbons. There
are many reasons to use only Printek brand ribbons in your FormsPro
4000se Series printer. First of all, using only Printek brand ribbons
will automatically extend the print head warranty to two years.
The reason this is possible is that Printek brand ribbons are manufactured to
much higher quality standards than those offered by other manufacturers.
This provides not only longer print head life, but also longer ribbon life… 23
million characters as compared to only 15 million characters from some
generic ribbons.
Remember that using only Printek brand ribbons is important because the
wear that is started and the contamination that remains from even one
inferior ribbon will continue to damage the print head. Also, damage to
other printer components that is caused by the use of non-Printek ribbons
will not be covered by the printer’s warranty.
REORDER NUMBER 90729
FOR NEAREST DISTRIBUTOR
CALL 1-800-368-4636

GETTING STARTED
11
Using inferior ribbons would be like using poor quality fuel in your
automobile. Premature engine failure and poor performance leading up to
the failure would be the best you could expect.
Other useful features available only with the use of Printek brand ribbons
are that the printer will not allow printing if a ribbon is not installed, and the
printer will alert the operator when a ribbon needs to be changed.
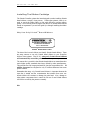
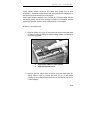
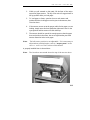
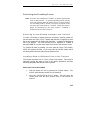
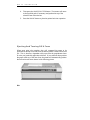
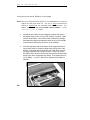
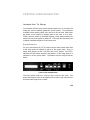
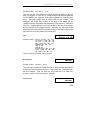
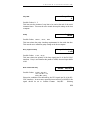
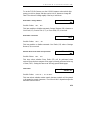
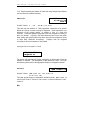
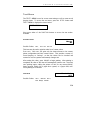
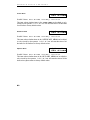
Ribbon Installation
1. Open the ribbon lid on top of the printer and position the print head
for ribbon loading by lifting the ribbon loading handle as indicated in
the following picture.
1. Opening the Ribbon Loading Handle
2. Ribbon Support Brackets
2. Remove the new ribbon from its plastic bag and make sure the
ribbon fabric is taut by turning the knob on top of the ribbon
cartridge in a counterclockwise direction as indicated by the arrow
on the cartridge.
1
2

GETTING STARTED
12
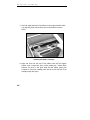
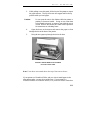
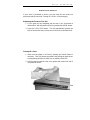
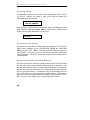
3. Place the right hand end of the ribbon on the support bracket while
you align the plastic tabs with the slots in the bracket as shown
below.
Installing the Ribbon Cartridge
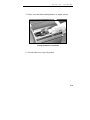
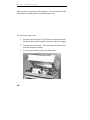
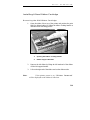
4. Align and lower the left end of the ribbon onto the left support
bracket until it snaps into place, while guiding the ribbon fabric
between the nose of the print head and the ribbon guide pins.
Continue to lower the cartridge until the tab on the left end of the
cartridge snaps into place.
La pagina si sta caricando...
La pagina si sta caricando...
La pagina si sta caricando...
La pagina si sta caricando...
La pagina si sta caricando...
La pagina si sta caricando...
La pagina si sta caricando...
La pagina si sta caricando...
La pagina si sta caricando...
La pagina si sta caricando...
La pagina si sta caricando...
La pagina si sta caricando...
La pagina si sta caricando...
La pagina si sta caricando...
La pagina si sta caricando...
La pagina si sta caricando...
La pagina si sta caricando...
La pagina si sta caricando...
La pagina si sta caricando...
La pagina si sta caricando...
La pagina si sta caricando...
La pagina si sta caricando...
La pagina si sta caricando...
La pagina si sta caricando...
La pagina si sta caricando...
La pagina si sta caricando...
La pagina si sta caricando...
La pagina si sta caricando...
La pagina si sta caricando...
La pagina si sta caricando...
La pagina si sta caricando...
La pagina si sta caricando...
La pagina si sta caricando...
La pagina si sta caricando...
La pagina si sta caricando...
La pagina si sta caricando...
La pagina si sta caricando...
La pagina si sta caricando...
La pagina si sta caricando...
La pagina si sta caricando...
La pagina si sta caricando...
La pagina si sta caricando...
La pagina si sta caricando...
La pagina si sta caricando...
La pagina si sta caricando...
La pagina si sta caricando...
La pagina si sta caricando...
La pagina si sta caricando...
La pagina si sta caricando...
La pagina si sta caricando...
La pagina si sta caricando...
La pagina si sta caricando...
La pagina si sta caricando...
La pagina si sta caricando...
La pagina si sta caricando...
La pagina si sta caricando...
La pagina si sta caricando...
La pagina si sta caricando...
La pagina si sta caricando...
La pagina si sta caricando...
La pagina si sta caricando...
La pagina si sta caricando...
La pagina si sta caricando...
La pagina si sta caricando...
La pagina si sta caricando...
La pagina si sta caricando...
La pagina si sta caricando...
La pagina si sta caricando...
La pagina si sta caricando...
La pagina si sta caricando...
La pagina si sta caricando...
La pagina si sta caricando...
La pagina si sta caricando...
La pagina si sta caricando...
La pagina si sta caricando...
La pagina si sta caricando...
La pagina si sta caricando...
La pagina si sta caricando...
La pagina si sta caricando...
La pagina si sta caricando...
La pagina si sta caricando...
La pagina si sta caricando...
La pagina si sta caricando...
La pagina si sta caricando...
La pagina si sta caricando...
La pagina si sta caricando...
La pagina si sta caricando...
La pagina si sta caricando...
La pagina si sta caricando...
La pagina si sta caricando...
La pagina si sta caricando...
La pagina si sta caricando...
La pagina si sta caricando...
La pagina si sta caricando...
La pagina si sta caricando...
La pagina si sta caricando...
La pagina si sta caricando...
La pagina si sta caricando...
La pagina si sta caricando...
La pagina si sta caricando...
La pagina si sta caricando...
La pagina si sta caricando...
La pagina si sta caricando...
La pagina si sta caricando...
La pagina si sta caricando...
La pagina si sta caricando...
La pagina si sta caricando...
-
 1
1
-
 2
2
-
 3
3
-
 4
4
-
 5
5
-
 6
6
-
 7
7
-
 8
8
-
 9
9
-
 10
10
-
 11
11
-
 12
12
-
 13
13
-
 14
14
-
 15
15
-
 16
16
-
 17
17
-
 18
18
-
 19
19
-
 20
20
-
 21
21
-
 22
22
-
 23
23
-
 24
24
-
 25
25
-
 26
26
-
 27
27
-
 28
28
-
 29
29
-
 30
30
-
 31
31
-
 32
32
-
 33
33
-
 34
34
-
 35
35
-
 36
36
-
 37
37
-
 38
38
-
 39
39
-
 40
40
-
 41
41
-
 42
42
-
 43
43
-
 44
44
-
 45
45
-
 46
46
-
 47
47
-
 48
48
-
 49
49
-
 50
50
-
 51
51
-
 52
52
-
 53
53
-
 54
54
-
 55
55
-
 56
56
-
 57
57
-
 58
58
-
 59
59
-
 60
60
-
 61
61
-
 62
62
-
 63
63
-
 64
64
-
 65
65
-
 66
66
-
 67
67
-
 68
68
-
 69
69
-
 70
70
-
 71
71
-
 72
72
-
 73
73
-
 74
74
-
 75
75
-
 76
76
-
 77
77
-
 78
78
-
 79
79
-
 80
80
-
 81
81
-
 82
82
-
 83
83
-
 84
84
-
 85
85
-
 86
86
-
 87
87
-
 88
88
-
 89
89
-
 90
90
-
 91
91
-
 92
92
-
 93
93
-
 94
94
-
 95
95
-
 96
96
-
 97
97
-
 98
98
-
 99
99
-
 100
100
-
 101
101
-
 102
102
-
 103
103
-
 104
104
-
 105
105
-
 106
106
-
 107
107
-
 108
108
-
 109
109
-
 110
110
-
 111
111
-
 112
112
-
 113
113
-
 114
114
-
 115
115
-
 116
116
-
 117
117
-
 118
118
-
 119
119
-
 120
120
-
 121
121
-
 122
122
-
 123
123
-
 124
124
-
 125
125
-
 126
126
-
 127
127


Printek 4000se Manuale utente
- Categoria
- Stampanti a matrice di punti
- Tipo
- Manuale utente
- Questo manuale è adatto anche per
in altre lingue
- English: Printek 4000se User manual
Documenti correlati
Altri documenti
-
Panasonic Printer KX-P3626 Manuale utente
-
Panasonic KXP3196 Istruzioni per l'uso
-
-
Star Micronics LC-4511 Manuale utente
-
Epson LC-7211 Manuale utente
-
-
Compaq LA36 Manuale utente
-
Printronix Printer L1524 Manuale utente
-
Lexmark Dot Matrix Manuale utente
-
TallyGenicom 6800 Series Programmer’s Reference Manual